
E1500 - Phone SWITEL - Free user manual and instructions
Find the device manual for free E1500 SWITEL in PDF.
| Product type | DECT cordless phone |
| Brand | Switel |
| Model | E1500 |
| RF Frequency | 1,89 GHz |
| Average RF power | < 10,4 dBm |
| Base station power supply | Input: 100-240 VAC 50/60 Hz, Output: 6 VDC 450 mA |
| Charger power supply | Input: 100-240 VAC 50/60 Hz, Output: 6 VDC 450 mA |
| Battery type | AAA NiMH 1,2 V 400 mAh |
| Number of batteries per handset | 2 |
| Outdoor range | Approximately 300 m |
| Indoor range | Approximately 50 m |
| Standby time | Up to 100 hours |
| Talk time | Up to 10 hours |
| Maximum receiver volume | +22 dB |
| Dialing mode | DTMF (tones) or pulse (decimal) |
| Flash duration | Short (100 ms), medium (300 ms), long (600 ms) |
| Optimal ambient temperature | 0 °C to 45 °C |
| Optimal relative humidity | 20 % to 80 % |
| Phonebook | Up to 20 entries (including VIP and blacklist) |
| Call log | Up to 20 entries |
| Maximum number of handsets | Up to 5 handsets (depending on model) |
| Main functions | Hands-free, amplification, call blocking, alarm, rename handset, auto answer |
| Care and cleaning | Disconnect before cleaning. Use a damp cloth, no liquid or aerosol. |
| Safety | Do not use near water, do not open the device, use only the supplied batteries. |
| General information | 24-month warranty. Manufacturer: Switel. CE declaration conforming to directive 2014/53/EU. |
Frequently Asked Questions - E1500 SWITEL
User questions about E1500 SWITEL
0 question about this device. Answer the ones you know or ask your own.
Ask a new question about this device
Download the instructions for your Phone in PDF format for free! Find your manual E1500 - SWITEL and take your electronic device back in hand. On this page are published all the documents necessary for the use of your device. E1500 by SWITEL.
USER MANUAL E1500 SWITEL
E1300/E1500/E1502/E1503
DECT Phone
Bedienungsanleitung
User's Manual
Manuel de l'utilisteur
Manuale utente
Manual de instrucciones
Handleiding

DEUTSCHE NGLISH FRANÇAIS ITALIANO ESPÁÑOLERLANDS

Mobilteil
1 Hörer
2 Menu/OK
Telgo AG, Route D'Agy 16, 1763 Granges-Paccot, Switzerland
Technische Daten
Standard DECT
Sendefrequency 1,89 GHz
VTech Telecommunications Ltd.
Modell: VT05EEU06045, Input 100-240V AC 50/60Hz 150mA, Output 6VDC
450mA (EU Stecker)


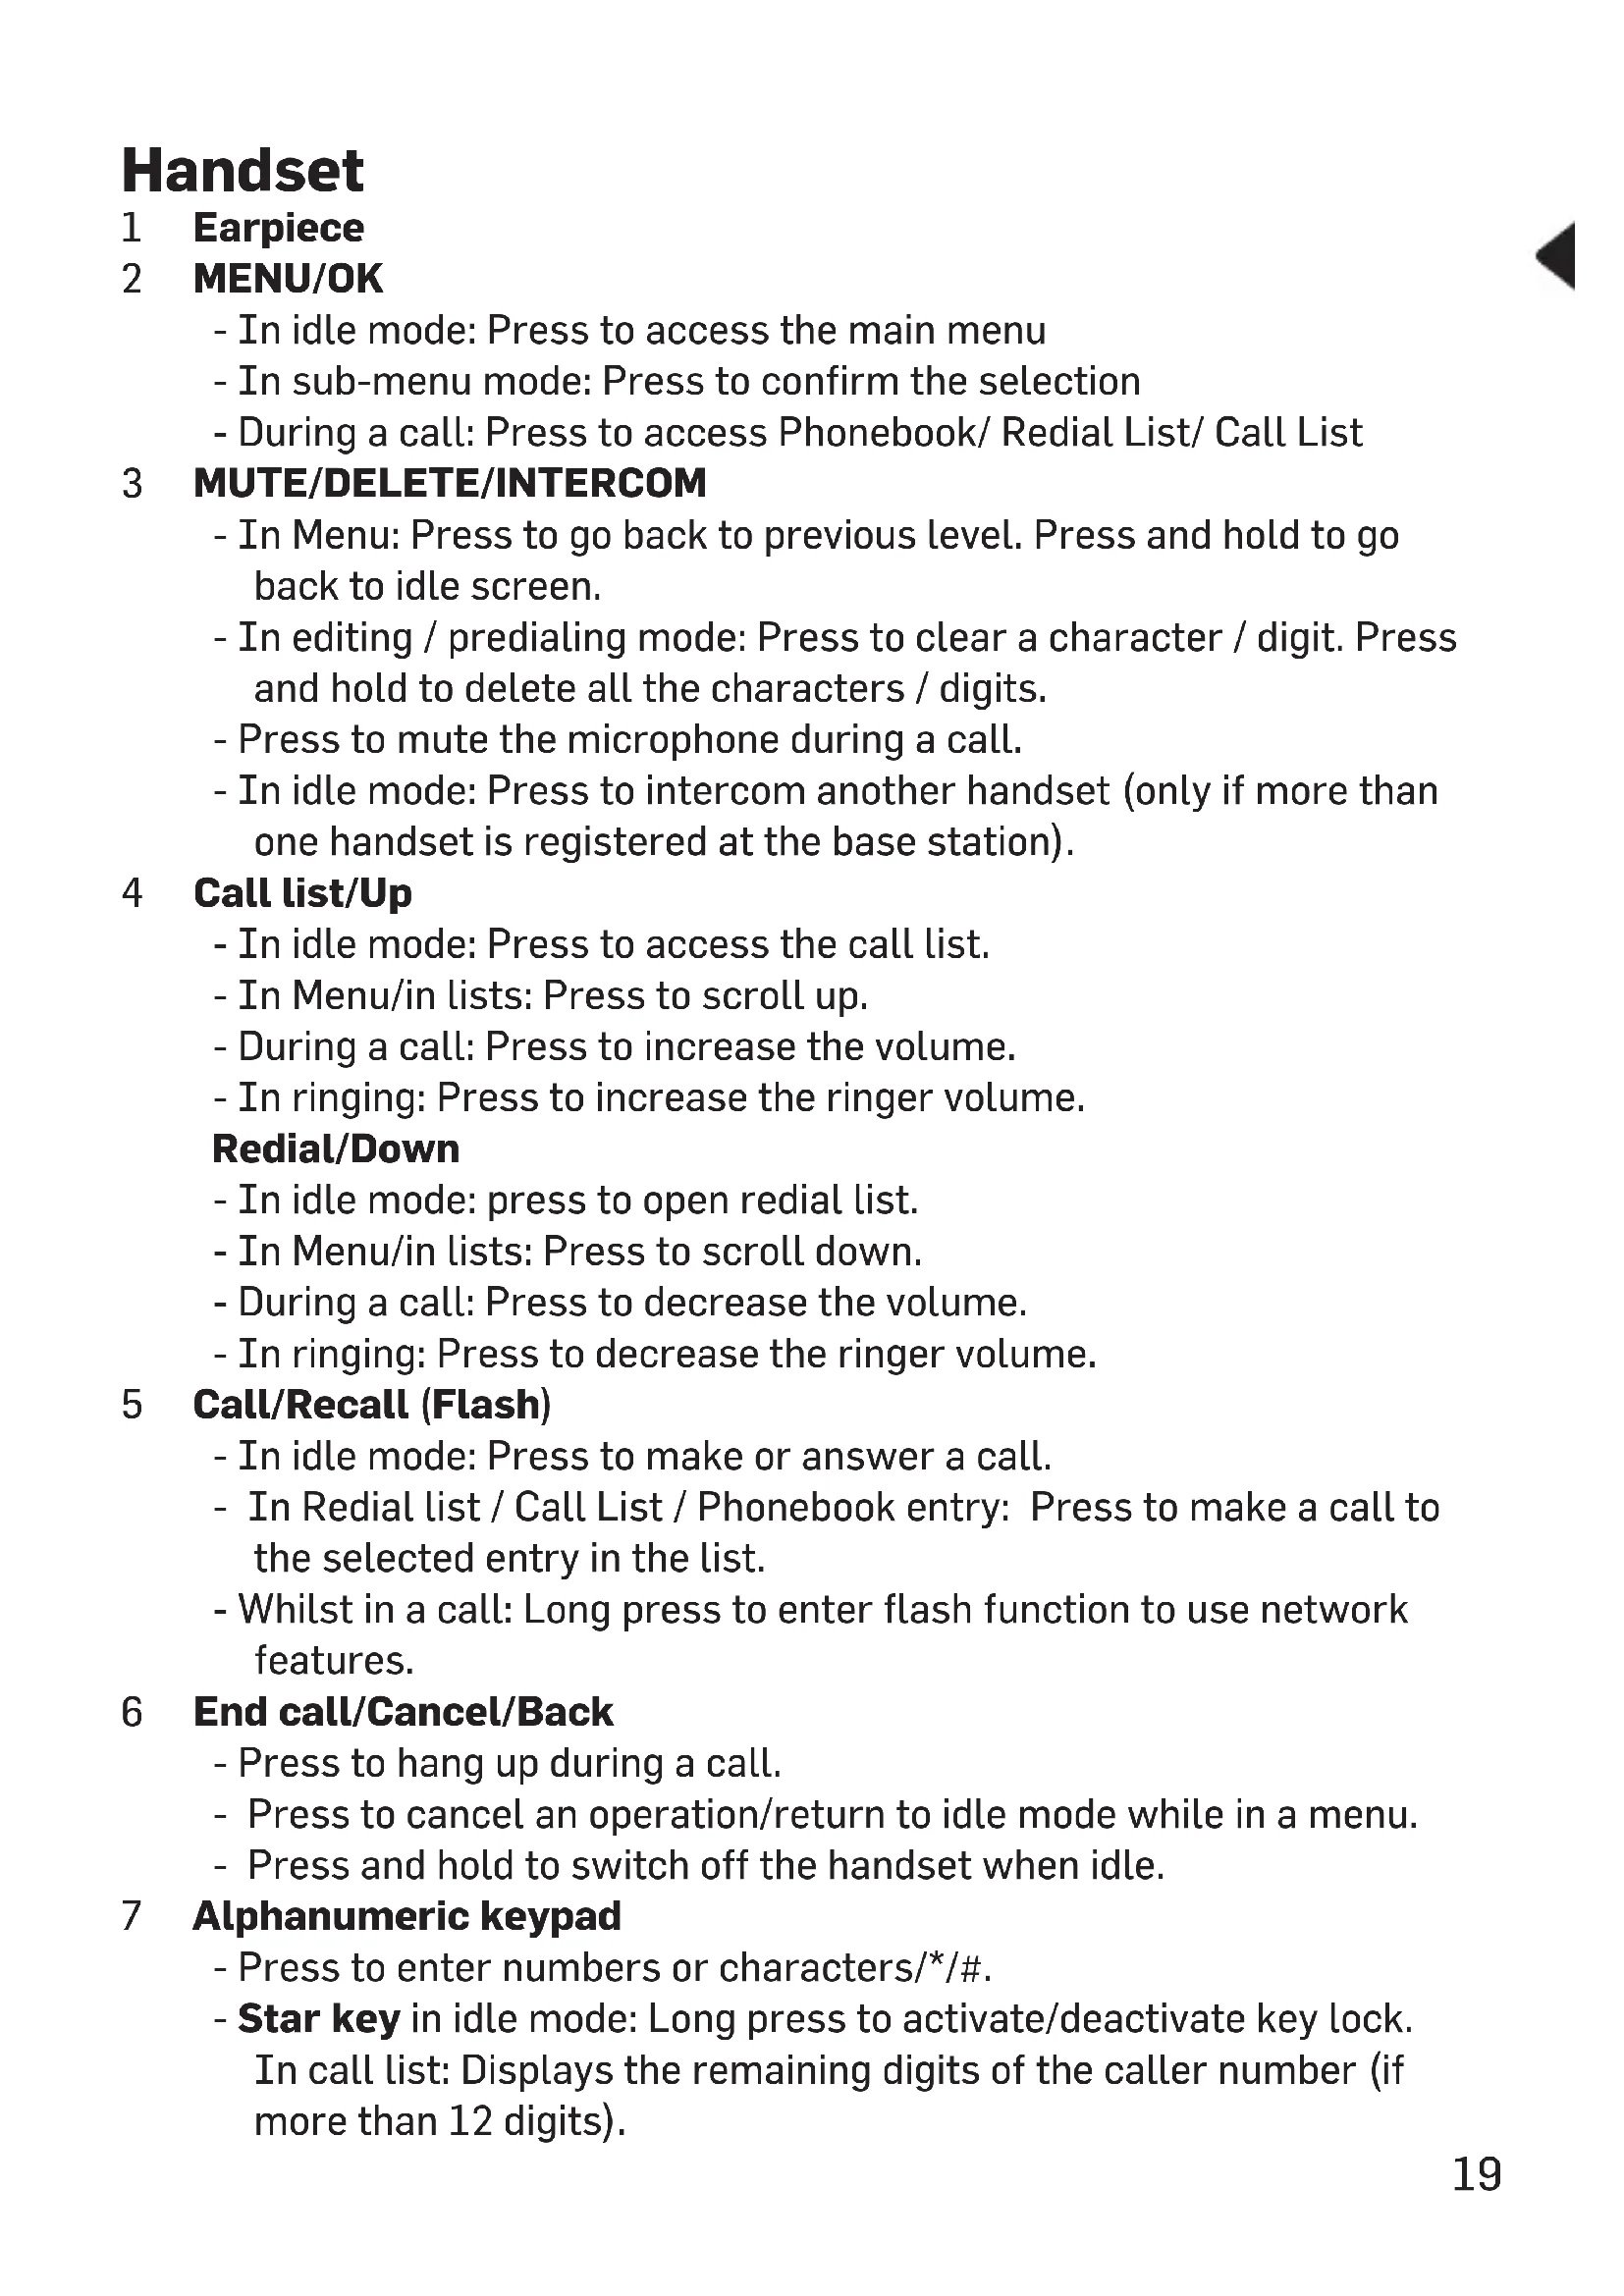
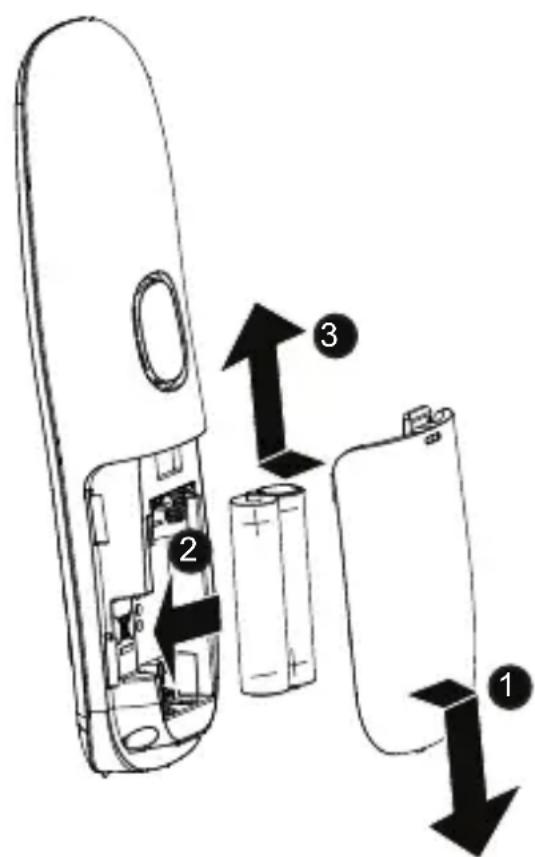
Handset
1 Earpiece
2 MENU/OK
- In idle mode: Press to access the main menu
- In sub-menu mode: Press to confirm the selection
- During a call: Press to access Phonebook/ Redial List/ Call List
3 MUTE/DELETE/INTERCOM
- In Menu: Press to go back to previous level. Press and hold to go back to idle screen.
- In editing / predialing mode: Press to clear a character / digit. Press and hold to delete all the characters / digits.
- Press to mute the microphone during a call.
- In idle mode: Press to intercom another handset (only if more than one handset is registered at the base station).
4 Call list/Up
- In idle mode: Press to access the call list.
- In Menu/in lists: Press to scroll up.
- During a call: Press to increase the volume.
- In ringing: Press to increase the ringer volume.
Redial/Down
- In idle mode: press to open radial list.
- In Menu/in lists: Press to scroll down.
- During a call: Press to decrease the volume.
- In ringing: Press to decrease the ringer volume.
5 Call/Recall (Flash)
- In idle mode: Press to make or answer a call.
- In Redial list / Call List / Phonebook entry: Press to make a call to the selected entry in the list.
- Whilst in a call: Long press to enter flash function to use network features.
6 End call/Cancel/Back
- Press to hang up during a call.
- Press to cancel an operation/return to idle mode while in a menu.
- Press and hold to switch off the handset when idle.
7 Alphanumeric keypad
- Press to enter numbers or characters/*/#.
-
Star key in idle mode: Long press to activate/deactivate key lock. In call list: Displays the remaining digits of the caller number (if more than 12 digits).
-
Hash key in idle mode: Long press to switch handset ringer on/off. During entering numbers: Long press to enter a dialling pause (P).
8 Speakerphone
- Press to switch the loudspeaker on/off.
- Press 2
9 Booster
- Press to switch the boost function on/off.
10 Microphone
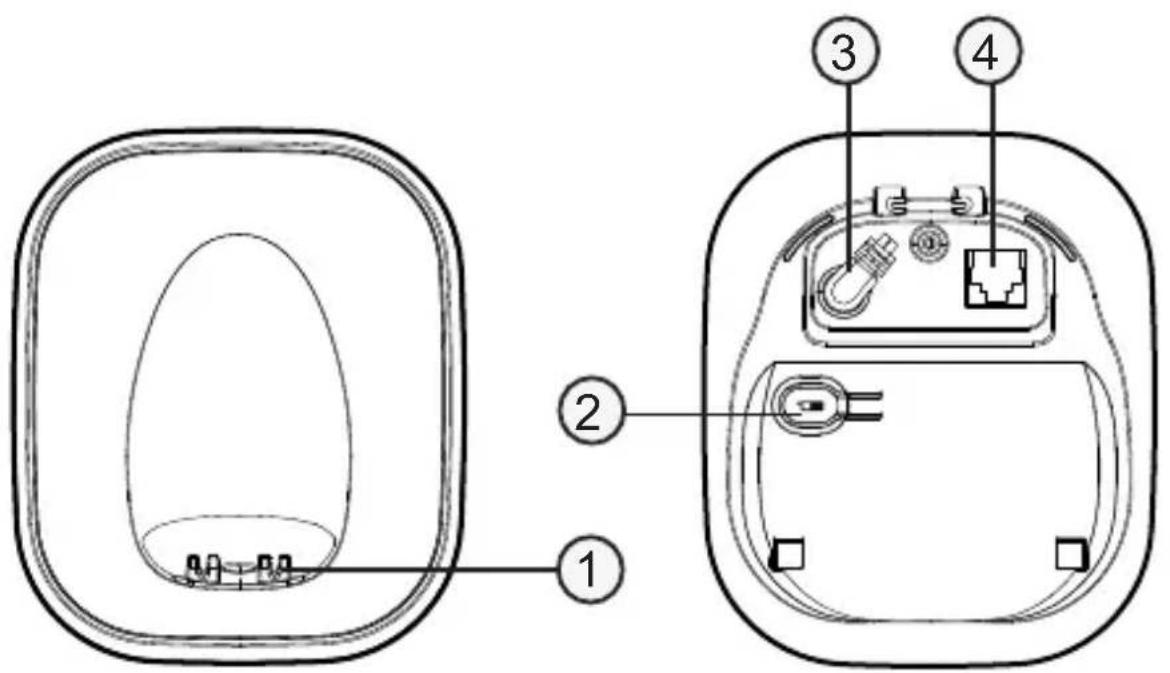
Base station
1 Charging contacts
2 Page key
- Press to page all handsets when in idle.
3 Power supply jack
4 Phone line jack
Scope of delivery
Content
Model
E1300
E1500
E1502
E1503
Base station / power supply
Charger / power supply
Handset
Telephone connection cable
Rechargeable batteries
User guide
1
1
1
1
-
-
1
2
1
1
2
3
1
1
1
1
2
2
4
6
1
1
1
1
Location
Place the base unit near a mains socket and a telephone wall jack to ensure that the connection cables are long enough. Keep the unit approx. 1 m away from other electronic devices to prevent interference. The base unit uses radio signals to connect with the cordless handset. Signal strength depends on the base unit's location. The maximum range is 300m based on an unobstructed line of sight; the range is shorter inside buildings because of walls and other obstacles.
Connect the base unit
- Plug the connector on the cable end into the corresponding jack on the rear side of the base and plug the power adaptor into the wall socket.
- Plug the small connector on the end of the telephone line cord into the corresponding jack on the base and plug the other end into the telephone jack.
Note: Guide the power adapter cable through the strain-relief tab on the base.
Important: Use only the power adaptors, telephone line cord and batteries supplied with your phone, otherwise your phone may not work. Do not block access to the wall power supply with furniture or other items.
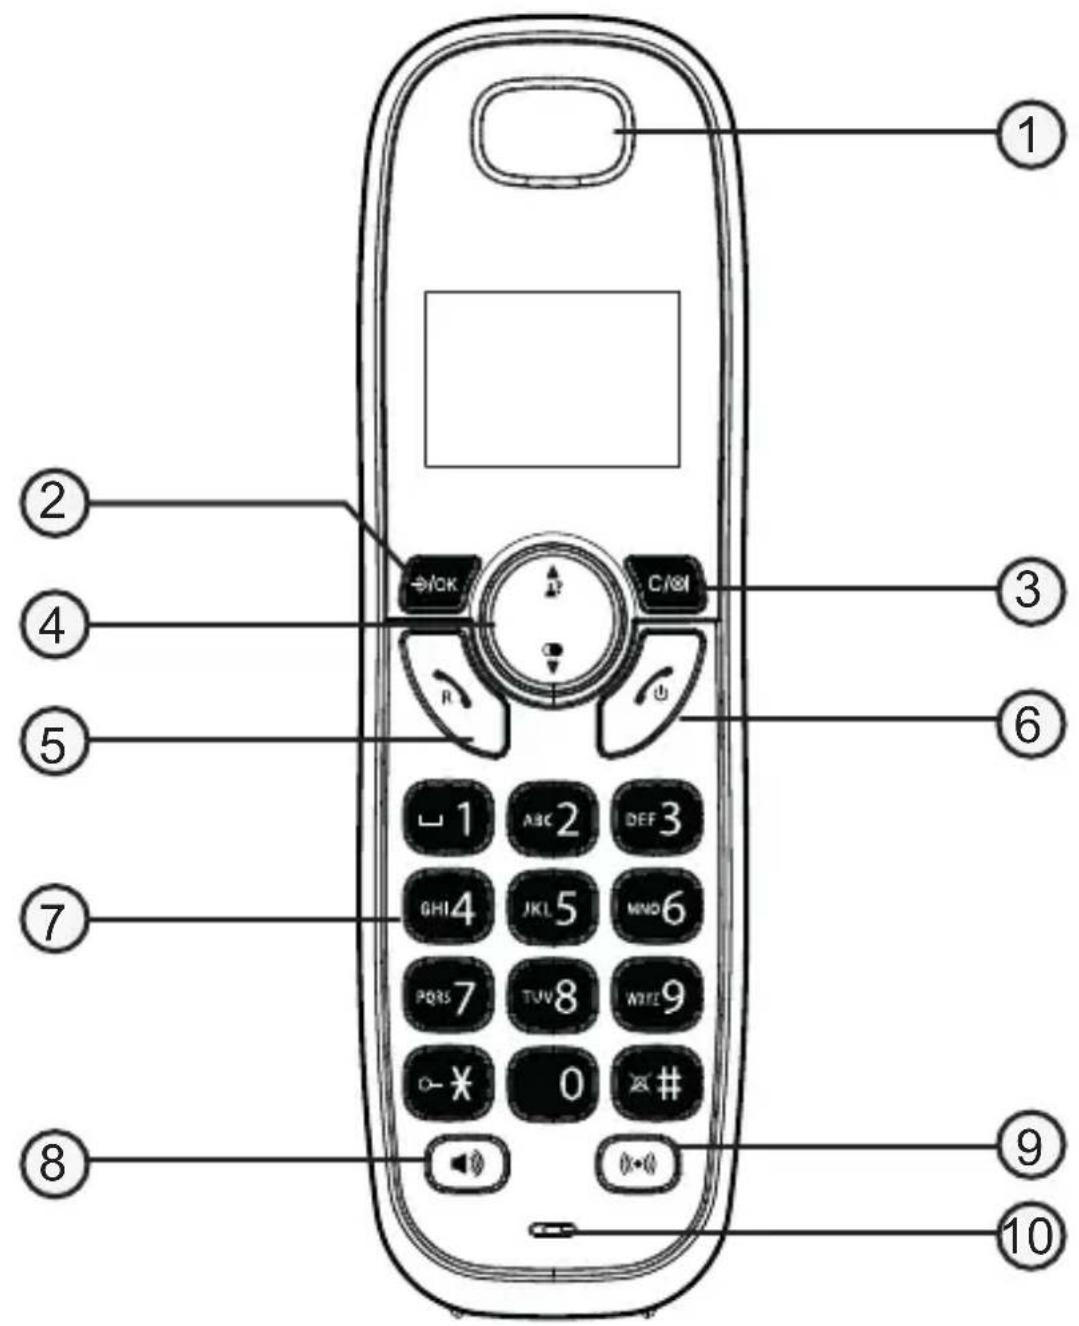
Connect the cordless handset
- Open the battery compartment and insert the rechargeable batteries. Observe the correct polarity.
- Slide the battery compartment cover towards the centre of the handset until it clicks into place.
For a full charge, the handset must be left in the base unit for at least 16 hours (check the base unit's power supply!).
Important: Use only the batteries supplied with this product. If the batteries need to be replaced later on the same battery type must be used.
Navigating the menu
- P 与 S 长
2.Use and to select the desired menu item and press . OK - Press Ctrl+o nce1 an operation, back up to the previous menu, or exit that menu.
- Press to return to idle state.
Note: If a key is not pressed within 30 seconds, the telephone automatically returns to idle mode.
Initial setup
When delivered, the menu language is set to "English". To change the language, proceed as follows:
- 2.Use or to select“HS SETTINGS”and press . OK
3.Use or to select "LANGUAGE"and press . /OK - Select the desired language and press OK
Menu layout
CALL LIST DETAILS
ADD TO PB
ADD TO BLIST
DELETE
DELETE ALL
CATEGORY
PHONEBOOK ALL CONTACTS
VIP
Under a selected Phonebook entry:
ADD
ADD TO VIP / DEL FROM VIP
VIEW
EDIT
DELETE
DELETE ALL
PB STATUS
BS SETTINGS DELETE HS
DIAL MODE
FLASH TIME
CHANGE PIN
HS SETTINGSALARM
RING SETUP
TONE SETUP
LANGUAGE
RENAME HS
AUTO ANSWER
DATE & TIME
REGISTRATION PIN?
DEFAULT PIN?
Making and receiving calls
Making a call, answering a call, ending a call To make a call
Enter the telephone number and press OK.
-or
Press or. When you hear a dial tone, enter the telephone number.
To answer a call
Press


To end a call
Press place the handset in the base station/charger.
Handsfree
Whilst in a call press deactivate, press the same key again.
Volume control
Whilst in a call press or
Mute
Whilst in a call press Press again to assume the conversation.
Redial (up to 10 entries)
-
Press in state.
-
Select the desired entry with

-
Make a call: Press on to d the telephone number.
-
Save to phonebook: Press , Add TO PB and press OK. Enter a name and press the telephone number if necessary and press Select a melody and press . OK
-
Delete: Press OK, select DELETE or DELETE ALL and press OK. Confirm the following query with OK
Call list (up to 20 entries)
Note: This function is only available if your telephone service provider has activated the CLIP (Calling Line Identification Presentation) service attribute. Please contact your service provider for more information.
You can determine whether all calls are recorded or only calls that were not accepted. Missed calls are indicated on the display.
Call list features
-
In idle state press.
-
Select the desired entry with

-
Make a call: Press on to did the telephone number.
-
Details: Press OK, select DETAILS and press OK. You will receive information about the date and time of the call.
-
Save to phonebook: Press , Add TO PB and press OK. Enter a name and press the telephone number if necessary and press Select a melody, and press . OK
-
Add to block list: Press , SELECT ADD TO BLIST and press OK. Enter a name and press the telephone number if necessary and press OK
-
Delete: Press OK, select DELETE or DELETE ALL and press OK. Confirm the following query with OK
Setting the call list type
-
In idle state press .
-
PresOK select CATEGORY and press
-
Select ALL CALLS or MISSED CALLS and press OK
Find handset
Start paging
Press the paging button on the base unit to page all registered cordless handsets.
Stop paging
On the base unit: press the paging button again.
On the cordless handset: press or place/te handset in the base unit/charger.
Internal call
1.
If only 2 devices are available the second one will ring right away. If there are several registered cordless handsets, choose one and press OK.
Transfer a call / Conference
- You are in an external call and want to forward it internally or set up a conference.
- Press OK. INTERCOM appears in the display. If only 2 devices are available the second one will ring right away. If there are several registered cordless handsets, choose one and press OK.
- When the internal partner has answered, press the end call key to transfer the call, or press and hold the asterisk key until
CONference appears on the display to connect all parties together.
- If the internal partner does not answer or you want to cancel
forwarding, press
Note: If one of the conference participants hangs up, the other two remain connected.
Phonebook
The phonebook stores up to 20 entries. If you enter phone numbers in the black list (see "Call Blocker"), the phonebook capacity is reduced by the number of entries there. So you have total 20 entries for Phonebook + VIP + black list.
You can find a phonebook entry by entering the first letter of the stored name using the numeric keys. If necessary, use the arrow keys to select the desired entry. You can set different ring melodies for your entries. Special contacts can be transferred to the VIP phonebook. When using call barring (see below), you can set it to signal calls from VIP list entries even though general call barring is enabled.
Create a new entry
- In idle state press 令力 .
- Select PHONEBOOK and press OK
- Select ALL CONTACTS and press OK
- Select any entry and press OK
- Select ADD and press OK
- Enter the name and press OK
- Enter the telephone number and press . OK
- Select a melody and press . OK
Using the phonebook
- Open the phonebook, select ALL CONTACTS and press OK
-
Select the entry with or? and press .
-
Make a call: Press

- Edit an entry: Press , Select EDIT and press . Edit the OK name if necessary and press the telephone number if necessary and press the melody if necessary and press OK.
- View an entry: Press , select VIEW and press . Press OK or view the details.
- Delete: Press OK, select DELETE or DELETE ALL and press OK. Confirm the following query with OK
- Check capacity: Press OK, select PB STATUS and press OK. You will see the number of entries, for example "1 / 20". That means
1 entry stored of 20 entries in total.
- Add an entry to VIP list/delete from VIP list: Press , SELECT ADD TO VIP or DEL FROM VIP and press OK
Settings
Base settings
- In idle state press the menu key . OK
- Select BS SETTINGS and press OK
-
Select from the options and press . OK
-
DELETE HS: enter the PIN of the base station and select the handset that you want to de-register. You cannot delete the handset you are using to do this operation. Answer the query with OK
- DIAL MODE: the standard dialling mode for analogue phones is "TONE". On some older phone systems the dialling mode must be set to "PULSE". Please see your phone system's user guide for more information.
- FLASH TIME: select SHORT, MEDIUM or LONG. The use of supplementary services requires a flash signal of a specific length. You can obtain information about available supplementary services and the required flash time from your telephone service provider.
- CHANGE PIN: in delivery state, the system PIN is set to "0000".
Handset settings
- In idle state press the menu key . OK
- Select HS SETTINGS and press OK
-
Select from the options and press . OK
-
ALARM: select ON or OFF. If ON is selected, enter the time and switch the Snooze function on or off. Press each step.
- RING SETUP: select INT. RING. for internal calls or EXT. RING. for external calls and select a melody. Press each step. Select RING VOLUME and set the ringer volume (1 ... 5, OFF).
-
TONE SETUP: select KEY TONE, BATTERY TONE or OUT OF RANGE and switch each tone on or off. Press after each step.
-
LANGUAGE: select the display language.
- RENAME HS: change the name for the handset.
- AUTO ANSWER: with this function activated, an incoming call is accepted directly when you take the handset from the base station or charger - you do not need to press any key.
- DATE & TIME
- DATE FORMAT: select the date format and press . 📁/OK
- TIME FORMAT: select the time format and press . 📁/OK
- SET TIME: enter the time and press OK Select AM or PM (when 12 hours are set) and press OK
- SET DATE: enter the year and press . the date and press OK
Registration
- In idle state press the menu key. OK
- Select REGISTRATION and press OK
- Enter the PIN for the base station and perform the necessary steps at the base station.
Example: to register a new handset on the base station, press the page button on the base station for approx. 5 s. The PIN is in delivery state "0000".
Reset
- In idle state press the menu key. OK
- Select DEFAULT and press OK
- Enter the PIN (in delivery state "0000") and answer the query with

Call blocker
Note: This function is only available if your telephone service provider has activated the CLIP (Calling Line Identification Presentation) service attribute. Please contact your service provider for more information. You can use the call blocker feature to block certain calls automatically by adding numbers into the Black List. You can also choose to block all calls or allow certain calls in the VIP list. When a call is blocked, the telephone will not ring.
Black list numbers
- In idle state press the menu key . OK
- Select CALL BLOCKER and press OK
- Select BLACK LIST and press OK
- Select the desired entry with or and press .

- Add an entry: Select ADD, press ,enter a name and press OK. Enter the telephone number and press OK
- View an entry: Select VIEW and press OK
- Edit an entry: Select EDIT and press . Edit the entry.
- Delete: Select DELETE or DELETE ALL and press OK. Confirm the following query with OK
Settings
- In idle state press the menu key. OK
- Select CALL BLOCKER and press OK
-
Select SETTINGS and press OK
-
Mode setting: Select BLOCK MODE and press .OK
-
Select from the options and press OK
-
OFF: the call barring function is off.
- BLOCK ALL: the call barring is on, all calls are blocked.
- ALLOW VIP: only calls from entries in the VIP list are signaled.
-
BLOCK BLIST: only calls from entries in the blacklist are blocked.
-
Block by call type: Select CALL TYPE and press Select a call type from the list and press Select ON or OFF and press OK.
Help and support
Some issues may be resolved by simply disconnecting the power to the unit. Switch off the power to the base station and remove the batteries in the handset for about 20 minutes.
Reconnect everything to determine if the issue has been resolved.
Safety information
When using your telephone equipment, basic safety precautions should always be followed to reduce the risk of fire, electric shock and injury, including the following:
- Read and understand all the instructions.
- Follow all warnings and instructions marked on the product.
- Unplug this product from the wall outlet before cleaning. Do not use liquid cleaners or aerosol cleaners. Use a damp cloth for cleaning.
- Do not use this product near water (for example, near a bath tub, kitchen sink, swimming pool).
- Do not overload wall outlets and extension cords as this can result in the risk of fire or electric shock.
-
Unplug this product from the wall outlet and refer servicing to your supplier under the following conditions:
-
When the power supply cord or plug is damaged or frayed.
- If the product does not operate normally by following the operating instructions.
- If the product has been dropped and the cabinet has been damaged.
-
If the product exhibits a distinct change in performance.
-
Avoid using a telephone (other than a cordless type) during an electrical storm. There may be a remote risk of electric shock from lightning.
- Do not use the telephone to report a gas leak in the vicinity of the leak.
- For pluggable equipment, the socket-outlet (power adaptor) shall be installed near the equipment and shall be easily accessible.
Rechargeable batteries
- Use only the supplied NiMH (Nickel Metal Hydride) batteries!
The operation periods for the handsets are only applicable with the default battery capacities
- The use of other battery types or non-rechargeable batteries/primary cells can be dangerous. These may cause interference and/or unit damages. The manufacturer will not be held liable for damage arising from such non-compliance.
- Do not use third party charging bays. The batteries may be damaged.
- Please note the correct polarity while inserting the batteries.
- Do not immerse batteries in water, do not place in fire.
- Risk of explosion if battery is replaced by an incorrect type.
- Dispose of used batteries according to the instruction. Must be disposed of at the point of sale or at the appropriate collection points provided by the public waste authorities.
Caution, risk of explosion if battery is replaced by an incorrect type. Dispose of used batteries according to the instructions.
Intended use
This phone is suitable for use on either a public telephone network or on an approved Private exchange (PABX). Any other use is considered unintended use. Unauthorised modifications are prohibited. Do not attempt to carry out repairs yourself.
Disposal
In order to dispose of your device, take it to a collection point provided by your local public waste authorities (e.g. recycling centre). According to laws on the disposal of electronic and electrical devices, owners are obliged to dispose of old electronic and electrical devices in a separate waste container. The symbol indicates that the device must not be disposed of in normal domestic waste!
Batteries represent a hazard to health and the environment!
Never open, damage or swallow batteries or allow them to pollute the environment. They may contain toxic, ecologically hazardous heavy metals. You are legally required to dispose of batteries and rechargeable batteries safely, either at a retailer that sells batteries or at an appropriate collection point that provides a suitable container. Never put batteries in the household waste. Disposal is free of charge. Lithium batteries and battery packs of all kinds should be fully discharged before you drop them off. Be sure to take precautions against short-circuits, e.g. by covering poles with adhesive tape, to prevent the risk of a fire.
Packaging materials must be disposed of according to local regulations.


Guarantee
SWITEL equipment is produced and tested according to the latest production methods. The use of carefully chosen materials and highly developed technologies ensures trouble free functioning and a long service life. The terms of the warranty do not apply where the cause of the equipment malfunction is the fault of the telephone network operator or any interposed private branch extension system. The terms of the warranty do not apply to the rechargeable batteries or power adaptors used in the products. The warranty period is 24 months from the date of purchase.
All deficiencies resulting from material or production faults which occur during the warranty period will be eliminated free of charge. Rights to claims under the warranty terms are voided following intervention by the purchaser or third parties. Damage caused as a result of improper handling or operation, incorrect positioning or storing, improper connection or installation, Acts of God or other external influences are not covered by the warranty.
In the case of complaints, we reserve the right to repair or replace defective
parts or provide a replacement device. Replaced parts or devices become our property. Rights to compensation in the case of damage are excluded where there is no evidence of intent or gross negligence by the manufacturer.
If your equipment shows signs of a defect during the warranty period, please return it to the sales outlet where you purchased the SWITEL equipment together with the purchase receipt. All claims under the warranty terms in accordance with this agreement must be asserted exclusively with regard to your sales outlet.
The right to assert a warranty claim expires two years after the purchase of our products.
Declaration of conformity
This device fulfils the requirements stipulated in the EU directive: 2014/53/EU.

Conformity with the above mentioned directive is confirmed by the CE symbol on the device.
To view the complete Declaration of Conformity, please refer to the free download available on our website www.switel.com/support.
Telgo AG, Route D'Agy 16, 1763 Granges-Paccot, Switzerland
Technical Detail
Standard
RF frequency
RF power average
Power supply
(Base and charger)
Range
Standby time
Talk time
Rechargeable battery
Maximum earpiece volume
Dialling mode
Recall time (Flash)
Optimum ambient temperature
Optimum relative humidity
DECT
1.89GHz
<10.4dBm
Input: AC 100-240V 50/60Hz
Output: DC 6V 450mA
Indoor approx. 300m, Indoor approx. 50m
Up to 100 hours
Up to 10 hours
AAA, 1.2V, 400mAh NiMH
+22dB
Tone (DTMF) / Pulse
Short (100 ms), Medium (300 ms),
Long (600 ms)
0^ C to 45^ C
20% to 80%
Power adaptor information
VTech Telecommunications Ltd.
Model: VT05EEU06045, Input 100-240V AC 50/60Hz 150mA, Output 6VDC
450mA (EU plug)

Mobile
1 Combiné
2 Menu/OK
Raccorder la station de base
Telgo AG, Route D'Agy 16, 1763 Granges-Paccot, Switzerland
Données techniques
Standard
DECT
VTech Telecommunications Ltd.
Model: VT05EEU06045, Input 100-240V AC 50/60Hz 150mA, Output 6VDC 450mA (fiche EU)

Unità mobile
1 Ricevitore
2 Menu/OK
Telgo AG, Route D'Agy 16, 1763 Granges-Paccot, Switzerland
Dati tecnici
Standard
DECT
Frequenza RF 1,89 GHz
Potenza media RF < 10,4 dBm
VTech Telecommunications Ltd.
Model: VT05EEU06045, Input 100-240V AC 50/60Hz 150mA, Output 6VDC
450mA (spina EU)


Terminal inalámbrico
1 Auricular
2 Menu/OK
Telgo AG, Route D'Agy 16, 1763 Granges-Paccot, Switzerland
Datasétécnicos
Estándar
DECT
VTech Telecommunications Ltd.
Model: VT05EEU06045, Input 100-240V AC 50/60Hz 150mA, Output 6VDC 450mA (enchufe EU)


Handset
1 Hoorn
2 Menu/OK
Telgo AG, Route D'Agy 16, 1763 Granges-Paccot, Switzerland
Technische gegevens
In the case of technical questions, please use the service form on our website: http://www.switel.com/en/product-information-technical-support/