TE6602 - Phone TOPCOM - Free user manual and instructions
Find the device manual for free TE6602 TOPCOM in PDF.

Frequently Asked Questions - TE6602 TOPCOM
User questions about TE6602 TOPCOM
0 question about this device. Answer the ones you know or ask your own.
Ask a new question about this device
Download the instructions for your Phone in PDF format for free! Find your manual TE6602 - TOPCOM and take your electronic device back in hand. On this page are published all the documents necessary for the use of your device. TE6602 by TOPCOM.
USER MANUAL TE6602 TOPCOM
UK The CE symbol indicates that the unit complies with the essential requirements of the R&TTE directive.
UK The features described in this manual are published with reservation to modifications.
UK To be connected to the public analogue telephone network.
This product is in compliance with the essential requirements and other relevant provisions of the R&TTE directive 89/336/EEC.
The Declaration of conformity can be found on :
http://www.topcom.be/cedeclarations.asp
1 Before Initial use
Thank you for purchasing this new desktop caller ID telephone.
1.1 Intended Purpose
This product is intend to be connected indoor to an analogue PSTN telephone line.
1.2 Caller ID
To use 'Caller ID' (display caller), this service has to be activated on your phone line. Normally you need a separate subscription from your telephone company to activate this function. If you don't have the Caller ID function on your phone line, the incoming telephone numbers will NOT be shown on the display of your telephone.
1.3 Connection
The CE symbol indicates that the unit complies with the essential requirements of the R&TTE directive.
This device has been designed and manufactured to comply with the 98/482/EC rule, referent to the Pan European connection of a terminal to the Public Switching Telephone Network (PSTN) and following the established guidelines by the 1999/5/EC Directive about radio electric equipments and the reciprocal acknowledge of their conformity. However, due to the fact that there are some differences in the PSTNs from one country to another, the verifying measurements by themselves do not set up an unconditional guarantee for an optimal working in every connection point to the PSTN of any country. If any problem comes up, get in touch firstly with the distributor.
In any case, use conditions for which the product has been created should be respected as well as avoid its use in public or private networks with technical requirements clearly different to those established in the EU.
2 Safety instructions
Please read carefully through the following information concerning safety and proper use. Make yourself familiar with all the functions of the equipment. Be careful to keep these advice notes and if necessary pass them on to a third party.
- Do not place the basic unit in a damp room or at a distance of less than 1.5m away from a water source. Keep water away from the telephone.
- Do not use the telephone in environments where there is a risk of explosions.
- Dispose of the batteries and maintain the telephone in an environment-friendly manner.
3 Cleaning
Clean the telephone with a slightly damp cloth or with an anti-static cloth. Never use cleaning agents or abrasive solvents.
4 Disposal of the device (environment)

At the end of the product lifecycle, you should not throw this product into the normal household garbage but bring the product to a collection point for the recycling of electrical and electronic equipments. The
symbol on the product, user guide and/or box indicate this.
Some of the product materials can be re-used if you bring them to a recycling point. By re-using some parts or raw materials from used products you make an important contribution to the protection of the environment.
Please contact your local authorities in case you need more information on the collection points in your area.
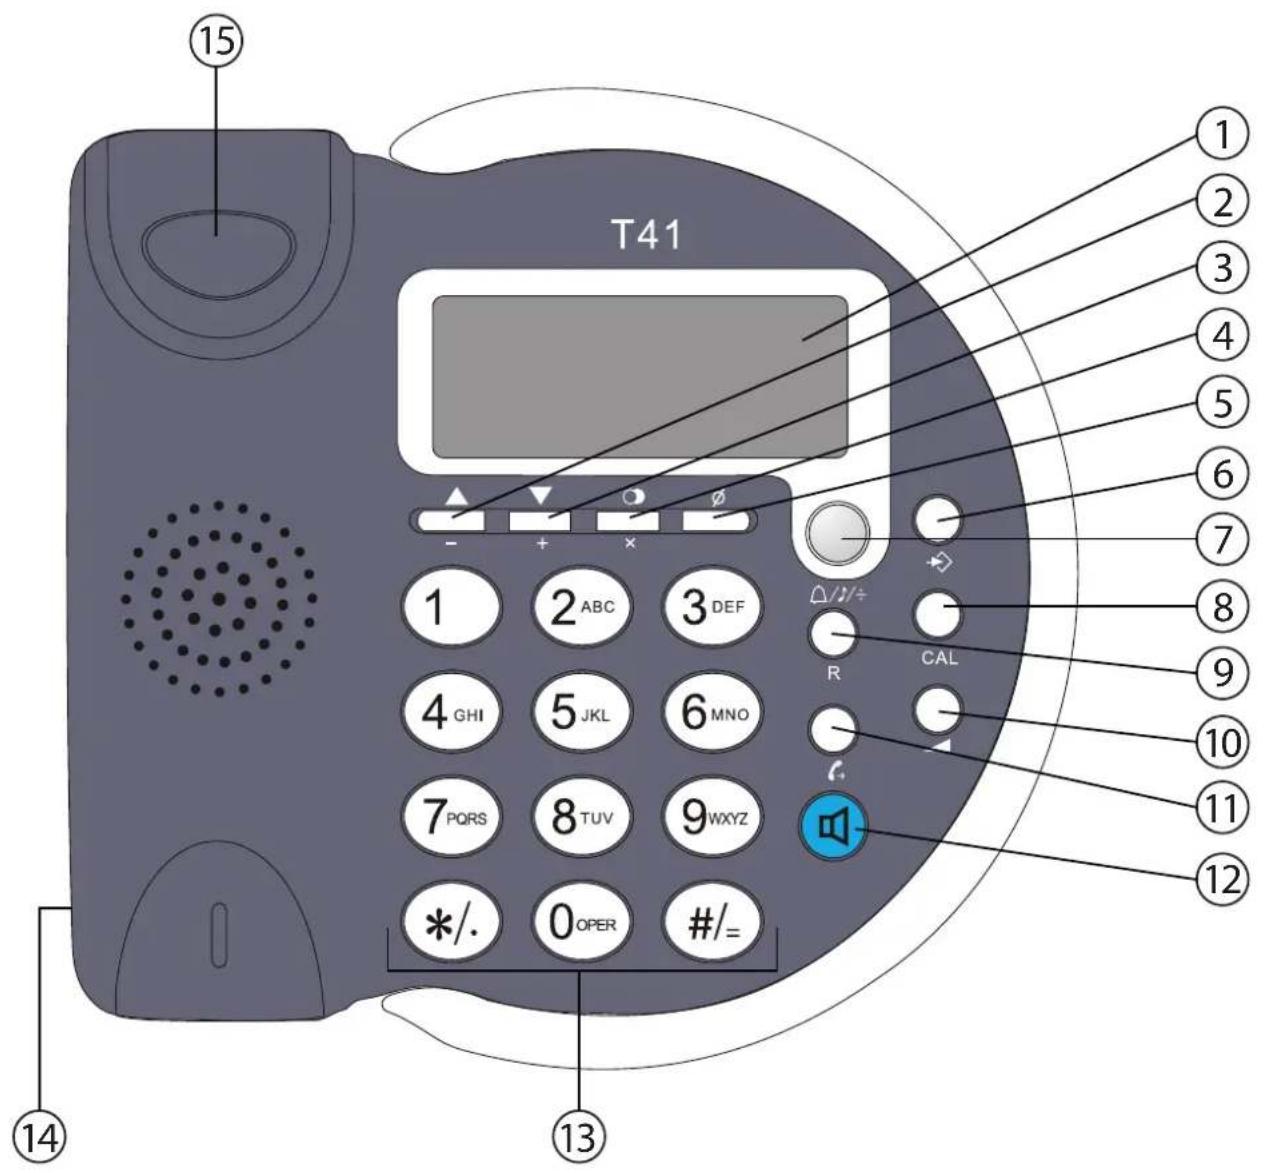
5 Buttons / connections
(See picture on folded cover page)
- LCD display
2.Up key - Down key
- Redial key
- Delete key
- Program key
- Ringtone / Hold key
- Calculator key
- Flash key
- Volume key
- Dial out key
- Handsfree key
- Numerical keypad
- Curl cord connection
- Hook Switch
6 Installation
Put batteries in the battery compartment to activate the display:
- Open the battery compartment at the bottom of the unit.
- Insert 3 Alkaline AA standard batteries.
- Close the battery compartment.
- Connect one end of the line cord to the telephone line wall socket and the other end to the backside of the telephone.
The telephone line needs to be disconnected prior to opening the battery door!
7 Telephone settings
7.1 Set the time and date
When you have a subscription to the caller ID service and your telephone provider sends the date and time together with the telephone number, the phone's clock will be set automatically. The year must always be set manually!
P r e s s
- Use / to select " set date"
- Press to enter the settings
- Use / to change
- Press to move to the next digit
- Press to exit the menu
7.2 Set the area code
When you have a subscription to the caller ID service it can be necessary in some countries to enter your area code. When the telephone receives a caller ID it will remove the entered area code from the incoming number.
- Press to enter the menu
- Use / to select “ set CODE”
- Press to enter the settings
- Use / to change
- Press to move to the next digit.
- Press to exit the menu
7.3 Set the PBX code
When your phone is connected to a PBX system you can enter the PBX line access code.
The line access code will be added when dialling out a number from the caller ID list.
- Press to enter the menu
- Use / təsect " pCOde"
- Press to enter the settings
- Use / to change select the digit
- Press to move to the next digit.
- Press to exit the menu
7.4 Set the operator prefix code
When you have subscribed at an alternative operator it sometimes is required to dial a prefix in front of the telephone number.
When entering the prefix, the phone will automatically add the prefix in front of the dialled number.
For example:
Operator prefix: 1234
Number to be dialled: 012345678
Number dialled by the phone: 1234012345678
- Press to enter the menu
Use / to select " autO 1p" - Press to enter the settings
Use / to select "ON" or "OFF"
P r e s s - Enter the prefix
P r s
- Press to exit the menu
7.5 Pulse / Tone selection
The T41 can dial numbers in pulse or tone mode (DTMF).
- Tone mode is set by default.
- Press to enter the menu
- Use / t▲sect "P-t"
- Press to enter the settings
Use / to select "tOnE" or "PULSE"
P r e s s - Press to exit the menu
7.6 Allow / Forbit parallel telephone on your line
You can forbid that another telephone can be connected in parallel with your T41. If you activate this function, the parallel telephone will not be able to make a call as the line will be disturbed with beep tones.
- Press to enter the menu
- Use / ▲select "ALAr"
- Press to enter the settings
Use ▲/▼ to select "On" or "OFF"
P r s - Press to exit the menu
7.7 Set the alarm
You can set three wakeup alarms in your T41.
- Press to enter the menu
- Use / ▲sect "ALERT"
- Press to enter the settings
Use / select alarm 1,2 or 3
P r e s - Use / change the digit.
- Press to move to the next digit
Use ▲/▼ to select "On" or "OFF" - Press to exit the menu
7.8 Ringer volume
There are 4 selectable ring volumes.
- Press to select the most suitable ringer volume
7.9 Hands-free volume
When the phone is in hands-free mode you can select 2 volume levels.
- Press to select the most suitable speaker volume during a hands-free call
7.10 Set the ring tone
There are 8 different ring tones to choose from.
- Press. The current ringtone can be heard at the highest volume
- Use / təsəct
After 12 seconds the telephone will go back to idle position
8 O p e r a t i o n
8.1 Making a call
- Enter the telephone number
- Press to delete a wrongly entered digit
- Press to start dialling the number in hands-free mode.
Pick up the handset to continue the call with the handset.
During a call made with the handset you can switch to hands-free by pressing and hanging up the handset.
8.2 Receiving a call
- When a call comes in, the phone will ring
Pick up the handset or press to take the call hands-free
8.3 Deactivating the microphone
During a call you can deactivate the microphone and talk freely without the caller hearing you.
- Press to activate (the caller will hear an electronic melody)
Press again to continue your conversation
8.4 Last number redial
The phone will store the 5 latest dialled numbers together with the call duration.
- Press to through your latest dialled numbers ("OUT" will appear in the display)
Press to dial the number - Press to delete a number
8.5 Caller ID
The phone can store up to 15 incoming numbers together with the time and date of the call.
- Press / to go through the incoming numbers ("IN" will appear in the display)
- Press to delete a number
Secret numbers will be displayed as "...p..." Missed calls will be displayed together with "NEW"
9 Calculator
The T41 has an integrated calculator.
- P r e s s CAL to enter the calculator mode All standard calculator functions can be found on the keyboard
- Press to exit the calculator
10 Technical data
- Battery power: 3 × 1.5V AA, non-rechargeable batteries (not included)
- Flash time: 100 ms
- Dial mode: Pulse / Tone (DTMF)
Normal conditions of use: +5^ to +45^ - Permitted relative air humidity: 25 to 85%
11 Topcom Warranty
11.1 Warranty period
The Topcom units have a 24-month warranty period. The warranty period starts on the day the new unit is purchased. There is no warranty on standard or rechargeable batteries (AA/AAA type). Consumables or defects causing a negligible effect on operation or value of the equipment are not covered.
The warranty has to be proven by presentation of the original or copy of the purchase receipt, on which the date of purchase and the unit-model are indicated.
11.2 Warranty exclusions
Damage or defects caused by incorrect treatment or operation and damage resulting from use of non-original parts or accessories are not covered by the warranty.
The warranty does not cover damage caused by outside factors, such as lightning, water and fire, nor any damage caused during transportation.
No warranty can be claimed if the serial number on the units has been changed, removed or rendered illegible.
Any warranty claims will be invalid if the unit has been repaired, altered or modified by the buyer.
Prefixs operatora: 1234
| DECLARATION OF CONFORMITY |
| We, Topcom Europe Nv, Grauwmeer 17, 3001 Heverlee, Belgium, declare that our product: Model type: T41 is in compliance with the essential requirements and other relevant provisions of the R&TTE directive 1999/5/EC and carries the CE mark accordingly. Supplementary information: The product complies with the requirements of: - EN 60950-1:2001 - EN 55022 :1998+A1:2000+A2 :2003 - EN 55024 :1998+A1 :2001+A2 :2003 - EN 61000-4-2 - EN 61000-4-3 - EN 61000-4-4 - EN 61000-4-5 - EN 61000-4-6 - EN 61000-4-8 |
| Date: 12/09/2008 Place: Heverlee, Belgium Name: Verheyden Geert Function: Technical Director Signature: |
| European contact: Topcom Europe Nv, R&D department, Research Park, Grauwmeer 17, 3001 Heverlee, Belgium. Tel : +32 16 398920 , Fax : +32 16 398939 |
TOPCOM
visit our website
www.topcom.net