
X91384MDO - Range hood AEG-ELECTROLUX - Free user manual and instructions
Find the device manual for free X91384MDO AEG-ELECTROLUX in PDF.
| Brand | AEG-Electrolux |
| Model | X91384MDO |
| Product type | Range hood |
| Dimensions (W x D x H) | 90 cm x 50 cm x variable (depending on installation) |
| Net weight | Approximately 18 kg |
| Power supply | 220-240 V ~ 50/60 Hz |
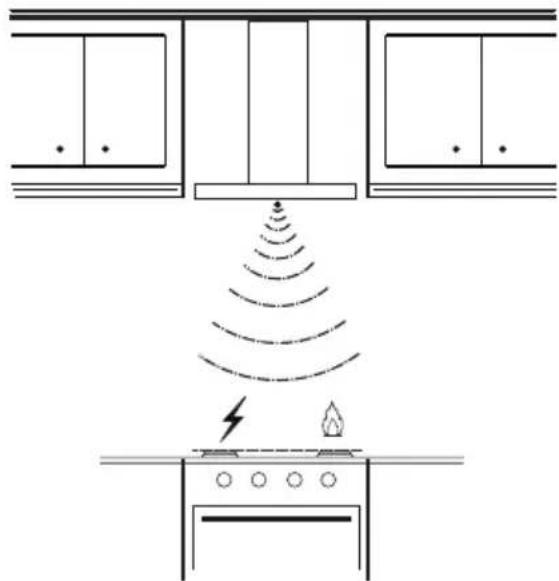
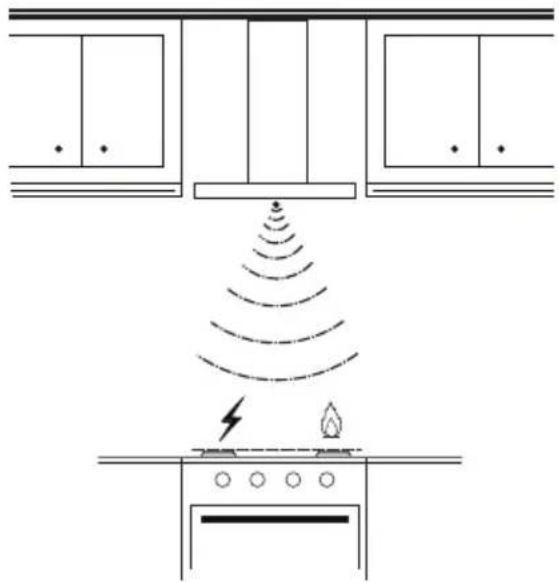
| Minimum safety distance (above cooking surface) | 650 mm |
| Duct connection diameter | ≥ 120 mm |
| Number of motor speeds | 4 speeds + intensive (P) |
| Intensive speed timed | 5 minutes |
| Lighting | LED, variable intensity (L1 to LMax) |
| Sensor function (automatic) | Yes, with electric/gas hob detection |
| Remote control | Yes, activation via key C |
| Grease filter type | Dishwasher safe (every 2 months) |
| Activated carbon filter type | Not washable, replace every 4 months |
| Filter saturation indicator | Fixed LED after 100h (metal), flashing after 200h (charcoal) |
| Delayed automatic shut-off | 10 minutes |
| Automatic shut-off after inactivity | 7 hours |
| Protection class | Class I (grounding required) |
| Supplied accessories | Ducting, filters, remote control (depending on version) |
| Repairability | Spare parts available through AEG after-sales service |
Frequently Asked Questions - X91384MDO AEG-ELECTROLUX
User questions about X91384MDO AEG-ELECTROLUX
0 question about this device. Answer the ones you know or ask your own.
Ask a new question about this device
Download the instructions for your Range hood in PDF format for free! Find your manual X91384MDO - AEG-ELECTROLUX and take your electronic device back in hand. On this page are published all the documents necessary for the use of your device. X91384MDO by AEG-ELECTROLUX.
USER MANUAL X91384MDO AEG-ELECTROLUX
Thank you for choosing this AEG product. We have created it to give you impeccable performance for many years, with innovative technologies that help make life simpler – features you might not find on ordinary appliances. Please spend a few minutes reading to get the very best from it.
ACCESSORIES AND CONSUMABLES
In the AEG webshop, you'll find everything you need to keep all your AEG appliances looking spotless and working perfectly. Along with a wide range of accessories designed and built to the high quality standards you would expect, from specialist cookware to cutlery baskets, from bottle holders to delicate laundry bags...

Visit the webshop at: www.aeg-electrolux.com/shop
GB - RECOMMENDATIONS AND SUGGESTIONS - The Instructions for Use apply to several versions of this appliance. Accordingly, you may find descriptions of individual features that do not apply to your specific appliance. The manufacturer will not be held liable for any damages resulting from incorrect or improper installation. The minimum safety distance between the cooker top and the extractor hood is 650~mm . Check that the mains voltage corresponds to that indicated on the rating plate fixed to the inside of the hood. For Class I appliances, check that the domestic power supply guarantees adequate earthing. Connect the extractor to the exhaust flue through a pipe of minimum diameter 120~mm . The route of the flue must be as short as possible. Do not connect the extractor hood to exhaust ducts carrying combustion fumes (boilers, fireplaces, etc.). If the extractor is used in conjunction with non electrical appliances (e.g. gas burning appliances), a sufficient degree of aeration must be guaranteed in the room in order to prevent the backflow of exhaust gas. The kitchen must have an opening communicating directly with the open air in order to guarantee the entry of clean air. The extractor hood has been designed exclusively for domestic use to eliminate kitchen smells. Never use the hood for purposes other than for which it has been designed. Never leave high naked flames under the hood when it is in operation. Adjust the flame intensity to direct it onto the bottom of the pan only, making sure that it does not engulf the sides. Deep fat fryers must be continuously monitored during use: overheated oil can burst into flames. Do not flambé under the range hood; risk of fire This appliance is not intended for use by persons (including children) with reduced physical, sensory or mental capabilities, or lack of experience and knowledge, unless they have been given supervision or instruction concerning use of the appliance by a person responsible for their safety. Children should be supervised to ensure that they do not play with the appliance. Switch off or unplug the appliance from the mains supply before carrying out any maintenance work. Clean and/or replace the Filters after the specified time period (Fire hazard), Grease filters Z The filters must be cleaned every 2 months of operation, or more frequently for particularly heavy usage, and can be washed in a dishwasher. - Activated charcoal filter W These filters are not washable and cannot be regenerated, and must be replaced approximately every 4 months of operation, or more frequently with heavy usage. Clean the hood using a damp cloth and a neutral liquid detergent. The symbol on the product or on its packaging indicates that this product may not be treated as household waste. Instead it shall be handed over to the applicable collection point for the recycling of electrical and electronic equipment. By ensuring this product is disposed of correctly, you will help prevent potential negative consequences for the environment and human health, which could otherwise be caused by inappropriate waste handling of this product. For more detailed information about recycling of this product, please contact your local city office, your household waste disposal service or the shop where you purchased the product.
Connect the hood to the mains through a two-pole switch having a contact gap of at least 3mm
Warning: Before installing the Hood, remove the protective films (white and transparent).
USE

| Button | Function Specifications | |
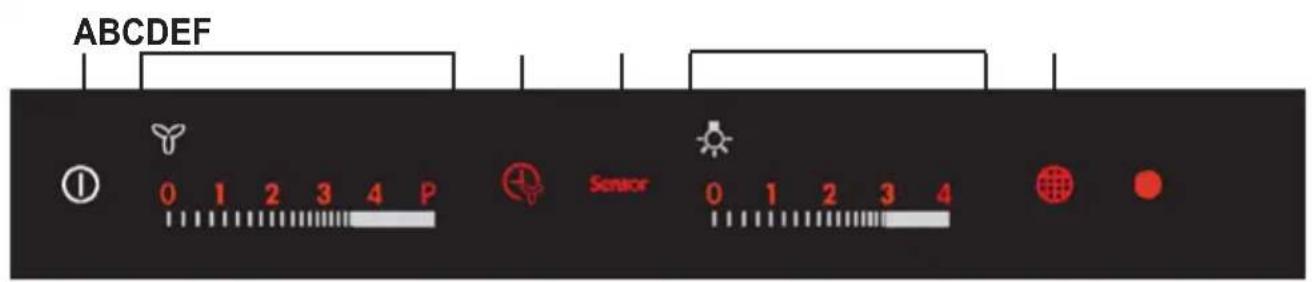
| A | Hood Functions On/Off | When the button is touched with the hood turned off, all functions light up (intensity 50%) and are enabled. When the button is touched with the hood in operation, all functions are turned off and disabled (Motor Off + Lights Off). |
| B | Manages motor speed:0--V1--V2--V3--V4--P | When the area is touched, the motor starts at the speed required. P = Intensive Speed, timed for 5 minutes, after which the system returns to the previous speed. When activated from Motor Off it returns to speed V1.When the required speed is touched, it will become brighter (intensity 100%) than the other functions (intensity 50%). |
| C | Delay function Touching this | button activates automatic shutdown of the Motor, the Fans and the Lighting with a 10 minute delay. It can only be activated with the motor on, running at any speed except Intensive, and with the Sensor = Off. |
| Enables / Disables the Remote Control Receiver. | When this button is pressed and held for 4 seconds (Motor Off + Lights Off, in the absence of other alarms, the Led will light up for: 4 seconds to indicate that the Remote Control has been Activated 2 seconds to indicate that the Remote Control has been Deactivated | |
| D | Sensor In this mode the Hood | operates automatically for a maximum of 5 hours, after which it switches the Motor off. The hood modifies the speed of the motor according to the findings of the sensor. Buttons B and C do not work. The function is disabled by pressing the Button or turning the hood off. |
| E | Manages Lighting Intensity:0--L1--L2--L3-LMax | When this area is touched, the Lights turn on at the required intensity. When the lighting intensity is touched, it will become brighter (intensity 100%) than the other functions (intensity 50%). |
| F | Filter Reset Resets the Filter Saturation alarm when the button is touched with the motor and lighting turned off. | After 100 hours operation the Led lights up continuously to indicate saturation of the Metal Grease Filters. After 200 hours operation the Led flashes to indicate saturation of the Activated Charcoal Filters. |
| Enables/Disables the Activated Charcoal Filter Alarm. | When this button is pressed and held for 4 seconds (Motor Off + Lights Off), in the absence of other alarms, the Led will light up for: 4 seconds to indicate that the Activated Charcoal Filter Alarm has been activated 2 seconds to indicate that the Activated Charcoal Filter Alarm has been deactivated |
After connecting the hood to the mains, the commands are activated after 4seconds. When the Hood is switched off, none of the functions is displayed, and only the normal lettering on the control panel is visible. All the rest will light up (intensity 50% ) when button A is touched. The controls are activated by touching the selected function, which will light up more brightly (intensity 100% ) with respect to the other hood functions (intensity 50% ). When no commands are given for at least 10 seconds, only the selected functions will be lighted (Intensity 100% ) and all the rest will turn off (Intensity 50% ). After 7 hours in operation, if no further commands are given the hood will switch off (Motor Off + Lights Off), from here you can touch for activated the function, and the next touch you can select the desired function. It is possible to activate one of the hood functions (Speed and Lighting) not just by touching the control panel, but also by placing a finger on the panel and sliding it towards the chosen function without lifting it off. If the motor and lights are turned off, by setting them to zero, all the command LEDs will remain on at 50% , and if no further commands are given in the next 10 seconds, then all the LEDs will be turned off with the exception of the "0" LEDs, which will remain on for a further 15 minutes.
HOOD OPTIONS IN SENSOR MODE
When operating in Sensor mode, the type of hob being used has an influence. Two options are available:
Electric hob;
Gas hob;
Initially it is set to electric hob. To change the setting, proceed as follows:
- Turn the hood off using the hood on/off button
- Press and hold the Sensor button for 8 seconds until the LED flashes as described:
- 4 flashes indicate selection of the electric hob;
- 2 flashes indicate selection of the gas hob;
- Remove power for 10 seconds and then reconnect it.
The calibration procedure is carried out every time the type of hob is changed.
Calibration procedure: every time the hood is turned on or the type of hob is changed, the sensor calibration procedure is run. During this time the hood must not be used for cooking or subjected to particularly intense smells, for example solvents or detergents.
This process requires:
13 minutes if the electric hob has been selected;
- 1 minute if the gas hob has been selected;
This phase is marked by flashing of the LED on the sensor button, if it has been pressed. Do not turn the motor on during calibration.
Warning: Do not spray directly on the grill cleaning products but only clean with a cloth soaked in detergent. Avoid cleaning the grill alcohol or silicone products.
LIGHTING
Warning: This appliance is fitted with a white LED lamp classed as 1M according to EN 60825-1: 1994 + A1:2002 + A2:2001 standards; maximum optical power emitted @439nm: 7μW. Do not look directly at the light through optical devices (binoculars, magnifying glasses...).
- For replacement contact technical support. ("To purchase contact technical support")
POUR DES RÉSULTATS PARFAITS
ACCESSIONS ET CONSOMMABLES
OPTIONS HOTTE MODE SENSOR
www.aeg-electrolux.com/shop
RU-COBETbI IN PEKOMEHDAUIN-HactoJuee pyKOBOCTBO NO 3KCNLYATAuMn COCTABNeHO IIN PA3HBX MOJe NpN-6Opa. BO3MOxHO, Bbl CPTeTneB HEM ONcAHNE OTDeHBHX KOMNNEKTYUQHX, HEOTHOCAHIXKMOEINBaWero npN6Opa.POn3BOHTeB OTKNHOETBCAYKO OTBETCBEHOCB 3a NOBPExDEHMA, Bt3BAHbHHe HeNPABUNH0I IN HECOTBECTBYUOe npBnAm yCTAHOBKO.MNHmAMhBoe 63ONACHOe PACCTOHME MEXdy PNIOTB IN BtTAKKO JIOXHO 6b50 MM. IpOBepNTcoBTcTBNE HANPJAENHcTe Ykaz3AHOMy HA TabnHKe, 3AQPENNEHHO BHyTPn BtTAKKn. DInrnpBOpBn KIACCA I pOBepNTb, TTO6bl 3NEKTPUECKA npOBoDA B DOME oBecne-UMBANA npABINbHOe 3a3EMNEHe. CoEDINHTB BtTAKKy C DlIMOXOD mTy6KO DNAMetPOM, PABHm NIN60JIbwe 120 MM. DInna Tpy6Kn DOJXHA 6bITb KAK MOXHO MeHBe. He CoedINHTB BtTAKKy C BblNYCKBHM TPy6AMN DlIMOB OT pOceCCOB RopeHHN (KOT-NbI, KAMNHBI INPOU.). B cnyae eCNI B NOMEHNHNCNOL3yOTcK kak BtTAKK, Ta n npB6pOBy, He paO-tAOUme Ha 3NEKTPO3HEPN (HaPmep, r3OBble np6bpO), Heo6DxMOH DoJHKbIM Obp3AM npOBETPBAT NOMSEHNE. Ecln Ha kyXHe HET OKHa, CdelaTb OTBcTne HApXy N3 NOMEHHN, TTO6bl CEPEH Noctynan CBexm Bo3dyux. BtTAKKa CNPOEKTHPOBAHcN KIKOUHTeBO DnE bSbTOBO PrimeHHENH DnE yHNTO-JeHHN 3aNAxOB OT RObTK. HIKORa He DonyckaTb HecOoBETCTBYUOero NpL3OBAHNA BtTAKKo. He octABnTb OTKbIToE N CnIBHO PlAmN IO NaHXoJAECEB C PaOBe BtTAKKo. OBsAteNBHO perYNPOBAtB NPMa, TTO6bl OHO He BixOINIO 3a DNO KAcTPOJB. CledIN7aPabOTFpHNUC: CnIBHO HAPeTOE MacLO MOKET BOCNAMEHTCBc. He RotOBte 6NIOda Phambe ND KxOHHO BtTAKKo; ONACHOT Bo3MHKOHEHNA NOJAPA. 3AnpeuAETC NOBJOBAbCS np6Opom NIOdAM (N DetM) COrPAHUYHBMIM NCNX-WeCKMN, CEHCOPHBIM NymCTBEHbIM CNOCO6HCTAM, a TAKKE Nlucam, He 0bLa-dAouzim ONbTOM N HeoBXOaMbIM 3NaHnMM, Be3 KOHTpon I PndapntelBO HorO Obyehn NpL3OBAHMe np6Opco CTobETCHBbX 3a N630aNCHocTB NLI. DeTI DINOJKHb HAXoITBCN OND HADzOPM B3POCbIX N HE IRPaTc Pn6Opom. PpEXde Yem npICTuNTaB KIOBOI ONeAUm NOYxOy, OTCoEOHNITB BtTAKKy OT CEtN, BBHyB 3NEKTPUeCKy BUKNY UNN BkIKIOUB RfABHBI BkIKIOUATEB. POn3BOIDT tuaTeNBHI IN CBOEBPemEHbYxOd 3a FInbTpAMN B PEKOMEHdy-Mle IBHTEPBANI BpEmEH (Onachot BoXapa), PpOTBOKIPOBBE fInbTpbl Z Takof pInbTp MoKHO TAKKE MbITB NocydoMoHcMaHMe. MbITb FInbTp Heo6xOduMo He pEXe ONDoro p4aB 2 Mecuza NNu Yaue B cnayae erO AKTNBOHRo npImeHHra - FInbTp OT 3aNAxOB W Takof FInbTp HeNb3R MybTG IN BCCTAHABMaBt, erO cneDeYer MeHb T CpeHem p4 B 4 Mecuza NNu DaKe Yaue B cnayae oc6o HHTEHCBHO IONoLBZOBAHRA BtTAKKN. DInr y6Opkn NOBepxHOCTeBBTAKKN NIOBzOBaTc BIAxHO KIAVE-CTBE 6bTOBx BYTOXOB.BMeCto 3TOrERo erO cneDyet CdATb B COOTBECTBOUH PNHYKT npEMLNK 3NEK-TPOHORO 3NEKTPOOBOPDOAHNA DnR NocNeyoue yTNIN3aun. Co6IODa npABINA yTNIN3aun IN3DEJIa, Bbl NOMeTE pPeDITbPTNb npiHHeNE OOKyaOioe CpeE NIODe NIOeNtHNALBOr yUepBa, KOtboBn BO3MOxEr, BpoNTBNOM cUYae, BCNECTBne HenoDBaUoe O6paue-HNc nno6bHMn OTOxDMn 3a 60nee noopohin HFOpmaue onytnor n3deinnpocba K MeCTHBIM BLACTRM, B cly8by no BBIOBy n tyIN3aun OTXODOB IN M Mara3HN, B KOTOPOM Bbl npio6pei n3deine.
CoeHNHTbBtJkKy C cTeBbIM HnpaJKeHMe, yCTaHOBB DByXNoIIOChbY BbIKNoIcATEb C pa3BeDeHMeKOHTaKTOB He MeHee 3 MM.
BnmaHne: npexJe CEm npncTyNTb K yctaHOBKe bItayKm, ydaJIte 3aunTHyU (6eIyIO npO3paHyU) pIeHky.
3KcPJIyATAUЯ
4 BCbIuKn yka3bIbAIOr Ha BbIbOp 3NEKTPnuecko BapOuHoi NaHeJIi
2 BCnbluKnyka3bIBAIOHa Bbl6Op Ra3OBOI naHEnI
OTKJIIOHTe NITaHHe BbITaXKn Ha 10 cekyHn 3aTeM BHOBb NOkJIIOHTe ero K npibopy.
Kakdbi pa3 npn n3MeHn Tnpa BapouHOI pAnEJI pON3BOIDTCr IpOeDpya KaJIb6pOBKn.
IpoeDpya KaNbPOBKn:KaJbIpa3, KOrdaHa BbITKky NODaETcH HApJxKeHne IIN MeHReTcTnBapOuHO nAHeJI, BKIOUaETcNpoEdupa KaNbPOBKn DaTUnKa,B XoDe KOToPOBn BbITkKa He DOJXHa NOBBePraTbcR BO3DeiCTBnO npOcecca rOTOBKn INn OCO60 CNlbHBIM 3anaxam,TnPa pactBOpNTeNe INn DETePeHTOB.
PpoeDypa 3aHnMaeT:
13 MmHyT,ecn BbIbpaHa 3JIeKTPnueckaBapOuHa naHeNb;
1 MInHyTy,ecnBbIbpaHa ra3OBaBapOuHaj nHeJIb.
3TOT 3tan 0603haaetcMnraHnem Hndnkatopa KhONKn DaTUnka,ecnN KhONKa 6bIina haxata.He BkNouayTe DBrarTeB BXode KaN6pOBKn.
BhImaHHe pa36pbI3rNaIe npraMo Ha peWetky OunuHne COCTaBbI; OunuAte ee TOJbKO CMOueHHbIMN B MOUcEM BeIeCTBe TpIKNAM.ДЯ OUnCTKn peWETKn He NcNoJIb3yIte COCTaBbI Ha CInPTOBO ININ CNINKOHOBOO OCHOBE.
OCBEUHEHNE
BHMaHne: Pnp6op obOpyOBoH CBeToIOoOM 6eIoro zBaTe knacca 1M corIacHo cTaHApTy EN 60825-1: 1994 + A1:2002 + A2:2001; MaKcImaJIbHaJ MoUHOCTb ONTnueCKOrO n3JnyeHnra @439nm: 7MBt: He peKOMeHNyETcR cMOrpeTB Ha CBeTOAnoD uepe3 ONTnueckne np6Opbl (6INHOKJIb, yBEnuHTeJIbHoe CTekNo n npou.).
-ДяЗamHeBcBeToDnOdaobpaaHTecbВ obCnyKnaIOUuI ΚeHTp.("ДЯ npno6peTeHnO bpaauTecb B O6CnyKnaIOUuI ΚeHTp").


Brand : AEG-ELECTROLUX
Model : X91384MDO
Category : Range hood