BM1 - Bread maker STEBA - Free user manual and instructions
Find the device manual for free BM1 STEBA in PDF.
Frequently Asked Questions - BM1 STEBA
User questions about BM1 STEBA
0 question about this device. Answer the ones you know or ask your own.
Ask a new question about this device
Download the instructions for your Bread maker in PDF format for free! Find your manual BM1 - STEBA and take your electronic device back in hand. On this page are published all the documents necessary for the use of your device. BM1 by STEBA.
USER MANUAL BM1 STEBA
Instructions for use 14
Mode d'emploi 26
This appliance is for private and indoor use only and must not be used commercially. Please read the instruction manual carefully and keep it at a safe place. When the appliance is given to another person the instruction manual should be passed to that person, too. Only use the appliance as described in the instruction manual and pay attention to the safety information. No liability for damages or accidents will be accepted, which are caused by not paying attention to the instruction manual.
Safety information

There is danger of burning when touching the surface during operation.
- Connect and operate the appliance in accordance with the specifications shown on the rating label
- Do not plug with wet hands.
- Do not plug into a socket where several other appliances are plugged in.
- Never use any accessories from other manufacturers. Your guarantee will become invalid if such parts are used!
-
Do not use if the plug cord is damaged or when the power plug does not fit the socket securely.
-
Do not modify the parts, or repair the unit by yourself.
-
Do not use the unit near a flame or wet places.
-
Do not use where children can easily touch the unit, nor let children use the unit by themselves.
The appliance can be used by children aged 8 and above and persons with limited physical, sensory or mental capabilities or lack of experience/knowledge, provided that are supervised or have been provided with instruction in the safe use of the appliance and have understood the resulting dangers. Children must not use the packaging as a toy. Cleaning and user maintenance must not be carried out by children unless they are 8 years or older and are supervised.
-
Children under the age of 8 must be kept away from the appliance and the connecting cable.
-
Never pull at the power cord or chafe it over sharp edges.
- Do not leave the appliance outdoors or in a damp area.
- Never leave the appliance unattended when in use.
-
Never immerse the unit in water.
-
The manufacturer is not liable for damage which is occurring due to the usage of the appliance in a different way as described or a mistake in the handling has been made.
-
Use the unit with sufficient space around it. Keep the front side and either right or left side of the unit clear.
- Never use the unit on carpet or tablecloth (viny1) or any other low-heat-resistant article.
- To prevent injury, repairs such as replacing a damaged cord, should only be carried out by a customer service
- You must not put any materials such as paper, cardboard, plastic etc. into the appliance.

Attention! Housing and glass get hot. Danger of burns! Do not place the appliance on a sensitive surface (e.g. painted furniture) and keep a distance of at
least 15cm to burnable materials.
- The backside of the appliance must be positioned direct at the kitchen wall.
Cleaning
- Unplug the bread maker and let it cool down fully before cleaning.
- Clean the bread maker after every use.
- Clean all internal metal parts with a damp cloth. Don't immerse the bread maker in water or any other liquid. Let everything dry well.
- Clean the bread pan with a soft damp cloth if necessary, dry with a soft cloth. Do not use harsh or abrasive cleaners, chemical cleaners or solvents, abrasive scouring pads or metal implements.
Bread Making Ingredients
Flour
The type of the flour indicates the amount of mineral nutrients.
- Type 405: Plain flour (All-purpose flour) for cake, bread etc.
- Type 1050: Bread flour has a high content of gluten. As the gluten content is higher than normal flour, it can be used for making bread in large sizes.
Whole Wheat flour: Whole grain flour has no type number and is ground from whole grains. Whole wheat flour is heavier and contains more nutrients than common flour. The bread made by whole wheat flour is usually small in size. So many recipes usually combine the whole wheat flour and bread flour to achieve the best result. - Corn flour and oatmeal flour: Corn flour and oatmeal flours are ground from corn and oatmeal separately. They are the additive ingredients for making rough bread, which is used for enhancing the flavor and texture of the bread.
Sugar
Sugar is a very important ingredient, which increases the sweet taste and color of the bread. Sugar is also considered as nourishment for the yeast. White sugar is largely used but brown sugar, powdered sugar or cotton sugar may be used for special dietary requirements.
Yeast
Yeast must be stored in the refrigerator, as the fungus in it will be killed at high temperatures. Before using it check the production date and storage life of your yeast. Refrigerate it as soon as possible after each use. Usually the main cause of bread failing to rise is bad yeast. The method described below will check whether your yeast is fresh and active.
- Pour 12 cup warm water (45-50°C) into a measuring cup.
- Put 1 tsp. white sugar into the cup and stir, then sprinkle 2 tsp. of yeast over the water.
- Place the measuring cup in a warm place for about 10 minutes. Do not stir the water.
- The froth that appears should come up to 1 cups worth. Otherwise the yeast is dead or inactive.
Salt
Salt is necessary to improve the flavor and crust color of the bread. Salt can also stop the yeast from working. Never use too much salt in a recipe.
Eggs
Eggs can improve bread texture and make the bread more nourishing and larger in size. The egg must be added and mixed in evenly.
Grease, butter and vegetable oil
Grease can make bread soft but can reduce storage life. Butter should be melted or chopped into small pieces before using.
Baking powder
Baking powder is used for rising the ultra-fast bread and cakes, as it does not need time to rise and instead produces air. The air will form to soften the texture of the bread or cakes.
Water and other liquids
Water is an essential ingredient for making bread. Generally speaking the water temperature should be between 20^ and 25^ for the best results. The water may be replaced with fresh milk which will enhance the breads' flavor and improve crust color.
Bringing into service
To install the bread pan, press the bread pan down and turn slightly clockwise to lock into place. Make sure that the bread pan is properly installed in the bread maker.
Mount the kneading paddle on the shaft, flat side down.
- Remember to attach your kneading paddles FIRST, and then add the ingredients.
To remove the bread pan: turn the bread pan slightly counter-clockwise.
After baking, make sure you always wear oven mitts to avoid being burned.
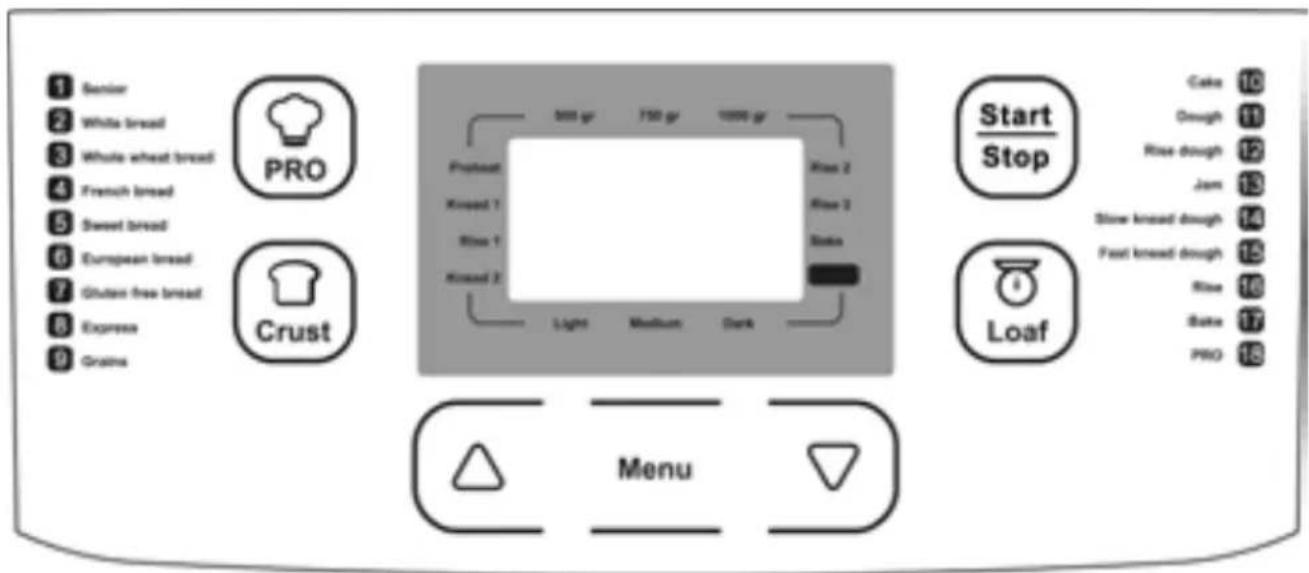
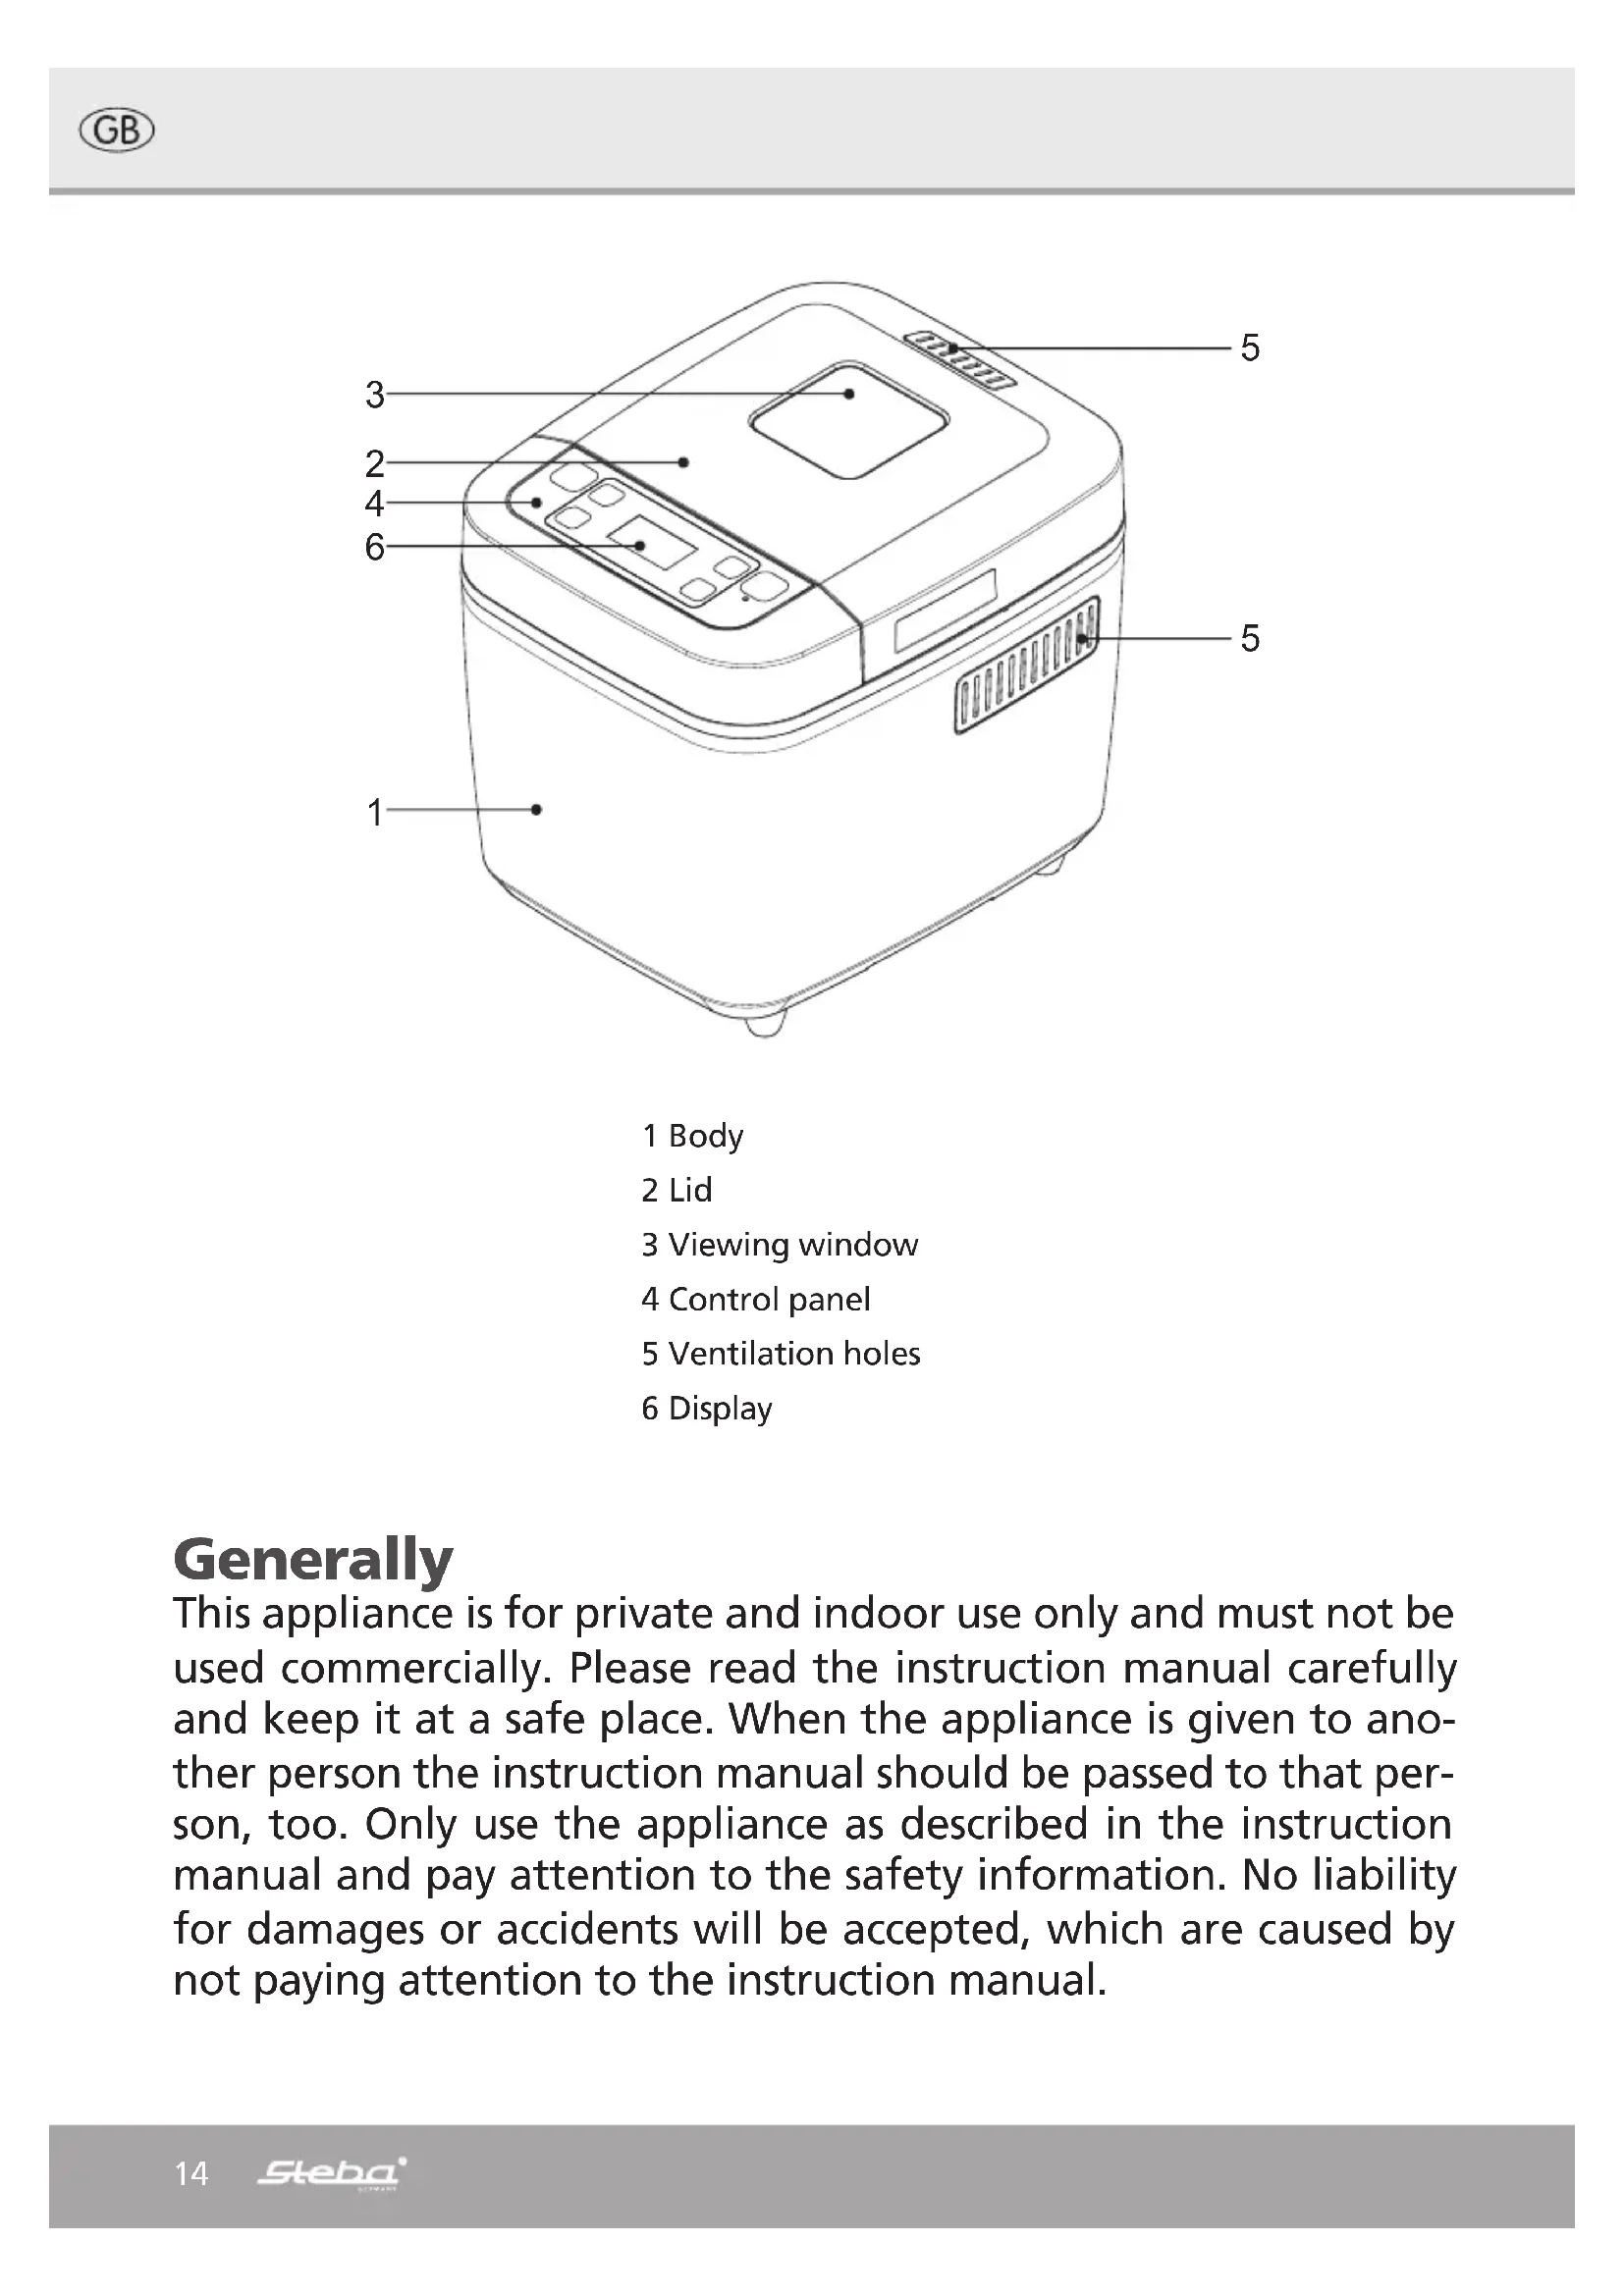
Display
The LCD screen displays the selections you have made for the bread-making process, including the size of your loaf, the chosen crust color and the stage of the bread-making process. When plugged into a power point, the appliance will sound a signal and the LCD screen will light up.
- The "Menu" button is designed to select the required cooking program. Each pressing is accompanied by the short sound signal. The selected program is displayed on the LCD screen.
- The "Start/Stop" button allows you to launch the cooking program, also it allows you to cancel the selected cooking program.
- The "Loaf" button allows you to select the loaf size, press the button until the indicator moves to the required loaf size: 500g/750g/1000g.
- You can also select the crust color by pressing the "Crust" button until the indicator moves to the required crust: Light/ Medium /Dark.
- The "PRO" program allows you to adjust temperature settings. It also allows you to store your current program settings. They will be automatically saved and displayed the next time you switch on the appliance.
Using "Up/Down" arrow keys you can adjust the cooking time.
Making Bread
- Open the lid and remove the bread pan. Always remove the bread pan from the bread maker before adding ingredients to ensure they are not spilt into the baking chamber and the heating element.
- Insert the kneading paddle. It is important that the kneading paddle is properly inserted on the shaft in the base of the bread pan. If the paddle is not inserted correctly the ingredients may not be mixed and kneaded properly.
- Add ingredients to the bread pan. It is IMPORTANT that the ingredients are added in the correct order and that the ingredients are measured and weighed accurately or the dough may not mix correctly or rise sufficiently. All ingredients should be at room temperature 20 - 25^ .
Ingredients should be added in the following order:
Liquid ingredients: milk/water, eggs
Dry ingredients: salt, sugar, flour
Yeast
NOTE! Mound the flour into the pan, make a small hollow in the center and place the yeast there. If the yeast contacts the water before the kneading, the bread may not rise well. Therefore always add yeast last!
How to use your Bread Maker
Plug the bread maker into an outlet. The display turns on.
- Select the bread program by repeatedly pressing the "Menu" button
- Choose a crust color by pressing the "Crust" button until the arrow in the window lines up with either "Light", "Medium" or "Dark". Some programs do not have the crust selection option, in this case, skip this step.
- Repeatedly press the "Loaf" button to select which loaf you would like to bake until the arrow in the window lines up with either "500g", "750g" or "1000g".
- TIP: if you would like to save the current settings (for example, the "Senior" (1) program), simply press the "PRO" button and the bread maker will save the settings automatically.
Press Up and Down buttons to adjust the cooking time.
- Press the "Start/Stop" button to commence operation, stop the cooking process or discard the program. Upon pressing the button you will hear a beep sound, the total setting time on the LCD screen will be flashing.
Power failure backup system
The bread maker is equipped with a power failure backup system or memory. If the power system is interrupted during the course of bread making, the process of making bread will be continued automatically within 20 minutes, even without pressing the "Start/Stop" button. If the interruption time exceeds 20 minutes, the memory cannot be kept and you must discard the ingredients in the bread pan and start again. If the dough has not entered the rising phase when the power supply breaks off, you can press the "Start/Stop" button directly to continue the program from the beginning.
After the bread is baked
When the baking is complete, 10 beeps will sound to alert you that the bread is ready, and then the unit will automatically switch to a warm setting.
Important: The bread maker has an automatic "Keep warm" setting that will keep your bread warm for up to 1 hour. Press the "Start/Stop" button for 3 seconds to cancel the "Keep warm" setting.
Use pot holders or oven mitts to carefully lift the pan by its handle from the bread maker.
Turn the pan upside down and gently shake it until the bread comes out.
The bread pan has a non-stick coated finish so that the bread should come out easily. Do not use metal utensils to remove bread as they may scratch the non-stick coating. Let the bread maker cool down thoroughly before using it again. If "HHH" appears in the display window, it indicates that the unit has not cooled sufficiently after baking to use immediately again. In this case, allow the bread maker to cool down for 10 - 20 minutes.
Delay function
The maximum delay time is 13 hours
E.g. it is 6:00 pm and you want to have your bread on the following day at 6:00 am. First, press the "Menu" button and select the required program. Each time pressing the "Up" and "Down" arrows you can increase/decrease the delayed start time by 10 minute increments. Set the delay time to 12:00.
- Press the "Menu" button until the required program is selected.
- Set the delayed time: you simply have to press the "Up" and "Down" arrows on the control panel until the display panel reads 12:00 for 12 hours.
- Once you have set the time, press the "Start/Stop" button and in 12 hours fresh bread will be ready by the time you get up.
Warning hints
If you have selected the "Jam" or the "Bake" program and the temperature inside the appliance is higher than 80^ , then the display screen will show "HHH" sign and will not switch to the working mode. For the rest programs if the temperature exceeds 45^ , then the same "HHH" sign will appear on the display screen. It means that the unit has not cooled sufficiently after baking to use immediately again. Unplug the unit and allow it to cool. If the display shows "EE1" sign, it means that the appliance is still too hot. Wait for "EE0" sign to appear on the display, which means that the unit has cooled down.
Automatic Programs
| 1 Senior Commonly used to make a regular white loaf of bread. It can be used for almost any bread recipe containing mostly bread flour. | ||
| 2 | White Bread | Used for breads that primarily includes white bread flour. |
| 3 Whole Wheat Bread | Used for recipes with significant amounts of whole wheat or rye flour, oats or bran. | |
| 4 | French Bread | Best suited for breads low in fat and sugar, which results in a crisp crust and coarse, chewy interior. |
| 5 Sweet Bread Specifically designed to bake breads with high amounts of sugar, fats, and proteins. | ||
| 6 | European Bread | For baking different varieties of white bread, or a combination of rye and wheat flours. |
| 7 Gluten Free Bread | For baking gluten-free bread | |
| 8 | Express | If you need to bake a loaf of white bread within a smaller amount of time. |
| 9 Grains Recommended | for cooking rice or cereals. | |
| 10 Cake | Recommended for baking various types of cakes with different fillings. | |
| 11 Dough If you just want the bread maker to make dough | ||
| 12 Rise Dough | Designed for making yeast dough, but it will not be baked | |
| 13 Jam | For processing fresh fruit or making marmalade or jam | |
| 14 Slow Knead Dough | Designed for a slow kneading of the dough | |
| 15 Fast Knead Dough | Designed for a quick kneading of the dough. | |
| 16 Rise | The dough is heated so that it can rise, but it will not be baked. | |
| 17 Bake | Intended to bake ready-made dough | |
| 18 PRO | Allows you to adjust temperature settings. It also allows you to store your current program settings. | |
Problem solving
| Problem Cause Solution | ||
| Bread collapses when baked | Dough rose unevenly and or too quickly, due to: Excess moisture Too much liquid or too much yeast was used High humidity and / or heat | Only use flour that is stored in an airtight container Measure all liquids using measuring cups Dough will rise too quickly and unevenly during hot and/or humid days |
| Heavy, dense texture Too much flour or not enough liquid Too much fruits, whole grain or other added ingredients | Much flour or not enough liquid Too much fruits, whole grain or other added ingredients | Adjust liquid amount Adjust the amount of ingredients used |
| Open, coarse or holey texture | Too much water was used Salt omitted Overheated liquid was used | Adjust liquid amount. Add salt Change liquid or cool down to room temperature. |
| The bottom and the sides are covered with too much flour. | Strong glutinosity ingredients in bread such as butter and bananas etc. You have used too much flour or not enough liquid. | Do not add strong glutin-osity ingredients Check the recipe and measure the right quantity |
| The bread is too dark | You are using too much sugar You chose the wrong crust color. | Press the "Start/ Stop" button to interrupt the program 5-10 minutes ahead of intended finish- ing time. Before removing the bread you should keep the bread in bread pan for about 20 minutes with lid closed. |
| Smoke emitted from chamber or steam vent | You might have spilled ingredients onto the heat- ing element. | Remove these ingredients after the device cooled down. |
| Bread bottom crust is too thick | The bread is kept warm for a long time | Take bread out soon with- out keeping it warm. |
| The ingredients are poorly stirred and baked | selected an improper program The lid was opened several times during operation Stir resistance is too large so the kneader cannot rotate and stir properly. | Select the proper program Do not open the lid Check the kneader, and then operate without load. If the problem is not fixed, contact the authorized service center. |
| It is very difficult to take bread out | Kneader adheres tightly to the shaft in bread pan | After taking the bread out, put hot water into the bread pan and let the kneader soak for around 10 minutes, then take it out and clean. |
| The display shows “HHH” after you have pressed the “Start/Stop” button | The temperature in bread maker is too high | Press the “Start/Stop” button and unplug bread maker. Allow the appliance to cool. |
| The motor noise is heard but the dough is not stirred | Bread pan is fixed improperly or dough is too much | Check whether the bread pan is fixed properly, as well as the recipe |
| The dough rose too high. | Too much yeast Forgot to add the salt. | Try using less yeast |
| The bread did not rise enough. | No or too less yeast Yeast may have a poor activity as water temperature is too high or yeast is mixed together with salt The environment temperature is lower. | Check the amount and quality of yeast, increase the environment temperature |
| Bread size is so large as to push cover | The amount of yeast, flour or water is excessive The temperature in the room is too high. | Reduce the amount of ingredients according to the instructions. |
The recommendations provided above are based on the assessment and analysis of the most common operation problems. For safety reasons, do not disassemble or repair the appliance on your own. If the problem persists, contact Authorized Service Centre.
Correct Disposal of this product
This marking indicates that this product should not be disposed with other household wastes throughout the EU. To prevent possible harm to the environment or human health from uncontrolled waste disposal, recycle it responsibly to promote the sustainable reuse of material resources. To return
your used device, please use the return and collection systems or contact the retailer where the product was purchased. They can take this product for environmental safe recycling.
Packaging disposal: Do not throw away the package materials. Please put it in the recycling bin.


Gift box: Paper, should be put to the old paper collection point. Plastic packaging material and foils should be collected in the special collection containers.
Service and Repair:
If the appliance must be repaired, please get in touch with your trader or with the manufacturer:
Krauterbrot - Bread with Herbs - Pain a Herbes
| 300 ml Buttermilch 300 ml buttermilk 300 ml babeurre | ||
| 250 g Weizenmehl (Typ 550) | 250 g Wheat flour 250 g farine de lé | |
| 150 g Roggenmehl (Typ 1150) | 150 g rye flour 150 g farine de seigle | |
| 1 EL Öl 1 tbsp. oil 1 CS huile | ||
| 1 TL Salz 1 tsp salt 1 CC sel | ||
| 1 Pck Trockenhefe 1 sachet dry yeast 1 sachet levure sèche | ||
| 1 Pck Trockenräuter 1 sachet dry herbes 1 sachet herbes sèche | ||
SUMMARY TABLE OF AUTOMATIC PROGRAMS
| PROGRAM | SENIOR | WHITE BREAD | WHOLE WHEAT BREAD | FRENCH BREAD | ||||||||
| Loaf size | 1000g | 750g | 500g | 1000g | 750g | 500g | 1000g | 750g | 500g | 1000g | 750g | 500g |
| Working time | 4:10 | 4:05 | 4:00 | 3:00 | 2:55 | 2:50 | 3:40 | 3:35 | 3:30 | 3:30 | 3:25 | 3:20 |
| Preheat | 10 | 10 | 10 | N/A | N/A | N/A | 5 | 5 | 5 | N/A | N/A | N/A |
| Knead 1 | 14 | 13 | 12 | 12 | 11 | 10 | 13 | 12 | 11 | 14 | 13 | 12 |
| Rise 1 | 41 | 40 | 40 | 21 | 20 | 20 | 31 | 30 | 30 | 29 | 28 | 28 |
| Knead 2 | 20 | 19 | 18 | 18 | 16 | 15 | 18 | 17 | 16 | 18 | 17 | 16 |
| Rise 2 | 45 | 45 | 45 | 26 | 26 | 26 | 38 | 38 | 38 | 31 | 31 | 31 |
| Rise 3 | 55 | 55 | 55 | 40 | 40 | 40 | 50 | 50 | 50 | 45 | 45 | 45 |
| Bake | 65 | 63 | 60 | 65 | 63 | 60 | 65 | 63 | 60 | 73 | 71 | 68 |
| Keep warm | 60 | 60 | 60 | 60 | 60 | 60 | 60 | 60 | 60 | 60 | 60 | 60 |
| Delay time | 13h | 13h | 13h | 13h | 13h | 13h | 13h | 13h | 13h | 13h | 13h | 13h |
| PROGRAM | SWEET BREAD | EUROPEAN BREAD | GLUTEN FREE BREAD | EXPRESS | ||||||||
| Loaf size | 1000g | 750g | 500g | 1000g | 750g | 500g | 1000g | 750g | 500g | 1000g | 750g | 500g |
| Working time | 2.58 | 2.53 | 2.48 | 3.00 | 2.55 | 2.50 | 2.55 | 2.50 | 2.45 | 1.30 | ||
| Preheat | N/A | N/A | N/A | N/A | N/A | N/A | N/A | N/A | N/A | N/A | N/A | N/A |
| Knead 1 | 13 | 12 | 11 | 12 | 11 | 10 | 11 | 10 | 9 | 2 | 2 | 2 |
| Rise 1 | 21 | 20 | 20 | 26 | 25 | 25 | 21 | 20 | 20 | N/A | N/A | N/A |
| Knead 2 | 18 | 17 | 16 | 15 | 14 | 13 | 15 | 14 | 13 | 12 | 12 | 10 |
| Rise 2 | 26 | 26 | 26 | 25 | 25 | 25 | 23 | 23 | 23 | N/A | N/A | N/A |
| Rise 3 | 40 | 40 | 40 | 37 | 37 | 37 | 40 | 40 | 40 | 31 | 31 | 32 |
| Bake | 60 | 58 | 55 | 65 | 63 | 60 | 65 | 63 | 60 | 45 | 43 | 40 |
| Keep warm | 60 | 60 | 60 | 60 | 60 | 60 | 60 | 60 | 60 | 60 | 60 | 60 |
| Delay time | 13h | 13h | 13h | 13h | 13h | 13h | 13h | 13h | 13h | 1:25 | 1:23 | 1:20 |
| PROGRAM | GRAINS | CAKE | DOUGH | RISE DOUGH | JAM | SLOW KNEAD DOUGH | FAST KNEAD DOUGH | RISE | BAKE | PRO | ||
| Loaf size | 1000g | 750g | 500g | |||||||||
| Working time | 1:15 | 1:40 | 1:38 | 1:36 | 0:20 | 0:15 | 0:10-2:00 | 0:30 0:15 | 0:10-2:00 | 0:10-1:30 | 2:55 | |
| Preheat | 28+ | N/A | NA | N/A | N/A | N/A | N/A | N/A | N/A | N/A | N/A | 0-30(0) |
| Knead 1 | 47+ | 18 | 18 | 18 | 10 | 20 | N/A | 10 | 15 | N/A | N/A | 5-15(11) |
| Rise 1 | N/A | 5 | 5 | 5 | 1 | N/A | 15+ | 5 | N/A | 50 | N/A | 20-26(20) |
| Knead 2 | N/A | N/A | N/A | N/A | 9 | N/A | N/A | 15 | N/A | N/A | N/A | 5-20(15) |
| Rise 2 | N/A | N/A | N/A | N/A | N/A | 30 | N/A | N/A | N/A | N/A | N/A | 5-120(26) |
| Rise 3 | N/A | N/A | N/A | N/A | N/A | 40 | 45+ | N/A | N/A | N/A | N/A | 0-120(40) |
| Bake | N/A | 67 | 65 | 63 | N/A | N/A | 0 | N/A | N/A | N/A | 0 | 0-80(63) |
| Keep warm | N/A | 60 | 60 | 60 | N/A | N/A | N/A | N/A | N/A | N/A | 60 | 0-60(60) |
| Delay time | N/A | N/A | N/A | N/A | 13h | 13h | N/A | 13h | 13h | N/A | N/A | 13h |