Titanium HC335 - Lawn mower REMINGTON - Free user manual and instructions
Find the device manual for free Titanium HC335 REMINGTON in PDF.
| Product Type | Hair Clipper |
| Brand | Remington |
| Model | Titanium HC335 |
| Power Supply | Rechargeable battery, mains adapter 3V 1000mA (SW-030100EU / SW-030100BST) |
| Charging Time | 14 to 16 hours for first charge, then as needed |
| Operating and Storage Temperature | 15 °C to 35 °C |
| Cutting Lengths | 0.5 mm (without guide, blade perpendicular), 1 mm (without guide), 6 mm, 9 mm, 12 mm, 15 mm (short guide), 18 mm (long guide) |
| Included Accessories | 2 cutting guides (short 18 mm, long 6-15 mm), scissors, cleaning brush, oil bottle, storage case, adapter |
| Maintenance and Cleaning | Clean blades and hair reservoir after each use; oil blades regularly; do not immerse in water |
| Safety | Do not use if cord is damaged; unplug before cleaning; keep out of reach of children under 8 years |
| Spare Parts and Repairability | Removable battery for disposal; replacement adapter available via consumer service |
| General Information | For domestic use only; warranty and support via Remington |
Frequently Asked Questions - Titanium HC335 REMINGTON
User questions about Titanium HC335 REMINGTON
0 question about this device. Answer the ones you know or ask your own.
Ask a new question about this device
Download the instructions for your Lawn mower in PDF format for free! Find your manual Titanium HC335 - REMINGTON and take your electronic device back in hand. On this page are published all the documents necessary for the use of your device. Titanium HC335 by REMINGTON.
USER MANUAL Titanium HC335 REMINGTON
Thank you for buying your new Remington® product. Please read these instructions carefully and keep them safe.
Remove all packaging before use.

IMPORTANT SAFETY INSTRUCTIONS
WARNING - TO REDUCE THE RISK OF BURNS, ELECTROCUTION, FIRE OR INJURY TO PERSONS:
1 This appliance can be used by children aged from 8 years and above and persons with reduced physical, sensory or mental capabilities or lack of experience and knowledge if they have been supervised/instructed and understand the hazards involved. Children shall not play with the appliance. Cleaning and user maintenance shall not be done by children unless they are older than 8 and supervised. Keep the appliance and cable out of reach of children under 8 years.
2 An appliance should never be left unattended when plugged into a power outlet.
3 Keep the power plug and cord away from heated surfaces.
4 Make sure the power plug and cord do not get wet.
5 Do not unplug the product with wet hands.
6 Do not use the product with a damaged cord. A replacement adaptor can be obtained via our International Service Centres.
7 Charge, use and store the product at a temperature between 15^ and 35^ .
8 Always unplug from the mains when cleaning.
9 Only use the parts supplied with the appliance.
10 This appliance is not intended for commercial or salon use.
11 This appliance should be supplied with approved safety isolating adaptors SW-030100EU (EU), SW-030100BS (UK) with the output capacity of 3V dc; 1000mA (adaptor output).
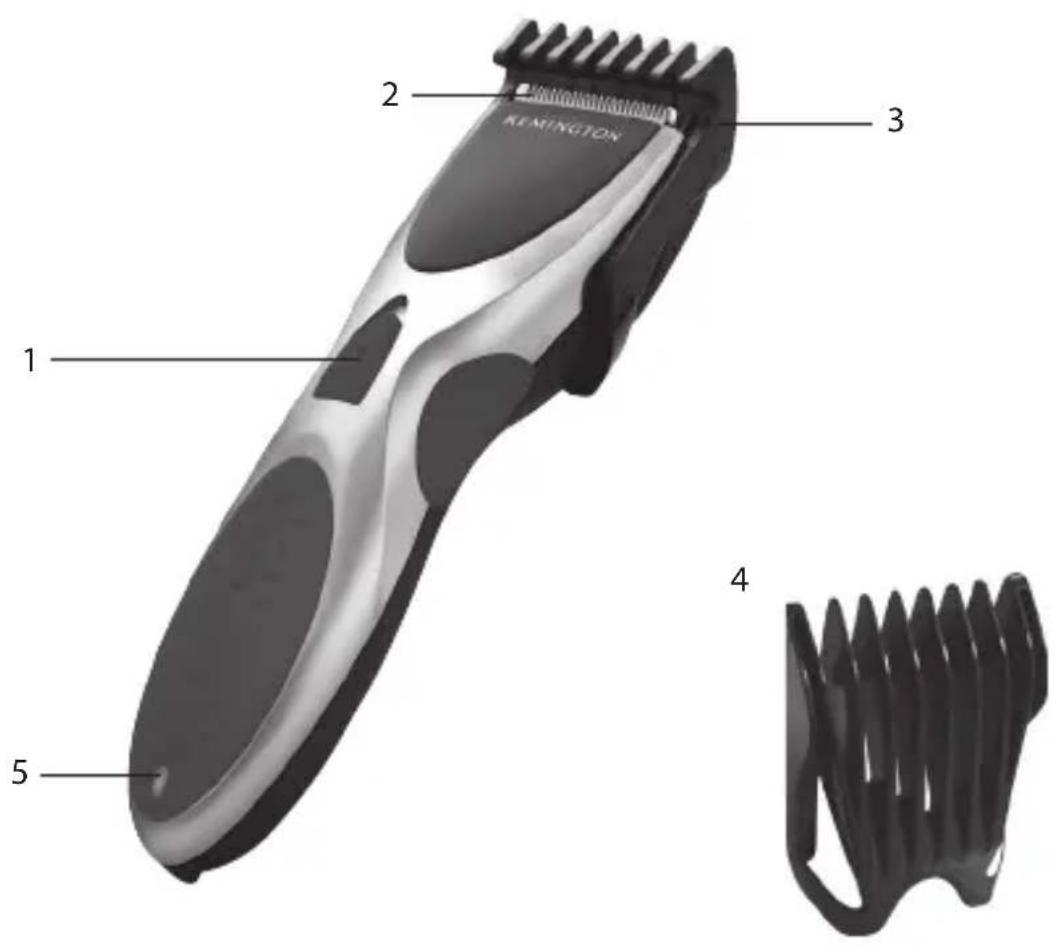

KEY FEATURES
1 On/off switch
2 Blade set
3 18mm attachment guide comb
4 6-15mm attachment guide comb
5 Charging indicator light
6 Blade release buttons (not shown)
7 Comb lock switch (located on back of clipper)
8 Scissors (not shown)
9 Comb (not shown)
10 Storage case (not shown)
11 Cleaning brush (not shown)
12 Oil bottle (not shown)
13 Adaptor (not shown)
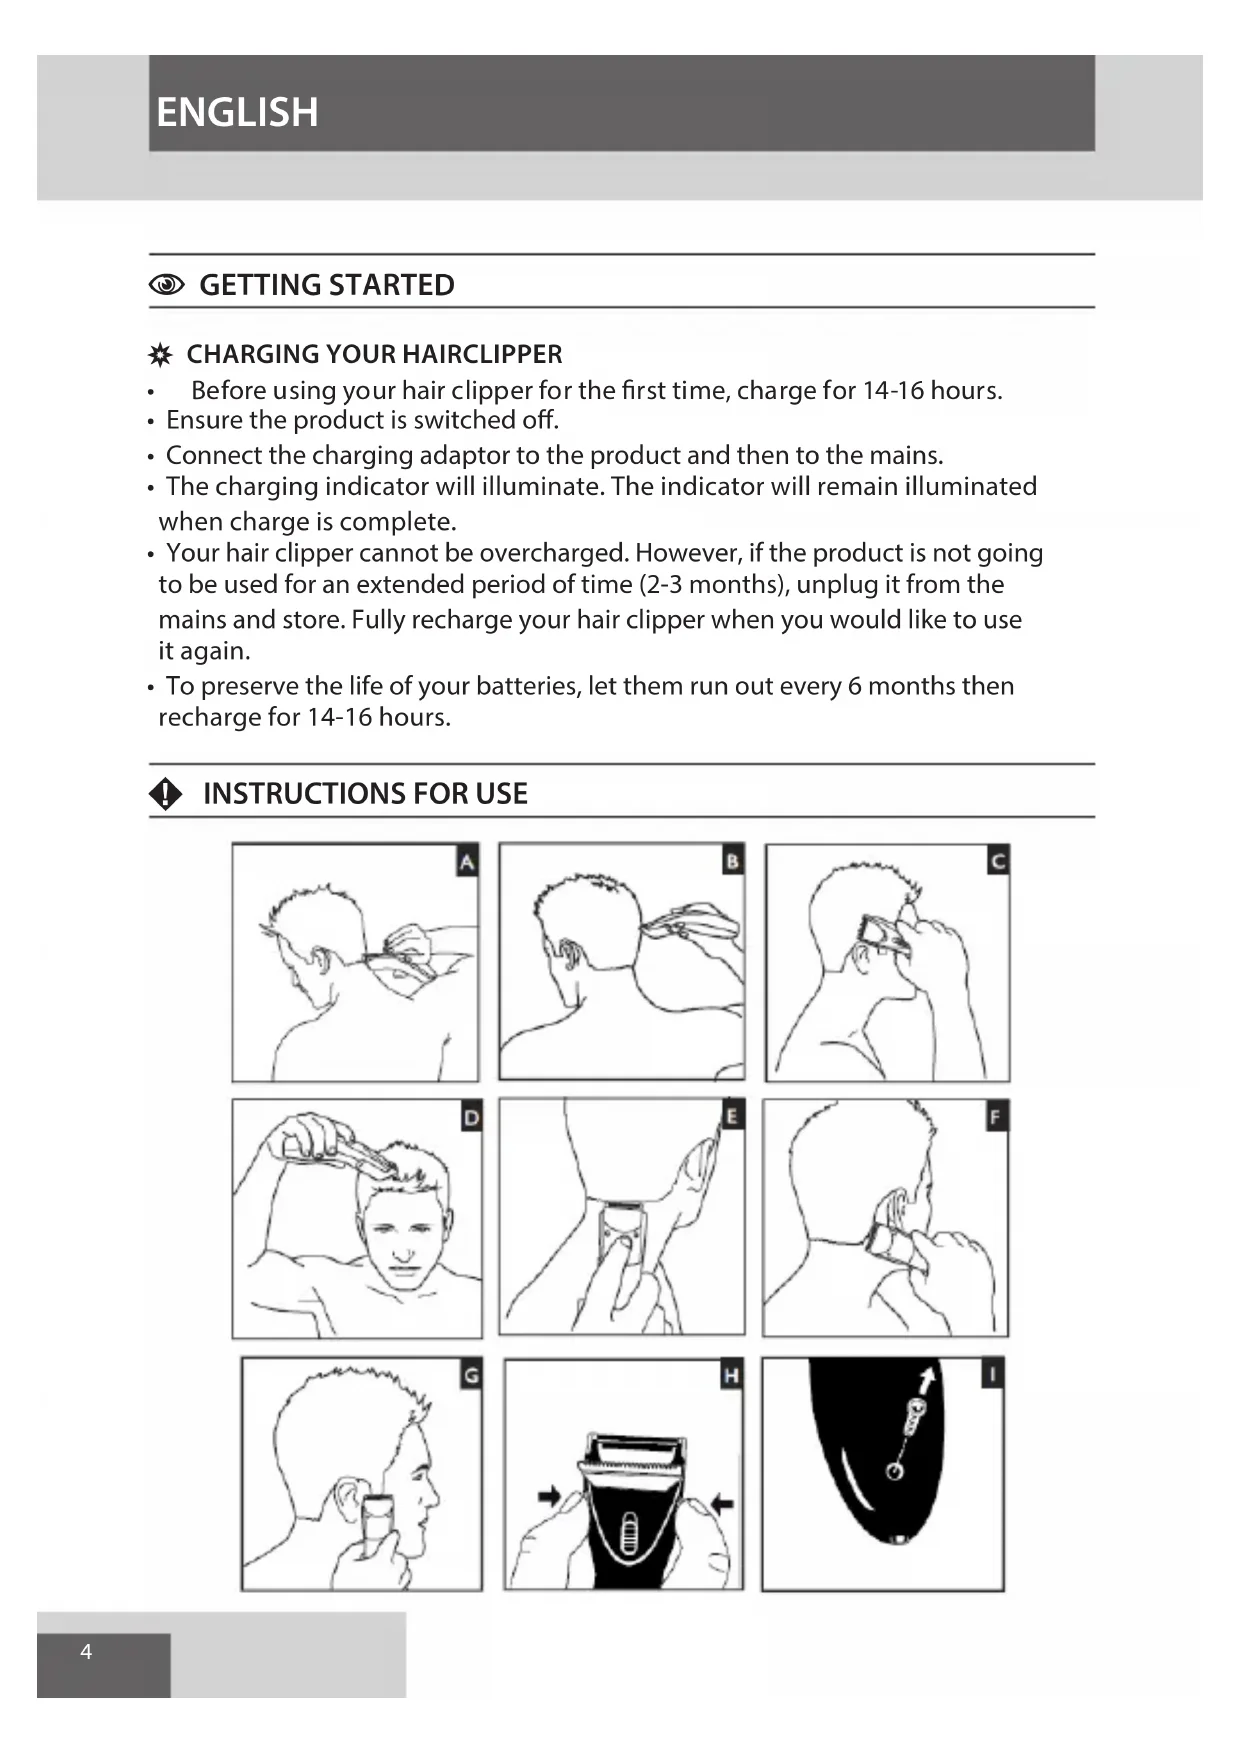
GETTING STARTED
CHARGING YOUR HAIRCLIPPER
Before using your hair clipper for the first time, charge for 14-16 hours.
- Ensure the product is switched off.
- Connect the charging adaptor to the product and then to the mains.
- The charging indicator will illuminate. The indicator will remain illuminated when charge is complete.
- Your hair clipper cannot be overcharged. However, if the product is not going to be used for an extended period of time (2-3 months), unplug it from the mains and store. Fully recharge your hair clipper when you would like to use it again.
- To preserve the life of your batteries, let them run out every 6 months then recharge for 14-16 hours.
INSTRUCTIONS FOR USE
BEFORE STARTING THE CUT
- Inspect the clipper making sure it is free from hair and dirt.
- Seat the person so that their head is approximately at your eye level.
- Before cutting, always comb the hair so it is tangle free and dry.
TO ATTACH A COMB
- Hold the clipper vertically.
- Line the comb rails up with the vertical channels on the sides of the clipper and slide the comb all the way until it stops.
NOTE: Please make sure that the comb locking mechanism is not activated (the switch on the back of the clipper should be in the down position when attaching a comb).
TOREMOVEACOMB
- Holding the clipper with the blades facing away from you, firmly push the comb upward and away from the blades.
NOTE: Please make sure that the comb locking mechanism is deactivated (the switch on the back of the clipper should be in the down position when removing the comb).
ADJUSTING THE TRIM LENGTH
The comb attachment can be adjusted to give you 4 different trim lengths.
- Move the comb up or down to the preferred setting and slide the switch on the back of the product up to lock the comb. To unlock, slide the button down.
| Comb Position Short Comb Long Comb | |
| 1 6mm | |
| 2 9mm | |
| 3 12mm | |
| 4 15mm |
- 1mm length is achieved without any combs.
- 0.5mm is achieved without any combs and holding the blades perpendicular to the skin.
INSTRUCTIONS FOR CUTTING HAIR
Note: for even cutting, allow the comb attachment/blade to cut its way through the hair. Do not force it through quickly. If you are cutting for the first time, start with the highest setting.
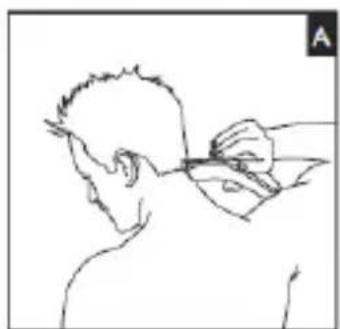
STEP 1 - Nape of the Neck - DIAGRAM A
- Use setting 1 (6mm).
- Hold the clipper with the blade teeth pointing upwards. Begin starting at the centre of the head at the base of the neck.
- Slowly lift the clipper, working upwards and outwards through the hair, trimming just a little at a time.
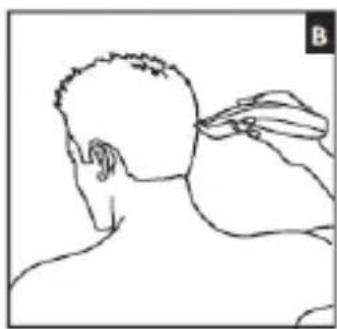
STEP2-BackoftheHead-DIAGRAMB
- With setting 3 (12mm), cut the hair at the back of the head.
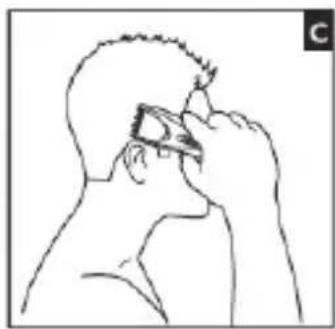
STEP3-SideoftheHead-DIAGRAMC
- With setting 1 (6mm), trim the sideburns. Then change to setting 2 (9mm) and continue to cut to the top of the head.
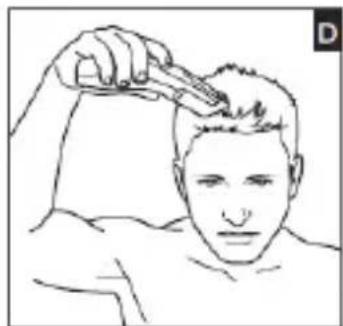
STEP4-Top of the Head-DIAGRAMD
- With setting 4 (15mm), cut hair on top of the head against the direction in which the hair normally grows.
- For longer hair on top either use the 18mm attachment guide comb or use without a guide comb.
- If using without a guide comb lift the hair on top of the head with a small hand comb. Cut over the hand comb with the hair lifted or hold the hair between the fingers to lift it and cut it to the desired length.
Always work from the back of the head.
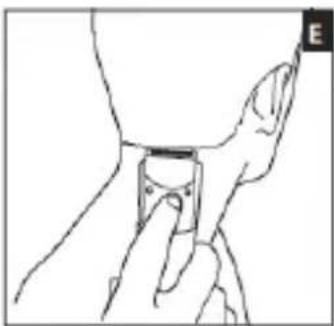
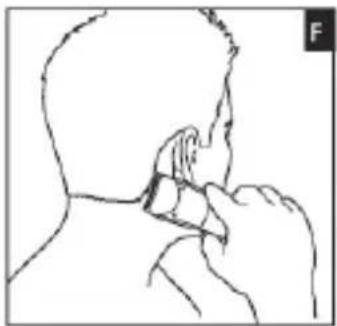
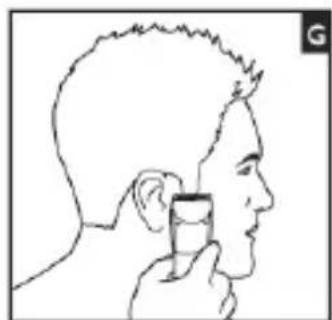
STEP5-TheFinishingTouches-DIAGRAME,F&G
- Use the clipper without an attachment comb for close trimming around the base and sides of the neck.
To produce a clean straight line at the sideburns, reverse the hair clipper. - Place the reversed clipper at right angles to the head, tips of the blades lightly touching the skin and then work downwards.
CARE FOR YOUR HAIRCLIPPER
- Your clipper is fitted with high quality blades. To ensure long lasting performance of your clipper, clean the blades and unit regularly.
AFTER EACH USE
- Ensure the clipper is switched off and disconnected from the mains.
- Turn the clipper to the backside.
-
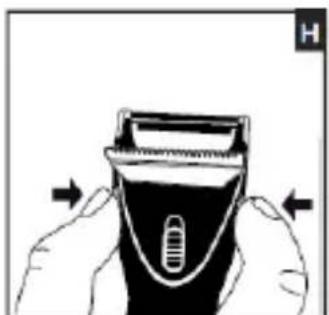
Press both buttons located above the lock switch at the same time to open the hair pocket (Diagram H).
-
Brush the accumulated hair from the blades and the hair pocket. Do not submerge the clipper in water.
After cleaning close the hair pocket. - Place one or two drops of oil on the blades. Turn the clipper on to distribute the oil evenly, wipe off any excess oil. Excess oil will cause damage to the product.
- To clean the unit, wipe with a damp cloth and dry immediately.
NOTE: Ensure that the clipper is turned off when cleaning.
CLEANING CAUTIONS
- Cleaning should only be done with a soft brush, such as the brush supplied with the product.
- Only use the light-grade oil supplied or sewing machine oil on the blades.
- Do not use harsh or corrosive cleaners on the units or their blades.
- Do not submerge in water as damage will occur.

BATTERY REMOVAL
- The appliance must be disconnected from the supply mains when removing the battery.
- Ensure the clipper is discharged of all power.
- First remove the comb.
- Open the hair pocket (Diagram H).
- Unscrew 2 screws in the hair pocket with a screwdriver.
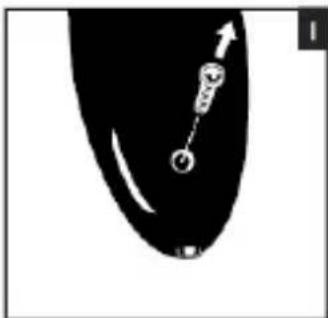
- Unscrew the screw on the back housing of the clipper (Diagram I).
- Lift or pry the clipper halves apart, exposing the battery.
- Cut the wires on both ends of the battery and remove it from the clipper.
- The battery must be removed from the appliance before it is scrapped.
- The battery is to be disposed of safely.

ENVIRONMENTAL PROTECTION
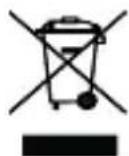
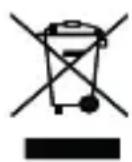
To avoid environmental and health problems due to hazardous substances in electrical and electronic goods, appliances marked with this symbol must not be disposed of with unsorted municipal waste, but recovered, reused or recycled.
UW APPARAAT VERZORGEN
NB: Sorg for, at trimmerer slukket under rengoring.
RENGØRINGSADVARSLER
INNAN DU BÖRJAR KLIPPA
UXOD 3A MAUHHKoIДЯ CTPNXKN BOJOC
MaunHka OchauHa BbICOKKaueCTBeHHbIMN Je3BnA M.
- Дя обесенья дintelbHо с lyЖбI MaunHKn cJeDyET perynapHO uNCTnTb Ie3BnI n cAmO yCTpoiCTBO.
PNCJI KAKDIOI OIPIUMEHEHNA
- Ipeed uicTKoI npOBepbTe, yTO6bycTpoiCTBO 6blIO BblKJIuOeHO nOTcoeHNHeHO OT cETn.
-ПОJOЖИТЕ Maшинку Ha 3aДню уаCTь. - OndOBpeMeHHo HaxMnte o6e KhoNKn, paCnoJoxeHHbIe Bblwe 6IOKnpoBOuHOrO nepeKJIouaTeTЯ, yTO6bl OTKpbITb OTceK dJa c6opa BOLOc (pnc. H).
OuHCTnTe Ie3BnI N OTCek Ia c6opa BOLOC OT OCTaTKOB BOLOC.
He norpykaTe TpMMep B BODy. - После очирки заразию OTскдя сбора волoc.
HaheCHTe OndHy nIIN DBe KaIIn MaCla Ha HOXn. BKnIOUHTe MaunHky dIpaBHomePHoro pacnpedeHnMaCla. N36bITOK MaCla BbITpntE. N36bITOK MaCla MOxET CTaTb PnUHHO INOLOMKN YCTPOINCTBa. - Дя чстк само Машинки Вьт pine ee влжно Трпкови Срау ще BBICYшITE.
PnmeuHne: nepeoNCTKoMaunHka OJxHa 6bITb BbIKIOyeHa.
PPEIOCTEPEXKENI INCTKE
- UnCTNTb MOxHOTobko npN NOMOuMraKo JTeKN, KOTOPaNoCTabJareTCBmecTe Cn3dennm.
-Дялзви можно Исплььзовыт Только MacNo CBetloro copTa, NOCTabЯEMoe CИЗДелNiM.ИI MaCNo ДяшевнМaSHN.
He nCnoB3yIe IJn YnCTKn yCTpoiCTBa nn ne3Bn arpeccNBhie nn BblBaIOUne KOPPO3NIO BeueCTBa.
He norgykaIte n3deJIne B BODY, 3TO npuBeTe K erO NOJOMKe.

N3BJIeUeHNE BATAPEI
- Пи n3BneHn 6aTape n np6op cneJyET OTKIOUHTb OT 3JIeKTpOceTn. Y6eIITecb, yTO MaunHka nONHOCTbIO pa3PRAKeHa.
- Chayana CHUMITE rpe6eHuA TVU HaCaIky.
- OTPoIte OTeCk Doa c6opa BOnoc (pnc.H).
- IcnoIb3yra OTBepTKy, BbIBHTnTe 2 BNHTa B OTCeKe dJa c6opa BOJoc.
BbIBNHTnte BnHT Ha 3aHHei CTOpOHe KOpNVCa MaunHKn. (pnc, l). - Пиюнмпге Илп подени Te OndHyЧаст Maшинк, OTделя ee ot Дуroy, уTOбI NOЛУчИТ DoCTvN K 6aTapeHOMY OTOCEKY.
- Ipepepejte npoBoda c o6eHX KOHcOB aKKymyIaTOPHO 6aTapeN n3BJIeKITe ee n3 3JIeKTO6pNTbbl.
- Pered yTnIIm3aUnei 6aTapeo CJIeYET N3BLeuN 3 UCTPOJCTBa.
- BaTapeI noJIeXHT 6e3OpacHoi yTuIN3aUIn.

3KoIornuecka 3aunTa
Bo n36eXaHne npo6Jem c 3KoIorNe i 3DopOBbEm, Bbl3BaHHbIX BeueCTBAMn, CoedePkaUIMMCnB 3JIeKTpNueCKnx i 3JIeKTPOHHbIX yCTpoiCTBax, ycTpoiCTBa, NOMEueHHbIe 3TmCnMBOJOM, CNeJyET yTINl3InPOBaTb OTdJIbHO OT HeCOPTuPoBAHHbIX 6bITOBbIX OTXODOB; OHI NOJIeXaT BOCCTaHOBJeHIO, NOBOTOPHOMY NCNOJIb3OBAHIO IJI nepepa6OTke.
PENTRU A INDEPARTA PIEPTENELE
KORAK 2-Potiljak (Slika B)
- S postavkom 3 (12 mm) šišajte kosu na zatiljku.
KORAK 3 - Bočna strana glave (Slika C)
- S postavkom 1 (6 mm) oblikujte zaliske. Potom promijenite na postavku 2 (9 mm) i nastavite s oblikovanjem kose na tjemenu.
KORAK 4 - Tjeme (Slika D)
- S postavkom 4 (15 mm), šišajte kosu na tjemenu u smjeru suprotnom od normal nog rasta kose.
- Za dulju kosu na vrhu koristite navodeci Češaj za 18-mm nastavke ili koristite urežaj bez navodećeg Češlja.
- Ako ga koristite bez navodeceg ceislja, podignite kosu na vrhu glave malim ručnim cešljem.
- Šišajte kosu podigavski kosu ručnim Češljem ili držeči kosu meū prstima kako biste je ošišali na Željenu duljinu.
- Uvjek počnite od zatiljka.
KORAK 5 - Završna dotjerivanja (Slika E, F, G)
- Upotrijebite šišač bez nastavka Češlja za fino uklanjanje kose po vratu.
- Za postizanje jasne ravne crte zalizaka, okrenite šišač naopako. Preokrenuti šišač postavite pod pravim kutom u odnosu na glavu, tak do vrsci šišača lagano dodiruju kožu, a zatim pomicite šišač prema dolje.
BRIGA O VAŠEM ŠIŠACU ZA KOSU
- Vaš šišac je opremljen visokokvalitetnim oštricama.
- Kako biste osigurali dugotrajnu učinkovitost Vaseg šišača, redovito Čistite oštrice i jedinicu.
NAKON SVAKE UPORABE
gaiie gao yiaolao aabaiyao
iill iie aaiil 1o sli:
.
.
.
.
#
l_e·s = l_1 + l_2
i 1
aaiiie iie aiee ie eae
4gill b 100000000000000000000000000000000000000000
.
y
.
5
aaii jg jgsj gaaia aal 1
Jau 1 Jau 1
jai
a a
a 1
pliswJ5
i 1
aill
S AOB = S COD + S BOC - S BOC
J 16-14 0d j
iiil 1
yllly jnnn nn nnnnnnnnnnnnnnnnnnnnnnnnnnnnnnnnnnnnnnnnnnnnnnnnnnnnnnnnnnnnnnnnnnnnnnnnnnnnnnnnnnnnnnnnnnnnnnnnnnnnnnnnn
jai jia oclis!
biail bjiie (jiaiiall gai jaiall.
f( x) 定义域为 x x k t2t2 , k z
1 1
a 1
aal j! dic (") aaiial" eaoall
yj
J 4 4 4 4 4 4 4 4 4 4 4 4 4 4 4 4 4 4 4 4 4 4 4 4 4 4 4 4 4 4 4 4 4 4 4 4 4 4 4
Jai jil.
Remington® is a Registered Trade Mark of Spectrum Brands, Inc.,
or one of its subsidiaries
VARTA Consumer Batteries GmbH & Co. KGaA, Alfred-Krupp-Str. 9, 73479 Ellwangen, Germany
www.remington-europe.com
© 2015 SBI