S1 Pro - Motorcycle helmet Schuberth - Free user manual and instructions
Find the device manual for free S1 Pro Schuberth in PDF.

Frequently Asked Questions - S1 Pro Schuberth
User questions about S1 Pro Schuberth
0 question about this device. Answer the ones you know or ask your own.
Ask a new question about this device
Download the instructions for your Motorcycle helmet in PDF format for free! Find your manual S1 Pro - Schuberth and take your electronic device back in hand. On this page are published all the documents necessary for the use of your device. S1 Pro by Schuberth.
USER MANUAL S1 Pro Schuberth
F. -S. 90 =
F.-J. Gorges
Leiter Vertrieb
SCHUBERTH GmbH
This helmet is not intended for use in the USA and Canada. The helmet has been inspected and approved to the European ECE Standard and therefore does not conform to US and Canadian regulations and requirements. It is only legal to use the helmet in countries in which the European ECE Standard is valid. If you use the helmet in other countries, you will not in the event of injury be entitled to make a claim for compensation before the US or Canadian courts or the courts of other countries not bound by the ECE Standard.

Avertissement:
Anti-Roll-Off-System (A.R.O.S.)
You have made an excellent choice with the SCHUBERTH S1 PRO. The S1 PRO is the result of the latest development and production methods. This helmet is a quality product that it is designed to provide the very highest standards of safety and performance on the road and race track and give you a great deal of pleasure at the same time.
We wish you a safe ride.

F. -S. 90 =
F.-J. Gorges
Director of Sales SCHUBERTH GMBH
A. THE RIGHT WAY TO USE THE MANUAL
Please take time to carefully read through this manual so that your helmet can really protect you when you ride your motorcycle. To ensure that you don't miss any aspect that is relevant to your safety, we recommend reading the manual in the order in which it is written.
Pay particular attention to:

Caution:
safety
instructions

Note:
advice

Tip: practical tips

Caution:
This helmet is not intended for use in the USA and Canada. The helmet has been inspected and approved to the European ECE Standard and therefore does not conform to US and Canadian regulations and requirements. It is only legal to use the helmet in countries in which the European ECE Standard is valid. If you use the helmet in other countries, you will not in the event of injury be entitled to make a claim for compensation before the US or Canadian courts or the courts of other countries not bound by the ECE Standard.

Avertissement:
We reserve the right to make changes for the purpose of technical progress - even without express notice.
B. CONTENTS
A. The right way to use the manual.. 55
B. Contents. 56
C. Choosing a helmet that fits properly 58
1. Measuring your head size 58
2. Ascertaining the right helmet size 59
3. Checking that the helmet fits properly 60
D. The helmet 62
1. Standard 62
2. ECE-approval 62
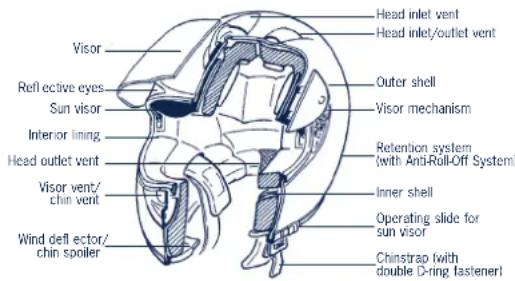
3. Anatomy of the helmet 63
4. Outer shell 63
5. Inner shell 63
6. Aerodynamics 64
7.Aeroacoustics 64
8.Retention system 66
9. PinLock® Visor 68
10. Sun visor 76
11. Interior lining 79
12. Ventilation systems 81
13. Additional safety features 83
E. Putting on an taking off the helmet 84
1.Putting on the helmet 84
2. Taking off the helmet 84
F. Before every journey.. 85
- Checking the helmet 85
- Checking the chin-strap 85
- Checking the visor and sun visor 86
G. For your safety 87
- Safety advice concerning the helmet 87
- Safety advice concerning the visor / sun visor 88
- Safety advice concerning modif cations / accessories 88
H. Maintenance and care. 90
- Outer shell 90
- Visor and sun visor 91
- Interior lining 94
- Fastener system 94
- Storing the helmet 95
I. Accessories and replacements parts.. 96
- Spare parts 96
- Communication systems 98
- Ordering original SCHUBERTH parts 98
J. SCHUBERTH Service 99
- Special adoptions 99
- Repair service 99
3.Guarantee 100 - Blue concept 101
- SCHUBERTH on the internet 101
K. How to contact us. 102
C. CHOOSING A HELMET THAT FITS PROPERLY
Choosing the right helmet is very important. The helmet must fit properly to give you the best protection if you fall off or are involved in an accident. Here's how to choose a helmet that fits properly:
Step 1: Measure your head size
Step 2: Ascertain the right helmet size
Step 3: Check that the helmet fits properly.
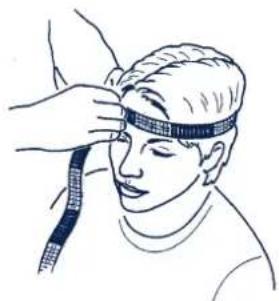
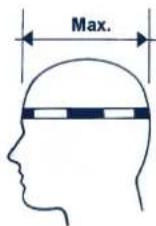
1. MEASURING YOUR HEAD SIZE
Measure your head size by placing a fl exible measuring tape around your head approximately one finger's width (2 cm) above the eyebrows. This will give you the greatest circumference of your head. The measured value represents your head size in centimetres.
2. ASCERTAINING THE RIGHT HELMET SIZE
The S1 PRO is available in six double helmet sizes. Refer to the following list for the helmet size that fits you:
| Head size in cm | SCHUBERTH helmet sizes | Alpha helmet sizes |
| 52 to 53 52 / 53 XS | ||
| 54 to 55 54 / 55 S | ||
| 56 to 57 56 / 57 M | ||
| 58 to 59 58 / 59 L | ||
| 60 to 61 60 / 61 XL | ||
| 62 to 63 62 / 63 XXL | ||
If your measured head size (e.g. 57.5 cm) is between two helmet sizes, we recommend trying the smaller size first.
C. CHOOSING A HELMET THAT FITS PROPERLY
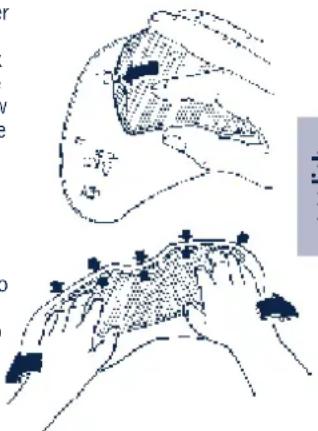
3. CHECKING THAT THE HELMET FITS PROPERLY
With the helmet on and the chinstrap fastened and properly adjusted (important: for chinstrap adjustment, see Section D.8. "Retention system"), check whether the helmet is the right size for you and fitts properly.
Step 1: Check that all pads of the interior lining press firmly against your head without being uncomfortable: a) Top centre pads b) Cheek pads c) Headband padding (especially in forehead area) If the pressure is uncomfortable or possibly even painful, try the next size up.
Step 2: Check that the helmet gives you an adequate peripheral field of vision. Lateral limitation of vision is normal with any helmet due to its design but it should not feel distracting or unduly restrict your vision.
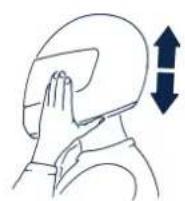
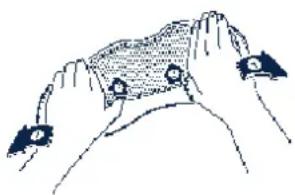
Step 3: Hold both sides of the helmet firmly with your hands and move the helmet up and down. Try also to rotate the helmet. You should be able to feel the helmet moving your head and the surface of your face. If it is too easy to move the helmet, it is too large! Try a smaller size.

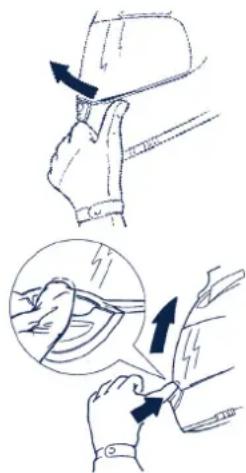
Step 4: With the helmet on, take hold of the chin section of the helmet and try removing the helmet from your head in a backwards direction. If you can do that, the helmet is too large or the chinstrap adjusted too loosely (not pulled tight enough). For your own safety, use a smaller size or re-adjust the chinstrap as necessary.
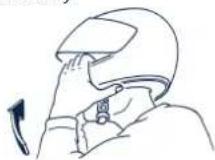
Step 5: With the helmet on, hold the back of the helmet with both hands and try tipping the helmet forwards over your head. If you can remove the helmet this way, either the chinstrap is adjusted too loosely (not pulled tight enough) or the helmet is too large. Re-adjust the chinstrap or choose a smaller helmet.
Repeat these steps until you have found the right helmet size that fits properly.
Ideally, confirm your choice by going for a test ride.

Caution:
Never ride with a helmet that doesn't fit properly!
D. THE HELMET
1. STANDARD
The S1 PRO conforms to the ECE-R 22.05 standard. This test standard guarantees conformity to defined safety standards in respect of impact absorption, penetration resistance, lateral rigidity, retention system and field of vision. The approval guarantees that you have approval for all the countries of the European Union and all countries which recognise the ECE standard. It also guarantees conformity for insurance purposes in the event of a claim.
Please note that this S1 PRO with ECE approval is specifically orientated to the ECE standard and is therefore particularly not approved for the USA or Canada. It is only legal to use it in countries where the ECE standard is valid.
Note:
The only SCHUBERTH helmets legal for use in the USA or Canada are those with appropriate approval and technical specifi catio. Further information and sales outlets for these helmets can be found on the Internet at:
www.schuberth.com/usa
www.schubert.com/canada
2. ECE APPPROVAL

3. ANATOMY OF THE HELMET
4. OUTER SHELL
The outer shell of the S1 PRO combines an aerodynamically optimal shape that is suitable for racing with thorough protection. It consists of a special glass fi BRE reinforced, duroplastic matrix developed by Schuberth, which gives the helmet the high level of strength needed for your protection.
Caution:
The safety helmet is designed to absorb the effect of only one impact. The helmet must be replaced after a fall, accident or any other impact.
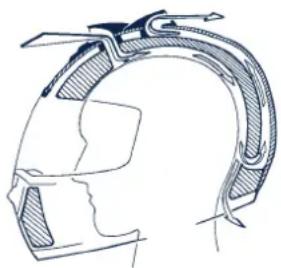
5. INNER SHELL
For optimised impact absorption properties, the inner shell of the helmet consists of several components. Complex multi-segment foam padding of the main body makes for better absorption and distribution of impact forces and gives you a high degree of protection. The large side sections ensure the helmet provides optimum fit and the greatest comfort.
D. THE HELMET
6. AERODYNAMICS
All SCHUBERTH motorcycle and racing helmets are developed and optimised in SCHUBERTH's own wind tunnel under scientific c, precisely defined conditions.
The S1 PRO is specifically designed for a sporty riding posture and remains stable in the air current. Even when travelling at speeds above 200 kph, the S1 PRO generates practically no upward lift. Further characteristic features of the S1 PRO are improved air resistance, excellent directional stability and minimal lateral forces. In addition, the buffeting often experienced at high speed is signi cantly reduced for unfaired motorcycles.
Note:
Please note that the strong eddy currents that can occur at the edges of the wind shadow on faired motorcycles owing to the body panels can have a considerable effect on the aerodynamic characteristics of a helmet.
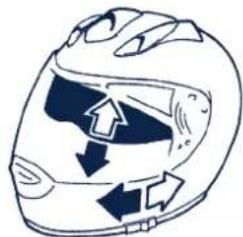
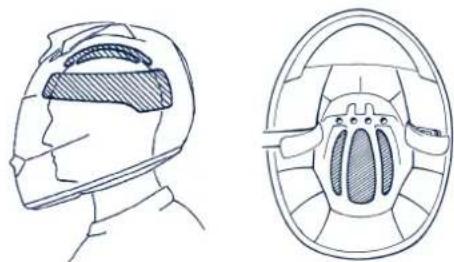
7. AEROACOUSTICS
Various measures developed in SCHUBERTH's wind tunnel ensure an aeroacoustically comfortable helmet* with optimised acoustic feedback while travelling. This enables enhanced concentration, especially at speeds in the upper ranges.
Aeroacoustic values can vary according to the type of motorcycle, bodywork design, riding position and body size.
Note:
Please note that on fared motorcycles strong eddy currents occur at the edges of the wind shadow. This can considerably reduce the aeroacoustic performance of the helmet. The fairing of the motorcycle should be adjusted so that the departing turbulence does not strike the bottom surface of the helmet.
Aeroacoustically non-critical area
Aeroacoustically critical area
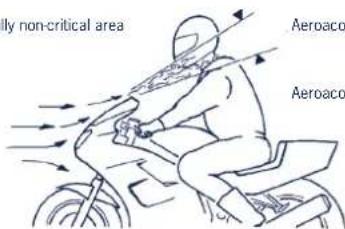
Aeroacoustically non-critical area
Tip:
Tip:
To ensure the helmet is as quiet as possible, the fit on the underside of the helmet is extremely important. This area needs to be well sealed off. If you have a narrow neck, it is advisable to use a scarf.
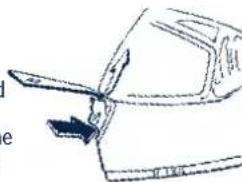
ANTI-NOISE PAD (included)
With the help of the supplied Anti-Noise-Pad, noise in the helmet can be further reduced. The pad is fitted in a few easy steps.
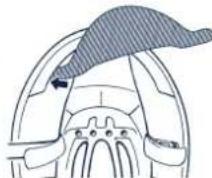
- Insert the rounded end of the Anti-Noise-Pad under the lip of the wind defi cctor.
- Slip the outer edge of the Anti-Noise-Pad step-by-step under the lip of the wind deft actor.
- Feed the second insertion tab with gentle pressure under the lip of the wind deflector.
D. THE HELMET
8. RETENTION SYSTEM
The retention system of the S1 PRO consists of a chinstrap that is additionally secured with neck bands at the back of the helmet shell (the anti-roll-off system, see section D.13.).
CHINSTRAP WITH DOUBLE D-RING FASTENER
The double D-ring fastener is easy to use and allows you to adjust the length of the chinstrap very precisely each time you put on the helmet.
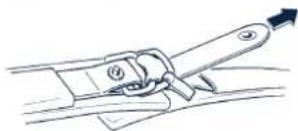
Fastening and tightening
- Thread the end of the chinstrap through the double D-ring fastener as illustrated in the adjacent diagram.
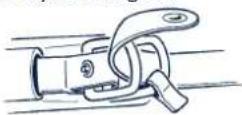
- Tighten the chinstrap by pulling on the end of the strap. The chinstrap should fit firmly but comfortably against your chin.
Tip:
To check that the helmet sits as comfortably as possible, we recommend that, having put it on, you take hold of the helmet at the sides with both hands and swivel it slightly on your head till you find the most comfortable positioning; now readjust the chinstrap accordingly.
- Fold the strap over and fasten it with the press-stud to prevent the end of the strap flapping in the wind.
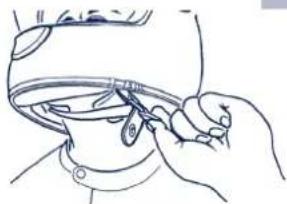
Loosening and opening
- Pull the little red tab of the double D-ring fastener to loosen the chinstrap.
- Take hold of the D-rings and pull them apart.
- Pull the end of the chinstrap from the Chinstrap with double D-ring fastener.
Tip:
If you are unfamiliar with the double D-ring type of fastener, we recommend using the fastener system when not wearing the helmet, then practicing its use with the helmet in place.
Caution:
Never ride without making sure the chinstrap is correctly fastened, adjusted to fit and properly positioned. If the chinstrap is not correctly adjusted or fastened, the helmet could be displaced in the event of an accident.
Caution:
Never open the chinstrap while riding.
D. THE HELMET
9. PINLOCK® VISOR
The Pinlock visor is a mist-free double shield visor in which the conventional anti-fog coating on the visor's inner surface is replaced by an integrated second visor shield. The two visor shields are separated from each other and sealed by a transparent, fl exible silicon seal. The inner visor shield is locked in place by means of eccentric pins, so the two visor shields are pretensioned to each other and the silicone seal is thus made tight. This in turn results in an insulated cushion of air between visor's main - i.e. outer - and inner shields which prevents any misting of the inner shield.
COATING
The main visor shield has a HighClear® anti-scratch coating on both its outer and inner surfaces. The Pinlock® inner shield, on the other hand, has an anti-fog coating on both its surfaces and so is only scratch resistant to a limited degree.
Caution:
When not in use, the helmet should never be used to deposit gloves or any other objects since the scratch-sensitive inner visor shield could otherwise be damaged.
Caution:
The inner visor shield is fitted with a protective foil to prevent any damage in transit. Remove this foil before using the helmet for the first time.
Caution:
The Pinlock® inner visor shield may only be used in conjunction with the SCHUBERTH main visor that has been specially designed for this purpose. Do not on any account fit the Pinlock® inner visor to any other visor. This also expressly applies to other visor variants.
Opening the visor
To open the visor, use your thumb to push the visor up, using one of the finger tabs situated to the left and right of the visor, and move it to the desired position.
Alternatively, you can use your thumb to push under the bottom edge of the visor in the middle to release it from the spring element of the chin vent. You can then push the visor up to the desired position. Opening the visor when the chin vent is open automatically causes the vent to close.
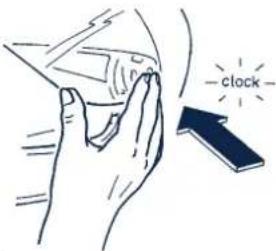
Visor lock (including city position)
The visor can be locked in any one of eight positions. The second position (city position) locks more strongly. It is therefore easy to feel the city position of the visor - especially while riding. When you push the visor open, it may well travel beyond the city position, but it is easy to find this position by moving it downwards again. The visor mechanism requires no additional lubrication. The visor can be operated at any time irrespective of the position of the sun visor.
Closing the visor
You can close the visor by grasping the finger tabs at top left and right and pushing them down with a movement of the hand.

REPLACING THE VISOR SHIELD
Changing the visor screen is easy to do without tools with the convenient EasyChange visor mechanism. To replace the visor, it is helpful to place the helmet on a flat surface or on your thighs while seated.
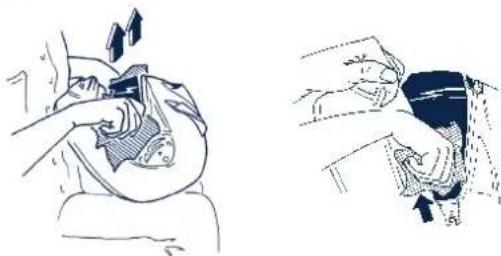
Removing the visor shield
- Fully open the visor; this exposes the operating lever lying on top of the notch plate that locates the visor.
- With the thumb, move the operating lever in the direction of the arrow.
- The T-pegs of the visor are released and the visor then springs out of its holder.
- Repeat the above steps for the other side of the visor.
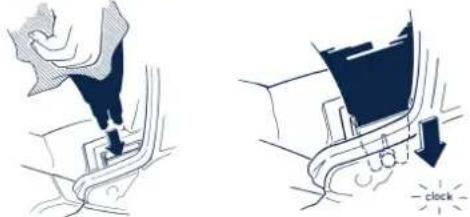
Fitting a new visor shield
- Insert the pivot peg of the visor into the recess provided for it in the visor mechanism and position the T-peg directly below the locking elbow.
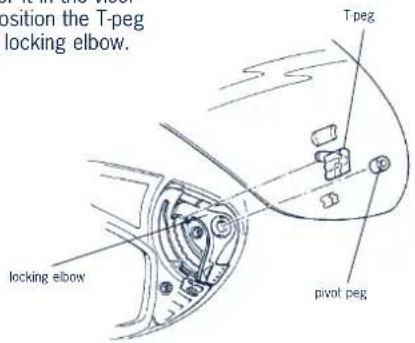
- By applying light pressure to the visor both upwards and towards the helmet, the locking elbow will slide upwards and you should hear the T-peg of the visor click into place.
- Repeat the above steps for the other side of the visor.
- Close the visor and check that the locking mechanism is working properly.
CHANGING THE INNER VISOR SHIELD Removing the inner visor shield
- Before starting to remove the visor's inner shield, first lay the visor on a soft, clean piece of cloth so that its top edge is facing you.
- For the purposes of reducing the pretensioning of the inner shield slightly if necessary, you can use the balls of your hands to carefully bend the visor suffi ciently apart while at the same time pressing with your thumbs so that the inner shield becomes released and moves approx. 2-3 mm forward.
- Now grasp behind the inner shield with your index and middle fingers and lift it off the outer shield. In this position you can now easily remove the inner shield from the locking pin with your thumb.
- You can now remove the inner shield from the visor.
Fitting an inner visor shield
- Lay the inner shield in the main visor in such a way that one side of it is already slotted into the locking pin and the silicone sealing is on the side facing the outer visor shield.

- Now grasp the other side of the inner visor shield by its upper and lower transverse edges and use your index finger to gently press the end of the inner shield into a light "S" form. Now you can easily guide the slot onto the locking pin and release the inner shield.
- The inner shield should now be positioned in the main visor with its lower edge parallel to the lower edge of the main visor. If you need to change the positioning of the inner shield, use the balls of your hands to gently bend the visor apart until the inner shield can be shifted accordingly.
- Check right around the visor to make sure that the silicone seal fits tightly and uniformly against the outer shield. It is only if it does that the visor can be guaranteed to prevent misting.
- If you have not done so already, remove the protective foil from the inner visor shield.
Any lack of airtightness accordingly leading to misting of the visor either means that the inner shield is incorrectly positioned or the pressure on the seal is inadequate. You can regulate the pressure on the seal by adjusting the eccentric locking pins. To do so, remove the inner visor shield, then use a fl at but not sharp-edged object to carefully press the locking pins out of the outer shield. Now adjust these pins by rotating them by up to 180^ and then reinsert them. Then fit the inner shield and check that the sealing is now airtight.
D. THE HELMET
Please note:
- To avoid any scratching of the visor, never remove or fit the inner shield unless the visor unit is clean and dry.
- When fitting the inner shield, be careful to ensure that neither dust nor moisture are able to get into the space between the two visor shields.
- When removing or fitting the inner shield, it is always best to lay the visor unit on a dry, clean piece of cloth.
- Check regularly to make sure that the fit of the silicone seal between the outer and inner visor shields is tight and even.
Please note:
In view of the high degrees of air pressure acting on the silicone seal when travelling with an open visor, we recommend riding with a closed visor at all times to prevent any dirt or moisture from getting inside the helmet.
Please note:
Never press the locking pins out with your fingers since the locking pins could otherwise break.
Caution:
Due to the double shield visor's structure, there is a possibility of greater light refraction in the visor, especially when riding at night. As a rule, such light refraction is regarded as uncritical due to the absence of misting with this type of visor. However, if this light refraction should nevertheless cause you diffculties as result of higher individual sensitivity, for example, you should refrain from using the double visor anymore.
Caution:
In the event that any moisture might be present in or penetrate the airtight zone between the two visor shields you should then remove the inner shield immediately in order to prevent any interference with visibility. Do not re-install it until both visor
shields are completely dry (we recommend air-drying). If you should subsequently detect any renewed penetration of moisture, the Pinlock visor should on no account be used anymore and must be replaced.
SAFETY ADVIVE
Check before each journey that the visor mechanism is functioning correctly and that the visor will guarantee good visibility. Any dirt should be removed before setting off. Check the visor and sunshield for physical damage and cracks. Severely scratched or matt visor shields will seriously impair visibility and should be replaced before setting out on a journey.
Caution:
Petrol, solvent and propellant vapours can cause cracking of the visor. Make sure the visor is not exposed to such vapours! On account of that, you should never place the helmet on your bike's tank of you bike.
D. THE HELMET
10. SUN VISOR
Shield
The sun visor shield has a grey tint and is heat formed in 3 dimensions. Due to the visor thickness of 1.5mm the sun visor still gives protection from light impact from stones and insects when the main visor is pivoted up. In addition, the UV-absorbing properties of the special polycarbonate mean that the sun visor provides effective protection against UV radiation.
Coating
The shield is scratch-resistant on both sides and has HighClear® anti-fog coating.
Operation
The sun visor is operated by means of the slide positioned on the left of the chin sectionThis is easy to do even when wearing gloves. Moving the slide forward lowers the visor, moving it back makes the visor disappear into the inner shell of the helmet. The sun visor snaps in place at both end positions to prevent it moving up or down as a result of vibration on bumpy stretches.
The sun visor can be operated irrespective of the position of the main visor.

Note:
Only use the slide to operate the sun visor.

Caution:
Never ride in darkness or conditions of poor visibility with the sun visor down. Always raise the sun visor before entering a tunnel.

Caution:
Riding without the visor or with an open visor can result in injury to the eyes and face through stones, dust, insects and other fl ying objects. The sun visor, when lowered, will provide a certain amount of protection from light impact from stones or insects but cannot protect from all hazards.
REPLACING THE SUN VISOR
The sun visor can be replaced without tools.

Tip:
To avoid fingerprints and scratches, use a soft, clean cloth (we recommend a microfibre cloth) to hold the sun visor when removing or ftting it.
Removing the sun visor
-
Pivot the sun visor down.
-
Firstly pull the sun visor down far enough so that you can see its top edge, then pull the ends of the visor from its mounting at left and right.
D. THE HELMET
Fitting the sun visor
- Position the sun visor holders on the helmet (on the left with the sun visor slide) so that you can see the mounting sockets for the sun visor.
- Carefully insert one end of the sun visor (with snap connector) into the corresponding mounting socket of the helmet, then push with appropriate pressure so that you feel and hear it snap in place. Repeat this with the other side.
- Retract the sun visor between helmet outer and inner shell and lower it with the operating slide.
- Check that sun visor mechanism is operating correctly.
Tip:
The sun visor was developed so that it can also be fitted with the straight edge at the bottom. Since one person's vision differs from another, this adaption can be more practical and comfortable for your own sense of vision.

Tip:
To suit the respective light conditions, a lighter version of the sun visor with 60% brown tint is available as an optional extra in addition to the standard visor with 80% grey tint.
11. INTERIOR LINING
The two-colour, exchangeable interior lining of the S1 PRO guarantees both an excellent fit (through the MaxFit interior concept) and better ventilation. The headband padding ensures that the helmet fits comfortably all around the head; there are three colour contrasted head pads for cushioning the head that leave the ventilation ducts uncovered (see also section D.12. "Ventilation systems - head ventilation"). Head pads and headbands of varying thickness allow individual adjustment within one helmet size.
The interior lining is made with materials that are kind to the skin (especially where it comes into direct contact with the head). The principal material used is a soft, breathable Coolmax® fabric with very good warmth and moisture-transporting properties. The head pads are made from a special anti-bacterial, perspiration-absorbing material.
Removing and fitting
Headband and pads are fixed to the inner shell with Velcro and can be removed by careful pulling. Make sure the headband is positioned centrally when re-fitting it. To help you with this, the headband is identified with two small notches and the inner shell with two protruding lines at the centre positions at front and back.
D. THE HELMET

Tip: When ftting the headband, we recommend starting at the visor cut-out, fixing it at the back of the helmet inner shell, then lining the sides last.

Caution: Never ride with parts of the interior lining removed.

Caution: Excessive heat (e.g. exhaust heat) can cause damage to the interior lining!

To avoid damage to the interior lining and inner shell, do not hang the helmet over the mirrors or handlebar grip.

Should you require individual modification of the comfort padding, contact your authorised dealer. Adjustments to the helmet can only be carried out within the bounds of the ECE-R 22 standard and at a charge (see also Section J.1. "Special adaptations").
12. VENTILATION SYSTEMS
Ventilation device 1 - visor setting The S1 PRO has a visor that can be adjusted to several positions. Depending on your road speed and tendency of the visor to mist up, open the visor suffi ciently wide to stop it misting up but so that it still protects your eyes from excessive draft. The first lock-in position (city position) provides a gap of around 10mm ; this strengthened lock-in position ensures that the gap remains open even at speeds in the upper ranges.
Ventilation device 2 - inlet vent in chin area (visor ventilation)
To ventilate the visor, the S1 PRO is provided with a vent in the chin area. Irrespective of riding posture, around 80 - 90% of the air in the central airstream flows exactly into the inlet of the vent. A deflector ensures that the air current ventilates the visor shield effectively even at low road speeds. You can open the inlet vent by pressing the lower part of the ventilation element or close it by pressing the upper part.
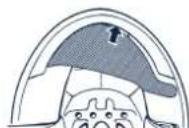
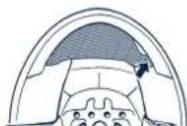
Ventilation 3 - air vent
Three air inlet cowls for ventilating the surface of the head are located on the top of the helmet shell. Air entering via these cowls is effectively directed through ducts to the top of the head. In the interior space of the helmet, the innovative padding system
consisting of headband and cushioning pads) enables direct contact between incoming air and the surface of the head, which causes heat

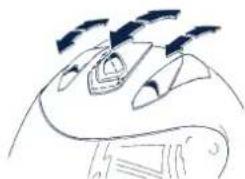
D. THE HELMET
to be more quickly picked up and taken away from the interior through outlet holes on the back of the helmet and in the neck area. The air inlet cows also act as a sliding control valve for the head ventilation system. Open the vent by sliding the inlet cow backwards. You can vary the intensity of the head ventilation by using more or fewer of the inlet cows. The vent is closed when the cows are in the forward position.
Ventilation device 4 - interior air extraction
The S1 PRO is equipped with a constant air extraction system. Air inside the helmet or fl owing in through the head vent is directed through the air outlet channels in the inner shell and out of the helmet via the special netting material inserted in the neck pad as well as the outlet vents. The reduced pressure around the back of the neck ensures constant extraction of interior air - even when the air inlet scoops are closed - and thus guarantees a pleasant climate inside the helmet.
Ventilation device 5 - minimum level of fresh air
The special shaping of the chin vent's upper zone provides the helmet with a guaranteed minimum ventilation function that ensures a constant supply of fresh air. The air entering by these means is regulated so that the rider barely notices it, but so that it guarantees an effective supply of fresh air from a speed as low as 30 kph (provided the helmet is fully in the air flow when travelling). This function counteracts any build-up of misting on the visor plate and any excessive concentration of CO_2 , even when the helmet is fully closed.
13. ADDITIONAL SAFETY FEATURES
Anti-Roll-Off System (A.R.O.S.)
The Anti-Roll-Off System specially developed by SCHUBERTH and provided as a safety feature in every SCHUBERTH motorcycle helmet, ensures - provided the chinstrap is closed and correctly adjusted - that
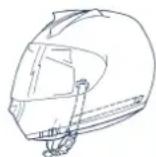
a) the helmet cannot pivot off the head from behind
b) due to the small angle of tilt, the risk of contact between the chin section of the helmet and the chin or neck of the rider is minimised and
c) the consequences of the helmet contacting the chest cavity as the result of an accident are reduced.
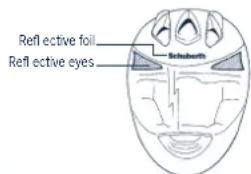
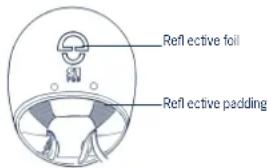
Reflective surfaces
The two large black reflective safety panels below the visor to left and right also contribute to the characteristic design of the S1 PRO. Together with the silver reflective material on the side zones at the back of the neck pad, this makes the rider more noticeable on the road - especially when visibility is poor. In the case of single-colour helmets without graphics, the SCHUBERTH logos on the front and back of the helmet are made of reflective foil.
Note:
Keep the safety reflective areas clean.
Note:
When riding in France, local law requires that further reflective safety stickers be attached at front and back as well as on both sides of the helmet.
E. PUTTING ON AND TAKING OFF THE HELMET
See section D.8. for operation of the chinstrap / fastener system.
- Open the chinstrap. Make sure the sun visor is retracted into the helmet shell.
- Take the lower ends of the chinstrap and pull these apart.
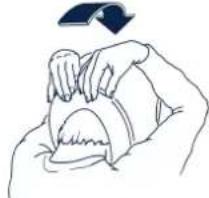
- It will now be easy to put the helmet on.
- To fasten the chinstrap, thread its free end through the double D-ring fastener, pull tight and fasten(for operation of the double D-ring fastener, please refer to Chapter D.8., Retention system).
- Make sure the chinstrap passes under the chin and fits firmly.
Note:
Check regularly that the chinstrap is correctly positioned and adjusted to the correct length (see Section F.2.).
2. TAKING THE HELMET OFF
- To open the chinstrap, pull the red lug of the double D-ring fastener and withdraw the chinstrap through the metal eyes.
- Grasp the ends of the chinstrap and pull the chinstrap ends apart.
- The helmet can now be removed easily from the head.
Tip:
To avoid scratching any objects you might place the helmet on, we recommend closing the chinstrap again after you have taken the helmet off.
For your safety, check the following points before every journey:
1. CHECKING THE HELMET
Check the helmet regularly for damage. Small superficial scratches will not impair the protective function of your helmet. In the case of more serious damage (cracks, dents, flaking and cracking paint, etc.), the helmet should no longer be used.
Note:
If your body weight has dropped significantly, you should check that your helmet is still the right size for you (see Section C.3.).
2. CHECKING THE CHINSTRAP (with helmet on and fastened)
- Check that the chinstrap passes under your chin.
-
Slip your index finger under the chinstrap and pull.
-
If the chinstrap is loose under the chin, it is adjusted too long and needs to be tightened.
If pulling with your index finger loosens the chinstrap, it's not properly fastened! Completely undo the chinstrap and try fastening it again. Repeat the test. -
If you are unable to fasten the chinstrap so that it is firmly against the chin, check that your helmet is still the right size for you (see Section C.3.).
Repeat the test after each correction.
Caution:
Never ride with the chinstrap unfastened or incorrectly adjusted! The chinstrap should fit correctly and should not become loose when pulled. The fastener is not correctly closed if the chinstrap becomes loose when pulled.
3. CHECKING THE VISOR AND SUN VISOR
Before every journey, check that the mechanisms of the visor and sun visor are working properly and that the visor or sun visor will provide suffi ciently good visibility. Any dirt should be removed before riding (for instructions on care, see Section H.2.).
Check the visor and sun visor for physical damage and cracks. A heavily scratched visor will considerably impair your vision and should be replaced before setting off on a journey.
Caution:
Never use tinted visors in conditions of poor visibility or when riding at night or in a tunnel.
Caution:
A scratched and/or dirty visor will seriously impair visibility. For your own safety, replace it or clean it immediately.
Caution:
Make sure the visor is always in perfect condition. A damaged visor is not suitable for riding and needs to be replaced.
Caution:
Stop riding when visibility is poor.
1. SAFETY ADVICE CONCERNING THE HELMET
Never ride without a helmet!
Motorcycling is associated with particular risks and dangers for the rider and passenger. These risks and dangers can be reduced, but not eliminated completely, by wearing a helmet. It is impossible to state precisely what the protective effect of a helmet will be in the event of an accident. Safe riding techniques, modif ed for the particular road and weather conditions, are essential for your safety.
Make sure your helmet is always correctly positioned and fits your head.
To provide adequate protection, the helmet must fit well and be securely fastened.
Always fasten the chinstrap before setting off and check the fastening system and strap for correct position!
Never ride with the chinstrap unfastened or incorrectly adjusted! The chinstrap must be correctly positioned and must not come loose when pulled. The fastener is not correctly closed if the chinstrap becomes loose when pulled.
The full protective function of a helmet can no longer be guaranteed after an accident or impact to it! Like the crumple zone of a car, the impact energy of a collision is absorbed by complete or partial destruction of the structure of the outer and/or inner shell of the helmet. Because of the way helmets are designed, this damage is rarely visible to the observer.
The safety helmet is designed to absorb only one impact. It is therefore essential to replace the helmet after a fall, accident or other violent impact. For safety reasons, the old helmet should be rendered unusable.
G. FOR YOUR SAFETY
The helmet safety mechanism described above can also cause small cracks in the shell when the helmet is dropped from a low height (less than 1 metre).
Any helmet that has been subjected to a violent impact should be replaced!
No helmet provides absolute protection from all conceivable impacts. This helmet has been specially developed for motorcycle riding and is unsuitable for other purposes.
Examine the helmet regularly for damage. Small scratches will not impair the protective function of your helmet.
The helmet should be replaced after 5 to 7 years, depending on use and care. Although the outer shell is in principle capable of a longer service life, the occurrence of material fatigue and wear to other components as well as the overall action of the helmet and the unknown conditions in which the helmet has been used, make it advisable for your own safety to replace the helmet after the aforementioned period of use.
Excessive heat (e.g. exhaust heat) can cause damage to graphics, the inner shell of the helmet and the interior lining!
Direct contact with motor fuel, thinners or solvents can destroy the structure of the inner and outer shell. Make sure the helmet does not come into contact with such substances, even for cleaning purposes.
2. SAFETY ADVICE CONCERNING THE VISOR / SUN VISOR
The protective film fastened to the visor with special adhesive dots to protect it from scratches in transit should be removed before use.
A scratched and/or dirty visor or sun visor considerably impairs visibility - especially at night or when riding into the sun - and increases the risk of an accident. For your own safety, replace or clean the visor immediately.
Never use a tinted visor in conditions of poor visibility or at night or in a tunnel!
Benzene, solvent and fuel vapour can cause cracks on the visor. Keep the visor away from such vapours and do not allow these kinds of substances to come into direct contact with the visor! For that reason, never place the helmet on the tank of your motorcycle.
Make sure the visor is always in perfect condition. Don't ride when visibility is poor!
3. SAFETY ADVICE CONCERNING MODIFICATIONS / ACCESSORIES
Original parts (especially on the outer shell, inner shell and retention system) should not be modified or removed. The fitting of non-genuine, non-recommended parts can partially or completely counteract the protective function of the helmet and invalidate the ECE approval together with all guarantee and insurance rights.
Use only original parts, replacement parts and accessories that SCHUBERTH has expressly approved for your helmet!
1. OUTER SHELL
To clean the helmet shell, you can use water, soapy water or one of the commonly available motorcycle shampoos, cleaners, polishes and plastic cleaners, or cleaning fluid. The use of water and soapy water is usually sufficient. Make sure when using the other cleaning materials that these do not come into contact with the visor, since these can cause damage to the visor and coating.
Note:
Never use motor fuel, thinners or solvents to clean the helmet. These substances can cause serious damage to the helmet with no externally visible indication. The full safety function of the helmet is then no longer guaranteed.
2. VISOR AND SUN VISOR
PINLOCK® VISOR
Outer surface of visor
Use a soft cloth and mild soapy water to remove dirt from the outside of the visor. Use a lint-free cloth to dry the visor.
Inside surface of the visor
The inside surface of the visor should only be cleaned with a soft and, if necessary, slightly damp cloth (we recommend a microfi bre cloth). Do not use any cleaning agents for this.
SUN VISOR
The sun visor should only be cleaned with a soft and, if necessary, slightly damp cloth (we recommend a microfi bre cloth). Do not use any cleaning agents for this. To protect the anti-fog coating, avoid vigorous rubbing.
VISOR SHIELD, CLEAR (optional)
Outer surface of visor
Use a soft cloth and mild soapy water to remove dirt from the outside of the visor. Use a lint-free cloth to dry the visor.
Inside surface of the visor
The inside surface of the visor should only be cleaned with a soft and, if necessary, slightly damp cloth (we recommend a microfi bre cloth). Do not use any cleaning agents for this. To protect the anti-fog coating, avoid vigorous rubbing.
Applicable to all visors:
Note:
After intensive cleaning, riding in the rain or long journeys in cold weather, the anti-fog coating takes a little time to become completely effective again. During this time, the coating is unable to absorb much or any moisture from your breath. You can accelerate recovery of the coating's anti-fog property by placing the helmet in a dry, well-ventilated place.
Note:
Use only lukewarm water for cleaning. Never on any account clean the outer visor or sun visor with petrol, solvent or a window or glass cleaner or other alcohol-containing cleaning agents.
Note:
To protect the anti-fog coating, avoid vigorous rubbing.
Note:
Never apply anti-fog gel, spray or similar substances to the active anti-fog coating. This can cause undesirable reactions and even irreparable damage to the coating.
H. MAINTENANCE AND CARE
Note:
The active anti-fog coating is subject to an ageing process, the rate of which depends on the intensity of use and the environmental conditions. For your own safety, we recommend replacing the visor shield or sun visor if the anti-fog effect starts to deteriorate signifi cantly.
Note:
The active anti-fog coating will also absorb chemical substances such as solvents and can be damaged by them. Therefore, avoid storing the visor in the vicinity of aggressive substances such as motor fuels or solvents.
Note:
Even moist lens cloths are often unsuitable for cleaning the visor - despite recommendations to the contrary - since the substances they contain are incompatible with the anti-scratch and anti-fog coating. Avoid using these cloths.
Note:
Do not soak the visor in water (i.e. to soften heavy dirt) as this can significantly reduce the surface hardness and thus the resistance of the anti-fog coating.
Note:
Avoid closing the visor fully when the helmet is not in use (especially in storage) since any moisture inside the helmet cannot escape and will be absorbed by the anti-fog coating to a greater extent than normal. This can reduce the service life of the coating. The best method is to lock the visor open in the 2nd locking position above the town-riding position.
Note:
Never attach labels, adhesive tape or stickers to the visor or sun visor.
Tip:
A milky coating that may occur after a long period of nonuse (through reaction of the active anti-fog coating with the environment) is most easily removed with a dry microfi bre cloth.
Tip:
Stubborn dirt on the outer surface of the visor (e.g. dried-on insect remains) can be easily removed by covering the closed visor with a moist to wet cloth and allowing the dirt to soften for around 1/2 to 1 hour.
Note:
The visor should not be stored in a place where the temperature is above 60^ since this will cause damage to the visor.
3. INTERIOR LINING
Replaceable parts of the interior lining
The head pads and headband can be washed by hand using mild soapy water (e.g. any very diluted, normal mild detergent) at a maximum of 30^ . Allow the damp interior lining to dry at room temperature and with good ventilation.

Tip:
If required (e.g. during a break in a journey), the headband can be hung out to dry over the mirror.
Non-replaceable parts of the interior lining
Use a mild, lukewarm soap solution (e.g. any very diluted, normal mild detergent can be used) to clean the interior lining.
Carefully apply the soap solution with a damp sponge or cloth by dabbing or gentle rubbing. The inner padding should not be soaked with water. Remove the soap solution from the padding by pressing a dry, absorbent cloth on it. Repeat this process with clear water.
Afterwards, allow the interior padding to dry in a well-ventilated place.
TechSkin
It is best to clean the TechSkin comfort material with high-quality leather-like surface structure regularly with a soft, moistened cloth.
4. FASTENER SYSTEM
Double D-ring fastener
The double D-ring fastener is maintenance-free.

Caution:
Do not apply oil or grease to the metal parts.
5. STORING THE HELMET
When not in use, keep the helmet in the supplied helmet bag in a dry, safe place. For better ventilation and protection of the anti-fog coating, make sure the visor is not fully closed, but is locked in at least the second locking position above the town-riding position. Always store the helmet so that there is no risk of it falling onto the floor. Damage caused this way is not covered by the guarantee.

Note:
Store the helmet out of reach of children and animals.
I. ACCESSORIES AN REPLACEMENT PARTS
1. SPARE PARTS
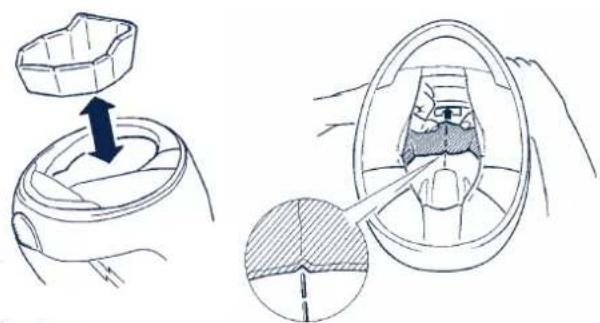
Breath guard
A breath guard is available as a SCHUBERTH original accessory. Insert the retaining lip of the breath guard centrally between the chin pad and outer chin bar.
Anti-Noise-Pad
By virtue of its special design, this anti-noise-pad makes for even greater reduction of noise levels in the helmet and is available as an replacement part.
Helmet bag
Padded helmet bag made from high-quality materials for safe transport and storage of your helmet. With 3-D Schuberth logo.
Sun visor 80% grey tinted
Sun visor 60% brown tinted
Visor shield Pinlock®
Replacement inner shield Pinlock®
Visor shield clear, AS/AF
Reflective sticker set
for use in France
Head pads size 52/53 - 54/55
size 56/57 - 62/63
Headband size 52/53
size
54/55
size
56/57
size
58/59
size
60/61
size
62/63
Cheek pad set (2 pieces)
(replacement only by authorised dealers and SCHUBERTH Customer Service)
size
52/53
size
54/55
size
56/57
size
58/59
size
60/61
size
62/63

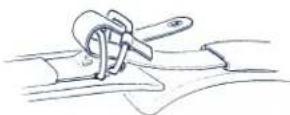
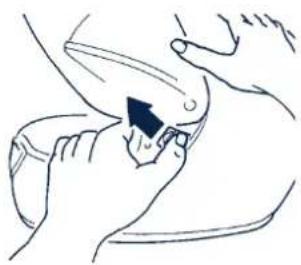
Note:
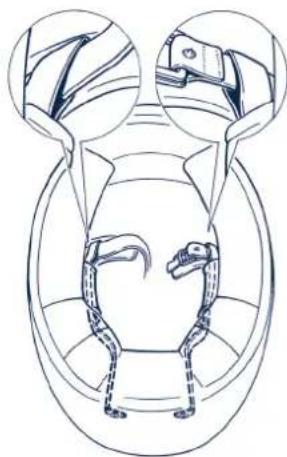
When replacing the cheek pads, the Anti-Roll-Off System must be properly joined to the chinstrap. For this purpose, the clips on the free ends of the neckbands - as shown in the illustration below - must enclose the corresponding ends of the chinstrap and the neckbands must not be twisted or knotted.

Caution:
For safety reasons, all other parts of the helmet should be replaced by the SCHUBERTH Repair Service only.
I. ACCESSORIES AN REPLACEMENT PARTS
J. SCHUBERTH SERVICE
2.COMMUNICATIONS SYSTEMS
Caution:
The installation of a communication system (including basic headsets) constitutes a modification of the helmet. For this reason it is necessary for such a communication system and headset destined for installation into a helmet model to be tested and approved in line with the ECE-R 22.05 standard, otherwise the helmet's approval and insurance conformity become invalid on installation of an unapproved system.
Substantiation of approval in line with ECE-R 22.05 in connection with a special communication system is only valid if certified by an offi cial regulatory offi ce of an EU member state. Any other form of information from these or other institutions (e.g. on the general suitability of communication systems for use in motorcycle helmets) is of no relevance and the helmet loses its approval.
3. ORDERING ORIGINAL SCHUBERTH PARTS
SCHUBERTH original replacement parts and accessories can be purchased from your authorised dealer. Please ask your SCHUBERTH importer for details of the SCHUBERTH dealer closest to you. You can find the SCHUBERTH importer responsible for your country by going to the "Motorcycle" section on our website and clicking on the link "Worldwide Importer List":
www.schuberth.com
1. SPECIAL ADAPTIONS
Individual modifications to the interior lining can be carried out at the factory provided they conform to the current ECE standard and at a charge. Please note that painting work cannot be carried out in the SCHUBERTH customer service departement.
For us to accept orders for special modifications, the helmet must be sent to SCHUBERTH carriage free.
We regret that special modifications cannot be carried out within the regular repair service time frame but will take a longer period of time.
2. REPAIR SERVICE
With the S1 PRO, you own a SCHUBERTH quality product that has been designed and manufactured using the latest development and production methods. Should your helmet nevertheless require a repair at some time, please contact your authorised dealer or send the helmet directly to us, stating your address, telephone number and e-mail as well as a clear description of the fault:
SCHUBERTH GMBH
Kundenservice Motorradhelme
(Customer Service, Motorcycle Helmets)
Stegelitzer Str. 12
39126 Magdeburg
Germany
For us to accept helmets for repair, the helmet must be sent to SCHUBERTH carriage free (except for guarantee claims).
Note:
If we receive an order from a customer to carry out a repair without a clear description of the fault, we are entitled to examine the item and/or delay completion of the order until discussion with the customer. If, even where a clear description of the original fault has been provided, we discover further faults in the
J. SCHUBERTH SERVICE
course of the repair, we are entitled, but not obliged, to remedy these without a specific c order if this is necessary to reinstate the correct functioning of the helmet and the cost of this is low in relation to the original repair job. Otherwise, we will seek the agreement of the customer.
3. GUARANTEE
On the condition of proper use of the helmet, SCHUBERTH guarantees replacement or repair of defective parts free of charge from the date of purchase for a period of 2 years for the helmet and 1 year for the visor and sun visor. All guarantee work is undertaken via our repair service.
For guarantee claims, the sales receipt must be submitted. Please keep the original invoice in a safe place. In the event of a guarantee claim, the original sales receipt (or a copy) must be enclosed with the helmet. Without the sales receipt, we cannot satisfy any guarantee claims. The granting of a proper replacement or repair does not extend the original guarantee period.
Complaints must be notified to us in writing as soon as possible, but within 8 days of the purchase date at the latest. Defects that, even with careful examination, are not discovered within this period must be notified to us in writing as soon as possible after their discovery. Do not forget to provide a full description of the fault when returning the helmet. A product that has already been worn will not be exchanged but will be repaired. Whether defective parts will be repaired, replaced or credited is at SCHUBERTH's discretion.
No guarantee rights exist specifically in the event of:
- improper use and excessive stressing of the product
- modification of the product by the customer
- failure to follow our product recommendations
normal wear and tear.
4. BLUE CONCEPT
At SCHUBERTH, "Blue Concept" refers to our environmental policy relating to our helmets. This policy extends from development through planning of production processes to the recycling of the materials used. Under the Blue Concept system, we will therefore take back any used SCHUBERTH motorcycle helmet in order to return the materials used in its production to a recycling facility.
5. SCHUBERTH ON THE INTERNET
If you would like to get the latest news on the our company and our range of helmets, you can visit us on the Internet at:
www.schuberth.com
Headquarters
Address
SCHUBERTH
Stegelitzer Str. 12
39126
Germany
GMBH
Magdeburg
Repair service
12 =
Fax
Address
+493918106-228
HUBERTH GMBH
Kundenservice
(Customer Service,
torcycle Helmets)
Stegelitzer Str. 12
39126
Germany
Motorradhelme
Ordering, spare parts and accessories
Fax
Address
+493918106-228
HUBERTH GMBH
Vertrieb
(Sales, Motocycle Helmets)
Stegelitzer Str. 12
39126
Germany
Motorradhelnle
Magdeburg
Internet
www.schuberth.com
motorcycle-helmets@schuberth.de
F
A. UTILISATION CORRECTE DU MANUAL
Toutes nos félicitations...
F. -S. 90 =
F.-J. Gorges
This helmet is not intended for use in the USA and Canada. The helmet has been inspected and approved to the European ECE Standard and therefore does not conform to US and Canadian regulations and requirements. It is only legal to use the helmet in countries in which the European ECE Standard is valid. If you use the helmet in other countries, you will not in the event of injury be entitled to make a claim for compensation before the US or Canadian courts or the courts of other countries not bound by the ECE Standard.

Attention :
REEMPLACEMENT DE L'ECRAN
Systeme anti-roll-off (A.R.O.S.)
F. -S. 90 =
F.-J. Gorges
This helmet is not intended for use in the USA and Canada. The helmet has been inspected and approved to the European ECE Standard and therefore does not conform to US and Canadian regulations and requirements. It is only legal to use the helmet in countries in which the European ECE Standard is valid. If you use the helmet in other countries, you will not in the event of injury be entitled to make a claim for compensation before the US or Canadian courts or the courts of other countries not bound by the ECE Standard.

Avertissement:
Sistema anti-roll-off (A.R.O.S.)
F. -S. 90 =
F.J. Gorges
This helmet is not intended for use in the USA and Canada. The helmet has been inspected and approved to the European ECE Standard and therefore does not conform to US and Canadian regulations and requirements. It is only legal to use the helmet in countries in which the European ECE Standard is valid. If you use the helmet in other countries, you will not in the event of injury be entitled to make a claim for compensation before the US or Canadian courts or the courts of other countries not bound by the ECE Standard.
Avertissement:
Anti-roll-off-system (A.R.O.S.)
Reserve binnenvizier Pinlock
Vizier transparent, AS/AF
Reflecterende stickerset
This helmet is not intended for use in the USA and Canada. The helmet has been inspected and approved to the European ECE Standard and therefore does not conform to US and Canadian regulations and requirements. It is only legal to use the helmet in countries in which the European ECE Standard is valid. If you use the helmet in other countries, you will not in the event of injury be entitled to make a claim for compensation before the US or Canadian courts or the courts of other countries not bound by the ECE Standard.
Avertissement:
IINI INI INI INI INI INI INI INI INI INI INI INI INI INI INI INI INI INI INI INI INI INI INI INI INI INI INI INI INI INI INI INI INI INI INI INI INI INI INI INI INI INI INI INI INI INI INI INI INI INI INI 10000000000000000000000000000000000000000000000000000000000000000000000000000000000000000000000000000
TITI TOTIO YUOBO HE YUQIDAI HAI MOKHOYU QEP3 BHKIP #BACOTOCNOOOCHOTM EKMHNH BHMNC, NONGANJYU. HIXGDA HE IHPMEKHI KAKHOKH, XINXUYI RAPRCEPCHEBELECTED BY ANSINGH.
EcnHn KaBbme POBNTTc BtNbHeaPAnHHN HIn DpyMe NcPBENKdEeHn Mo 0o cOoBpaekvMg SeBaONaOH n OdoJIe6 BuIzAmeHn
343temenbnhnBnBnBnBnBnBnBnBnBnBnBnBnBnBnBnBnBnBnBnBnBnBnBnBnBnBnBnBnBnBnBnBnBnBnBnBnBnBnBnBnBnBnBnBnBnBnBnBnBnBn
BMMHMAH H 30T LUNEN HENBH RAHOCHTS KACY, GEMHN NNN PACTOBPNTN. A TAKON HENBH AHHKNEBH 3THN
BHHMnHOT 3TNT HmN BHMnHbON308aB C LIIA u KAHADe OT TnHm npoepen HnDyueHN yKTHOPDEHNO cORTBOB ENBPOEKCN HOMP MCM ECE, He OH COBTETCBYTO EMAPKHCKMn KAHADcOBNM HOMP Mx He IMEET donyoCAI a NpimrHMeHN B CILAA u KAHADe. OH MOKET npIMHeHbTCa TcBA bCTPAHx B kOTOpBx dyEBCTBYOT EBPOENXE HOMP MCE t e He a CILAA u He b KAHADe.VcNtOBsABe 3 xTtX CTPAHx B CYUEyeupe6h He daet ppaa ppaedrenon HtpTeCBOBAnHx HA 003MuEHNYE yBaTIOB nepc CyAMn CILAA, KaHADu mApynx CTPAH, B kOTOpux HE DEETBXY HOMP MCE
MbOaTnA 3 a c0Bb Ta TnHcNcKcE yCobepuHCTOBaHKe MdaH, dae He daa
Ф�ИЗСТЕРБERT (HUYBEPT) рп Ндемыхалуногрбима rapануггует SFePnTHaZaMehyI нлі крашь NGHIMRANBAPINX VACCTE: Дддллma - b TeyHENH 2 pet nД RAHIMN a Тугкоюнсв�инг�уо КOTKБИК - b TeyHENH 1 rOdA ca dalny kokmyn - Bce rapanHHNcY cUytN OvocuysTeBnTOrCt Epe3 Naур'meHTOHy CryOb7k yHn Epe3 OTeBTrCHeRrHO MIOIropteraВ 止萌
Balaero pnpbbaa. NcnoBnBnA nPpOeBaeBnA npnnHbX yCnRnTnEON KOnr OvEBaBnNnO BnBnBnNnO BnBnBnNnO BnBnBnNnO BnBnBnNnO BnBnBnNnO BnBnBnNnO BnBnBnNnO BnBnBnNnO BnBnBnNnO BnBnBnNnO BnBnBnNnO BnBn
TapaHTHHe Tpe6oBaHnHE Moryr 8bIb npedBnneHb Cnya
HeHaIeKaeero ynotpeBneHn nepEHarpyxNkdenna
HECOHOeHHAuxpeXOMEHuaHNO HdEnIO
086H0103HOCA
SCHUBERTH GMBH
Kundenservice Motorradbelme
Stegofrster 12
Stegelzer St. 12, D-39126 Magdeburg