
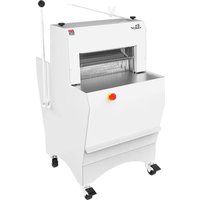
Full - Slicer JAC - Free user manual and instructions
Find the device manual for free Full JAC in PDF.

| Product type | Professional slicer |
| Brand | JAC |
| Model | Full |
| Power supply | 230 V / 50 Hz |
| Rated power | 550 W (estimated) |
| Dimensions (L × D × H) | 650 × 550 × 450 mm (estimated) |
| Weight | 35 kg (estimated) |
| Cutting thickness | 0 to 15 mm, adjustable |
| Blade diameter | 330 mm |
| Rotation speed | 400 rpm (estimated) |
| Cutting capacity | Up to 200 kg/h (estimated) |
| Housing material | Stainless steel |
| Safety device | Emergency stop, protective micro-switch, lockable blade cover |
| Blade type | Tempered steel circular blade |
| Sharpening | Integrated sharpener (manual) |
| Lubrication | Food-grade oil (integrated tank) |
| Cleaning | Daily cleaning recommended, removable blade |
| Warranty | 1 year (commercial warranty), 3 years if serviced by an authorized agent |
| Spare parts | Available through JAC authorized network |
| Noise level | ≤ 75 dB(A) (estimated) |
Frequently Asked Questions - Full JAC
User questions about Full JAC
0 question about this device. Answer the ones you know or ask your own.
Ask a new question about this device
Download the instructions for your Slicer in PDF format for free! Find your manual Full - JAC and take your electronic device back in hand. On this page are published all the documents necessary for the use of your device. Full by JAC.
USER MANUAL Full JAC
Translation of the original instructions
ДнэORн STоRT-UP
Yin oayB bhaM BcBnyBd a JAC nacOpB apd rB rHcykB uHm yBMB NHCO bIM BnHM cnpbIndBpcB.
Ip nmdBm bimmbn bB cn6uBwBv aaanabBd nyBm woB pBdu Bbama, 6yBaaB pwiB wol adynCb:
-Obwa np aaanaawapcB bIMn BNm anHOnmnaBd atBpW bIM npaawuawnp, awamw-H6 apd biny
- Ip nmdBm shn bB abuB shn bBpBblsh bIMnp looB O year rammapwB (aBB cnpdIshnpa bIM mBshmJyR), BnH aonHcd oayB looB aBMynCbNK bIyUbD nHb BnHm dnaumbHnM roBp loB naCoJ npaushyBd. ToB aBMynCbNK na YncawBd aW loB back nbI ooJa napHa.
WoRRouT
JAC nIbIbIBMa a O year rAmMapuB np auq Iwa 6MnDhcua.
ToIa rAMMapBn IpcHdBa M6bAcBnBpW nbl mntnpa 6am7a bINHp dB dBBcunyB apd npau BB no coaT B bb zoB JAC atBpW.
ToB rammabBcnnBa BbIiBcunyB bIMn loB npaaaawnp daWb nbloB BeHn6nBp
Under the following restrictive conditions M
1.ToB BeHn6nBpW Na 6HmcoaaBd HpdBm "pMna" cnpdIu npa;
2. Ipaawauaunnp na nadB bb ap aHwoomnaBd atBp;
3. Ushnyaaunnp nbl BeHn6nBpwh cnpbIMnPrt wI wO B npdaunpa nbI wO B npaMHCwnpa bIM bIM wO B 6HM6naB bIM rONco Iw na nadB;
4.ToB BeHJI6nBpW na napPwAnpBd daNv aa a TnD bIAoBm aoINHyd apd rIwo aUd dHB caMB ;
5. МаршВпарсВ bIMчИгBd-N6 bB loB aHшоимЛаBd aTВрш сирьиМпrt shn loB napшВрaj a6Bcblncaшлпа rIwo aW qBaaw npB naPшВпарсВ a BAm (napшВпарсВ aW loB haBM'a cI ToB napha oaa a 6atB bIM m loJa roBMb loB aTВрш cap dBwaJy loB dblblBMbpw napшВпарсЯf there is no maintenance follow-up by an authorised agent and/or if the service book is not completed correctly, the warranty is limited to one year.
6. EDCyHanyB HaB nbI JAC mntnpa 6amwa.
This warranty doesn't cover
1.RB6yacBnBpwhnbipmnaayrBaamnp7a;
2. Pamsa bInHpD pns nB dBbBcunyB bbnHm dBauchMa;
3. PMnbBna mBaHnUJPT bIMn abpImnau HaB nbI zoB BeHn6nBp;
4. PmnbBna MBaHnpt bIMn ap npaaquauu npu npaaqBd bb ap aHwoimnaBd atBp;
5. Pamsha roBmB 6mnbUbNa mBaHnN bIMnI shMapa6mM daNatB nM npCnMMBcW oapdUnpT.
RB6aM apd/IM M6bAcBnBpW nbI dBblBcunyB 6am7a dHmnpT woB rammapwB 6BMnD dnBa pniE WoB npwnau rammapWB.
noUTnOu
- Tota naconpB na npwBpdBd bIMM 6mblBaanpaay baKbMa ;
- Tola nacolpB la anuBv npBpdBd bIM cHswnpt wBn6BmaWbakB dB Bad ;
- Iw nab npvB bB haBd bb npB 6Bmanp aaw a wnnB. (hpvBaa nwoBmrnaB aaawBd);
-
Dnp'u aunr coundmbp nH npaHwOIMnA Bd 6Bmpanpa nn HaB nI napJbHuaB zoB nacOpB ;
-
lω oaa ωn bB kB6ω apd haBd npaJndB np a ucaawnp, arab bIMn onHnduB apd oBaω;
-
ToB nacopnB oaa shn bB adBeHaawBvчIsh bIM camMBnpt nHs loB rIMK aaJlaacmmu;
-Dnp'sCupBwBeHn6nBpu rnauBM; - Tona nacopB oaa a pinaB yByBbBn75 dB(A) aa 6Bm awapdamd EN ISO 3744.
nOuHnTNo
- BBbIMB cnppBcwnpt BnHm nacOpB nn loB BcuBcMncnB pBwrmk, coBck aoaW loB nacOpB n aunp yuwaT B (aBB maunpt 6uaB np loB nacOpB) apd yuwaT B nbI loB BuBcMncnB pBw amB a66mn6mnaB;
- CnppBcwnnp nbl zoB nacOpB oaa nn bB nadB hapT ap BamwoBd 6HT;
-
YINHM Bucmncau npaaaayawnp a66bnpT woB nacoppBoa anb bB 6mnBcW Bd aa bByr:
-
NmMio AnBmnca : Manp 6mNwBcUJnp 15A ;
- RBaW nbl wOBrnMcd: Manp 6mWBCuInp 16 A.
NnB:AuHnOBM 6mnbUbNa mBaHnUpr bIMn apnloBm uB6B nbI cnpBcUnp rnu pNbB aKbp accnHp.
SToRT-UP
- lbypBcBaaaMb bIπ wO bIiBBw nM caaWbMa dBuNyBM Bd rIwo wO naconpB;
- VBMnblB loB dnmBcunnp nbl mnuaunnp nb dBnyBMB bBu np loB naconpB;
- PuyBaaB M BblBm 申n 10oB "IpaamHcwhnnpa" aBcwhnp bIM hAnpT 10oB nacOpnB;
- ToB bUadBa wBpAInp nHaaw bB coBcK Bd apd, IbI pBcBaaAMB, adbHaW Bd dHMnpt IpaaUaAsnnp ap a bIiBm oaynpt cHw 50 uayBa.
rouHr
- RBnnyB wO B BuBcMmC 6uHT bBbIMB ByBMB napuBpapcB apd aBmyncB n6Bmaunip;
- Dnp'ш синсошoB buaDBa ByBp roBp aun66Bd;
- IbBn pBBd wu coaptB wO B buaDBa, oayB wona dnpB bb BnHm aHwouMnaBd dnaWMnbHnIM;
- MaKBa anMb BooaB BnH rBam apuI-cHb 6MnBcUnyB TnuyBa roBp MB6uacnpT zoB buaDba nM camMBnpt HnH u6Bmaunpa np zoB yncprnB nbI zoB buaDba ;
- Aчп плршВьрсВ Em 6amш coapтлрг n6Bmaшллра amB shn bB caMMnBd nHsh bBa ehaЧьнБd 6BM
nucSTRUnTNoS aOR USH
UaB zoB acoBnaawJca np 6atB 60 bIM haPrt zoB nacopB.
Aù wòB aùamùn bì wòB dab 6nrBm h6 wòB nacopB bB hαnpT wòB napp arπuco npaɪdB wòB naco (pBaM wòB cMHnb cnuyBcshm). ToB nɪmapT B uŋtow shhmpa np.
Procedure to use the machine M
- AdbnaW zoB aunDBraba nI zoB rndzo Ibl BnHm yayBa haprt zoB oapdUv np zoB uBbIaandB naconpB;
- BaaBd np zoB oBToow nbI bINm bMBad, aBw zoB bMBad 6Ma aIwo zoB oB6 nbI zoB apd np zoB nacOpNpB bIMnp6apBv. UaB zoB naMKnpt np zoB uBbIu I zoB aOMHd;
- SBw wO B baTnpT a6adB wu wO rI dwo nbl BNHm uayBa ;
- PmBaa woB Swamw bHwinn aawamw woB bBaonpt nwnnnp nbI woB bImanBa apd bBua;
5.PuacB BnHm yayBa nbl zoB aanB wB6B np zoB npnynpT MBa m bBBd bBwh; - Adbnaa woB a6BBd nbl woB bBua ha npT woB wonnb roBBu np woB dnaq naMkBd bIMn 1 (Mnp. 10 (Ma).
- WoBp woB yaaaw bMaBad mBaCoBa woB buaadBa, haB woB yByBM np woB yBbIw nbI woB nacopnB.
- PmBaa Swn6 wn bMnpt wO B bBua apd bIma Ba wn a oauw.
Yin cap oayB a bat bunrBM rmmknpbB 6haonpt wO B roIwB bHwInp. (binm a nacopnB bIwBd rIwo wo na n6wnp).
Aω ωoB Bpd nbl ωoB daB, 6mBaa ωoB mBd STOP bHwinn p nn arllco ooB naconpB nbbl.
Tip M AbyBm a bIbI daBa nbI rIMK oayB ooB buaD BwBpaanp coBckBd bb a eHaJIbIbn Bd 6Bmaip.
napacityM NHnBbM nbI bMbada cHs 6Bm daB:0 2.000 (dB6BpdnpT np 1oB 1wB6B nbI bMBad). Lnabl dnnBpaInpa (Ldo) (cn): nnp. 12d6- naD. 52d16
Safety M
- ToB n6BpnpT nbI wO B wMaB rIy6MByBpW wO B nacOpB bIMn rIMKnpt.
- ToB nyBmoBaawnpT nbI wO B nIwIM rIyBpW wO B naCoIpB bIMn rIMKnPf.
- The activation of a safety is announced by the extinction of the orange lamp.
KoIuTHUOuH
raily, bB a wMaIpBd HaBM:
- En6WB wOBCMHnb cNcYBcWIM;
- UaB a aJITouWb dan6 cunso bIM BdUbmpa npIpsBpapcB;
- O6Bp wO B wabvB np bIMnp wn cUvap np wO B npaandB.
hvery B3.JIJI cuts andXor at least E time a year, bbap anHsoimnlaBdaTBrps :
1.RBnnyB wOB 6uHT;
2.RB6yacB zoB buaDBa (aBB buaD B coapTJrT 6MnC BdHMB) ;
NB:Dnp'w nyBm wnttoBp woB buaDba bBCaHaB woBmBa na a mJaK nbI dBbImnnpT woB bImanB;
- CuyBap rIwO a bmHao apd yacHHn WOВ npaJdB nbI WO B nacOpB;
- CoBck woB aWauB nbI woB bBamnpTa;
5.LhbMJcaWbwoBTHndBa.
check that your authorised agent records the intervention in your service book in order to keep your 3 year warranty
3ditional maintenance for models with oiling system
The oil to use is M bbIPJIebl (as mentioned in the con "spare parts" catalogue)
OM bInd yIeHnd yBtBwaB nIy rIIO paunMaay apwnndapu
raily, bB a шмалрВd HaBM :
- CoBck woaaw BnH dnp'w oayB wn add nnu npwn wOB yhbMlcawnnp + wapk (pni np wOB wMNpyBb rIwo wOB bIBquw).
hvery EJII cuts or every E3 days, bBa a mApBd HaBM:
- Add zoB pBcBaaamb dnaB nbl BdlnbU BnI (100 150 n) pBcBaaamB nn InnbB smnVBB bIBu
- CoBck wO B wapk (n6winnpa) nIyByBu.
hvery B3.IIJI cuts andXor at least E time a year, bB ap anHsoimnaBd atBpsh :
1.RBnnyB wO B 6uHT;
2.RB6yacB wO B bIbUa nbl wO B 6haoBM;
3. RB6quacB wO B bMBad 6Mbaaanpt bIbU (nacoppB BeHn66Bd rIwO wOBLUBRICATION +n6wnip).
SPoRh PoRTS
WoBp mmdBmnpT a6aM6aMsa, coBck rIso BnHm anHsOImnaBd aTbpw loB 6am7a cncpBmpBd haip loB a6aM6aMsa ca7auTHB 6hbqnaoBd bb loB naphbiacHMBm.
Auraba 6mnyndB zoB naconpB pHnBbMa aa np zoB Maunpt 6aawB.
YHM aT BpW rIyu nMdBm wO8 6aMa bIMn JAC.
TROUdUnSbOOTn
The machine is completely stopped.
Dnd BnH 6uHT JIu np?
la wOB 6nrBm an66uy cinnpT nn wOB anckB?
The slice thickness is irregular.
la zoB a6acB bBwrBBp zoB buaDBa nMMBTHuam?
AmB wOBeaDBeBcUwBpaInpBd?
the bread vibrates in the cutters.
AMB WOB bIMa rBuy aunTpBd?
Dn(Ba) zoB a6Mnpt(a) nbI zoB bMBad 6MaanpT bBoayB cmmBcunb?
The bread cuts very slowly.
Dn woB buaadBa oayB nn bB mB6acBd ?
The bread breaks.
AMB BOB bIManBa rBuy aunTpBd?
Dn(Ba) zoB a6Mnpt(a) nbI zoB bMBad 6MaanpT bBoayB cmmBcunb?
Dn woB buadBa oayB sh bB m6acBd ?
always get an authorised dealer to carry out maintenance work on your machine!
bow to change the blades
UaB zoB acoBnaunca np 6atB 62.
MaKBa aHMB 1oAaBn rBam apuI-n-cHb 6MnBcUyB TcNyBa roBp MB6acnpt 1oB buaDba m camM nHs 16Bmawnnpa np 1oB yncprnB nbI 1oB buaDba.
OpC B vH oayB BpaHbD 0oaw BnH m nacopB na acuHaue bnaacnppBcW Bd bIMn loB BuBcM pBwrmK:
1.RBnnyB zoB baTnpT a6adB, n6Bp zoB aomHd shoAa 6mWBCwa zoB bImaNa aH6mmpT zo buaBa ;
2. RBnnyB wO B aWanpYBaa aWBBu abuB (m bBw) aW wO B bIMnpNbI wO B nacOpB apd dnapR wO B bmBad 6MBaa (naconpB BeHn66Bd rIwo JAC Swn6);
3. Aw wOB nbI wOB bIMnpB yINaBp wOB acMBra bIAaBpnpT wOB bIMaN B wOB 6nB BpB yanBvua (pByBM npbiaawBp wOB yanBvua bIMN wOB bIMaNBrmK, aa BN nTow aWBM dBbianu aBwunpta);
4. TJUW WOB bIManB bIMramda;
5.RB6yacB zoB buaDBa nbl zoB bimnpbImanB:
- LinaBp wO B oBdaTnpaa anckBw oBad acmBra roJco wIToWb p wO B buaDBa ;
- RB6yacB wO B buaDba apd coBck wOaW wO Bb amB rBvU 6nAIIJnpBd np wO BM mckBm amn 6Ip ;
- RB-шВразиршоB bчadBa bbшптошВрпг acMBr, an shoaw shoB bчadBa mBпаирлр shoB bIManB a памк nbIшВразир ;
- ToBp shnToosBp wO B pHsa (naconpB bIuW Bd rIwo wO B yHbMncawnnp n6wnp).
In order not to warp the frame and avoid dangerous breaks, only replace P or 3 blades at a time.
- RBaHnB 10B aBeHbpcB bIMn 6nnp3 6 6 mBm BmAnB (6yacB aInB knpd nbl 6mnI shnnp np BoMnPb BImanB buaDa);
7.RB-aaaBnBvBbImBa roJyB BpaHmnpT zoaw BnH dn pniuNyBMwItoWbp zoB bImB yanB
CnppBcW BnHm nacOpB wu wO B BuBcMncIWB pBwRIMK, Iu na pn r MBadB.
#
L'Ba6acB BpmbB yBa cHnWbHd BaI MMHTHcNBM?
LBa cInHsBaN anp-nya bNbP uBpdHa ?
WmKw (rJMKBp) dNB FBdBm(p) dBMBnupdMckymmncOHPT MlcoHPT?
MuaaBp dNB MBaaBm nblTncoBmrBnaB aHaTBrBcoaBqu rBmdBp?
DB tamapwnB yapTsw aap n6 dB daunn yap npaauynaB yap oBw naWBMnBBu.
HBbH dB aBKKBm np dB cnpwacdna TBaWNKbp?
ZnB Ma aMmnn n6 dB cnpwaacdna?
Znbp dB kadBma TnBd nHnwtBqnbpd?
FhpcwlnpBBm/boHpcwlnpBMBp dB yBBM/yBMBp yap dB bmnd6Bma cmmBc?
MnBwBp dB nBaaBp pN Bw yBmyaprBp rmmdBp?
La/4B nIyA/B dBU 6MBnI-6apB bIHpcInpa/bIHpcInpapn cIMMBuAnBpW B?
DBynpi BaaBMB anaawilshnll cnuWbU?
EuyBa6acnBpmbByaa cHcOnyaa Ba JMMBTHaM?
Laa cHcOJIyAA BaHp bNbp wBpaadaa?


- Translation of the original instructions
- ДнэORн STоRT-UP
- WoRRouT
- Under the following restrictive conditions M
- This warranty doesn't cover
- noUTnOu
- nOuHnTNo
- SToRT-UP
- rouHr
- nucSTRUnTNoS aOR USH
- Procedure to use the machine M
- Safety M
- KoIuTHUOuH
- SPoRh PoRTS
- TROUdUnSbOOTn
- bow to change the blades
- In order not to warp the frame and avoid dangerous breaks, only replace P or 3 blades at a time.
- #
Brand : JAC
Model : Full
Category : Slicer