
BIODISCOVER 201280X - Microscope BRESSER - Free user manual and instructions
Find the device manual for free BIODISCOVER 201280X BRESSER in PDF.
| Brand | Bresser |
| Model | BIODISCOVER 201280X |
| Product type | Optical microscope for children and beginners |
| Magnifications | 20x to 1280x (depending on eyepiece/objective combination and Barlow lens) |
| Supplied eyepieces | 5x WF, 16x WF |
| Objectives | 4x, 10x, 40x (3-position revolving nosepiece) |
| Barlow lens | Integrated, doubles magnification when extended |
| Illumination | Dual LED: transmitted (bottom) and incident (top) light, with separate brightness control |
| Power supply | Mains 220-230 V via included AC adapter |
| Disc diaphragm/filter | Rotating disc under the stage combining diaphragm and color filter |
| Stage | Fixed with stage clips |
| Focus | Adjustment knob (rack and pinion) |
| Included accessories | Microtome, tweezers, pipette, dissecting needles, Petri dish, yeast, gum arabic, sea salt, brine shrimp eggs, box of slides and coverslips, permanent preparations |
| Optional | Movable mechanical stage with orthogonal movements |
| Maintenance | Clean optics with a soft lint-free cloth and alcohol if necessary; protect from dust and humidity |
| Safety | Keep out of reach of children under 3 years; use under supervision; unplug if not used for extended periods |
| Approximate dimensions | 30 × 20 × 40 cm (estimated) |
| Approximate weight | 1.5 kg (estimated) |
| Warranty | 2 years, extendable upon registration |
Frequently Asked Questions - BIODISCOVER 201280X BRESSER
User questions about BIODISCOVER 201280X BRESSER
0 question about this device. Answer the ones you know or ask your own.
Ask a new question about this device
Download the instructions for your Microscope in PDF format for free! Find your manual BIODISCOVER 201280X - BRESSER and take your electronic device back in hand. On this page are published all the documents necessary for the use of your device. BIODISCOVER 201280X by BRESSER.
USER MANUAL BIODISCOVER 201280X BRESSER
To work with this microscope, sharp and pointed aids are being used. Please take care that this microscope and its accessories are stored at a place out of reach of children. Let children only work with this microscope under an adult's supervision! Keep packing material (plastic bags etc.) away from children!
ATTENTION!
natural_image
Close-up of a hand holding a pipette tip over a small transparent object, with a red circle and number 1 in the corner (no text or symbols on the object itself)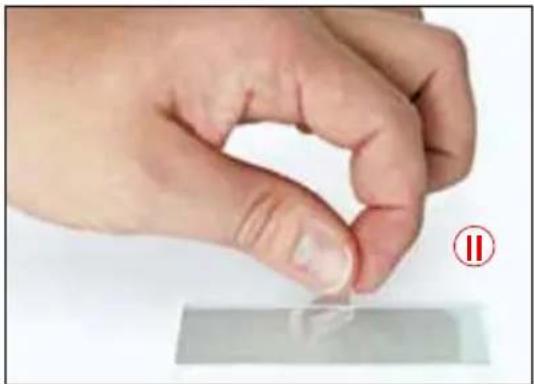
natural_image
Close-up of a hand holding a small object, with a red circle and number 11 visible in the corner (no text or symbols on the object itself)
natural_image
Close-up of a black electronic device with a cable and connector, no visible text or symbolsoptional
optionnel
opcional

16x WF eyepiece
2 5x WF eyepiece
3 Barlow lens
4 Eyepiece barrel
5 Microscope head
6 LED lighting (direct light)
7 Focus knob
8 On/Off switch / dimmer
9 Power connection
10 Eyepiece holder
⑪ Combined colour filter and diaphragm wheel
12 LED lighting (transmitted light)
13 Microscope stage
14 Specimen holder clamps
15 Objective
16 Nosepiece
17 Fixing screw
All parts (Fig. B):
18 MicroCut
19 Tweezers
20 Pipette
21 Preparation needles
22 Shrimp hatchery
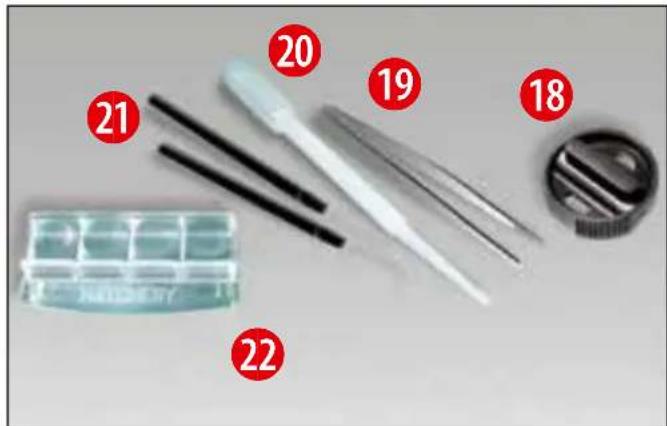
23 Yeast
24 Gum media
25 Sea salt
26 Shrimp eggs
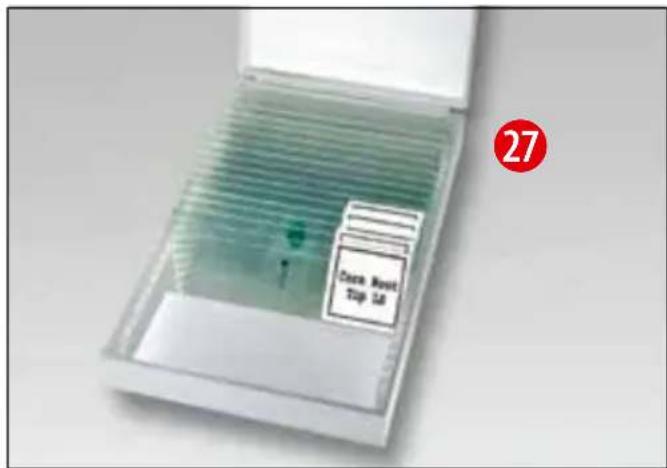
27 Box of slides holders, covering glasses and permanent specimens
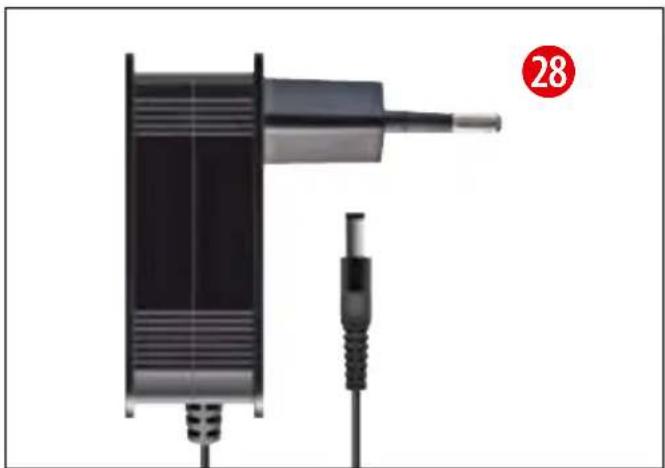
28 Mains plug
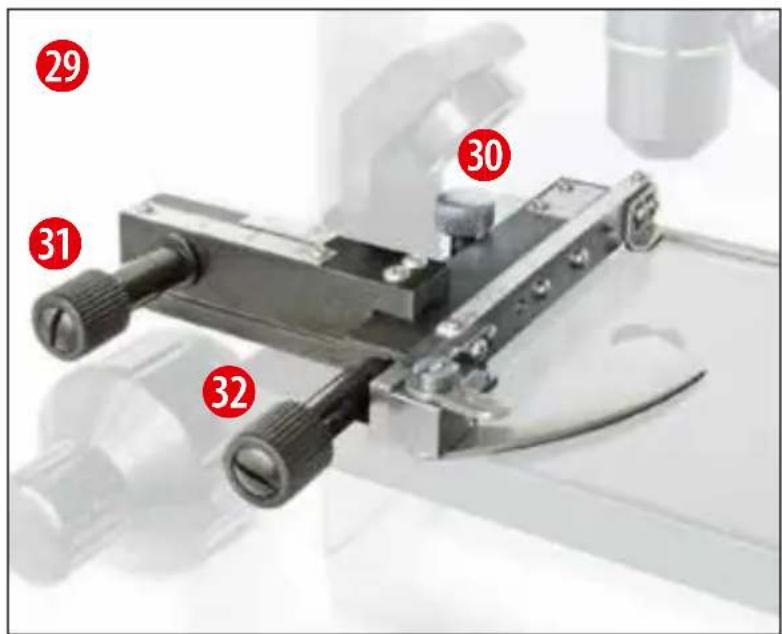
29 Cross table (optional)
30 Fastening screw
31 Longitudinal adjustment screw
32 Crosswise adjustment screw
Index of contents Page
- General / siting 9
- Electric LED lighting with dimmer 9
- Combined colour filter and diaphragm wheel 9
- Microscope settings (transmitted light) 9
- Observation 9
- Observation specimen -
characteristics and preparation 9
- Microscope settings (direct light) 10
- Experiments (transmitted light) 10
- Optional accessories 11
- Care and maintenance 11
- Technical data 11
- EEC conformity explanation 11
Warranty & Service 19
Important note:
These instructions include a fold-out page at the beginning and end with numbered Fig.s. These make the instructions easily comprehensible. All Fig. numbering with the prefix letter A refer to Fig.s on the first foldout page. Fig.s with the prefix letter B refer to those on the back foldout page.
1. General / siting
Before you begin assembling your microscope first select a suitable position for it. Make sure it stands on a stable base free of vibration. Use of the electric lighting predicates mains power connection (220-230 V). (Use only the power connections supplied for safety reasons. Other such parts may not comply with the applicable technical specifications. We cannot accept any liability whatsoever for any damage due to the use of third-party power connection parts/plugs/sockets.)
2. Electric LED lighting with dimmer
The microscope has two independently adjustable lighting units for upper and lower lighting that can be controlled using the dimmer wheel (Fig. A 8). The transmitted light unit is used for transparent specimens on slides. To view solid non-transparent specimens use the direct light unit. Simultaneous use of both direct and transmitted light is only reasonable if the specimen is semi-transparent. This operating mode is not recommended for transmitted light specimens on slides as it may cause reflection on the slide.
3. Combined colour filter and diaphragm wheel
Use this wheel (Fig. A 11), under the microscope table, to adjust observation quality for transparent specimens. The finer details are better visible depending on colour and specimen. In direct light examination of e.g. transparent specimens coloured underlighting combined with white upper light may improve detail imaging. Depending on the diaphragm opening used the appropriate light bundling can improve focus, focus depth, contrast and detail resolution.
4. Microscope settings (transmitted light)
The microscope view (Fig. A 1-5) is now adjusted for the first observation. First undo the screw (Fig. A 17) and turn the eyepiece barrel (Fig. A 4) until it reaches a position comfortable for you. You can now look through the lens, always beginning at the lowest magnification. Move the microscope stage (Fig. A 13) down using the focussing wheel (Fig. A 7) and turn the lens nosepiece (Fig. A 16) to the lowest magnification (4x). (The 4x objective is now positioned vertically downward.)
Insert the 5x eyepiece (Fig. A 2) into the Barlow lens (Fig. A 3). Make sure the Barlow lens is wholly inserted in the eyepiece barrel (Fig. A 4) and does not project.
Note
Before changing the objectives, always move the microscope stage right down. This prevents possible damage.
5. Observation
Once you've set the microscope up with the right lighting and settings the principles below apply. Start with simple observation at lowest magnification. Centring and adjustment of the specimen is thus made easier. The higher the magnification the more light is needed for good observation quality. Place a slide with a permanent specimen right under the objective on the microscope stage and secure it in place with the clamps (Fig. A 14). Important: The specimen must be precisely sited in the centre of the transmitted lighting. Look through the eyepiece (Fig. A 1/2) and turn the focussing wheel (Fig. A 7) carefully until you get it right. Use the dimmer wheel (Fig. A 8) to set the brightness of the underlighting to view specimen details optimally. You can then set higher magnification by slowly pulling the Barlow lens (Fig. A 3) out of the eyepiece barrel (Fig. A 4). When nearly fully extracted magnification is nearly doubled.
For even higher magnification use the 16x eyepiece (Fig. A 1) and
Important note.
Higher magnification need not necessarily lead to better results. This depends on the specimen.
Please note.
If magnification is changed (eyepiece or objective change, Barlow lens extraction) the focus must be re-adjusted using the focussing wheel (Fig. A 7). Be very cautious when doing this. If you turn the microscope stage up too fast you may damage it and/or the slide.
6. Observation specimen - characteristics and preparation
6.1 Condition
Both transparent and non-transparent specimens can be examined with this microscope, which is a direct as well as transmitted light model. If opaque specimens are examined - such as small animals, plant parts, tissue, stone and so on - the light is reflected from the specimen through the objective and eyepiece, where it is magnified, to the eye (reflected light principle). If transparents
specimens are examined the light from below goes through the specimen, objective and eyepiece to the eye and is magnified en route (direct light principle). Many small organisms of the water, plant parts and finest animal components have now from nature these transparent characteristic, other ones
must be accordingly prepared. Is it that we make it by means of a pre-treatment or penetration with suitable materials (media) transparent or thus that we cut finest wafers off of them (hand cut, MicroCut) and these then examine. With these methods the following part will us make familiar.
6.2 Producing a thin specimen slide
As already stated, specimens for microscopic observation should always be sliced as thin as possible. A little wax or paraffin is needed to achieve the best results. A candle can be used for the purpose. The wax is put in a bowl and heated over a flame. The specimen is then dipped several times in the liquid wax. The wax is finally allowed to harden. Use a MicroCut (Fig. B 18) or knife/scalpel (careful!!!) to slice the wax-coated specimen as thinly as possible. The slices are laid on slides and covered with a covering glass.
6.3 Making your own specimens
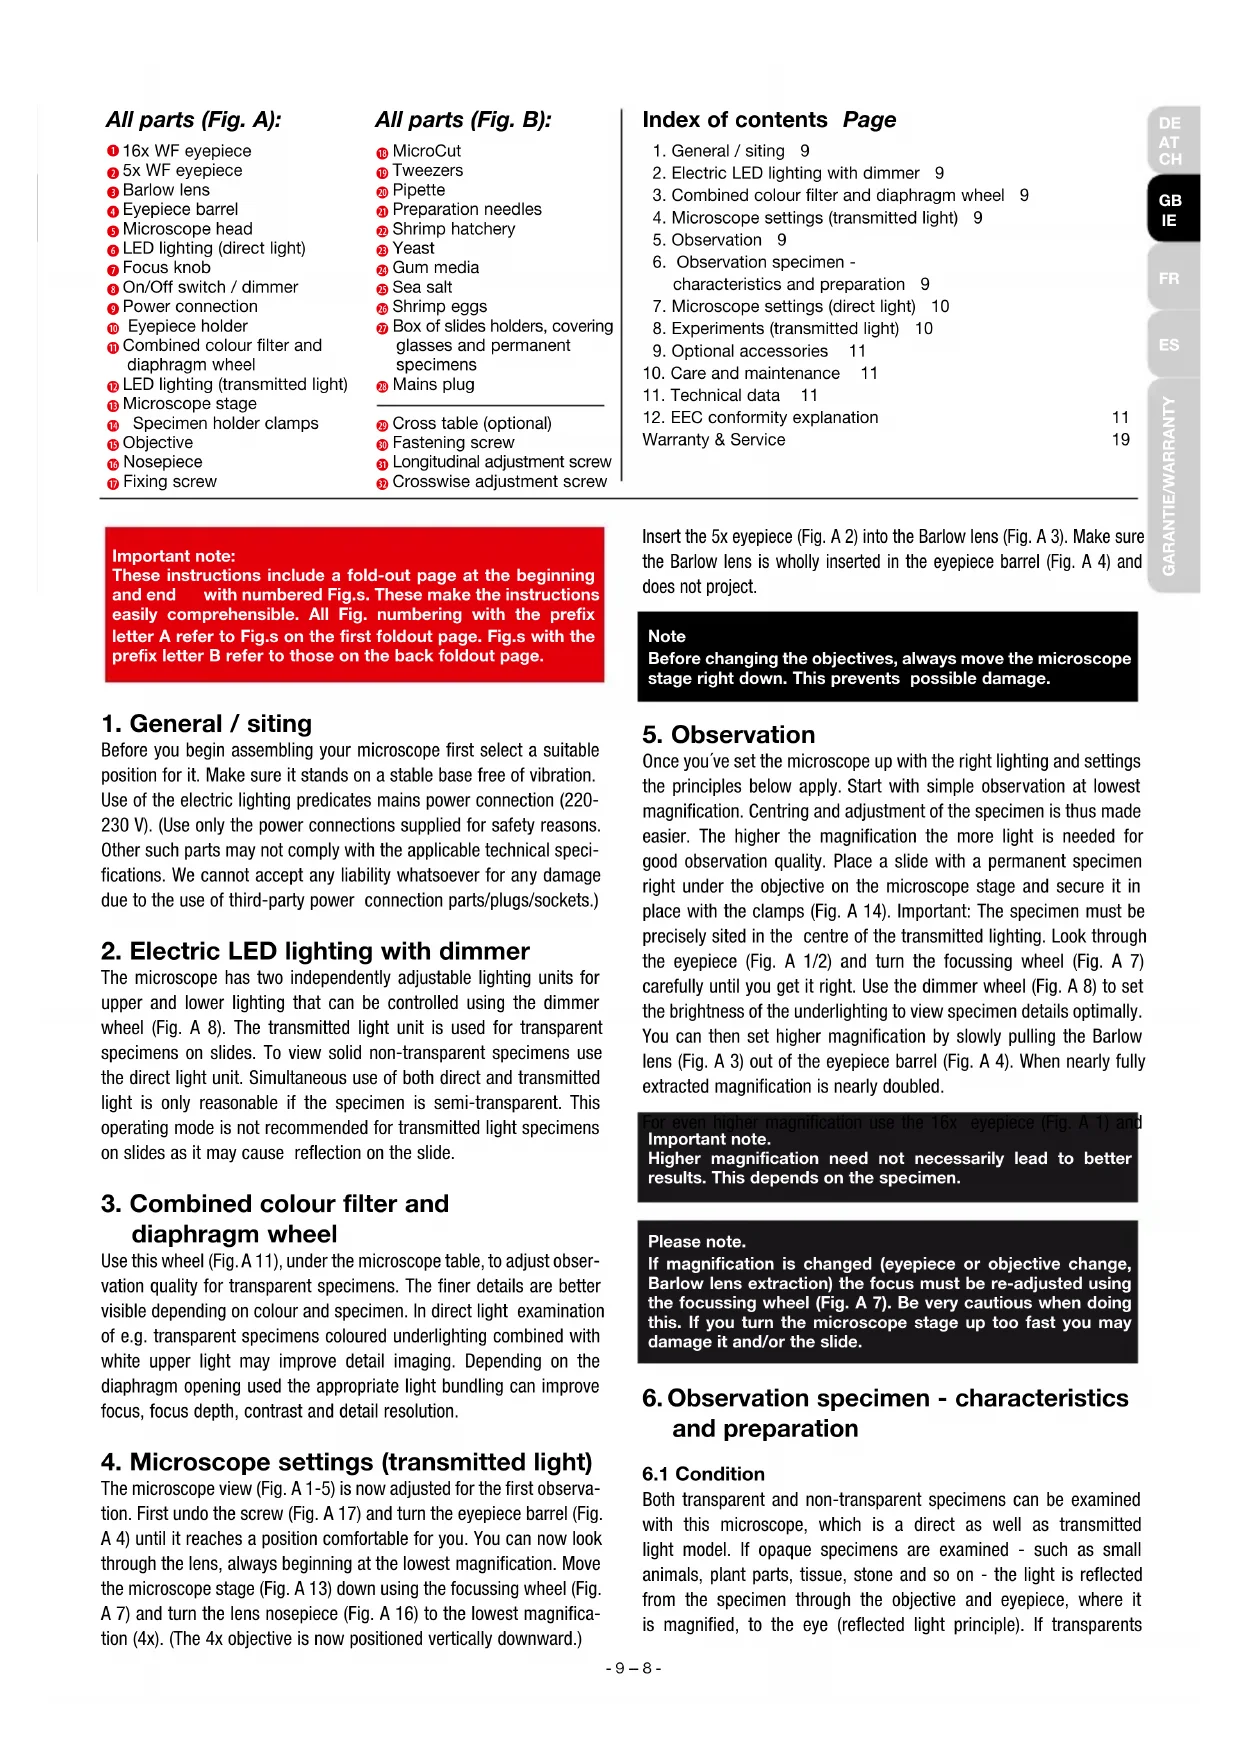
Place the specimen on the slide and add a drop of distilled water with a pipette (Fig. B 20) to the specimen (Fig. B I). Set a covering glass vertically at the edge of the drop so that the water runs along the glass edges (Fig. B II). Then slowly place the covering slide atop the drop.
Note
The gum media provided (Fig. B 24) is used in making permanent slides. Add it instead of distilled water. The medium hardens and the specimen is then permanently affixed to the slide.
7. Microscope settings (direct light)
You can adjust both upper and lower lighting individually or together to optimally illuminate any specimen. The best results in the direct light mode are achieved by combining the 5x eyepiece and the 4x objective. Any other combination increases magnification but reduces the field of visibility.
8. Experiments (transmitted light)
Once you're familiar with the microscope you can try the following experiments and view the results.
8.1 Newspaper print
Objects:
- A small piece of paper from a newspaper with parts of a picture and some letters,
- a similar piece of paper from an illustrated magazine.
Use your microscope at the lowest magnification and use the preparation of the daily paper. The letters seen are broken out, because the newspaper is printed on raw, inferior paper. Letters of the magazines appear smoother and more complete. The picture of the daily paper consists of many small points, which appear somewhat dirty. The pixels (raster points) of the magazine appear sharply.
8.2 Textile fibers
Objects and accessories:
- Threads of different textiles: Cotton, linen, wool, silk, Celanese, nylon etc.,
- two needles.
Each thread is put on a glass slide and frayed with the help of the two needles. The threads are dampened and covered with a cover glass.
The microscope is adjusted to a low magnification. Cotton fibres are of vegetable origin and look under the microscope like a flat, turned volume. The fibres are thicker and rounder at the edges than in the centre. Cotton fibres consist primary of long, collapsed tubes. Linen fibres are also of vegetable origin; they are round and run in straight lines direction. The fibres shine like silk and exhibit countless swelling at the fibre pipe. Silk is of animal origin and consists of solid fibres of smaller diameter contrary to the hollow vegetable fibres. Each fibre is smooth and even moderate and has the appearance of a small glass rod. Wool fibres are also of animal origin; the surface consists of overlapping cases, which appear broken and wavy. If it is possible, compare wool fibres of different weaving mills. Consider thereby the different appearance of the fibres. Experts can determine from it the country of origin of wool. Celanese is, like already the name says, artificially manufactured by a long chemical process. All fibres show hard, dark lines on the smooth, shining surface. The fibres crinkle after drying in the same condition. Observe the thing in common and differences.
8.3 How does bread mould develop?
Object: An old piece of bread.
The spores of the kind of mould, which strike our bread, are to be found everywhere in the atmosphere. Put bread on a slide and squirt carefully some water on it. Moisten bread only, don't wet it. Put the whole into a container with a screw-type cap and place it into a cabinet, into which only little light breaks in and which prevails it in a warm temperature. Within a short time the black bread mould forms. Regard the bread each day. At the first the mould shows up a white, shining consistence. Take it on a slide to observe it. The material turns out as a complicated thread mass, which forms the fungus body in its whole. One calls the whole mycelium. Each thread is a hypha. Soon some rhizoids arise, which embody the mould fungus with bread, in order thereby to receive water and nutrients for the growth of the mycelium. In the course of time the Rhizoid colours itself brownish. Vertically over this group hyphae grow like long slim stacks, which end in a tiny small, white ball. One calls the stack sporangiophores (carrier of the sporcap), the ball is a sporangium or a sporcap. Soon these balls accept a black color. Inside spores present mature. If now the sporcap breaks open, then it sets the spors free, which step now to air and infect other bread. With the naked eye you can recognize mature the sporcaps as tiny black marks. They are scattered on the mould fungus surface and give thus to the kind of mushroom its name. There are however still different kinds of mould fungi. They can be pink, red, blue or green. Manufacture yourselves preparations of all stages of the bread mould.
8.4 Salt water shrimps
Accessories:
8.4.1 The lifecycle of the saltwater shrimp
The saltwater shrimp or Artimia salina to scientists has an unusual and interesting lifecycle. The female's eggs are hatched without any male shrimp having to fertilise them. The resultant baby shrimps are all female. Under unusual conditions such as when a swamp is drained the eggs may produce male shrimps. These males fertilise the female's eggs, resulting in a specific type of eggs. These are called winter eggs and have a thick shell as protection. They're pretty rugged
and can survive the swamp or lake drying out causing the death of the entire shrimp population for up to a decade in a form of hibernation. The eggs hatch once the right ambient conditions again obtain. The eggs supplied (Fig. B 26) are of this type.
8.4.2 Hatching of the salt water shrimp
To hatch the shrimp it is essential to first have a saline solution suited to the shrimp's needs. Fill half a litre of rain- or freshwater in a container. Let it stand for about thirty hours. As water evaporates over time it's a good idea to have a second container of such water left standing for thirty-six hours. Once it's stood for this length of time pour half of the sea salt supplied into one of the containers and stir until it has dissolved. Then pour some of it into the shrimp sbreeding plant (Fig. B 22). Add a few eggs and close the lid. Put it somewhere with plenty of light but not in the direct sun. The tempera ture should be approximately 25^ C. The shrimps will hatch in two or three days at this temperature. Should any water evaporate during this time replace it from the second container.
8.4.3 The saltwater shrimps under the microscope
What comes out of the egg is known as a nauplius larva. Use the pipette (Fig. B 20) to put some of them on a slide for examination. They will move in the solution using their hair like limbs. Remove a few daily from the container for examination under the microscope. If you do so and save the pictures made with the MicrOcular you will then have a seamless record of the shrimp's lifecycle. You can remove the upper lid of the shrimp's breeding plant and put the whole thing under the microscope. The larvae will mature in six to ten weeks depending on ambient temperature. You will soon have bred an entire generation of saltwater shrimps that constantly reproduce.
8.4.4 Feeding your saltwater shrimps
To keep them alive saltwater shrimps must be fed occasionally. This must be done carefully as overfeeding causes the water to stagnate and poison the shrimps. Feeding is best done with dry powdered yeast (Fig. B 23). Give them a little every other day. If the water darkens this signifies it is stagnating. If so remove the shrimps and put them in a fresh saline solution.
Note
Eggs and shrimps are unfit for human consumption!
9. Optional accessories
A cross table is available for the Bresser BioDiscover as an optional accessory (Fig. B 29). Remove the specimen holder clamps to install it (Fig. A 14).
Use the screw (Fig. B 30) to fasten the cross table to the microscope table. Use the adjusting screws (Fig. B 31+32) to precisely position the specimen longitudinally (Fig. B 31) and crosswise (Fig. B 32).
10. Care and maintenance
Your microscope is a top-quality optical device. Therefore please prevent dust or damp affecting it. Avoid fingerprints on all optical surfaces. Remove any dirt or dust with a fine soft brush first. Then clean the place/s affected with a soft lint-free cloth. Fingerprints on optical surfaces are best removed with a lint-free cloth dampened with a little alcohol.
11. Technical data
Magnification table
| Eyepiece | Objective | Magnification | with Barlow lens |
| 5x | 4x | 20x | |
| 5x | 10x | 50x | |
| 5x | 40x | 200x | |
| 16x | 4x | 64x | |
| 16x | 10x | 160x | |
| 16x | 40x | 640x |
12. EEC conformity explanation
Bresser GmbH, resident in 46414 Rhede/Westf., Gutenbergstr. 2, Germany, explains the agreement with in the following specified EEC guidelines for this product:
EN 61558-2-6:1997
EN 61558-1: 1997 +A1
Product description: Biological-/ Stereo-type microscope
Model: BRESSER BioDiscover
Rhede, July 2007
Bresser GmbH

Helmut Ebbert
Managing director
Descriptif (Fig. A):
Higher magnification need not necessarily lead to better results. This depends on the specimen.
Please note.
If magnification is changed (eyepiece or objective change, Barlow lens extraction) the focus must be re-adjusted using the focussing wheel (Fig. A 7). Be very cautious when doing this. If you turn the microscope stage up too fast you may damage it and/or the slide.
The regular guarantee period is 2 years and begins on the day of purchase. To benefit from an extended voluntary guarantee period as stated on the gift box, registration on our website is required. You can consult the full guarantee terms as well as information on extending the guarantee period and details of our services at www.bresser.de/warranty_terms.
Would you like detailed instructions for this product in a particular language? Then visit our website via the link below (QR code) for available versions.
Alternatively you can also send an email to manuals@bresser.de or leave a message on +49 (0) 28 72 - 80 74-220*. Please always state your name, precise address, a valid phone number and email address, as well as the article number and name.
*Number charged at local rates in Germany (the amount you will be charged per phone call will depend on the tariff of your phone provider); calls from abroad will involve higher costs.
FR GARANTIE ET SERVICE
Reservation of technical alterations

- ATTENTION!
- All parts (Fig. B):
- Index of contents Page
- Important note:
- General / siting
- Electric LED lighting with dimmer
- Combined colour filter and diaphragm wheel
- Microscope settings (transmitted light)
- Note
- Observation
- Please note.
- Observation specimen - characteristics and preparation
- Condition
- Producing a thin specimen slide
- Making your own specimens
- Microscope settings (direct light)
- Experiments (transmitted light)
- Newspaper print
- Objects:
- Textile fibers
- Objects and accessories:
- How does bread mould develop?
- Object: An old piece of bread.
- Salt water shrimps
- Accessories:
- The lifecycle of the saltwater shrimp
- Hatching of the salt water shrimp
- The saltwater shrimps under the microscope
- Feeding your saltwater shrimps
- Optional accessories
- Care and maintenance
- Technical data
- EEC conformity explanation
- Descriptif (Fig. A):
- FR GARANTIE ET SERVICE
Brand : BRESSER
Model : BIODISCOVER 201280X
Category : Microscope