VR20J9010UR - Vacuum Cleaner SAMSUNG - Free user manual and instructions
Find the device manual for free VR20J9010UR SAMSUNG in PDF.

Frequently Asked Questions - VR20J9010UR SAMSUNG
User questions about VR20J9010UR SAMSUNG
0 question about this device. Answer the ones you know or ask your own.
Ask a new question about this device
Download the instructions for your Vacuum Cleaner in PDF format for free! Find your manual VR20J9010UR - SAMSUNG and take your electronic device back in hand. On this page are published all the documents necessary for the use of your device. VR20J9010UR by SAMSUNG.
USER MANUAL VR20J9010UR SAMSUNG
POWERbot user manual
* Before operating this unit, please read the instructions carefully. * For indoor use only.
English
imagine the possibilities
Thank you for purchasing a Samsung product.
Contents
03 Safety information
08 Installation Accessories
10 Charging Automatic charging / Recharging / Low battery
12 Using POWERbot Turning the power on/off / Starting Auto clean mode / Starting Spot clean mode / Recharging / Selecting cleaning modes
14 Using the remote control Power/Recharging / Cleaning modes / Suction modes / Additional functions / Direction control
15 Name of each part Top / Bottom / Display panel
16 Cleaning and maintaining Cleaning the dustbin / Cleaning the sensors and the camera / Cleaning the Power brush / Cleaning the Driving wheel
18 Notes and cautions Charging / In use / Cleaning and maintenance
20 Information codes
21 Troubleshooting
22 Warnings about battery
23 Open Source Announcement
23 Specifications
Safety information
SAFETY INFORMATION

- Before operating the appliance, please read this manual thoroughly and retain it for your reference.

- Because these following operating instructions cover various models, the characteristics of your vacuum cleaner may differ slightly from those described in this manual.
CAUTION/WARNING SYMBOLS USED
| WARNING | Indicates that a danger of death or serious injury exists. |
| cAutloN | Indicates that a risk of personal injury or material damage exists. |
OTHER SYMBOLS USED
| NotE | Indicates that the following text contains additional important information. |
Safety information
IMPORTANT SAFETY INSTRUCTIONS
When using an electrical appliance, basic precautions should be observed, including the following:
READ ALL INSTRUCTIONS BEFORE USING YOUR POWERbot.
Unplug from outlet when not in use and before conducting maintenance.
WARNING: to reduce the risk of fire, electric shock, or injury:
GENERAL
- Use only as described in this manual.
- Do not operate POWERbot or the adapter / docking station if it has been damaged in any way.
- If the vacuum cleaner is not working as it should, has been dropped, damaged, left outdoors, or dropped in water, return it to a customer care center.
- Do not handle the adapter / docking station or POWERbot with wet hands.
- Use only on dry, indoor surfaces.
- This appliance can be used by children aged from 8 years and above and persons with reduced physical, sensory or mental capabilities or lack of experience and knowledge if they have been given supervision or instruction concerning use of the appliance in a safe way and understand the hazards involved.
- Children shall not play with the appliance. Cleaning and user maintenance shall not be made by children without supervision.
Adapter / Docking station
- Do not modify the polarized plug to fit a non-polarized outlet or extension cord.
- Do not use outdoors or on wet surfaces.
- Unplug the adapter / docking station from the outlet when not in use and before servicing.
- Use only the adapter / docking station supplied by the manufacturer to recharge.
- Do not use with a damaged cord or plug or a loose power outlet.
- Do not pull or carry by the cord, use the cord as a handle, close the door on the cord, or pull the cord around sharp edges or corners. Keep the cord away from heated surfaces.
- Do not use extension cords or outlets with inadequate current carrying capacity.
- Do not unplug by pulling on the cord. To unplug, grasp the plug, not the cord.
-
Do not mutilate or incinerate batteries as they will explode at high temperatures.
-
Do not attempt to open the adapter / docking station. Repairs should only be carried out by a qualified customer care center.
- Do not expose the adapter / docking station to high temperatures or allow moisture or humidity of any kind to come into contact with the adapter / docking station.
POWERbot
- Do not pick up hard or sharp objects such as glass, nails, screws, coins, and etc.
- Do not use without a filter in place. When servicing the unit, never put fingers or other objects into the fan chamber in case the unit accidentally turns on.
- Do not put any objects into openings. Do not use with any openings blocked; keep openings free of dust, lint, hair, and anything that may reduce air flow.
- Do not pick up toxic materials (chlorine bleach, ammonia, drain cleaner, etc.).
- Do not pick up anything that is burning or smoke, such as cigarettes, matches, or hot ashes.
- Do not use to pick up flammable or combustible liquids such as gasoline, nor use on areas where they may be present.
- Locations with candles or desk lamps on the floor.
- Locations with unattended fires (fire or embers).
- Locations with distilled alcohol, thinner, ashtrays with burning cigarettes, etc.
- Do not use POWERbot in an enclosed space filled with vapours given off by oil based paint, paint thinner, moth proofing substances, flammable dust, or other explosive or toxic vapours.
- Leaks from battery cells can occur under extreme usage or temperature conditions. If the liquid gets on skin, wash quickly with water. If the liquid gets into the eyes, flush them immediately with clean water for a minimum of 10 minutes. Seek medical attention.
Safety information

WARNING
Power related
▶ Please prevent any risk of electric shock or fire.
- Do not damage the power cord.
- Do not pull the power cord too hard or touch the power plug with wet hands.
- Do not use a power source other than 100-240 V\~ and also do not use a multi outlet to supply power to number of devices at the same time. (Do not leave the cord carelessly on the floor.)
- Do not use a damaged power plug, power cord or loose power outlet.
▶ Clean dust or any foreign matters on the pin and contact part of the power plug.
– There is a risk of electric shock or malfunction.

WARNING
Before use
▶ Do not use POWERbot near combustible materials.
- Place near candle, desktop lamps, fireplace or near combustible materials such as gasoline, alcohol, thinners etc.
The POWERbot is intended for household use therefore do not use it in an attic, basement, storage, industrial building, out of indoor space, places with moisture (such as bathroom, laundry), on the table or shelves.
- The POWERbot can be damaged or malfunction.
▶ Be sure POWERbot does not pass through or touch any kind of liquids.
- The POWERbot can be severely damaged and it may contaminate other areas if the wheels pass through liquid.
▶ Do not spill any liquids on the docking station.
– There is a risk of fire or electric shock.
▶ Do not use the docking station for anything other than its intended purpose.
– There is a risk of fire or severe damage to the docking station.
▶ Always keep the cliff sensor clean for your safety.

WARNING
In use
▶ If any abnormal sounds, smells or smoke come from POWERbot, immediately shut off the emergency switch at the bottom of POWERbot and contact a service center.

WARNING
Cleaning and maintenance
▶ When power cord is damaged, contact a service center to get it replaced by certified repairman.
- There is a risk of fire or electric shock.
▶ Please check with a Samsung Electronics service center when exchanging batteries.
- Using batteries from other products can cause malfunction.

CAUTION
Before use
- Insert the dustbin before using POWERbot. - Be careful with the followings for proper automatic recharging.
- Always turn on the power of the docking station.
- Install the docking station where POWERbot can easily find.
- Do not leave any object in front of the docking station.
▶ When installing the docking station, do not leave the cord carelessly on the floor since POWERbot may get tangled by it.
▶ Do not use POWERbot on black colored floors.
- The POWERbot may not be able to operate normally.
▶ Do not pick up POWERbot by the dustbin holder.
▶ Do not place any objects within 0.5 m to both sides and 1 m to the front of the docking station.
▶ Make sure the docking station's charging contact is not damaged or have any foreign matters on it.
▶ Do not install the docking station in an area with a dark floor.
- If the floor around the docking station is dark, recharging is hindered.
▶ Move any obstacles that may disturb POWERbot's movement (such as children's indoor swing or slides) before cleaning.

CAUTION
In use
▶ Using POWERbot on thick carpet may damage both POWERbot and the carpet.
- The POWERbot cannot pass over carpet that is thicker than 1 cm.
▶ Do not use POWERbot on tables or other high surfaces.
– There is a risk of damage if it falls.
The POWERbot may bump into chair, desk legs therefore move them away for faster and efficient cleaning.
▶ When POWERbot is operating, do not lift it up or carry it to another area.
▶ Do not hold by driving wheels of POWERbot when carrying it to another area.
▶ Do not put any objects on top of POWERbot since it may cause malfunction.
▶ Remove any large papers or plastic bags immediately when using POWERbot since they may block the intake.
▶ Do not aim the red pointer directly at people or animals.

CAUTION
Cleaning and maintenance
▶ Prevent any damage to POWERbot by complying the followings.
- Do not clean POWERbot by spraying water directly onto it or use benzene, thinner, acetone or alcohol to clean it.
▶ Do not disassemble or repair POWERbot. This should only be done by a certified repairman.
▶ Always keep the obstacle sensor and cliff sensor clean.
- If foreign matter accumulates, sensors may malfunction.
Installation
The docking station must be plugged in and turned on at all times.
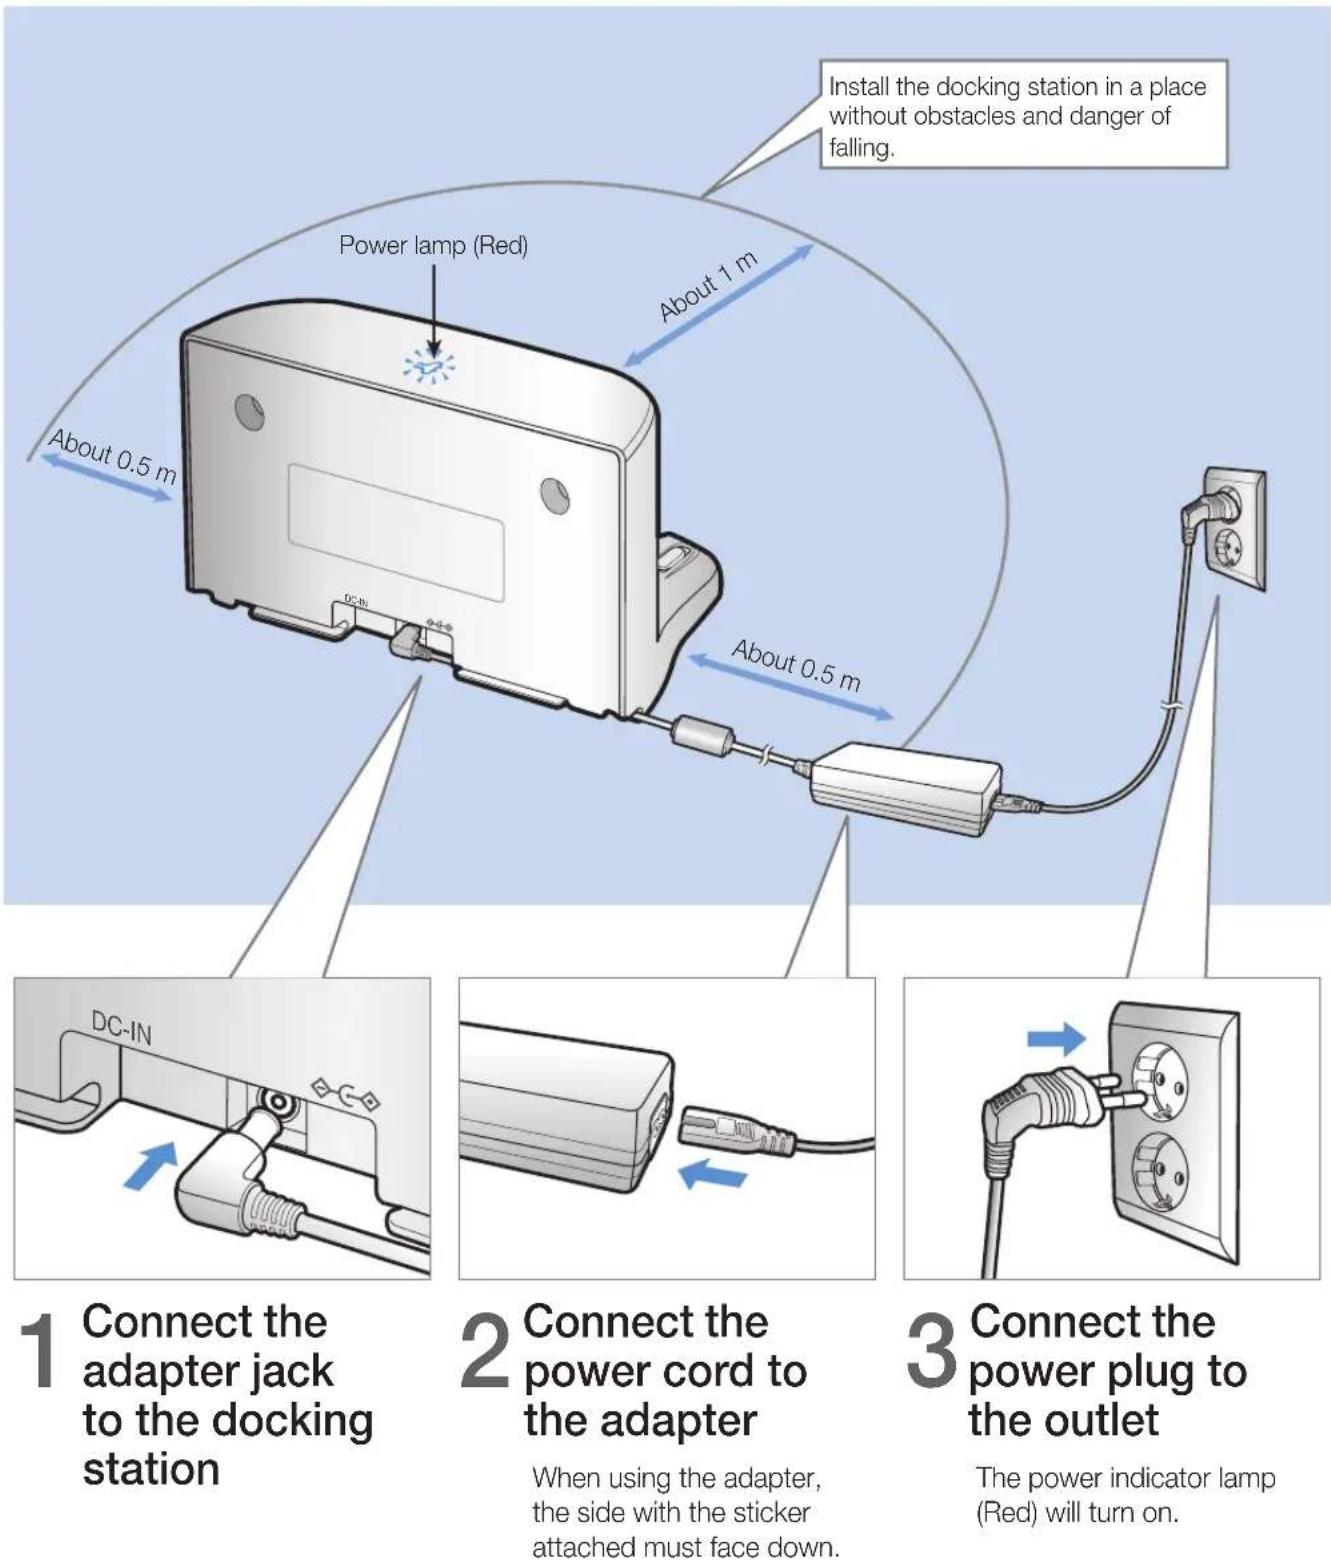
text_image
Install the docking station in a place without obstacles and danger of falling. Power lamp (Red) About 1 m About 0.5 m About 0.5 m DC-IN Connect the adapter jack to the docking station 2 Connect the power cord to the adapter When using the adapter, the side with the sticker attached must face down. 3 Connect the power plug to the outlet The power indicator lamp (Red) will turn on.Accessories
 |  |  |  |
| Remote control Batteries (AAA type) User manual Spare filter | |||
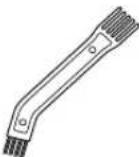 | 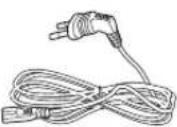 | 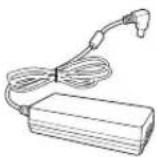 | |
| Cleaning brush Power cord Adapter | |||

Note
▶ Install the docking station in a place where the floor and wall are level.
▶ It is best to install the docking station along the grain of wooden floors.
▶ If the emergency switch is off, the POWERbot will not charge even if it is docked on the docking station.
▶ Always turn on the power of the docking station.
- If power is not supplied to the docking station, the POWERbot cannot find it and cannot automatically recharge.
- If the POWERbot is left detached from the docking station, the battery will drain naturally.
▶ If the POWERbot is in sleep mode, power will not come on even if the emergency switch is turned off and then on. Press and hold the [Start/Stop] button on the POWERbot to turn off the sleep mode.
Charging
text_image
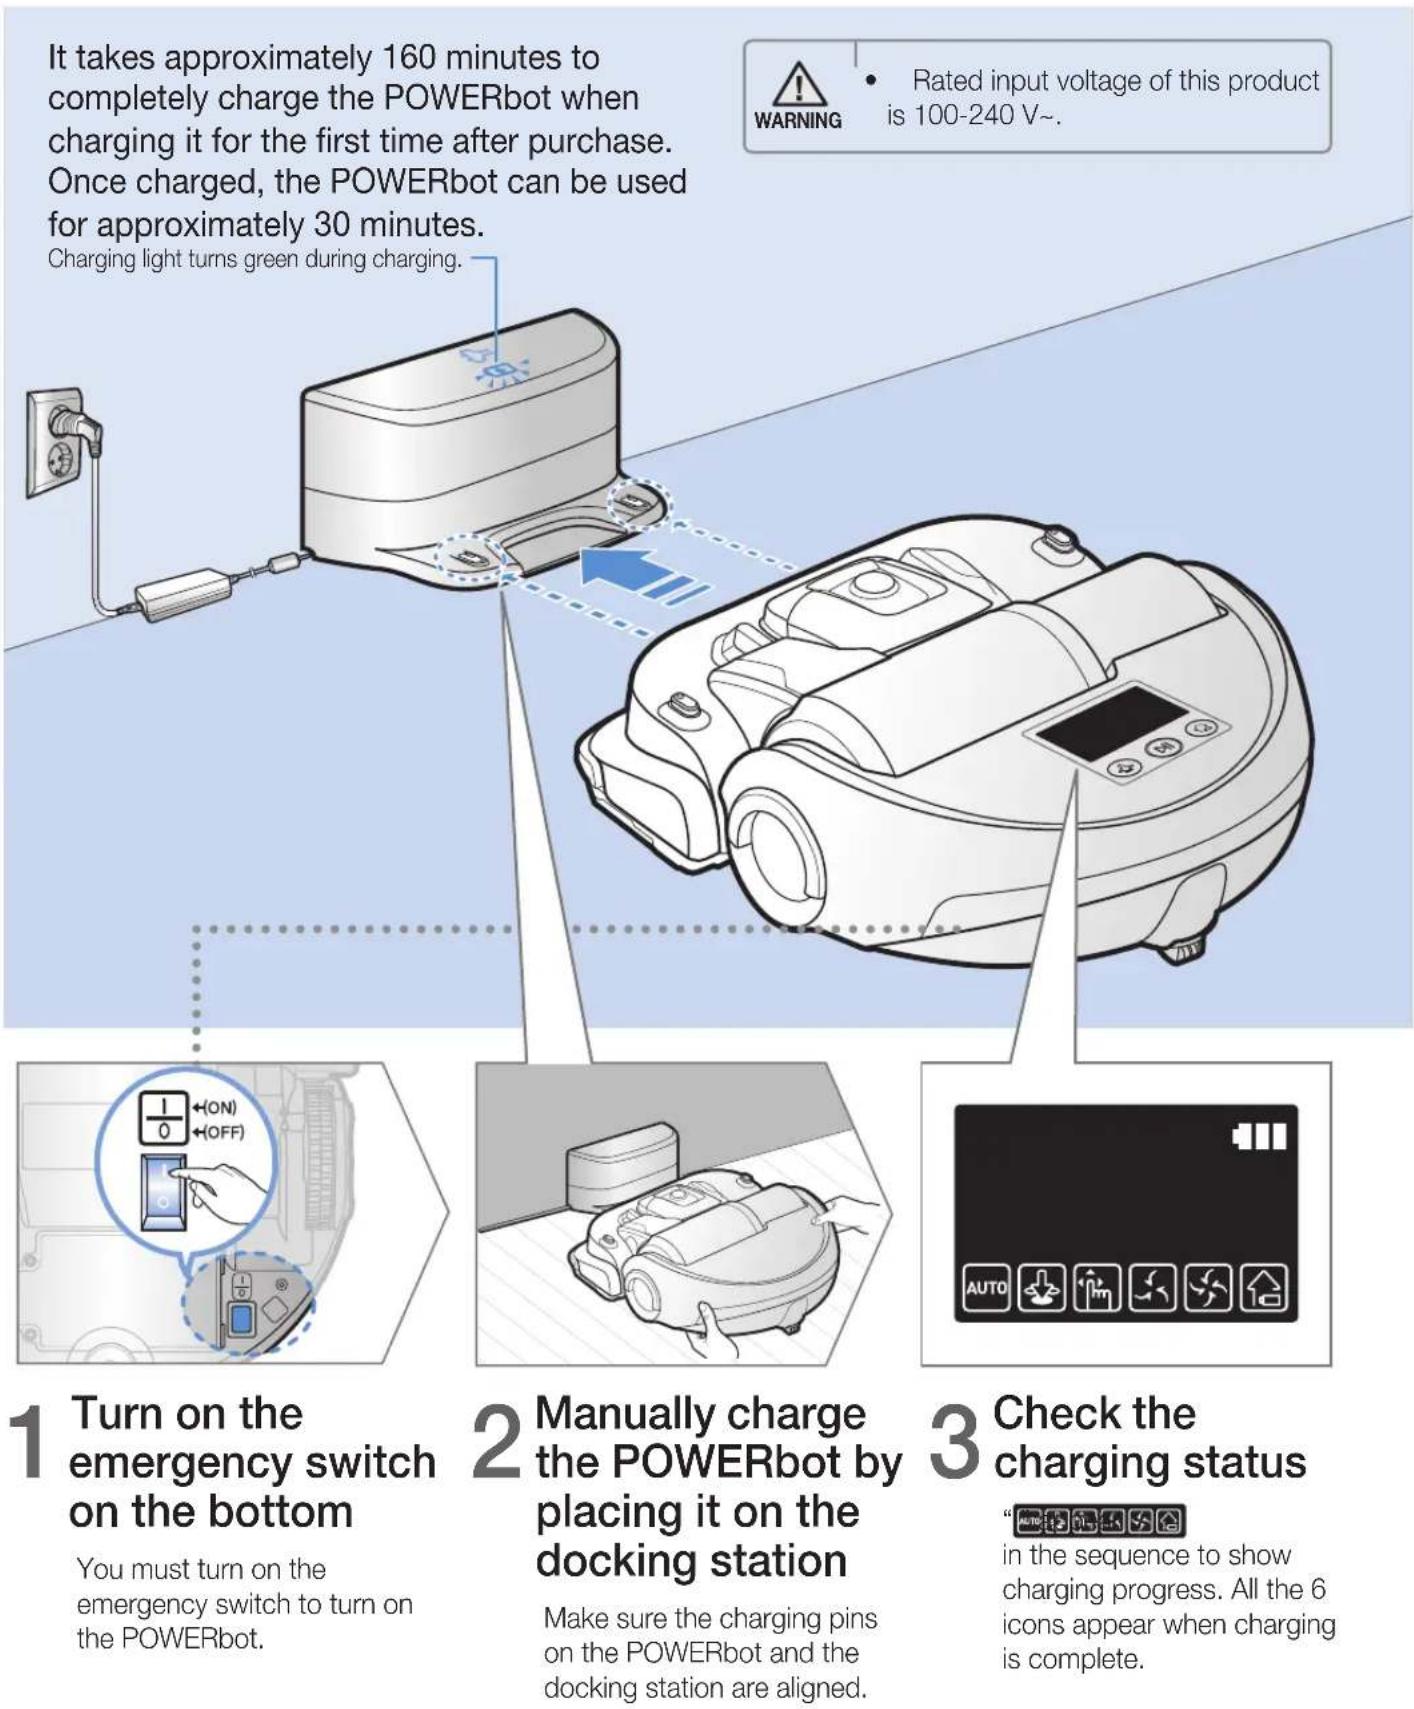
It takes approximately 160 minutes to completely charge the POWERbot when charging it for the first time after purchase. Once charged, the POWERbot can be used for approximately 30 minutes. Charging light turns green during charging. 1 Turn on the emergency switch on the bottom You must turn on the emergency switch to turn on the POWERbot. 2 Manually charge the POWERbot by placing it on the docking station Make sure the charging pins on the POWERbot and the docking station are aligned. 3 Check the charging status in the sequence to show charging progress. All the 6 icons appear when charging is complete.Automatic charging
natural_image
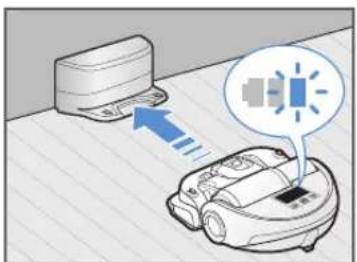
Illustration of a robotic device emitting sound waves from a cloud device (no text or symbols)When the battery indicator blinks during cleaning, the POWERbot will return to the docking station to charge itself automatically.
Recharging
natural_image
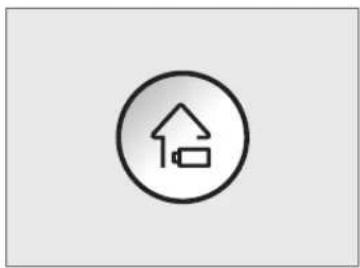
Simple line icon of a house inside a circle, no text or symbols presentYou can command the POWERbot to recharge at the docking station while it is in cleaning.
Low battery
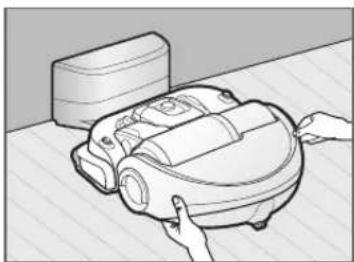
natural_image
Illustration of a robotic vacuum cleaner with hands interacting with it (no text or symbols present)Manually charge the POWERbot by placing it on the docking station.
Steps to take if recharging not occurring:
Check the installation status of the docking station when:
▶ the docking station is located in a place where the POWERbot cannot easily access it.
▶ the distance between the docking station and POWERbot is over 5 m.
-It may take a long time for POWERbot to return to the docking station for recharging
Manually charge the POWERbot when:
▶ the docking station is located in a corner
▶ the battery is fully exhausted
▶ the POWERbot is immobilized by an obstacle (furniture etc.)
▶ the POWERbot can't climb a threshold near the docking station (The maximum height of a threshold the POWERbot can climb is about 1.5 cm.
▶ the battery indicator blinks
▶ the POWERbot is set to the Spot clean or Manual clean mode
Using POWERbot
You must turn on the emergency switch on the bottom of the unit before using POWERbot.
Turning the power on/off
Press the button for more than 3 seconds

- When POWERbot is not used for 30 minutes, power will turn off automatically.
natural_image
Technical line drawing of a mechanical component with no visible text or symbolsStarting Auto clean mode
Press and release this button. The POWERbot moves and cleans automatically until it cleans an entire space once.

* Stop cleaning: Press and release the button
Starting Spot clean mode
Press and release this button. The POWERbot cleans a localized area intensely.
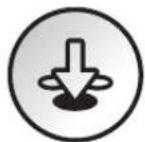
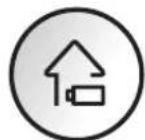
Recharging
▶ Recharging
You can command POWERbot to recharge at the docking station automatically while it is cleaning by pressing this button.
Selecting cleaning modes
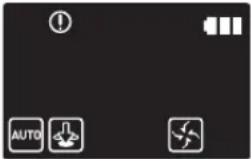
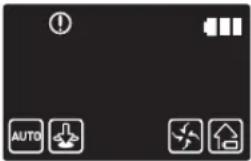
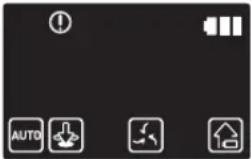
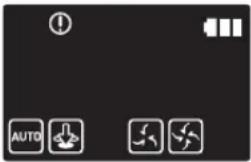
| Cleaning mode How to select Displayed icon | ||
| Auto clean |  |  |
| Spot clean |  | 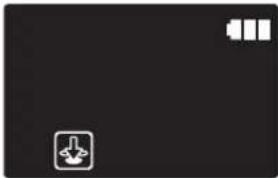 |
| Manual clean | * The movement and direction of the POWERbot is controlled by the remote control. | 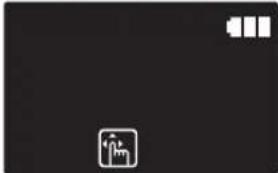 |
* When the POWERbot is being charged, you can select the Auto clean mode only.
* If the POWERbot fails to return to the charger, it will be turned into the sleep mode. Then the display panel of the main body will be turned off. Press [Start/Stop] or [Power] button to cancel the sleep mode.
* Charging and cleaning times may differ according to conditions of use.

natural_image
Solid dark gray rectangle with no visible text, symbols, or features.Cleaning method for each modes
natural_image
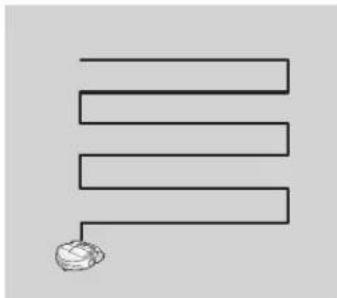
Simple line drawing of three parallel horizontal lines with a small spherical object at the bottom (no text or symbols)Auto clean
Cleans automatically until an entire space is cleaned once.
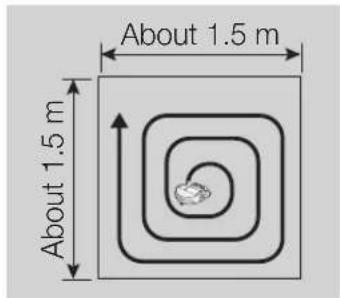
text_image
About 1.5 m About 1.5 mSpot clean
Cleans a localized area intensely. It can be used to clean bread or cookie crumbs.

natural_image
Illustration of a hand holding a remote and a device with a scroll (no text or symbols)Manual clean
You can control the POWERbot with the remote control and direct it to clean a desired spot.
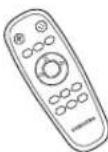
Using the remote control
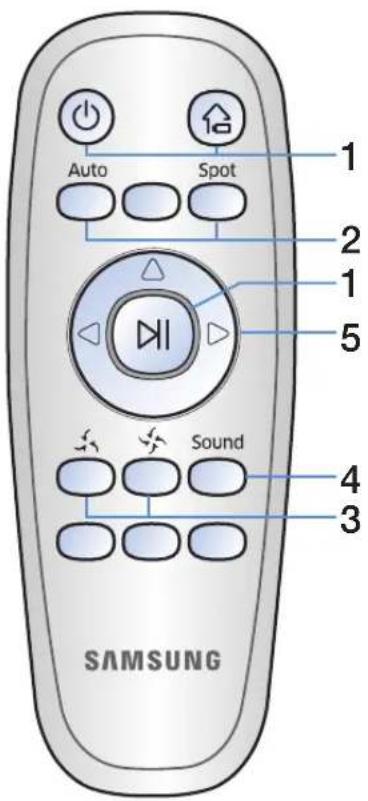
text_image
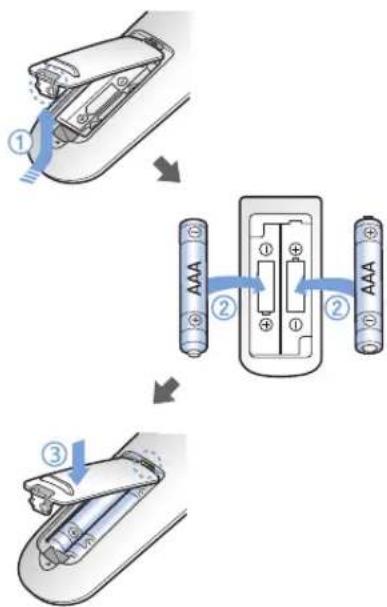
Auto Spot 1 2 1 5 Sound 4 3 SAMSUNGInserting batteries
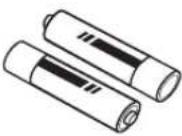
Open the battery cover by lifting it up while pressing the locking tab, and then insert the batteries as shown in the illustration. Then, close the cover until it clicks into place.
flowchart
graph TD
    A["Step ①: Discharge"] --> B["Step ②: Internal charging"]
    B --> C["Step ③: External charging"]
1 Power/Recharging
| Power |  | Turn POWERbot's power on/off |
| Recharging |  | Select to recharge POWERbot at the docking station while it is cleaning. |
| Start/Stop |  | Select to start or stop cleaning |
2 Cleaning modes
| Auto clean | Auto | Select to automatically clean an entire space once |
| Spot clean |  | Select to clean a localized area intensely |
3 Suction modes
| Silence mode |  | Select to clean with lower operational noise |
| Normal mode |  | Select to clean with normal suction power |
4 Additional functions
| Sound | Sound | Each time you press this button,Sound Effects → Mute is selected in this sequence. |
5 Direction control
| Forward movement |  | Select to move forward |
| Left turn |  | Select to turn left |
| Right turn |  | Select to turn right |
* Moving backward is not available
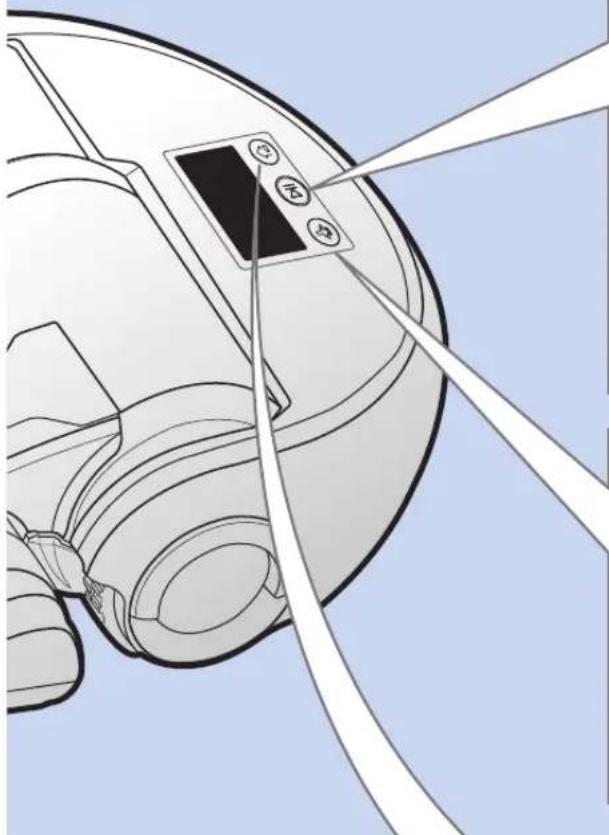
Name of each part
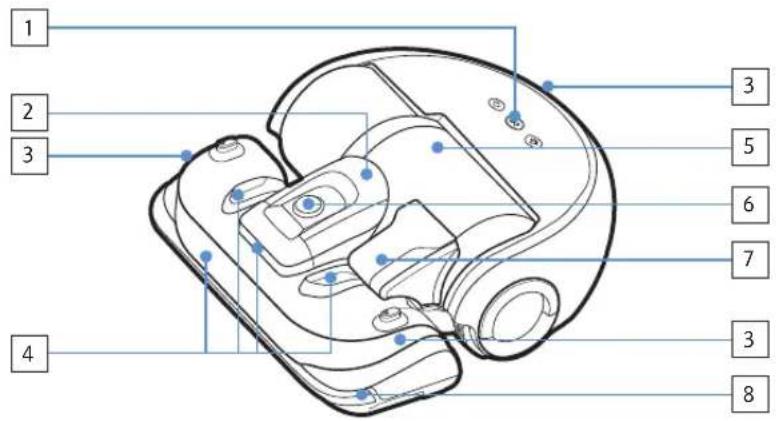
text_image
1 2 3 4 5 6 7 8 3 3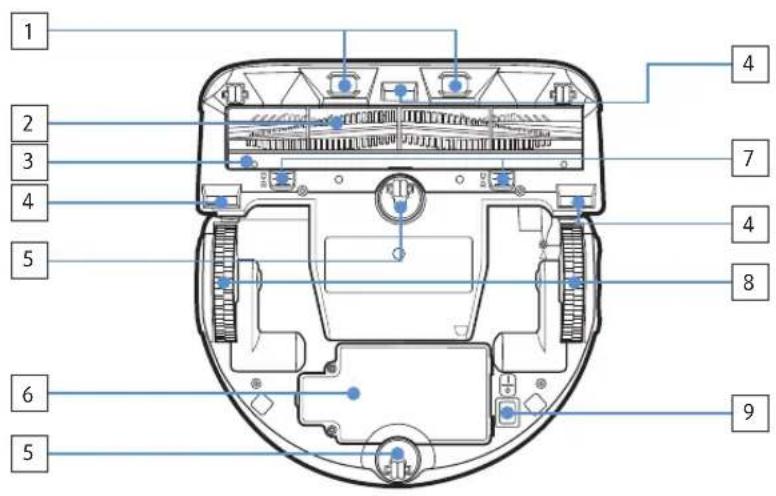
text_image
1 2 3 4 5 6 5 4 7 4 8 9
text_image
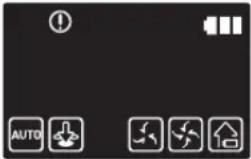
1 2 3 AUTO 894765 10 12 11Top
- Display panel
- Dustbin holder
- Remote control signal receiver
- Obstacle sensor
- Dustbin
- Camera
- Dustbin handle
- Bumper sensor
Bottom
- Charge pins
- Power brush
- Power brush cover
- Cliff sensor
- Roller
- Battery cover
- Power brush cover button
- Driving wheel
- Emergency switch
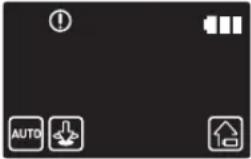
Display panel
- Mute
- Information indicator
- Battery indicator
- Auto clean
- Spot clean
- Manual clean
- Silence mode
- Normal mode
- Recharging
- Spot cleaning button
- Start/Stop button
- Recharging button
Cleaning and maintaining
You must turn off the emergency switch before cleaning POWERbot.
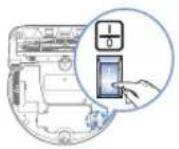
Cleaning the dustbin

natural_image
Illustration of a hand holding a device with a blue arrow pointing to the component (no text or symbols present)1 Remove the dustbin

text_image
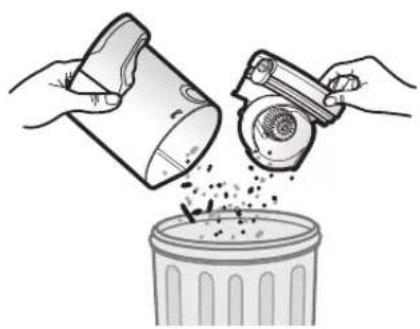
Diagram showing two steps of a hand operating a device, labeled with numbered instructions for each step.2 Remove the dustbin cover
natural_image
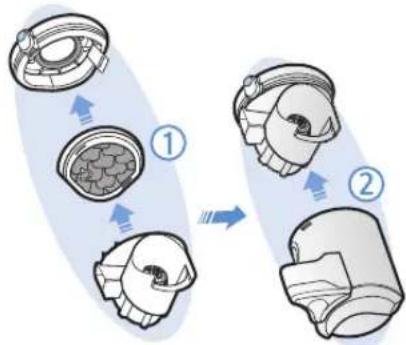
Illustration of hands pouring liquid from a container into a trash bin (no text or symbols)3 Remove dust in the dustbin and cyclone unit
text_image
Illustration showing steps to organize a toothbrush with water filter, including cleaning and cleaning of the tooth.4 Detach the cyclone unit from the dustbin cover, and then wash the dustbin and the filter
flowchart
graph TD
    A["Step 1: Internal component"] --> B["Step 2: Final assembly"]
    B --> C["Arrow indicating assembly direction"]
5 Reassemble the dustbin
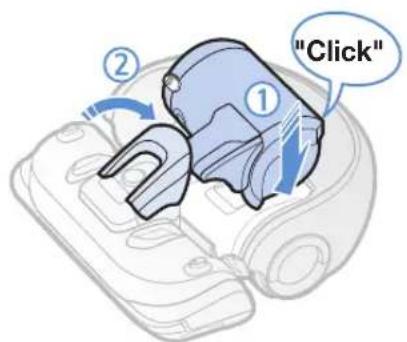
text_image
"Click"6 Reinsert the dustbin into the main body until it clicks
Cleaning the sensors and the camera
Lightly wipe with soft cloth. Do not use water or cleaning solutions.

text_image
Camera Front sensor window Cliff sensors Rear sensor windowCleaning the power brush
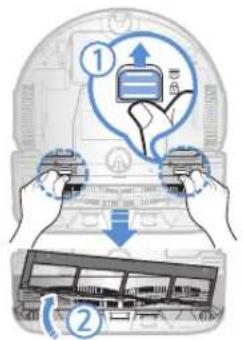
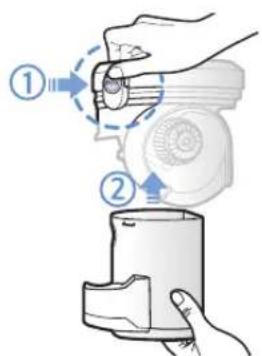
text_image
Diagram illustrating credit card usage steps with labeled arrows and icons1 Remove the Power brush cover

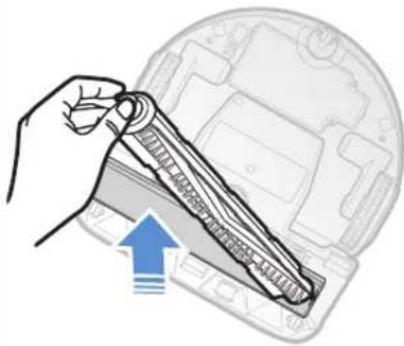
natural_image
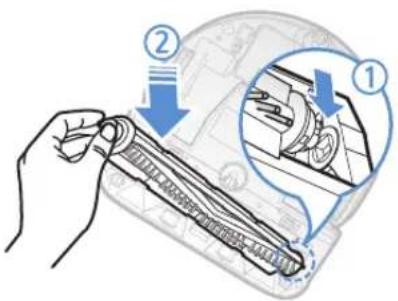
Illustration of a hand holding a mechanical component with an upward arrow indicating motion (no text or symbols present)2 Remove the Power brush
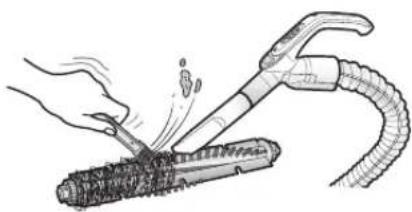
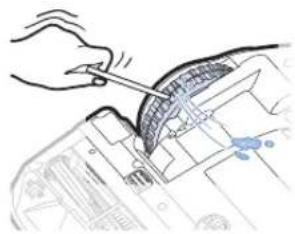
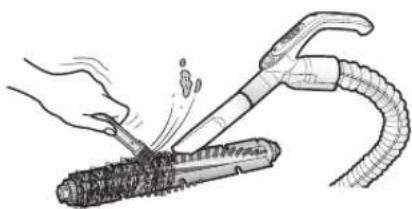
natural_image
Illustration of a hand using a tool to cut a cylindrical object with motion lines, no text or symbols present3 Clean the Power brush
text_image
Diagram illustrating a mechanical assembly process with labeled steps ① and ②, showing hand positioning and tool path.4 Reassemble the Power brush
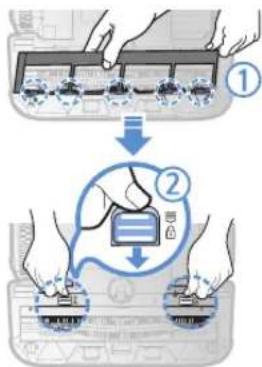
text_image
Diagram illustrating two-step installation of a device with labeled components and directional arrows5 Reassemble the Power brush cover
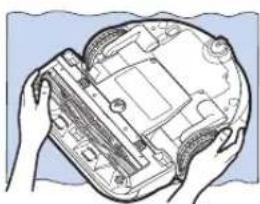
Cleaning the Driving wheel

natural_image
Illustration of hands holding a computer motherboard with visible circuitry and components (no text or symbols)1 Put a soft cloth on the floor and place POWERbot upside-down on the cloth.

natural_image
Hand using a tool to cut or mark a curved mechanical component (no text or symbols visible)2 Use a blunt rod or tweezers to remove foreign matter.
Notes and cautions
Charging

Note
▶ If the battery overheats during charging, it may take longer to charge.
▶ When automatic charging is not working, do the following:
- Turn the emergency switch (on the bottom of POWERbot) off and on again.
- Unplug the docking station's power plug and then plug it back on.
- Unplug the docking station, and then check whether there is any foreign matter on the charge pins and clean POWERbot and the charge pins of the docking station with a dry cloth or rag.
- Check for any obstacles such as reflective objects, chairs, etc. near the docking station.
▶ If POWERbot is left detached from the docking station, the battery will drain naturally.
– Try to keep POWERbot being charged on the docking station. (However, turn off the emergency switch and leave the docking station unplugged when planning to leave the house for long periods of time by going on a business trip or vacation, etc.)
In use

Note
The POWERbot may get caught on thresholds, etc. during cleaning.
- To restart operation, shut off the emergency switch, move the POWERbot to an area where it can move easily, and then turn on the power again.
The POWERbot cannot completely clean areas it cannot enter, such as corners, between the wall and sofa, etc.
- Please use another cleaning tool to clean them regularly.
▶ The POWERbot cannot vacuum clumps of dirt, so some may remain on the floor after cleaning.
- Please use another cleaning tool to clean them regularly.
▶ If the battery becomes low during Auto clean mode, POWERbot will recharge and finish cleaning the remaining area after recharging. (Repeat cleaning frequency: 1 time)
▶ You cannot select and have the POWERbot execute Spot/Manual clean mode while it is charging.
▶ Do not unnecessarily move the POWERbot or press buttons while it is in Auto clean mode. It assumes that cleaning is complete and starts cleaning again from the beginning.
▶ Close doors before cleaning with the POWERbot. The POWERbot can enter rooms through thresholds even though the thresholds are below 5 cm.
▶ Try not to use the POWERbot at areas near slides, indoor swing, pots, fireplaces, or places with flame or moisture.
- If not, it may cause the loss of property.
▶ Do not lie down around the POWERBOT that is running.
- Your hair may be caught in the power brush, resulting in physical injury.
Cleaning and maintenance

Note
▶ If you washed the dustbin and filter with water
– Dustbin: Completely wipe out the water.
- Filter: Completely dry it in the shade before using.
▶ Purchase a filter at authorized Samsung service centers if you need more filters.

caution
▶ Watch your fingers when attaching or detaching the filter, since they may get stuck in the dustbin's intake.
▶ To avoid blockages by foreign matter, do not let the POWERbot vacuum up toothpicks, cotton swabs etc.
▶ If it is difficult to remove foreign matter from the Power brush, contact an authorized Samsung service center.
▶ Since the power brush removes dirt from the floor during cleaning, foreign matter such as thread, long hair, etc. may get caught in it. For the best cleaning results, check and clean it regularly.
About the battery

Note
▶ Purchase batteries at authorized Samsung service centers and check for the genuine part symbol (SAMSUNDel name before purchasing.
This battery is exclusively for the Samsung Electronics POWERbot. Do not use it for any other product.
▶ Do not disassemble or modify the battery.
▶ Do not throw the battery out in fire or heat it.
▶ Do not connect any metallic object to the charging contacts (+, -).
▶ Store the battery indoors (at 0 °C\~40 °C).
▶ If the battery malfunctions, do not disassemble it yourself. Contact your nearest Samsung service center.
- Battery charging time and usage time may decrease the more the battery is used. If the battery’s lifespan has been exceeded and it no longer chargers properly, have it replaced at a Samsung service center.
The battery warranty period is 6 months from the date of purchase.
Information codes
1 The information codes below appear on the display panel
2 If a code appears, turn off the emergency switch and check the instructions below and take appropriate action
3 The information code will disappear when you turn on the emergency switch
| Information codes Checklist | |
 | The POWERbot is caught, stuck, trapped or lifted while moving around.►Turn off the emergency switch and move the POWERbot to another area. |
 | Foreign matter caught in the Power brush.►Turn off the emergency switch and remove the foreign matter from the Power brush. |
 | Foreign matter caught in the left Driving wheel.►Turn off the emergency switch and remove the foreign matter from the Driving wheel. |
 | Foreign matter caught in the right Driving wheel.►Turn off the emergency switch and remove the foreign matter from the Driving wheel. |
 | Bumper sensor needs to be checked.►Turn off the emergency switch and turn it back on.►Contact a service center if information code does not disappear. |
 | Foreign matter accumulated on the obstacle sensor.►Turn off the emergency switch and clean the front and rear sensor with a soft cloth. |
 | Foreign matter accumulated on the cliff sensor.►Turn off the emergency switch and clean the cliff sensor with a soft cloth. |
Troubleshooting
| Symptom Checklist | |
| The POWERbot is not working at all. | ▶Check if the emergency switch is on.▶Check if all the icons are displayed on the display panel.▶Check if the POWERbot's battery is depleted.▶Replace the batteries (AAA type) if the remote controller is not working. |
| The POWERbot has stopped during cleaning. | ▶When POWERbot is immobilized by an obstacle such as a cord, threshold etc, pick it up and move it away from the obstacle.- If any fabric or string is caught in a drive wheel, turn off the emergency switch and remove the fabric or string before using it again. |
| Suction power is weak. | ▶When there's too much dust in the dustbin, suction power may get weakened. Turn off the emergency switch and empty the dustbin.▶If the intake (on bottom of POWERbot) is blocked by foreign matter, turn off the emergency switch and remove foreign matter from the intake.▶When noise suddenly increase, turn off the emergency switch and empty the dustbin.▶If the dustbin is assembled incorrectly, suction power may get weakened. Turn off the emergency switch and refer to page 17 for reassembling. |
| The POWERbot cannot find the docking station. | ▶Check if there's a power failure or whether the power plug is unplugged.▶Remove any obstacles around the docking station that may prevent POWERbot from returning to the docking station.▶When there's foreign matter on the charge pins, charging can be affected. Clean the foreign matter off the pins. |
| The POWERbot suddenly cleans diagonally. | ▶Check if the docking station is installed along the grain of wooden floors or tiles.▶The POWERbot may clean in a diagonal direction if it is moving to another area using the shortest route. It may also move at a diagonal if it made contact with an obstacles at that angle, if it was charged at the charger at an angle, or if the grain of the wooden/tile floor skewed is in that direction. |
| POWERbot does not clean a certain area. | ▶Check if the charger is installed near a narrow passage or door, and reinstall it in the other areas.- If the charger is installed near a narrow passage or door, the POWERbot cannot pass through the passage or threshold. |
Warnings about battery

You must not remove (or attempt to remove) the battery incorporated in this product on your own. To replace the battery, you must contact your service provider or an independent qualified professional. These instructions have been prepared for the exclusive use of your service provider or independent qualified professional.
FOR YOUR OWN SAFETY, DO NOT ATTEMPT TO REMOVE THE BATTERY ON YOUR OWN OR DISPOSE OF IT IN FIRE. DO NOT DISASSEMBLE, CRUSH OR PUNCTURE THE BATTERY.
How to remove the battery
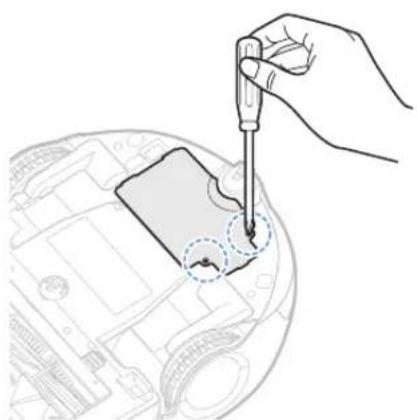
Remove POWERbot from the charger (station) for disassembling. You must turn off POWERbot for safety before disassembling.
natural_image
Hand using a dropper to apply a component on a car interior (no text or symbols visible)1 Lay down and invert POWERbot and then remove 2 screws.
natural_image
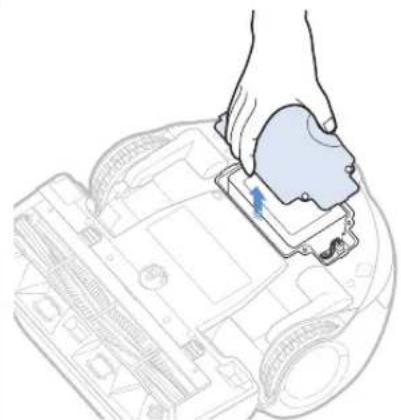
Illustration of a hand inserting a component into a device casing (no text or symbols visible)2 Remove the dustbin cover
text_image
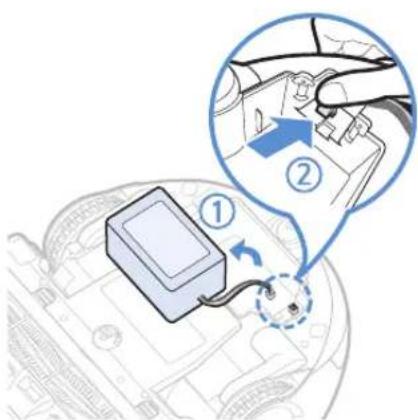
Diagram showing a car battery connected to a switch, with labeled parts and a magnified view of the switch's internal structure.3 Remove the battery from the slot and disconnect the connector.
Correct disposal of batteries in this product
(Applicable in countries with separate battery return systems.)
The marking on the battery, manual or packaging indicates that the battery in this product should not be disposed of with other household waste. Where marked, the chemical symbols Hg, Cd or Pb indicate that the battery contains mercury, cadmium or lead above the reference levels in EC Directive 2006/66.
The battery incorporated in this product is not user replaceable. For information on its replacement, please contact your service provider. Do not attempt to remove the battery or dispose it in a fire. Do not disassemble, crush, or puncture the battery. If you intend to discard the product, the waste collection site will take the appropriate measures for the recycling and treatment of the product, including the battery
Open Source Announcement
The software included in this product contains open source software. You may obtain the complete corresponding source code for a period of three years after the last shipment of this product by sending an email to mailto:oss.request@samsung.com.
It is also possible to obtain the complete corresponding source code in a physical medium such as a CD-ROM; a minimal charge will be required.
The following URL http://opensource.samsung.com/opensource/VR9000H/seq/0 leads to the download page of the source code and open source license information as related to this product. This offer is valid to anyone in receipt of this information.
text_image
QR code image containing encoded data, no visible human-readable textSpecifications
| Classification Item Detail information | ||
| Mechanical specifications (POWERbot) | Size (Depth x Height x Length) | 378 mm x 135 mm x 362 mm |
| Weight 4.3 kg | ||
| Sensor Ceiling shape recognition (Visionary mapping plus TM) | ||
| Button type of POWERbot Touch type | ||
| Power specifications | Power voltage 100-240 V~, 50 Hz/60 Hz | |
| Power consumption 80 W | ||
| Battery specifications Lithium ion 21.6 V/ 39 Wh | ||
| Cleaning | Charging type Automatic charging/Manual charging | |
| Cleaning mode Auto, Spot, Manual | ||
| Charging time Approximately 160 minutes | ||
| Cleaning time | Approximately 30 minutes (Normal mode/ On the basis of hard floor) | |
* Charging and cleaning times may differ according to conditions of use.
* This Vacuum cleaner is approved the following.
- Electromagnetic Compatibility Directive : 2004/108/EEC
- Low Voltage Directive : 2006/95/EC
SAMSUNG
natural_image
Illustration of hands operating a vacuum cleaner on a tiled floor (no text or symbols visible)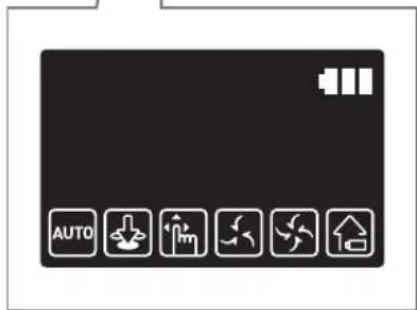
text_image
AUTOnatural_image
Illustration of a robotic car with a sensor emitting sound waves (no text or symbols)natural_image
Simple line icon of a house inside a circle, no text or symbols presentnatural_image
Illustration of a robotic vacuum cleaner with hands adjusting its body (no text or symbols visible)natural_image
Technical line drawing of a mechanical component with no visible text or symbolsnatural_image
Simple line drawing of three parallel horizontal lines with a small circular object at the bottom (no text or symbols)Pulizia automatica
natural_image
Illustration of a hand holding a remote control next to a robotic device with motion lines (no text or symbols)Pulizia manuale
natural_image
Illustration of a hand holding a device with a blue arrow pointing to it, against a background of a car (no text or symbols)text_image
Diagram showing two steps of a hand holding a device, labeled with arrows and numbered indicators.natural_image
Illustration of hands pouring liquid from a container into a trash bin (no text or symbols)text_image
Illustration showing steps to organize a toilet with water, including cleaning and cleaning of the cup.flowchart
graph TD
    A["Step 1: Internal component"] --> B["Step 2: Final assembly"]
    B --> C["Step 3: Internal component with internal cavity"]
    style A fill:#f9f,stroke:#333
    style B fill:#ccf,stroke:#333
    style C fill:#cfc,stroke:#333
text_image
Diagram illustrating two steps of a device operation: step 1 shows a hand pressing a device with an upward arrow, while step 2 shows a hand holding a device with a downward arrow and a schematic diagram below.natural_image
Illustration of a hand holding a mechanical component with an upward arrow, no text or symbols presentnatural_image
Illustration of a hand using a tool to lift a cylindrical object, with motion lines indicating impact (no text or symbols)text_image
Diagram illustrating mechanical assembly steps with labeled arrows and magnified detail viewnatural_image
Illustration of hands holding a device with internal components (no text or symbols visible)natural_image
Hand using a tool to cut or mark a curved mechanical component (no text or symbols visible)natural_image
Hand using a dropper to apply a component on a device (no text or symbols visible)natural_image
Line drawing of a hand placing a component into a car engine compartment (no text or symbols)text_image
Diagram showing a device connected to a car interior with labeled parts and a magnified view of the component being inserted.text_image
QR code image containing encoded data, no visible human-readable textSpecifiche
text_image
(ON) (OFF)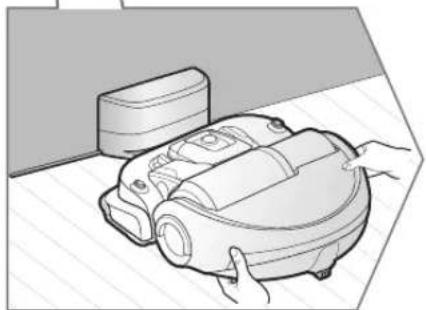
natural_image
Illustration of a robotic vacuum cleaner with hands operating it (no text or symbols visible)
text_image
AUTOnatural_image
Illustration of a robotic car with a sensor emitting sound waves (no text or symbols)natural_image
Simple line icon of a house inside a circle, no text or symbols presentnatural_image
Illustration of a robotic vacuum cleaner with hands adjusting its body (no text or symbols visible)natural_image
Simple line drawing of three parallel horizontal lines with a small circular object at the bottom (no text or symbols)Limpieza automática
natural_image
Illustration of a hand holding a remote control next to a robotic device with motion lines (no text or symbols)Limpieza manual
natural_image
Illustration of a hand holding a device with a blue arrow pointing to it, against a background of a car (no text or symbols)1 Quite el contenedor de polvo
text_image
Diagram showing two steps of a hand operating a device with labeled arrows indicating process flow.natural_image
Illustration of hands pouring liquid from a container into a trash bin (no text or symbols)text_image
Illustration showing steps to remove a tooth from a sink, with labeled arrows and illustrations of water flow and cleaning.text_image
Diagram illustrating two steps of a device operation: adding a device to a laptop and adding a bus, with labeled arrows and icons.natural_image
Illustration of a hand holding a mechanical component inside a vehicle head (no text or symbols)natural_image
Illustration of a hand using a tool to lift a cylindrical object, with a coiled tube nearby (no text or symbols)text_image
Diagram showing a hand holding a mechanical component with two labeled parts (① and ②) indicating different states or states.text_image
Diagram illustrating two-step installation of a device, showing hand positioning and assembly steps with numbered annotations.natural_image
Illustration of hands holding a computer case with visible circuitry and components (no text or symbols)natural_image
Hand using a tool to adjust or install a mechanical component (no visible text or symbols)natural_image
Hand using a pipette to apply a component on a car interior (no text or symbols visible)natural_image
Illustration of a hand inserting a component into a device casing (no text or symbols visible)text_image
Diagram showing a device with labeled parts and a magnified view of the component being inserted into a car interior.text_image
QR code image containing encoded data, no visible human-readable textEspecificaciones
natural_image
Illustration of a robotic car with a sensor emitting sound waves (no text or symbols)natural_image
Simple line icon of a house inside a circle, no text or symbols presentnatural_image
Illustration of a robotic vacuum cleaner with hands adjusting its body (no text or symbols visible)natural_image
Simple line drawing of a ladder with a ball at the bottom (no text or symbols)Limpeza automática
natural_image
Illustration of a hand holding a remote control and a device with a scroll (no text or symbols)Limpeza manual
natural_image
Illustration of a hand holding a device with a blue arrow pointing to it, against a background of a car (no text or symbols)text_image
Diagram showing two steps of a hand holding a device, labeled with arrows and numbered indicators.natural_image
Illustration of hands pouring liquid from a container into a trash bin (no text or symbols)text_image
Illustration showing steps to organize a toothbrush with water filter, including cleaning and cleaning of the tooth.text_image
Diagram illustrating two steps of a device operation: adding a component to a bus, then adjusting the circuit board.1 Remova a tampa da escova eléctrica
natural_image
Illustration of a hand holding a mechanical component inside a vehicle dashboard (no text or symbols visible)2 Remova a escova eléctrica
natural_image
Illustration of a hand using a tool to lift a cylindrical object, with a coiled tube nearby (no text or symbols)text_image
Diagram showing a hand holding a mechanical component with two labeled parts (① and ②) indicating different states or states.text_image
Diagram illustrating two-step installation of a device, showing hand positioning and assembly steps with numbered annotations.5 Volte a colocar a tampa da escova eléctrica
Limpeza da roda motora
natural_image
Illustration of hands holding a computer case with visible circuitry and components (no text or symbols)natural_image
Hand using a tool to adjust or install a mechanical component (no text or symbols visible)natural_image
Hand using a pipette to apply a component on a car interior (no text or symbols visible)natural_image
Illustration of a hand inserting a component into a device casing (no text or symbols visible)text_image
Diagram showing a device with labeled parts and a magnified view of the component being inserted into a car interior.3 Retire a bateria da ranhura e desligue o conector.
text_image
QR code image containing encoded data, no visible human-readable textEspecificações
text_image
(ON) (OFF)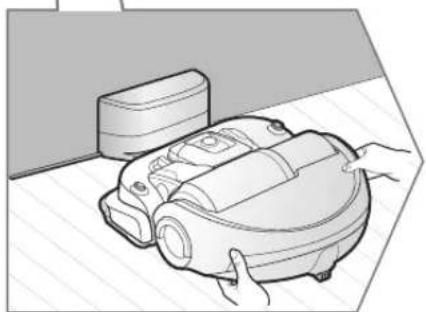
natural_image
Illustration of a robotic vacuum cleaner with hands operating it (no text or symbols visible)
text_image
AUTOnatural_image
Illustration of a robotic car with a sensor emitting sound waves (no text or symbols)natural_image
Simple line icon of a house inside a circle, no text or symbols presentnatural_image
Illustration of a robotic vacuum cleaner with hands adjusting its body (no text or symbols visible)natural_image
Technical line drawing of a mechanical component with no visible text or symbolsAutomatikbetrieb
natural_image
Simple line drawing of three parallel horizontal lines with a small circular object at the bottom (no text or symbols)natural_image
Illustration of a hand holding a remote control next to a robotic device with motion lines (no text or symbols)Handsaugen
flowchart
graph TD
    A["Step 1: Discharge"] --> B["Step 2: Capacitor with AAA"]
    B --> C["Step 3: Charge/discharge"]
    C --> D["Final state"]
natural_image
Illustration of a hand holding a device with a blue arrow pointing to it, against a background of a vehicle (no text or symbols)text_image
Diagram showing two steps of a hand holding a device, labeled with arrows and numbered indicators.natural_image
Illustration of hands pouring liquid from a container into a trash bin (no text or symbols)text_image
Illustration showing steps to organize a toothpaste with water filter, including cleaning and cleaning of the tooth.flowchart
graph TD
    A["Step 1: Internal component"] --> B["Step 2: Final assembly"]
    B --> C["Step 3: Internal component with internal cavity"]
    style A fill:#f9f,stroke:#333
    style B fill:#ccf,stroke:#333
    style C fill:#cfc,stroke:#333
text_image
Diagram illustrating two steps of a device operation: adding a device to a laptop and adding a bus, with labeled arrows and icons.natural_image
Illustration of a hand holding a mechanical component inside a vehicle dashboard (no text or symbols visible)natural_image
Illustration of a hand using a tool to lift a cylindrical object, with a coiled tube nearby (no text or symbols)text_image
Diagram illustrating a mechanical assembly process with labeled steps ① and ②, showing hand tool interacting with gear or component.text_image
Diagram illustrating a process of device installation or repair, showing steps labeled ① and ② with numbered components.natural_image
Illustration of hands holding a computer case with visible circuit board and components (no text or symbols)natural_image
Hand using a tool to adjust or install a mechanical component (no text or symbols visible)natural_image
Hand using a screwdriver to adjust or install a component on a device (no text or symbols visible)natural_image
Line drawing of a hand inserting a component into a device casing (no text or symbols)text_image
Diagram showing a car interior with a device labeled ① and a magnified view of the component being inserted into a car.text_image
QR code image containing encoded data, no visible human-readable textTechnische Daten
Adapter/dockingstation
natural_image
Illustration of a robotic vacuum cleaner with hands operating it (no text or symbols visible)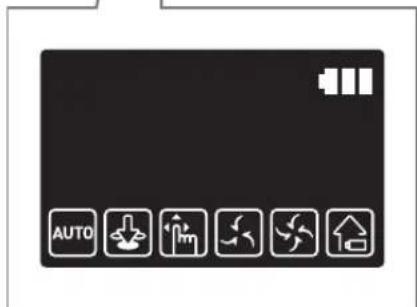
text_image
AUTOnatural_image
Illustration of a robotic car with a sensor emitting sound waves (no text or symbols)natural_image
Simple line icon of a house inside a circle, no text or symbols presentnatural_image
Illustration of a robotic vacuum cleaner with hands adjusting its body (no text or symbols visible)natural_image
Simple line drawing of a three parallel horizontal lines with a small spherical object at the bottom (no text or symbols)natural_image
Illustration of a hand holding a remote control next to a robotic device (no text or symbols)Handmatig reinigen
natural_image
Illustration of a hand holding a device with a blue arrow pointing to it, against a background of mechanical components (no text or symbols)text_image
Diagram showing two steps of a hand operating a device, labeled with numbered instructions for each step.natural_image
Illustration of hands pouring liquid from a container into a trash bin (no text or symbols)text_image
Illustration showing steps to clean a toothbrush, including eye manipulation and cleaning with water filterflowchart
graph TD
    A["Step 1: Internal component"] --> B["Step 2: Final assembly"]
    B --> C["Arrow indicating assembly direction"]
text_image
"Klikken"natural_image
Illustration showing a hand adjusting a device with a warning symbol (no text or labels present)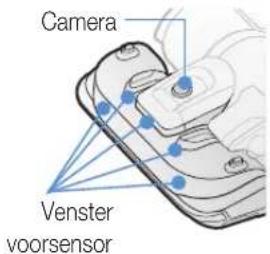
text_image
Diagram illustrating two steps of inserting a device into a device, labeled with numbered annotations.natural_image
Illustration of a hand holding a mechanical component with an upward arrow indicating motion (no text or symbols present)natural_image
Illustration of a hand using a tool to cut a cylindrical object with motion lines, no text or symbols presenttext_image
Diagram illustrating mechanical assembly steps with labeled arrows and magnified detail viewnatural_image
Illustration of hands holding a computer case with visible circuitry and components (no text or symbols)natural_image
Hand using a tool to adjust or install a mechanical component (no text or symbols visible)natural_image
Line drawing of a hand using a pipette to inspect a component on a car interior (no text or symbols)natural_image
Line drawing of a hand inserting a component into a device casing (no text or symbols)text_image
Diagram showing a car battery connected to a switch, with labeled parts and a magnified view highlighting the switch's internal mechanism.text_image
QR code image containing encoded data, no visible human-readable textSpecifications
natural_image
Illustration of a robotic car with a sensor emitting sound waves (no text or symbols)natural_image
Simple line icon of a house inside a circle, no text or symbols presentnatural_image
Illustration of a robotic vacuum cleaner with hands interacting with it (no text or symbols present)natural_image
Technical line drawing of a mechanical component with no visible text or symbolsnatural_image
Solid dark gray image with no visible content, text, or symbols.natural_image
Simple line drawing of three parallel horizontal lines with a small globe at the bottom (no text or symbols)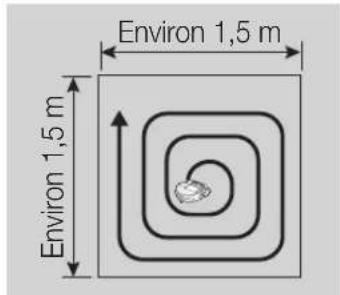
natural_image
Illustration of a hand holding a remote control and a device with a scroll (no text or symbols)Nettoyage auto
flowchart
graph TD
    A["Step 1: Discharge"] --> B["Step 2: Capacitor with AAA"]
    B --> C["Step 3: Charge/discharge"]
    C --> D["End"]
1 Mise en marche/Recharge
natural_image
Illustration of a hand holding a device with a blue arrow pointing to it, against a background of a vehicle (no text or symbols)text_image
Diagram showing two steps of a hand holding a device, labeled with arrows and numbered indicators.natural_image
Illustration of hands pouring liquid from a container into a trash bin (no text or symbols)text_image
Illustration showing steps to remove a tooth from a device, including eye manipulation and cleaning with a water tap.flowchart
graph TD
    A["Step 1: Grain-based component"] --> B["Step 2: Flanged component"]
    B --> C["Step 3: Flanged component"]
text_image
Diagram illustrating two steps of a device operation: adding a component to a bus, then adjusting the battery.1 Retirez le cache de la brosse principale.

natural_image
Illustration of a hand holding a mechanical component inside a vehicle head (no text or symbols visible)2 Retirez la brosse principale.

natural_image
Illustration of a hand using a tool to lift a cylindrical object, with a coiled tube nearby (no text or symbols)text_image
Diagram showing a hand holding a mechanical component with two labeled parts (① and ②) indicating different states or states.text_image
Diagram illustrating two steps of a device operation, labeled ① and ②, showing hand positioning and assembly.natural_image
Illustration of hands holding a computer case with visible circuitry and components (no text or symbols)natural_image
Illustration of a hand using a tool to cut a curved mechanical component (no text or symbols visible)natural_image
Hand using a pipette to inspect a car interior (no text or symbols visible)natural_image
Illustration of a hand inserting a component into a device casing (no text or symbols visible)text_image
Diagram showing a car interior with a device labeled ① and a hand interacting with the engine, highlighting a blue arrow indicating direction.text_image
QR code image containing encoded data, no visible human-readable textSpécifications