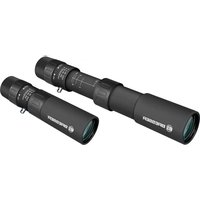
Topas 12X32 - Binoculars BRESSER - Free user manual and instructions
Find the device manual for free Topas 12X32 BRESSER in PDF.

Frequently Asked Questions - Topas 12X32 BRESSER
User questions about Topas 12X32 BRESSER
0 question about this device. Answer the ones you know or ask your own.
Ask a new question about this device
Download the instructions for your Binoculars in PDF format for free! Find your manual Topas 12X32 - BRESSER and take your electronic device back in hand. On this page are published all the documents necessary for the use of your device. Topas 12X32 by BRESSER.
USER MANUAL Topas 12X32 BRESSER
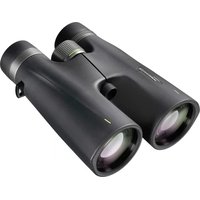
This instruction manual was created for various models in our series of binoculars. Pages 2-7 present the relevant features in pictures. Depending on the model you have purchased, this chapter of the manual covers the binoculars in full or in part. As a result, please pay attention to the letters (P, R or C) to make sure that a chapter applies to your model.
Please read this manual carefully and completely before using the binoculars.
Your
BRESSER Team
= Porro prism model · = Roof prism model · = Compact model
General Safety Informations!
RISK of physical injury!
Never look through this device directly at or near the sun. There is a risk of BLINDING YOURSELF!
Children should only use this device under supervision. Keep packaging materials (plastic bags, rubber bands, etc.) away from children. There is a risk of SUFFOCATION.

Fire/Burning RISK!
Never subject the device - especially the lenses - to direct sunlight. Light ray concentration can cause fires and/or burns.
RISK of material damage!
Never take the device apart. Please consult your dealer if there are any defects. The dealer will contact our service centre and send the device in for repair if needed.
Do not subject the device to temperatures exceeding 60^
BINOCULARS
List of Parts
1 Centre axle
a Twist-up eyecups or
Rubber eyecups
3 Diopetre adjustment
Body of the binoculars
Lens tube
Central focussing wheel
Eyepiece
Objective lens
Threaded tripod connection
10 Image circle with correctly set eye distance
Eyepieces for spectacle wearers P R C
Depending on the model, your binoculars are equipped with either twist-up eyecups (2a) or rubber eyecups (2b). Since there is a larger distance between the binocular eyepiece and the pupil for those wearing glasses, both eyecup varieties can be adjusted individually.
Twist-up Eyecups (2a)
Screw in the twist-up eyecups (2a) to use the
binoculars while wearing glasses. If you are not wearing glasses, unscrew the eyecups to achieve the required distance from the pupils. OR
Rubber Eyecups (2b)
To use the binoculars while wearing glasses, turn the rubber eyecups (2b) towards the sides and down. If you are not wearing glasses, leave the eyecups in the upright position to achieve the required distance from the pupils.
Adjusting the eyepiece distance P R C
The distance between the eyes differs between individuals. To achieve perfect interaction between your eyes and the eyepieces of your binoculars set the angle at the centre of the binoculars (1) so that you see a circular image (10). Note this setting for later use.
Adjusting the focus P R C
Look through your binoculars with your right eye closed. Now adjust the image for your left eye using the centre wheel (6) until it is sharp and
clear. Close your left eye and adjust the image for your right eye using the dioptre ring (3) until it too is sharp and clear.
Mounting the binoculars on a tripod P R
Your binoculars have a threaded tripod connection (9) built in. The required tripod adapter is available as an optional accessory (Art. No. 19-16000 or 19-16500). With this accessory, you are able to mount your binoculars on a tripod with a DIN mounting thread (e.g. Art. No. 49-22100).
TIPS on cleaning
Lenses (eyepieces and/or object lenses) should be cleaned with a soft, lint-free cloth (e.g. microfibre) only. Do not use excessive pressure - this may scratch the lens.
Dampen the cleaning cloth with a spectacle cleaning fluid and use it on very dirty lenses.
Protect the device against dirt and dust. Leave it to dry properly after use at room temperature. Then put the dust caps on and store the device in the case provided.
JUMELLES
Chere cliente, cher client,
Tevikc oyniec aαaaleia
KINADYNOs oWmuTikwBαβwV!
Mny koitatae note tn ouokenuaun npoc n kovtao tov hio. YnapxekINADYNOZ TYFANQHsI
IeTn DoJIKHbI NcNoJIb3OBaTb npN6Op TOnbKO NOI npNCMOTpOM B3pOcJIbIX. HckJIIOHTe DOCTyI JeTeY K yNaKOBouHbIM MaTePnaJAM (IIaCTIKOBbie NaKeTbI, pe3INHOBbie IeHTbI n.T.D.)! ONACHOCTb YdUJbI!

ONACHOCTb NOKAPA!
He npnbop - B oco6eHHoCTn IIN3bl - NOI npAmbIMN cOnHeHbIMN lyuamn! N3-3a foKycnpOBcONHeHbIX LyueM MoKeT Bo3HKnHyTb Noxap!
ONACHOCTb npnHHeHHaMaTepeHaJIbHoro yuepe6a!
He pa3bpaIe np6op! B clyuae HencnpaBHOCTn o6paauTeCb K dInepy. OH cBxKETc C cepBnHbIM ceHTpOM I MOKeT nepeCtA b np6op IJIy BblONHeHr peMOHTa.
He donyckaia Te harpebaHna npnbopa do BbICOKo TemnepaTpybl!
IpeueHb KOMnoHeHToB
1 LcHTpaJIbHaI OcB 6HOKJIa
2a HABINHnBaIOUneCry OkyIpybI
b Pe3nHOBbie OKyIpaI
3 MexaHn3M dnoontpnueecko HABODKN
Kopnyc 6HOKJIa
5 Ty6yc 06bEeKTHBa
6 LcHTpaJIbHbI npHBOD (yCTaHOBka Hape3KoCTb)
7 OkyIap
8 JInH3a 06bektnBa
9 Pe3b6aДЯ yCTaHOBKN Ha WtTaTINB
10 OTo6paKaHouaOkpyKHOCTb npn npaBnIbHo HAcTpoEHOn rna3HO 6a3e
OkyIap IJnI NOJIb3OBaTeIeB OUYKax P R C
B 3aBnCmOCTn OT MoDenn 6HOKlb OCHaaetcra INoo HABINHuaHOuMnscr OkyIpaMn (2a), INoo pe3nHObIMn OkyIpaMn (2b).Tak KaK y noJIb30Ba -TeNe B Ouykax pacCToRHe MExdY OkyIpaMn 6HOKnI 3paUkamn yBeInuEHO, oBa HABINHuaIOuXxCsR OkyIpaMOrT perynipOBaTbCSr NO OTDeJIbHOCTN.
HaBnHcyBaIOUneCg OKyJApbI (2a)
EcIn Bbl cmOpnte uepe3 6HOKlb B Ouchk, BKpyTnte HABINHnBaIOUneC8 OkyIaPbI (2a). EcIn Bbl He HOCHTe OUYKN, BblKpyTnte HABINHnBAIOUneC8 OKyIaPbI DnO obeCneueHn Heo6xO-DMIMO pacCTOHHN Do 3paUKOB.
HNN
Pe3nHOBbIe OKyIpaIbI (2b)
EcIn BbI cMOtpnTe uepe3 6HOKlb B Ouchk, OTBepHnTe pe3HHOBble OKyIaPbI (2b) C6Oky BHN3. EcIn Bbl He Hocnte OUY, OCTaBBte OKyIaPbIBBepTKaJIbHOM NIOJKeHIN DnA ObecneueHnHEo6xOdMOro paCCTOraHn DO 3paUKOB.
HacTpoKa Tla3HO6a3bI P R C
PacctoHne MeJdy rla3amn ABJHeTcN HINBnBnDaIbHbIM dIg KaKDoRo YeNoBeka. IJIa OBeCneueHnnaIealbHorO corlaocBaHnra rla3 COKyIpaMn 6HHokJI erO HeoXoHMo cOrHytB OTHOCTeJIbHO ueHTpaIbHoN oCN (1) TaKIM o6pa3OM, UTO6bl Chepe3 Hero 6bla BnHa OTo6paKaHOUaA OKpyxHocTb (10). 3anOMHnte HaCTpOiKy DnNCIOb3OBaHnRA B6dyuem.
YcTaHOBKa Ha pe3KoCTb P R C
IocmOTpnte uepe3 6HOKnb n 3akpoTe npabBn rna3. Otperynpyte n3o6paKeHne dny IeBoro rna3a c NOMOsbU O ceHTpaNbHoro npNbOda (6). 3akpoTe neBbI rna3 n otperynpyte pe3KocTb n3o6paKeHnA dny npaboro rna3a C NOMOsbIO dnoNTpnHoro Koblua (3).
YCTAHOBKa 6HHOKnHa WtTaTHB P R
Ha 6nHOKJIe HmEeTcpe3b6a dIy yCTaHOBKn Ha 5tATNB (9). Heo6xOIMbI dIy 3TOr oIaNTep 5tATNBA NOCTABJHETcB KaueCTBe OUcIN ((No no kataIory 19-16000 nIi 19-16500). C ero noMoou MOxHO yCTaHAbNBAtB 6nHOKJIb Ha 5tATNB c npncOeDHHTeNbHO pe3b6oB DIN (hAnp., No no kataIory 49-22100).
YKA3AHN no nCTKe
HcnoIb3yIte dna qnCTKn IINH3 (OKyIpaI n/IIIO bEKTNBI) TOIbKO MAnKyO caIΦeTKy H3 HeTKaHO rMOtePnAna (HaNPmEp, MInKpOBOJOKHO). He HaXMaIte Ha caIΦeTKy CInuKOM CInbHO, UTObI NCKIHOHTB BepoATHOCTb O6pa3OBaHHa apaHH Ha IINH3ax.
Дя удаленя 6олlee сиьньix 3aря3нн CMочnte yнстяшую calфety B JxndKoCTn ДячNTN OчКOB n npOTpTe LInH3bl C He6OЛьшIM yCINHeM.
3aunuane npnbop ot nbinn Bnarn! Nocne nCnoB3OBaHnra - BOCOeHHoCTn PnBbICOKoBnJHOCTN BO3dyxa - NOdePKeTepnpbOp HeKOTOpoe Bpemn Pn KOMHaTHOH Tempeatype, UTObI DaTb NCnapntbcra OCTaToCHoBnAare. HAdenbTe PbIe3aunTHbIe KOJIpaKn I NOMeCTNTe npnbop B Cymky, BXODaYIO B KOMPJIeKT NoCTaBKn.
DE Garantie & Service
GB Warranty & Service
The regular guarantee period is 2 years and begins on the day of purchase. To benefit from an extended voluntary guarantee period as stated on the gift box, registration on our website is required.
You can consult the full guarantee terms as well as information on extending the gua
rantee period and details of our services at www.bresser.de/warranty_terms.