4CAST NGW - Weather Station BRESSER - Free user manual and instructions
Find the device manual for free 4CAST NGW BRESSER in PDF.
Frequently Asked Questions - 4CAST NGW BRESSER
User questions about 4CAST NGW BRESSER
0 question about this device. Answer the ones you know or ask your own.
Ask a new question about this device
Download the instructions for your Weather Station in PDF format for free! Find your manual 4CAST NGW - BRESSER and take your electronic device back in hand. On this page are published all the documents necessary for the use of your device. 4CAST NGW by BRESSER.
USER MANUAL 4CAST NGW BRESSER
General Informationen 24
Must read before getting started 25
Introduction 28
Getting started 30
Notes on cleaning 41
EC Declaration of Conformity 41
Disposal 41
Service and Warranty 43
NL BE GEBRUISHANDLEIDING 44
WETTERINFORMATIONSWECHSEL TAG NAGHT
WETTER-STATUS/-INFORMATIONEN
About this Instruction Manual
Please read the safety instructions in this manual carefully. To avoid damage to the unit and the risk of injury, only use this product as described in the manual. Keep the instruction manual handy so that you can easily look up information on all the functions. When the device is sold or given to someone else, the instruction manual must be provided to the new owner/user of the product.
GENERAL WARNING

DANGER!
This device contains electronic components which operate via a power source (power supply and/or batteries). Only use the device as described in the manual, otherwise you run the risk of an electric shock. Children should only use the device under adult supervision. Keep packaging material, like plastic bags and rubber bands, out of the reach of children, as they pose a choking hazard.
Keep batteries out of the reach of children! Make sure you insert the batteries correctly. Used or damaged batteries could cause burns if they come into contact with the skin. If necessary, wear adequate gloves for protection.

DANGER!
Do not expose the device to high temperatures. Use only the recommended batteries. Do not short-circuit the device or batteries, or throw them into a fire. Excessive heat or improper handling could trigger a short-circuit, a fire or an explosion.

NOTE!
Do not disassemble the device. In the event of a defect, please contact your dealer. The dealer will contact the Service Centre and can send the device in to be repaired, if necessary.
Use only the recommended batteries. Always replace weak or used batteries with a new, complete set of batteries at full capacity. Do not use batteries from different brands or with different capacities. The batteries should be removed from the unit if it has not been used for a long time.
SCOPE OF DELIVERY (Fig. 1)
Weather station (A), Outdoor sensor (B), Wall mount for Outdoor sensor (C), 2x AA batteries 1.5 V (for station)) (D), 2x AAA batteries 1.5V (for sensor) (E)
MUST READ BEFORE GETTING STARTED
Your Meteotime Weather Station is different to traditional weather stations which measure the prevailing conditions only, the data of this weather station is based on the METEOTIME which is worked out on a daily basis by highly professional meteorologists using state-of-art instruments.
The Metotime Weather Station is engineered in such a way that it is able to receive the coded METEOTIME signal containing the weather information. The information is broadcasted via the stations for radio controlled clocks DCF (located in Germany). For this reason, your Metetime Weather Station is also a radio controlled clock with all the known advantage, such as always showing the exact time, and automatic change to daylight saving time in winter and summer.
You are able to receive weather forecasts for 60 meteorological regions within Europe for up to 4 days in advance, and offer a 2-day-advance forecast for an additional 30 regions.
WHAT DOES IT TAKE TO GET GOOD RECEPTION?
Similar to wireless signals like the mobile phone network or Radio/TV broadcasts, it is possible that Meteotime weather stations do not receive signals all the time and everywhere. The following are some tips you should follow by all means to make sure that your device works properly:
The location for Meteortime weather station is very important. For this reason we have equipped all of them with an innovation test function (the [TEST] button) which enables you to test the quality of reception in your environment and to place the device where the best conditions prevail.
Try your reception by testing your Meteortime weather station as stated in the manual. To do this, turn on all the potential sources of interference (for example, a TV set in the room you want to install the device. Then put the Meteortime weather station in the place and direction you want it to be, but always at least one meter within the potential source of interference.
Watch the symbol GOOD RECEPTION or BAD RECEPTION on the display. Once you have found the right location for GOOD RECEPTION, you may leave the Meteotime weather station there. It will collect its data by a radio-controlled signal. Within a few minutes time, the date will appear. However, the transfer of very large amount of data (forecast for all regions and days) will take much longer. To completely receive all data, it will take up to 24 hours from the time of the initial setup.
POTENTIAL SOURCES OF INTERFERENCE
With all Meteotime weather stations, we should take measures to provide best possible radio reception. DCF is a long wave station with a broad reach (approximately 1500km ). However, as with a long wave radio station, interference may occur which is often caused by the following influences:
- In buildings with lots of concrete, metal parts, and the electrical equipment you may get reception problems (for example, in shopping centers and at exhibitions).
- Electronic equipment such as TVs, computers, household machines, etc., or transformers, power lines, radio transmitters, and trains are potential sources of interference.
- Atmospheric influences might affect the radio waves.
- The distance from the station, and also the geographic conditions (mountains, etc.) also affect the reception. Due to their great distance from the station, areas like Southern Italy or Northern Scandinavia are critical.
- So-called (dead-spots) which make reception impossible can appear everywhere
- There is less interference in rural area than in heavily built-up urban ones.
- On principle at night the sources of interference are less active, consequently reception is better than during the day.
- Weak batteries in the device will lower the quality of reception.
DATA TRANSFER
METEOTIME sends the data during precisely defined time slots in accordance with UTC. (UTC, i.e. for Central Europe during the winter UTC+1, during the summer UTC+2; for Great Britain and Portugal during the winter UTC, during the summer UTC+1)
Transmission times (UTC) Forecast for
10:00 p.m. - 03:59 a.m. the actual (new) day (TODAY)
04:00 a.m. - 09:59 a.m. the next day (TOMORROW)
10:00 a.m. - 03:59 p.m. the following day (the day after TOMORROW)
04:00 p.m. - 06:59 p.m. the day following this (Two days after TOMORROW)
07:00 p.m. - 09:59 p.m. the 30 additional regions
In the event that the reception during the above time slots is completely or at times interfered with or has broken down, these forecasts, or parts of them, will be missing.
The package comes with a base station, which is the Meteortime weather station, and one 3-channel wireless outdoor sensor (thermometer). This Meteortime weather station has equipped a thermometer sensor to measure the indoor temperature, and uses the wireless outdoor sensor to measure the outdoor temperature.
KEY FEATURES:
- Weather status for today and coming three days for 600 cities
- Rain/Snow/Hail probability
- Wind speed and wind direction
- 3-channel outdoor sensor with 433MHz wireless thermometer (channel 1 sensor is included, additional sensors are required for channels 2 and 3)
- Indoor and Outdoor temperature
- Indoor and Outdoor humidity
Maximum and minimum memories of temperature readings - Temperature trends (rising/steady/falling)
- Temperature unit in degree C only.
Regional day-time temperature and night-time temperature information - 7-languages abbreviation (English/Spanish/French/Italian/Dutch/Swedish/German)
Critical weather alert - Weather information for a maximum of 5 cities can be selected and displayed
- Personalized a place name / city
- Radio-controlled clock and calendar (24 hours format only)
- Time-zone setting
- Dual alarm (weekday alarm/single alarm will sound for 2 minutes)
- Programmable pre-alarm for outdoor sensor (Channel 1 only)
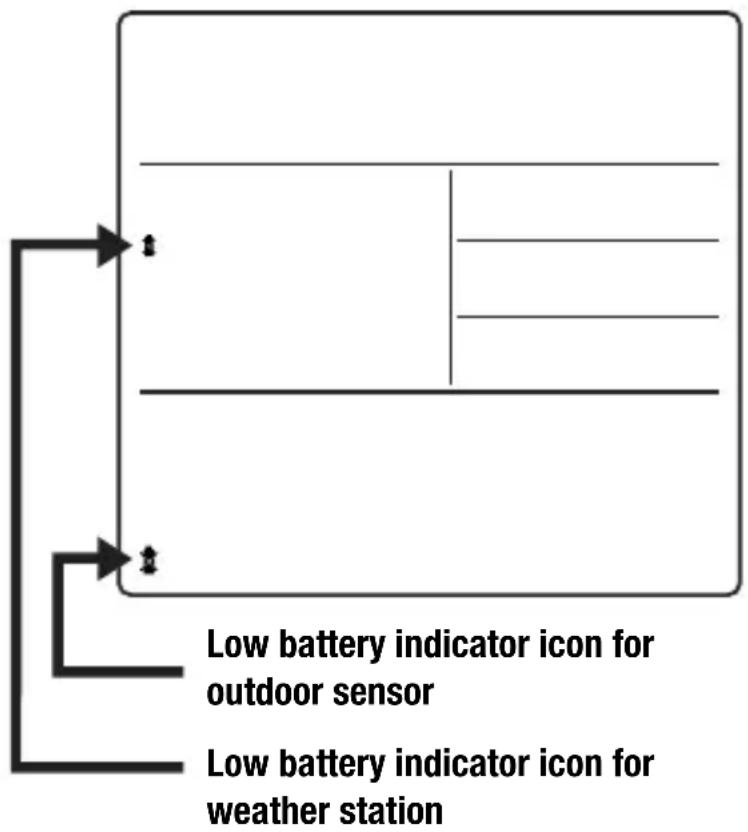
- Low battery indicator for the weather station and outdoor sensor
- Powered by 2 pcs. AA batteries for the weather station and 2 pcs. AAA batteries for the outdoor sensor
MANUAL SETTINGS IN 10 LETTERS SHORT FORM
| MANUAL SETTINGS SHORT FORM IN INFORMATION WINDOW | |
| SEARCH SIGNAL SEARCH SIG. | |
| SELECT CITY CITY | |
| SELECT COUNTRY COUNTRY | |
| TIME ZONE ZONE | |
| HOURS H | |
| RECEPTION TEST SCAN | |
| CONTRAST. CONTRAST. | |
| MEMORY FULL MEM.FULL | |
| EXIT SETTINGS EXIT | |
INTRODUCTION
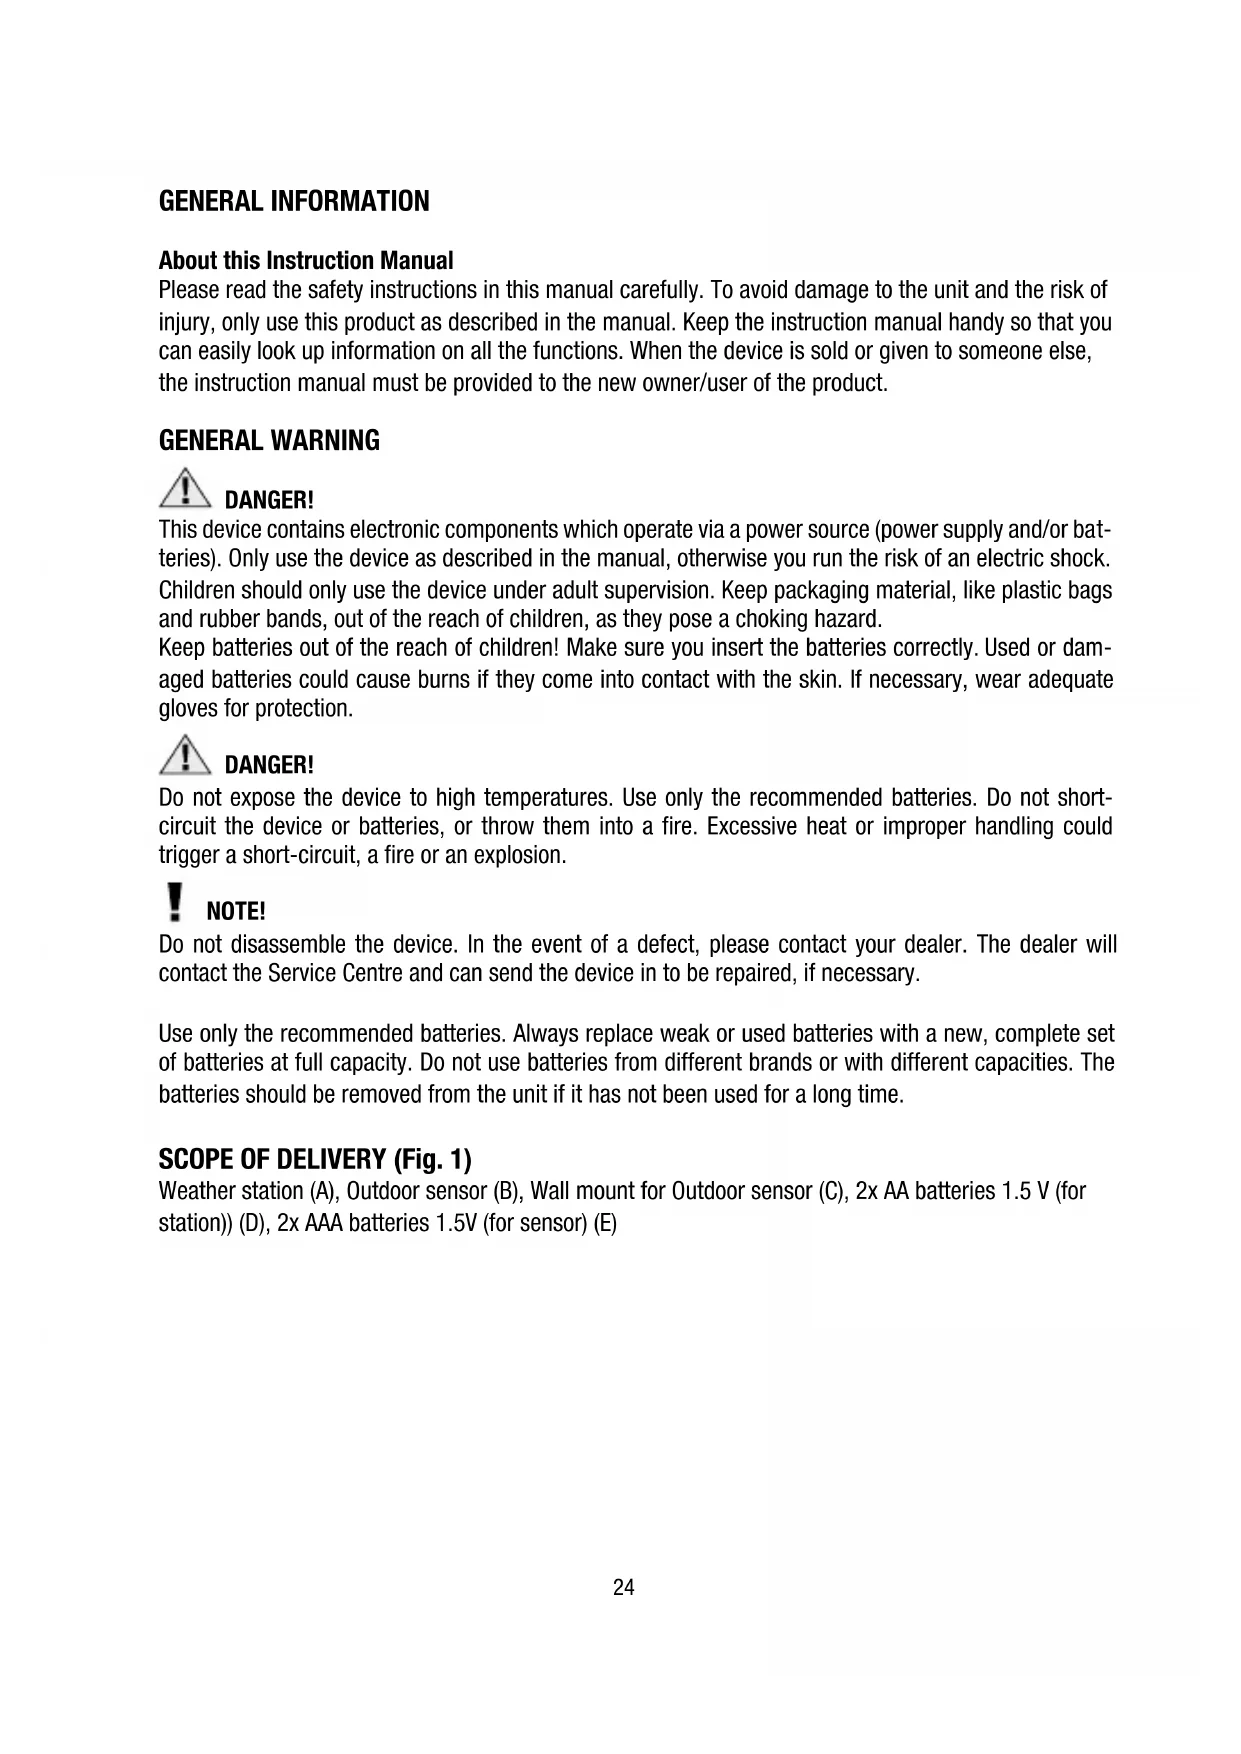
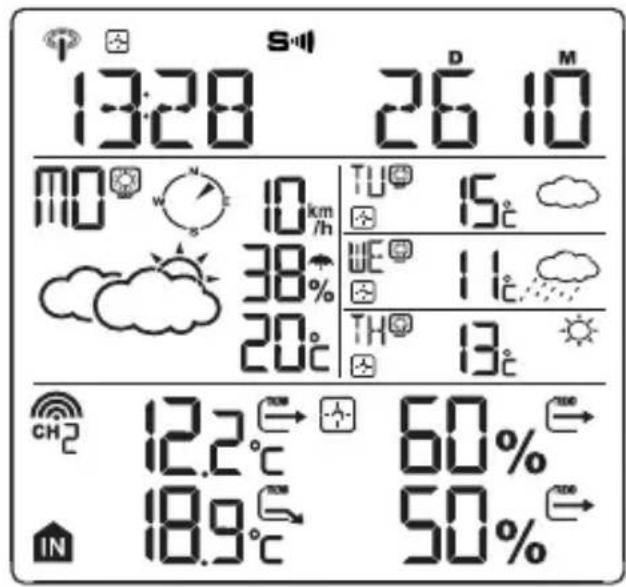
The Meteorite weather station LCD display shows:
- Weather information window for today
- Indoor/outdoor temperature
- Tomorrow, one-day-after, and two-day-after weather information
Information window, which shows date, alarm time, cities, and notifications on critical weather.
Today's weather information including wind speed, wind direction, and the probability of rain/snow/hail/day and night temperature, day and night weather status.
Time and information window.
Tomorrow, one-day-after and two-day-after weather information including day & night temperature, day & night weather status.
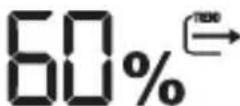
Indoor and Outdoor temperature. Indoor and Outdoor humidity.
Weather station (receiver) Outdoor sensor (transmitter)
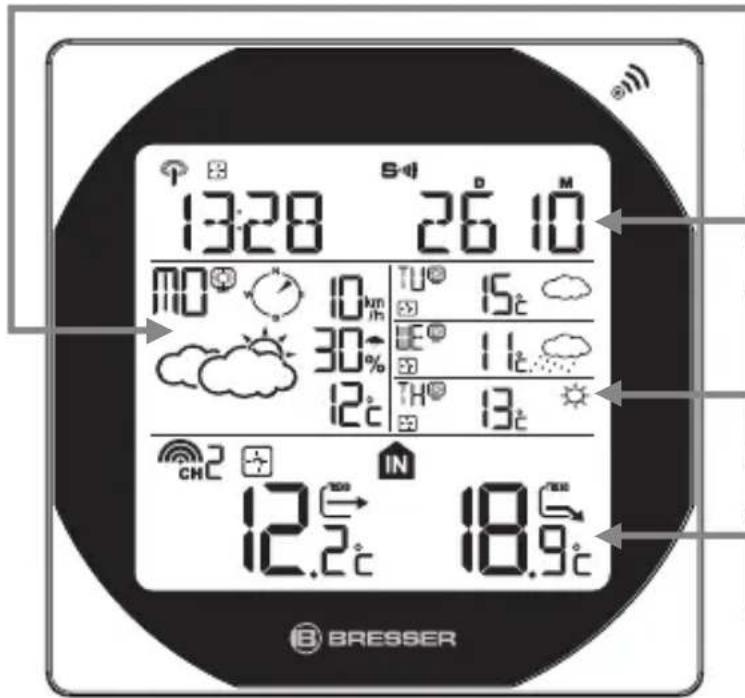
THERE ARE A TOTAL OF 7 BUTTONS ON THE WEATHER STATION:
SET
- Selected Date & Time City Weekday Alarm "OFF W-ALM"
Single alarm "OFF S-ALM" Pre-Alarm "OFF P-ALM"

- Press and hold [SET] for 3 seconds to select <1> Country, <2> Time Zone, <3> Language, <4> Exit to city display mode.
DAY NIGHT
- Critical weather information DAYNIGHT weather status change.
- Read the critical weather information one by one.
#
Increases the value during setting.
- Turn on the alarm.
- Press and hold this button for 3 seconds to enforce a radio controlled clock DCF signal search.
- Display weather forecast for the next three days
#
Decreases the value during setting.
- Choose one of the pre-selected cities.
- Turn off the alarm.
- Press and hold this button for 3 seconds to enforce a wireless RF signal search for the outdoor sensor.
MEM
- Display the maximum and minimum measured temperature readings on record.
- Press and hold this button for 3 seconds to clear all the maximum and minimum records.
TEST
Find a place for the device with good reception.
- Add a city into the list of your desired cities. OR
Remove a city out of the list of desired cities.
- Edit your home town.
CHANNEL
- Switch to read outdoor thermometer channel 1, 2, 3.
- Press and hold this button for 3 seconds to enter into auto circulation display mode.
GETTING STARTED
- Insert 2 pcs. AA batteries in the weather station, and then 2 pcs. AAA batteries in the outdoor sensor.
- The weather station will automatically scan for the radio-controlled clock signal and the Meteotime
weather signal.
Attention! For first time operation and battery replacement: First insert batteries for main unit and then insert batteries for remote sensor.
- The time and date signal will be received in a few minutes. Since there is a large amount of weather information for all regions and days, the unit needs about 24 hours from the time of the initial setup to complete the reception of all data
- After the time and date signal is being received successfully, it shows "SELECT COUNTY" and then "FINOW" as default city in the information window. To change the Country and the City please see the information below.
- If the unit is able to receive the Meteotime signal successfully, this Meteotime icon will appear in the second row of the display. Otherwise, the Meteotime icon will show.
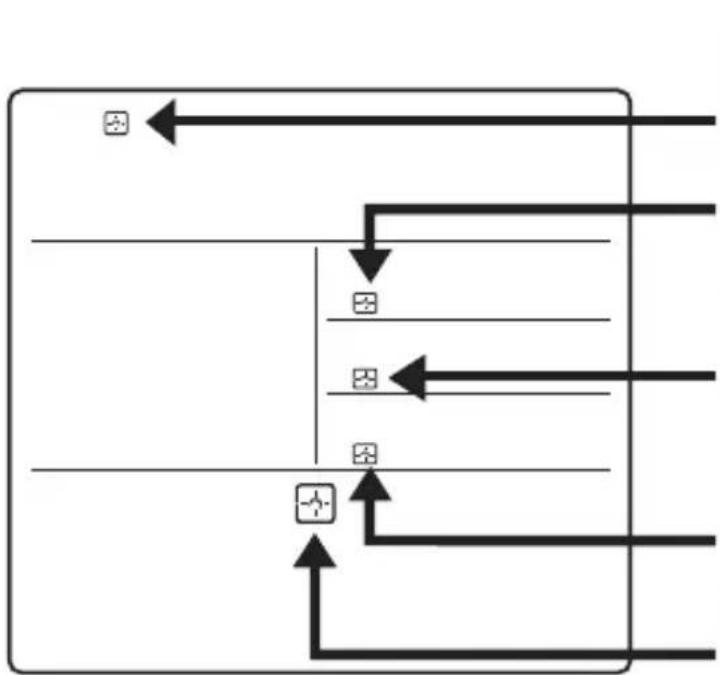
means it successfully receives today's weather information. Otherwise, it will be
means it successfully receives tomorrow's weather information. Otherwise, it will be
means it successfully receives weather information of one-day-after. Otherwise, it will be
means it successfully receives weather information of two-day-after. Otherwise, it will be
means it is able to receive the Meteortime weather signal. Otherwise, it will be
In the event the Meteotime icon changes to that means there are potential sources of interference on the unit. The sources of interference may come from electronic equipment such as TV-sets, computers, household machines etc. It may also be due to lots of concrete, metal parts and electrical equipment in the building. Your living area can also be the problem, if it is too far away from the radio-controlled clock tower.
You are able to use the TEST-function to look for a better location.
- If you press the [TEST] button, the information window will display "SCAN".
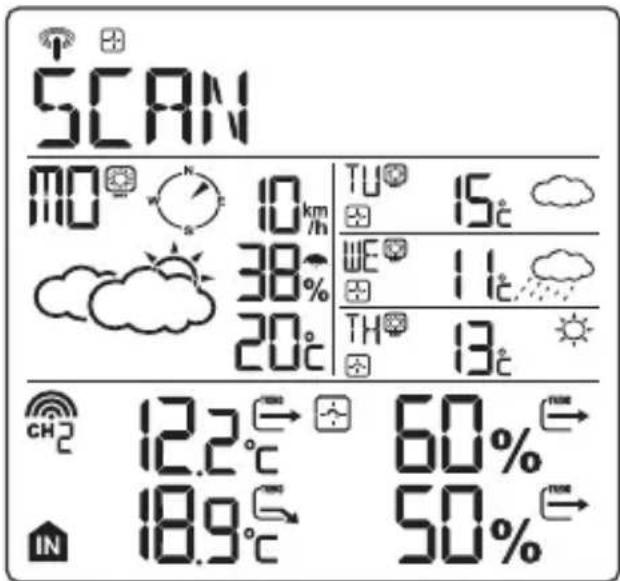
Pick up the unit and find a better location.
- Flashing: The test is running and the Meteotime signal reception is good. You can leave the device at this location.
fashing: The test is running and the Meteotime signal reception is poor. You need to keep on looking for a better location.
- The test lasts for around 1 minute. You can restart the test with the [TEST] button at any time, and also discontinue the test by pressing the [TEST] button again.
- SCAN: The reception quality throughout the test will be indicated from 0 (very bad) to 9 (very good).
SWITCH CITY ARM TIME & BATE
- After inserting the batteries, the weather station searches for the radio-controlled time signal as well as the Meteotime signal. After it has successfully received the Meteotime signal, the display shows the default city "in the information window.
- You are able to press the [SET] button to switch from the display of the city to weekday alarm, single alarm or pre-alarm to time and date.

SELECT THE COUNTRY AND CITY
- Press and hold the [SET] button for 3 seconds. "COUNTRY" will be shown in the information window. Press the [▲] or [▼] button to select the country of your choosing. For example, if you see in the information window / , then you have selected "Germany".
- Press the [SET] button to confirm the country. Assuming you have selected Germany, then the information window will now show "EITY
- You can now press the [▲] or [▼] button to select the city of your choosing. The city name will be shown in the information window. Example: Frankfurt am Main' is selected.
Press the [SET] button again to accept the setting. From now on, your selected city will be shown in the information window.
NOTE: A detailed list of 600 European cities can be found on our website at www.bresser.de/download/metetime
ACTIVATE FAVOURITES
Once you have set your city as described above, you may select more cities for easier access. Instead of accepting the setting with the [SET] button, you can continue as follows:
- If Frankfurt am Main' is your selection as one of your favorite cities, then press the [TEST] button to confirm. A will be shown on top of your selected city, and it will be stored into your personal memory list.
- Now, you may press the [▲] or [▼] button to select more cities in the same country, and then press the [TEST] button again to add those too.
- If you wish to select cities from different countries, you have to exit the setting with [SET] and re-enter again as, described above, in order to change the country.
You may select a maximum of five cities as favourites. If you try to add more than five cities, MEMFULL will be shown in the information window. When all settings are done, press the [SET] button to confirm and exit the setting mode.
REMARK: If you have skipped the city selection the first time you have powered up the unit, the product will select "Finow" by default as your selected city.
DISPLAY OF FAVOURITES
If you have more than one city as favourites, for example "Finow", Paris and Stockholm, then you are able to scroll through these cities by pressing the [▼] button when the information window shows the city name (Press the [SET] button until it displays the city name).
FINOW [ ] KOLN [ ] MUNSTER
REMOVE A CITY FROM THE LIST OF FAVOURITES
- Press and hold the [SET] button for 3 seconds. Now "COUNTRY" is shown in the information window. Press the [▲] or [▼] button to select the country.
- Press the [SET] button to confirm the country.
- Then, press the [▲] or [▼] button to go to your selected city with the √ icon.
-
Press the [TEST button to remove the . This city is now removed from your favourites list.
-
Repeat this if you wish to remove more cities from your list.
- Now, you may also press the [▲] or [▼] button to select another favourite city.
Once you have made all your changes, press the [SET] button to quit. will be shown in the information window. After 4 seconds, it will go to the City-Date-Time Mode.
PERSONALIZE A PLACE NAME
- Press and hold the [SET] button for 3 seconds. "COUNTRY" will be shown in the information window. Press the [▲] or [▼] button to select the country of your choosing. For example, if you see in the information window / , then you have selected "Germany".
- Press the [SET] button to confirm the country. Assuming you have selected Germany, then the information window will now show "ITY
- You can now press the [▲] or [▼] button to select the city of your choosing. The city name will be shown in the information window. Example: Frankfurt am Main' is selected.
- If you now press the [MEM] button, a cursor flashes on the first position of the Information Window.
Please apply the following input commands:
KEY FUNCTION
[▲] or [▼] Selection of a letter
[SET] <1> Accept the selected letter and jump to the next position. OR
< 2 > If you have not entered any letter (in other words, if only the cursor is flashing at the last position), confirm the entry with this key and your place will also be included in the memory with immediate effect.
TEST One position back in the data entry process.
- Press the [SET] button to confirm and exit.
REMARK: The place that you have selected to enter your own description will still exist under its original name.
SET THE TIME ZONE AND LANGUAGE
- Press and hold the [SET] button for 3 seconds. "COUNTRY" will be shown in the information window.
- Press the [SET] button again, then ZONE +00HR will be shown in the information window. Press the [▲] or [▼] button to adjust the time zone.
- Press the [SET] button again and the language will be shown in the information window. Press the [▲] or [▼] button to select your desired language. There are a total of seven languages to choose from: English, Spanish, French, Italian, Dutch, Swedish and German.
- Press the [SET] button one last time. Will be shown in the information window. After 4 seconds, it will change to the City-Date-Time Mode.
- Drücken Sie die [SET] Taste, damit im Informationsfenster (EXIT) angezeit wird. Nach 4 Sekunden schaltet das Gerät in den Stadt-Datum-Zeit-Modus.
Remark: If you do not have any selection into the Setup mode up to 30 seconds, it will automatically exit the setup mode. The Information Window will show City mode
DISPLAY OF WEATHER FORECAST
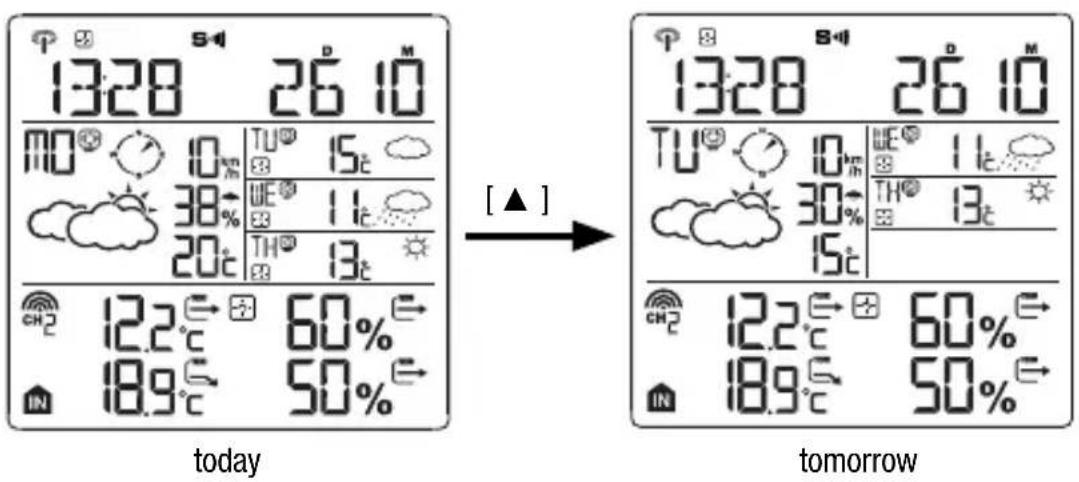
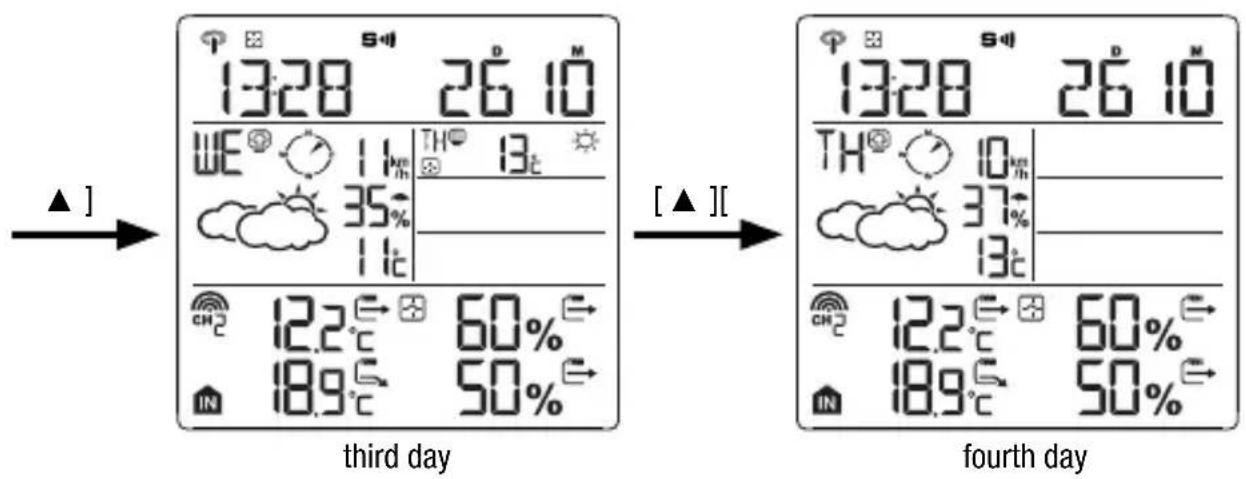
With the [▲] button you can switch between the weather of today, tomorrow, as well as the third and fourth day.
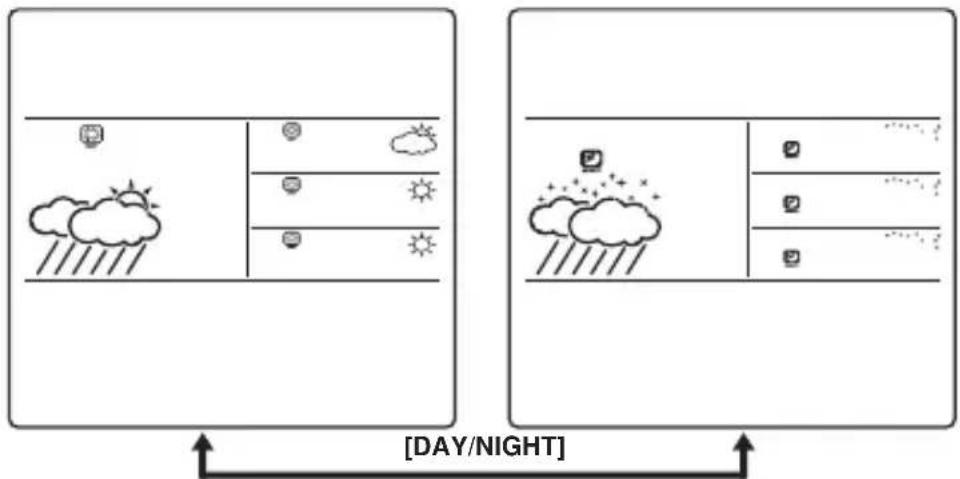
The device is able to automatically switch to DAY-WEATHER and NIGHT-WEATHER respectively. The user can move his hand directly over the motion sensor (up to 30 cm) or press the [ ] button to see the DAY-WEATHER (for a 10-second period) if currently in the NIGHT-WEATHER mode, or vice versa.
CRITICAL WEATHER INFORMATION
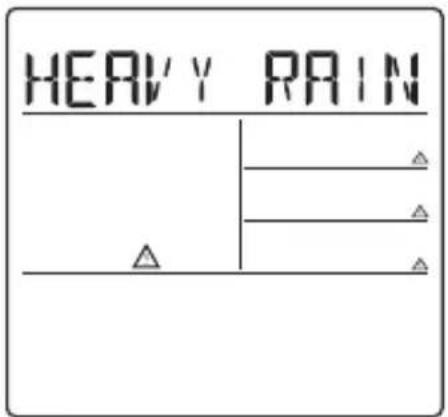
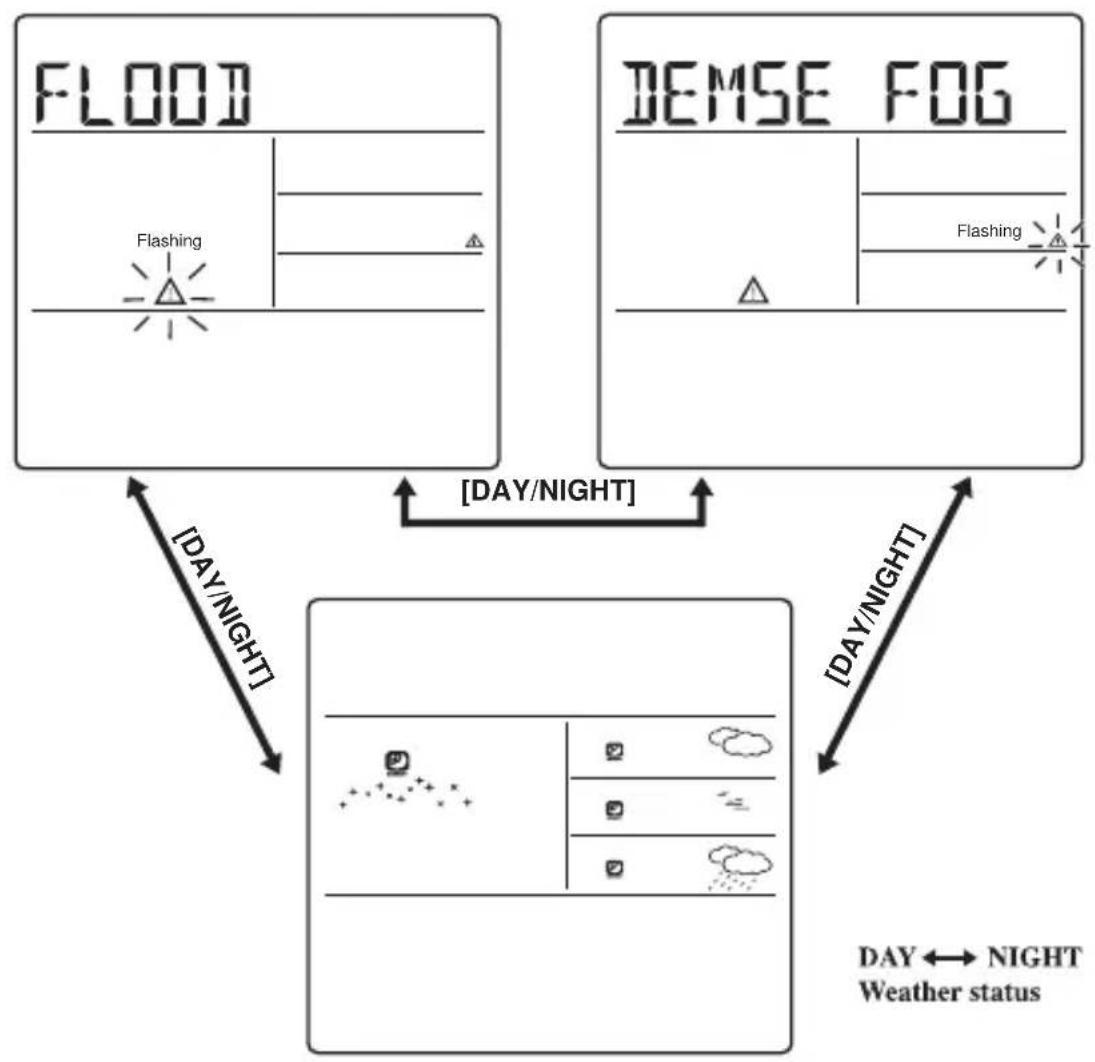
The Meteortime weather signal contains critical weather information such as Gust, Frozen Rain, Heavy Snow, Thunder, Strong UV, Dense Fog, Bise, Mistral, etc. for today and coming three days. A critical weather alert signal will be activated, in case that day has critical weather that the user must know about.
Sometimes there are more than one critical weather information in the 4-days.
Press the [ button to read the critical weather information one by one.
The weather alert signal symbol will flash next to the particular day.
- Press the [SET] button to go back to the display of CITY WEEKDAY ALARM SINGLE ALARM PRE-ALARM TIME& DATE. If you would like to read the weather Information in the information window, then simply move your hand directly over the motion sensor or press the [] button to display DAY NIGHT weather information and also the critical weather information.
If no key is pressed, the critical weather information will automatically appear on the display, to make sure that you will not miss any critical weather details.
OUTDOOR SENSOR STATUS
The wave icon above the current channel icon shows the connection status of the corresponding outdoor sensor:
| Icon Status | |
| - | Searching for the signals from the outdoor sensor |
| Corresponding outdoor sensor signal received successfully | |
| No signals received for over 1 hour |
SEARCH FOR OUTDOOR SENSORS
- The weather station can be manually activated to search for the signals from the outdoor sensors by pressing and holding the [] button for 3 seconds.
TEMPERATURETREND
- The trend indicator shows the trend of temperatures collected at that particular outdoor sensor. Three trend indicators are possible: rising, steady and falling.
| Arrow indicator | TREND | TREND | TREND |
| Temperature Trend | rising steady | falling |
VIEWING OUTDOOR SENSOR (CHANNEL) TEMPERATURE
Static display
- Press the [CHANNEL] button to select measurements from different outdoor sensors, relevant to the unique channels 1, 2, or 3


NOTE: The included outdoor sensor is defaulted to channel 1. Additionally available outdoor sensors are required for channel 2 and 3.
CHANNEL AUTO-SCAN DISPLAY
- Press the [CHANNEL] button, until the icon is displayed, to enable an automatic scan of all channels. The measurements from each channel will be displayed alternatively in 5-second intervals.
NOTE: The channel auto-scan feature can only be activated if there is more than one outdoor sensor operating and each is set to a different channel.
MAXIMUM AND MINIMUM RECORDED TEMPERATURE AND HUMIDITY
- The maximum and minimum recorded indoor and outdoor temperature and humidity will be automatically stored in the memory of the main unit. If you press the [MEM] button, the respective indicators, [MAX] or [MIN] will be displayed.
- To clear the memory, hold the [MEM] button for 3 seconds. The maximum and minimum temperature records will be erased.
ALARM FUNCTIONS
Weekday Alarm
- This is a repeat alarm that will be activated daily from Monday to Friday at a set time.
Single Alarm
- This is a single alarm that will be activated once at a set time.
Pre-Alarm PRE-AL
- The pre-alarm will be activated and the icon will flash if the temperature of Channel 1 is falling to +0^ or below.
- This alarm is programmable 15, 30, 45, 60 or 90 minutes earlier than the weekday alarm or single alarm.
HOW TO SET THE ALARM
- Press the [SET] button to toggle between weekday alarm, single alarm or pre-alarm. If the alarm is disarmed, the time will be displayed as "OFF W-ALM"
- Hold the [SET] button for 3 seconds. The hour digits will start flashing.
- Enter the hour by using the [▲] or [▲] button.
- Press the [SET] button to confirm, the minute digits will start flashing.
- Enter the minute by using the [▲] or [▲] button.
- Press the [SET] button to exit and the respective alarm icons [W], [S] and [PRE-AL] will be activated.
HOW TO STOP THE ALARM
- When the alarm is on, the respective alarm icons [W] and [S] will be flashing. Press the [▲] or [▼] button to stop the alarm immediately.
- To turn off the alarm, press the [▲] or [▼] button to change the alarm time display as "OFF W-ALM".
- If no button is pressed, the alarm will sound for 2 minutes and then deactivated automatically.
SETTING THE PRE-ALARM (ICE WARNING ALARM)
- If weekday alarm [W] or single alarm [S] is set, the Pre-Alarm [PRE-AL] can be programmed.
- Press and hold the [SET] button for 3 seconds to enter into the Pre-Alarm setting mode "P-ALM" [PRE-AL].
- The number 15 will start flashing, meaning that if selected, the alarm will sound 15 minutes earlier than the weekday or single alarm.
- Select the desired Pre-Alarm interval in 15 minutes increments between 15 and 90 minutes by using the [▲] or [▼] button.
- Press the [SET] button to confirm and exit from the alarm setting mode.
LOW BATTERY INDICATION
When it is time to replace batteries, the respective low-battery indicator (see graphic) will appear next to the weather forecast on the weather station or next to the outdoor temperature on the outside sensor.
WEATHER STATUS / INFORMATION
- There are a total of 15 weather status symbols for the Day and 15 symbols for the Night.
| SignificanceDayNightSignificanceDayNight | |||||
| Sunny (Clear at night) | Heavy rain | ||||
| Light cloudy | Frontal storms | ||||
| Mostly cloudy | Heat storms | ||||
| Overcast | Sleet showers | ||||
| Stratus clouds | Snow showers | ||||
| Fog | Sleet | ||||
| Showers | Snow | ||||
| Light rain | |||||
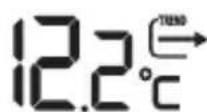
SPECIFICATION ON INDOOR / OUTDOOR TEMPERATURE
| Temperature Display Range -20 °C to +60 °C | |
| Temperature Resolution 0,1 °C | |
| Temperature Accuracy +/-1 °C (within +5 °C to +40 °C) | |
| RF Transmission Frequency 433 Mhz | |
| RF Transmission Range Maximum 30 meters (open area) |
The Weather station is powered by 2 pcs. AA batteries.
The Outdoor sensor is powered by 2 pcs. AAA batteries.
NOTES ON CLEANING
Separate the device from the power supply or remove the batteries before cleaning.
! NOTE!
Only use a dry cloth to clean the exterior of the device. Do not use any cleaning fluid to avoid damaging the electronics.
EC DECLARATION OF CONFORMITY

Bresser GmbH declares that the device (Weather station - Art.No.: Art.No.: 70-01023) is in accordance with applicable guidelines and corresponding standards of the 2014/53 directive.
Dispose of the packaging materials properly, according to their type, such as paper or cardboard. Contact your local waste-disposal service or environmental authority for information on the proper disposal.
Do not dispose of electronic devices in the household garbage!
As per the Directive 2002/96/EC of the European Parliament on waste electrical and electronic equipment and its adaptation into German law, used electronic devices must be collected separately and recycled in an environmentally friendly manner.
In accordance with the regulations concerning batteries and rechargeable batteries, disposing of them in the normal household waste is explicitly forbidden. Please make sure to dispose of your used batteries as required by law — at a local collection point or in the retail market. Disposal in domestic waste violates the Battery Directive.
Batteries that contain toxins are marked with a sign and a chemical symbol.
Cd^1Hg^2Pb^3


1 battery contains cadmium
2 battery contains mercury
3 battery contains lead
CRITICAL WEATHER MESSAGES IN 10 LETTERS SHORT FORM
The regular guarantee period is 2 years and begins on the day of purchase. To benefit from an extended voluntary guarantee period as stated on the gift box, registration on our website is required.
You can consult the full guarantee terms as well as information on extending the guarantee period and details of our services at www.bresser.de/warranty_terms.
ALGEMENE INFORMATIE
ALGEMENE WAARSCHUWINGEN

GEVAAR!
WEERGAVE BATTERIJVERMOGEN
POTENTIAL SOURCES OF INTERFERENCE
TRANSFERT DES DONNÉES
04:00 a.m. - 09:59 a.m. le lendemain (DEMAIN)
10:00 a.m. - 03:59 p.m. e surlendemain (APRÉS-DEMAIN)