
ClimateTemp NDH-NEO - Weather Station BRESSER - Free user manual and instructions
Find the device manual for free ClimateTemp NDH-NEO BRESSER in PDF.

| Product type | Weather station |
| Brand | Bresser |
| Model | ClimateTemp NDH-NEO |
| Base station power supply | Mains adapter (included) or 2 AAA/LR03 batteries (not included) |
| Outdoor sensor power supply | 2 AAA/LR03 batteries (included) |
| Indoor temperature display range | -9.9 °C to 50 °C |
| Outdoor temperature display range | -40 °C to 70 °C |
| Humidity display range | 20% to 95% RH |
| Main functions | DCF radio-controlled clock, weather forecast (5 symbols), moon phase, barometer with 12h history, alarm with snooze, backlight (3 levels), ice warning, temperature alert, channel selection (up to 3 sensors), max/min recording |
| Maximum number of sensors | 3 (channels 1-3) |
| Temperature units | °C / °F |
| Trend display | Trend arrows for temperature and pressure |
| Maintenance and cleaning | Clean with a soft, dry cloth. Do not use solvents. |
| Safety | Do not disassemble the device. Do not expose to temperatures above 60 °C. Use only recommended batteries. Keep batteries out of reach of children. |
| Spare parts and repairability | Standard AAA batteries commercially available. Specific mains adapter. For any repairs, contact the dealer. |
| Warranty | 2 years, extendable by registering at bresser.de/warranty_terms |
Frequently Asked Questions - ClimateTemp NDH-NEO BRESSER
User questions about ClimateTemp NDH-NEO BRESSER
0 question about this device. Answer the ones you know or ask your own.
Ask a new question about this device
Download the instructions for your Weather Station in PDF format for free! Find your manual ClimateTemp NDH-NEO - BRESSER and take your electronic device back in hand. On this page are published all the documents necessary for the use of your device. ClimateTemp NDH-NEO by BRESSER.
USER MANUAL ClimateTemp NDH-NEO BRESSER
Visit our website via the following QR Code or web link to find further information on this product or the available translations of these instructions.
FR
- Validity note....17
- General Information....17
- General Warnings....18
- Scope of delivery 18
- Parts Overview....19
- Main Function Sensor....21
- AC Power Adapter....21
- Setting up power supply 22
- Time Setting.... 23
- Alarm setting 23
- Max / Min temperature and humidity record.....24
- Channel select....24
- Backlight 24
- Temperature Alert....25
- Ice Alert 25
- Weather Forecast....25
- Weather Forecast......26
- Moon Phase....26
- Barometer....27
- Technical data....27
- EC Declaration of Conformity 27
- DISPOSAL....28
- Warranty....28
1. Validity note
This documentation is valid for the products with the following article numbers:
7004350
Manual version: 0325
Always provide information when requesting service.
2. General Information

About this Instruction Manual These operating instructions are to be considered a component of the device.
Read the safety instructions and the instruction manual carefully before using this device.
Keep these instruction manual in a safe place for future reference. If the device is sold or passed on, the instruction manual must be passed on to any subsequent owner/user of the product.

DANGER!
You will find this symbol before every section of text that deals with the risk of minor to severe injuries resulting from improper use.

ATTENTION!
You will find this symbol in front of every section of text which deals with the risk of damage to property or the environment.
3. General Warnings
! DANGER!
This device contains electronic components which operate via a power source (power supply and/or batteries). Only use the device as described in the manual, or you run the risk of an electric shock.
Keep batteries out of the reach of children! Make sure you insert the batteries correctly. Empty or damaged batteries could cause burns if they come into contact with the skin. If necessary, wear adequate gloves for protection.
! ATTENTION!
Do not disassemble the device. In the event of a defect, please contact your dealer. The dealer will contact the Service Centre and can send the device in to be repaired, if necessary. Do not expose the device to temperatures above 60^ C.
Do not expose the device to high temperatures. Use only the supplied power supply or the recommended batteries. Do not short-circuit the device or batteries or throw them into a fire! Excessive heat or improper handling could trigger a short-circuit, a fire or an explosion.
Use only the recommended batteries. Always replace weak or empty batteries with a new, complete set of batteries at full capacity. Do not use batteries from different brands or with different capacities. The batteries should be removed from the unit if it has not been used for a long time.
4. Scope of delivery
Radio-controlled weather station, EU/UK power adapter, thermo-hygrosensor incl. 2 AAA/LR03 type batteries
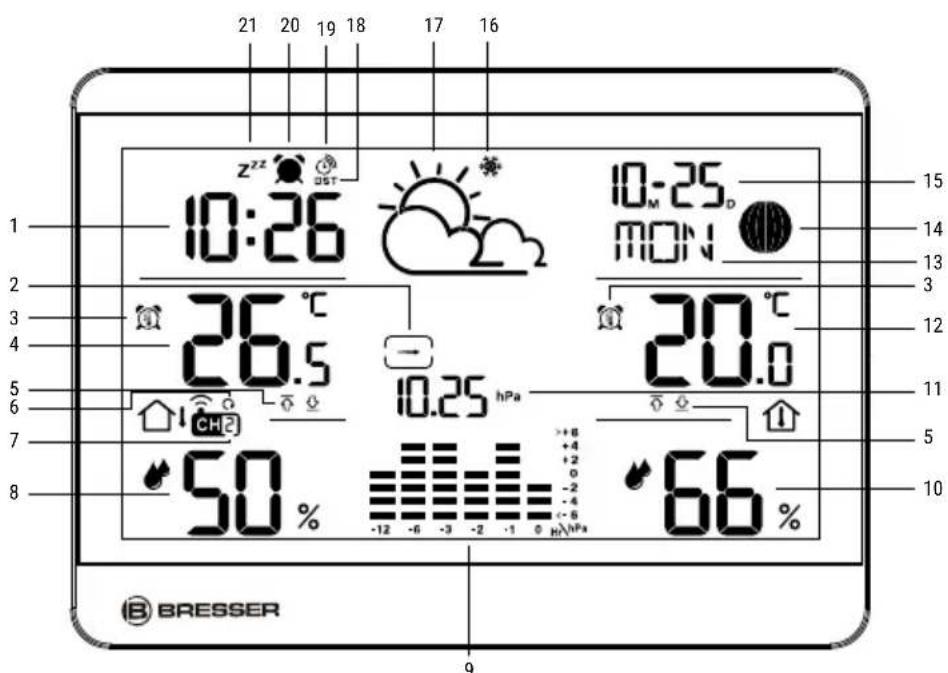
5. Parts Overview
- Time with DCF
- Trend arrow
- Temperature alert
- Outdoor temperature
- MAX and MIN arrows
-
Channel flow
-
Channel number
- Outdoor humidity
- Bar chart
- Indoor humidity
- Barometer value
-
Indoor temperature
-
7 languages week display
- Moon phase
- Calendar
- Ice-Alert
- Weather forecast (five kinds of weather forecast: Sunny, Partly Sunny, Cloudy, Rainy, Snowy)

- Summertime
- Receive symbol Time
- Alarm clock
- Snooze-Symbol
-
button
-
▲utton
- button
- button
- button
-
button
-
Battery cover
- DC hole
- Hanging hole
- button (set snooze function/ display brightness)
6. Main Function Sensor
A. Temperature
B. Current channel
C. Humidity
D. LED INDICATOR
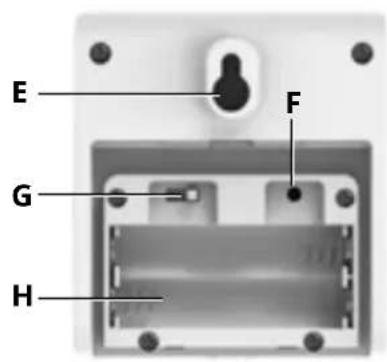
E. Wall Mount
F. Reset
G. Transmission channel (1-3)
H. Battery Compartment
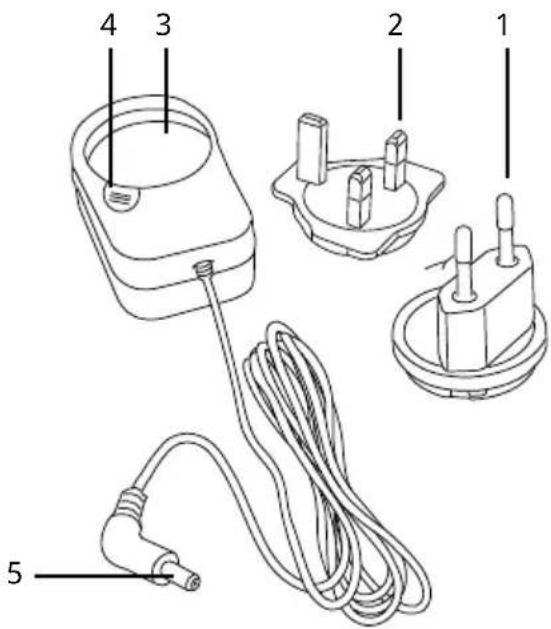
7. AC Power Adapter
- Euro plug adapter
- UK plug adapter
- Adapter fixture
- Locking knob
- DC barrel connector
8. Setting up power supply
Base device:
- Insert the DC connector into the connection socket (29) of the base station.
- Insert the mains plug into the power outlet.
- The device is energized directly.
- Wait until the indoor temperature is displayed on the base station.
NOTICE! For permanent operation, mains power supply is recommended. Alternatively a power supply with batteries is also possible, to keep the time setting in case of power failure (permanent backlight not active).
Proceed as follows:
- Remove the battery compartment cover.
- Insert the batteries into the battery compartment. Ensure that the battery polarity (+/-) is correct.
- Replace the battery compartment cover.
- Wait until the indoor temperature is displayed on the base station.
NOTICE! After 7 seconds, the display switches to power-saving mode in battery mode. When using battery power, press the SNOOZE/LIGHT button to activate the display for about 7 seconds.
NOTICE! When switching from mains power supply to battery power supply or vice versa, the power supply is being disabled for a short moment for technical reasons. Exception: permanent battery operation.
Remote sensor:
- Remove the battery compartment cover.
- Insert the batteries into the battery compartment. Ensure that the battery polarity (+/-) is correct.
- Set the channel selector switch to the desired channel.
NOTICE! This weather station can be operated with one or more remote sensors. Each remote sensor being connected must be operated on a
different channel. If only one remote sensor is connected, it should be operated on channel 1. 4. Replace the battery compartment cover.
9. Time Setting
After the power is restored, the unit automatically searches for the radio signal. It takes approximately 3-8 minutes for this process to complete.
If the radio signal is received correctly, the date and time are set automatically and the reception symbol is displayed.
If no radio signal is received, proceed as follows:
-
Press and hold the button on the base unit for approx. 3 seconds to activate reception of the radio signal. Reception is now initialized again.
-
If still no radio signal is received, the time must be set manually.
Manual time setting:
-
Press and hold button for approx. 3 seconds to enter to the time setting mode.
-
Digits to be set are flashing.
- Press ▲ button to change the value.
- Press Button to confirm and continue to the next setting.
- Settings order: Time zone>12/24H format>Hour > Minute>DM/MD> Year> Month>Day>Week language
- Finally press the button to save the settings and exit the setting mode.
In normal mode, press ▲ button to select the temperature unit in C or F.
10. Alarm setting
- In normal mode, press button to check the alarm time.
- When check the alarm time, press button again to turn on or turn off the alarm.
- When enter the alarm mode, press and hold the 🔔 button for approx. 3 seconds to enter
the alarm setting mode. Digits to be set are flashing. Press ▲ or ▼ button to change the value. Press 📋 button to confirm and continue to the next setting. Settings order: Hour> Minute.
- Finally press the button to save the settings and exit the Alarm setting mode.
When the alarm sounds, press the ⚙️ button to activate the snooze function. The alarm sounds again after 5 minutes.
When the alarm sounds, press any other key to stop the alarm until the set alarm time is reached again.
11. Max / Min temperature and humidity record
- In normal mode, press the button to check the Max and Min temperature and humidity record.
- When checking the Max/Min record, press and hold the button to clear the record.
12. Channelselect
- In normal mode, press the button to select Channel 1, Channel 2, Channel 3 or cycle display.
- Hold the button for approx. 3 seconds to reset values and search for an RF signal.
NOTICE! Always make sure the channel chosen on the display unit matches the channel option chosen on the outdoor sensor.
13.Backlight
When power on the adapter, press the button to choose the backlight level. It has 3 levels backlight (dark, medium, light).
When power by batteries, press the button to turn on the backlight for 7 seconds.
14. Temperature Alert
- In normal mode, Press the button to turn on or turn off the temperature alert. The outdoor temperature alarm is set first, then the outdoor and indoor temperature alarms, then the indoor temperature alarm.
- In normal model, Press and hold the ⚠ button for approx. 3 seconds to enter the temperature alert setting.
- Press the ▲ button to set the temperature.
- Press button to confirm and continue to the next setting.
- Settings order: Indoor high temperature> Indoor low temperature> Outdoor high temperature> Outdoor low temperature
- In the same way, you can set temperature alarms for CH1-3 by selecting the desired channel with the Channel button 📂 then setting and activating the temperature alarm.
15. Ice Alert
When the outdoor temperature hits is between -1.0+2.9°C, the ice alert symbol 🙏 will appear on the display, flashing continuously.
NOTICE! The main unit can connect with 3 outdoor sensors, if one of the sensors temperature is between -1.0\~+2.9°C, the main unit will show the ice alert symbol 📋. The symbol will stop flashing when the temperature has risen above 3°C.
16. Weather Forecast
The temperature trend indicator shows the trends of weather change for the coming minutes. Arrows indicate a rising, stable or falling trend.
The barometer measures the air pressure every 15 minutes. Based on this measurement, the main unit calculates the air pressure for the current hour (the average air pressure of now / 15 minutes ago / 30 minutes ago / as well as 45 minutes ago) and
compares this value with the value of the previous hour. If the measured air pressure has changed by more than 1 hPa, an increasing (UP) or decreasing (DOWN) trend arrow is displayed.

flowchart
graph LR
    A["①"] --> B["②"]
    B --> C["③"]
17. Weather Forecast
A weather trend for the next 12-24 hours is calculated from the measured values and displayed graphically as follows:
| SYMBOLDESCRIPTION | |
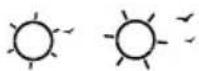 | Sunny |
 | Sunny to cloudy |
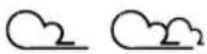 | Cloudy |
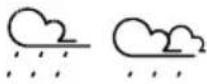 | Cloudy to rain |
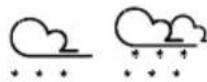 | Cloudy to snow |
18. Moon Phase
The phase of the moon depends on the current date. It is automatically calculated and the following symbols are displayed:
| SYMBOL DESCRIPTION | |
 | Full moon |
 | Waning moon |
 | New moon |
| Waxing moon | |
| Full moon | |
19. Barometer
Record and display the changing trend in a chart based on the air pressure history in the past 12 hours. The horizontal data is the 6 time periods in the past 12 hours (-12, -6, -3, -2, -1, 0), and the vertical data is the air pressure change value (the value is 0 by default when the power plugged in, each grid above or below represents 2hPa). Taking the air pressure value of the current period as the reference point, through comparison and calculation, we can determine whether the air pressure in the past 6 time periods has increased or decreased. (It is flat when it is just powered on.)
20. Technical data
Main unit
Radio-controlled clock: via DCF time signal Power supply: EU/UK power adapter (incl.) or 2 x AAA/LR03 type batteries (optional, not incl.) Temperature measuring unit: °C / °F Temperature display range: -9.9°C – 50°C Humidity display range: RH 20% - 95%
Wireless sensor
Power supply: 2x AAA/LR03 type batteries (incl.) Temperature measuring unit: °C / °F Temperature display range: -40°C – 70°C Humidity display range: RH 20% - 95%
21. EC Declaration of Conformity
CE Bresser GmbH hereby declares that the radio equipment type with item number 7004350 is in compliance with Directive 2014/53/EU. The full text of the EC Declaration of Conformity is
available at the following web address: www.bresser.de/download/7004350/CE/7004350_CE.pdf
22. DISPOSAL

Dispose of the packaging materials properly, according to their type, such as paper or cardboard. Contact your local waste-disposal service or environmental authority for information on the proper disposal.

Do not dispose of electronic devices in the household garbage! As per Directive 2002/96/ of the European Parliament on waste electrical and electronic equipment and its adaptation into German used electronic devices must be collected separately recycled in an environmentally friendly manner. Accordance with the regulations concerning batteries and rechargeable batteries, disposing of them in the normal household waste is explicitly hidden. Please make sure to dispose of your
used batteries as required by law — at a local collection point or in the retail market. Disposal in domestic waste violates the Battery Directive.
Batteries that contain toxins are marked with a sign and a chemical symbol. "Cd" = cadmium, "Hg" = mercury, "Pb" = lead.


Cd^1Hg^2Pb^3
^1 battery contains cadmium
^2 battery contains mercury
^3 battery contains lead
23. Warranty
The regular warranty period is 2 years and starts on the day of purchase. To benefit from an extended voluntary warranty period as indicated on the gift box, registration on our website is required. You can consult the full guarantee terms as well as information on extending the guarantee period and details of our services at www.bresser.de/warranty_terms.
Table des matières
chemical
Chemical reaction diagram showing Cd¹Hg²Pb³ reduction with crossed arrows indicating electron movement"Cd" = cadmium, "Hg" = kwik, "Pb" = lood.


Cd^1Hg^2Pb^3

^1 Batterij bevat cadmium
^2 Batterij bevat kwik
^3 Batterij bevat lood
23. Garantie
Please contact the service centre first for any questions regarding the product or claims, preferably by e-mail.
E-Mail: service@bresseruk.com
Telephone*: +44 1342 837 098
BRESSER UK Ltd.
Suite 3G, Eden House
Enterprise Way
Edenbridge, Kent TN8 6HF
Great Britain
*Number charged at local rates in the UK (the amount you will be charged per phone call will depend on the tariff of your phone provider); calls from abroad will involve higher costs.
NL BE
- FR
- Validity note
- General Information
- DANGER!
- ATTENTION!
- General Warnings
- ! DANGER!
- ! ATTENTION!
- Scope of delivery
- Parts Overview
- Main Function Sensor
- AC Power Adapter
- Setting up power supply
- Base device:
- Proceed as follows:
- Remote sensor:
- Time Setting
- Alarm setting
- Max / Min temperature and humidity record
- Channelselect
- 13.Backlight
- Temperature Alert
- Ice Alert
- Weather Forecast
- Weather Forecast
- Moon Phase
- Barometer
- Technical data
- Main unit
- Wireless sensor
- EC Declaration of Conformity
- DISPOSAL
- Warranty
- Table des matières
- Garantie
- BRESSER UK Ltd.
- NL BE
Brand : BRESSER
Model : ClimateTemp NDH-NEO
Category : Weather Station