USER MANUAL Comfort Weather Center 7in1 7803300 BRESSER
COMFORT WEATHER CENTER WITH 7-IN-1 PROFESSIONAL SENSOR
natural_image
Exterior view of a weather station instrument with a digital display showing real-time weather data (no text or symbols on the device itself)
DE BEDIENUNGSANLEITUNG
GB INSTRUCTION MANUAL
FR MANUEL D'INSTRUCTION
NL GEBRUIKSAANWIJZING
ES MANUAL DE INSTRUCCIONES
IT MANUALE DI ISTRUZIONI

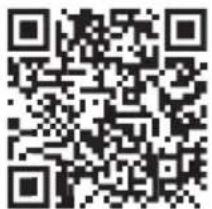
Visit our website via the following QR Code or web link to find further information on this product or the available translations of these instructions.

DE BEDIENUNGSANLEITUNG.....4
GB INSTRUCTION MANUAL ..... 44
FR MANUEL D'INSTRUCTION.... 82
NL GEBRUIKSAANWIJZING....122
ES MANUAL DE INSTRUCCIONES..... 161
IT MANUALE DI ISTRUZIONI.....201
UNTERSTÜTZT / WORKS WITH:

AWEKAS
https://awekas.at

WEATHER UNDERGROUND
https://www.wunderground.comhttps://weathercloud.net

weathercloud

https://pwsweather.com
APP DOWNLOAD:
WSLINK

Download on the
App Store

GET IT ON
Google Play
Weather Underground is a registered trademark of The Weather Channel, LLC. both in the United States and internationally. The Weather Underground Logo is a trademark of Weather Underground, LLC. Find out more about Weather Underground at www.wunderground.com
Apple and the Apple logo are trademarks of Apple Inc., registered in the U.S. and other countries. App Store is a service mark of Apple Inc., registered in the U.S. and other countries. Google Play and the Google Play logo are trademarks of Google Inc.
| Produkt / Product Art.No. | |
| Station + 7-in-1 Sensor 7003300 | |
| Only/Nur 7-in-1 Sensor 7803300 | |
| Only/Nur Station 7903300 | |
- Einleitung 6
3.1 7-in-1-Funksensor 8
3.1 7-in-1-Funksensor
natural_image
Interior view of a toilet with lid and vent, showing mechanical components (no text or symbols visible)
natural_image
Technical line drawing of a mechanical component with mounting flanges and a rod (no text or symbols)
natural_image
Technical line drawing of a mechanical device with no visible text or symbols
natural_image
Technical line drawing of a weather instrument with no visible text or symbols
natural_image
Diagram of a USB connector with internal structure and cable connection (no text or symbols)

Hinweis:
4.7.4 Wetter-Index
natural_image
Three laboratory glassware items: a tripod-mounted device, a beaker with a tripod, and a stand (no visible text or labels)

App-Store Google Play
(e) WLAN Seite
https://www.wunderground.com/dashboard/pws/XXXX
10.2 7-in-1-Funksensor
"Cd" = Cadmium, "Hg" = Quecksilber, "Pb" = Blei.
1.2 Scope of delivery/packaging contents 47
1.2.1 Mounting kit set 47
- Pre installation 48
2.1 Checkout 48
2.2 Site selection 48
- Getting started 48
3.1 Wireless 7-in-1 sensor....48
3.2 Install Wireless 7-in-1 sensor 48
3.2.1 Battery and installation 49
3.2.2 Assembly the stand and pole 49
3.2.3 Mounting guidelines 50
3.3 Synchronizing additional sensor(s) (optional) 51
3.3.1 Thermo-hygro sensors ....51
3.4 Setup the Console 51
3.4.1 Power up the display console 51
3.4.2 Setup display console 52
3.4.3 Synchronizing wireless 7-in-1 sensor array .52
3.4.4 Data clearing 52
- Display console functions and operation 53
4.1 Screen Display 53
4.2 Display console keys 53
4.3 Time and date 54
4.3.1 Time synchronize status ....54
4.3.2 WI-FI connection 55
4.3.3 Wireless sensor signal receiving .....55
4.3.4 Moon phase ....55
4.4 Time, Date, Unit and other setting 56
4.5 Setting alarm time 56
4.5.1 Activating alarm and temperature pre-alarm function .....57
4.5.2 Alarm operation 57
4.6 Setting high / low weather alert 57
4.6.1 Weather alert operation ....58
4.7 Console features 59
4.7.1 Weather forecast 59
4.7.2 Barometric pressure 59
4.7.3 Outdoor temperature, humidity 60
4.7.4 Weather index 60
4.7.5 Indoor and optional CH1 \~ 7 temperature and humidity .....61
4.7.6 Wind 61
4.7.7 Rain 63
4.7.8 Light intensity, UV index & Sunburn time 63
4.8 Trend indicator 64
4.9 Maximum / Minimum records 64
4.9.1 MAX / MIN records 65
4.9.2 To Clear the MAX / MIN records 65
4.10 PAST 24 HOURS HISTORY DATA 65
4.11 Back light 65
- Connect console to WI-FI 66
5.1 Download WSLink configuration app 66
5.2 Console in access point mode 66
5.3 Add your console to WSLink 67
5.4 Setup new console with WSLink 68
5.5 Weather server setting 69
5.6 Calibration 70
5.7 Firmware 71
- Create account for weather server 71
6.1 For Weather Underground (WU) 71
6.2 For Weathercloud (WC) 73
6.3 For PWSWeather 74
6.4 For Awekas 74
- View WUnderground & Weathercloud live data 75
7.1 Viewing your weather data in WUnderground 75
7.2 Viewing your weather data in Weathercloud 75
7.3 Viewing weather data via WSLink app 76
- Maintenance 76
8.1 Firmware update 76
8.1.1 Firmware update step 76
8.2 Battery replacement 76
8.2.1 Re-pairing the sensor array manually 77
8.3 Reset and factory reset 77
8.4 Wireless 7-in-1 sensor array maintenance 77
-
Troubleshoot 78
-
Specifications 78
10.1 Console 78
10.2 Wireless 7-in-1 sensor 80
About this user's manual

These operating instructions are to be considered a component of the device.
Please read the safety instructions and the operating instructions carefully before use.
Keep these instructions for renewed use at a later date. When the device is sold or given to someone else, the instruction manual must be provided to the new owner/user of the product.
This product is intended only for private use. It was developed as an electronic medium for the use of multimedia services.

This symbol represents a warning. To ensure safe use, always adhere to the instructions described in this documentation.

This symbol is followed by a user's tip.
Precautions

- Keeping and reading the “User manual” is highly recommended. The manufacturer and supplier cannot accept any responsibility for any incorrect readings, export data lost and any consequences that occur should an inaccurate reading take place.
- Images shown in this manual may differ from the actual display.
- The contents of this manual may not be reproduced without the permission of the manufacturer.
- Technical specifications and user manual contents for this product are subject to change without notice.
- This product is not to be used for medical purposes or for public information
- Do not subject the unit to excessive force, shock, dust, temperature or humidity.
- Do not cover the ventilation holes with any items such as newspapers, curtains etc.
- Do not immerse the unit in water. If you spill liquid over it, dry it immediately with a soft, lint-free cloth.
- Do not clean the unit with abrasive or corrosive materials.
- Do not tamper with the unit's internal components. This invalidates the warranty.
- Placement of this product on certain types of wood may result in damage to its finishing for which manufacturer will not be responsible. Consult the furniture manufacturer's care instructions for information.
- Only use attachments / accessories specified by the manufacturer.
- This product is not a toy. Keep out of the reach of children.
- The console is intended to be used only indoors.
- Place the console at least 20cm from nearby persons.
- Console working temperature: -5°C \~ 50°C
Warning
- Do not ingest the battery. Chemical Burn Hazard.
- Keep new and used batteries apart. If battery door does not close securely, stop using the product and keep it away from children.
- If you think batteries might have been swallowed or placed inside any part of the body, seek immediate medical attention.
- An appliance is only suitable for mounting at height ≤ 2m. (Equipment mass ≤1kg)
- This product is intended for use only with the adaptor provided:
Manufacturer: Dong Guan Shi Jie Hua Xu Electronics Factory
Model: HX075B-0501000-AX
- When disposing of this product, ensure it is collected separately for special treatment.
- The AC/DC adaptor is used as disconnect device.
- The AC/DC adaptor of apparatus should not be obstructed OR should be easily accessed during intended used.
- To be completely disconnect the power input, the AC/DC adaptor of apparatus shall be disconnected from the mains.
Caution
- Danger of explosion if battery is incorrectly replaced. Replace only with the same or equivalent type.
-
Battery cannot be subjected to high or low extreme temperatures, low air pressure at high altitude during use, storage or transportation.
-
Replacement of a battery with an incorrect type can result in an explosion or the leakage of flammable liquid or gas.
- Disposal of a battery into fire or a hot oven, or mechanically crushing or cutting of a battery, can result in an explosion.
- Leaving a battery in an extremely high temperature surrounding environment can result in an explosion or the leakage of flammable liquid or gas.
- A battery subjected to extremely low air pressure may result in an explosion or the leakage of flammable liquid or gas.
1. Introduction
Thank you for selecting WI-FI weather station with 7-in-1 professional sensor. This system gathers and automatically uploads accurate and detailed weather data to Weather Underground, Weathercloud website and 3rd partly weather platform which you can access and upload your weather data freely. This product offers professional weather observers and with exclusive app for easy setup. You will get your own local forecast, high / low, totals and averages for virtually all-weather variables without using a PC / Mac. This Weather Station which transmits wireless sensor array's temperature, humidity, wind, rain UV and light intensity data to the console. This sensor array is fully assembled and calibrated for your easy installation. It can send data at a low power radio frequency to the console from up to 150m / 450 feet away (line of sight).
In the console, a high-speed processor is embedded to analyze the received weather data and these real time data can be published to the weather platforms through your home WI-FI router.
The console can also synchronize with Internet time server to keep the time and weather data time stamp of high precision. The color background LCD display shows informative weather readings with advanced features, such as high/low alert alarm, different weather index, and MAX / MIN records. With calibration and moon phase feature, this system is truly a remarkably personal yet professional weather station for your own backyard.
1.1 Quick start guide
The following Quick Start Guide provides the necessary steps to install and operate the weather station, and upload to the Internet, along with references to the pertinent sections.
| Step | Description Section | |
| 1 | Power up the 7-in-1 wireless sensor array 3.2 | |
| 2 | Power up the display console and pair with sensor array 3.4 | |
| 3 | Manually set date and time (This part is unnecessary if the weather station is connected to internet and time synchronize function is on) | 4.4 |
| 4 | Create account and register weather station at WUnderground and/or Weathercloud | 6 |
| 5 | Connect weather station to WI-FI using WSLink APP 5.1 to 5.5 | |
1.2 Scope of delivery/packaging contents
You will find the following items in the box.
| | | |
| WIFI Weatherstation DC | 5V1A EU/UK adaptor 7-in-1 Sensor Manual | |
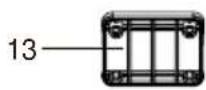
1.2.1 Mounting kit set
 |  |  |
| 1. Pole mounting stand 2. Mounting clamp 3. Plastic pole |
 |  |  |
| 4. Screws 5. Hex nuts | 6. Flat washers | |
 |  |  |
| 7. screws | 8. Hex nut | 9. Rubber pads |
2. Pre installation
2.1 Checkout
Before permanently install your weather station, we recommend the user to operate the weather station at a location which is easy to access to. This will allow you to get familiar with the weather station functions and calibration procedures, to ensure proper operation before installing it permanently.
2.2 Site selection
Before installing the sensor array, please consider the followings;
- Rain gauge must be clean every few months
- Batteries must be changed every 2 to 2.5 years
- Avoid radiant heat reflected from any adjacent buildings and structures. Ideally, the sensor array should be installed at 1.5m (5') from any building, structure, ground or roof top.
- Choose an area of open space in direct sunlight without any obstruction of rain, wind, and sunlight.
- Transmission range between sensor array and display console could reach a distance of 150m (or 450 feet) at line of sight, providing there are no interfering obstacles in between or nearby such as trees, towers, or high voltage line. Check the reception signal quality to ensure good reception.
- Household appliance such as fridge, lighting, dimmers may pose Electro-magnetic interference (EMI), while Radio Frequency Interference (RFI) from devices operating in the same frequency range may cause signal intermittent. Choose a location at least 1-2 meter (3-5 feet) away from these interference sources to ensure best reception.
3. Getting started
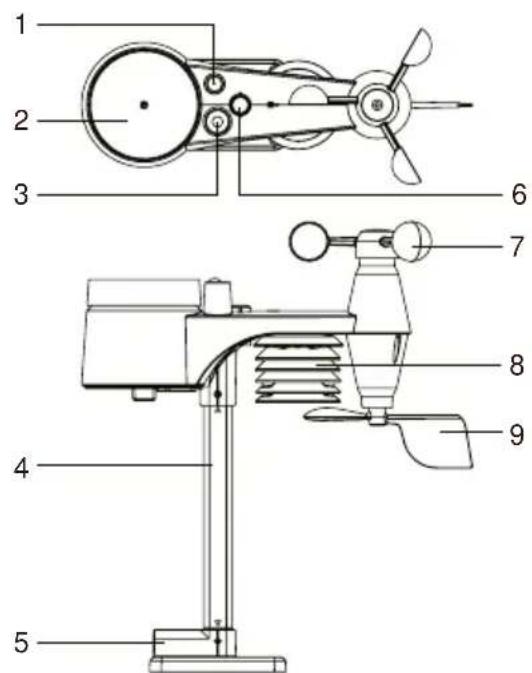
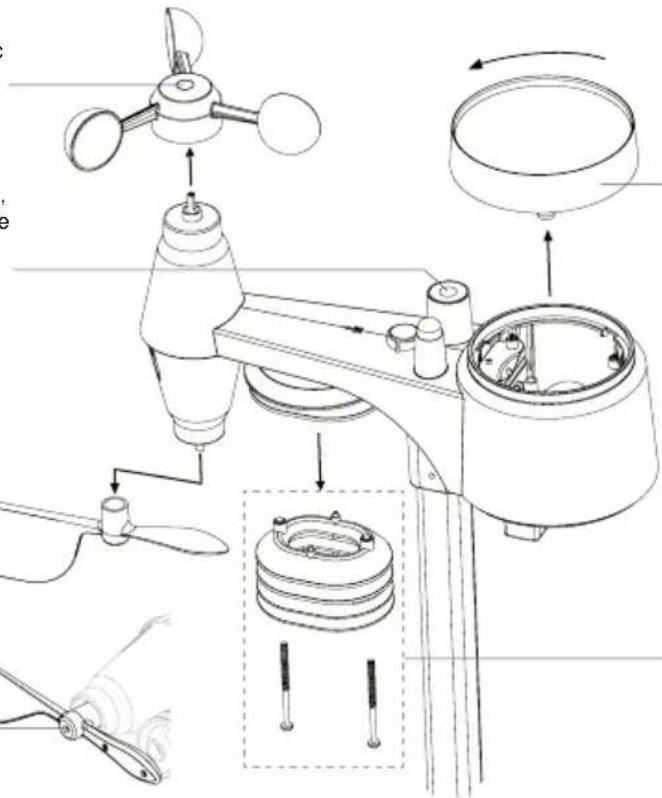
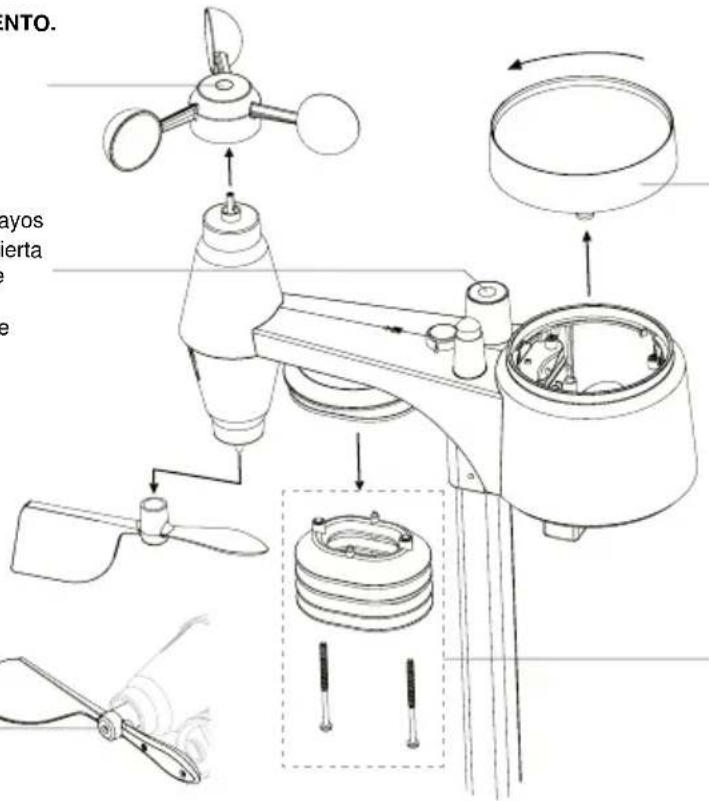
3.1 Wireless 7-in-1 sensor
- Antenna
- Rain collector
- UVI / light sensor
- Mounting pole
- Mounting base
- Balance indicator
- Wind cups
- Radiation shield
- Wind vane
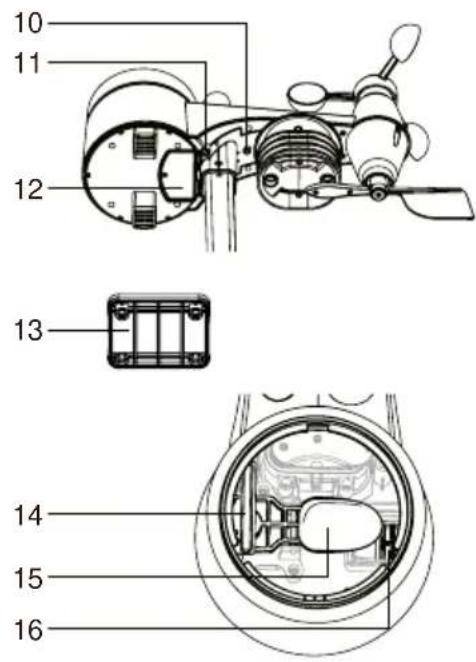
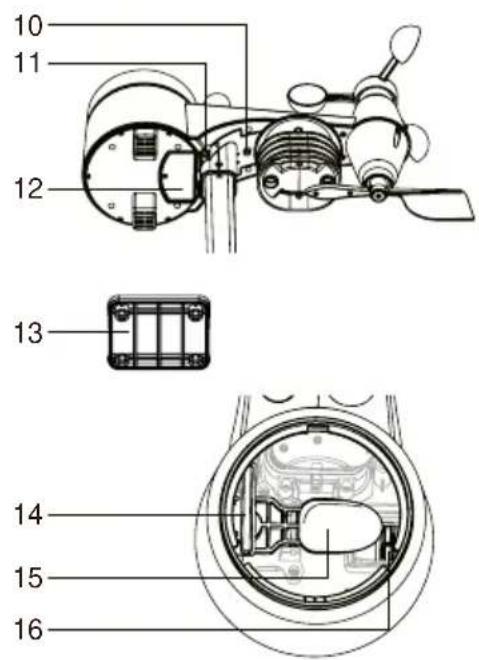
- Red LED indicator
- [RESET] key
- Battery door
- Mounting clamp
- Rain sensor
- Tipping bucket
- Drain holes
3.2 Install Wireless 7-in-1 sensor
Your wireless 7-IN-1 sensor measures wind speed, wind direction, rainfall, UV index, light intensity, temperature and humidity for you. It's fully assembled and calibrated for your easy installation.
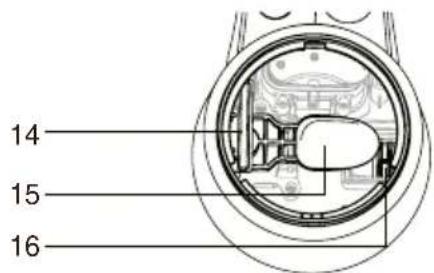
3.2.1 Battery and installation
Unscrew the battery door at bottom of unit and insert the batteries according to the +/- polarity indicated. Screw the battery door compartment on tightly.

Note:
- Ensure the water tight O-ring is properly aligned in place to ensure water resistant.
- The red LED will begin flashing every 12 seconds.
natural_image
Close-up of a mechanical device with internal components and a central hub (no visible text or symbols)
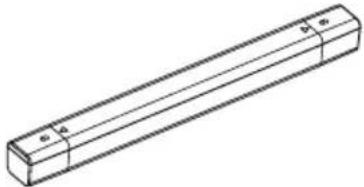
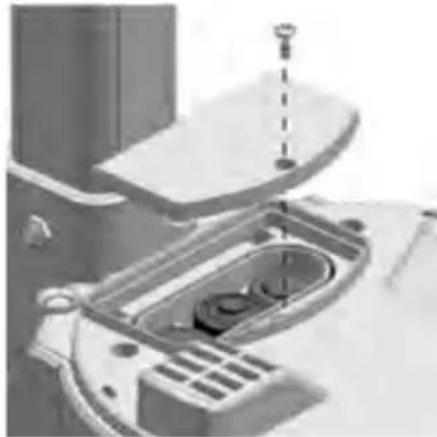
3.2.2 Assembly the stand and pole
| Step 1Insert the top side of the pole to the square hole of the weather sensor.Note:Ensure the pole and sensor's indicator align. |  |
| Step 2Place the nut in the hexagon hole on the sensor, then insert the screw in other side and tighten it by the screw driver. |  |
| Step 3Insert the other side of the pole to the square hole of the plastic stand.Note:Ensure the pole and stand's indicator align. |  |
Step 4
Place the nut in the hexagon hole of the stand, then insert the screw in other side and then tighten it by the screw driver.
natural_image
Technical line drawing of a mechanical bracket with mounting holes and a rod (no text or symbols)
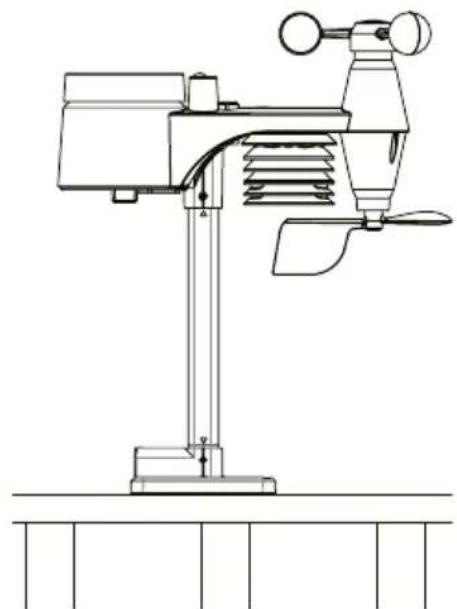
Install the wireless 7-in-1 sensor in an open location with no obstructions above and around the sensor for accurate rain and wind measurement. Install the sensor with the smaller end facing the North to properly orient the wind direction vane.
Secure the mounting stand and clamps (included) to a post or pole, and allow minimum 1.5m off the ground.

3.2.3 Mounting guidelines
- Install the wireless 7-in-1 sensor at least 1.5m off the ground for better and more accurate wind measurements.
- Choose an open area within 150 meters from the LCD console.
- Install the wireless 7-in-1 sensor as level as possible to achieve accurate rain and wind measurements.
- Mount the wireless 7-in-1 sensor with the wind meter end pointing to the North to correctly orient direction of the wind vane.
natural_image
Technical line drawing of a mechanical device with no visible text or symbols
natural_image
Technical line drawing of a weather instrument mounted on a stand, showing no text or symbols.
A. Mounting on pole (Pole Diameter 1"\~1.3")(25\~33mm) B. Mounting on the railing
3.3 Synchronizing additional sensor(s) (optional)
The console can support up to 7 optional wireless thermo-hygro sensors. Please contact your local retailer for details of different sensors.
3.3.1 Thermo-hygro sensors
| Model | No. of sensor supported | Description Image | |
| 7009971 | | High Precision Thermo-Hygro sensorSensor data:CH1~7 temperature and humidity |  |
| 7009972 | Soil Moisture and Temperature sensorSensor data:CH1~7 soil moisture and temperature |  |
| 7009973 | Pool sensorSensor data:CH1~7 water temperature | 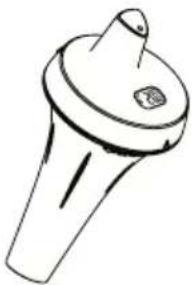 |
3.4 Setup the Console
Follow the procedure to setup the console connection with wireless sensor array and WI-FI.
3.4.1 Power up the display console
- Remove the battery door at the bottom of the main unit.
- Insert 3 new AAA batteries.
- Replace the battery door.
- Connect the display console power jack to 5V 1A USB power with USB type-C cable included.

natural_image
Diagram of a cable connector with internal components and an arrow indicating direction (no text or symbols)

Note:
- The backup battery can backup: Time & Date & Max/Min weather records, history, rainfall records and alert setting values / status.
- The built-in memory can backup: WI-FI setting, Hemisphere setting, Calibration values, and Sensor ID.
- Please always remove the back-up battery if the device is not going to be used for a while. Please keep in mind that even when the device is not in use, certain settings, such as the clock, alert settings and records in its memory, will still drain the back-up battery.
3.4.2 Setup display console
- Once the console power up, all the segments of the LCD will be shown.
- The console will automatically start AP mode and show the "AP" icon on the screen, you can follow Section 5.2 to setup the WI-FI connection.

Note:
If no display appears when power up the console, you can press [ RESET ] key by using a pointed object. If this process still not work, you can remove the backup battery and unplug the adapter then re-power up the console again.
3.4.3 Synchronizing wireless 7-in-1 sensor array
Immediately after power up the console, while still in synchronization mode, the 7-in-1 sensor can be paired to the console automatically (as indicated by the flashing antenna ☎). User may also manually restart the synchronization mode by pressing the [SENSOR / WI-FI] key. Once they are paired up, the sensor signal strength indicator and weather reading will appear on your console display.
3.4.4 Data clearing
During installation of the wireless 7-in-1 sensor, the sensors were likely to be triggered, resulting in erroneous rainfall and wind measurements. After the installation, user may clear out all the erroneous data from the display console. Simply press the [ RESET ] key once to re-start the console.
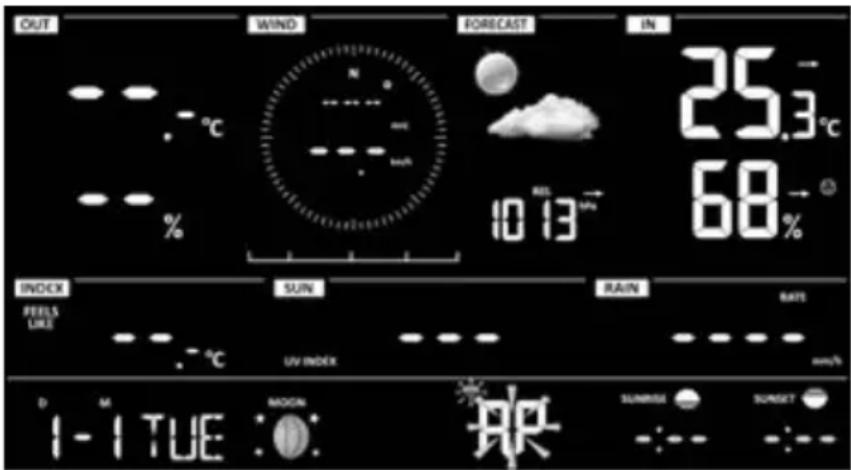
4. Display console functions and operation
4.1 Screen Display
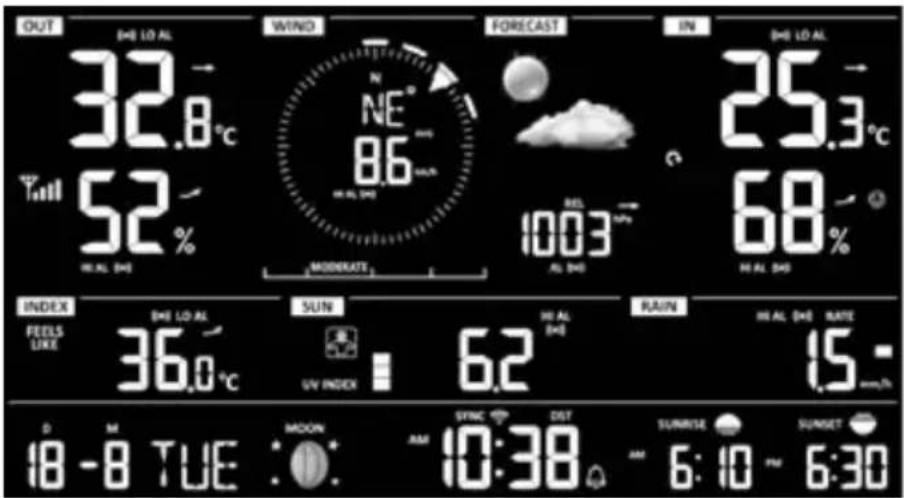
- Outdoor temperature & humidity
- Wind direction & speed
- Weather forecast & Barometer
- Indoor / Ch temperature & humidity
- Weather index
- UV index & light intensity (SUN)
-
Rainfall & Rain rate
-
Time, calendar, moon phase & sunrise/sunset
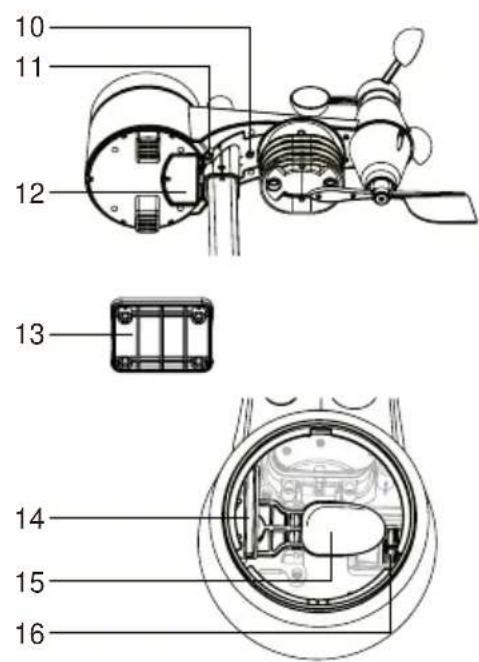
4.2 Display console keys
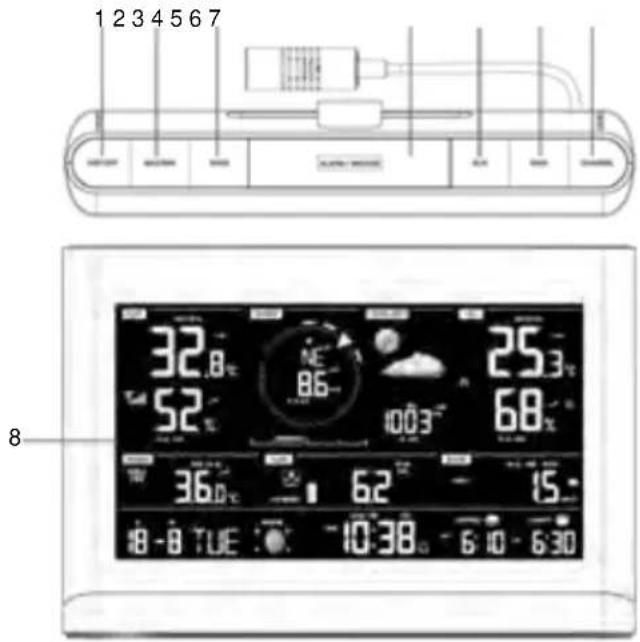
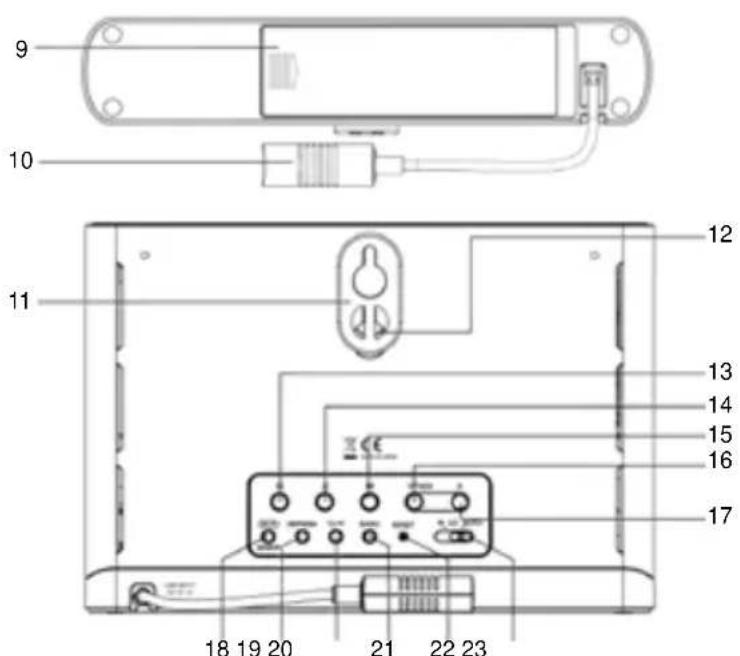
| No | Key / Part Name | Description |
| 1 | HISTORY Press to view the past 24 hours records |
| 2 | MAX / MIN To switch between maximum and minimum values since last reset |
| 3 | WIND Press to change between average, beaufort and gust wind speed |
| 4 | ALARM / SNOOZE | Press to stop alarm sound |
| 5 | SUN | Press to change between sunlight intensity, UV index and sunburn time |
| No. | Key / Part Name | Description |
| 6 | RAIN | Press to switch between rain rate and rainfall of different periods |
| 7 | CHANNEL Press to | switch between indoor and Ch 1~7 temperature and humidity |
| 8 | Display screen |
| 9 | Battery door |
| 10 | USB type-C power jack |
| 11 | Extended wall mount holder |
| 12 | Wall mount hole |
| 13 | SET Hold 2 seconds | to enter time, date and other setting |
| 14 | ALARM Press to view alarm time |
| 15 | ALERT Press to show the alert setting values |
| 16 | INDEX / ∨ | - To switch between Feels Like, Dew point, Heat Index and Wind Chill- Set the value decrease |
| 17 | ^ | - Set the value increase |
| 18 | SENSOR / WI-FI | - Press to start sensor synchronization (pairing)- Hold 6 seconds to enter or exit AP mode |
| 19 | REFRESH Press to update the upload data and time synchronization |
| 20 | °C / °F To switch temperature unit between °C or °F |
| 21 | BARO Press to change between relative and absolute pressure |
| 22 | RESET | - Press to reset the console- Hold 6 seconds to factory reset the console |
| 23 | HI / LO / AUTO | To select backlight mode |
4.3 Time and date
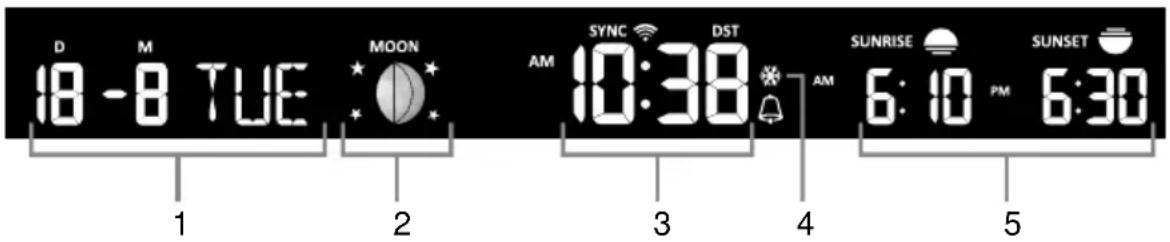
- Date / Day of week
- Moon phase
- Time with Daylight saving time (DST) indication
- Alarm and ice pre-alarm
- Sunrise and Sunset time
4.3.1 Time synchronize status
After the console has connected to the time server, it can get the UTC time. The “SYNC” icon will appear on the LCD.

The time will automatically synchronize per hour. You can also press the [ REFRESH ] key to get the Internet time manually within 1 minute.
4.3.2 WI-FI connection
WI-FI icon on the console display indicates the console's connection status with WI-FI router.
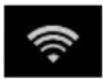
Stable: Console is in connection with WI-FI router

Flashing: Console is scanning to connect to WI-FI router
4.3.3 Wireless sensor signal receiving
- The console display signal strength for the wireless sensor(s), as per table below:
| No signal Weak signal Good signal |
| Outdoor 7-in-1 sensor |  |  |  |
| Sensor channel |  |  | 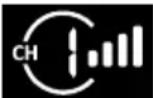 |
- If the signal has discontinued and does not recover within 15 minutes, the signal icon will disappear. The temperature and humidity will display "Er" for the corresponding channel.
- If the signal does not recover within 48 hours, the "Er" display will become permanent. You need to replace the batteries and then press [SENSOR / WI-FI] key to pair up the sensor again.
4.3.4 Moon phase
The moon phase is determined by time and date of the console. The following table explains the moon phase icons of the Northern and Southern Hemispheres. Please refer to section 4.4 about how to setup for the Southern Hemisphere.
| Northern Hemisphere | Moon Phase | Southern Hemisphere |
|  | New Moon | |
|  | Waxing Crescent | |
|  | First quarter | |
|  | Waxing Gibbous | |
|  | Full Moon | |
|  | Waning Gibbous | |
|  | Third quarter | |
|  | Waning Crescent | |
4.4 Time, Date, Unit and other setting
Press and hold the [SET] key for 2 seconds to enter the setting mode. Press [∧] or [INDEX / ∨] key to adjust, and press [SET] key to proceed with next step of the setting. Please refer to following setting procedures.
| Step | Mode Setting procedure | |
| [SET]+2s | DST (Daylight Saving Time | Press [ ∧ ] or [ INDEX / ∨] key to select AUTO / ON / OFF.AUTO is to adjust the daylight saving time automatically based on time zone entered.ON is to add one hour on current default time.OFF is to completely turn off the DST function. |
| [SET] | Time | Press [ ∧ ] or [ INDEX / ∨] key to adjust the minute / hour |
| [SET] | 12/24 hour format | Press [ ∧ ] or [ INDEX / ∨] key to select 12 or 24 hour format |
| [SET] | Year | Press [ ∧ ] or [ INDEX / ∨] key to adjust the year |
| [SET] | Date | Press [ ∧ ] or [ INDEX / ∨] key to adjust the day / month |
| [SET] | MD / DM display format | Press [ ∧ ] or [ INDEX / ∨] key to select "Month / Day" or "Day / Month" display format |
| [SET] | Time sync On / off | Press [ ∧ ] or [ INDEX / ∨] key to on / off Time Sync function.If you want to set the time manually, you should set Time Sync off |
| [SET] | Hemisphere | Press [ ∧ ] or [ INDEX / ∨] key to select North / South hemisphere for moon phase and wireless sensor array point to direction. |
| [SET] | Weekday language | Press [ ∧ ] or [ INDEX / ∨] key to select weekday display language(available: EN, DE, FR, IT, ES, NL, RU) |
| [SET] | Temperature unit | Press [ ∧ ] or [ INDEX / ∨] key to select °C or °F |
| [SET] | Wind speed unit | Press [ ∧ ] or [ INDEX / ∨] key to select m/s, knots, mph or km/h |
| [SET] | Wind direction display format | Press [ ∧ ] or [ INDEX / ∨] key to select 360 deg or 16 directions display format |
| [SET] | Light unit | Press [ ∧ ] or [ INDEX / ∨] key to select Klux, Kfc or W/m ^2 |
| [SET] | Baro pressure unit | Press [ ∧ ] or [ INDEX / ∨] key to select hPa, mmHg or inHg |
| [SET] | Rain unit | Press [ ∧ ] or [ INDEX / ∨] key to select mm or in |
| [SET] | Exit setting mode | |

Note:
- In normal mode, press [SET] key to switch between year and date display.
- During the setting, you can back to normal mode by press and hold [SET] key for 2 seconds.
4.5 Setting alarm time
- In normal time mode, press and hold [ALARM] key for 2 seconds until the alarm hour digit flashes to enter alarm time setting mode.
- Press [∧] or [INDEX / ∨] key to change the value. Press and hold the key for quick-adjust.
- Press [ ALARM ] key again to step the setting value to Minute with the Minute digit flashing.
- Press [∧] or [INDEX / ∨] key to adjust the value of the flashing digit.
- Press [ ALARM ] key to save and exit the setting.
4.5.1 Activating alarm and temperature pre-alarm function
- In normal mode, press [ ALARM ] key to show the alarm time for 5 seconds.
- When the alarm time displays, press [ ALARM ] key again to activate the alarm function. Or press [ ALARM ] key twice to activate the alarm with ice pre-alarm function.
| Alarm off Alarm on Alarm with ice-alert | |
|  | |  | |  | |

Note:
Once the ice pre-alert activated, the alarm will sound 30 minutes earlier if it detects outside temperature is below -3^ C.
4.5.2 Alarm operation
When the time reaches the alarm time, the alarm sound will beep.
The alarm beeping can be stopped by following operation:
- Auto-stop after 2 minutes if without any operation and the alarm will activate again in the next day.
- By pressing [ALARM / SNOOZE] key to enter snooze, and the alarm will sound again after 5 minutes.
- By pressing and hold [ALARM / SNOOZE] key for 2 seconds or press [ ALARM ] key to stop the alarm and the alarm will activate again in the next day.

Note:
During the snooze, the alarm icon " will keep flashing.
4.6 Setting high / low weather alert
In normal time mode, press [ ALERT ] key to view the alert setting in below step.
| Step Mode Setting procedure |
| [ALERT] | OUT temperature high alert | - Hold [ALERT] key for 2 secs to enter setting mode, than press [^ ] or [ INDEX / ∨] key to adjust alert value.- Press [ALARM] key to on / off the alert. |
| [ALERT] | OUT temperature low alert | - Hold [ALERT] key for 2 secs to enter setting mode, than press [^ ] or [ INDEX / ∨] key to adjust alert value.- Press [ALARM] key to on / off the alert. |
| [ALERT] | OUT humidity high alert | - Hold [ALERT] key for 2 secs to enter setting mode, than press [^ ] or [ INDEX / ∨] key to adjust alert value.- Press [ALARM] key to on / off the alert. |
| [ALERT] | OUT humidity low alert | - Hold [ALERT] key for 2 secs to enter setting mode, than press [^ ] or [ INDEX / ∨] key to adjust alert value.- Press [ALARM] key to on / off the alert. |
| [ALERT] | IN / CH temperature high alert | - Press [CHANNEL] key to select the IN or CH 1~7- Hold [ALERT] key for 2 secs to enter setting mode, than press [^ ] or [ INDEX / ∨] key to adjust alert value.- Press [ALARM] key to on / off the alert. |
| [ALERT] | IN / CH temperature low alert | - Press [CHANNEL] key to select the IN or CH 1~7- Hold [ALERT] key for 2 secs to enter setting mode, than press [^ ] or [ INDEX / ∨] key to adjust alert value.- Press [ALARM] key to on / off the alert. |
| [ALERT] | IN / CH humidity high alert | - Press [CHANNEL] key to select the IN or CH 1~7- Hold [ALERT] key for 2 secs to enter setting mode, than press [^ ] or [ INDEX / ∨] key to adjust alert value.- Press [ALARM] key to on / off the alert. |
| [ALERT] | IN / CH humidity low alert | - Press [CHANNEL] key to select the IN or CH 1~7- Hold [ALERT] key for 2 secs to enter setting mode, than press [ ∧ ] or [ INDEX / √] key to adjust alert value.- Press [ALARM] key to on / off the alert. |
| [ALERT] | Wind speed high alert | - Hold [ALERT] key for 2 secs to enter setting mode, than press [ ∧ ] or [ INDEX / √]key to adjust alert value.- Press [ALARM] key to on / off the alert. |
| [ALERT] | Feels like high alert | - Hold [ALERT] key for 2 secs to enter setting mode, than press [ ∧ ] or [ INDEX / √]key to adjust alert value.- Press [ALARM] key to on / off the alert. |
| [ALERT] | Feels like low alert | - Hold [ALERT] key for 2 secs to enter setting mode, than press [ ∧ ] or [ INDEX / √]key to adjust alert value.- Press [ALARM] key to on / off the alert. |
| [ALERT] | Dew point high alert | - Hold [ALERT] key for 2 secs to enter setting mode, than press [ ∧ ] or [ INDEX / √]key to adjust alert value.- Press [ALARM] key to on / off the alert. |
| [ALERT] | Dew point low alert | - Hold [ALERT] key for 2 secs to enter setting mode, than press [ ∧ ] or [ INDEX / √]key to adjust alert value.- Press [ALARM] key to on / off the alert. |
| [ALERT] | Heat index high alert | - Hold [ALERT] key for 2 seconds enter setting mode, than press [ ∧ ] or [ INDEX / √]key to adjust alert value.- Press [ALARM] key to on / off the alert. |
| [ALERT] | Wind chill low alert | - Hold [ALERT] key for 2 secs to enter setting mode, than press [ ∧ ] or [ INDEX / √]key to adjust alert value.- Press [ALARM] key to on / off the alert. |
| [ALERT] | UV high alert | - Hold [ALERT] key for 2 secs to enter setting mode, than press [ ∧ ] or [ INDEX / √]key to adjust alert value.- Press [ALARM] key to on / off the alert. |
| [ALERT] | Light intensity high alert | - Hold [ALERT] key for 2 secs to enter setting mode, than press [ ∧ ] or [ INDEX / √]key to adjust alert value.- Press [ALARM] key to on / off the alert. |
| [ALERT] | Pressure drop alert (drop in 30 minutes) | - Hold [ALERT] key for 2 secs to enter setting mode, than press [ ∧ ] or [ INDEX / √]key to adjust alert value.- Press [ALARM] key to on / off the alert. |
| [ALERT] | Rain rate high alert | - Hold [ALERT] key for 2 secs to enter setting mode, than press [ ∧ ] or [ INDEX / √]key to adjust alert value.- Press [ALARM] key to on / off the alert. |
| [ALERT] | Exit setting mode | |
4.6.1 Weather alert operation
If you set the weather alert, and this value out of the setting range, alarm sound will start and the related weather
reading will flash.
Where it can be stopped by following operation:
- Auto-stop once the value back to the range.
- By pressing the [ALARM / SNOOZE] or [ ALARM ] key to stop the sound.

Note:
- When you turn on the time alarm, the "icon will display on time section.
- When you turn on the ice pre alarm, the " 🔊 and " 🔊on will display on time section.
- When you turn on the weather alert, the "AL (n) n will display near the reading.
- During the setting, hold the [ ] or [ INDEX / ] key for quick-adjusting the value.
- The alarm function(s) will turn on automatically once you set the alarm time.
- During the setting, you can return back to normal mode by press and hold [ SET ] key for 2 seconds.
4.7 Console features
4.7.1 Weather forecast
The built-in barometer continually monitor atmosphere pressure. Based on the data collected, it can predict the weather conditions in the forthcoming 12\~24 hours within a 30\~50km (19\~31 miles) radius.
| Sunny Partly cloudy Cloudy Rainy Rainy / Stormy Snowy | |
 |  |  |  |  |  |

Note:
- The accuracy of a general pressure-based weather forecast is about 70% to 75%.
- The weather forecast is reflecting the weather situation for next 12\~24 hours, it may not necessarily reflect the current situation.
- The SNOWY weather forecast is not based on the atmospheric pressure, but based on the temperature of outdoor. When the temperature is below -3°C (26°F), the SNOWY weather icon will be displayed on the LCD.
4.7.2 Barometric pressure
The atmospheric pressure is the pressure at any location of the earth caused by the weight of the column of air above it. One atmospheric pressure refers to the average pressure and gradually decreases as altitude increases. Meteorologists use barometers to measure atmospheric pressure. Because absolute atmospheric pressure decreases with altitude, meteorologist correct the pressure relative to sea-level conditions. Hence, your ABS pressure may read 1000 hPa at altitude of 300m, but the REL pressure is 1013 hPa.
To obtain accurate REL pressure for your area, consult your local official observatory or check weather website on internet for real time barometer conditions, and then adjust the relative pressure in configuration app (Section 5.6).
- Absolute / Relative pressure indicator
- Barometric pressure trend
- Barometric pressure reading
- Pressure drop alert indicator
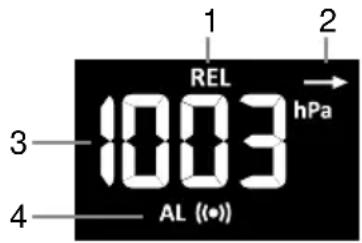
4.7.2.1 Absolute or relative barometric pressure
In normal mode, press [ BARO ] key to switch between ABSOLUTE and RELATIVE barometric pressure.
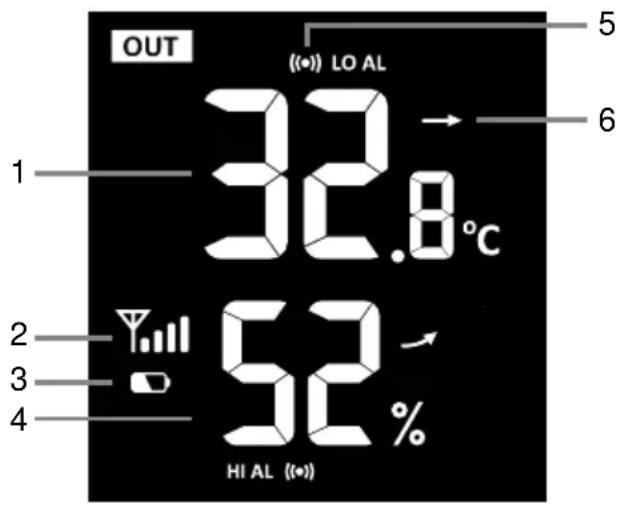
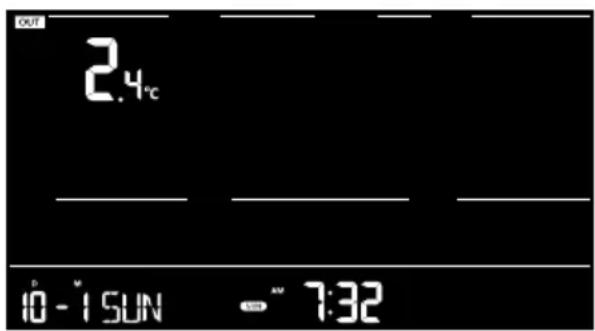
4.7.3 Outdoor temperature, humidity
- Outdoor temperature reading
- Signal indicator to show the signal receiving strength
- Low battery indicator
- Outdoor humidity reading
- High / Low alert indicator
- Trend indicator

Note:
If temperature / humidity is below or above the measurement range, the reading will show "LO" or "HI" respectively.
The low battery indicator (3) only appears when the battery power is low. When the batteries are full, no battery symbol is displayed.
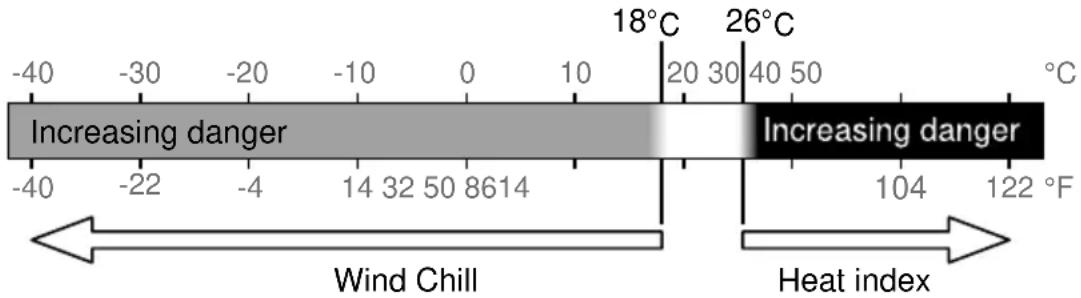
4.7.4 Weather index
Press [INDEX] key to switch display between FEELS LIKE, DEW POINT, HEAT INDEX and WIND CHILL readings in weather index section.
4.7.4.1 Feels like
Feels Like Temperature shows what the outdoor temperature will feel like. It's a collective mixture of Wind Chill factor (18°C or below) and the Heat Index (26°C or above). For temperatures in the region between 18.1°C to 25.9°C where both wind and humidity are less significant in affecting the temperature, the device will show the actual outdoor measured temperature as Feels Like Temperature.
4.7.4.2 Dew point
Dew point is the temperature below which the water vapor in air at constant barometric pressure condenses into liquid water at the same rate at which it evaporates. The condensed water is called dew when it forms on a solid surface.
4.7.4.3 Heat index
The heat index which is determined by the wireless 7-in-1 sensor's temperature & humidity data when the temperature is between 26°C (79°F) and 50°C (120°F).
| Heat Index range Warning | Explanation | |
| 27°C to 32°C (80°F to 90°F) | Caution Possibility of heat exhaustion |
| 33°C to 40°C (91°F to 105°F) | Extreme Caution Possibility of heat dehydration |
| 41°C to 54°C (106°F to 129°F) | Danger | Heat exhaustion likely |
| ≥55°C (≥130°F) | Extreme Danger | Strong risk of dehydration / sun stroke |
4.7.4.4 Wind chill
A combination of the wireless 7-in-1 sensor's temperature and wind speed data determines the current wind chill factor. Wind chill number are always lower than the air temperature for wind values where the formula applied is valid (i.e. due to limitation of formula, actual air temperature higher than 10^ C with wind speed below 9km/h may result in erroneous wind chill reading).
4.7.5 Indoor and optional CH1 \~ 7 temperature and humidity
This console can display Indoor and CH1\~7 optional thermo-hygro sensor readings. In normal mode, press [CHANNEL] to switch between indoor and different wireless channels.
For auto-loop function, just press and hold the [CHANNEL] for 2 seconds and the ☐ on will appear. The console will scroll the readings of all the sensors every 4 seconds.
- Indoor / CH 1 \~ 7 temperature reading
- CH 1 \~ 7 auto loop icon
- CH 1 \~ 7 icon and signal strength indicator
- CH 1 \~ 7 low battery indicator
- Indoor / CH 1 \~ 7 humidity reading
- High / Low alert indicator
- Trend indicator
- Comfort index icon

Note:
The low battery indicator (4) only appears when the battery power is low. When the batteries are full, no battery symbol is displayed.

4.7.5.1 Comfort Indication
The comfort indication is a pictorial indication based on indoor air temperature and humidity in an attempt to determine comfort level.


Note:
Comfort indication can vary under the same temperature, depending on the humidity. There is no comfort indication when temperature is below 0^ C ( 32^ F) or over 60^ C ( 140^ F).
4.7.6 Wind
- Wind direction reading (16 point or 360 degrees)
- High wind speed alert indicator
- Wind speed level indicator
- Real time wind direction indicator (16 points)
- Average / gust wind speed reading or Beaufort scale

4.7.6.1 To select the wind display mode
In normal mode, press [WIND] key to switch between BEAUFORT scale, AVERAGE and GUST wind speed.
4.7.6.2 Beaufort scale table
The Beaufort scale is an international scale of wind velocities ranging from 0 (calm) to 12 (Hurricane force).
| Beaufort Scale | Description Wind Speed Land Condition |
| 0 Calm | | < 1 km/h | Calm. Smoke rises vertically. |
| < 1 mph |
| < 1 knots |
| < 0.3 m/s |
| 1 Light air | | 1.1 ~ 5km/h | Smoke drift indicates wind direction.Leaves and wind vanes are stationary. |
| 1 ~ 3 mph |
| 1 ~ 3 knots |
| 0.3 ~ 1.5 m/s |
| 2 Light breeze | | 6 ~ 11 km/h | Wind felt on exposed skin. Leaves rustle.Wind vanes begin to move. |
| 4 ~ 7 mph |
| 4 ~ 6 knots |
| 1.6 ~ 3.3 m/s |
| 3 Gentle breeze | | 12 ~ 19 km/h | Leaves and small twigs constantly moving, light flags extended. |
| 8 ~ 12 mph |
| 7 ~ 10 knots |
| 3.4 ~ 5.4 m/s |
| 4 | Moderate breeze | 20 ~ 28 km/h | Dust and loose paper raised. Small branches begin to move. |
| 13 ~ 17 mph |
| 11 ~ 16 knots |
| 5.5 ~ 7.9 m/s |
| 5 Fresh breeze | | 29 ~ 38 km/h | Branches of a moderate size move.Small trees in leaf begin to sway. |
| 18 ~ 24 mph |
| 17 ~ 21 knots |
| 8.0 ~ 10.7 m/s |
| 6 Strong breeze | | 39 ~ 49 km/h | Large branches in motion. Whistling heard in overhead wires. Umbrella use becomes difficult. Empty plastic bins tip over. |
| 25 ~ 30 mph |
| 22 ~ 27 knots |
| 10.8 ~ 13.8 m/s |
| 7 High wind | | 50 ~ 61 km/h | Whole trees in motion. Effort needed to walk against the wind. |
| 31 ~ 38 mph |
| 28 ~ 33 knots |
| 13.9 ~ 17.1 m/s |
| 8 Gale | | 62 ~ 74 km/h | Some twigs broken from trees.Cars veer on road. Progress on foot is seriously impeded |
| 39 ~ 46 mph |
| 34 ~ 40 knots |
| 17.2 ~ 20.7 m/s |
| 9 Strong gale | | 75 ~ 88 km/h | Some branches break off trees, and some small trees blow over. Construction / temporary signs and barricades blow over. |
| 47 ~ 54 mph |
| 41 ~ 47 knots |
| 20.8 ~ 24.4 m/s |
| 10 Storm | | 89 ~ 102 km/h | Trees are broken off or uprooted, structural damage likely. |
| 55 ~ 63 mph |
| 48 ~ 55 knots |
| 24.5 ~ 28.4 m/s |
| 11 Violent storm | | 103 ~ 117 km/h | Widespread vegetation and structural damage likely. |
| 64 ~ 73 mph |
| 56 ~ 63 knots |
| 28.5 ~ 32.6 m/s |
| 12 Hurricane force | | ≥ 118 km/h | Severe widespread damage to vegetation and structures. Debris and unsecured objects are hurled about. |
| ≥ 74 mph |
| ≥ 64 knots |
| ≥ 32.7m/s |
4.7.7 Rain
The RAIN section shows the rainfall or rain rate information.
- Period of rainfall indicator
- Rainfall or rain rate reading
- Rain rate high alert indicator
- Rain rate indicator
- Rain rate level
4.7.7.1 The rain display mode
Press [RAIN] key to toggle between:
- HOUR - the total rainfall of the current hour
- DAY - the total rainfall from midnight (default)
- WEEK - the total rainfall of the current week
- MONTH- the total rainfall of the current calendar month
- TOTAL - the total rainfall since the last reset
- RATE - current rainfall rate (base on 10 min rain data)
4.7.7.2 Rain rate level definition
| Level 1 Level 2 | Level 3 Level 4 | | |
 | [ZXWX] |  |  |
| Light rain Moderate Heavy rain Violent rain | |
| 0.1~2.5 mm/h 2.51 | ~10.0 mm/h 10.1~50.0 mm/h | >50.0 mm/h | |
To reset the total rainfall record
In normal mode, press and hold [RAIN] key for 2 seconds to reset all the rainfall record.
The rain rate level is only displayed when it is raining.

Note:
Erroneous readings may occur during the installation of the 7-in-1 sensor array. Once the installation is completed and functioning correctly, it's advisable to clear all the data and start afresh.
4.7.8 Light intensity, UV index & Sunburn time
- Exposure level indicator
- Light intensity indicator
- UV index indicator
- UV level
- UV index, Light intensity or suburn time
- UV high alert indicator
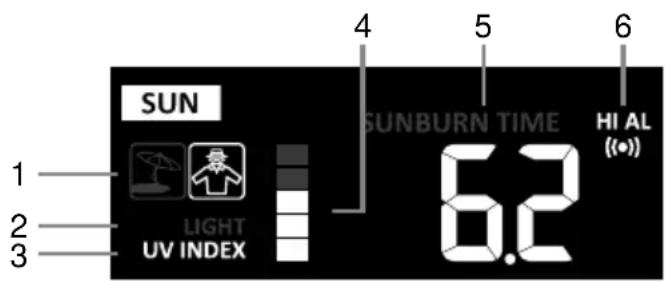
In normal mode, press SUN key to change between sunlight intensity, UV index and sunburn time
Light intensity mode:
To show the current Light intensity detected by the outdoor sensor.
UV index mode:
To show the current UV index detected by the outdoor sensor. Corresponding exposure level and suggested protection indicator are also displayed.
Sunburn time mode:
To show the recommended sunburn time according to current UV level.
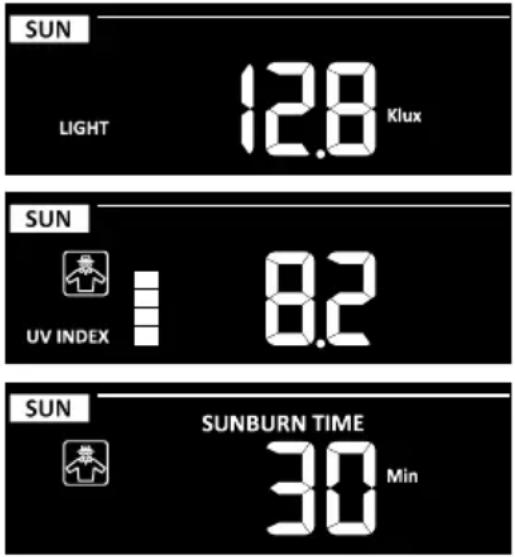
4.7.8.1 UV index vs exposure table
| Exposure level | Low M | Moderate High Very | high Extreme | | |
| UV index | 1 2 | 3 4 | 5 6 7 | 8 9 10 | 11 | 12~16 | | | | | |
| Sunburn time | N/A | 45 minutes | 30 minutes | 15 minutes | 10 minutes |
| Recommended protection | N/A | Moderate or high UV level!Suggest to wear sunglasses,broad brim hat and long-sleeved clothing. |  | Very high or Extreme UV level!Suggest to wear sunglasses, broadbrim hat and long-sleeved clothing,If you have to stay outdoors, makesure to seek shade. |  |

Note:
- The sunburn time is based on normal skin type, it is just a reference of UV strength. In general, the darker one's skin is, the longer (or more radiation) it takes to affect the skin.
- The light intensity function is for sunlight detection.
- The UV index is only displayed when there is measurable sunlight.
4.8 Trend indicator
The trend indicator shows the temperature, humidity and barometric pressure trends of changes in the forthcoming few minutes.
4.9 Maximum / Minimum records
The console can record the accumulated MAX / MIN weather data with the corresponding time stamp for your easy review.
MAX record mode
MIN record mode
4.9.1 MAX / MIN records
In normal mode, press [ MAX / MIN ] key to check MAX/MIN records in the following display sequence is: outdoor MAX temperature → outdoor MIN temperature → outdoor MAX humidity → outdoor MIN humidity → indoor or current channel MAX temperature → indoor or current channel MIN temperature → indoor or current channel MAX humidity → indoor or current channel MIN humidity → MAX average wind speed → MAX gust → MAX FEELS LIKE → MIN FEELS LIKE → MAX dew point → MIN dew point → MAX heat index → MIN heat index → MAX wind chill → MIN wind chill → MAX UV index → MAX light intensity → MAX relative pressure MIN relative pressure → MAX absolute pressure → MIN absolute pressure → MAX rain rate.
4.9.2 To Clear the MAX / MIN records
Press and hold [ MAX / MIN ] key for 2 seconds to reset all the MAX and MIN records.
4.10 PAST 24 HOURS HISTORY DATA
The console automatically stores the weather data of the past 24 hours.
- Press [ HISTORY ] key to check the beginning of the current hour's weather data, e.g. the current time is 7:25 am, March 8, the display will show the data of 7:00am, March 8.
- Press [ HISTORY ] key repeatedly to view older readings of the past 24 hours, e.g. 6:00am (Mar 8), 5:00am (Mar 8), ..., 10:00am (Mar 7), 9:00am (Mar 7), 8:00am (Mar 7)
4.11 Back light
Use the [HI / LO / AUTO] slide switch to select backlight mode.
5. Connect console to WI-FI
5.1 Download WSLink configuration app
natural_image
Three laboratory glassware items: a beaker with a tripod, a beaker with a beaker, and a beaker with a beaker (no visible text or labels)
To connect console to WI-FI, you need to download the "WSLink" configuration app from one of the following links by scanning the QR code or search "WSLink" in App Store or Google Play.
App Store Google Play

WSLink app is required for the console to connect to WI-FI and Internet, setup weather server, perform sensor calibration and firmware update.

Note :
- WSLink app is only for configuration. It is not used to remotely view your weather data.
- WSLink app may subject to change and update.
5.2 Console in access point mode
- When you power up the console for the first time, the console LCD will show flashing "AP" and " " icon to signify that it has entered AP (Access Point) mode, and is ready for WI-FI settings. User can also press and hold the [ SENSOR / WI-FI ] key for 6 seconds to enter AP mode manually.

AP mode of the console
5.3 Add your console to WSLink
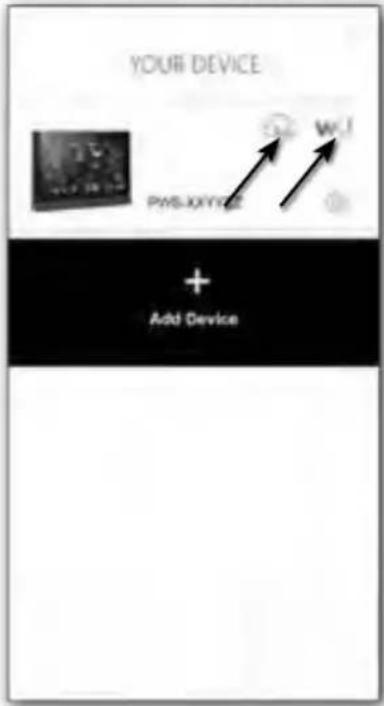
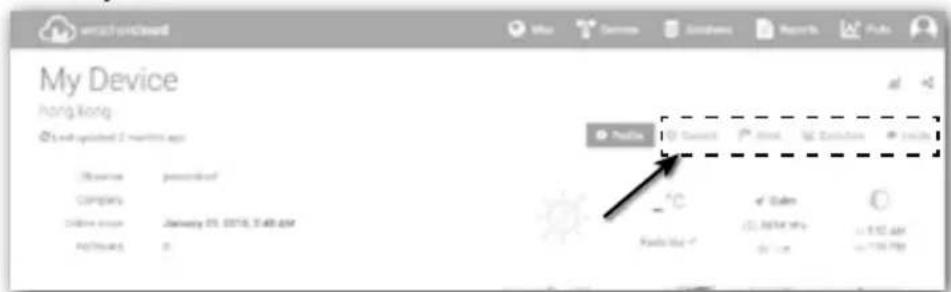
Open the WSLink app and follow the steps below to add your console to WSLink.
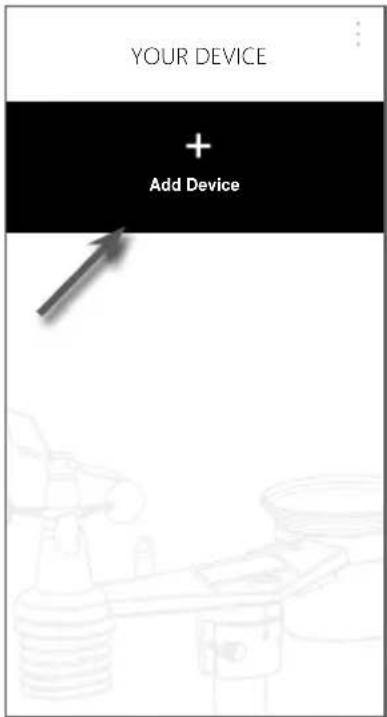
(a) Your Device page
Tap "Add Device" icon.
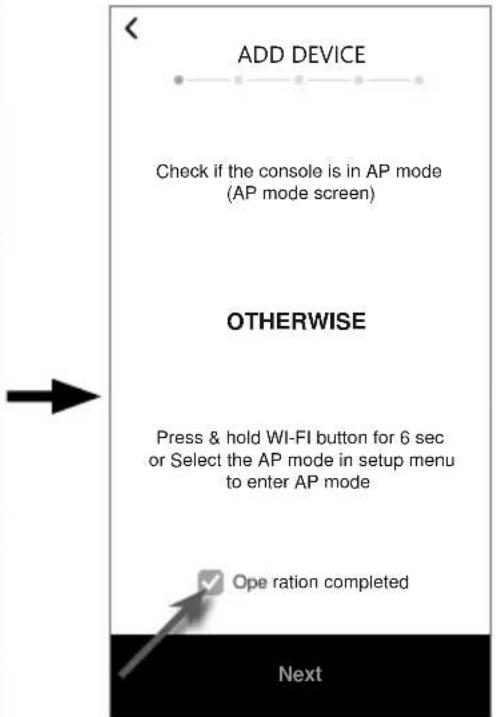
(b) Ensure the console is in AP mode and check the "Operation completed" box, then tap "Next" to go to system WI-FI network page of your smart phone.
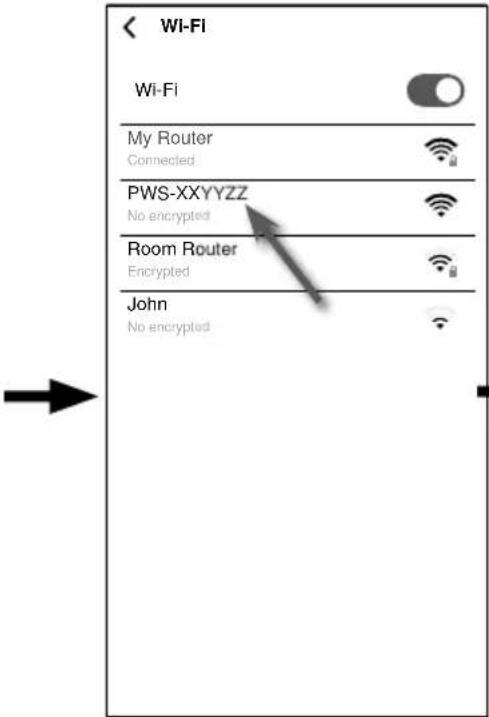
(c) Select the console WI-FI network name (the name always begin with PWS-) to connect your smart phone to the console. Then tap back to WSLink app.

Note :
- For the first time connection, you need to select "No Internet connection" when connect to this device.
- If your smart phone cannot connect to the console, please turn off the mobile data / network in you smart phone and try again
Section 5.4
Setup new console with WSLink
(d) Once the console is added to WSLink, the console icon will appear on your device list. Tap it to continue the setup.
5.4 Setup new console with WSLink
The app will follow the steps below to guide you through the setup.
Network: select WI-FI network (router SSID) for connection.
Password: enter WI-FI password.
Other WI-FI network: setup to hidden WI-FI network.
Next: go to "Edit Device" page.
To remove device from the app, swipe the console icon left and tap the bin.
Device name: Create a name for your device.
Time server: select time server
Time Zone: select the time zone
Location: input you location if need.
Next: go to "Weather server" page.
Your setup is now completed. You can tap the console icon and follow the procedure to do the console settings anytime if necessary.
Weather Underground: please refer to section 5.5 (c1).
Weathercloud: please refer to section 5.5 (c2).
Other server: please refer to section 5.5 (c3).
Next: go to "Settings" page.
This is main page of the console, you can enter different setup page to setup your console. Once you complete the setup, tap "Confirm & Exit" to exit AP mode.
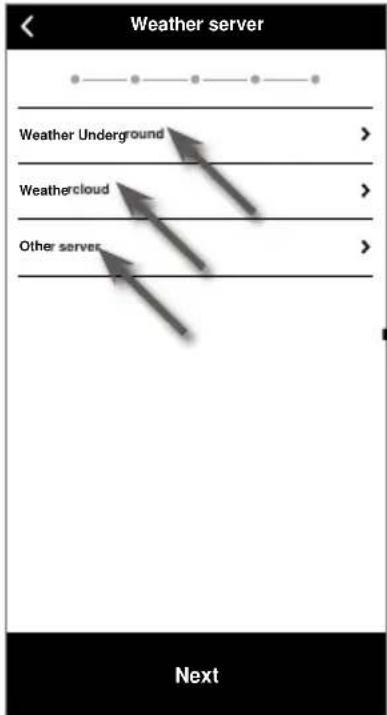
5.5 Weather server setting
(a) Settings page
At the settings page, tap
"Weather server".
flowchart
graph TD
    A["Weather server"] --> B["Weather Underground"]
    A --> C["Weathercloud"]
    A --> D["Other server"]
    B --> E["c1"]
    C --> F["c2"]
    D --> G["c3"]
    style A fill:#f9f,stroke:#333
    note right of A: NOTE: For Awekas, PWS select option 'c3'
(b) Select the Weather server
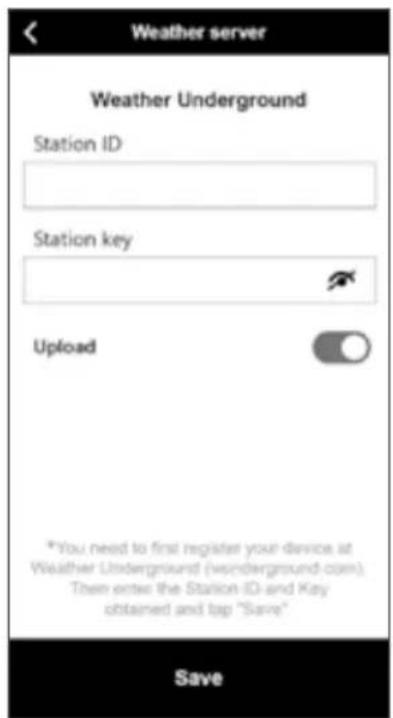
(c1) Upload your weather data to Weather Underground
- Register an account and weather station at wunderground.com per section 6.1
- Enter the Station ID and Station key obtained from wunderground.com
- Enable (or disable) the upload.
- Tap "Save".
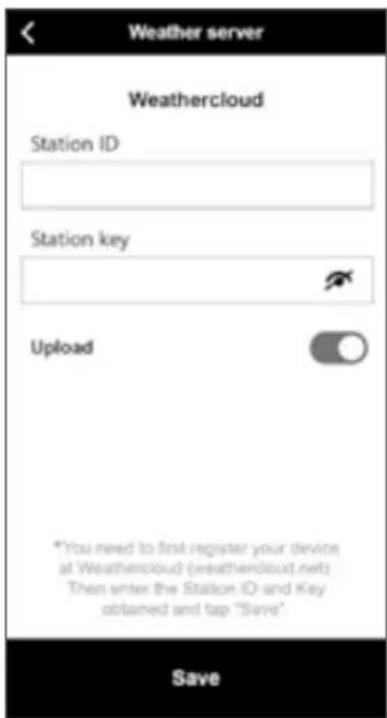
(c2) Upload your weather data to Weathercloud
- Register an account and weather station at Weathercloud.net per section 6.2
- Enter the Station ID and Station key obtained from Weathercloud.net
- Enable (or disable) the upload.
- Tap "Save".
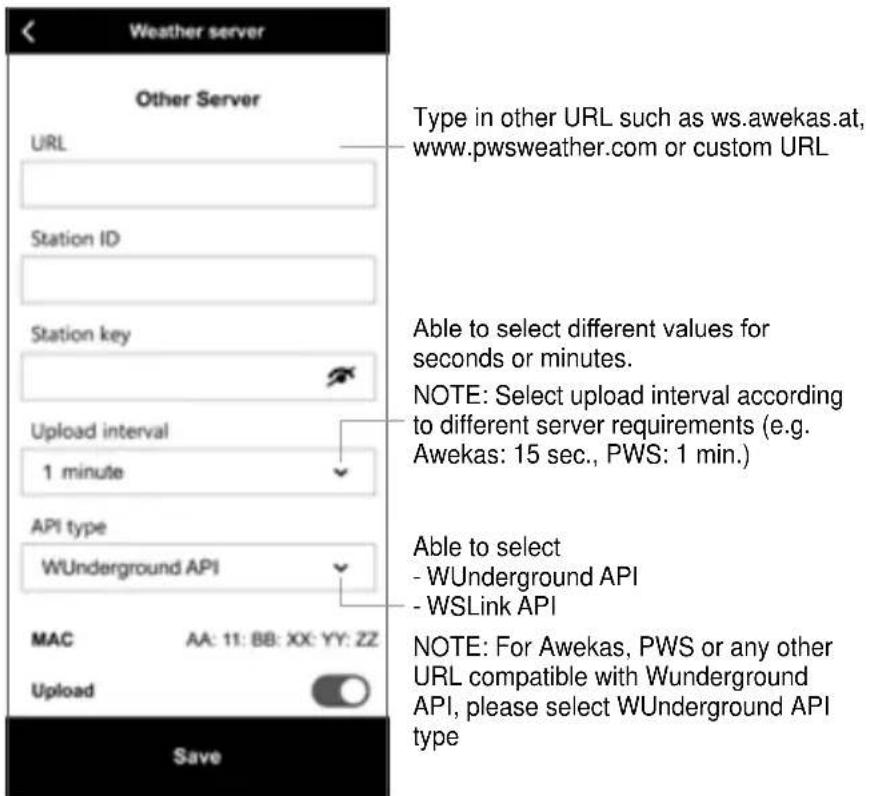
(c3) Upload to customized server (optional)
- Prepare your customized server based on WUnderground or WSLink API
- Enter the URL address, Station ID and Station key of the customized server.
- Select upload interval and API type
- Enable (or disable) the upload.
- Tap "Save".
5.6 Calibration
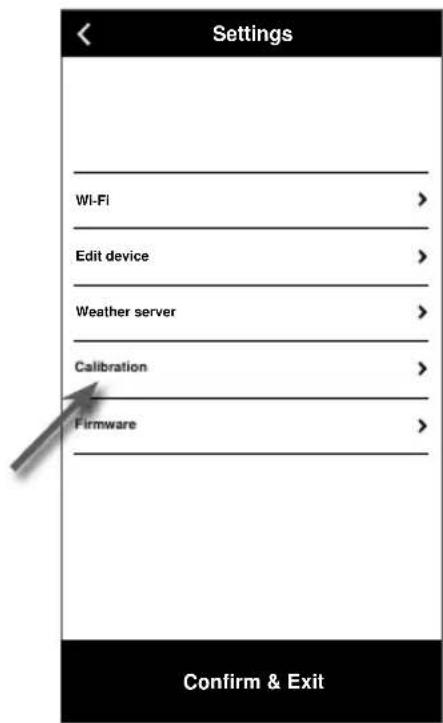
(a) Settings page
At the settings page, tap "Calibration".

(b) Calibration page
- Tap "Unit" to change the unit if necessary before entering the calibration value.
- Tap the box and enter the calibration required.
- Tap "Save".

Note:
- Calibration of most parameter is not required, with the exception of Relative Pressure, which must be calibrated to sea-level to account for altitude effects.
- For temperature and pressure, the app will always calculate & convert the calibration value in °C and hPa respectively.
5.7 Firmware
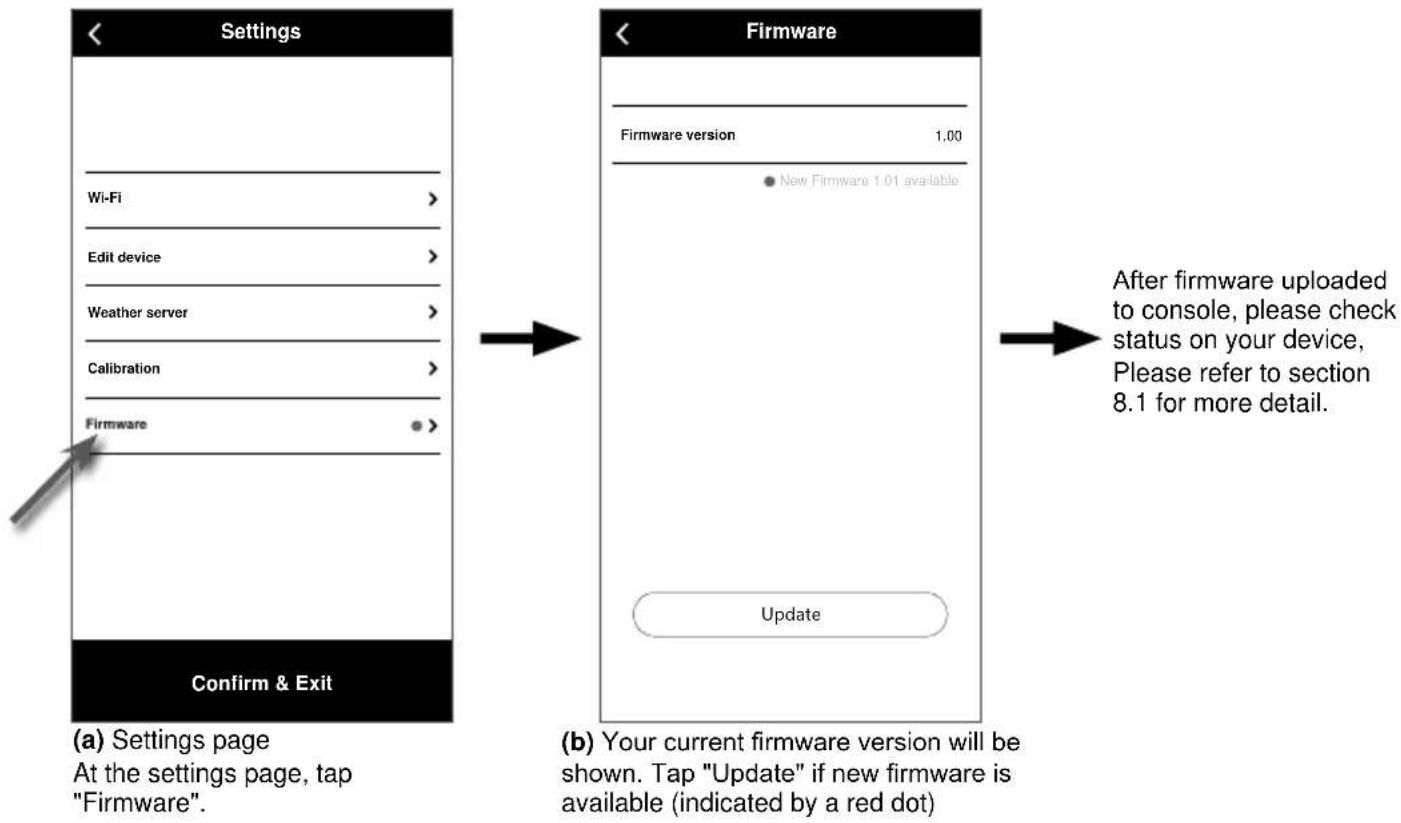
6. Create account for weather server
The console can upload weather data to Weather Underground, Weathercloud or 3nd party cloud server through WI-FI router, you can follow the step below to setup your device.

Note: Add the cloud server website and app are subjected to change without notice.
6.1 For Weather Underground (WU)
- In https://www.wunderground.com click the "Join" on the top right corner to open the registration page. Follow the instructions to create your account.

- Once you have created your account and completed the Email validation, please go back to the WUnderground web page to login. Then, click "My Profile" on the top to open the dropdown menu and click "My Weather Station".

- In "My Weather Station" page bottom, click the "Add New Device" to add your device.
- In step "Select a Device Type", choose "Other" in the list, then press "Next".
- In step "Set Device Name & Location", select your location on the map, then press "Next".

- Follow their instruction to enter your station information, in the Step "Tell Us More About Your Device", (1) enter a Name for your weather station. (2) fill in the other information (3) select "I Accept" to accept Weather Underground's privacy terms, (4) click "Next" to create your station ID and key.
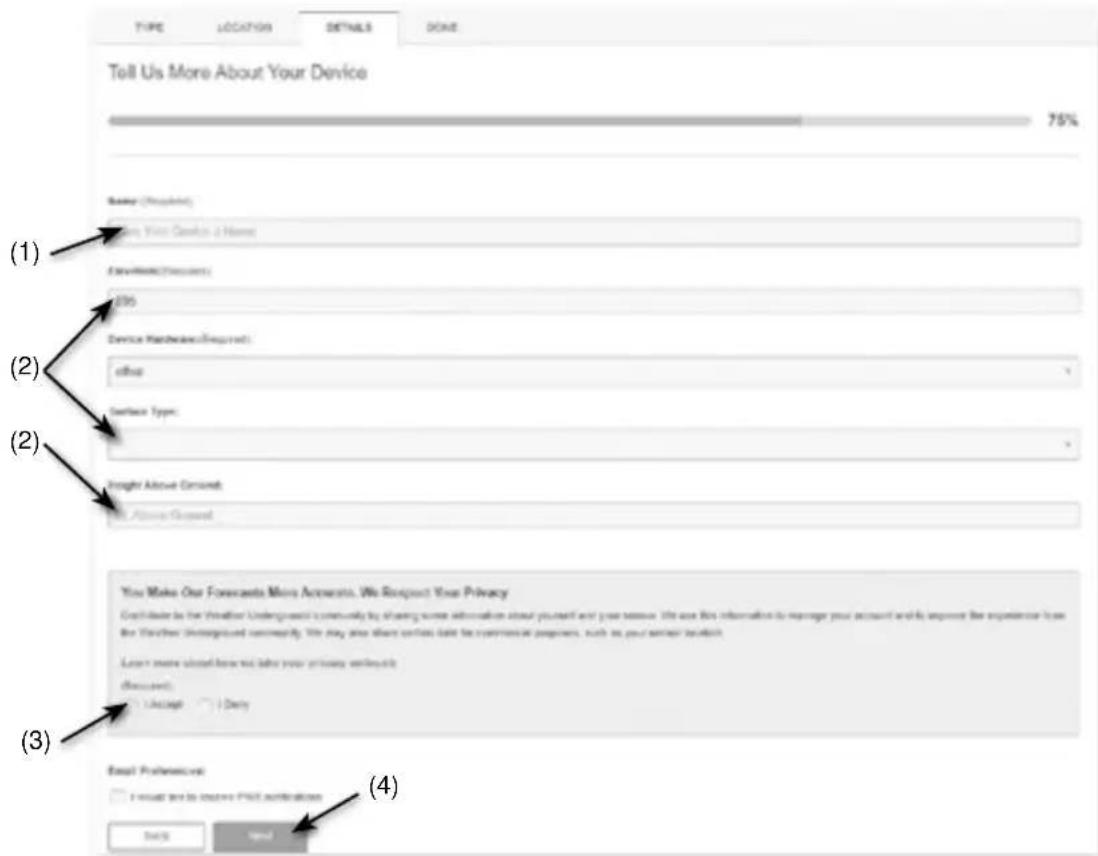
- Jot down Your "Station ID" and "Station key" for the further setup step.
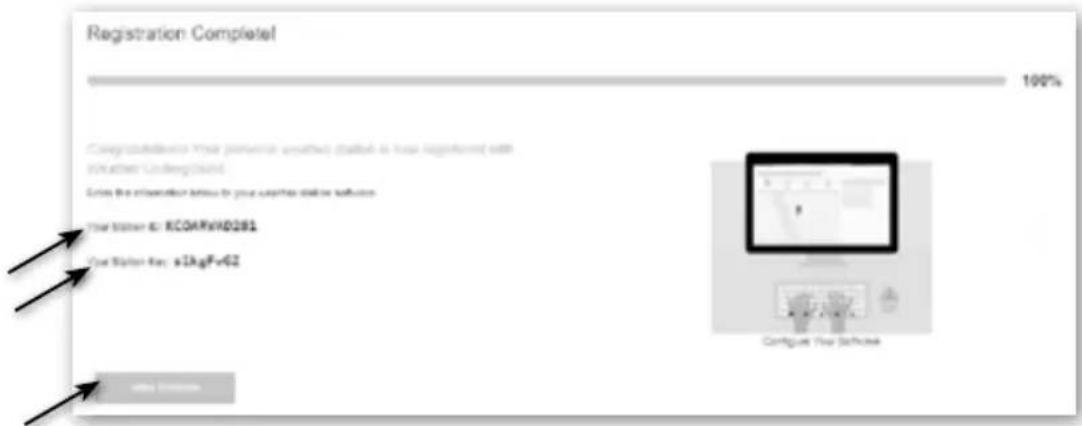
- In the setup UI that mention in section 5.5, select the Weather Underground in first row of the Weather server setup section then key-in the Station ID and key that assigned by Weather Underground, follow the steps to complete setting.
- Your data is now being uploaded to Weather Underground.
6.2 For Weathercloud (WC)
- In https://weathercloud.net enter your information in "Join us today" section, then follow the instructions to create your account.

- Sign in Weathercloud and then you will go the "Devices" page, click "+ New" to create new device.

- Enter all the information in Create new device page, for the Model* selection box select the "W100 Series" under "CCL" section. For the Link type* selection box select the "SETTINGS", Once you have completed, click Create.
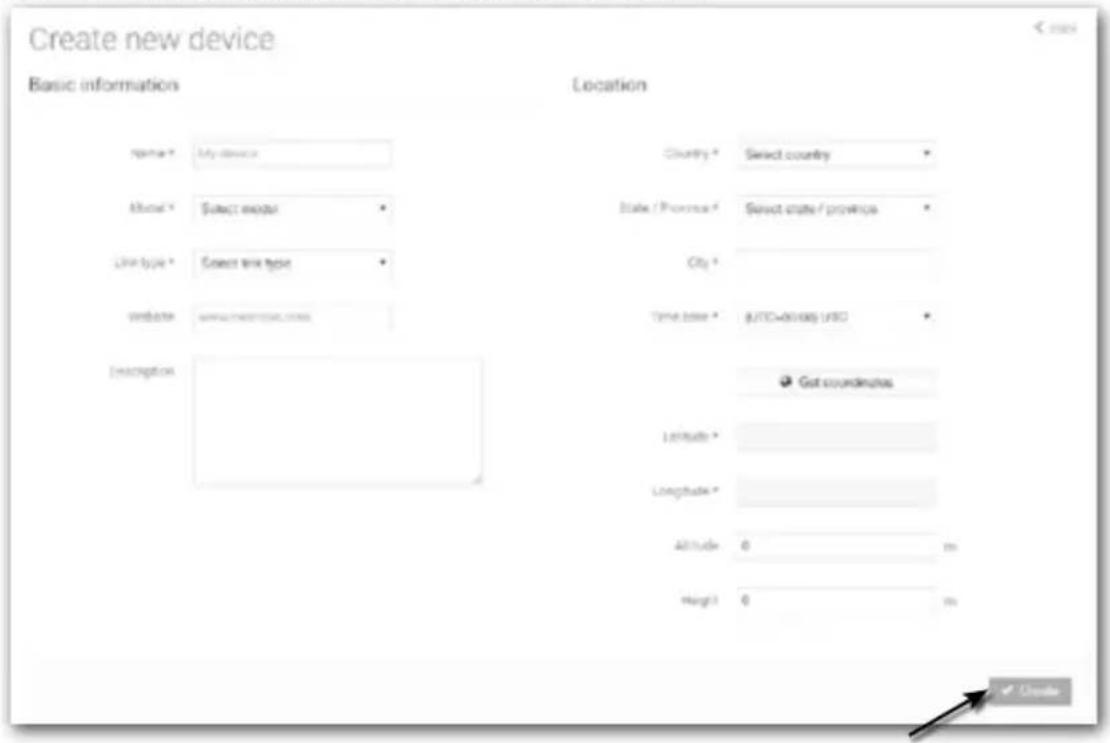
- Jot down your ID and key for the further setup step.
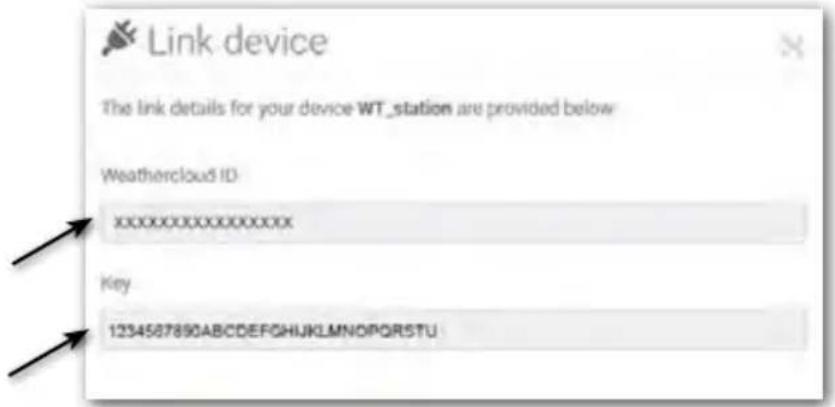
- In the setup UI that mention in section 5.5, select the Weathercloud in second row of the Weather server setup section then key-in the Station ID and key that assigned by Weathercloud, follow the steps to complete setting.
6.3 For PWSWeather
Detailed additional instructions for account creation and connection setup for PWSWeather are available for download at the following Internet address (English language): https://www.bresser.de/download/pwsweather
6.4 For Awekas
Detailed additional instructions for account creation and connection setup for AWEKAS are available for download at the following Internet address (German language): https://www.bresser.de/download/awekas
7. View WUnderground & Weathercloud live data
7.1 Viewing your weather data in WUnderground
Login your account.
To view your weather station live data in a web browser (PC or mobile version), please visit http://www.wunderground.com, and then enter your "Station ID" in the searching box. Your weather data will show up on the next page. You can also login your account to view and download the recorded data of your weather station.

Another way to view your station is use the web browser URL bar, type below in the URL bar:
https://www.wunderground.com/dashboard/pws/XXXX
Then replace the XXXX by your Weather Underground station ID to view your station live data.
7.2 Viewing your weather data in Weathercloud
-
To view your weather station live data in a web browser (PC or mobile version), please visit https://weathercloud.net and sign in your own account.
-
Click the icon inside the pull down menu of your station.
- Click "Current", "Wind", "Evolution" or "Inside" icon to view the live data of your weather station.
7.3 Viewing weather data via WSLink app
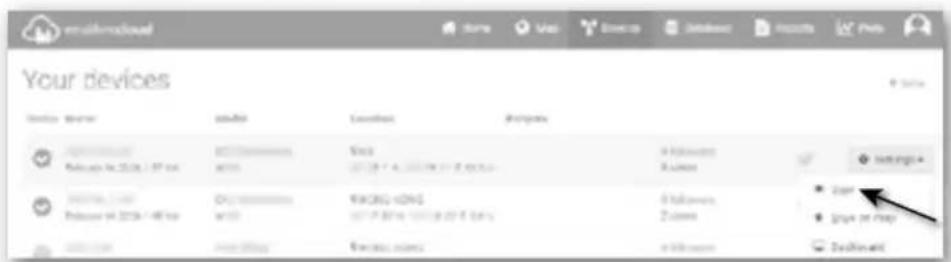
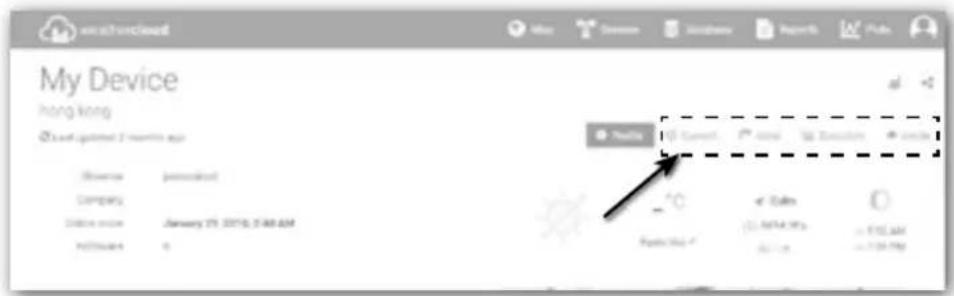
With WSLink app, user may tap the WUnderground and/or Weathercloud icon in "Your Device" to directly access live weather data on their dashboard respectively.
8. Maintenance
8.1 Firmware update
The console supports OTA firmware update capability. Its firmware may be updated over the air anytime (whenever necessary) through WSLink app.
8.1.1 Firmware update step
- The latest firmware will download to you smart phone automatically, just connect you console to check the firmware version (refer to section 5.7).
- Follow the app step to transfer the OTA file from smart phone to console
- Once file transferred, the console will start to update, the update time is around 5 \~ 10 minutes. While updating, the progress will be displayed (i.e. 100 is completion).

-
The console will restart once the update is completed.
-
The console will stay in AP mode for you to check the firmware version and all the current setting. Simply press and hold [SENSOR / WI-FI] key for 6 seconds to exit AP mode.
i Important note:
- Please keep connecting the power during the firmware update process.
- Please make sure your WI-FI connection is stable.
- When the update process start, do not operate the smart phone and console until the update finished.
- During firmware update the console will stop upload data to weather server. It will reconnect to your WI-FI router and upload the data again once the firmware update succeed. If the console cannot connect to your router, please enter the WSLink app to setup again.
- After the firmware update, If the setup informations are missing, please input the setup information again.
- Firmware update process have potential risk, which cannot guarantee 100% success. If the update fail, redo the above step to update again.
8.2 Battery replacement
When low battery indicator “☐” appear near the sensor antenna icon, it indicates that the current sensor battery power is low respectively. Please replace with new batteries.
8.2.1 Re-pairing the sensor array manually
Whenever you changed the batteries of the 7-in-1 weather sensor array or other additional sensors, re-synchronization must be done manually.
- Change all the batteries to new ones of the wireless sensor array.
- Press [SENSOR / WI-FI] key on the console to enter sensor synchronization mode (as indicated by the flashing antenna ☎).
8.3 Reset and factory reset
To reset the console and start again, press the [RESET] key once or remove the backup battery and then unplug the adapter.
To resume factory settings and remove all data, press and hold the [ RESET ] key for 6 seconds.
8.4 Wireless 7-in-1 sensor array maintenance

REPLACE THE WIND CUP
- Remove rubber cap and Unscrew
- Remove the wind cup for replacement
CLEANING THE UV SENSOR
- For precision UV measurement, gentle clean the UV sensor cover lens with damp micro-fiber cloth.
• Over time, the UV sensor will naturally degrade.
REPLACE THE WIND VANE
Unscrew and remove the wind vane for replacement
CLEANING THE RAIN COLLECTOR
- Rotate the rain collector by turning it 30°anti-clockwise.
- Gently remove the rain collector.
- Clean and remove any debris or insects.
- Install the collector when it is clean and fully dried.
CLEANING HYGRO-THERMO SENSOR
- Remove the 2 screws at the bottom of the radiation shield.
- Gently pull out the bottom 4 shields.
- Carefully remove any dirt or insects on the sensor (do not let the sensors inside get wet).
- Clean the shield with water to remove any dirt or insects.
- Install all the parts back when they are clean and fully dried.

In general, if the regular maintenance schedule in the owner's manual is followed, the user can expect a lifetime in excess of 3 years before the sensor array is completely replaced. The life expectancy of a weather station is largely influenced by its environment, see the following examples:
Coastal, swampy or wetland environments. Salt air, salt spray, and acidification are the most difficult environments for a weather station to live long. These can corrode bearings, sensor plates (temperature, humidity, etc.), mounting hardware, and other moving parts. In this environment, the expected product life is 1-3 years. Our boards are conformal coated to prevent this corrosion. Digital thermometer and hygrometer sensors rely on the changing nature of the metal's resistance, allowing corrosion to occur faster
Long-term exposure to high humidity environment. Prolonged exposure to high humidity,
whether salty or acidic, can easily cause premature failure of metal parts. In a hot and dry environment, the lifespan of a weather station is known to last up to 5 years.
Hurricanes and tropical storms can also shorten the lifespan of weather stations.
- Troubleshoot
| Problems Solution | |
| 7-in-1 wireless sensor array is intermittent or no connection | 1. Make sure the sensor array is within the transmission range2. If it still does not work, reset the sensor pair with console again |
| No WI-FI connection | 1. Check the WI-FI icon on the display, it should be on if connectivity is successful2. In the console SETUP page, make sure the WI-FI settings (router's name, security type, password) are correct3. Make sure you connect to 2.4G band of the WI-FI router (5G not supported) |
| Not able to add the device to WSLink | 1. Make sure your WSLink is the latest version2. Make sure your device is in AP mode3. Make sure no other smart phone connected your device. |
| After first time setup, data is not showing at WUnderground or Weathercloud | 1. Please note it make a few minutes to a few hours for WUnderground or Weathercloud to validate your upload data.2. Try to refresh the WUnderground or Weathercloud website. |
| Data not reporting to WUnderground or Weathercloud | 1. Make sure the WI-FI connection of the console is good.2. In the console SETUP page, ensure your Station ID and Station Key are correct |
| Rainfall is not correct | 1. Make sure the rain collector is clean for the tipping bucket to tip smoothly2. Make sure the sensor has stable and level mounting to ensure correct tipping |
| Temperature reading too high in the day time | 1. Place the sensor in open area and at least 1.5m off the ground.2. Ensure that the sensor is placed away from heat generating sources or structures, such as buildings, pavement, walls or air conditioning units. |
| Some condensation beneath the UV sensor may occur overnight | This will disappear when temperature rises up under the sun and will not affect the performance of the unit. |
10. Specifications
10.1 Console
| General specification |
| Dimensions (W x H x D) 202 x | 138 x 38mm (7.9 x 5.4 x 1.5 in) |
| Weight 546.2g (without battery) | |
| Main power DC 5V, 1A (USB type C input) | |
| Backup battery 1.5V AAA x 3 (Alkaline batteries recommended) | |
| Operating temperature range | -5°C ~ 50°C |
| Operating Humidity range RH | 10~90% non-condensing |
| Support sensor | - 1 Wireless 7-in-1 weather sensor array- 7 Wireless thermo-hygro sensor (optional) |
| RF frequency(Depend on country version) | 868Mhz (EU or UK version) |
| Time related function specification |
| Time display HH : MM | |
| Hour format 12hr AM / PM or 24 hr |
| Date display DD / MM or MM / DD |
| Time synchronize method Internet time server |
| Weekday languages EN / DE / FR / ES / IT / NL / RU |
| Setup app |
| App name WSLink | |
| App download platform Google play and Apple Store |
| Support platform Android smart phone or iPhone |
| WI-FI communication specification |
| Standard 802.11 b/g/n | |
| Operating frequency : 2.4GHz | |
| Supported router security type | WPA / WPA2, WPA3, OPEN, WEP (WEP only support Hexadecimal password) |
| Barometer (Note: Data detected by console) |
| Barometer unit hPa, inHg and mmHg |
| Measuring range 540 ~ 1100hPa |
| Accuracy | (700 ~ 1100hPa ± 5hPa) / (540 ~ 696hPa ± 8hPa)(20.67 ~ 32.48inHg ± 0.15inHg) / (15.95 ~ 20.55inHg ± 0.24inHg)(525 ~ 825mmHg ± 3.8mmHg) / (405 ~ 522mmHg ± 6mmHg)Typical at 25°C (77°F) |
| Resolution | 1hPa / 0.01inHg / 0.1mmHg |
| Indoor temperature (Note: Data detected by console) |
| Temperature unit °C and °F | |
| Accuracy | ≤0°C ± 2°C (≤32°F ± 3.6°F)>0 °C ± 1°C (>32 °F ± 1.8°F) |
| Resolution | °C / °F (1 decimal place) |
| Indoor humidity (Note: Data detected by console) |
| Humidity unit | % |
| Accuracy | 1 ~ 9% RH ± 8% RH @ 25°C (77°F)10 ~ 90% RH ± 5% RH @ 25°C (77°F)90 ~ 99% RH ± 8% RH @ 25°C (77°F) |
| Resolution | 1% |
| Outdoor temperature (Note: Data detected by 7-in-1 sensor) |
| Temperature unit °C and °F | |
| Feels like display range | -65 ~ 50°C |
| Heat index display range | 26 ~ 50°C |
| Wind chill display range | -65 ~ 18°C (wind speed > 4.8km/h) |
| Dew point display range | -20 ~ 80°C |
| Accuracy | 0.1 ~ 60°C ± 0.4°C (32.2 ~ 140°F ± 0.7°F)-19.9 ~ 0°C ± 0.7°C (-3.8 ~ 32°F ± 1.3°F)-40 ~ -20°C ± 1°C (-40 ~ -4°F ± 1.8°F) |
| Resolution | °C / °F (1 decimal place) |
Outdoor humidity (Note: Data detected by 7-in-1 sensor)
| Humidity unit % | |
| Accuracy | 1~9% RH ± 5% RH @25°C (77°F)10~90% RH ± 3.5% RH @25°C (77°F)91~99% RH ± 5% RH @25°C (77°F) |
| Resolution 1% | |
| Wind speed & direction (Note: Data detected by 7-in-1 sensor) |
| Wind speed unit mph, m/s, km/h and knots |
| Wind speed display range 0 ~ 112mph, 50m/s, 180km/h, 97knots |
| Resolution mph, m/s, km/h and knots (1 decimal place) |
| Speed accuracy < 5m/s: +/- 0.8m/s; > 5m/s: +/- 10% (whichever is greater) |
| Wind direction display mode 16 directions |
| Rain (Note: Data detected by 7-in-1 sensor) |
| Unit for rainfall mm and in | |
| Unit for rain rate mm/h and in/h | |
| Accuracy ±7% or 1 tip | |
| Range 0 ~ 19999mm (0 ~ 787.3 in) |
| Resolution 0.254mm (3 decimal place in mm) |
| UV index (Note: Data detected by 7-in-1 sensor) |
| Display range 0 ~ 16 | |
| Resolution Integer | |
| Light intensity (Note: Data detected by 7-in-1 sensor) |
| Light intensity unit Klux, Kfc and W/m2 |
| Display range 0 ~ 200Klux | |
| Resolution Klux, Kfc and W/m2 | (2 decimal place) |
10.2 Wireless 7-in-1 sensor
| Dimensions (W x H x D) 343.5 x 393.5 x 136mm (13.5 x 15.5 x 5.35in) installed mounting |
| Weight 665g (not include batteries) |
| Main power | 3 x AA size 1.5V batteries (Non-rechargeable Lithium batteries recommended) |
| Weather data | Temperature, humidity, wind speed, wind direction, rain, UV and light intensity |
| RF transmission range | 150m |
| RF frequency (depend on country version) | 868Mhz (EU, UK) |
| Transmission interval | 12 seconds |
| Operating temperature range | -40 ~ 60°C (-40 ~ 140°F) Non-rechargeable Lithium batteries required for low temperature |
| Operating humidity range | 1 ~99% RH |
DISPOSAL
Dispose of the packaging materials properly, according to their type, such as paper or cardboard. Contact your local waste-disposal service or environmental authority for information on the proper disposal.

Do not dispose of electronic devices in the household garbage!
As per Directive 2012/19/EC of the European Parliament on waste electrical and electronic
equipment and its adaptation into German law, used electronic devices must be collected separately and recycled in an environmentally friendly manner.

In accordance with the regulations concerning batteries and rechargeable batteries, disposing of them in the normal household waste is explicitly forbidden. Please make sure dispose of your used batteries as required by law — at a local collection point or in the retail ket. Disposal in domestic waste violates the Battery Directive.Batteries that contain toxins marked with a sign and a chemical symbol. "Cd" = cadmium, "Hg" = mercury, "Pb" = lead.

Hereby, Bresser GmbH declares that the equipment type with part number: 7003300 is in compliance with Directive: 2014/53/EU. The full text of the EU declaration of maturity is available at the following internet address: http://www.bresser.de/oad/7003300/CE/7003300_CE.pdf
WARRANTY & SERVICE
The regular warranty period is 2 years and begins on the day of purchase. To benefit from an extended voluntary warranty period as stated on the gift box, registration on our website is required.
You can consult the full warranty terms as well as information on extending the warranty period and details of our services at www.bresser.de/warranty_terms.
- Introduction 84
natural_image
Interior view of a kitchen appliance with a lid and ventilation system (no visible text or symbols)
3.2.2 Assemblez le support et le poteau
natural_image
Technical line drawing of a mechanical assembly with an inset showing a close-up of a component detail (no text or symbols present)
Étape 2
natural_image
Technical line drawing of a mechanical assembly with gears and shafts (no text or symbols)
natural_image
Technical line drawing of a mechanical device with no visible text or symbols
natural_image
Technical line drawing of a weather instrument with no visible text or symbols
natural_image
Diagram of a cable connector with internal components and an arrow indicating direction (no text or symbols)
Note :
natural_image
Three laboratory glassware items: a tripod, a beaker with a dial, and a container (no visible text or labels)
App Store Google Play
https://www.wunderground.com/dashboard/pws/XXXX
REEMPLACER LE COUPE-VENT
natural_image
Line drawing of a hand holding a flat blade and a curved handle (no text or symbols)
NETTOYAGE DU COLLECTEUR DE PLUIE
6.3 Foor PWSWeather. 152
6.4 Voor Awekas 152
- Bekijk WUnderground & Weathercloud live data. 153
3.2 Installeer de draadloze 7-in-1 sensor
natural_image
Interior view of a mechanical device with a lid and internal components (no visible text or symbols)
natural_image
Technical line drawing of a mechanical assembly with an inset showing a close-up of a component detail (no text or symbols present)
Stap 2
natural_image
Technical line drawing of a mechanical assembly with gears and shafts (no text or symbols)
Stap 3
natural_image
Technical diagram showing a mechanical assembly with an inset close-up of a component detail (no text or symbols present)
Stap 4
natural_image
Technical line drawing of a mechanical bracket with mounting holes and a vertical rod (no text or symbols)
natural_image
Technical line drawing of a mechanical device with no visible text or symbols
natural_image
Technical line drawing of a weather instrument with no visible text or symbols
natural_image
Diagram of a cable connector with internal components and an arrow indicating direction (no text or symbols)

Let op:
4.7.4 Weerindex
MIN-recordmodus
4.9.1 MAX / MIN-records
natural_image
Three laboratory glassware items: a separatory funnel, a beaker with a lid, and a stand (no visible text or labels)
App Store Google Play
6.3 Foor PWSWeather.
https://www.wunderground.com/dashboard/pws/XXXX
- Klik op "Actueel", "Wind", "Ontwikkeling" of "Binnen" pictogram om de live data van je weerstation te bekijken.
natural_image
Line drawing of a manual blade with a handle and blade extension (no text or symbols)
SCHOONMAKEN VAN DE REGENVERZAMELAAR
SCHOONMAKEN VAN DE HYGRO- THERMO SENSOR
natural_image
Interior view of a washing machine with a central sink and attached pipe (no visible text or symbols)
natural_image
Technical line drawing of a mechanical assembly with an inset showing a close-up of a component detail (no text or symbols present)
Paso 2
natural_image
Technical line drawing of a mechanical assembly with gears and shafts (no text or symbols)
Paso 3
natural_image
Technical diagram showing a mechanical assembly with an inset close-up of a component detail (no text or symbols present)
natural_image
Technical line drawing of a mechanical bracket component with mounting holes and a threaded rod (no text or symbols)
natural_image
Technical line drawing of a weather instrument with no visible text or symbols
natural_image
Technical line drawing of a weather instrument with no visible text or symbols
natural_image
Diagram of a connector with a loop and internal segmented structure, showing an arrow indicating direction (no text or symbols)

Nota:
natural_image
Three laboratory glassware items: a tripod-mounted device, a beaker with a tripod handle, and a stand (no visible text or labels)
App Store Google Play
flowchart
graph TD
    A["ADD DEVICE"] --> B["Check if the console is in AP mode (AP mode screen)"]
    B --> C["OTHERWISE"]
    C --> D["Press & hold WI-FI button for 6 sec or Select the AP mode in setup menu to enter AP mode"]
    D --> E["Operation completed"]
    E --> F["Next"]
6.1 Para Weather Underground (WU)
https://www.wunderground.com/dashboard/pws/XXXX
REEMPLACE LA COPA DE VIENTO.
natural_image
Line drawing of a hand holding a flat blade (no text or symbols)
LIMPIEZA DEL RECOLECTOR DE LLUVIA.
3.1 Sensore wireless 7-in-1 205
3.2 Installa il sensore wireless 7-in-1 205
3.1 Sensore wireless 7-in-1
natural_image
Interior view of a washing machine with a lid and internal components (no visible text or symbols)
natural_image
Technical line drawing of a mechanical bracket with mounting holes and a rod (no text or symbols)
natural_image
Technical line drawing of a weather instrument with no visible text or symbols
natural_image
Technical line drawing of a weather instrument with no visible text or symbols
natural_image
Diagram of a cable connector with internal components and an arrow indicating direction (no text or symbols)

Nota:
natural_image
Three laboratory glassware items: a tripod stand, a beaker with a tripod handle, and a beaker with a bucket (no visible text or labels)

App Store Google Play

(e) Pagina Wi-Fi

6.1 Per Weather Underground (WU)
https://www.wunderground.com/dashboard/pws/XXXX
PULIZIA DEL SENSORE HYGRO- THERMO
14.2 Sensore wireless 7-in-1
Please contact the service centre fi rst for any questions regarding the product or claims, preferably by e-mail.
E-Mail: service@bresseruk.com
Telephone*: +44 1342 837 098
BRESSER UK Ltd.
Suite 3G, Eden House
Enterprise Way
Edenbridge, Kent TN8 6HF
Great Britain
*Number charged at local rates in the UK (the amount you will be charged per phone call will depend on the tariff of your phone provider); calls from abroad will involve higher costs.
FR BE
The image contains only a stylistic horizontal line, which must be ignored according to Rule 2. No text or placeholder characters should be output.
[Non-Text]
[Non-Text]
[Non-Text]
[Non-Text]
[Non-Text]
[Non-Text]
[Non-Text]
[Non-Text]
[Non-Text]
[Non-Text]
The Ground Truth image displays a single, solid horizontal line. According to Rule 2 (UNDERSCORE & LINE RULES), this is a stylistic or background line, not a placeholder underscore. Therefore, the OCR result must ignore it. The provided OCR content is "____", which consists of four underscores. This is an incorrect interpretation of the line as a placeholder, violating the rule that stylistic lines must be ignored. The OCR has hallucinated underscores where none should exist based on the GT's visual context. Hence, the OCR result is inconsistent with the Ground Truth.
[Non-Text]
The Ground Truth image displays a single, solid horizontal line. According to Rule 2 (UNDERSCORE & LINE RULES), this is a stylistic or background line, not a placeholder underscore. Therefore, the OCR result must ignore it and output nothing or only meaningful text. The provided OCR content is "____", which consists of four underscores. This is an incorrect interpretation of the line as a placeholder, violating the rule that stylistic lines must be ignored. The OCR has hallucinated underscores where none should exist based on the GT's visual context. Hence, the OCR result is inconsistent with the Ground Truth.
The Ground Truth image displays a single, solid horizontal line, which is a stylistic or background element (like a rule line on paper). According to Rule 2, such lines must be ignored by the OCR result. The provided OCR content is "____", which consists of underscores. Underscores are not equivalent to a solid line and are not permitted under the “Stylistic/Background Lines (Ignore)” rule. Outputting underscores for a solid line constitutes an error, as it misrepresents the visual element and violates the instruction to ignore stylistic lines. Therefore, the OCR result is inconsistent with the Ground Truth.
The Ground Truth image displays a single, solid horizontal line, which is a stylistic or background element (like a rule line on paper). According to Rule 2, such lines must be ignored by the OCR result. The OCR content provided is "", which consists of no characters. Since the OCR output correctly ignores the stylistic line, it complies with Rule 2. Therefore, the OCR result is consistent with the Ground Truth.
[Non-Text]
(一)本次股东大会的召集和召开程序
The Ground Truth image displays a single, solid horizontal line. According to Rule 2 (UNDERSCORE & LINE RULES), this is a stylistic or background line, not a placeholder underscore. Therefore, the OCR result must ignore it and output nothing or only meaningful text. The provided OCR content is "____", which consists of four underscores. This is an incorrect interpretation of the line as a placeholder, violating the rule that stylistic lines must be ignored. The OCR has hallucinated placeholder underscores where none should exist in the GT. Hence, the OCR result is inconsistent with the Ground Truth.
The Ground Truth image displays a single, solid horizontal line, which is a stylistic or background element (like a rule line on paper). According to Rule 2, such lines must be ignored by the OCR result. The provided OCR content is "____", which consists of underscores. Underscores are not equivalent to a solid line and are not permitted under the “Stylistic/Background Lines (Ignore)” rule. Outputting underscores for a solid line constitutes an error, as it misrepresents the visual element and violates the instruction to ignore stylistic lines. Therefore, the OCR result is inconsistent with the Ground Truth.
The Ground Truth image displays a single, solid horizontal line, which is a stylistic or background element (like a rule line on paper). According to Rule 2, such lines must be ignored by the OCR result. The provided OCR content is "____", which consists of underscores. Underscores are not equivalent to a solid line and are not permitted under the “Stylistic/Background Lines (Ignore)” rule. Outputting underscores for a solid line constitutes an error, as it misrepresents the visual element and violates the instruction to ignore stylistic lines. Therefore, the OCR result is inconsistent with the Ground Truth.
The Ground Truth image displays a single, solid horizontal line. According to Rule 2 (UNDERSCORE & LINE RULES), this is a stylistic or background line, not a placeholder underscore. Therefore, the OCR result must ignore it. The provided OCR content is "____", which consists of four underscores. This is an incorrect interpretation of the line as a placeholder, violating the rule that stylistic lines must be ignored. The OCR has hallucinated underscores where none should exist based on the GT's visual context. Hence, the OCR result is inconsistent with the Ground Truth.
Bresser GmbH
Gutenbergstraße 2
46414 Rhede · Germany
www.bresser.de


@BresserEurope

BRESSER®
Bresser UK Ltd.
Suite 3G, Eden House
Enterprise Way
Edenbridge, Kent TN8 6HF
Great Britain