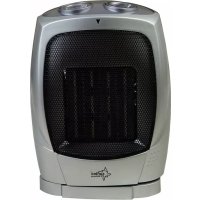
Heat Flow 2010 - Pan SUNTEC - Free user manual and instructions
Find the device manual for free Heat Flow 2010 SUNTEC in PDF.
Frequently Asked Questions - Heat Flow 2010 SUNTEC
User questions about Heat Flow 2010 SUNTEC
0 question about this device. Answer the ones you know or ask your own.
Ask a new question about this device
Download the instructions for your Pan in PDF format for free! Find your manual Heat Flow 2010 - SUNTEC and take your electronic device back in hand. On this page are published all the documents necessary for the use of your device. Heat Flow 2010 by SUNTEC.
USER MANUAL Heat Flow 2010 SUNTEC
natural_image
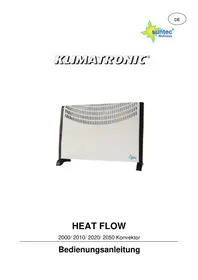
Exterior view of a white outdoor solar heating unit with perforated ventilation grilles and black frame (no text or symbols visible)KLIMATRONIC HEAT FLOW
natural_image
Technical line drawing of a mechanical clamp or bracket with a screwdriver inserted (no text or symbols)
text_image
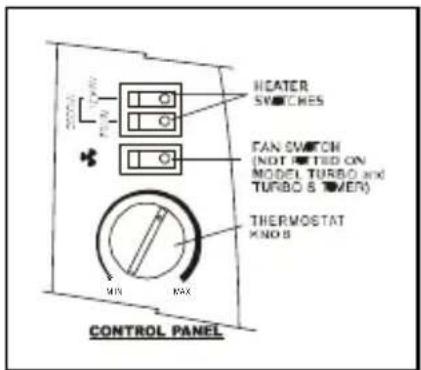
HEATER SWITCHES FAN SWITCH (NOT TIED ON MODEL TURBO and TURBO S LOWER) THERMOSTAT XNO B ON MAX CONTROL PANELBEDIENPANEL
- KONVEKTORSCHALTER (HEATER SWITCHES)
- VENTILATORSCHALTER (HEAT FLOW 2020 und 2050)
- THERMOSTATKNOPF (THERMOSTAT KNOB)
TIMER (NUR HEAT FLOW 2010 und 2050)
© 2016 KLIMATRONIC® Heat Flow
SUNTEC WELLNESS GMBH / HOLZSTRASSE 2 / 40221 DÜSSELDORF / GERMANY
SAFETY INSTRUCTIONS (to be read before operating the heater)
This appliance can be used by children aged from 8 years and above and persons with reduced physical, sensory and mental capabilities or lack of experience and knowledge if they have been given supervision or instruction concerning use of the appliance in a safe way and understand the hazards involved. Cleaning and user maintenance shall not be made by children without supervision.
. Do not use the heater unless the feet are correctly attached.
- Ensure the power supply to the socket into which the heater is plugged is in accordance with the rating label on the heater and that the socket is earthed.
- Keep the mains lead away from the hot body of the heater.
. The heater is not intended for use in bathrooms, laundry areas or similar indoor locations. Never place the heater where it may fall into a bathtub or other water container.
.Do not use outdoors.
. Do not cover or obstruct any of the heat outlet grilles or the air intake openings of the heater.
. Do not place the heater on carpets having a very deep pile.
. Always ensure that the heater is placed on a firm level surface. Ensure that the heater is not
positioned close to curtains or furniture as this could create a fire hazard.
. Do not position the heater in front of, or immediately below, a wall socket.
. Do not insert any object through the heat outlet or air intake grilles of the heater.
. Do not use the heater in areas where flammable liquids are stored or where flammable fumes may be present.
. Particular care should be taken when the heater is situated in areas occupied by children or invalids.
· Always unplug the heater when moving it from one location to another.
. Do not use the heater if the power cord is damaged. If the power cord is damaged, it must be replaced by a
recognized service agent or other qualified person. If the plug is damaged, see Plug Replacement details below.
TECHINICAL CHARACTERISTICS
HEAT FLOW 2000 - Convector heater with thermostat. HEAT
FLOW 2010 - Convector heater with thermostat and timer.
HEAT FLOW 2020 - Convector heater with thermostat and fan.
HEAT FLOW 2050 - Convector heater with thermostat, timer and fan.
MAX.POWER: 2000-2200W/ POWER RANGE: 700-1250-2000W/ MOTOR POWER:
20W/ VOLTAGE: 230V\~50Hz
IMPORTANT
Read these instructions fully before using the heater. Retain these instructions for future reference.
This appliance is not intended for use by persons (including children) with reduced physical, sensory or mental capabilities, or lack of experience and knowledge, unless they have been given supervision or instruction concerning use of the appliance by a person responsible for their safety. Children should be supervised to ensure that they do not play with the appliance.
KLIMATRONIC HEAT FLOW
Congratulations on the purchase of your new KLIMATRONIC HEAT FLOW. Before first using your KLIMATRONIC HEAT FLOW, it is most important that you read and follow the instructions in this use and care booklet, even if you feel you are quite familiar with this type of appliance. Find a place and keep this booklet handy for future reference. Your attention is drawn particularly to the section dealing with SAFETY INSTRUCTIONS! Your KLIMATRONIC HEAT FLOW is safe and easy to use. It has been designed to function quietly and safely under normal circumstances. This quality KLIMATRONIC HEAT FLOW is fully portable, with a sturdy base and a modern design
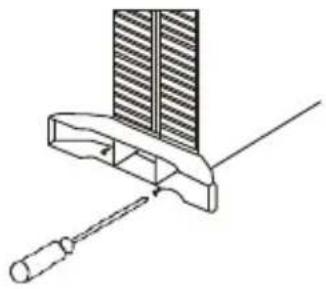
ASSEMBLY OF THE HEATER
Before using the heater, the feet (supplied separately in the carton), must be fitted to the unit. These are to be attached to the base of the heater using the 4 self-tapping screws provided, taking care to ensure that they are located correctly in the bottom ends of the heater side moldings

natural_image
Diagram of a screwdriver inserted into a slot on a mechanical component (no text or symbols)NOTE: - It is normal when the heaters are turned on for the first time or when they are turned on after having not been used for a long period of time the heaters may emit some smell and fumes. This will disappear when the heater has been on a short while.
text_image
HEATER SWITCHES FAN SWITCH (NOT LISTED ON MODEL TURBO AND TURBO & TOWER) THERMOSTAT KNOS MIN KAX CONTROL PANELCONTROL PANEL
- HEATER SWITCHES
- FAN SWITCH
(NOT FITTED ON HEAT FLOW 2020 and 2050)
- THERMOSTAT KNOB
TIMER (ONLY HEAT FLOW 2020 and 2050)
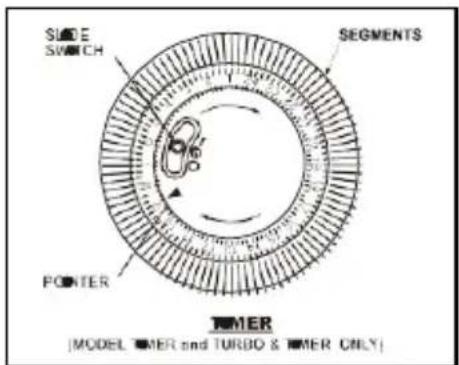
A. SLIDE SWITCH
B. SEGMENTS
C. POINTER
text_image
SIDE SWITCH SEGMENTS POINTER TIMER [MODEL MER and TURBO & MER ONLY]HEAT FLOW 2000 Convector heater with thermostat
Choose a suitable location for the heater, taking into account the safety instructions above.
Insert the plug of the heater into a suitable socket. Turn the thermostat knob fully in a clockwise direction to the maximum setting. Turn on the heating elements by means of the rocker switches on the side panel. When the heating elements are on the switches will illuminate. For maximum heat output both switches should be on.
When the desired room temperature has been reached, the thermostat knob should be turned slowly anti-clockwise until the thermostat is heard to click off and the lights on the element switches are seen to go out. After this the heater will keep the air temperature in the room at the set temperature by switching on and off automatically. In its minimum (fully anti-clockwise) position, the thermostat provides a frost guard position. In this position (depending on the size of the room) the heater will maintain the temperature above freezing.
HEAT FLOW 2010 Convector heater with thermostat and timer
All the above instructions for model HEAT FLOW 2000 (above) also apply to model HEAT FLOW 2010.
This model is also fitted with a 24hr timer which has 96 segments around its circumference, each segment being equivalent to 15 minutes of time. With the aid of this timer it is possible to preset the time and duration of the period(s) that it is desired the heater will operate, in any 24hr period.
Timer Operation
The centre of the timer has a 3 position slide switch.
In the central position (denoted by the clock symbol) the timer will switch the heater on and off at times set by the segments, (see setting the timer, below).
The position denoted by the "l", is a timer override position. The timer will continue to run but power will be fed continuously to the heater. This enables the heater to be on all the time if required.
In the position denoted by the “O”, the timer continues to run but no power is fed to the heater.
Setting the Timer
Ensure the slide switch on the timer is at the mid position next to the clock symbol.
Rotate the outer ring of the timer in a clockwise direction until the current time is lined up with the arrow pointer, i.e. if the time the timer is being set is 8 pm, rotate the outer ring until the number 20 is in line with the arrow pointer.
Set the time the heater is required to run by pulling the segments around the outer ring forward appropriate to the running period(s) required.
When set, the heater will operate each day during the times programmed. Note, the heater must always be plugged into a power socket, the element switches must be in the position and the thermostat must be suitably set to ensure the heater will come on.
If the heater is required to run continuously the slide switch on the timer should be set to the "I" position.
If it is subsequently required to revert back to timer operation, the slide switch on the timer should be set to the central (clock) position.
Note: - When using in timer mode, due consideration should be given to the fact that the heater may come on whilst unattended.
HEAT FLOW 2020 Convector heater with thermostat and fan
All the above instructions for model HEAT FLOW 2000 (above) also apply to model HEAT FLOW 2020.
Model HEAT FLOW 2020 also incorporates an internal fan, which can be switched on independently of the heating elements.
Fan Operation: -This is operated by means of the switch with the fan symbol along side it.
The fan will only operate with the thermostat in the “on” position and can be used when the heating elements are “on” to blow warm air into the room. In warm conditions the fan can be used with the heating elements “off” to blow cool air into the room.
HEAT FLOW 2050 Convector heater with thermostat, timer and fan
All the above instructions for models HEAT FLOW 2000 and HEAT FLOW 2010 and HEAT FLOW 2020 (above) also apply to model HEAT FLOW 2050.
WALL MOUNTING
The heater is supplied with 4 off each fixing brackets, screws and plastic wall plugs to enable it to be mounted onto a wall if required. If it is decided to mount the heater on the wall, the feet should not be fitted. The position must be chosen carefully. It must not be in front of or below a power socket. It must not be below a shelf, curtains or any other obstruction. Also refer to the safety instructions overleaf.
Having decided on the location of the heater it is necessary to drill 2 fixing holes 8mm diameter by 43mm deep at 486mm centers on a horizontal line at a minimum height of 400mm from the floor. Allowance must be made for any floor coverings, carpet etc and if any skirting boards are present, the fixing holes must be a minimum of 400mm above the top edge of the skirting board. Using the plastic plugs and fixing screws provided, attach 2 of the fixing brackets to the wall. The other pair of fixing brackets must be attached to the base of the heater using the feet retaining screws so that the brackets project out at the rear of the heater and space the bottom edge away from the wall. If required, these brackets may also be secured to the wall using the remaining fixing screws and plastic wall plugs. If this option is chosen it is suggested that the heater is hung on the upper brackets and the hole positions for the lower brackets is then marked on the wall, prior to drilling the holes for attachment purposes.
CLEANING THE HEATER
Always un-plug the heater from the wall socket and allow it to cool down before cleaning. Clean the outside of the heater by wiping with a damp cloth and buff with a dry cloth. Do not use any detergents or abrasives and do not allow any water to enter the heater.
STORING THE HEATER
When the heater is not used for long periods of time it should be protected from dust and stored in a clean dry place.
In case of complaint
- You can claim the device within 24 months from date of purchase (receipt).
• A free replacement or repair will be excluded from prior improper product handling. - Defects in wear parts, consumables, as well as cleaning, maintenance or replacement of said parts are therefore with costs.
- If you want to make a complaint, please bring the entire device in its original packaging and with proof of purchase to your dealer. For a timely and convenient service register, visit our website www.suntec-wellness.de and learn more.
• Without a proof of purchase, generally there will be no repair or replacement. - In the event that the complaint case is analogous to our terms of service, all defects of the device or its accessories due to material or manufacturing defects will be eliminated by repair or, at our discretion, replacing the unit.
- The damage of accessories does not automatically lead to a free exchange of the whole device. In these cases, please contact your dealer. Glass breakage or breakage of plastic parts are always to charge.
- The dealer or repair service can perform the repair after the expiration of warranty against charge.
NOTE CONCERNING PROTECTION OF ENVIRONMENT
natural_image
Symbol of a trash bin with crossed lines indicating no waste or discharge, and a solid black rectangle below (no text or labels)This product must not be disposed of via normal household waste after its service life, but must be taken to a collection station for the recycling of electrical and electronic devices. The symbol on the product, the operating instructions or the packaging indicates such disposal procedures. The materials are recyclable in accordance with their respective symbols. By means of re-use, material recycling or any other form of recycling old appliances you are making an important contribution to the protection of our environment. Please ask your local council where your nearest disposal station is located.
As part of our extended producer responsibility, this product is indicated in accordance to the European Directive 2002/96/EC on Waste Electrical and Electronic Equipment (WEEE). The aim is to avoid, reduce, and environmentally friendly disposal of electronic waste. Please help actively to protect the environment and dispose electronic waste through local collection points. The packaging and this manual can be recycled.
EC Declaration of Conformity
The device meets the essential health and safety requirements of the European Union. The EC declaration of conformity is the basis for CE marking this unit.
With publication of this manual supersedes all previous their validity. SUNTEC, SUNTEC Wellness, KLIMATRONIC and the Sun-Logo are registered trademarks. © 2016/02 SUNTEC WELLNESS GMBH
© 2016 KLIMATRONIC® Heat
Flow SUNTEC WELLNESS GMBH / HOLZSTRASSE 2 / 40221 DÜSSELDORF / GERMANY
Heat Flow KLIMATRONIC
natural_image
Technical line drawing of a mechanical component with a screwdriver inserted, showing no text or symbols.
natural_image
Symbol of a trash bin crossed with no text or numbers, representing waste sorting or disposal (no text present)© 2016 KLIMATRONIC® Heat Flow
SUNTEC WELLNESS GMBH / HOLZSTRASSE 2 / 40221 DÜSSELDORF / GERMANY
CONSEILS DE SECURITE (A LIRE
AVANT D'UTILISER LE
RADIATEUR)
FR
KLIMATRONIC HEAT FLOW
natural_image
Technical line drawing of a screwdriver inserted into a slot on a mechanical component (no text or symbols)natural_image
Symbol of a trash bin crossed with no text or labels, accompanied by a black rectangular bar below (no readable text or symbols)© 2016 KLIMATRONIC® Heat Flow
SUNTEC WELLNESS GMBH / HOLZSTRASSE 2 / 40221 DÜSSELDORF / GERMANY
VEILIGHEIDSINSTRUCTIES
NL
KLIMATRONIC HEAT FLOW
natural_image
Diagram of a screwdriver inserted into a slot with a slide, showing mechanical components (no text or symbols)
natural_image
Symbol of a trash bin crossed with no visible text or labels© 2016 KLIMATRONIC® Heat Flow
SUNTEC WELLNESS GMBH / HOLZSTRASSE 2 / 40221 DÜSSELDORF / GERMANY
natural_image
Technical line drawing of a mechanical component with a screwdriver inserted (no text or symbols)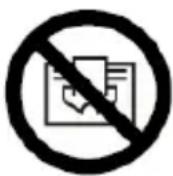
© 2016 KLIMATRONIC® Heat Flow
SUNTEC WELLNESS GMBH / HOLZSTRASSE 2 / 40221 DÜSSELDORF / GERMANY
UPUTE ZA SIGURNOST (Molimo pročitajte prije rukovanja grijalicom)
HR
KLIMATRONIC HEAT FLOW
Čestitamo na kupnji vašeg novog KLIMATRONIC DOTOKA TOPLINE. Prije upotrebe KLIMATRONIC DOTOKA TOPLINE, vrlo je važno pročitati i pridržavati se ovih uputa za upotrebu i održavanje opisanih u ovoj knjižici, čak i ako mislite da ste dobro upoznati s ovom vrstom uređaja. Nađite prikladno mjesto i čuvajte ovu knjižicu pri ruci za buduće savjete. Želimo vam naročito obratiti pažnju na odjeljak UPUTE ZA SIGURNOST! Vaš KLIMATRONIC HEAT FLOW je siguran i njime se jednostavno rukuje. Dizajniran je za tihi i sigurni rad pod normalim okolnostima. Ovaj kvalitetan KLIMATRONIC HEAT FLOW se može prenositi i ima čvrstu bazu i modernog je dizajna.
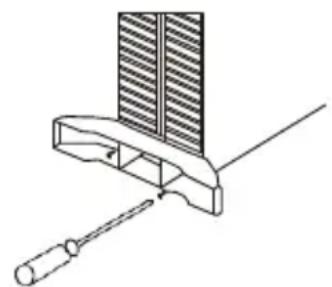
SASTAVLJANJE GRIJALICE
Prije upotrebe grijalice, nožice (isporučene posebno u kutiji) treba montirati na jedinicu. One se pričvršćuju na bazu grijalice korištenjem 4 samo-nareziva isporučena vijka pri čemu se mora voditi računa o ispravanom položaju u donjim krajevima bočnih profila grijalice.
natural_image
Technical line drawing of a mechanical component with a screwdriver inserted (no text or symbols)RUKOVANJE GRIJALICOM
© 2016 KLIMATRONIC® Heat Flow
SUNTEC WELLNESS GMBH / HOLZSTRASSE 2 / 40221 DÜSSELDORF / GERMANY
UPUTE ZA BEZBJEDNOST (trebale bi se pročitati prije rukovanja grijalicom)
KLIMATRONIC HEAT FLOW
Čestitamo na kupovini vašeg novog KLIMATRONIC PROTOKA TOPLINE. Prije upotrebe vašeg KLIMATRONIC PROTOKA TOPLINE, veoma je važno da pročitate i slijedite ove instrukcije za upotrebu i održavanje koje su opisane u ovoj knjižici čak i ako mislite da ste dobro upoznati sa ovim tipom aparata. Nađite prikladno mjesto i čuvajte ovu knjižicu pri ruci za buduće potrebe. Želimo vam naročito obratiti pažnju na odjeljak o UPUTAMA ZA BEZBJEDNOST! Vaš KLIMATRONIC HEAT FLOW je bezbjedonosan i njime se lagano rukuje. Napravljen je za tihi i bezbjedonosni rad pod normalim okolnostima. Ovaj kvalitetan KLIMATRONIC HEAT FLOW se može prenositi i ima čvrstu bazu i moderni dizajn.
SASTAVLJANJE GRIJALICE
Prije upotrebe grijalice, nožice (posebno isporučene u kutiji) se moraju montirati na jedinicu. One se trebaju pričvrstiti na bazu grijalice upotrebom 4 samo-nareziva priložena vijka pri čemu se mora obezbjediti njihov ispravan položaj u donjim krajevima bočnih profila grijalice.
natural_image
Technical line drawing of a mechanical clamp or bracket with a screwdriver inserted (no text or symbols). Ukoliko je utikač oštećen, pogledajte dolje opisane detalje o njegovoj zamjeni.
natural_image
Symbol of a trash bin crossed with no text or numbers, accompanied by a black rectangular block below (no readable text or symbols)Kad odsluži svoje, ovaj se proizvod ne smije zbrinuti kao obični kućni otpad, već se mora predati tamo gdje se prikupljaju električni i lektronski uređaji zbog reciklaže. Na to ukazuje simbol na proizvodu, u uputstvu za upotrebu ili na pakovanju. Materijali se u skladu s njihovom oznakom mogu ponovo upotrijebiti. Ponovnom upotrebom, korištenjem materijala ili nekim drugim oblikom korištenja starih aparata dajete važan doprinos zaštiti naše okoline. Obratite se upravi svoje općine da vas informira gdje možete zbrinuti svoj uređaj.
U okviru šire odgovornosti nas kao proizvođača ovaj uređaj nosi oznaku u skladu s Direktivom 2002/96/EZ za stare električne i elektroničke uređaje (WEEE). Cilj je da se spriječi, smanji i ekološki odstrani elektronički otpad. Molimo vas da nam u tome aktivno pomognete i predate svoj elektronički otpad na lokalnim sakupljalištima takvog otpada. Samo pakovanje i ovo uputstvo za upotrebu mogu se reciklirati.
EZ- Izjava o sukladnosti
Uređaj je napravljen u skladu s najvažnijim zahtjevima Evropske unije u vezi sa zdravljem i sigurnošću. EZ-izjava o sukladnosti predstavlja osnovu za CE-oznaku na ovom uređaju.
Objavljivanjem ovog Uputstva za upotrebu dosadašnja uputstva postaju nevažeća. SUNTEC, SUNTEC Wellness, KLIMATRONIC i logoti sunca su registrirane marke. © 2016/02 SUNTEC WELLNESS GMBH
© 2016 KLIMATRONIC® HEAT FLOW
SUNTEC WELLNESS GMBH / HOLZSTRASSE 2 / 40221 DÜSSELDORF / GERMANY
VARNOSTNA OPOZORILA (Pred uporabo konvektorja obvezno preberite)
SI
KLIMATRONIC HEAT FLOW
natural_image
Technical line drawing of a screwdriver holding a component with a grid-patterned blade (no text or symbols)UPORABA KONVEKTORJA
text_image
12.5℃ 300 Mn 12.2% 80% (100%)mm V/16 (40) 19.5% 75% 16.1 Lan 100% 75%NADZORNA PLOŠČA
- STIKALO KONVEKTORJA (HEATER SWITCHES)
- STIKALO VENTILATORJA (HEAT FLOW 2020 in 2050)
- TERMÓSTATSKI GUMB (THERMOSTAT KNOB)
ČASOVNO STIKALO (SAMO HEAT FLOW 2010 in 2050)
A. DRSNO STIKALO (SLIDE SWITCH)
B. ODSEKI (SEGMENTS)
C. KAZALO (POINTER)
© 2016 KLIMATRONIC® HEAT FLOW
SUNTEC WELLNESS GMBH / HOLZSTRASSE 2 / 40221 DÜSSELDORF / GERMANY
KLIMATRONIC HEAT FLOW
natural_image
Technical line drawing of a mechanical component with a screwdriver inserted, showing no text or symbols.
KLIMATRONIC HEAT FLOW
natural_image
Technical line drawing of a mechanical component with a screwdriver inserted, no text or symbols present© 2016 KLIMATRONIC® HEAT FLOW
SUNTEC WELLNESS GMBH / HOLZSTRASSE 2 / 40221 DÜSSELDORF / GERMANY
BIZTONSÁGI TUDNIVALÓK (a
KLIMATRONIC HEAT FLOW
natural_image
Technical line drawing of a mechanical device with a screwdriver and a grid-patterned panel (no text or symbols)© 2016 KLIMATRONIC® HEAT FLOW
SUNTEC WELLNESS GMBH / HOLZSTRASSE 2 / 40221 DÜSSELDORF / GERMANY