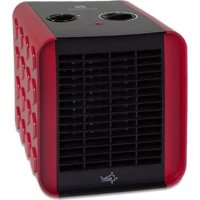
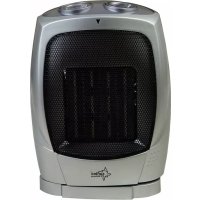
Heat Patio - Pan SUNTEC - Free user manual and instructions
Find the device manual for free Heat Patio SUNTEC in PDF.
Frequently Asked Questions - Heat Patio SUNTEC
User questions about Heat Patio SUNTEC
0 question about this device. Answer the ones you know or ask your own.
Ask a new question about this device
Download the instructions for your Pan in PDF format for free! Find your manual Heat Patio - SUNTEC and take your electronic device back in hand. On this page are published all the documents necessary for the use of your device. Heat Patio by SUNTEC.
USER MANUAL Heat Patio SUNTEC
© 2016 Suntec Wellness® Heat Patio
SUNTEC WELLNESS GMBH / HOLZSTRASSE 2 / 40 221 DUSSELDORF / DEUTSCHLAND
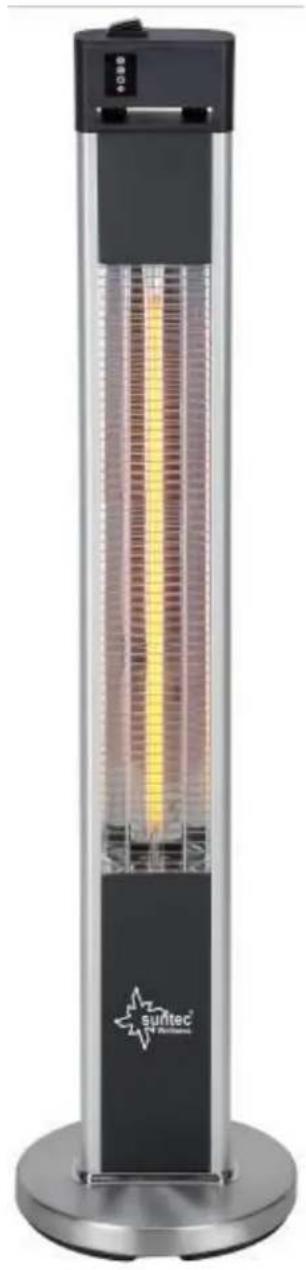
Heat Patio
Instruction manual
Thank you for buying this product from Suntec Wellness. Please read the manual carefully before using the appliance. Retain this manual for future reference.
CAUTION!
This appliance can be used by children aged from 8 years and above and persons with reduced physical, sensory and mental capabilities or lack of experience and knowledge if they have been given supervision or instruction concerning use of the appliance in a safe way and understand the hazards involved. Cleaning and user maintenance shall not be made by children without supervision.
Safety Instructions
- Operate this appliance if the cable or plug is damaged.
- Keep away from heat, sharp objects or anything that may cause damage to the device and the cable.
- Bring the device to your dealer when the power cable is damaged. Another use of the device can lead to injury.
- Make sure the power is off before you insert the plug into the socket and take the unit into operation.
-
Take the device from the power away when it is not in use as well as before cleaning or maintenance.
-
Move the main switch in the OFF position before removing the plug from the socket. Do not pull the power cord, but on the plug.
- The heater must not stand directly under a wall socket.
- Do not use and store the unit near gasoline, paint or flammable liquids.
- The device is only suitable for outdoor use. Any other use which is not recommended by the manufacturer may cause fire, electric shock, personal injury or property damage.
- The device is intended for household use. Please operate the unit at construction sites, in greenhouses, barns or stables.
- Please do not use the appliance as a room heater.
- To avoid overheating, never cover the heater off please.
- To prevent a possible fire, keep air inlets and outlets freely.
- The device should be on a flat, level surface, 150~cm away from other objects.
- Do not touch the hot surfaces.
- Do not Insert foreign material in the ventilation or suction as this may result in electric shock, fire or damage to the unit.
- Please do not touch the unit, the power cord and the power plug with wet hands.
-
Please do not leave the device during commissioning unattended.
-
The most common cause of overheating is deposits of dust or lint in the machine. Make sure that these deposits are removed regularly, by turning off the device and vacuum with the vacuum cleaner air vents and grids.
- Please do not put the heater on carpets and do not place the cable under the carpet. Make sure that the cable is not in a way positioned that you could trip over.
- Do not use this heater in the immediate vicinity of bathtubs, showers or swimming pools. The device must not be operated in a sauna.
- Store the device in a cool, clean and free from environmental influences place
- Do not use the device with a programmer, timer or any other device that uses the heater automatically or turn it on or off, in order to avoid the risk of fire
- Please, do not wrap the cable around the device.
- Please keep the product away from places, where draft and / or corrosive substances are exposed.
- Please do not use the appliance as a towel or dryer.
- Please do not operate the device in animal breeding stations etc.
- Please keep the device away from other heating or other hot air sources.
-
Please do not put the appliance in water.
-
The surface of the unit remains during operation and for some time after switching off hot. Please take care to avoid burns.
- The product must not be exposed to vibration or shock. Please use the device with caution.
- The device may only be operated connected to ground.
- Please keep the device away from flammable materials.
- Please allow the unit to cool completely before you clean or move it.
Important: This heater is equipped with a temperature control unit. Please do not operate the unit near people who cannot move independently be, unless they are supervised throughout.
Components / Scope of supply
Screw M6 * 50 (2 pieces) Cable clip
Equipment base Screws Nuts (2 pieces)
Base cover Screw M4 * 28 (2 pieces)
Equipment housing Allen key
Installation
- Please place the device on the head (Figure A). Connect the plug (8) and the power cord through the holes in the center of the base cover (3) and the base (2). Mount the base cover (3), the base (2) and the screw nuts (6) on the main body.
- Fasten the two screw nuts (6), the base (2) and the base cover (3) using the screws M6 * 20 (1).
- Secure the power cable with the clip (5) at the base and screw the cable clip with the screws M4 * 35 (7) fixed, as shown in the picture B.
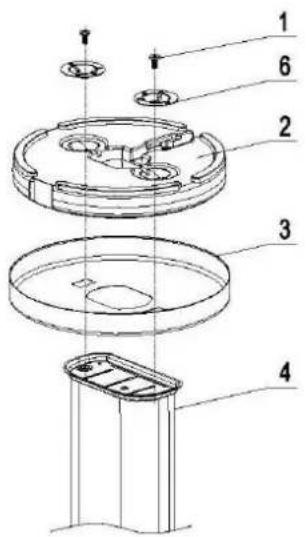
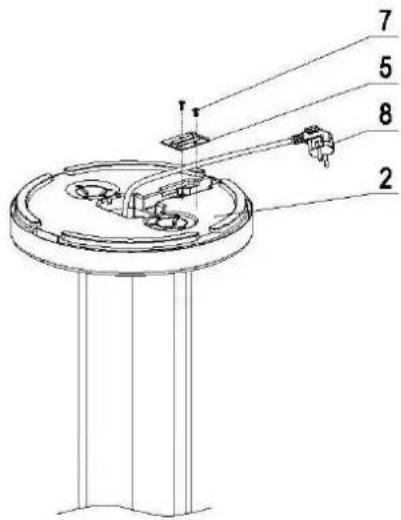
Figure A
Figure B
Commissioning
- Please connect the unit to the power.
- Please return the power switch (on the top the unit) in the "l" position; the indicator light flashes red.
- Please press the "MODE" button (9) to switch between the following heat settings:
o Low (low, the indicator lamp lights green),
o medium (medium, the indicator lamp lights orange)
o High (high, the indicator lights up red).
- Please press the button "OFF" to disable the device.
- Please return the switch to the "O" position.
Remote control
With the supplied remote you can control the device as follows:
Please bring the main switch (on top of the unit) in the "I" position to put the unit into standby mode; the indicator light flashes red.
MODE button: please press the button once to turn the unit on. By further pressing the button you can switch between the three heat settings mentioned above.
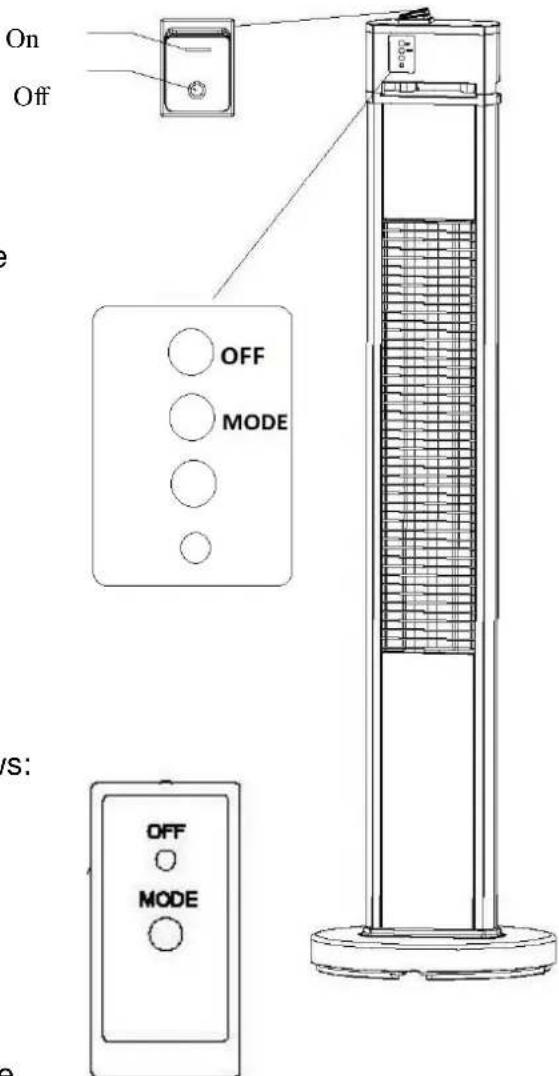
OFF button: Please press the button to put the unit into standby mode.
Please bring the main switch in the "O" position to turn off the device.
Cleaning and maintenance
- Disconnect the device from the power supply and let it cool completely before cleaning or servicing.
- Clean the outside of the appliance with a damp cloth and dry it with a dry cloth. Do not immerse the device in water, do not let water drip into the device.
- Please do not use water, aggressive cleaning agents, abrasives, or chemicals (alcohol, petrol, etc.)
Storage
- Remove the machine from the AC power when it is not in use, or you want to clean it or maintain it.
- If you do not use this unit for a long time, put it to the storage together with the operating manual back in the original box in a dry, dust-free place.
- Store. Heavy objects on the box, as this may damage the device.
Note Concerning protection of the environment

This product must not be disposed of via normal household waste after its service life, but must be taken to a collection station for the recycling of electrical and electronic devices. The symbol on the product, the operating instructions or the packaging indicate such disposal procedures.
The materials are recyclable in accordance with their respective symbols. By means of re-use, material recycling or any other form of recycling old appliances you are making an important contribution to the protection of our environment. Please ask your local council where your nearest disposal station is located.
As part of our extended producer responsibility, this product is indicated in accordance to the European Directive 2002/96/EC on Waste Electrical and Electronic Equipment (WEEE). The aim is to avoid, reduce, and environmentally friendly disposal of electronic waste. Please help actively to protect the environment and dispose electronic waste through local collection points. The packaging and this manual can be recycled.
EC Declaration of Conformity
The device meets the essential health and safety requirements of the European Union. The EC declaration of conformity is the basis for CE marking this unit.
With publication of this manual supersedes all previous their validity.
SUNTEC, SUNTEC Wellness, KLIKATRONIC and the Sun-Logo are registered trademarks. © 2016/02 SUNTEC WELLNESS GMBH
No liability is assumed for printing errors and mistakes.

Heat Patio
Mode d'emploi
Composants / Fourniture
Vis M6 * 50 (2 pieces) Clip de cable
© 2016 Suntec Wellness Heat Patio
SUNTEC WELLNESS GMBH / HOLZSTRASSE 2 / 40221 DUSSELDORF / ALLEMAGNE