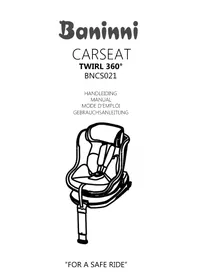
BN513 - Car seat Baninni - Free user manual and instructions
Find the device manual for free BN513 Baninni in PDF.
| Product type | Car seat group 1-2-3 |
| Brand | Baninni |
| Model | BN513 |
| Weight categories | Group I (9-18 kg), Group II (15-25 kg), Group III (22-36 kg) |
| Installation | Forward-facing, vehicle 3-point seat belt |
| Harness | Integrated 5-point, usable up to 18 kg, removable for groups II and III |
| Dimensions (L x W x H) | 45 x 44 x 68 cm |
| Seat weight | 6.5 kg |
| Materials | Plastic, foam, fabric |
| Cover | Removable, hand washable at 30°C, air dry |
| Safety standard | ECE R44.04 (universal) |
| Airbag precautions | Do not use on a seat equipped with an airbag |
| Recommended position | Rear seat of the vehicle |
| Recommended age | From approximately 9 months (depending on weight) |
| Cleaning | Mild detergent and warm water, no bleach or dry cleaning |
| Repairability | Must be replaced after a severe accident |
| Included accessories | 5-point harness, belt guide for categories II and III |
| Warranty | 2 years (manufacturer estimate) |
| Manufacturer | Baninni |
Frequently Asked Questions - BN513 Baninni
User questions about BN513 Baninni
0 question about this device. Answer the ones you know or ask your own.
Ask a new question about this device
Download the instructions for your Car seat in PDF format for free! Find your manual BN513 - Baninni and take your electronic device back in hand. On this page are published all the documents necessary for the use of your device. BN513 by Baninni.
USER MANUAL BN513 Baninni
natural_image
Line drawing of a car seat assembly with no text or symbols"FOR A SAFE RIDE"
text_image
NLCARSEAT BN513 MONTAGE RICHTLIJNEN
text_image
lap belt and diagonal belttext_image
Diagram of a car showing crosshair and checkmark indicators for vehicle positioningnatural_image
Simple line drawing of a smiling child wearing a vest (no text or symbols)NO-Too low

natural_image
Simple line drawing of a smiling child wearing a seatbelt (no text or symbols)NO-Too hight
natural_image
Simple line drawing of a smiling child wearing a long hairline and two shoulder straps (no text or symbols)YES-Correct
natural_image
Illustration of a medical device being adjusted for a cable or cable assembly, showing internal components and motion (no text or symbols)natural_image
Medical illustration showing a surgical procedure on a patient's abdomen, with an inset magnified view of the procedure (no text or symbols present)
natural_image
Diagram of a car seatbelt device with a close-up inset showing internal components (no text or symbols)natural_image
Line drawing of a child's seat with a bandage and two straps, held by a hand (no text or symbols)natural_image
Illustration of a car seatbelt with red arrows indicating force or movement, no text or symbols presentnatural_image
Illustration of a person performing a knee press or grip technique with red arrows indicating movement (no text or symbols)fig.4

natural_image
Illustration of a person using a seatbelt to lift a seatbelt, with no text or symbols present.fig.5
natural_image
Illustration of a child wearing a seatbelt and red straps, enclosed in a circle (no text or symbols)fig.6

natural_image
Diagram of a red belt buckle with a white seatbelt, enclosed in a circle (no text or symbols)fig.7
natural_image
Illustration of a baby wearing a high chair, with hands adjusting the seatbelt (no text or symbols)natural_image
Illustration of a baby wearing a full-body seatbelt with a hand holding a small object, no text or symbols present.flowchart
graph LR
    A["1: Laparoscopic cable fastening"] --> B["2: Headrest placement"]
    B --> C["3: Infant seatbelt with comfort"]
natural_image
Line drawing of a car seat with a red heart-shaped button on the backrest, placed on a floor line (no text or symbols)natural_image
Line drawing of a seated person with a red heart-shaped object on the chest, labeled 'fig.2' at bottom right (no other text or symbols)flowchart
graph TD
    A["Red ribbon with arrow"] --> B["Red ribbon with arrow"]
    B --> C["Red ribbon with arrow"]
    C --> D["Red ribbon with arrow"]
    D --> E["Fig.4"]
text_image
fig.5 fig.6ZORG EN ONDERHOUD
text_image
Medical illustration showing a procedure for implant placement, with labeled steps and directional arrows indicating movement.7.1 De bekleding afnemen / vervangen
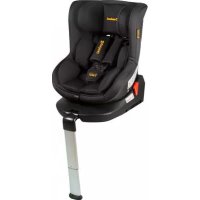
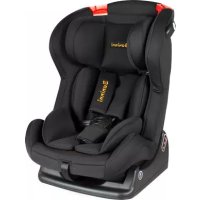
Group 1-2-3 Suitable from 9kg to 36kg
1. NOTES
Please read through these instructions carefully before using the child car seat for the first time. The instructions can be retained on the child car seat for its life period in the case of built-in restraints, and take good care of it for reference in the future.
- This is a "Universal" child restraint; it is approved to Regulation No.44,04 series amendments, for general use in vehicles and it will fit most, but not all, car seats.
2.A correct fit is likely if the vehicle manufacturer has declared in the vehicle handbook that the vehicle is capable of accepting a "Universal" child restraint for this age group. - This child restraint has been classified as "Universal" under more stringent conditions than those which applied to earlier designs which do not carry this notice.
- If in doubt, consult either the child restraint manufacturer or the retailer
ATTENTION: Only suitable if the approved vehicles are fitted with 3-point safety-belts, approved to UN/ECE Regulation No.16 or other equivalent standards.
Do not use in passenger seats equipped with airbags (SRS).
1.1 Applicability:
The child car seat is suitable for group I, II, III (9 TO 36KG)
Group I : 9-18 kg
Group II: 15-25 kg
Grop III: 22-36 kg
This child car seat can be used with its harness system for children of group I. It must be secured with the belt fastener on the 3-point vehicle belt.
For children of group II and III (15kg to 36kg) the harness system must be removed and the vehicle's 3- point belt system be used to secure the child.
Only suitable if the vehicle is fitted with 3 point safety belts, approved to UN/ECE Regulation No. 16 or other equivalent standards.
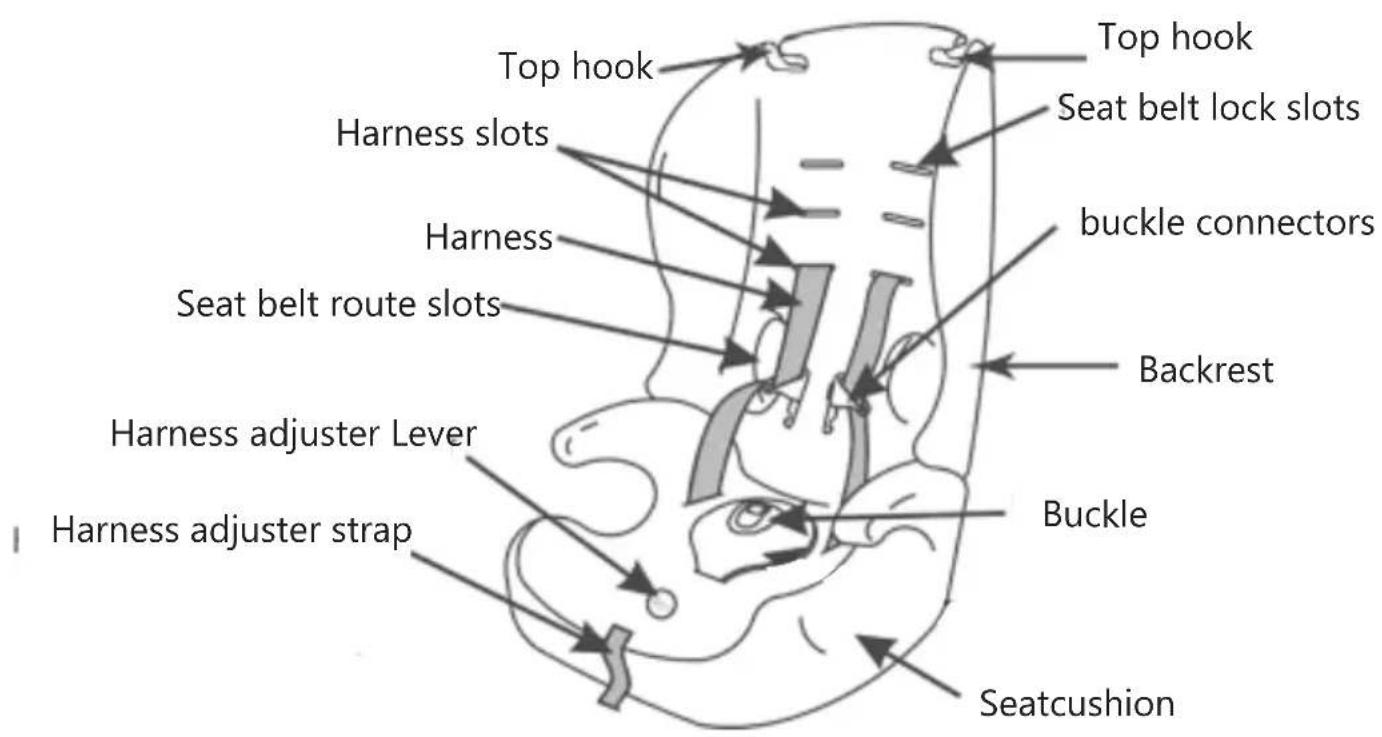
PARTS
text_image
Top hook Harness slots Top hook Seat belt lock slots Harness buckle connectors Seat belt route slots Backrest Harness adjuster Lever Buckle Harness adjuster strap Seatcushion
text_image
Crescent clasp Chest pad connector Harness straps Seat belt route slots Harness connector4. VEHICLE APPLICATION

Correct fitting/suitable
Incorrect fitting/not suitable
text_image
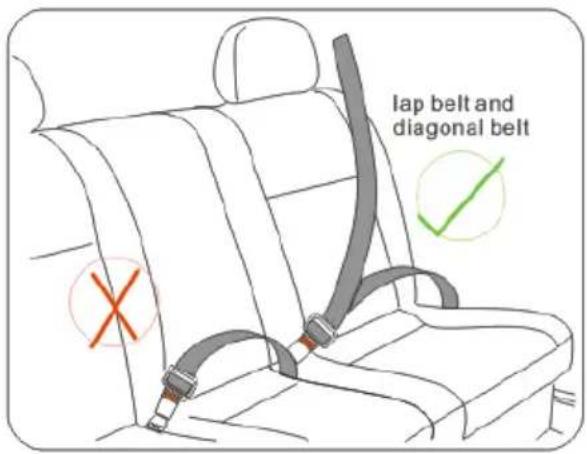
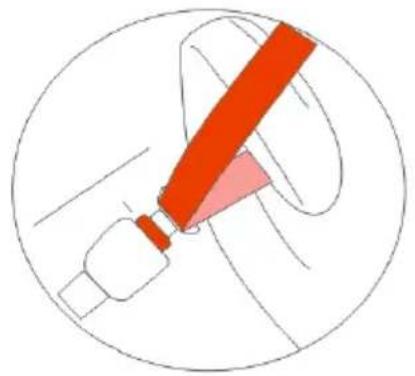
lap belt and diagonal beltThis child seat is suitable for conventional use in all cars equipped with 3-point seat belts that are fitted in accordance with European standard (ECVE44 or equivalent standard)
IMPORTANT: the cild seat must only be installed using a lap and diagonal seat belt
text_image
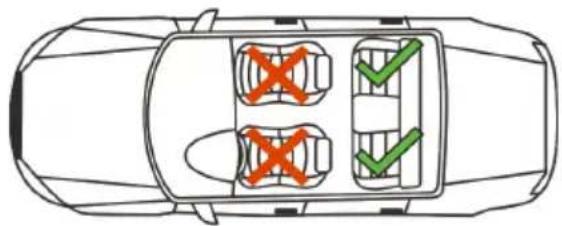
Diagram of a car showing crosshair and checkmark indicators for vehicle positioningForward facing on the rear seat.
5. USAGE FOR THE AGE GROUP I
Use of the harness system is only permitted for children of age group I, which means from 9kg to 18kg.
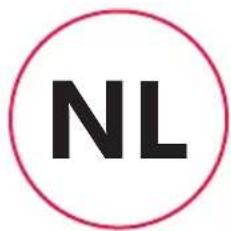
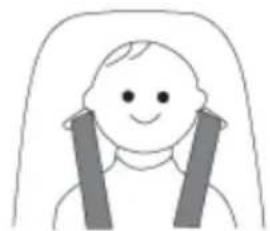
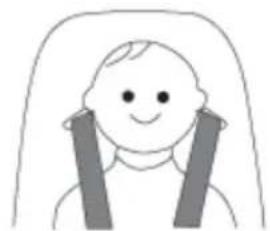
5.1 Adjusting the shoulder height (group I)
natural_image
Simple line drawing of a smiling child wearing a vest (no text or symbols)NO-Too low

natural_image
Simple line drawing of a smiling child wearing a seatbelt (no text or symbols)NO-Too hight

natural_image
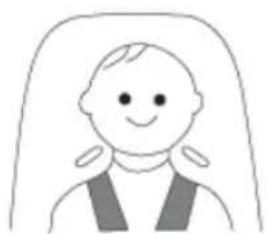
Simple line drawing of a smiling child wearing a long hairline and two shoulder straps (no text or symbols)YES-Correct
The straps should go into the slots at, or the nearest slots above the height of the child's shoulders. Remove straps by passing them through the slots from the front to the back of the car seat to adjust the harness: re-route the straps through the appropriate slots
If the height of your shoulder belts in child car seat is not fit for your child, adjust the height of the shoulder belts, please proceed as follows:
text_image
fig.1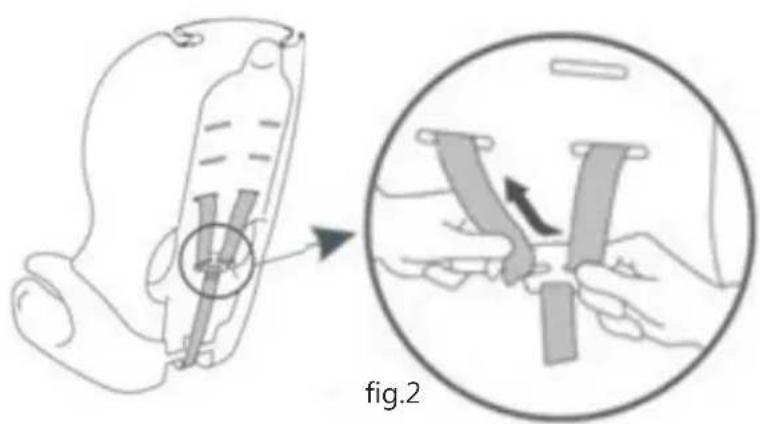
natural_image
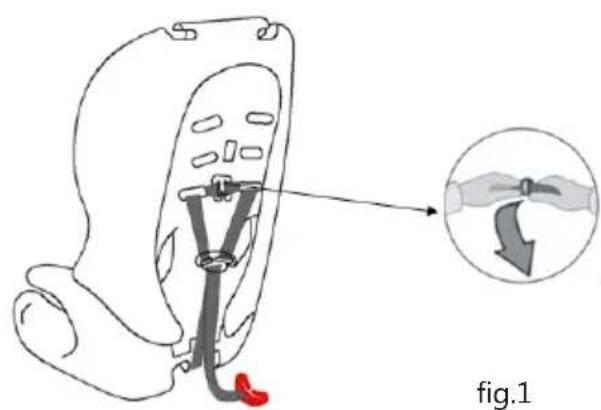
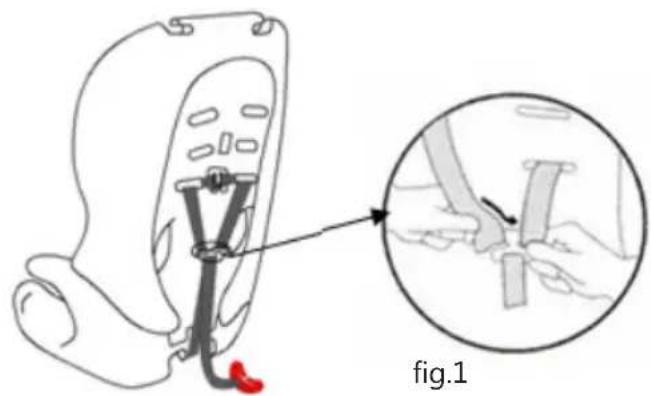
Illustration of a medical device being adjusted for a cable or cable assembly, showing internal components and motion (no text or symbols)Step1. Loosen the shoulder harness (see point 4.3). Turn the child seat to the back, Slide the chest belt off the harness connector (Fig. 1).
Step 2. Slide both of the shoulder harness off the harness connector (Fig. 2).

natural_image
Medical illustration showing a surgical procedure on a patient's abdomen, with an inset magnified view of the procedure (no text or symbols present)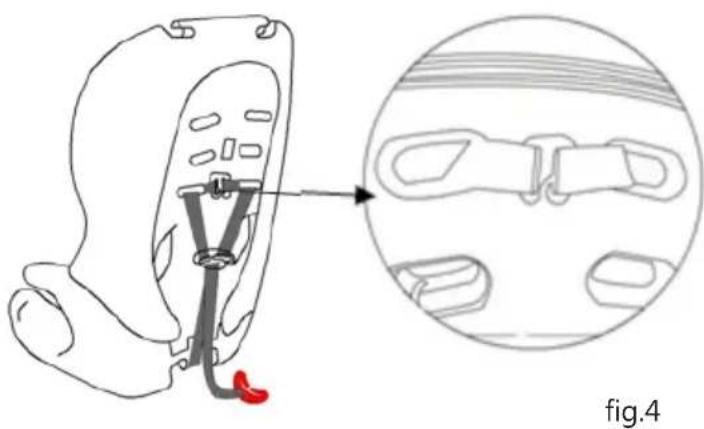
natural_image
Diagram of a car seatbelt device with a close-up inset showing internal components (no text or symbols)Step 3. Now thread the small belts of the chest pads and harness into the corresponding belt slots. Slide the harness straps in the harness connector (Fig 3)
Step 4. Slide both of the chest pads in the chest pad connector (Fig 4)
Ensure that both of the shoulder belts and chest belt go through slots at the same height, and not twisted.
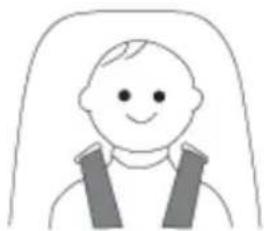
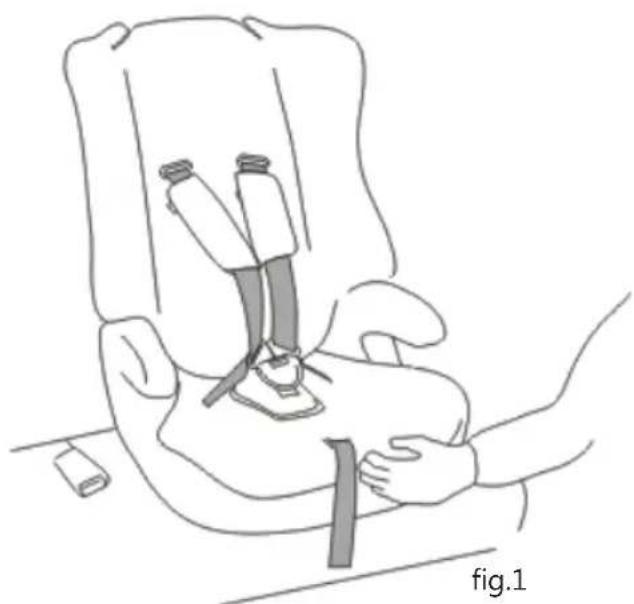
5.2 Securing the child car seat (group I)
natural_image
Line drawing of a baby car seat with a bandage and seatbelt, no text or symbols presentStep 1. Place the child safety seat on the vehicle's seat which is fitted with 3-point safety belts, ensuring it is firmly pressed against the car seat's backrest (Fig. 1).
natural_image
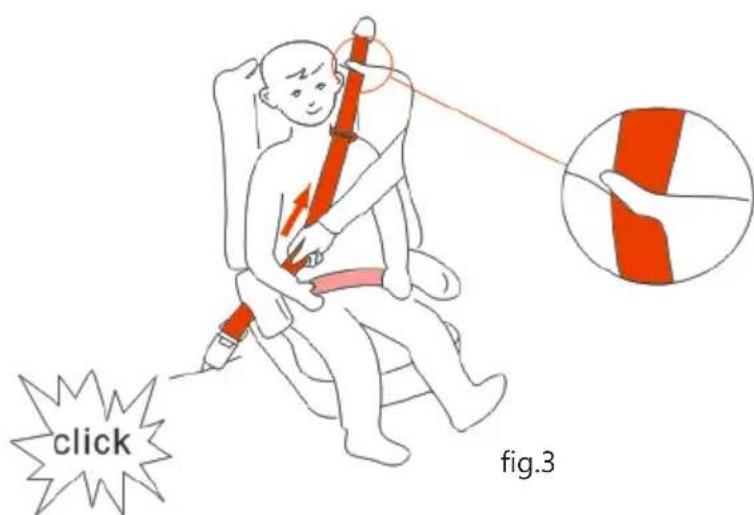
Illustration of a person adjusting a seatbelt using a red tool, no text or symbols presentStep 2. Pull out the vehicle belt, thread the belt tongue (incl. vehicle belt) through the adult belt route slot to the rear and through the back rest, through the other adult belt route slot (on the buckle side), and allow it to lock in place. You will hear "click" (Fig. 2)
text_image
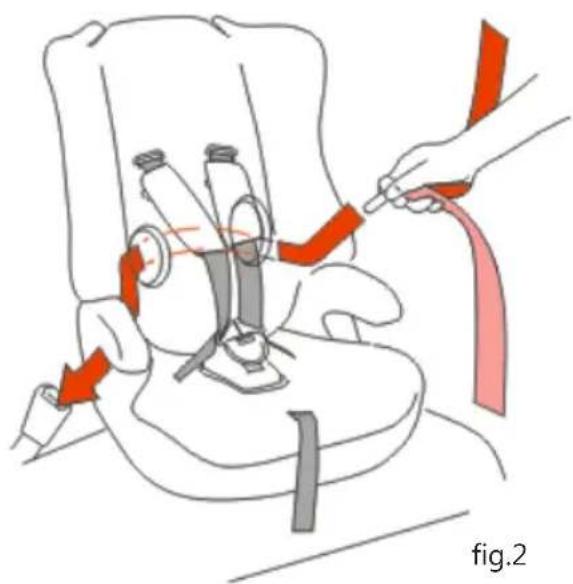
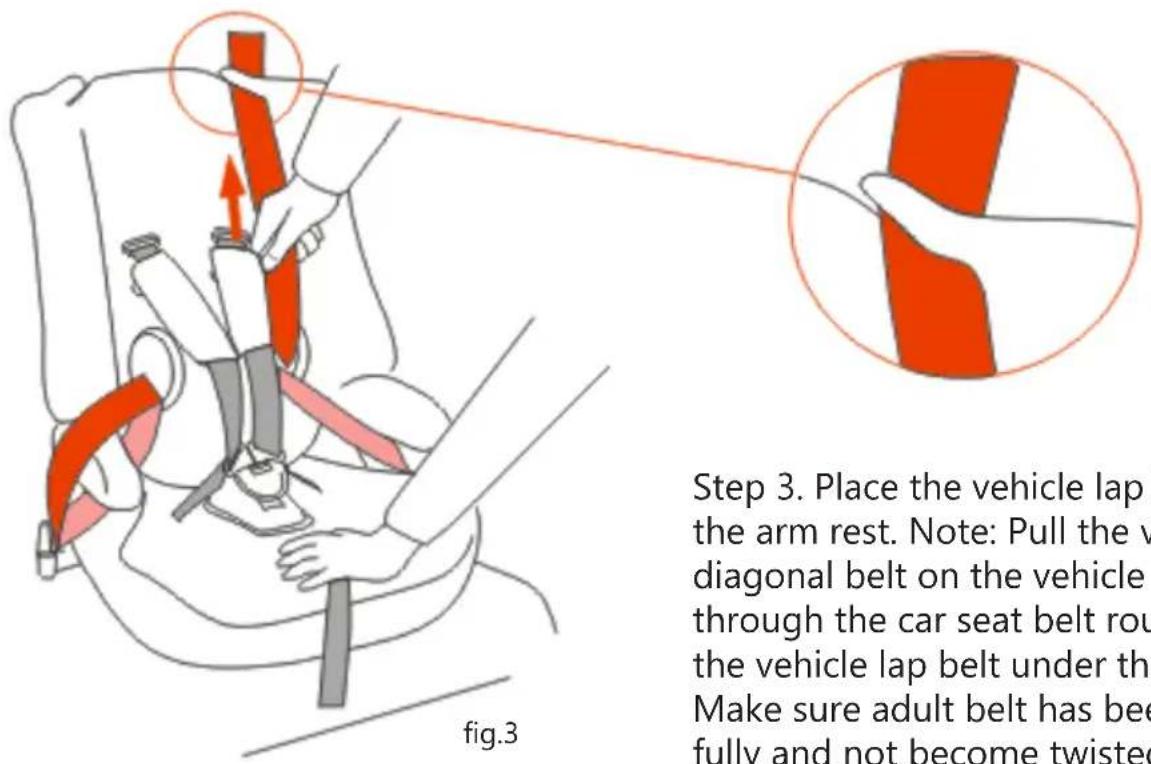
Step 3. Place the vehicle lap the arm rest. Note: Pull the v diagonal belt on the vehicle through the car seat belt rou the vehicle lap belt under th Make sure adult belt has been fully and not become twisted fig.3Step 3. Place the vehicle lap belt under the arm rest. Note: Pull the vehicle diagonal belt on the vehicle buckle side through the car seat belt route slot and the vehicle lap belt under the arm rest. Make sure adult belt has been clipped fully and not become twisted (Fig. 3).
Group I( 9-18KG) : The adult belt should pass through the top hook!
natural_image
Illustration of a person performing a knee press or grip technique with red arrows indicating movement (no text or symbols)fig.4

natural_image
Illustration of a person using a seatbelt to lift a seatbelt, with no text or symbols present.fig.5

natural_image
Illustration of a child wearing a seatbelt and red straps, enclosed in a circle (no text or symbols)fig.6
natural_image
Diagram of a red belt buckle with a white seatbelt, enclosed in a circle (no text or symbols)fig.7
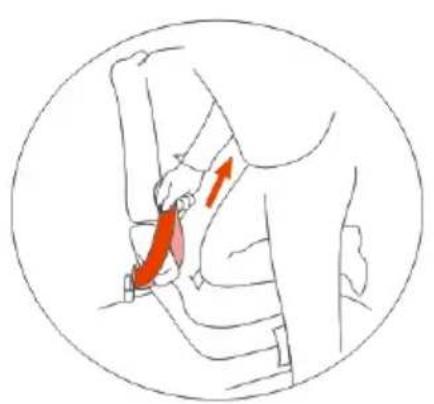
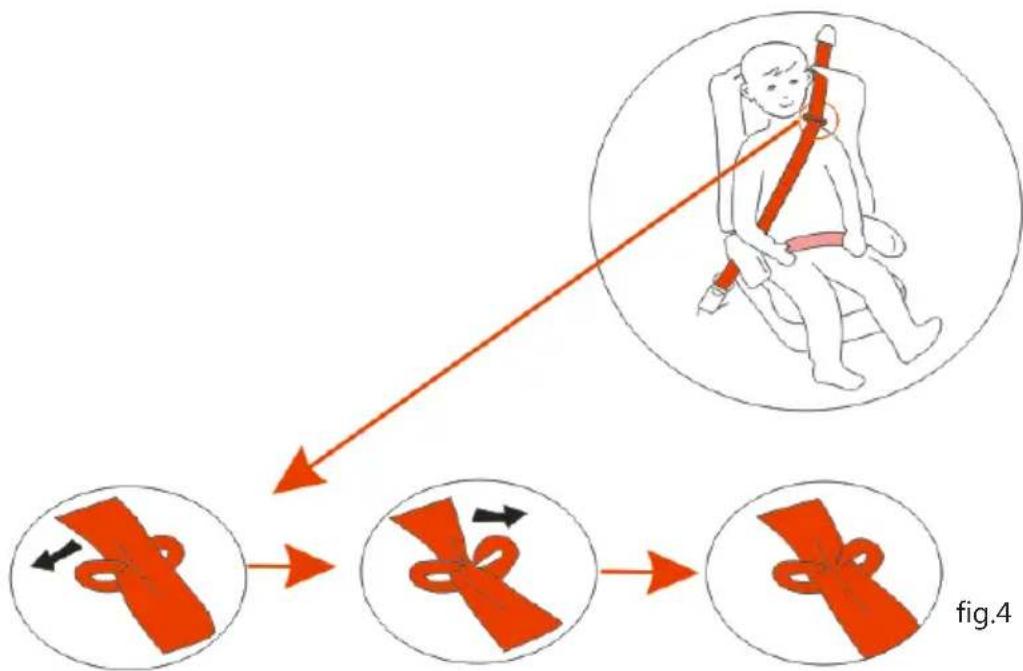
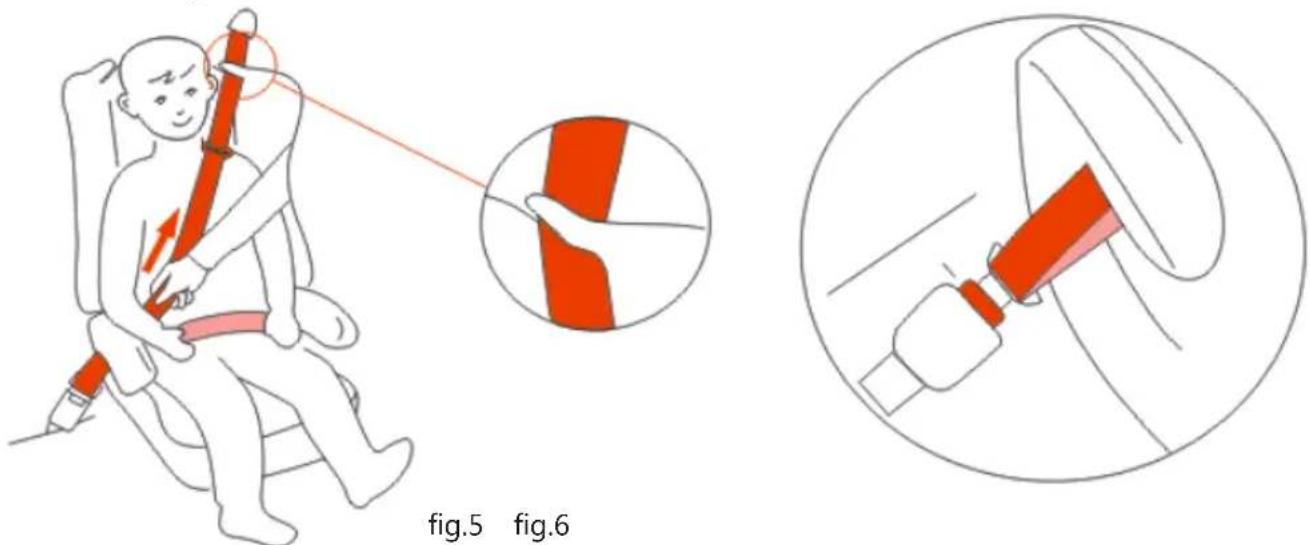
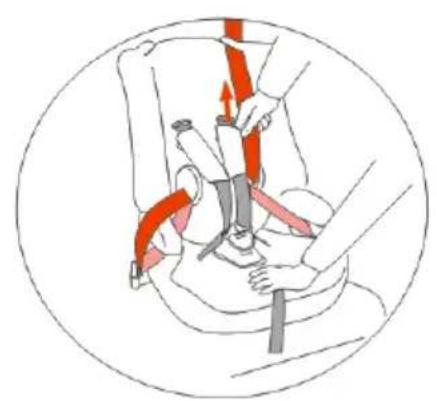
Step 4. Press your knee on the child car seat and pull the diagonal belt along the direction as the picture shows (Fig.4 - Fig.6). Make sure that belt has not loosened. Tighten the diagonal shoulder belt in the direction of the automatic roll-up as possible.
The satisfactory position of the adult safety-belt buckle relative to the child car seat is as the Fig 7.
You can contact the child car seat manufacturer if in doubt about this point.
To release your child seat following the above instructions in reverse order.
Ensure that each part of the belt is tightened as possible.
Make sure all the belts` position is right and has not become twisted.
Also check that the cover is not impeding the movement or fit of the belt webbing in any way.
When installing the child car seat (Group I), In no way should you use the head belt guide (group II III) in the head rest.
5.3 Loosening the shoulder straps
natural_image
Illustration of a baby wearing a high chair, with hands adjusting the seatbelt (no text or symbols)Step1. The shoulder straps are slackened by pressing the lever (under the car seat cover) on the front of the car seat.
Step2. Press down on the label marked "Press" as you grip the two shoulder straps with your other hand. Pull the shoulder straps towards you to loosen it. (see left picture)
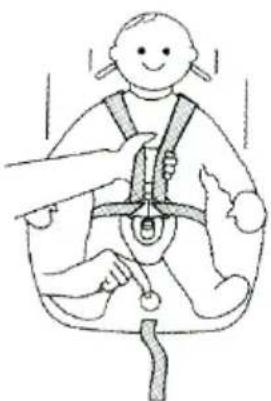
5.4 Securing the child with the harness
Firstly, adjust the shoulder belts height (see point 4.1), proceed as follows:
Step1. Loosen the harness (see point 4.3), open the buckle (see point 4.4.1), and place them down sideways.
Step2. Seat your child in the child car seat. Place both shoulder belts over your child's shoulders. Fasten the buckle (see point 4.4.1).
natural_image
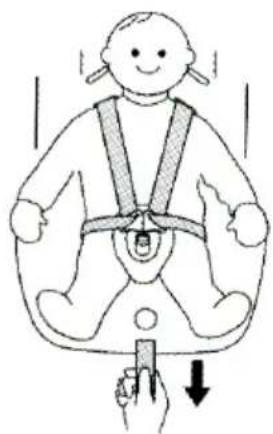
Illustration of a baby wearing a full-body safety harness and holding a device, with no text or symbols present.Step3. Pull the shoulder straps upwards to remove the slack from the lap sections of the harness then pull the adjuster strap until the harness is fully tightened.(see left picture)
The harness should be adjusted as tightly as possible without causing discomfort to your child.
flowchart
graph LR
    A["1: Laparoscopic cable fastening"] --> B["2: Headrest placement"]
    B --> C["3: Infant seatbelt with comfort"]
A loose harness can be dangerous. Check the harness adjustment and tighten each time the child is placed in the seat.
Ensure that any lap strap is worn low down, so that the pelvis is firmly engaged, the belt is not twisted.
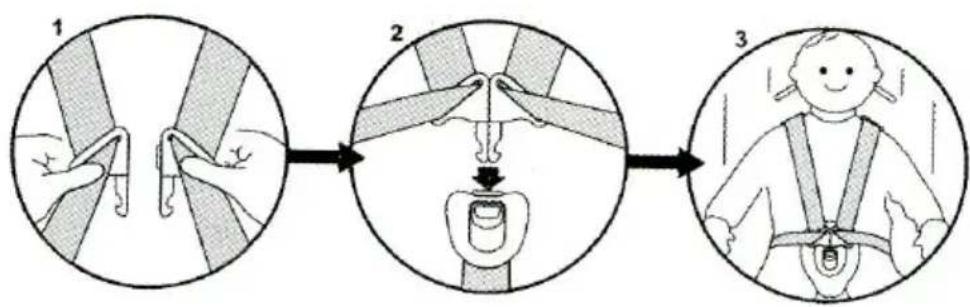
5.4.1 Using the buckle
Step1. Put the two metal sections of the buckle connectors together (fig. 1), Step2. Slot the two buckle connectors into the slot in the top of the buckle until they "click" into place (fig. 2)
Step3. Check the harness is correctly locked by pulling the shoulder straps upwards (fig.3).
To release the harness, press the red button on the buckle downwards.
6. USAGE FOR THE AGE GROUP II + III
The harness system must be removed from the seat (see point 5.1) when used for these age group II, III, which means from 15kg to 36kg. Only the 3-point vehicle belt system can be used to buckle up the child car seat.
6.1 Removal of the harness
text_image
fig.1Step1. Loosening the harness (see point 4.3), Turn the seat to the back (Fig. 1)
Step2. Slide both of the harness straps off the harness connector (Fig. 1).
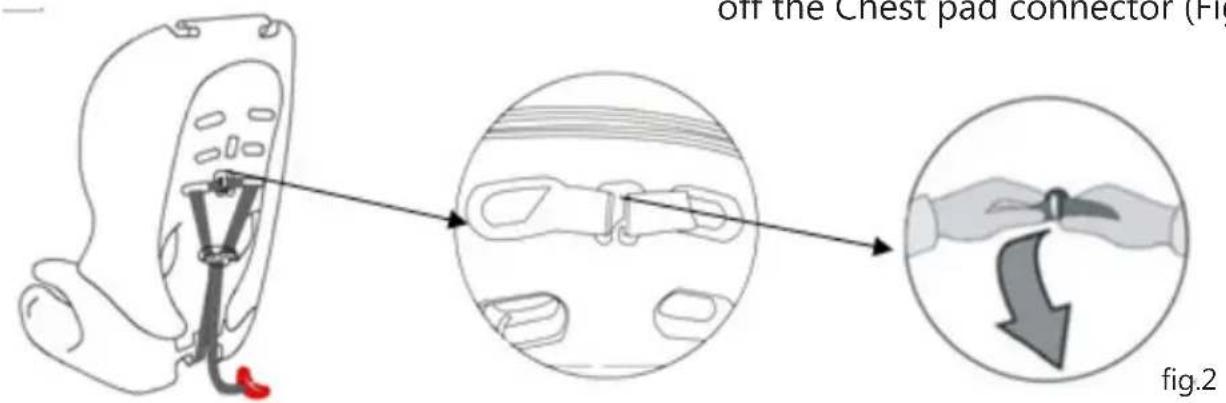
Step3. Slide the belt of the chest pads off the Chest pad connector (Fig. 2)
text_image
off the Chest pad connector (Fig.2)
text_image
fig.3Step4. Pull the strap till the steel pole gets out of the slot (Fig. 3). Now you can remove the belts as well as the tongue in an upwards direction.
Installation of the harness is carried out in reverse order to removal.
Keep harness with all parts in a safe place, to use in the future.
6.2 Securing the child car seat with vehicle's belt.
The car seat must be used vehicle's 3-point belt system for children of the age groups II + III (15kg-36kg). The harness system must be removed from the seat (see point 5.1) When used for these age groups II + III (15kg-36kg).
natural_image
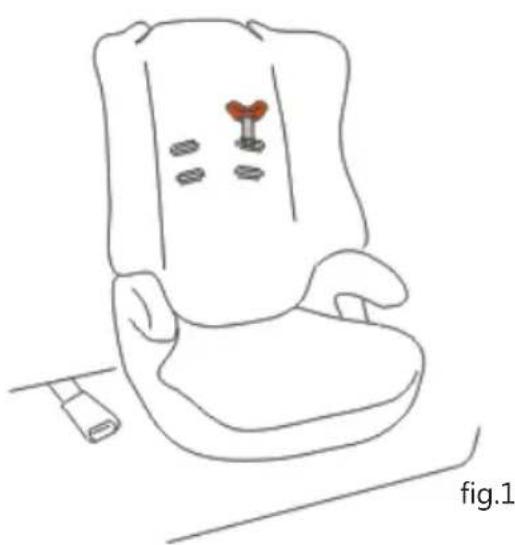
Line drawing of a car seat with a red button on the backrest, placed on a floor line (no text or symbols)Step1. Thread the crescent clasp (with belt) into the highest slot which one is near to car belt automatic roll-up device. Pull the clasp from back side of child seat to it's face side. (Fig. 1)
natural_image
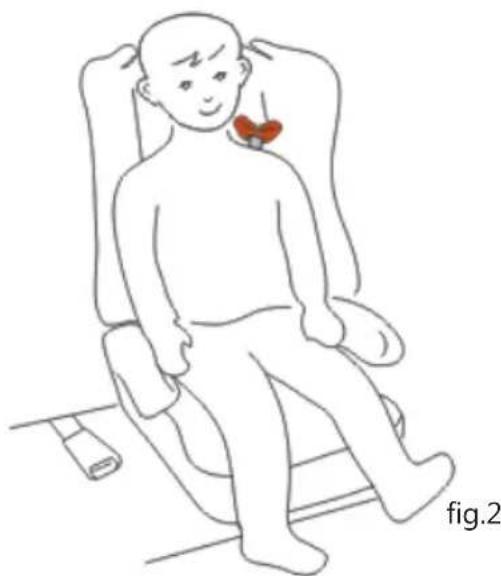
Line drawing of a person sitting on a chair with a red heart-shaped object on the chest, labeled 'fig.2' (no text or symbols on the diagram itself)Step2. Place the child safety seat on the vehicle's seat ensuring it is firmly pressed against the car seat's backrest. Seat your child in the child car seat (Fig. 2).
text_image
click fig.3Step3. Pull out the 3-point vehicle belt and place the lap belt on the opposite side of the buckle under the arm rest. (Make sure that the diagonal belt and the lap belt on the buckle side are under the armrest).
Group II + III (15\~36 kg): The adult belt must pass through the top hook!
The lap strap should be worn low down, so that the pelvis is firmly engaged and the straps should not be twiste
And allow it to the buckle in place. You will hear "click" (Fig. 3).
Step4. Place the diagonal belt goes through the crescent clasp. Make sure that the belt is not twisted. (Fig. 4)
flowchart
graph TD
    A["Step 1: Red ribbon on left"] --> B["Step 2: Red ribbon on right"]
    B --> C["Step 3: Red ribbon on right"]
    C --> D["Step 4: Red ribbon on right"]
    D --> E["Figure 4"]
Step5. Tighten the adult belts in the direction as Fig. 4 shows, and the diagonal shoulder belt in the direction of the automatic roll-up as possible. Pull the strap in the front of child safety seat to adjust anger of the diagonal shoulder belt (Fig. 5).
All the belts should be adjusted as tightly as possible without causing discomfort to your child.
The satisfactory position of the adult safety-belt buckle relative to the child car seat is as the Fig 6. You can contact the child car seat manufacturer if in doubt about this point.
text_image
fig.5 fig.6CARE INSTRUCTIONS
text_image
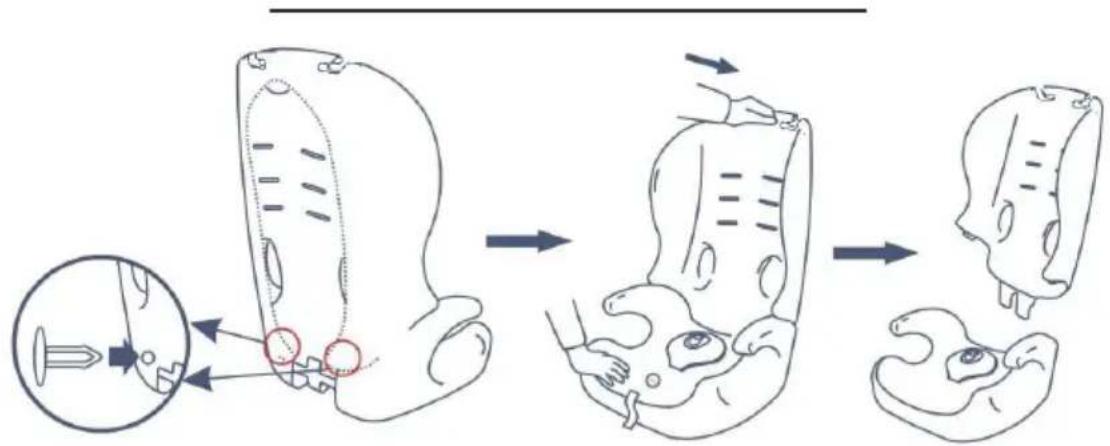
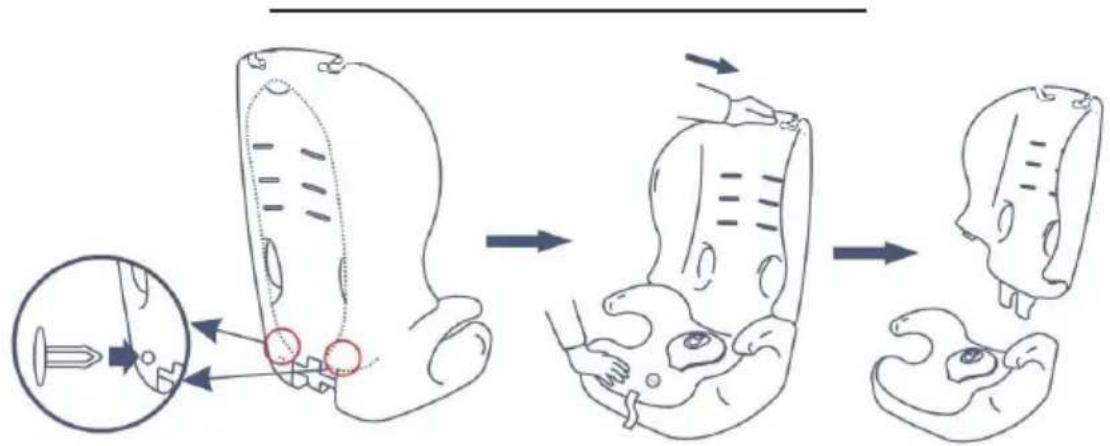
Medical illustration showing a procedure for implantation or dissection, with labeled steps and magnified views.7.1 Removing / replacing the cover
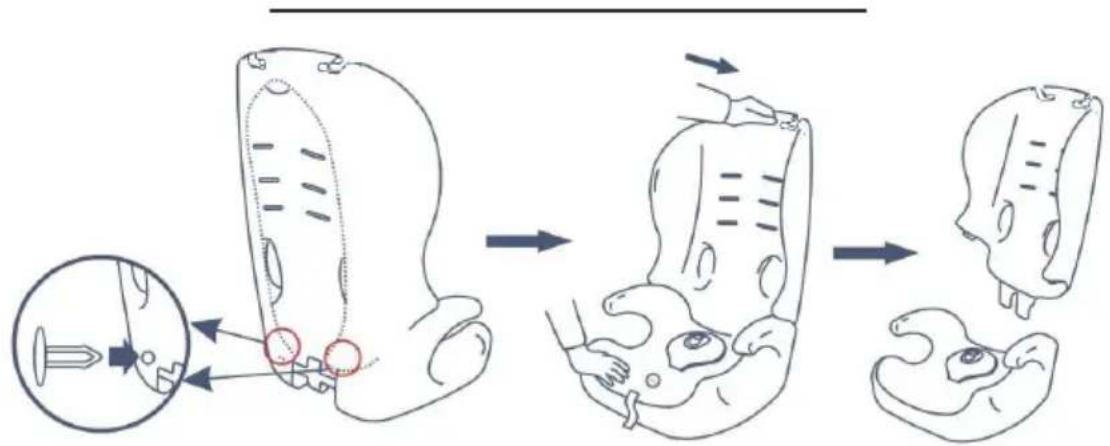
Step1. Remove the belt system as described in point 5.1.
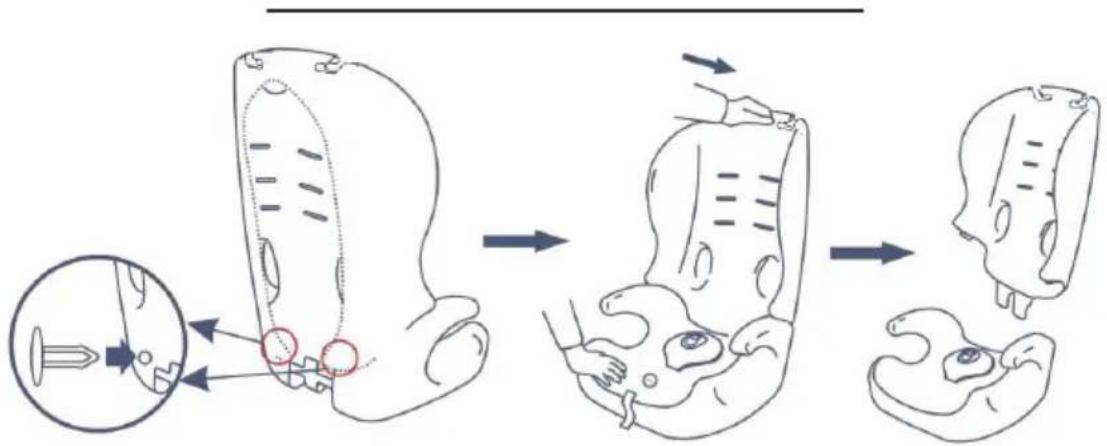
Step2. Remove the plastic pins from the back side of backrest. (see above picture). Then press the backrest so far back so that it rests flat on the floor. Now you can remove the cover of backrest.
Step3. Remove the backrest. Now the seat cushion cover can be pulled forward and removed.
To replace the cover proceed in the reverse order to removing the cover.
7.2 Cleaning the car seat and cover
The seat cover, harness and plastic parts can be washed with very mild detergent and warm water.
Do not use chemical cleansers, bleach or corrosives to wash any part of the car seat.
Do not wash by machine, Spin-dry or tumble-dry are not recommended.
Washing instruction for cover:
The cover is removable and washable at 30^ , line dry only.
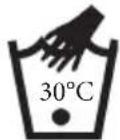
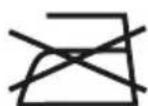
Handwash, watertemperature below 30°
Do not bleach Drycleen, any, solvent except trichioroethylene
Do not tumble dry Do not iron
8. PROCEDURE AFTER AN ACCIDENT
The child car seat must be replaced when it has been subject to violent stresses in an accident.
9. PRODUCTSERVICE
Please contact the store from which the product was bought
WARNING
PLEASE READ THIS USER GUIDE CAREFULLY BEFORE INSTALL THE CHILD SEAT AND FOR FUTURE REFERENCE.
DO NOT USE THIS CHILD SEAT IN PASSENGER SEATS EQUIPPED WITH AIRBAGS.
*This child seat can be used with the harness for children of 9 to 18kg in weight (group I).
*This child seat can be used without the harness for children of 15 to 36kg in weight (group II,III).
*This child seat can only be installed forward facing using a three-point lap and diagonal seat belt.
* Do not use this child seat in the home. It has not been designed for home use and should only be used in your car.
* This safest seating position for this child car seat is on the rear seat of a vehicle.
* Never use the child seat without fastening it into the car.
* It is dangerous to make any alteration or additions to the device without the approval of the competent authority, and a danger of not following closely the installation instructions provided by the child restraint manufacturer.
* Do not leave your child unattended in the seat at any time.
* The seat should be kept away from sunlight if the seat is not provided with a textile, otherwise it may be too hot for the child's skin.
* In the event of an emergency it is important that the child can be released quickly. This means that the buckle is not fully tamper proof and so your child must be taught never to play with the buckle.
* Any luggage or other objects liable to cause injuries in the event of a collision shall be properly secured.
* Periodically inspect the harness for wear, paying particular attention to attachment points. stitching and adjusting devices.
* The rigid items and plastic parts of a child restraint must be so located and installed that they are not liable, during everyday use of the vehicle to become trapped by a moveable seat or in a door of the vehicle.
* Always make sure that any straps holding the seat restraint to the vehicle shall be tight, any straps restraining the child should be adjusted to the child's body, and check that the straps shall not be twisted.
* Ensuring that any lap straps is worn low down, so that the pelvis is firmly engaged, shall be stressed.
* The seat device should be changed when it has been subject to violent stresses in an accident.
* The instruction can be retrained on the child restraint for its life.
* Do not use any load bearing contact points other than those described in the instructions and marked in the child restraint.
* Store this child seat in a safe place when it is not being used. Avoid placing heavy objects on top of it. Do not allow your child seat to come into contact with corrosive substances e.g. battery acid.
* The child restraint must not be used without the cover. The seat cover should not be replaced with any other than the one recommended by the manufacturer, because the cover constitutes an integral part of the restraint performance.

text_image
FRCARSEAT BN513 MODE D'EMPLOI
text_image
Top hook Harness slots Top hook Seat belt lock slots Harness buckle connectors Seat belt route slots Backrest Harness adjuster Lever Buckle Harness adjuster strap Seatcushion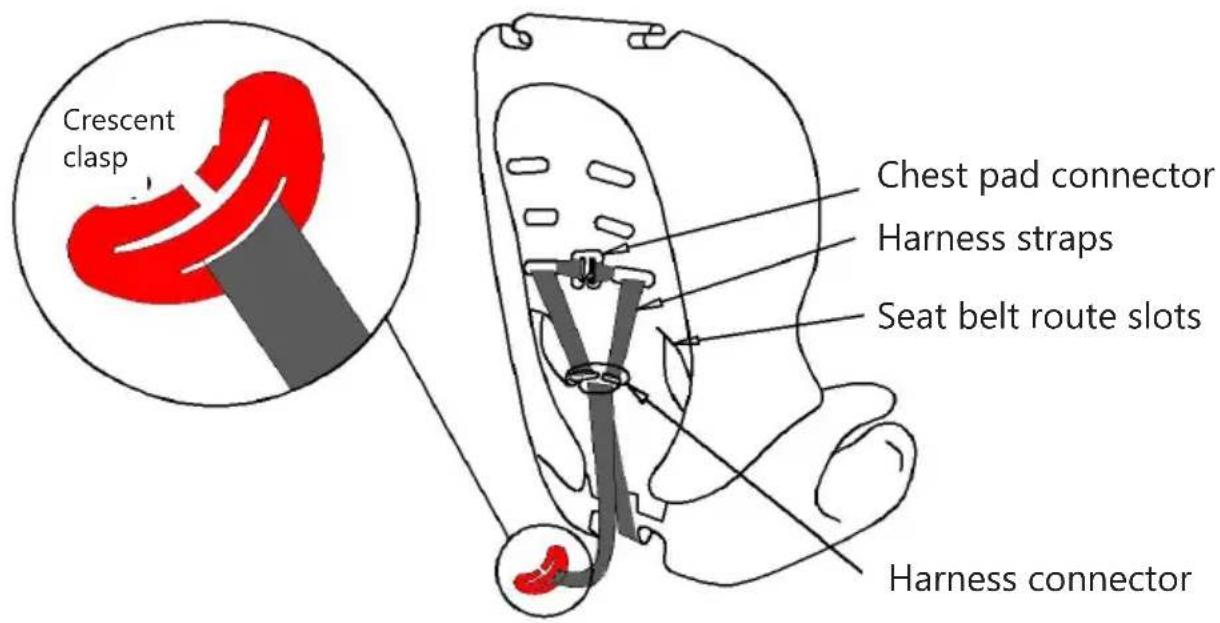
text_image
Crescent clasp Chest pad connector Harness straps Seat belt route slots Harness connector4. APPLICATION DANS UN VEHICULE

text_image
lap belt and diagonal belttext_image
Diagram of a car showing crosshair and checkmark indicators for vehicle positioningnatural_image
Simple line drawing of a smiling child wearing a vest (no text or symbols)NO-Too low
natural_image
Simple line drawing of a smiling child wearing a seatbelt (no text or symbols)NO-Too hight

natural_image
Simple line drawing of a smiling child wearing a full-body backpack (no text or symbols)YES-Correct
natural_image
Diagram showing a device being adjusted for a cable or cable assembly, with magnified detail highlighting the component (no text or symbols present)natural_image
Medical illustration showing a catheter insertion procedure with magnified detail (no text or labels)natural_image
Diagram of a car seatbelt device with a close-up inset showing internal components (no text or symbols)natural_image
Line drawing of a baby car seat with a hand adjusting the seatbelt (no text or symbols)natural_image
Illustration of a car seatbelt with red arrows indicating force or movement, no text or symbols presentnatural_image
Illustration of a person using a seatbelt to lift a car seatbelt, showing red belt and orange motion arrows (no text or symbols)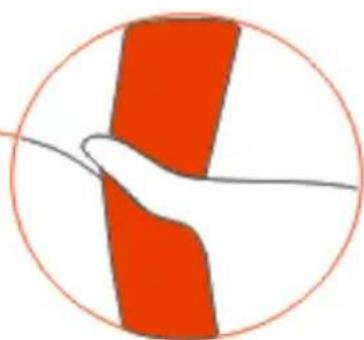
natural_image
Simple line drawing of a hand holding a red object within a circle (no text or symbols)natural_image
Illustration of a person performing a knee press or grip technique with red arrows indicating movement (no text or symbols)fig.4
natural_image
Illustration of a person using a seatbelt to lift a seatbelt, with no text or symbols present.fig.5

natural_image
Illustration of a child wearing a seatbelt and red straps, enclosed in a circle (no text or symbols)fig.6

natural_image
Diagram of a red belt buckle with a white seatbelt, enclosed in a circle (no text or symbols)fig.7
natural_image
Illustration of a baby wearing a high chair, with hands adjusting the seatbelt (no text or symbols)natural_image
Illustration of a baby wearing a full-body seatbelt with a hand holding a small object, no text or symbols present.flowchart
graph LR
    A["1: Laparoscopic cable fastening"] --> B["2: Headway placement"]
    B --> C["3: Infant seatbelt with comfort and safety"]
Step1. Put the two metal sections of the buckle connectors together (fig. 1), Step2. Slot the two buckle connectors into the slot in the top of the buckle until they "click" into place (fig. 2)
Step3. Check the harness is correctly locked by pulling the shoulder straps upwards (fig.3).
To release the harness, press the red button on the buckle downwards.
6. UTILISATION POUR LES CATEGORIES D'AGE II + III
text_image
Diagram illustrating a cable fastening technique with labeled steps and magnified views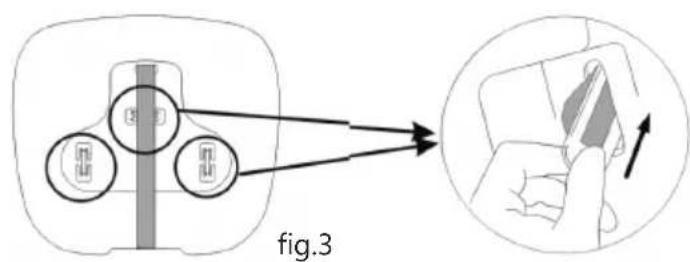
text_image
fig.3natural_image
Line drawing of a car seat with a red button and screw base, labeled 'fig.1' at bottom (no text or symbols on the diagram itself)natural_image
Line drawing of a seated person with a red heart-shaped object on the chest, labeled 'fig.2' at bottom (no text or symbols on diagram)flowchart
graph TD
    A["Step 1: Red ribbon on left"] --> B["Step 2: Red ribbon on right"]
    B --> C["Step 3: Red ribbon on right"]
    C --> D["Step 4: Red ribbon on right"]
    D --> E["Figure 4"]
text_image
fig.5 fig.6PRESCRIPTIONS D'ENTRETIEN
text_image
Medical illustration showing a procedure for implantation or dissection, with labeled steps and magnified views.9.REPARATION DU PRODUIT
text_image
lap belt and diagonal belt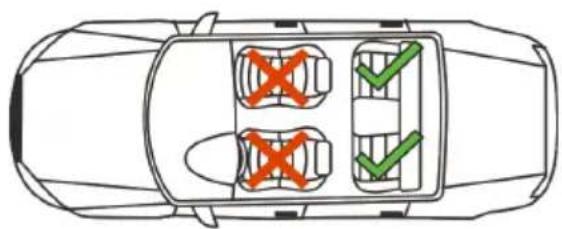
text_image
Diagram of a car showing crosshair and checkmark indicators for vehicle positioningnatural_image
Simple line drawing of a smiling child wearing a vest (no text or symbols)NO-Too low
natural_image
Simple line drawing of a smiling child wearing a seatbelt (no text or symbols)NO-Too hight

natural_image
Simple line drawing of a smiling child wearing a vest (no text or symbols)YES-Correct
natural_image
Illustration of a medical device being adjusted for a cable or cable assembly, showing internal components and motion (no text or symbols)natural_image
Medical illustration showing a surgical procedure on a patient's abdomen, with an inset magnified view of the procedure (no text or symbols present)
natural_image
Diagram of a car seatbelt device with a close-up inset showing internal components (no text or symbols)natural_image
Line drawing of a baby car seat with a hand holding the seatbelt, no text or symbols presentnatural_image
Illustration of a car seat with a hand adjusting the seatbelt, showing red arrows indicating movement (no text or symbols)natural_image
Illustration of a person performing a knee press or grip technique with red arrows indicating movement (no text or symbols)fig.4

natural_image
Illustration of a person using a seatbelt to lift a seatbelt, with no text or symbols present.fig.5

natural_image
Illustration of a child wearing a seatbelt and red straps, enclosed in a circle (no text or symbols)fig.6

natural_image
Diagram of a red belt buckle with a white seatbelt, enclosed in a circle (no text or symbols)fig.7
natural_image
Illustration of a baby wearing a baby seatbelt, with hands adjusting the seatbelt (no text or symbols present)natural_image
Illustration of a baby wearing a full-body safety harness, with a hand holding a tool and a downward arrow indicating force or pressure (no text or symbols)flowchart
graph LR
    A["1: Laparoscopic cable fastening"] --> B["2: Head assembly with seatbelt"]
    B --> C["3: Infant safety harness with seatbelt"]
natural_image
Line drawing of a car comfort seat with a red heart symbol on the seat, placed on a horizontal line (no text or symbols on the chair itself)natural_image
Line drawing of a seated person with a red heart-shaped object on the chest, labeled 'fig.2' at bottom (no text or symbols on diagram)flowchart
graph TD
    A["Step 1: Red ribbon on left"] --> B["Step 2: Red ribbon on right"]
    B --> C["Step 3: Red ribbon on right"]
    C --> D["Step 4: Red ribbon on right"]
    D --> E["Figure 4"]
text_image
fig.5 fig.6WARTUNG UND PFLEGE
text_image
Medical illustration showing a procedure for implantation or dissection, with labeled steps and magnified views.Find us on Facebook & Instagram