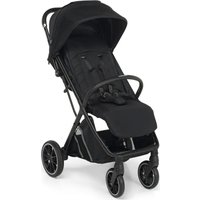
Passenger - Stroller Foppapedretti - Free user manual and instructions
Find the device manual for free Passenger Foppapedretti in PDF.
| Product type | Stroller |
| Brand | Foppapedretti |
| Model | Passenger |
| Category | Standard stroller |
| Recommended age | 6 to 36 months |
| Maximum child weight | 15 kg |
| Safety standard | EN 1888:2012 |
| Number of children | 1 |
| Backrest position | Multiple reclining positions |
| Canopy | Removable and adjustable |
| Safety harness | 5-point, adjustable |
| Parking brake | Red pedal (engage) / gray (disengage) |
| Swivel front wheels | Yes, with lock |
| Basket capacity | 4 kg |
| Rain cover | Included |
| Folding | Compact with locking hook |
| Chassis material | Metal |
| Fabric material | Washable fabric |
| Care | Clean with warm water and mild detergent |
| Warranty | 12 months |
| Manufacturer | Foppa Pedretti S.p.A., Italy |
Frequently Asked Questions - Passenger Foppapedretti
User questions about Passenger Foppapedretti
0 question about this device. Answer the ones you know or ask your own.
Ask a new question about this device
Download the instructions for your Stroller in PDF format for free! Find your manual Passenger - Foppapedretti and take your electronic device back in hand. On this page are published all the documents necessary for the use of your device. Passenger by Foppapedretti.
USER MANUAL Passenger Foppapedretti
natural_image
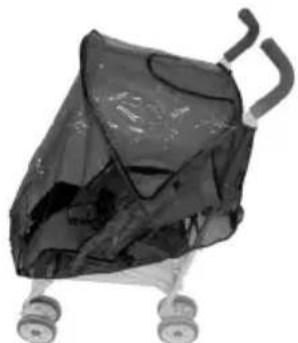
Black and white photo of a baby stroller with open lid and black handle (no text or symbols visible)For children from 6 months and max. weight of 15 kg - Complies with EN 1888:2012
D BUGGY - Montageanweisungen
AND KEEP FOR FUTURE REFERENCE
IMPORTANT!
LIRE ATTENTIVEMENT ET CONSERVER
SOIGNEUSEMENT A PORTEE DE MAIN
natural_image
Person kneeling on a bicycle-like structure with a labeled arrow pointing to the component (no text or symbols present)APERTURA PASSEGGINO
natural_image
Person using a mobility device with a hand operating it, no visible text or symbolsnatural_image
Close-up of a hand using a bicycle pedal mechanism, showing wheel positioning and adjustment (no text or symbols visible)natural_image
Close-up of a hand using a tool to adjust or install a mechanical component, with no visible text or symbols.natural_image
Close-up of a hand adjusting a two-wheeled bicycle tire with labeled parts (1 and 2), no text or symbols present.natural_image
Close-up of hands using a tool to adjust or install a mechanical component (no visible text or symbols)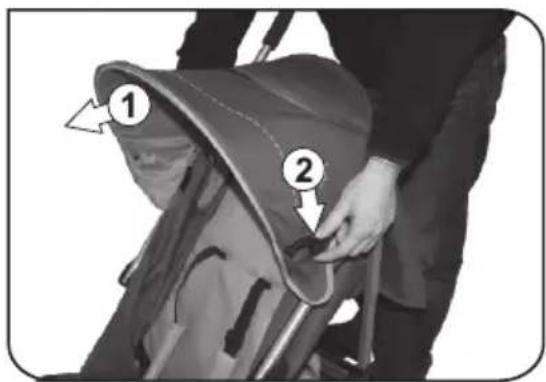
text_image
Instructional diagram showing two steps of a person using a backpack to adjust or install a seatbelt, with arrows indicating the process.MONTARE LA CAPOTTINA
text_image
Instructional diagram showing hand positioning of a wheelchair seat with numbered labels (1, 2, 3) indicating different positions or states.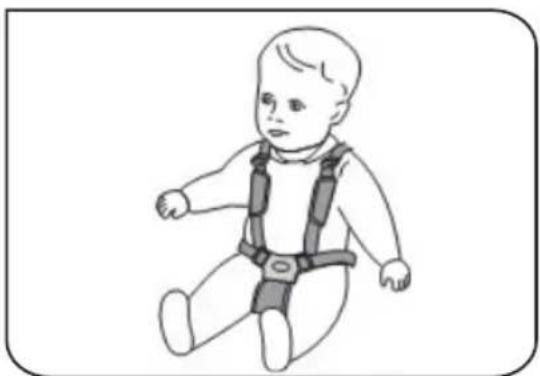
natural_image
Line drawing of a baby wearing a full-body safety harness (no text or symbols)natural_image
Close-up of a hand adjusting a stroller with arrows indicating motion (no text or symbols visible)
text_image
Diagram showing two steps of a seatbelting operation with numbered annotations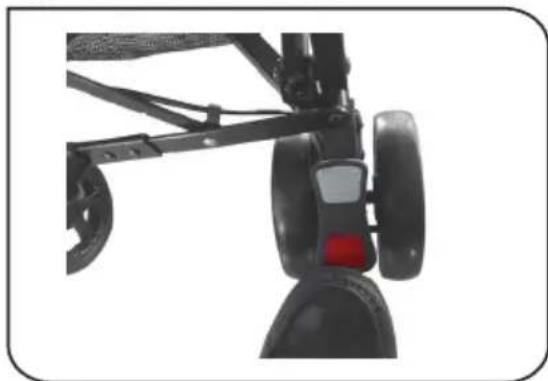
natural_image
Close-up of a black bicycle shuttle with wheels and a red head indicator (no text or symbols visible)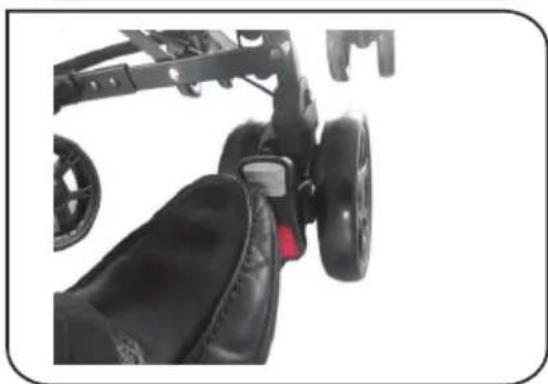
natural_image
Close-up of a black stroller with wheels and leather strap, no visible text or symbols
text_image
Instructional diagram showing two steps of a stroller with numbered labels indicating mechanical or safety instructions.ATTIVARE/BLOCCARE IL MOVIMENTO PIROETTANTE DELLE RUOTE ANTERIORI
natural_image
Close-up of a stroller with wheels and a foot, showing a pointing arrow (no text or symbols)CHIUSURA PASSEGGINO
natural_image
Close-up of a child's hand wearing a stroller with wheels and a circular logo labeled 'B' (no text or symbols on the device itself)natural_image
Person using a mobile cart with a hand operating it, no visible text or symbolstext_image
Diagram of a toy car with labeled parts and an inset showing a tool or bracket with X and V symbols.natural_image
Close-up of hands using a tool to adjust or install components (no visible text or symbols)natural_image
Close-up of hands using a tool to adjust or install a mechanical component, with an arrow and letter 'A' indicating a specific section (no text or symbols on the main subject)natural_image
Black and white photo of a baby stroller with wheels and handle (no text or symbols visible)ACCESSORI
PARAPIOGGIA
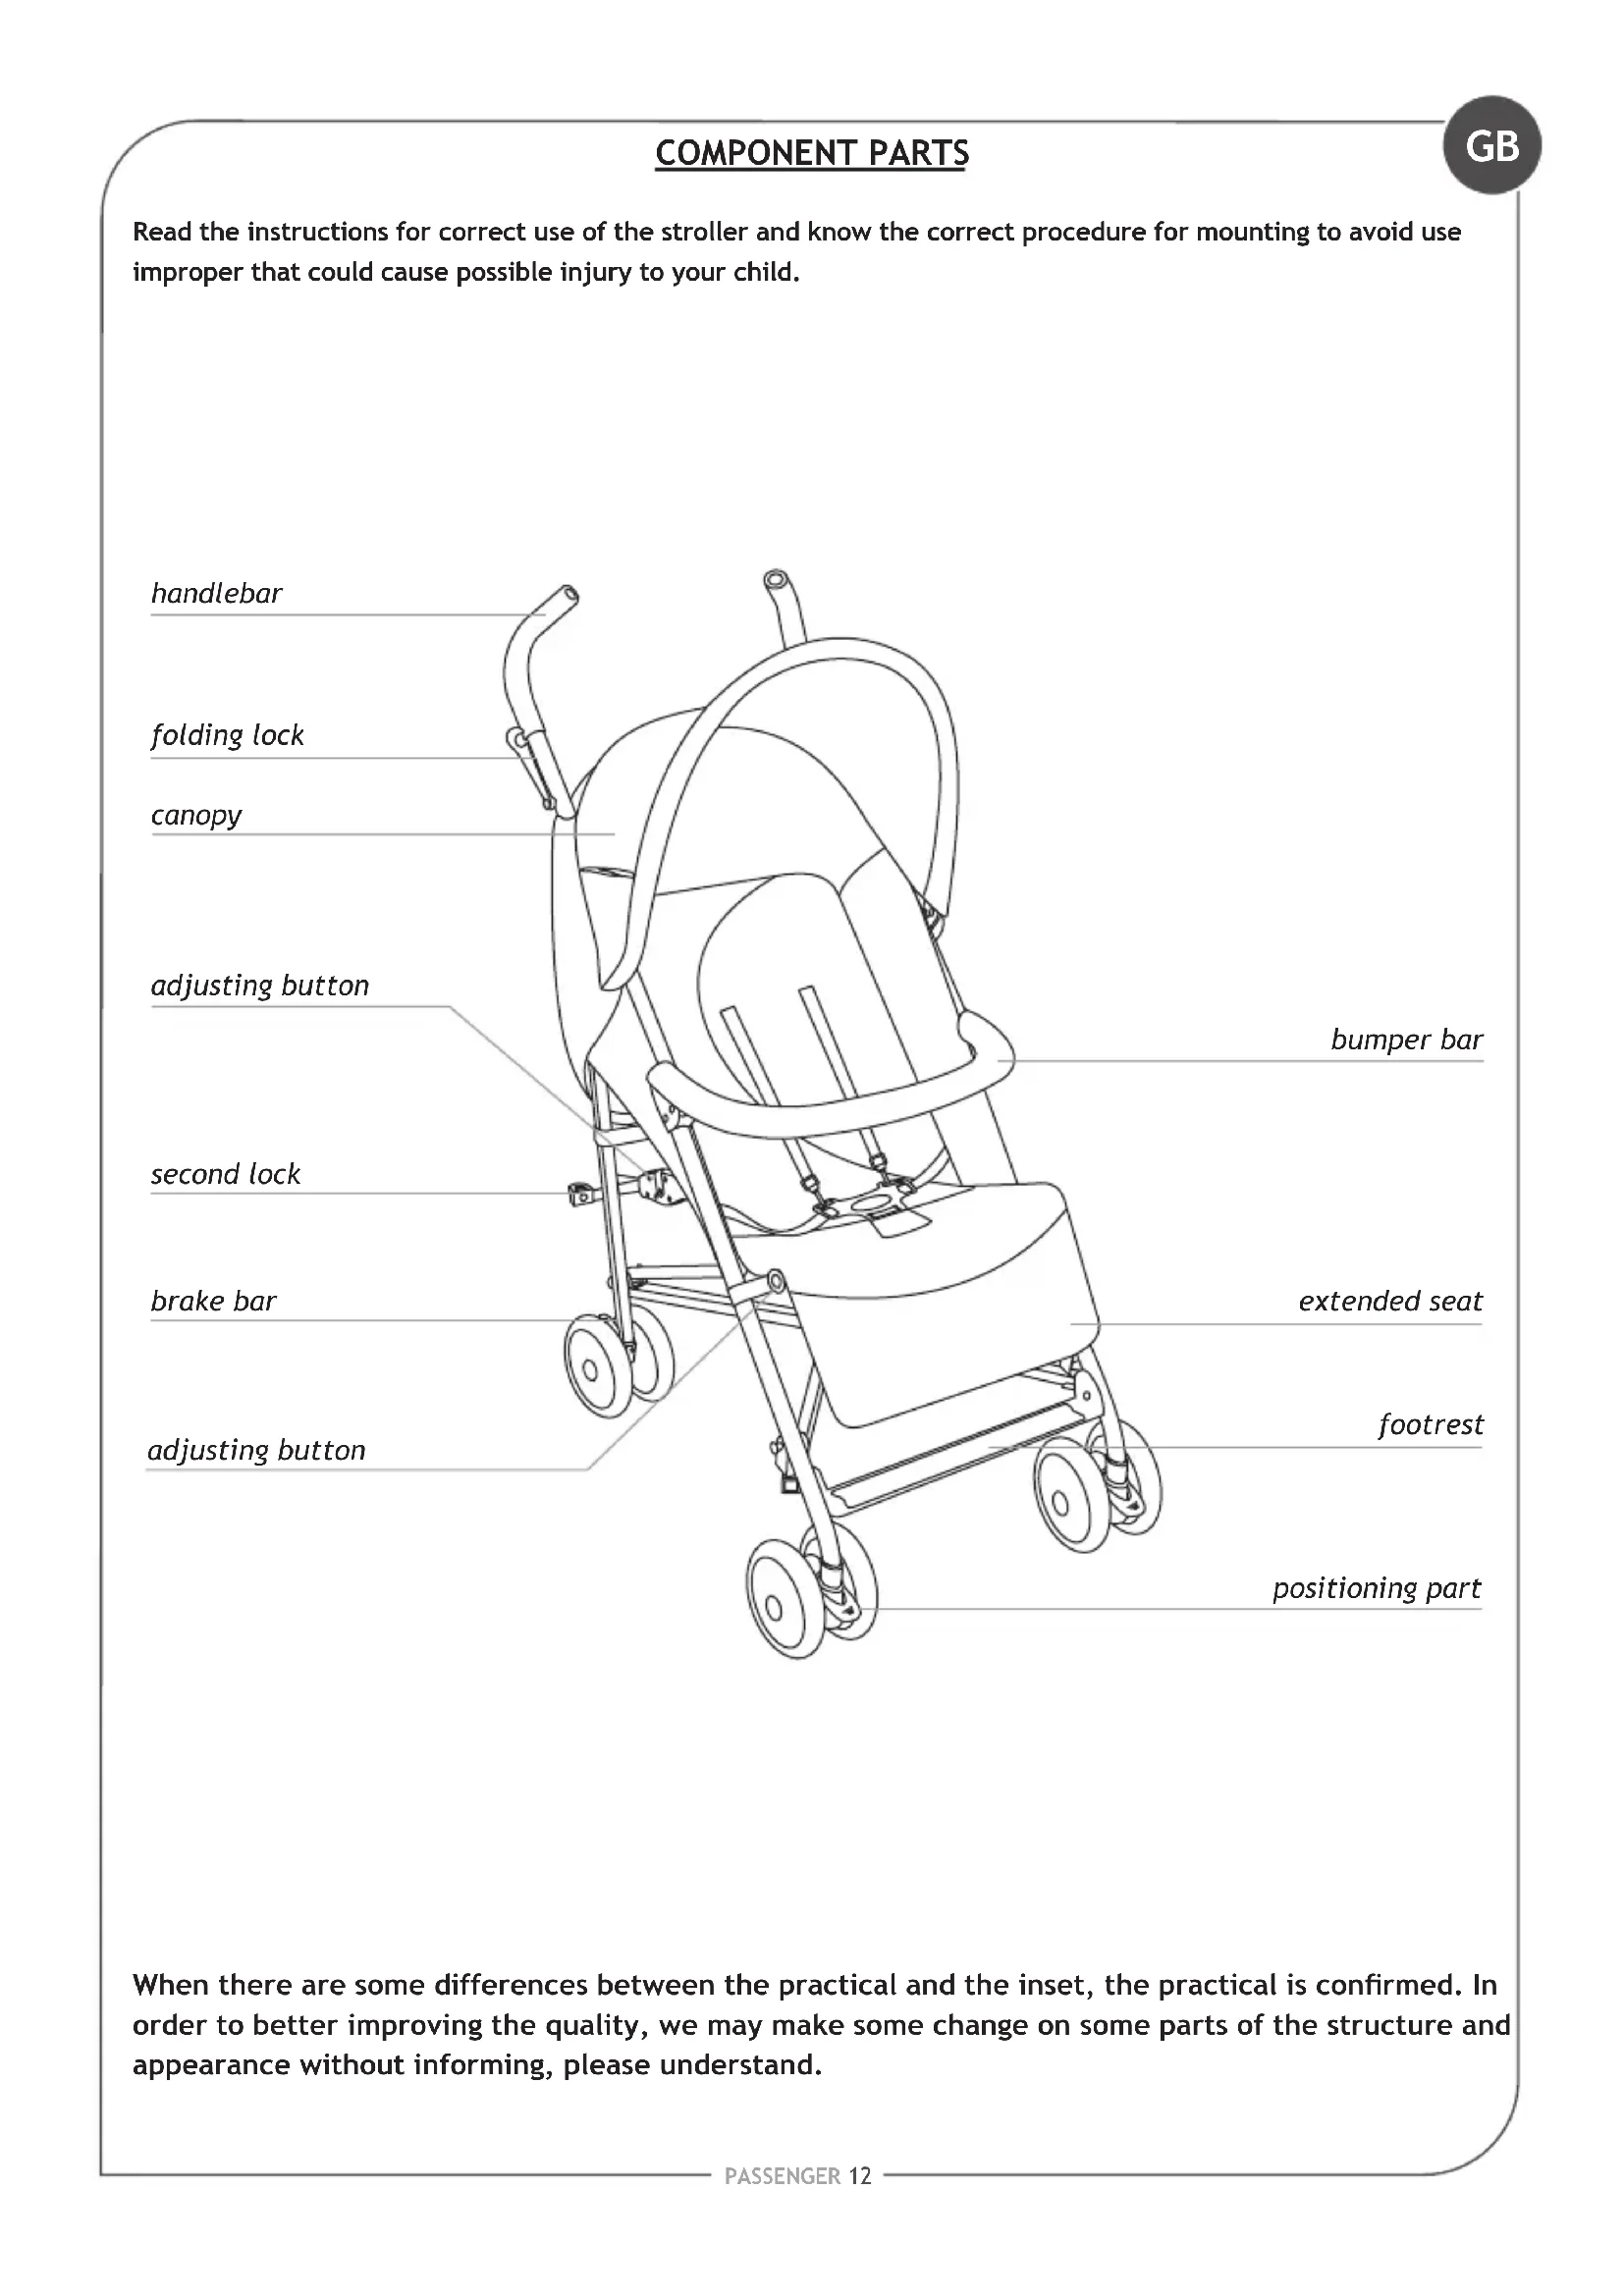
Read the instructions for correct use of the stroller and know the correct procedure for mounting to avoid use improper that could cause possible injury to your child.
text_image
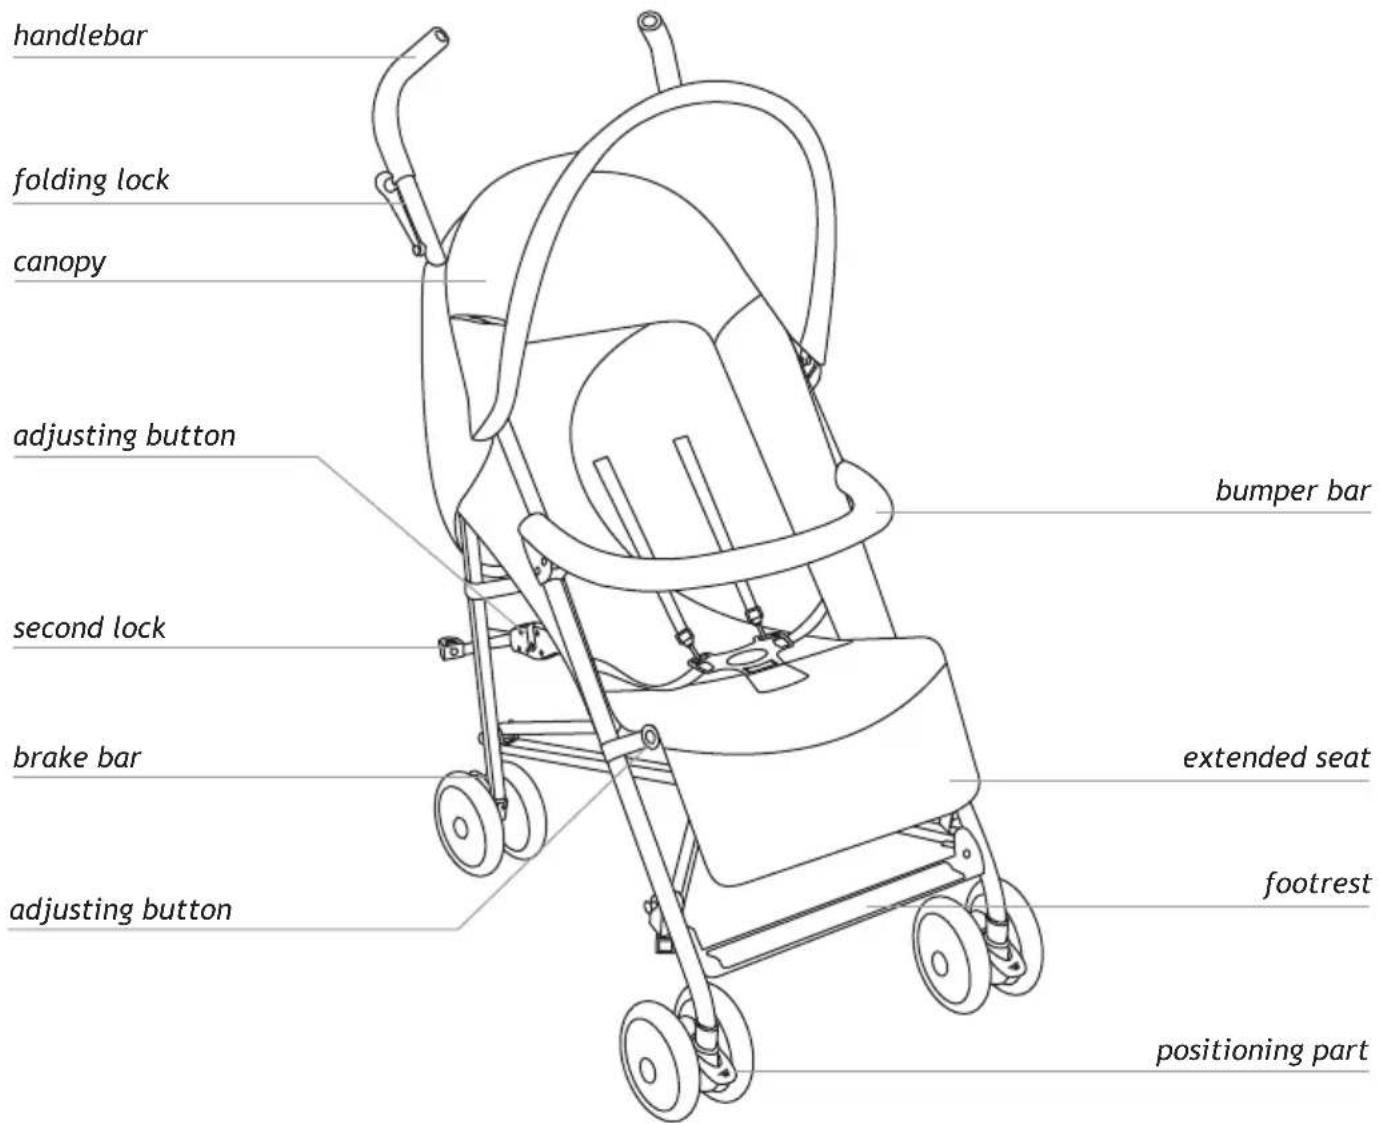
handlebar folding lock canopy adjusting button second lock brake bar adjusting button bumper bar extended seat footrest positioning partWhen there are some differences between the practical and the inset, the practical is confirmed. In order to better improving the quality, we may make some change on some parts of the structure and appearance without informing, please understand.
natural_image
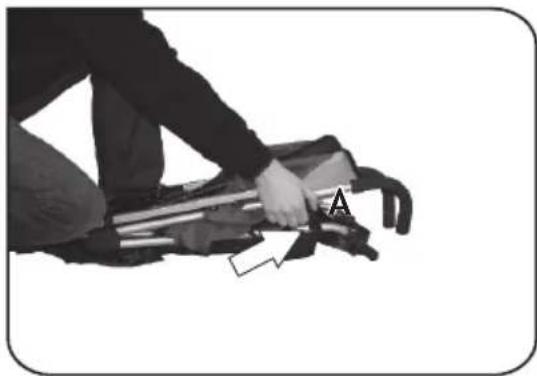
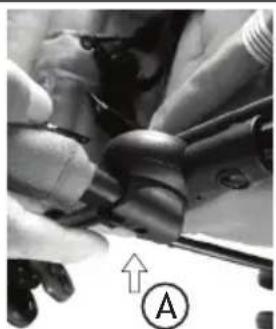
Person kneeling on a bicycle-like structure, holding a tool (no visible text or symbols)TO UNFOLD
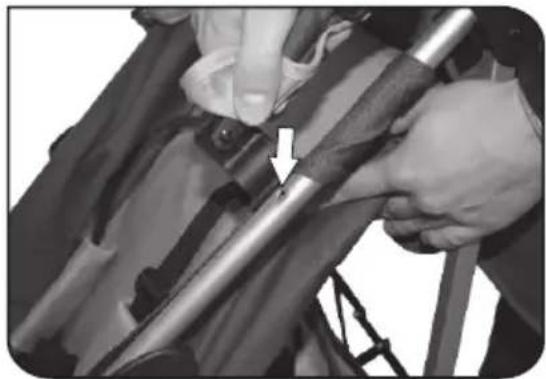
Open the fold pot hook A.
natural_image
Person using a mobility device with a hand operating it, no visible text or symbolsUnfold the stroller by pulling the handles.

text_image
A APress down the lock lever A until hear a CLICK. Ensure that the stroller is correctly opened and blocked. The metal bars is supposed to be completely open in horizontal position.
natural_image
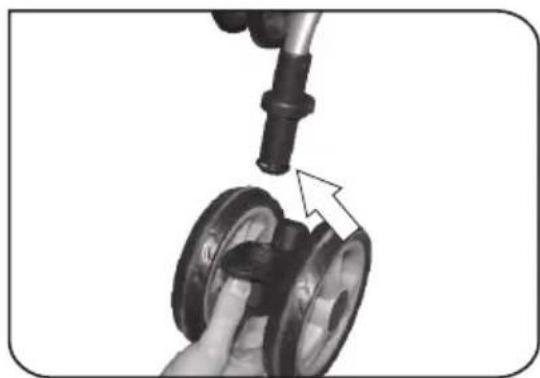
Close-up of a hand adjusting a mechanical component with a tool, showing a curved arrow indicating motion (no text or symbols present)To install the front wheel: press down the reed, and insert the front wheel parts into the axle sheath of the front wheel. A CLICK will indicate the correct assembly. It should not unhook pulling the wheel.
natural_image
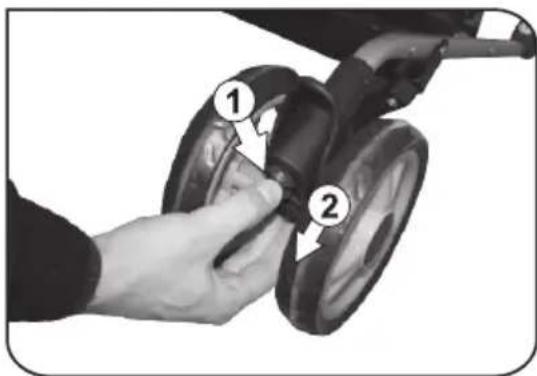
Close-up of a hand adjusting a car tire with two numbered components (1 and 2), no visible text or symbols.To detach the front wheels: press the docking device sticking out at the bottom of the wheel set and pull the wheel set until it slides off of the tube.
natural_image
Close-up of hands using a tool to adjust or install a mechanical component (no visible text or symbols)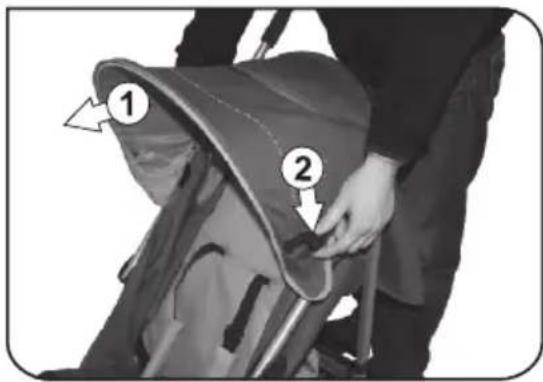
text_image
Instructional diagram showing two steps of installing a mountain backpack cover, labeled with arrows and numbered annotations.TO INSTALL THE CANOPY
To install the canopy: Hook the canopy onto to the frame and centre the pivot in the hole on the seat frame. Repeat on the other side.
TO USE
Open the canopy: pull the canopy forward (1) and use the canopy stretcher to stretch it (2).
Close the canopy: undo the canopy stretcher (2) and pucker it.
Important: Never close the canopy without first undo the stretchers. The canopy could be damaged.
TO USE

text_image
Black-and-white photo showing a person adjusting a seatbelt device with numbered labels (1, 2, 3) pointing to different positions.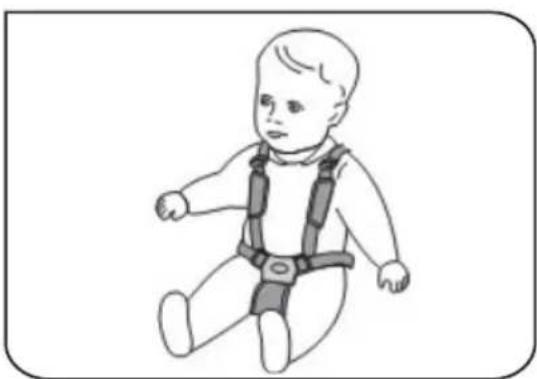
natural_image
Line drawing of a baby wearing a full-body safety harness (no text or symbols)TO OPEN AND FASTEN THE SAFETY BELT
Fasten: as showing, press inside together until you hear a CLICK. Adjust the strap length with the adjustment slides (2)
Open: press down the button and draw it out.
Important:
The safety belt has to be used always and only correctly fasten, including all components, as shown in figure.
Apply the brake before placing your baby in the pushchair.
natural_image
Close-up of a hand adjusting a stroller with arrows indicating motion (no text or symbols visible)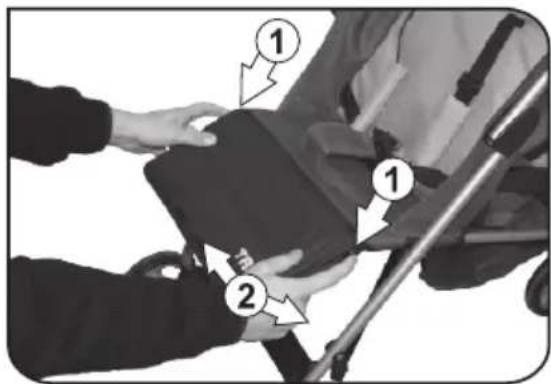
text_image
Diagram showing two labeled parts (1 and 2) interacting with a device, likely illustrating a mechanical or safety procedure.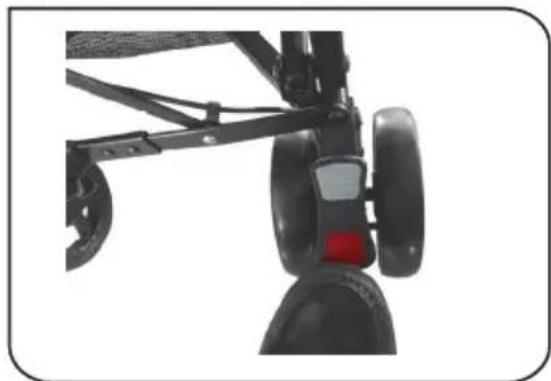
natural_image
Close-up of a black bicycle suspension frame with visible wheels and a red sensor on the wheel (no text or symbols)
natural_image
Close-up of a black stroller with wheels and a red accent, no visible text or symbols
text_image
Diagram showing a person assembling a stroller with numbered parts labeled 1 and 2TO DIRECT THE FRONT WHEEL
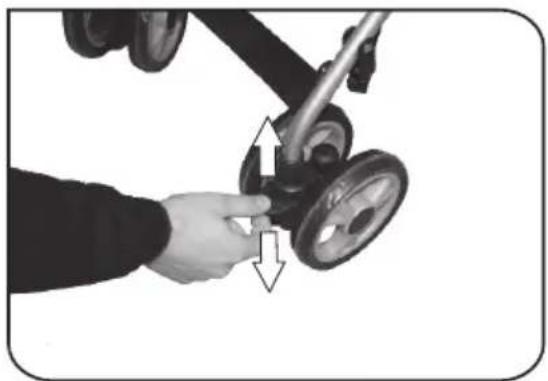
Press down the locking arm to block the swivel wheels. Lift the locking arm to release the swivel wheels lock.
TO ADJUST THE FOOTREST
To change the footrest position, press the buttons(1) on both sides of the footrest and adjust it to the required position(2).
Press down the red pedal to lock the brake wheels.
Gently push the stroller forward to ensure the brake is correctly engaged
Press down the grey pedal to unlock the brake wheels
TO ADJUST THE BACKREST
To lower the backrest press the backrest mechanism locks on both sides(1) and adjust the backrest to the required position (2). To raise the backrest simply pull it upwards.
TO USE
GB

natural_image
Close-up of a stroller with wheels and a hand pointing to the seat (no text or symbols visible)Lower the stroller backrest to the horizontal position.
Lift the lock lever A.
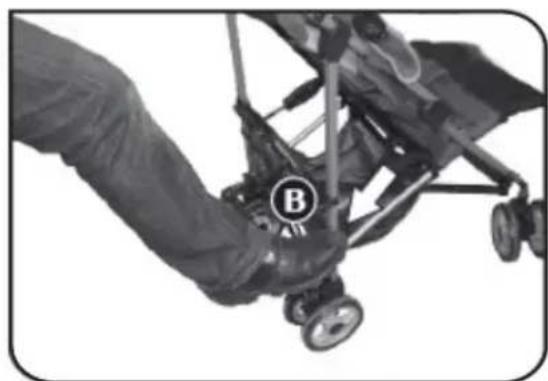
natural_image
Close-up of a hand operating a small wheeled toy car with wheels and a circular label marked 'B' (no visible text or symbols on the car itself)Press down the unlocked B.
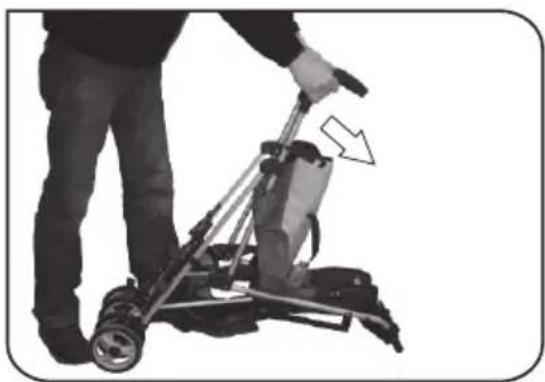
natural_image
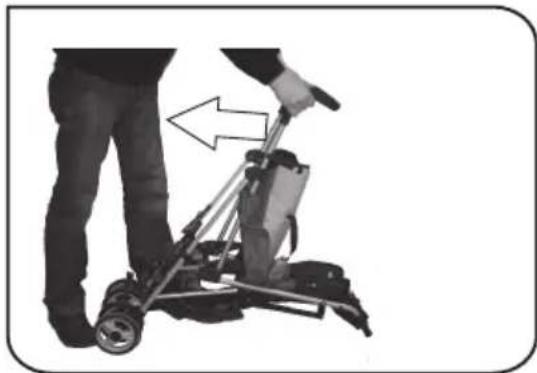
Person using a mobile lawn mower on a wheeled cart, with an arrow indicating motion direction (no text or symbols visible)Push the stroller forwards to fold it.
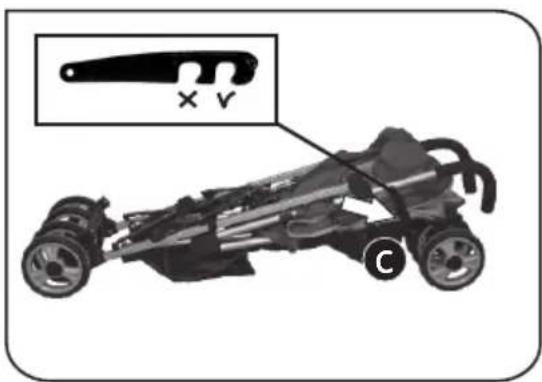
natural_image
Illustration of a toy car with a close-up inset showing a tool labeled 'X' and 'V', no text or symbols present.Secure the stroller with the transport safeguard C.
natural_image
Close-up of hands using a tool to adjust or install components (no visible text or symbols)Fitting the bumper bar : line the bumper bar up with the slots and press on both sides. A click indicates that it has been fastened correctly.
natural_image
Close-up of hands using a tool to adjust or install a mechanical component, with an arrow and circle labeled 'A' (no readable text or symbols beyond basic diagram)Removing the bumper bar : press button A on both sides of the bumper bar and at the same time pull to remove it. Opening the bumper bar on just one side: press button A on one side of the bumper bar and pull to open it like a gate.
natural_image
Black and white photo of a baby stroller with wheels and handle (no text or symbols visible)ACCESSORIES
RAIN COVER
Place the rain cover as the image shows. Fix the rain cover to the frame, using the straps of Velcro.
For the safety of your child, please read the following and keep for future reference. The safety of your child can be at risk if not following the instructions with attention.
WARNING: A CHILDS SAFETY IS YOUR RESPONSIBILITY.
- WARNING: Never leave child unattended. Always keep child in view when in stroller.
- WARNING: This stroller is suitable for 6-36 months, maximum weight 15kg . For new born baby, do not recline seat back to sitting position (should be in full reclining position) as the baby doesn't have ability to control its head.
- WARNING: Use seat belt, avoid serious injury from falling or sliding out Always.
- WARNING: Ensure your child wears a correctly fitted and adjusted harness at all times.
- D-rings are provided on the existing harness for the attachment of a separate safety harness approved to BS 6684 or BS En 13210 should this be required.
- Verify regularly that the safety belts are correctly fastened, not damaged or frayed.
- WARNING: Ensure that all the locking devices are engaged before use.
- WARNING: Only one child for one stroller.
- WARNING: This product is not suitable for running or skating.
- WARNING: Check that the seat unit attachment devices are correctly engaged before use.
- WARNING: Do not add a mattress thicker than 25 mm.
- WARNING: When folding, unfolding or adjusting before using stroller, keep child away from moving parts.
- WARNING: Do not place or hang parcels, bags or accessories on any part of the stroller including the handle. Failure to comply with this warning may cause, hazardous, unstable conditions to exist.
- WARNING: Always use the brakes when stroller is stopped.
- WARNING: Never fold the stroller, not even partly, when your child is in it.
- A basket is provided for the carriage of 4kg of goods, evenly distributed.
- The product must be assembled by an adult.
- Only the minder can operate the recline adjuster.
- Never use the stroller if any part of it is damaged or any component is missing.
- Do not allow children to play with or hang onto the stroller.
- This vehicle requires regular maintenance by the user.
- Do not use replacement parts or accessories other than those approved by the supplier as they may render the pushchair unsafe.
• Overloading, incorrect folding, and the use of non-approved accessories or spare parts may damage or break this pushchair and could render the product unsafe. Read the instructions.
- Do not overload this pushchair with additional children, goods or accessories. Bags and other items must not be hung from the handle.
- Never leave rain covers on indoors, in a hot atmosphere or near a heat source as the baby could overheat.
- Ensure all users are familiar with the products operation. It should always open and fold easy. If it does not, do not force the mechanism - stop and read the instructions.
- Do not use your pushchair in a manner for which it is not designed.
- Do not allow your child to climb unassisted into, play with or hang onto your pushchair.
- Hold on to your pushchair when close to moving road vehicles or trains. Even with the brake on the draught from the vehicle may move the pushchair.
• Exercise caution when mounting or dismounting a kerb.
- Remove your children and fold the pushchair when ascending or descending stairs or escalators.
- Ensure the folded pushchair is stored away from children so that it does not fall and cause injury.
- Do not use replacement parts or accessories, e.g. child seats, bags, hooks, trays, rain covers etc. other than those approved by the supplier, they may render the pushchair unsafe.
- Never carry a third child on your pushchair.
WARNING
GB
- Do not use any platforms or attachments that allow transportation of third child.
- CARE: Your pushchair has been designed to meet safety standards and with correct use and maintenance will give many years of trouble free performance.
- The chassis is strong but will weaken should the back wheels be bumped down stairs or kerbs. continual impact will cause damage.
- If your child wears hard shoes these might damage the soft fabric.
- Storing a damp pushchair will encourage mildew to form.
• After exposure to damp conditions, dry off with a soft cloth, open fully and allow to dry thoroughly before storing. - Store your pushchair in a dry, safe place.
- Do not leave the pushchair in sunlight for prolonged periods - some fabrics may fade.
MAINTENANCE
This pushchair requires regular maintenance by the user.
This product is designed to operate with minimum maintenance, however regular lubrication of moving parts will extend the life of your pushchair and make opening and folding easier.
Should parts of your pushchair become stiff or difficult to operate, apply a light application of a spray lubricant e.g. WD 40. Do not use oil or grease. WD 40 should not be used to lubricate the running of removable wheels.
If necessary, these should be removed and cleaned with a soft dry cloth.
Regularly inspect the locking devices, brakes, wheels, harness assembly, catches, seat adjusters, joints and fixings to ensure they are secure and in full working order.
Brakes, wheels and tyres are subject to wear and should be replaced if necessary.
Your pushchair should be serviced and reconditioned before using it for a second baby, or within 18 months, whichever is the sooner.
CLEANING
The fabric may be cleaned by sponging lightly using warm water and a mild detergent.
Plastic and metal parts may be sponged clean with warm water and a mild detergent.
Never clean with abrasive, ammonia based, bleach based or spirit type cleaners.
The contents of this document as stated below will come into effect as from 01.01.2005 and replace, on every account and in full, any previous message referring to the guarantee provided by Foppa Pedretti S.p.A.
FORMAL GUARANTEE
Foppa Pedretti S.p.A. the head office of which is located at n. 11 Via Volta, Grumello del Monte (Italy), guarantees directly to the Consumer that this brand new product is free of faults with regard to the materials, design and manufacture and that it complies with the characteristics as declared by the manufacturer.
This formal guarantee is valid in all Member Countries of the European Union and it neither excludes nor limits the Consumer's rights in accordance with mandatory measures provided for by the law with regard to the Retailer of the Product.
To take advantage of this formal guarantee, the Consumer must return the faulty product to the Retailer, presenting to the same the proof of purchase of the Product which must clearly show the Retailer's address, the date of purchase of the Product with the Retailer's stamp and signature and an indication of the Product itself or, alternatively, the receipt which must not have been altered and which must clearly show the same information as that referred to above.
The formal guarantee is valid for twelve (12) months from the date of purchase of the Product. During this period, Foppa Pedretti S.p.A. will repair or replace the faulty product, at its own discretion.
The formal guarantee is granted to the end buyer of the Product (Consumer) and it neither excludes nor limits the mandatory rights of the Consumer as provided for by the law and/or the rights that the Consumer may have with regard to the Dealer/Retailer of the Product.
EXCLUSIONS TO THE FORMAL GUARANTEE.
The formal guarantee is excluded in the case of damage caused to the Product for the following reasons: if the product is used in a way that does not comply with the information contained in the use and assembly instruction sheet, if the product is knocked or dropped, if the Product is exposed to humidity or extreme heat or environmental conditions, or to sudden changes in the same, corrosion, oxidization, unauthorized alterations or repairs to the Product, repairs using unauthorised spare parts, improper use, improper maintenance or failure to carry out the same, improper maintenance compared to the information given on the use and assembly instruction sheet, incorrect assembly, accidents, damage caused by food or drink, damage caused by chemical products, cases of force majeure.
In any case, Foppa Pedretti S.p.A. declines all responsibility for damage caused to persons or to property, other than the Product, when such damage is caused by a failure to comply with the instructions/advice/warnings contained in the manual or, alternatively, in the use and assembly instruction sheet provided with each Product for the owner/user. (Purely as an example, in the case of a cot : "Check your baby constantly. Make sure that the sheets and blankets do not cover the baby's head...").
Furthermore, Foppa Pedretti S.p.A. declines all responsibility for damage to persons and to property when the breakage of its products is due to a deterioration in the components of the Product that are subject to wear. All the components of the Product made of plastic are considered to be components subject to wear.
COMPOSANTS
F
natural_image
Person kneeling on a bicycle-like structure with a labeled arrow pointing to the handle (no text or symbols present)OUVERTURE DE LA POUSSETTE
natural_image
Person using a mobility scooter with a hand operating it, no visible text or symbolsnatural_image
Close-up of a person using a bicycle-mounted device with labeled parts (A), no visible text or symbols beyond labelsnatural_image
Close-up of a hand adjusting a mechanical component with a white arrow indicating motion (no text or symbols visible)natural_image
Close-up of a hand adjusting a stroller with two numbered parts (1 and 2), no visible text or symbols.natural_image
Close-up of hands using a tool to adjust or install a mechanical component (no visible text or symbols)INSTALLER LA CAPOTE
text_image
Instructional diagram showing a person using a backpack to adjust the seat, with numbered arrows indicating steps 1 and 2.UTILISATION DE LA CAPOTE
text_image
Instructional diagram showing hands installing or adjusting a component in a wheelchair, labeled with numbers 1 and 2.EMPLOI DE LA CEINTURE DE SECURITE, HARNAIS
natural_image
Line drawing of a baby wearing a full-body safety harness (no text or symbols)natural_image
Close-up of a hand adjusting a stroller with arrows indicating motion (no text or symbols visible)
text_image
Instructional diagram showing two steps of installing a device component, labeled with arrows and numbered annotations.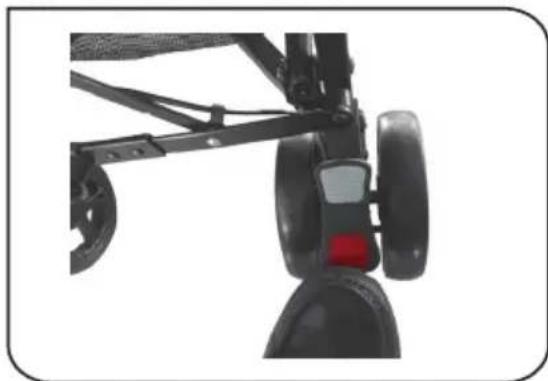
natural_image
Close-up of a black bicycle suspension frame with visible wheels and a red sensor on the wheel (no text or symbols)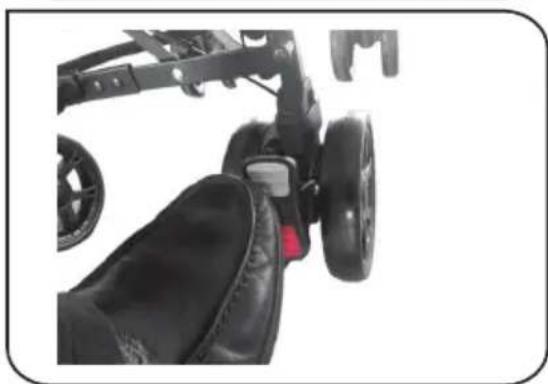
natural_image
Close-up of a stroller with black wheels and a red button, no visible text or symbols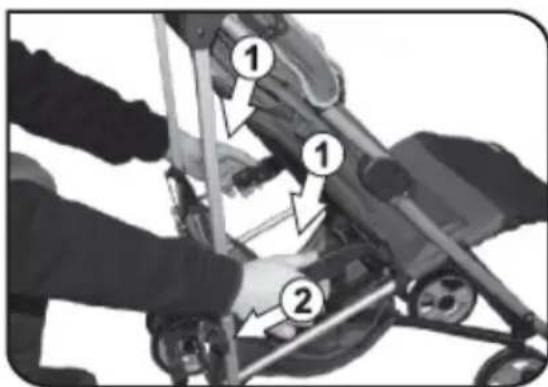
text_image
Diagram showing a person assembling a stroller with numbered parts labeled 1 and 2ACTIVER/BLOQUER LE MOUVEMENT PIVOTANT DES ROUES ANTERIEURES.
natural_image
Close-up of a stroller with wheels and a hand pointing to the seat (no text or symbols visible)FERMETURE DE LA POUSSETTE
Refermer la capote.
natural_image
Close-up of a person's hand using a stroller with a circular logo labeled 'B' (no text or symbols on the device itself)natural_image
Person using a small cart with a hand operating it, showing motion direction (no text or symbols visible)natural_image
Illustration of a stroller with a close-up inset showing a tool handle and cross symbol (no text or labels)natural_image
Close-up of hands using a tool to adjust or install components (no visible text or symbols)MONTAGE APPUI-BRAS DE PROTECTION
natural_image
Close-up of hands using a tool to adjust or install a mechanical component, with an arrow and letter 'A' indicating a specific section (no text or symbols on the main subject)natural_image
Black and white photo of a stroller with wheels and handle (no text or symbols visible)ACCESSOIRES
PROTECTION PLUIE
EXCLUSIONS DE LA GARANTIE CONVENTIONNELLE.
natural_image
Person kneeling on a bicycle-like structure, holding a tool (no visible text or symbols)ÖFFNEN DES BUGGY
natural_image
Person using a mobility device with a hand operating it, no visible text or symbolsnatural_image
Close-up of a person using a bicycle pedal mechanism, showing wheel positioning and a close-up of the lever (no text or symbols visible)natural_image
Close-up of a hand using a tool to adjust or install a mechanical component, with no visible text or symbols.natural_image
Close-up of a hand adjusting a stroller with two numbered components (1 and 2), no visible text or symbols.natural_image
Close-up of hands holding a metal rod, no visible text or symbolsMONTAGE DER HAUBE
text_image
Instructional diagram showing two steps of a person using a backpack to adjust or install a seatbelt, with arrows indicating the process.text_image
Black-and-white photo showing a person adjusting a seatbelt with numbered labels (1, 2, 2) pointing to different positions.natural_image
Line drawing of a baby wearing a full-body safety harness (no text or symbols)natural_image
Close-up of a hand adjusting a children's stroller wheel (no text or symbols visible)
text_image
Instructional diagram showing two steps of installing a seatbelt on a vehicle, labeled with arrows and numbered annotations.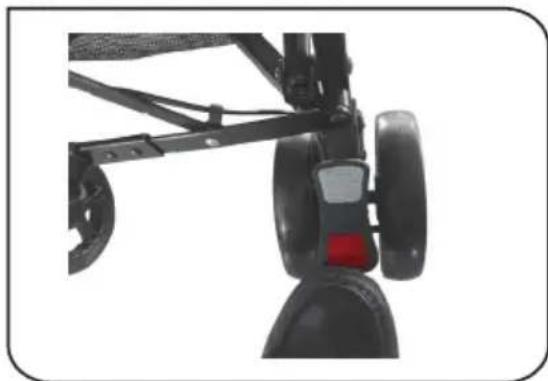
natural_image
Close-up of a black bicycle suspension frame with wheels and a red sensor on the wheel (no text or symbols visible)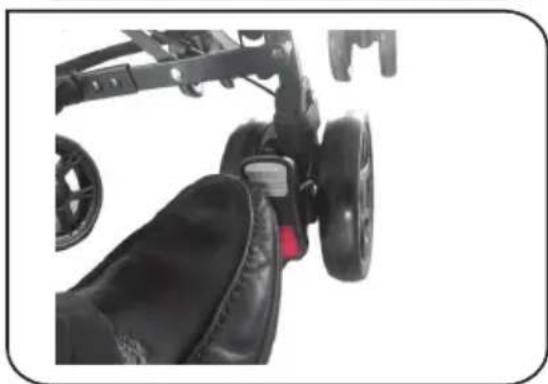
natural_image
Close-up of a black stroller with wheels and a red accent, no visible text or symbols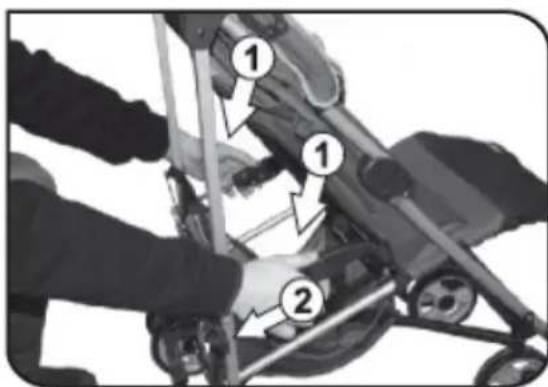
text_image
Diagram of a stroller with numbered parts indicating mechanical or electrical componentsnatural_image
Close-up of a stroller with wheels and a foot, showing a pointing arrow (no text or symbols)SCHLIESSEN DES BUGGY
natural_image
Close-up of a person's hand using a stroller with wheels and a circular logo labeled 'B' (no text or symbols on the device itself)natural_image
Person using a small wheeled cart with a hand operating it, no visible text or symbolsnatural_image
Diagram of a toy car with a close-up inset showing a tool and cross symbol (no text or labels)natural_image
Close-up of hands using a tool to adjust or install a component, no visible text or symbolsMONTAGE DER SCHUTZARMLEHNE
natural_image
Close-up of hands using a tool to adjust or install a mechanical component, with an arrow and circled symbol (no readable text or symbols)natural_image
Black and white photo of a baby stroller with wheels and handle (no text or symbols visible)ZUBEHÖRTEILE
REGENHAUBE
natural_image
Person kneeling on a bicycle-like structure with a curved handle, no visible text or symbolsnatural_image
Person using a mobility device with a hand operating it, no visible text or symbolsnatural_image
Mechanical assembly diagram showing a hand operating a stroller with labeled parts (A), no readable text or symbols present.natural_image
Close-up of a hand using a tool to adjust or install a mechanical component, with no visible text or symbols.natural_image
Close-up of a hand adjusting a stroller with two numbered parts (1 and 2), no visible text or symbols.natural_image
Close-up of hands using a tool to adjust or install a mechanical component (no visible text or symbols)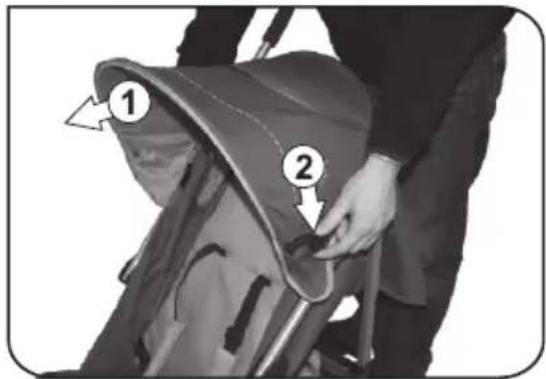
text_image
Instructional diagram showing two steps of installing a canopy cover, labeled with arrows and numbered positions.MONTARE LA CAPOTA
text_image
Diagram showing hands operating a wheelchair seat with numbered labels (1, 2, 2) indicating specific positions or components.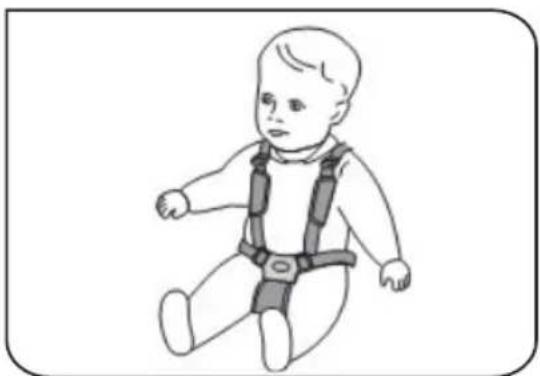
natural_image
Line drawing of a baby wearing a full-body safety harness (no text or symbols)natural_image
Close-up of a hand adjusting a stroller wheel with directional arrows indicating motion (no text or symbols)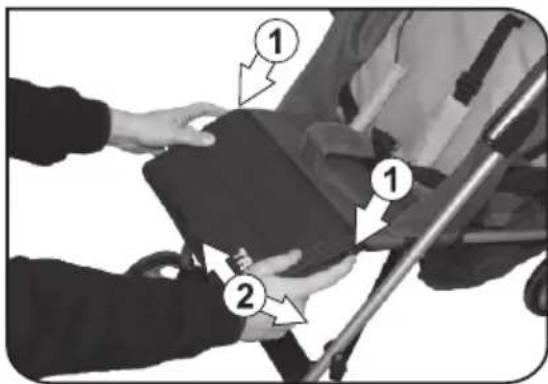
text_image
Instructional diagram showing two steps of installing a device component, labeled with arrows and numbered annotations.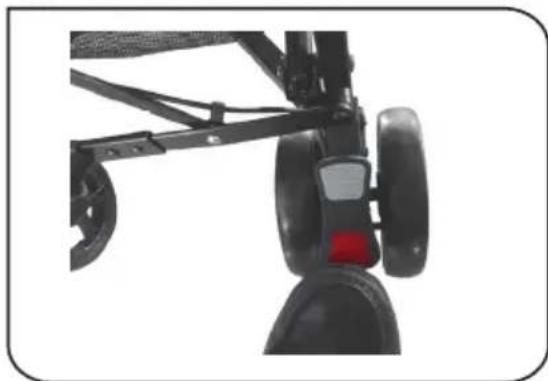
natural_image
Close-up of a black bicycle suspension frame with visible wheels and a red accent (no text or symbols)
natural_image
Close-up of a black stroller with wheels and a red button, no visible text or symbols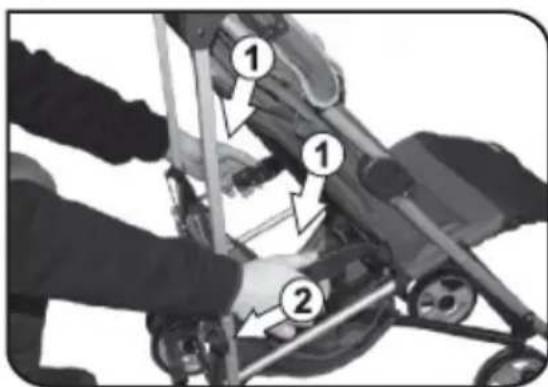
text_image
Instructional diagram showing two steps of a stroller with numbered labels indicating mechanical or electrical components.natural_image
Close-up of a stroller with wheels and a foot, showing a pointing arrow (no text or symbols)CIERRE DEL COCHECITO
Cerrar la capota.