
Vitalini - Saucepan BEEM - Free user manual and instructions
Find the device manual for free Vitalini BEEM in PDF.
| Product type | Pressure cooker |
| Brand | BEEM |
| Model | Vitalini |
| Total capacity | 3 liters |
| Body material | Stainless steel |
| Base type | Encapsulated sandwich (triple layer) |
| Suitable for | All hob types (electric, gas, induction) |
| Operating pressure | 80 kPa (cooking position) |
| Control valve | 3 positions: cooking, cleaning, quick evaporation |
| Safety valve | Red pressure indicator |
| Sealing ring | Silicone, replaceable |
| Handles | One long, one short, insulating |
| Locking system | Unlocking lever |
| Minimum fill volume | 1/4 of capacity (approx. 0.75 L) |
| Maximum fill volume | 2/3 of capacity (approx. 2 L); 1/2 for foaming foods |
| Cleaning | Hand washing recommended, do not use in dishwasher |
| Maintenance | Clean valves after each use |
| Wear parts | Sealing ring (replace every 1-2 years or 400 uses) |
| Safety | Do not open under pressure, do not fry, do not use without liquid |
| Included accessories | Instruction manual, quick guide |
| Warranty | Extended manufacturer warranty (conditions on packaging) |
Frequently Asked Questions - Vitalini BEEM
User questions about Vitalini BEEM
0 question about this device. Answer the ones you know or ask your own.
Ask a new question about this device
Download the instructions for your Saucepan in PDF format for free! Find your manual Vitalini - BEEM and take your electronic device back in hand. On this page are published all the documents necessary for the use of your device. Vitalini by BEEM.
USER MANUAL Vitalini BEEM
Operating instructions
Mode d'emploi
Spare parts and accessories are available on our homepage or on request from our customer service.
This document is copyrighted. Any duplication or reprinting, in whole or in part, and the reproduction of the illustrations, even in modified form, is only permitted with the written approval of the manufacturer.
FR
Droits d'auteur
Notes on environmental protection

The packaging materials used can be recycled. When no longer required, dis- of the packaging materials according to environmental regulations.
Dispose of the product according to current environmental regulations.
FR
Safety instructions. 9
Product description 12
Before using for the first time. 12
Handling the pressure cooker. 12
Cooking with the pressure cooker... 12
Cleaning and care 14
Storage 15
Notes on cooking times. 15
General notes 16
Dear Customer,
before using the pressure cooker, please read the instructions contained in this user manual on the special properties for safe and intended use as well as cleaning and care.
Open the fold-out page at the beginning and end of the user manual in order to view the illustrations during reading.
Keep this user manual in a safe place and pass it on to any future owners together with the appliance.
Safety instructions
General safety instructions
Read the instructions contained in this user manual completely before you work with the pressure cooker. Improper use can lead to considerable damage.
Do not allow anyone to use the pressure cooker before they have made themselves completely familiar with the user manual.
Only pass on the pressure cooker to a third party together with the user manual.
DANGER
Risk of suffocation from the packing material!
Never play with packaging material.
Risk of suffocation.
Supervision
Do not leave the pressure cooker unattended during use.
Do not use the pressure cooker in the vicinity of children.
This pressure cooker is not intended for use by persons (including children) with restricted physical, sensory or mental capabilities or with insufficient experience and/or knowledge unless they are supervised by a person responsibly for their safety or have received instructions on the use of the appliance from such a person.
Safe use
WARNING
Observe the following notes to avoid injury:
The pressure cooker cooks under pressure. Before heating, check that the lid is properly in place as described in the section Putting on the lid and closing the pot (p. 12). Never use the pressure cooker with a loosely fitting lid.
- Check the cleanliness and functioning of the safety valve, regulating valve and seal ring before every use (see section Check safety valve p. 12) and check the pressure cooker for externally visible damage before using. Do not use a damaged appliance.

WARNING
Observe the following notes to avoid injury:
Do not use the pressure cooker to deep-fry.
Observe the following instructions to avoid burning/scalding:
Only hold the pressure cooker with the handle and operating elements. If necessary, use gloves or pot holders.
- Move the pressure cooker carefully when it is under pressure.
Hot steam can escape from the safety valve and regulating valve. Keep a safe distance from the appliance.
Do not overfill the pressure cooker. In the case of foodstuffs that froth or expand during cooking such as rice, beans and peas, broth or dried vegetables, do not fill the pressure cooker beyond half of its filling capacity.
Do not prepare apple puree and compotes in the pressure cooker as this can lead to steam bubbles that could cause scalding when the pot is opened.
- When cooking meat with skin, do not prick into the skin of the meat as long as the skin is swollen. Squirting broth could lead to burns.
CAUTION
Observe the following instructions to avoid damage to the pressure cooker or hot plate:
- Never heat the pressure cooker without liquid otherwise the pot can be damaged by overheating. Fill the pressure cooker with at least 1/4 I liquid.
- Never use the product in the oven. Handles, valves, seals and safety equipment will be damaged by high temperatures.
Safe opening of the pressure cooker
WARNING
Observe the following notes to avoid injury:
Never use force to open the pressure cooker. Do not open it before the pressure has been completely released as described in the section Opening the pressure cooker (p. 13).
Shake the pressure cooker thoroughly before opening each time so that steam bubbles cannot squirt and scald you. This is particularly important when releasing pressure quickly.
Always keep hands, head and body away from the danger zone. You could otherwise be injured by escaping steam. Please pay particular attention when releasing pressure quickly with the regulating valve at position
Safety during cleaning
WARNING
Danger of burns!
Always allow the pressure cooker to cool down before cleaning.
CAUTION
Do not use sharp objects or abrasive cleaning agents to clean the pressure cooker.
Safety during repairs and maintenance
WARNING
Observe the following notes to avoid injury:
- Do not modify the pressure cooker. In particular, do not interfere with the safety equipment other than the cleaning measures listed in these operating instructions. Do not oil the valves!
Replace the sealing ring with an original spare part regularly after using approx. 400 times or after 2 years at the latest.
Expendable parts that exhibit visible damage (e.g., cracks, discolouring or deformation) or that are not correctly in place must be replaced immediately. Failure to observe this will impair the function and safety of your pressure cooker.
Repairs to the product must only be carried out by an authorised specialist or by the works customer service. Unqualified repairs can lead to considerable danger for the user. They will also invalidate the warranty/guarantee.
Defective parts may only be replaced with original spare parts. Only original spare parts guarantee that the safety requirements are met.
Intended use
This product is intended for non-commercial preparation of food on electric, gas and induction cookers
Any use other than previously stated is considered as improper use.
WARNING
If not used for its intended purpose and/or used in any other way, the appliance may be or become a source of danger.
Use the appliance only for its intended purpose.
Observe the procedures described in this user manual.
No claims of any kind will be accepted for damage resulting from use of the appliance for other than its intended purpose.
The risk must be borne solely by the user of the appliance.
Symbols used
DANGER
This indicates a possible hazardous situation, which could lead to severe physical injury or death.
Follow these instructions to avoid danger.
WARNING
This is used for a possible hazardous situation that could lead to injury.
Follow these instructions to avoid danger.
CAUTION
This is used for a possible hazardous situation that could lead to damage.
Follow these instructions to avoid danger.
NOTE
A note contains additional information to simplify the use of the appliance.
Product description
The Vitalini pressure cooker is suitable for preparing soups, stews, vegetables and meat. It is suitable for all types of stove.
Product overview/scope of supply
(See illustration on the left fold-out page)
1 Sealing ring
2 Lid
3 Pot handle, short
4 Pot body
5 Sandwiched capsule base
6 Pot handle, long
7 Lid handle
8 Release lever
9 Regulating valve
10 Safety valve
11 User manual (not illustrated)
12 Short manual (not illustrated)
Before using for the first time
Check the delivery contents
- Check for visible signs of damage or missing items.
- Report incomplete or damaged contents to your supplier immediately.
Before using for the first time
- Clean all parts in warm dishwater to remove possible production residues.
- Clean the sealing ring and dry it properly.
- Insert the sealing ring into the lid as described in the section Inserting the sealing ring (p. 12).
Handling the pressure cooker
Take off lid
(See illustration A)
- Hold both handles tightly and push the release lever (8) on the lid handle upwards.
- At the same time, turn the lid counterclockwise.
- Lift the lid upwards.
WARNING
Wait until the pressure has been fully released before opening the lid.
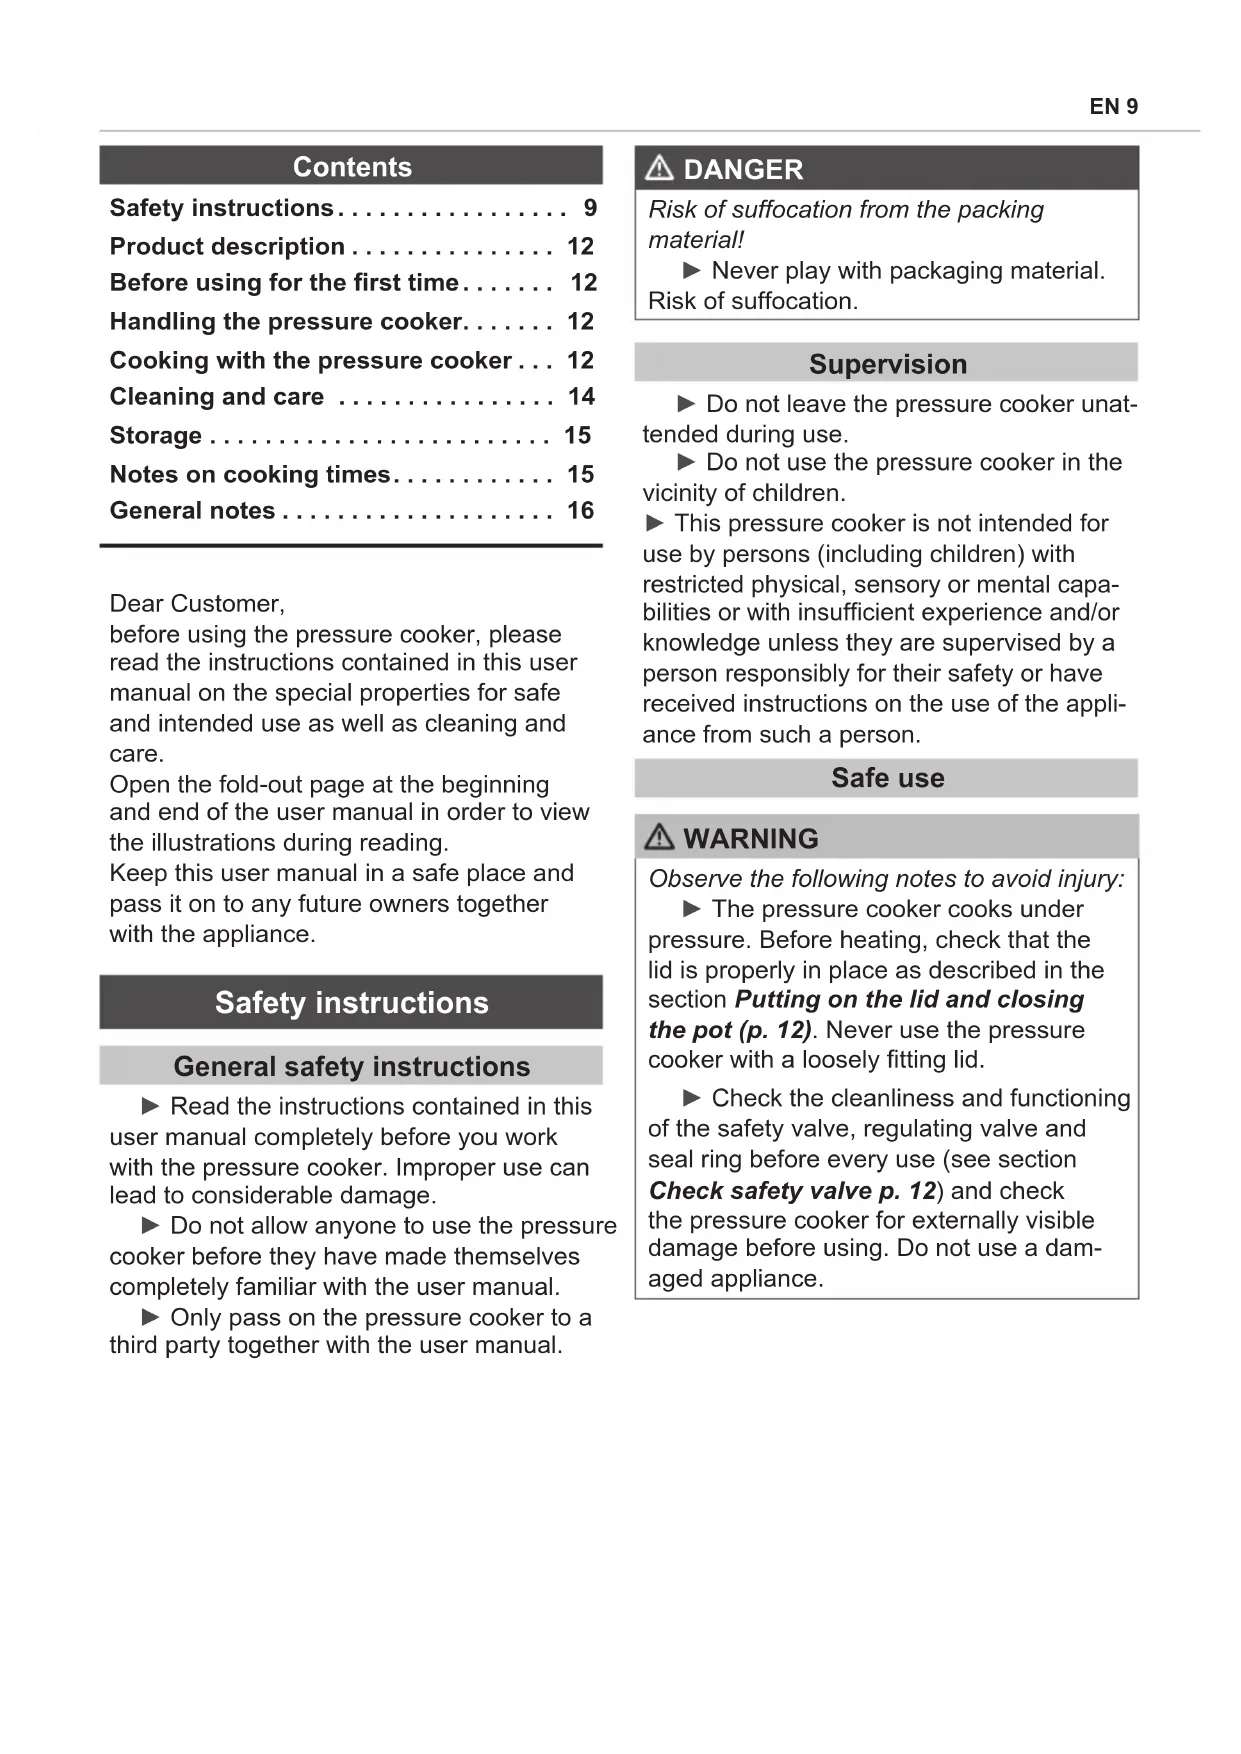
Putting on lid and closing pot (See illustration B)
- Put the lid with the inserted sealing ring onto the pot so that the circle on the lid is in line with the circle on the pot handle.
- Hold the lid tight and turn it clockwise until the lid handle snaps into place over the pot handle with an audible "click" and cannot be moved any further. Your pressure cooker is now ready for use.
Inserting sealing ring
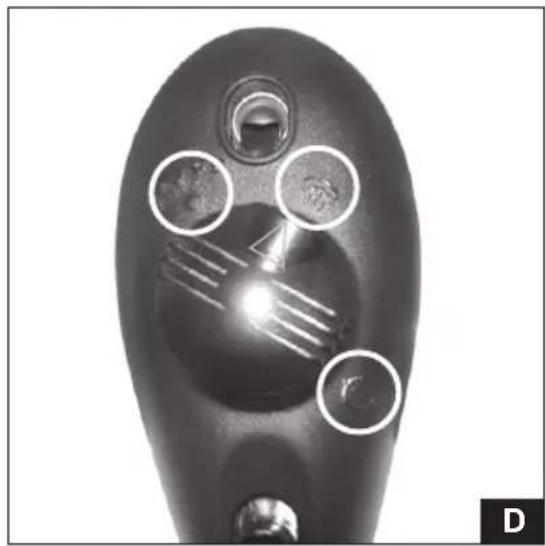
- Insert the sealing ring into the lid without twisting it and or leaving gaps. The sealing ring must lie flat underneath the inwardly bent edge segments of the lid (see fig. C2).
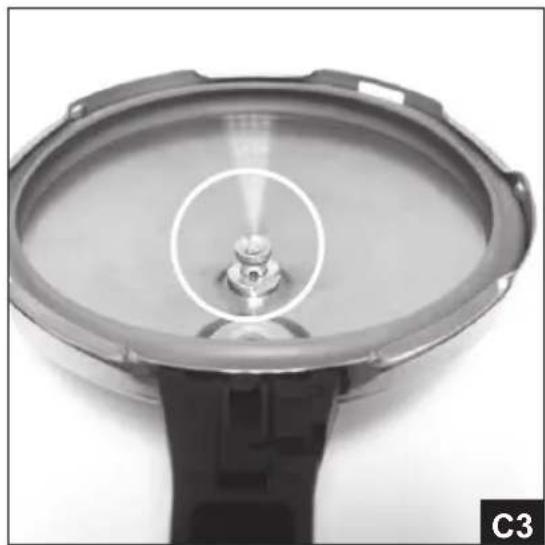
Check safety valve
(see illustration C1-C3)
The safety valve (10) indicates the pressure in the pressure cooker by its red cap:
Red cap down: pressure cooker is not under pressure and can be opened.
Red cap up: Pressure cooker is under pressure and CANNOT be opened.
NOTE
Before using each time, check that the safety valve can move easily by pressing against it from beneath. It must be possible to push it up easily and must fall into the lower position after being let go (see fig. C2 and C3). In addition, the pin in the middle of the safety valve can be pushed upward when clean.
Cooking with the pressure cooker
Pay attention to the filling quantity
Minimum filling quantity: For the production of steam, a minimum liquid quantity of approx. 1/4 I is necessary.
Maximum filling quantity: the pressure cooker may only be filled to a maximum of 2/3 of its entire filling capacity. That is about 2 l.
NOTE
When you cook food that foams or expands during cooking (e. g., rice, peas and beans), the pressure cooker may only be filled up to half of its filling capacity (approx. 1.5 l).
Setting the regulating valve
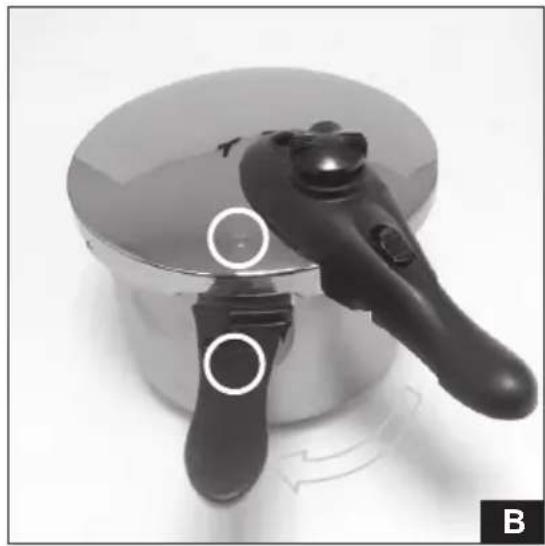
(See illustration D)
The regulating valve (9) can be moved to 3 positions:
Position
Use

(80 kPa)
for cooking

To remove the regulating valve for cleaning

For releasing steam quickly so that the lid can be opened
NOTE
Before each use, check the function of the regulating valve. Press and turn the rotary knob to each position and back for this purpose. At the individual positions, the regulating valve springs upward when you let go of it.
Tips for energy-saving cooking
To save energy, cook vegetables and potatoes with the minimum amount of water.
Match the pot size to the size of the hot-plate. The pressure cooker should not be smaller than the hotplate, otherwise more energy will be consumed than necessary.
Switch to the lower heat setting of the stove as soon as cooking begins.
Make use of the residual heat of the hotplate for simmering and switch off the hotplate a few minutes before the end of the cooking time.
Preparations
- Put the ingredients into the pressure cooker. Note the minimum and maximum filling quantity (see section Note filling quantity, p. 12)
- Check for correct seating of the sealing ring as described in the section Inserting the sealing ring (p. 12).
- Close the lid of the pressure cooker as described in the section Putting on the lid and closing the pot (p. 12).
- Put the pressure cooker onto the stove and switch the stove on to maximum heat.
Heating up
At the start of the cooking process, steam escapes from the safety valve. This is normal because the pressure at this point in time is insufficient to close the safety valve. As soon as this pressure is reached, the red cap of the safety valve rises - clearly recognisable in the inspection window of the safety valve (see fig. C1).
- Move the regulating valve to position (80 kPa).
- Adjust the stove to maximum heat.
- As soon as steam escapes from the regulating valve, gradually decrease the heat from the cooker until no more steam escapes. From the escaping of the steam, the values stated in the section Notes on cooking times (p. 15) apply.
- When no more steam escapes from the regulating valve, gradually increase the heat from the cooker. When steam appears again, leave the heat at that level.
Opening the pressure cooker
Before the pressure cooker is opened, the pressure in the pot must be reduced.
NOTE
The pressure cooker can only be opened once the pressure has been reduced completely. You can see this when the red cap on the security valve is all the way down.
Slower method:
As soon as cooking has finished, remove from the heat and allow the pot to cool down. The red cap of the safety valve sinks - clearly visible in the inspection window of the safety valve.
NOTE
Be aware that this cool-down time is part of the cooking time.
Faster method:
To achieve faster cooling down and release of pressure in the pressure cooker, move the regulating valve to the fast steam position so that the steam can escape and the pressure can be released.

WARNING
- Keep a sufficient distance away from the escaping steam to avoid injuries from scalding.
Cleaning and care
Before beginning any work, pay attention to the safety instructions in the section Safety instructions (p. 9)!
Allow the pressure cooker to cool down to avoid burns!
NOTE
Pot body, lid and sealing ring must NOT be cleaned in the dishwasher.
Pressure cooker
For cleaning, use a commercially available washing up liquid and dry the pressure cooker thoroughly.
Do not use abrasive cleaners or hard sponges for cleaning as they may scratch the stainless steel.
In the event of calcium deposits, you can boil diluted vinegar in the pressure cooker. Do not put the lid on during this.
Sealing ring
Remove all soiling thoroughly and dry the sealing ring.
Insert the sealing ring back into the lid as described in the section Inserting the sealing ring (p. 12).
NOTE
Do not put the sealing ring into the dishwasher. The material will become brittle.
Replace the sealing ring regularly with a new one (every one to two years depending in the frequency of use or a soon as wear becomes apparent) to ensure perfect operation of the pressure cooker. Pay particular attention to brittle material, cracks, discolouring, deformations and hardening.
Safety valve
The safety valve must be thoroughly cleaned after each use.
- Hold the valve on both sides, holding it under running water.
- Make sure that the holes are always clean and exposed. Remove crusted food residue with a small needle.
- Check movability as described in the section Checking safety valve (p. 12).
Regulating valve
The regulating valve must be thoroughly cleaned after each use.
- Move the regulating valve to position 0 to remove it.
- Pull the regulating valve off upwards.
- Take the regulating valve apart as shown in figure F.
- Clean all individual parts thoroughly in the warm dishwater.
- Dry all the parts thoroughly.
-
Put the regulating valve together again, in the sequence shown in figure F. Make sure that the two noses of the silicone seal click into the grooves of the regulating valve.
-
In the lid, clean the socket of the regulating valve. The silicone there can be removed and also cleaned in the same way. 8. Insert the regulating valve in the lid: The indication arrow points to
NOTE
If soiling of the safety valve or the regulating valve cannot be eliminated, please contact qualified service staff or our customer service directly.
Storage
If you do not need to use the appliance for a longer period of time, lay the lid upside down on the pressure cooler to care for the sealing ring.
Notes on cooking times
Cooking begins when steam escapes evenly from the regulating valve.
The general rules are:
Cooking times are shortened by half when compared to conventional pots. Example: potatoes require 30 minutes to cook in a normal pot and only around 10 minutes in the pressure cooker.
The smaller size of the food to be cooked, the shorter the cooking time. Example: potatoes cut into smaller chunks cook more quickly than whole potatoes.
The less is in the pressure cooker, the shorter the cooking time. Example: 2 potatoes require less time to cook than 6 potatoes.
The following listed cooking times are intended only as a guide. Please adjust the cooking times to your personal taste.
| Food | Cooking time in minutes | |
| Meat, poultry, fish | Roast pork 25-30 | |
| Pork goulash 15-20 | ||
| Roast veal 15-20 | ||
| Beef goulash 15-20 | ||
| Beef stew (leg slices) | 20-25 | |
| Roast beef 30-40 | ||
| Chicken breast 10-15 | ||
| Fish fillet 5-8 | ||
| Crustaceans, mussels, shrimps | 3-6 | |
| Peas and beans | Lentils 10-15 | |
| Peas 12-16 | ||
| White beans 12-16 | ||
| Rice 6-10 | ||
| Buckwheat 5-8 |
General notes
Declaration of Conformity
HOBERG hereby declares that this appliance complies with the fundamental requirements and other relevant provisions of the 97/23/EC directive. You will receive a complete declaration of conformity upon request.
Warranty/Guarantee
In addition to the statutory warranty obligation, HOBERG also grants an extended manufacturer's guarantee for some products. Provided this is granted, the corresponding details for each product can be found either on the product-specific packaging, advertising material or from HOBERG customer service.
For commercial or equivalent use, e.g. in hotels, guest houses or communal premises, or if the customer is not a consumer as defined by the German Civil Code, the guarantee period is 6 months. This does not infringe the warranty disclaimer.
Please contact your supplier if you have any questions on guarantee conditions, ordering accessories or service handling outside of Germany.
Limitation of liability
We assume no reliability for damage or follow-up damage in the case of:
failure to observe the instructions in the user manual,
use for other than the intended purpose,
improper or unsuitable handling,
incorrectly performed repairs,
unauthorised modifications,
use of non-approved parts or spare parts,
use of unsuitable supplementary or accessory parts.
Table des matieres
(Cf. illustration A)
(Cf. illustration B)
(Cf. illustrations C1-C3)
(cf. illustration D)
HnKOrda He nCNoIb3yIte IJRA YnCTKNCKOpOBaPKIOCTpbIE ppeMTebl IIN a6pa-3NBbIe YnCTaUne CpeDCTBa.
KpacbI KOLIIaQOK BHN3y: B CKOpOBapKe T DaBJIeHnI, I ee MOxHO OTKpbITb.
KpacbI KOJIpaOK BBepy: CKOpOBapKa HaxoITcI NOd DaBHeHem I ee HEJIb3r OTKpbIBaTb.
YKA3AHNE
Ipeed kaxdbim nCnoJb3ObaHneM Heo6XODIMO npOBepaTb JERKocTb XoDa ppeOxpaHntBHorO KlaPanaHa, CnerKa HaxmHa Ha Hero cHn3y. Knaan DoJKeH JERKo CDBNATbcB BBePx, a ecn erO OTNyCTNTb, OH DoJKeH NaTaB B HnxHee NOLOXeHne (cM. pnc. C2 u C3). Kpome TOrO, cTejKeHb B ceHTpe PpeOxApaHntBHorO KlaPanaHa DOJKeH B YnCTOM COCTOAHn HaxImaTbcB BBePx.
PnroToBJIeHne 6JIouc NOMOuTO CKOpOBaPKN
Co6nOeHne o6bema 3aOpHeHna
MHHMaIbHbI O6bEm 3aONHeHn: nIy o6pa3OBAHnI npa Heo6xOdIMo, YTO6bl B cKOpOBapKe 6bIIO He MeHee 1/4 I JxNdkocTn. MakcMaIbHbI O6bEm: pa3peWaeTcra 3aONHtB cKOpOBapKy He 60Jee Yem Ha 2/3 obuero obbema. 3To npImepHo 2 I.
YKA3AHNE
Pn npuroTOBHeHn npOdyKTOB, KOTOpbIe neHrTcR nn yBeJIuHBAIOrC B O6b-eme BO Bpem npuroTOBHeHn (HaNPmep, pnc, 6o6OBie), 3aONHnTe cKOpOBapky He 6oJee Yem Ha NOnOBHy ee o6bema (ok.1,5 n).
Hac troika perylnpoBouHoro klaNaHa
(cM. pucyHOK D)
PerynipoBOHbI KnaHaH (9) MoXeT 6bITb yCTaHOBHeB B 3 NOIOKeHnA.
O6paTnte BHMaHHe Ha To, YTO BpemOCTbIBaHn TaKKe ABJAreTc YaactbIO BpeMeHn PnIroTOBJIeHn.
БыICTpbiCnocO6
YTO6bI 6bICTPO OXnAINTb CKOpOBapKy N BblnyCTNTb nap, yCTaHOBnTE peRyJInpOBOUHbIKnapanB NOLOXeHne 6bICTpOro BblNycka npapa , YTO6bI nap MOR BbIHTN, a DaBJeHne MOrNo HOpMaJIIN3OBaTbcra.
I P E D U N P E X D E H N E
UTo6bI n36eXaTb OXORA BbIXOJaUM napOM, cToIte Ha DoCTaTOUHOM pacCToHnN OT CKOpOBapKn.
UncTka n yXoD
Ipepe haayamop pa6om 03HaKOMbmec b c yka3aHmU no mexHuKe 6e3oNaChocmu 82naBe Yka3aHnNo 6e3oNaChocmu (c.46)!
Jaume ckopoeapke ocbimb neped yucmko,ymo6bl u36examb oxo208!
YKA3AHVE
Kopnyc KactpnoHn, KpbIshky u yNIOTHN-TeJIbHOe KOJIbCuO HEJb3r MblB B NOCydoMOeHOn MaUNHe.
CkopoBapka
Исплььтугелдя чистк immobility MOIOUоee cpeДСТВОИ TшаTeЛьно ВыITираNTeCKOPOBAPKy.
He nCnoB3yIe dIy uNCTKn a6pa3NB HbIe YnCTaIe CpeIcTBA IIN TBepDbIe r6- K, yTObI He nOuapaNaTb HepXaBeIOU O CTaJIb.
06pa3oBaBmNcH a cKOpOBapKe n3-BeCTKObI HAneT MoXHo yDaJIntb C NOMO-UsbIO pactBopa YKcyca. Pn 3Tom He 3aKpbI-BaIte KpbIShKy.
yNIOHTHeIbHoe KOJIbUO
TuaTeNbHO ydaHnTe Bce 3aRpa3HeHnIy BBITpNTe yNIOHTHeJIbHOE KOJIbQo.
BCTaBbTe yNIOHTHnTeIbHoe KOJIbO O6paTHo B KpbIiKy, KaK ONuCAHO B TnaBe BcmaEka yNlOMHumeIbHozo KOJIbua (c. 44).
YKA3AHHE
He MoTe yIIOTHInTeJIbHoe KOJbO B nocydomoeyHoMaunHe. 13-3a 3TOro MaTePnAn cTaHOBnTCxpyKnM.
UTo6bI obecneuHTb 6e3ynpueHyU pa60Ty ckopoBapKn, peryIaRpHO 3aMeHnTe yIIOTHIneJIbHOe KOJIbO Ha HOBoE (KaXdbie OAnH-DABa rOda B 3aBnCmOCTn OT YAcTOTb INCNoJIb3OBaHnA, INI pN IOYBJIeHN Ipn3HaKOB n3HocA).ObpaauTe oc6oBe BVHMaHHe Ha xpyNKoCTb MaTePnaJa, TpeunHbI, n3MeHnIaCBeta, DeOpMaun I npOChHe MeMaTePnaJa.
PpeoXpHnteIbHbI KlaNaH
IocneKaJDoRo IcNoJIb3OBAHnI ppeOxpaHnTeJIbHbI KJIaHaH Heo6XoIMo TuaTeJIbHO YNCTNTb.
1.ДЯэTORO ONONCHITE KlaanH npOTOHNoBODoCObENxCSTOPH.
2.CneIte 3a Tem, yTo6bI OTBepCTnRA Bcerda 6blN YnCTbIMN N CBO6oHbIMN. YdaJIaYTe 3acOXUne OCTaTKN NUsC NOMOuBIO He6oJbWOn nJIbI.
3. Поберп Te Лergocьхoda КлanaHa, КаК onиcaHoВ ГlaBe Поберka npedoxpaHumeьнoуо КлanaHa (c. 44).
PerynpoBouHbI KnaHaN
IocJe KaJDoRo IcNoJIb3OBAHnpeRyInpoBOuHbIKaPAn HEO6XoDnMo TuaTeJbHo YNCTNTb.
- UTo6bl n3BLeueb peryIInpoBOUHbI KnaHaH, yCTaHOBInTe erO B noJoxeHne 0.
- Notaryte perylnipobouhki knanah BBepx.
- Pa36epnte perylnpoBouhnyklaan, kaK noka3aHO Ha pncyunke F.
- Tцateьно npomоTe BCE deTaJI N B TeTNO BOe.
5.ДаиTe DeTaNm XOPOUO BbICOXHyTb. - Co6epnte perynpoBouhki Kaanah, KaK noka3aHO Ha pucyHke F. Y6eintecb, yTO oBa KOHca cNIkoHOBOrO yNIOTHHeNy UCTaHOBJIeHbI B na3bl peynpoBouHoro KlaanaHa.
-
OuInCTIte KpeJIeHne peryIpOBOUHOKnIaHa Ha KpbIuKe. HaxoJaunCra TaM CINIKOH MOXHO N3BLeuB IN TOKe OUnCTITb.
-
YctaHOBIne peRyIuPoBOUHbI KJIanaH B KpbIiKy: CTepeJka Ha KJIanaHe DoJXHa yKa3bIBaTb Ha 0.
yKA3AHNE
EcnBbHe MoKeTe ydaHnTb 3aRpa3He HnC npedoxpaHntbHoro nnpereynpoBOOHOro KlaHOB, o6paNTeCb K KBaIN-ΦuNPOBaHHOMy cepBnCHOMy nepcoHaJy IIN HeNoCpeDCTBeHHO B HaShy cepBnCHUcny6y.
Xpahene
EcnBbldntelbHoe BpemHe 6ydeTe nOlb30BaTbcrCKOpOBapKO,NOLOXHTe KpbIshkyHa cKOpOBapKy nepeBepHyTo, UTO- 6blnobepuynnotHtEnbHOe Kobluo.
Yka3aHnI NO BpeMeHn npuroTOBJeHn
Bpem npiroTOBHeHnHaunHaetcTOrda, KOrda n3 peryInpoBOUHO KlananaHa HauHnHaET paBHomepHo BbIeJIaTbcr nap. OchOBhble npabnla
No cpaBHeHIO C npnroTOBJIeHNem 6JIOB B ObUHOK KAcTpOJe, BpeM npnroTOBJIeH N H B CKOpOBaPKe COKpaUaETCs T pImePHo B NOIobHy. PpIMep: B ObUHOK KAcTpOJe KapToOeJIb BapNTcR npImePHo 30 MmHT, B CKOpOBaPKe - OK. 10 MmHT.
Chm MeIbue npOdyKtbl, KOTOpBle Bbl roTOBnTe, Tem MeHbWe BpeMeHN Tpe6yeTcRdIaN nprirotOBJIeHn. PpIMep: KapTo-FeNb, Hape3aHHbI Ky6nKaMn, rTOBNTcR6bICTpee, Yem ceJIbI.
Yem Mehbe o6bem 3aONHeHnckopoBapKn, Tem Mehbe BpEm npuROBHeHn.
PnpMep:2 KapToeJIInHbI roTOBArTc8 bI- cTpee, yem 6.
PpNBeDeHHe Hxke BpeMa npiroTOBneHnRABJIeTcOpHeHTnpoBOUHybIM.KoppeKTIpyuTe Heo6xOAnMOe BpeMa npiroTOBneHnIPO CBOeMy BKycy.
The following table will help you locate and eliminate minor faults:
| Fault Possible cause Remedy | ||
| Pressure is not built up. | Safety valve is stuck. | Clean the safety valve. |
| Sealing ring not correctly inserted. | Insert the sealing ring correctly. | |
| Regulating valve set to . | Set the regulating valve to cooking. | |
| The lid is not properly fitted. | Fit and lock the lid properly. | |
| Not enough liquid filled. | Fill the pot with at least 1/4 litre of liquid. | |
| Sealing ring worn. | Replace the sealing ring. | |
NOTE
If you cannot resolve the problem with the steps described above, please contact customer service.


Kundenservice:
Customer service:
Subject to printing error.
Subject to technical modifications.
Sous reserve de modifications techniques.
For service in other countries contact your local dealer.

- FR
- Droits d'auteur
- Notes on environmental protection
- Safety instructions
- General safety instructions
- DANGER
- Supervision
- Safe use
- WARNING
- CAUTION
- Safe opening of the pressure cooker
- WARNING
- Safety during cleaning
- Safety during repairs and maintenance
- Intended use
- Symbols used
- NOTE
- Product description
- Product overview/scope of supply
- Before using for the first time
- Check the delivery contents
- Handling the pressure cooker
- Take off lid
- (See illustration A)
- Putting on lid and closing pot (See illustration B)
- Inserting sealing ring
- Check safety valve
- (see illustration C1-C3)
- Cooking with the pressure cooker
- Pay attention to the filling quantity
- Setting the regulating valve
- Position
- Use
- Tips for energy-saving cooking
- Preparations
- Heating up
- Opening the pressure cooker
- Slower method:
- Faster method:
- Cleaning and care
- Pressure cooker
- Sealing ring
- Safety valve
- Regulating valve
- Storage
- Notes on cooking times
- General notes
- Declaration of Conformity
- Warranty/Guarantee
- Limitation of liability
- Table des matieres
- (Cf. illustration A)
- (Cf. illustration B)
- (Cf. illustrations C1-C3)
- YKA3AHNE
- PnroToBJIeHne 6JIouc NOMOuTO CKOpOBaPKN
- Co6nOeHne o6bema 3aOpHeHna
- Hac troika perylnpoBouHoro klaNaHa
- БыICTpbiCnocO6
- I P E D U N P E X D E H N E
- UncTka n yXoD
- YKA3AHVE
- CkopoBapka
- yNIOHTHeIbHoe KOJIbUO
- YKA3AHHE
- PpeoXpHnteIbHbI KlaNaH
- PerynpoBouHbI KnaHaN
- Xpahene
- Yka3aHnI NO BpeMeHn npuroTOBJeHn
Brand : BEEM
Model : Vitalini
Category : Saucepan