USER MANUAL K 4.700 MD Kärcher
Register and win! www.kaercher.com
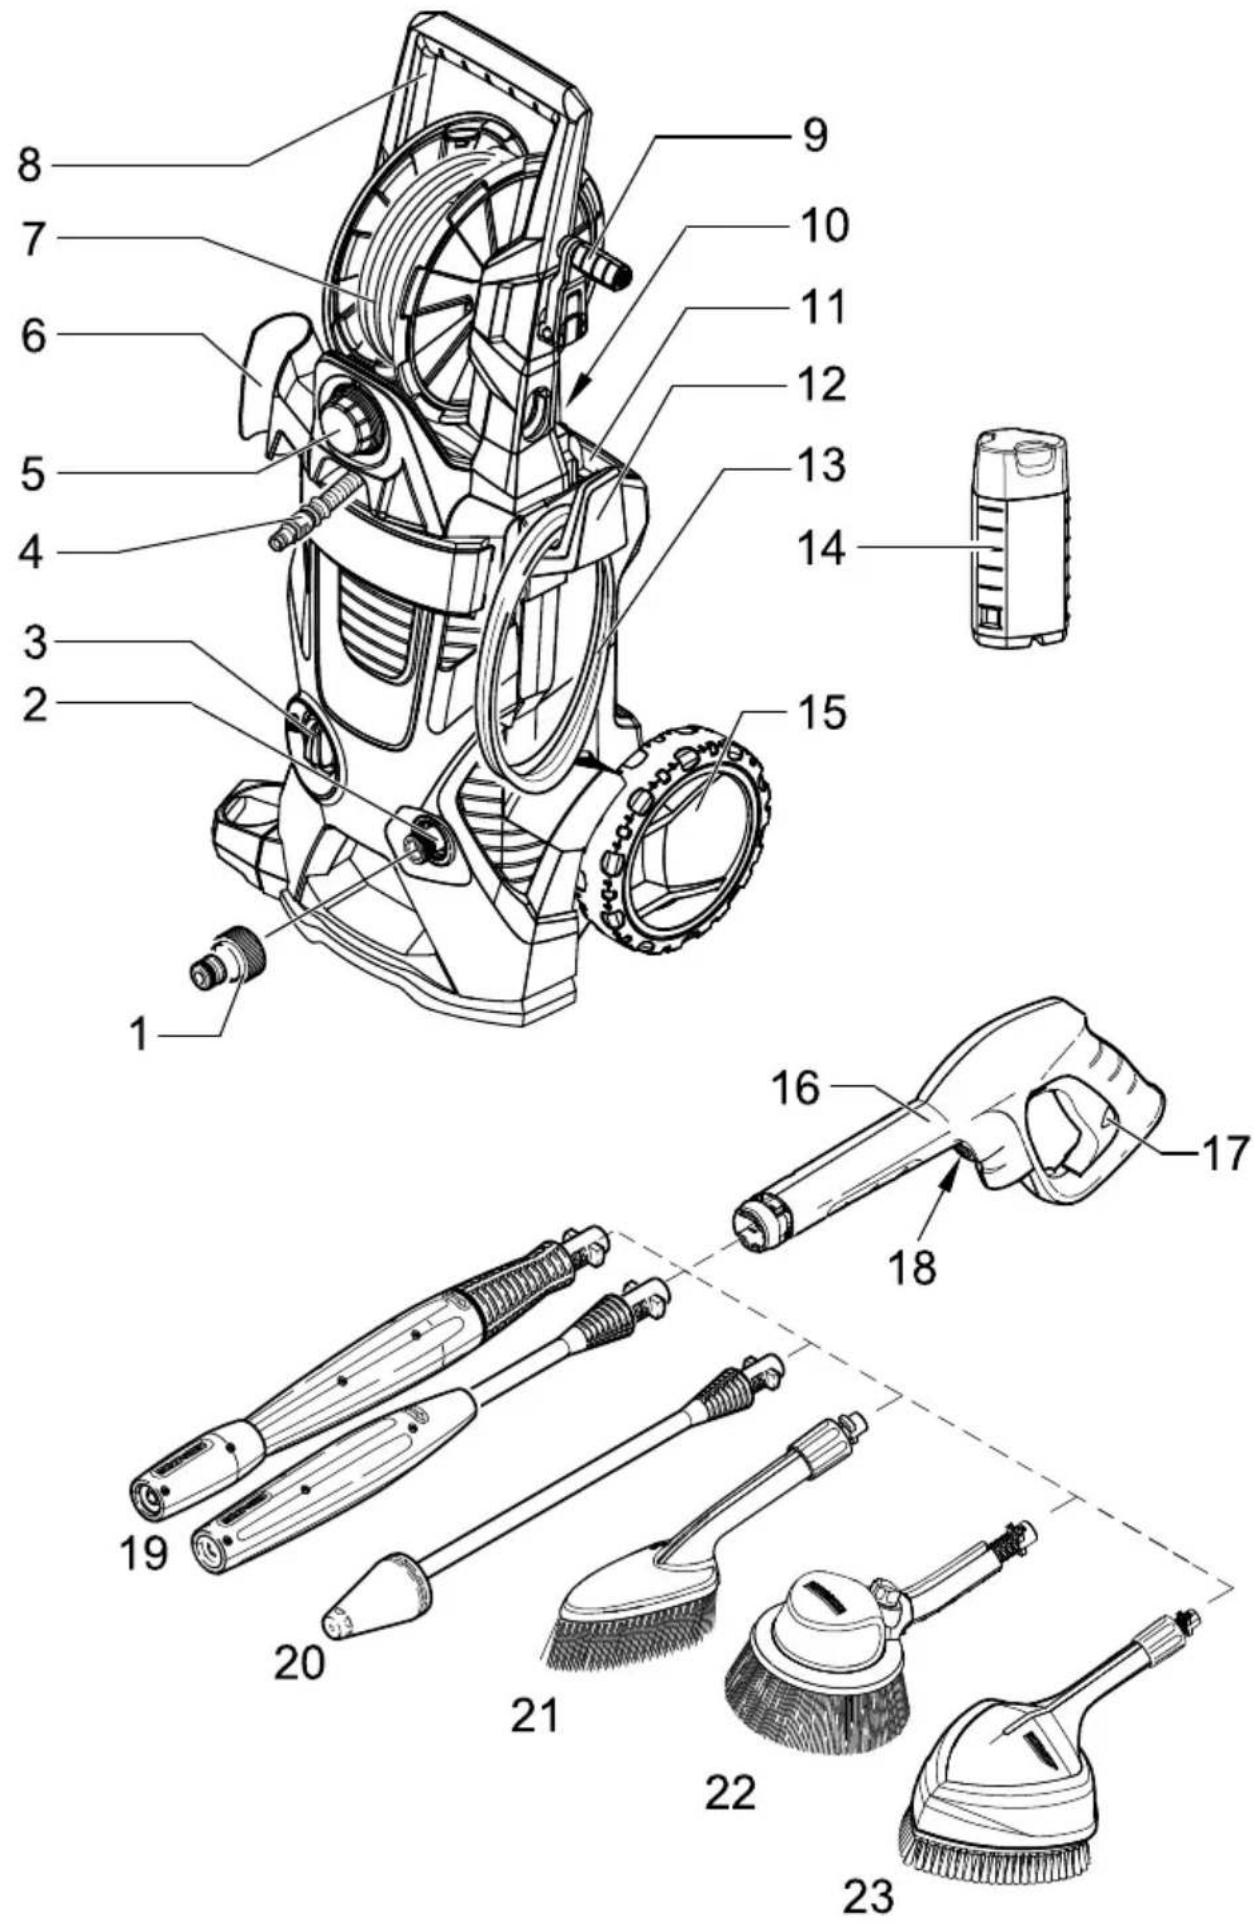
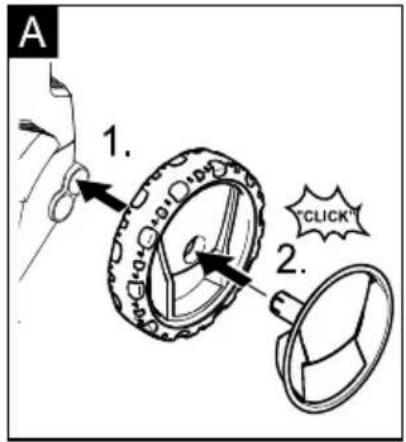
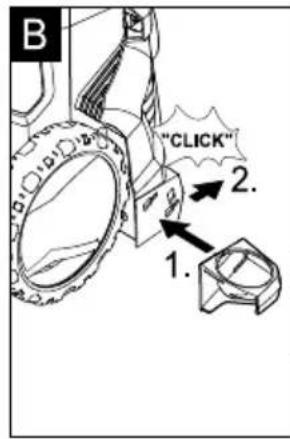
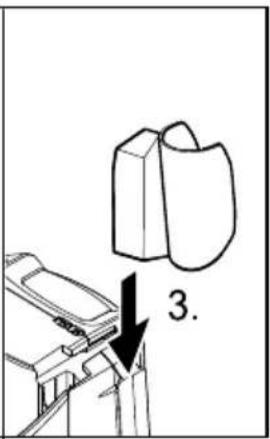
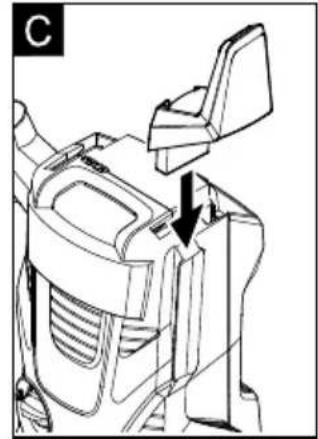
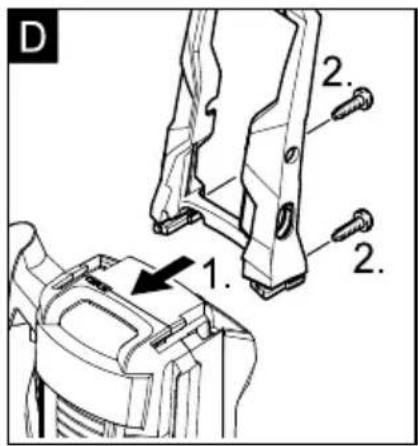

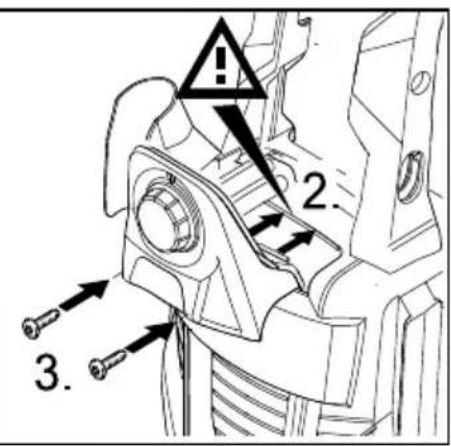
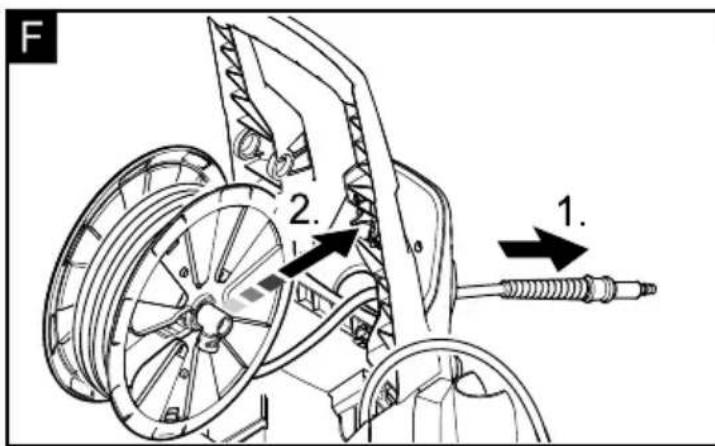

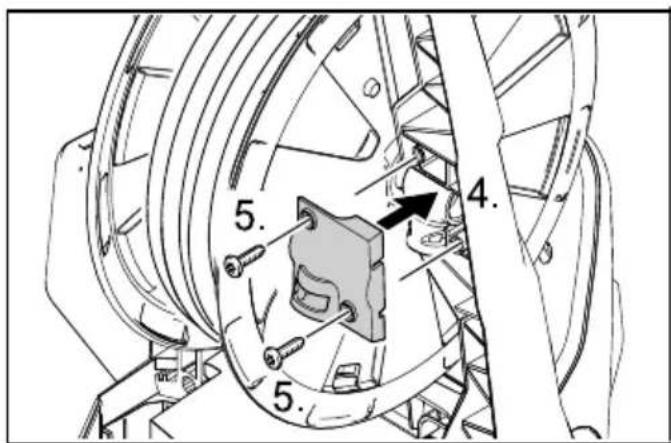
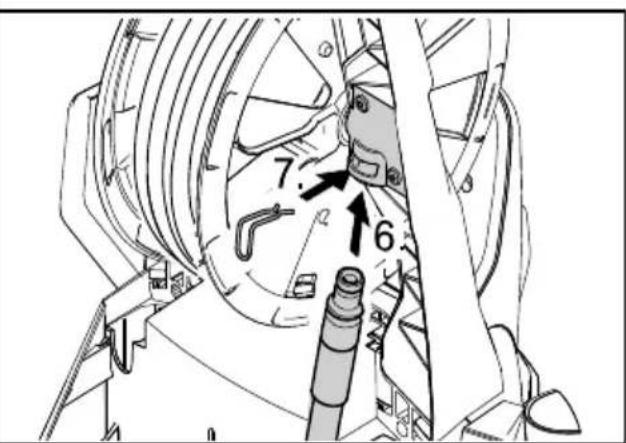
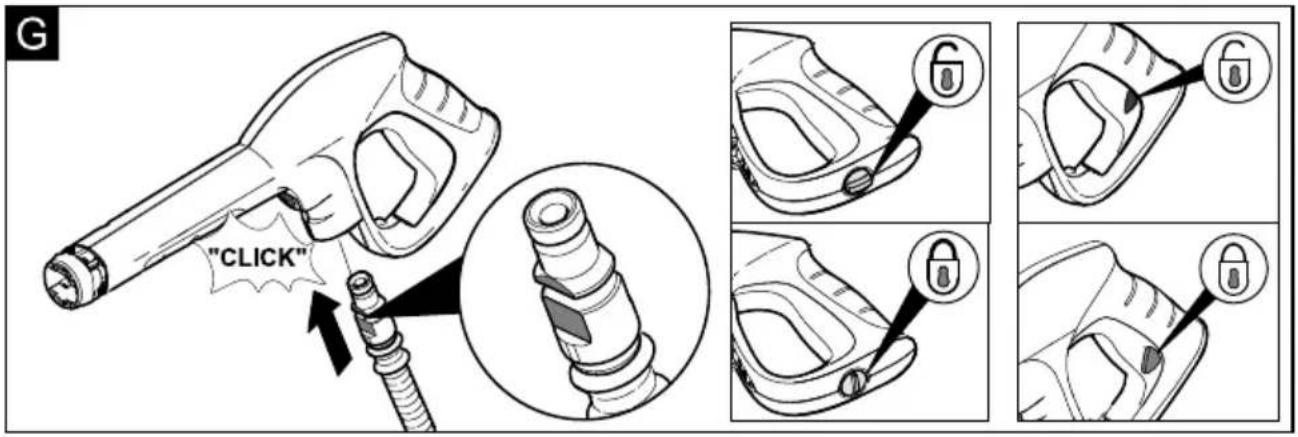
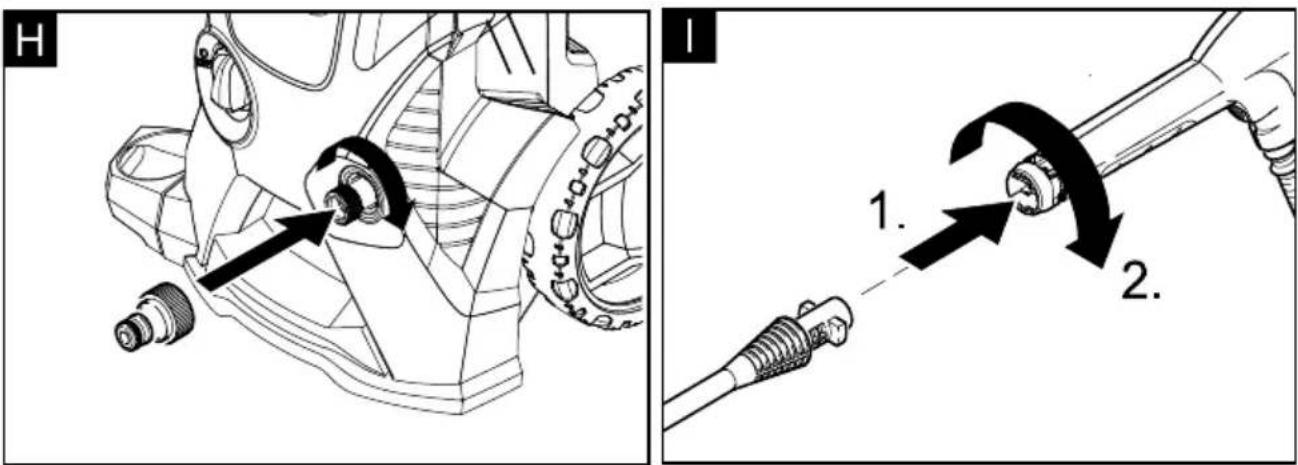
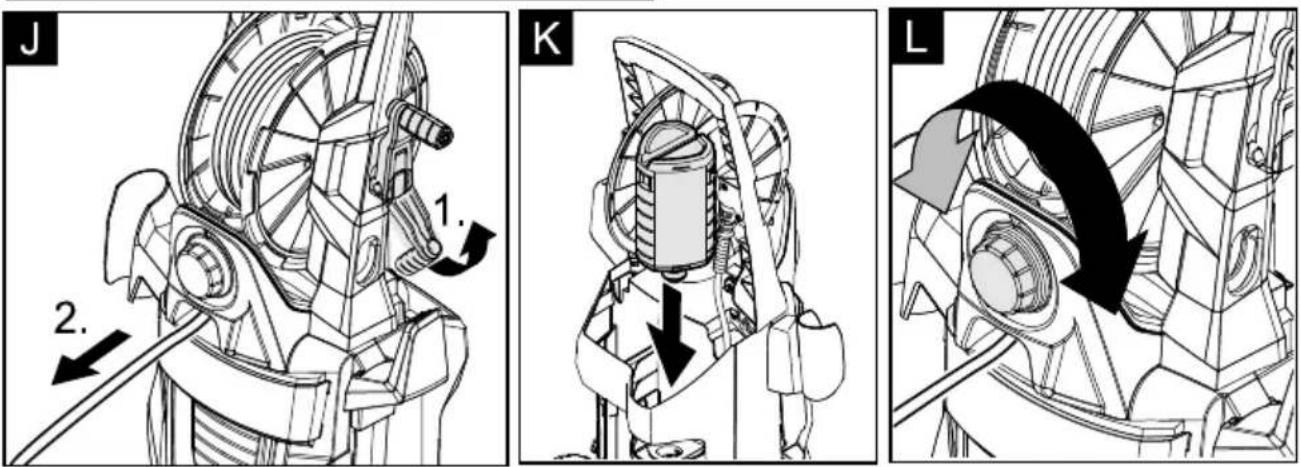
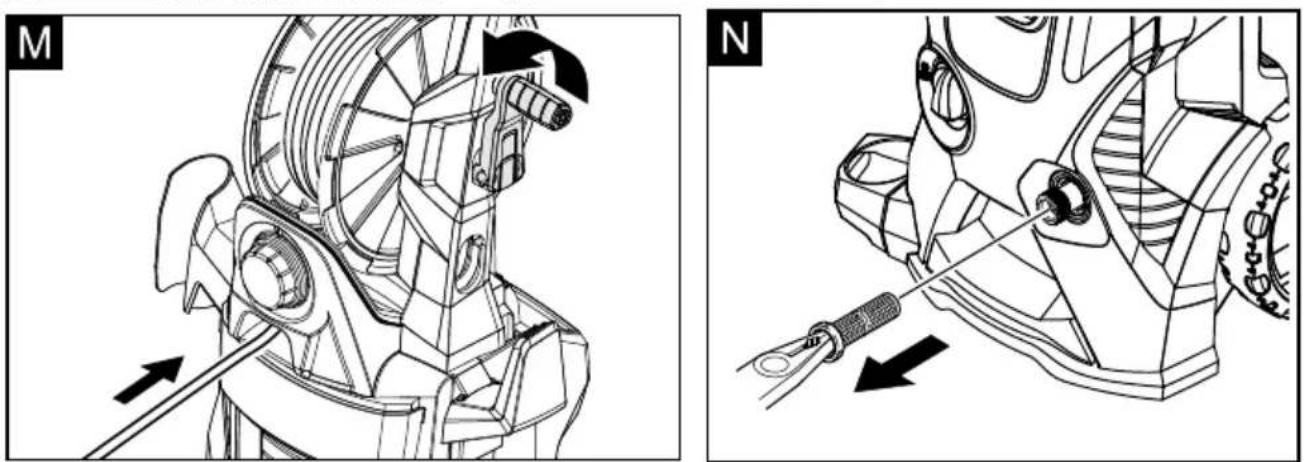
Table of Contents
71364 Winnenden (Germany)
Tel.: +49 7195 14-0
Fax: +49 7195 14-2212
Contents
General information EN - 1
Safety instructions EN - 2
Operation EN - 3
Description of the Appliance EN - 3
Transport EN - 7
Storage EN - 7
Maintenance and care EN - 7
Troubleshooting EN - 8
Technical specifications EN - 8
Dear Customer,

Please read and comply with these original instructions prior to
the initial operation of your appliance and store them for later use or subsequent owners.
Proper Use
This high-pressure cleaner is designed for domestic use only:
- to clean machines, vehicles, buildings, tools, facades, terraces, garden equipment etc. using a high-pressure water jet (and detergents if required). with accessories, replacement parts and detergents approved by KÄRCHER. Observe the instructions provided with these detergents.
Environmental protection

The packaging material can be recycled. Please do not place the packaging in the ordinary refuse for disposal, but are for the proper recycling.
Old appliances contain valuable materials that can be recycled. Please arrange for the proper recycling of old appliances. Please dispose your old appliances using appropriate collection systems.
Notes about the ingredients (REACH)
You will find current information about the ingredients at:
The warranty terms published by the relevant sales company are applicable in each country. We will repair potential failures of your appliance within the warranty period free of charge, provided that such failure is caused by faulty material or defects in manufacturing. In the event of a warranty claim please contact your dealer or the nearest authorized Customer Service centre. Please submit the proof of purchase.
(See address on the reverse)
Symbols in the operating instructions
Danger
Immediate danger that can cause severe injury or even death.
Warning
Possible hazardous situation that could lead to severe injury or even death.
Caution
Possible hazardous situation that could lead to mild injury to persons or damage to property.
Symbols on the machine
- High-pressure jets can be dangerous if improperly used. The jet must not be directed at persons, animals, live electrical equipment or at the appliance itself.

live electrical equipment or at the appliance itself.
- Frost can destroy the appliance if it is not completely drained. Store the appliance in a frost-resistant room during winter.
Danger
Never touch the mains plug and the socket with wet hands. The appliance must not be used if the power cord or important parts of the appliance, e.g. high-pressure hoses, trigger gun or safety devices are damaged. Check the power cord and mains plug for damage before every use. If the power cord is damaged, please arrange for it to be replaced immediately by an authorised repair agent or a skilled electrician. Check the high-pressure hose for damage before every use. Please arrange for the immediate replacement of a damaged high-pressure hose. The appliance may not be used in areas where a risk of explosion is present. If the appliance is used in hazardous areas (e.g. filling stations) the corresponding safety provisions must be observed. High-pressure jets can be dangerous if improperly used. The jet must not be directed at persons, animals, live electrical equipment or at the appliance itself. The high-pressure jet must not be directed at other persons or directed by the user at him/herself to clean clothing or footwear. Never use the appliance to clean objects containing hazardous substances (e.g. asbestos). Vehicle tyres or tyre valves are susceptible to damage from the high-pressure jet and may burst. The first indication of this is a discolouration of the tyre. Damaged vehicle tyres/tyre valves are highly dangerous. Ensure that a distance of at least 30 cm is observed when cleaning with the jet! Risk of explosion!
- Never touch the mains plug and the socket with wet hands. The appliance must not be used if the power cord or important parts of the appliance, e.g. high-pressure hoses, trigger gun or safety devices are damaged. Check the power cord and mains plug for damage before every use. If the power cord is damaged, please arrange for it to be replaced immediately by an authorised repair agent or a skilled electrician. Check the high-pressure hose for damage before every use. Please arrange for the immediate replacement of a damaged high-pressure hose. The appliance may not be used in areas where a risk of explosion is present. If the appliance is used in hazardous areas (e.g. filling stations) the corresponding safety provisions must be observed. High-pressure jets can be dangerous if improperly used. The jet must not be directed at persons, animals, live electrical equipment or at the appliance itself. The high-pressure jet must not be directed at other persons or directed by the user at him/herself to clean clothing or footwear. Never use the appliance to clean objects containing hazardous substances (e.g. asbestos). Vehicle tyres or tyre valves are susceptible to damage from the high-pressure jet and may burst. The first indication of this is a discolouration of the tyre. Damaged vehicle tyres/tyre valves are highly dangerous. Ensure that a distance of at least 30 cm is observed when cleaning with the jet! Risk of explosion!
Do not spray flammable liquids.
Never draw in fluids containing solvents or undiluted acids and solvents! This includes petrol, paint thinner and heating oil. The spray mist thus generated is highly inflammable, explosive and poisonous. Do not use acetone, undiluted acids and solvents as they are damaging to the materials from which the appliance is made.
Warning
The mains plug and the coupling of an extension cable must be watertight and must never lay in the water. Unsuitable extension cables can be hazardous. Only use extension cables outdoors which have been approved for this purpose and labelled with a sufficient cable cross-section:
1 - 10 m: 1.5 mm²; 10 - 30 m: 2.5 mm²
Always fully unroll electrical cables from the cable drum. High-pressure hoses, fixtures and couplings are important for the safety of the appliance. Only use high-pressure hoses, fixtures and couplings recommended by the manufacturer. This appliance is not intended for use by persons with reduced physical, sensory or mental capabilities.
The appliance must not be operated by children or persons who have not been instructed accordingly.
Children should be supervised to prevent them from playing with the appliance.
Keep packaging film away from children - risk of suffocation!
The operator must use the appliance correctly. When working with the appliance, he must consider the local conditions and pay due care and attention to other persons, in particular children, who are nearby. Do not use the appliance when there are other persons around unless they are also wearing safety equipment. Wear protective clothing and safety goggles to protect against splash back containing water or dirt.
Caution
In case of extended downtimes, switch the appliance off at the main switch / appliance switch or remove the mains plug. Do not operate the appliance at temperatures below 0°C. Observe a distance of at least 30 cm when using the jet to clean painted surfaces to avoid damaging paintwork. Never leave the appliance unattended when it is in operation.
Make sure that the power cable or extension cables are not damaged by running over, pinching, dragging or similar. Protect the power cable from heat, oil, and sharp edges. All current-conducting parts in the working area must be protected against jet water. The appliance may only be connected to an electrical supply which has been installed in accordance with IEC 60364. The appliance may only be connected to alternating current. The voltage must correspond with the type plate on the appliance. For safety reasons, we recommend that you operate the appliance only via a earth-leakage circuit breaker (max. 30 mA). Cleaning operations which produce oily waste water, e.g. engine washes, under-body washes, may only be carried out using washing stations equipped with an oil separator. This appliance was designed to be used with detergents which are supplied or recommended by the manufacturer. The use of other detergents or chemicals may compromise the safety of the appliance.
Safety Devices
Caution
Safety devices protect the user and must not be modified or bypassed.
Power switch
The appliance switch prevents unintentional operation of the appliance.
Lock trigger gun
This lock locks the lever of the trigger gun and prevents the inadvertent start of the appliance.
Overflow valve with pressure switch
The overflow valve prevents the permissible working pressure from being exceeded. If the lever on the trigger gun is released the pressure switch turns off the pump, the high-pressure jet is stopped. If the lever is pulled the pump is turned on again.
High pressure hose
The high pressure hose is specially constructed with reinforced walls to handle water pressure up to 13/14 MPa (1900/2050 psi) - it can be easily damaged and should be stored carefully.
Do not kink. Do not drive vehicles over the hose. Do not expose the hose to sharp edges or corners.
Misuse will lead to ballooning or premature failure and will invalidate warranty.
Prerequisites for the appliance's stability
Caution
Create stability for the appliance prior to all work on or with the appliance to prevent accidents or damage.
- The stability of the appliance is warranted when it is placed onto an even surface.
Operation
Scope of delivery
The scope of delivery of your appliance is illustrated on the packaging. Check the contents of the appliance for completeness when unpacking.
In the event of missing accessories or any transport damage, please contact your dealer.
Description of the Appliance
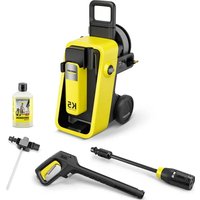
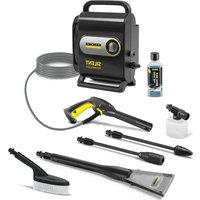
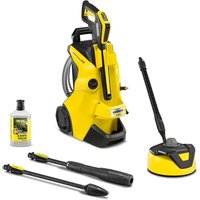
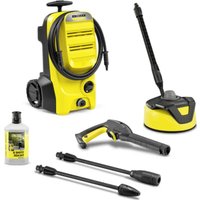
These operating instructions describe the basic models of the high pressure cleaners shown on the front cover. These operating instructions describe the maximum equipment. Depending on the model, there are differences in the scopes of delivery (see packaging).
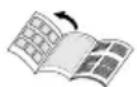
Illustrations on fold-out page!
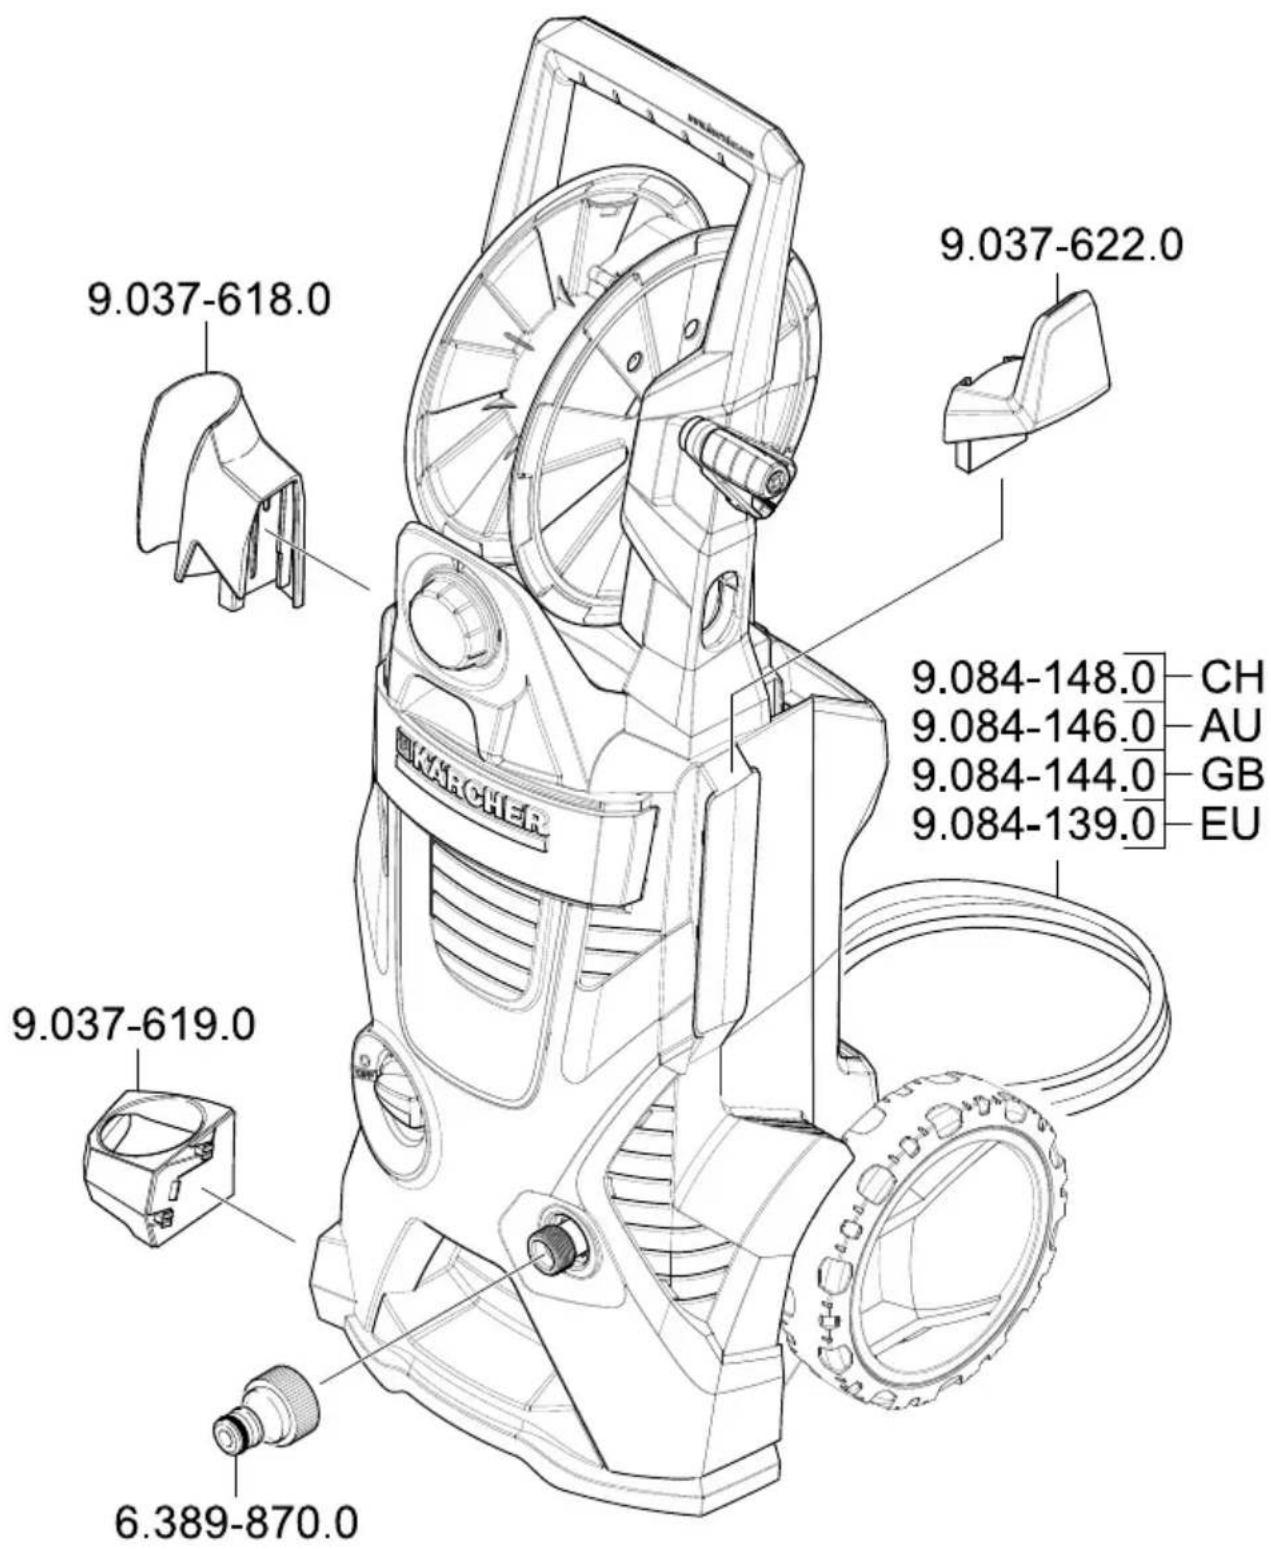
1 Coupling element for water connection
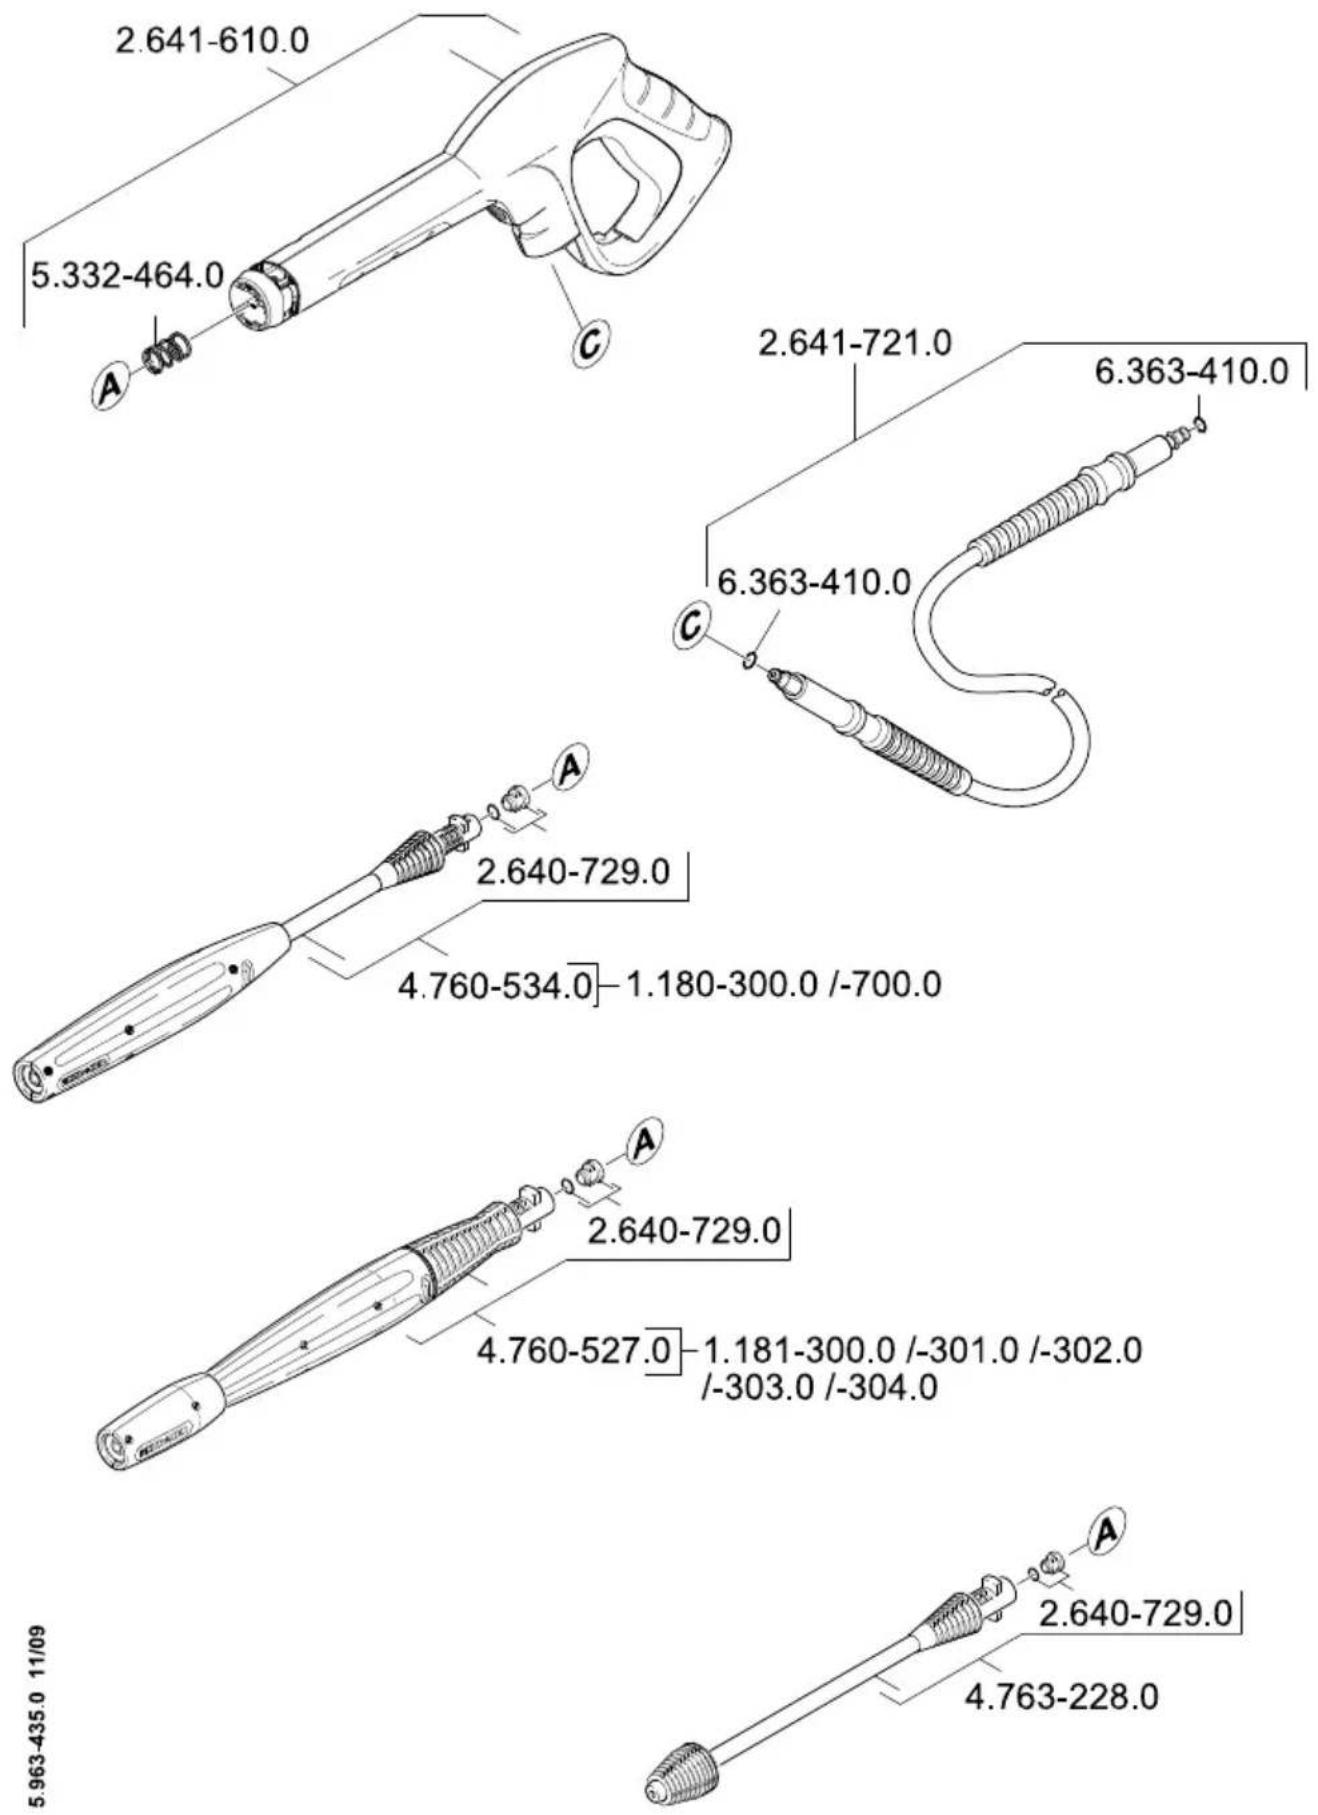
2 Water connection with integrated sieve 3 Appliance switch "0/OFF"/,I/ON" 4 High pressure hose 5 Dosage regulator for detergent 6 Storage for trigger gun 7 High-pressure hose drum 8 Transport handle 9 Hand crank for hose drum 10 Storage of detergent reservoir with detergent connection 11 Storage for accessories 12 Storage hook for mains connection cable 13 Mains cable with mains plug 14 Detergent reservoir with locking lid 15 Wheels 16 Trigger gun 17 Lock trigger gun 18 Key to detach the high-pressure hose from the trigger gun 19 Spray lance with pressure regulation (Vario Power) 20 Spray lance with Dirtblaster 21 Washing brush 22 Rotary washing brush 23 Delta-Racer D150
Special accessories
Special accessories expand the possibilities of using your appliance. Please contact your KARCHER dealer for further information.
Before Startup
Mount loose parts delivered with appliance prior to start-up.
Install wheels
IllustrationA
Push the wheels into the intake and secure them with the plugs. Align the plug properly.
Install the storage for hand-spray gun
IllustrationB
Place the bottom holder into the recesses and push forward until it audibly locks in. Insert the top holder and push down all the way.
Install the storage hook for the mains connection cable
IllustrationC
Press in the storage hook and lock it into the top position.
Install the transport handle
You will need the 2 included screws as well as a Philips screwdriver PH 2.
IllustrationD
Slide the transport handle into the guide and secure it with 2 screws.
Install the dosage regulator for detergent
You will need the 2 included screws as well as a Philips screwdriver PH 2.
Illustration
Insert both detergent hoses onto the hose fittings.
Install the dosage regulator and connect using 2 screws.
Note: During installation you must make sure that the tongues of the dosage regulator match up with the intended recesses in the casing.
Install the high pressure hose drum
Illustration F
Slide the free end of the coiled high pressure hose through the recesses on the dosage regulator.
Insert the hose drum into the intakes on the transport handle.
Insert the axle of the hand crank into the guides.
Install the fixating plate and secure it using 2 screws.
Press the connecting fitting from the short high pressure hose into the brass intake, secure with clamps.
Note: Make sure the connection nipple is aligned correctly.
Connect the high pressure hose to the hand spray gun
Illustration
Push the high pressure hose into the trigger gun until it locks audibly.
Note: Make sure the connection nipple is aligned correctly.
Check the secure connection by pulling on the high-pressure hose.
Water supply
Warning
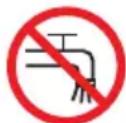
According to the applicable regulations, the appliance must never be used on the drinking water supply without a system separator. Use a

suitable system separator manufactured by KÄRCHER; or, as an alternative, a system separator as per EN 12729 Type BA. Water flowing through a system separator is considered non-drinkable.
Caution
Always connect the system separator to the water supply, never directly to the appliance!
Note: Impurities in the water can damage the high-pressure pump and accessories. For protection, the use of the KÄRCHER water filter (optional accessory, order no. 4.730-059) is recommended.
Water supply from mains
Observe regulations of water supplier.
For connection values, see type plate/technical data.
Use a fibre-reinforced water hose (not included) with a standard coupling. (Minimum diameter 1/2 inch (13 mm), minimum length 7.5 m). Illustration H
Screw the coupling element (supplied) to the water connection on the appliance.
Push the water supply hose onto the coupling unit, then connect it to the water supply.
Drawing in water from open reservoirs
This high-pressure cleaner is suited to work with the KARCHER suction hose with backflow valve (Optional accessory, order no. 4.440-238) to draw in surface water, e.g. from water butts or ponds (see specifications for max. suction height).
Fill the KARCHER suction hose with backflow valve with water, screw it to the water supply, and hang it into the water butt. Appliance ventilation: Switch the appliance on with the high-pressure hose detached and operate (max. 2 minutes) until the water exits the high-pressure connection without bubbles. Switch off the appliance and reconnect the high-pressure hose.
Start up
Caution
Dry runs lasting longer than two minutes lead to damage to the high pressure pump. If the appliance does not build up pressure within two minutes, switch it off and proceed as instructed in the Chapter "Troubleshooting".
Illustration
Push the spray lance into the trigger gun and fasten it by turning it through 90°.
Illustration J
Unwind the high pressure hose from the hose drum. Hold on to the transport handle during this procedure.
Note: If the hand crank is in its secured position, fold it up first.
Completely open the water tap. Insert the mains plug into the socket. Turn on the appliance "I/ON".
Operation
Danger
The trigger gun is subjected to a recoil force when the water jet is discharged. Make sure that you have a firm footing and are also holding the trigger gun and spray lance firmly.
Caution
Prior to cleaning, make sure that the high pressure is placed safely on level ground. Wear protective goggles and protective clothing during the cleaning process.
Unlock the lever on the trigger gun. Pull on the lever of the trigger gun; the device will switch on.
Note: Release the lever of the trigger gun; the device will switch off again. High pressure remains in the system.
Spray lance with pressure regulation
Carrying out the most common cleaning tasks. The work pressure can be stagelessly regulated between "Min" and "Max".
Release the lever on the trigger gun. Turn the spray lance to the desired position.
Note: Suitable for working with detergent; for this, turn the spray lance to the "Mix" position.
Spray lance with Dirtblaster
For particularly dirty items or areas.
Caution
Cartyres, paint or sensitive surfaces such as wood should not be cleaned with the dirt blaster, as there is a risk of damage.
- Not suitable for use with detergents.
Washing brush
- Note: Suitable for use with detergents.
Set the dosage regulator to the desired suction volume for detergent.
Rotary washing brush
The rotating washing brush is ideally suited for the cleaning of vehicles.
Caution
Please make sure that the washing brush is free from dirt or other particles. Otherwise, it may damage the paint work.
- Note: Suitable for use with detergents.
Set the dosage regulator to the desired suction volume for detergent.
Delta-Racer D150
The Delta-Racer combines a wash brush with a rotating high pressure jet. Therefore, it is especially suited for vehicle cleaning or heavily soiled surfaces.
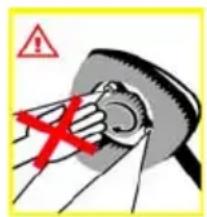
Danger
Do not reach under the edge of the Delta Racer during operation!
Working with detergent
Please use exclusively KÄRCHER detergents and care products to carry out the respective cleaning task, as these were specifically developed for your appliance. The use of other detergents and care products may lead to premature wear and can invalidate your warranty claims. Please obtain information at your local dealer or request information directly from KÄRCHER.
Notes regarding the detergent: The most commonly use detergents can be purchased ready to use in their detergent reservoirs with locking lids. This will make the pesky refilling and filling processes redundant.
Remove the lid from the detergent reservoir and press the detergent reservoir into the detergent connection with the opening facing down.
Adjust the suction volume of the detergent solution by means of the dosage regulator for detergents.
Use spray lance with pressure regulation (Vario Power). Turn the spray lance to "Mix" position.
Note: This will mix the detergent with the water stream.
Note: If required, the washing brushes can be used to work with detergent.
Recommended cleaning method
Spray the detergent sparingly on the dry surface and allow it to react, but not to dry. Spray off loosened dirt with the high-pressure jet.
Interrupting operation
Release the lever on the trigger gun. Lock the lever on the trigger gun. During longer breaks (more than 5 minutes), also turn the appliance off using the "0/OFF" switch. Insert the trigger gun in its holder.
Finish operation
Caution
Only separate the high-pressure hose from the trigger gun or the appliance while there is no pressure in the system.
Remove the detergent reservoir from the intake and close it with the lid. To store, place into the intake rotated by 180 degrees. Release the lever on the trigger gun. Turn off the appliance "0/OFF". Turn off tap. Detach the appliance from the water supply.
Caution: When disconnecting the supply or high pressure hose, warm water may leak from the connections after operation.
Press the lever on the trigger gun to release any remaining pressure in the system. Then lock the lever on the trigger gun. Pull out the mains plug.
Transport
Caution
In order to prevent accidents or injuries, keep in mind the weight of the appliance during transport (see Specifications).
When transporting by hand
Lift the appliance by the carrying handle and carry it. Pull the appliance by its transport handle.
When transporting in vehicles
Prior to horizontal transport: Remove the detergent reservoir from the intake and close it with the lid. Secure the appliance against shifting and tipping over.
Storage
Caution
In order to prevent accidents or injuries, keep in mind the weight of the appliance when selecting a storage location for it (see Specifications).
Storing the Appliance
Park the machine on an even surface.
Wind the entire high pressure hose onto the hose drum by rotating the hand crank counter-clockwise.
Insert the hand spray gun with the spray lance into the holder for the hand spray gun. Stow away the mains cable and accessory at the machine. Store the appliance in a dry room.
Frost protection
Caution
Protect the appliance and its accessories against frost.
The appliance and its accessories can get destroyed through frost if there are any water residues in them. To avoid damage to them: Completely drain all water from the appliance:
Detach the appliance from the water supply. Detach spray lance from the trigger gun. Switch the appliance on ("I/ON"), press the trigger gun lever until no further water is discharged (approx. 1 min). Turn off the appliance. Store the appliance and the entire accessories in a frost-safe room.
Maintenance and care
Danger
Turn off the appliance and remove the mains plug prior to any care and maintenance work.
Maintenance
The appliance is maintenance-free.
Care
Prior to longer periods of storage, e.g. in the winter:
Completely drain all water from the appliance:
(for a description, see section on "Frost protection")
Pull out the sieve in the water connection using flat-nose pliers and clean under running water.
Spare parts
Use only original KARCHER spare parts. You will find a list of spare parts at the end of these operating instructions.
Troubleshooting
You can rectify minor faults yourself with the help of the following overview. If in doubt, please consult the authorized customer service.
Danger
Turn off the appliance and remove the mains plug prior to any care and maintenance work. Repair works may only be performed by the authorized customer service.
Appliance is not running
Pull on the lever of the trigger gun; the device will switch on. Check whether the voltage indicated on the type plate corresponds to the voltage of the mains supply. Check the mains connection cable for damages.
Pressure does not build up in the appliance
Check setting at the spray lance. Remove air from appliance before operation. Switch on the appliance without connection the HP hose (max. 2 minutes) and run it until the water discharging from the HP outlet is free of bubbles. Switch off appliance and reconnect HP hose. Check the water supply. Pull out the sieve in the water connection using flat-nose pliers and clean under running water.
Appliance does not start, motor hums
Cause: Voltage reduction due to weak mains supply or when using an extension cable. When switching on, first pull the lever of the trigger gun and then switch the appliance switch to "I/ON".
Strong pressure fluctuations
Clean high-pressure nozzle: Remove dirt and debris from the nozzle bore, using a needle and rinse through with water from the front. Check water flow quantity.
Appliance is leaking
Slight leakage from the appliance pump is normal. If the leakage increases contact the authorized customer service.
No detergent infeed
Use spray lance with pressure regulation (Vario Power). Turn the spray lance to "Mix" position. Check the settings at the dosage regulator for detergent. Check the detergent suction hose for kinks.
Technical specifications
| | K 3.700 | K 4.700 | K 5.700 |
| Water connection |
| Max. feed temperature | °C 40 | |
| Min. feed volume l/min | 10 | |
| Max. feed pressure MPa | a 0.8 | |
| Max. Suction height m | 0.5 | |
| Electrical connection |
| Voltage *GB
1~50 Hz | V 23 | 0-240 |
| Connected load kW 1.8 | 1.9 2.1 | | | | | | |
| Mains fuse *GB
(slow-blow) | A | 13 |
| Protective class | | I |
| Protection class | | IP X5 |
| Performance data |
| Working pressure | MPa 11 | 12 | 12 | 12 | 5 |
| Max. permissible pres-sure | MPa 12 | 13 | 14 |
| Water flow rate | l/min | 6.3 | 6.7 | 7.5 |
| Dimensions and weights |
| Length | mm 87 | 6 |
| Width | mm 32 | 5 |
| Height | mm 28 | 5 |
| Weight, ready to oper-ate with accessories | kg | 14.8 | 14.8 | 15.3 |
| Detergent flow rate | l/min | 0 - 0.3 |
| Recoil force of trigger gun | N | 15 |
| Values determined as per EN 60335-2-79 |
| Hand-arm vibration value | m/s2 | < 2.5 |
| Uncertainty K | m/s2 | 0.3 |
| Sound pressure level LpA | dB(A) | 76 | 76 | 73 |
| Uncertainty KpA | dB(A) | 3 | 2 | 2 |
| Sound power level LWA + Uncertainty KWA | dB(A) | 92 | 93 | 89 |
Subject to technical modifications!
CE Declaration
We hereby declare that the machine described below complies with the relevant basic safety and health requirements of the EU Directives, both in its basic design and construction as well as in the version put into circulation by us. This declaration shall cease to be valid if the machine is modified without our prior approval.
Product: High-pressure cleaner
Type: 1.180-xxx 1.181-xxx
Relevant EU Directives
2006/42/EC (+2009/127/EC)
2004/108/EC
2000/14/EC
Applied harmonized standards
EN 55014-1:2006
EN 55014-2:1997 + A1:2001
EN 60335-1
EN 60335-2-79
EN 61000-3-2:2006
EN 61000-3-3:2008
EN 62233:2008
Applied conformity evaluation method
Appendix V
Sound power level dB(A)
The undersigned act on behalf and under the power of attorney of the company management.
71364 Winnenden (Germany)
Phone: +49 7195 14-0
Fax: +49 7195 14-2212
Helpline
KARCHER UK Limited operate a helpline allowing customers to discuss any problems experienced with our products.
The helpline operates during normal business hours and may be busy at peak periods. If you have difficulty getting through we would ask that you try to contact us again later in the day.
The helpline number is 01295 752200, open from 8.30 am to 5.00 pm Monday to Friday.
It helps us if you have the model number and data plate details to hand before making your call so that we can assist you with your query more effectively.
Alternatively you may write to us at the address below:
KÄRCHER UK Ltd
Kärcher House
Beaumont Road
Banbury
Oxon, OX16 1TB
or E-mail us:
info@karcher.co.uk
Type: 1.180-xxx 1.181-xxx
2006/42/EC (+2009/127/EC)
2004/108/EC
2000/14/EC
71364 Winnenden (Germany)
Telephone: +49 7195 14-0
Model: 1.180-xxx 1.181-xxx
2006/42/EC (+2009/127/EC)
2004/108/EC
2000/14/EC
S. Reiser Head of Approbation
71364 Winnenden (Germany)
Tel.: +49 7195 14-0
Fax: +49 7195 14-2212
Contents
Model: 1.180-xxx 1.181-xxx
Applicable community directives
2006/42/EC (+2009/127/EC)
2004/108/EC
2000/14/EC
71364 Winnenden (Germany)
Tel.: +49 7195 14-0
Fax: +49 7195 14-2212
Index
2006/42/EC (+2009/127/EC)
2004/108/EC
2000/14/EC
71364 Winnenden (Germany)
Tel.: +49 7195 14-0
Fax: +49 7195 14-2212
Mounting the transport handle
Type: 1.180-xxx 1.181-xxx
Applicable EC Directives
2006/42/EC (+2009/127/EC)
2004/108/EC
2000/14/EC
71364 Winnenden (Germany)
Tel.: +49 7195 14-0
Fax: +49 7195 14-2212
Table of contents
General notes NO -1
Type: 1.180-xxx 1.181-xxx
Relevant EU Directives
2006/42/EC (+2009/127/EC)
2004/108/EC
2000/14/EF
71364 Winnenden (Germany)
Tel: +49 7195 14-0
Type: 1.180-xxx 1.181-xxx
Applicable EU Directives
2006/42/EC (+2009/127/EC)
2004/108/EC
2000/14/EC
Applied harmonized standards
EN 55014-1:2006
EN 55014-2: 1997 + A1: 2001
EN 60335-1
EN 60335-2-79
EN 61000-3-2: 2006
EN 61000-3-3:2008
EN 62233: 2008
Applied method for conformity assessment
Annex V
Sound power level dB(A)
71364 Winnenden (Germany)
Tel.: +49 7195 14-0
Fax: +49 7195 14-2212
Subject to technical changes!
Table of contents
71364 Winnenden (Germany)
Tel.: +49 7195 14-0
Type: 1.180-xxx 1.181-xxx
71364 Winnenden (Germany)
Tel.: +49 7195 14-0
Fax: +49 7195 14-2212
Table of contents
In case of malfunctions TR-8
Relevant EU regulations 2006/42/EG (+2009/127/EG) 2004/108/EG 2000/14/EG
Applied harmonized standards EN 55014-1:2006 EN 55014-2:1997 + A1:2001 EN 60335-1 EN 60335-2-79 EN 61000-3-2:2006 EN 61000-3-3:2008 EN 62233:2008
Installing the spray rate regulator
For installation, 2 supplied screws and a cross-head screwdriver PH 2 are required.
Figure
Install the connection elements for both plugs of the spray device. Install the spray rate regulator and secure it with the screws.
Note: During installation, always check that the regulator's locking tabs are engaged in the provided recesses on the device.
Installing the high-pressure hose drum
Figure
Pull the free end of the wound high-pressure hose through the recesses on the spray rate regulator.
Install the hose drum into the brackets located on the handle for transport.
Insert the drive bridge of the handle into the guide.
Attach the prepared part using 2 screws.
Insert the connecting piece of the short high-pressure hose into the pump connection and secure it with a clamp.
Note: Ensure the correct positioning of the connecting piece.
Connecting the high-pressure hose to the hand spray gun
Figure
Insert the high-pressure hose into the hand spray gun up to the stop.
Note: Ensure the correct positioning of the connecting piece.
Check the security of the connection by pulling on the high-pressure hose.
Water supply
Warning
According to current regulations, the device must not be operated without a system separator in the drinking water pipe. Use a suitable system separator from KARCHER or an alternative system separator that complies with EN 12729 type BA. Water that has passed through a system separator is considered potable.
Attention!
Always connect the system separator to the water supply system, never directly to the device!
Note: Contaminants containing water can cause damage to the high-pressure pump and accessories.
For drinking water, it is recommended to use a KARCHER water filter (special accessory, order number 4.730-059).
Iopaa BObI n3 BODonpoBOda
Co6IIOJaTe npeIncaHn npeInpnTna BOOCha6KeHn.
IapametpbI nIy noKIOUeHn yka3aHbHa 3aBOIDcKO TaBNIuKe N B pa3dene "TexHnueckne daHHble".
→ IcnoJb3yIte BoJaHOJ uHaHr n3 npOuHOro MaTePnaJa (B KOMJIeKT NOCTaBKn He BxOuNT) C O6bUHOJ COeINHITeJbHOJ MyΦToJ. (DnAmETp: MInHMym 1/2 dIOmAs n1n 13 MM; peKOMeHNyEma dInHa 7,5M).
PunCyHOH
HaxoJyUocB KOMnJIeKTe COeINHTeIbHyO MyQTy NOcOeINHITe K 3JeMeHTy aInpaTa DnA NoaH N BoDbl. HaHeNbTe BOJHO HsHaCoeINHTeIbHyO MyQTy aInpaTa, nocIe Yero NoCoEINHITe ero K BODOpOBdy.
IOnaHa BObI N3 OTKpbITbIX BOoEMOB
DaHHbI BbICOKOHaOpHbIM MOIOuN annapat co BCaCbIBaIOUm IJNaHrom KARCHER n 6paTHbIM KJIaPAnOH (CneuaJIbHbIe npHaJdJIeXHOCTn, HOMep 3aKa3a.4.440-238) npEdHa3HaueH dIЯ BCaCbIBaHnB BoDbI n3 OTKpbITbIX pe3epByapOB, HApPImEp, n3 6oueK dIydoJxDeBOB BObl IJIN npyIDOB (MaKcIMMaJIbHyIO BbICOTy BCaCbIBaHnCM.B pa3deJe "TexnHueCKne daHHbIe").
→ HanoJIHHTb BCaCbIBaIOUm IJIaHr KARCHER c o6paTHbIM KJIaNaHOM BOIOI, PnBnHTtB K 3JIeMeHTy NOKJIIOUeHnBAObl NOBecHTb B DOJDeByo 6Oky. → YdaJIeHHe BO3dUxHa nI np6Opa: BkIIOuHTb aannapat 6e3 noKJIOueHHoro BbICOKOHAnOpHOro IJnAHra nNoD0XJaTb (He 6oJee 2 MInHyT), noka n3 BbICOKOHAnOpHOro IJnAHra He NaHcET BbIXOJITb BOJa 6e3 Ny3bIPbKOB BO3dUxHa. BbIKIOuHTb np6Op n 3aHOBO NOcOeINHTb BbICOKOHAnOpHbI JIaHr.
Hauano pa60tbI
BhumaHue!
Pa6oma 8cyxyo 8 meueHue 60onee 2 Muhym npueodum K 6bixody u3 cmpo8 bICOKOHAnopHO 8nacoc. Ecnu npubop e meueHue 2 MuHym He Habipaem daBneHue, mo e2o cneodyem 6bIKIOUohmbu deucmboambc coombemcmbu C yka3aHuaM, KomopbIe npueodamc 8 2nae "Pomoub 6 cnyuae HenoiaadoK".
PncyHO
HaedeHbTe Ha puHoi NnCTOJETpacnbIInTeJIb CtpyHyo Tpy6ky 3aΦnKcnpyIe ee, NOBepHyBa 90°.
Pncyho
Unwind the high-pressure hose.
Hold the handle for transport.
Note: If the handle is in the locked position, it must first be folded up.
→ Fully open the water tap. Insert the power plug into the socket. → Switch on the appliance (I/ON).
Operation
Danger
The high-pressure jet from the nozzle can cause injury to the skin. Therefore, it is necessary to take a safe stance, firmly holding the spray lance with the spray tube.
Attention!
Before starting work, make sure that the device and the high-pressure hose are securely installed on a level surface. During work, use protective goggles and protective clothing.
Unlock the trigger of the spray lance. → Pull the trigger, the appliance switches on.
Note: If the trigger is released again, the appliance switches off again. High pressure is maintained in the system.
Spray tube with pressure regulator (Vario Power)
The tube is intended for the most common cleaning tasks. The working pressure is regulated by turning the knob between "Min" and "Max".
→ Release the trigger of the spray lance. → Turn the spray tube to the desired position.
Note: When using cleaning agents, the spray tube must be turned to the "Mix" position.
CtpyHnA Tpy6ka c 0pe3oJ dnydaneHn rpa3n
For removing stubborn dirt.
Attention!
Do not clean car tires, lacquered surfaces or delicate surfaces (e.g., wooden) with the dirt remover. There is a risk of damage.
Not intended for use with detergent.
Moussaeta
- Note: Intended for use with detergent. Set the detergent suction volume using the dosing regulator.
Bpaaioaia Mooja Ta
BpaaHuaaJcMoUaJuTeKa B Oco6eHHoCTn IOnXoJNT JJI MaIKN aBTOMo6nIeJ.
Attention!
During operation, the foam brush must not contain dirt or other particles. There is a risk of damage to the paint finish.
- Note: Intended for use with detergent. Set the detergent suction volume using the dosing regulator.
Delta-Racer D150
The Delta-Racer cleaning device combines a cleaning brush with a rotating high-pressure jet. Thanks to this, it is particularly suitable for cleaning car wheels and heavily soiled surfaces.
Danger
Bo epempaobmhe dompaueaumecb u He nohocume pyku nokpau moouezo npubopa DeltaRacer!

Working with cleaning agents
For cleaning tasks, use exclusively clean cleaning agents and care products from KÄRCHER, as they are specially developed for use in your device. The use of other cleaning agents and care products can lead to accelerated wear and loss of warranty claims. Detailed information can be obtained from a specialized retailer or directly from the KÄRCHER representative.
Information on cleaning agents: The most commonly used cleaning agent from Kärcher for this device can be purchased ready-to-use in a tank for cleaning agent, equipped with a screw cap. This eliminates the time-consuming task of rinsing or filling the tank.
Figure
Remove the cap from the tank for cleaning agent and insert the open tank upside down into the connection element for cleaning agent.
Figure
Set the amount of cleaning agent solution using the dosing knob for cleaning agent.
Use the spray lance with pressure regulator (Vario Power). Turn the spray lance to the "Mix" position.
Note: In this way, during operation, the cleaning agent solution is mixed with the water jet.
Note: If necessary, the brush can also be used with cleaning agent.
Recommended cleaning method
Spray the cleaning agent economically onto the dry surface and allow it to take effect (do not let it dry). Rinse off the dissolved dirt with the high-pressure jet.
Interrupting work
Release the trigger of the hand spray gun. Lock the trigger of the hand spray gun. During longer work breaks (more than 5 minutes), switch the device to "0/OFF" (0/off). Insert the hand spray gun into the holder.
Work procedure
Attention!
High-pressure hose to connect to the manual spray gun and device, when the system is without pressure.
→ Remove the detergent tank from the bracket, close with the lid. For storage, turn 180° and place in the bracket. Release the lever of the manual spray gun. → Switch off the device "0/OFF" (0/off). → Close the water tap. Disconnect the device from the water supply. Caution: Residual water from the high-pressure pump during operation may cause a leak of oil at the connections. → Press the lever of the manual spray gun to release the pressure. Lock the lever of the manual spray gun. → Disconnect the vacuum cleaner from the electrical network.
Transport
Attention!
To avoid accidents or damage, when transporting, take into account the weight of the device (see section "Technical data").
Transport by hand
→ Lift the device high by the handle and carry it. → Hold the device by the handle for transport.
Transport on vehicles.
Protection against freezing
Attention!
Protect the device and accessories from frost.
The device and accessories can be damaged by frost if water is not completely removed from them. To avoid damage:
Completely remove water from the device.
Disconnect the spray lance from the trigger gun. → Switch on the appliance (1/ON) and press the trigger of the trigger gun until water stops flowing (approx. 1 minute). → Switch off the appliance. Store the appliance and all accessories in a frost-free room.
Care and maintenance
Danger
Before performing any care or maintenance work on the appliance, switch it off and pull the mains plug out of the socket.
Maintenance
The appliance does not require preventive maintenance.
Care
Before prolonged storage, e.g. in winter:
→ Completely drain the water from the device. (See description in chapter "Frost protection") Figure
Clean the water filter with a pair of pliers and rinse it under running water.
Spare parts
Use only original spare parts from KÄRCHER.
The spare parts description is at the end of these operating instructions.
Troubleshooting
Minor malfunctions can be rectified yourself using the following description.
If the appliance is damaged, contact the authorized customer service.
Danger
Before performing any maintenance or servicing work, unplug the appliance and remove the power cord from the outlet.
Repair work on electrical components may only be carried out by the authorized customer service.
The appliance does not work
→ Pull the trigger of the spray gun, the appliance switches on. → Check that the voltage indicated on the rating plate matches the voltage of the power source. → Check the power cord for damage.
The appliance does not switch on, the motor hums
Cause: Voltage drop due to weak power supply or when using an extension cord.
→ Switch off the appliance, pull the trigger of the spray gun, then set the appliance switch to "I/ON" (I/ON).
Strong pressure fluctuations
Clean the high-pressure nozzle: Remove dirt from the nozzle opening and rinse it with water. → Check the amount of water being supplied.
The appliance is leaking
Slight leakage of the appliance is due to technical characteristics. In case of severe leakage, contact the authorized customer service.
Detergent is not being sucked in
→ Use the suction hose with pressure regulator (Vario Power). Turn the suction hose to the "Mix" position. → Check the regulator for detergent. → Check the suction hose for detergent for kinks.
Technical data
Type: 1.180-xxx 1.181-xxx
Essential directives EC 2006/42/EC (+2009/127/EC)
2004/108/EC
2000/14/EC
Applied harmonized standards
EN 55014-1:2006
EN 55014-2: 1997 + A1: 2001
EN 60335-1
EN 60335-2-79
EN 61000-3-2: 2006
EN 61000-3-3:2008
EN 62233: 2008
Applied conformity assessment procedure
Annex V
Sound power level dB(A)
S. Reiser Head of Approbation
71364 Winnenden (Germany)
Tel.: +49 7195 14-0
Fax: +49 7195 14-2212
Table of contents
71364 Winnenden (Germany)
Tel.: +49 7195 14-0
Fax: +49 7195 14-2212
Contents
Type: 1.180-xxx 1.181-xxx
2006/42/EC (+2009/127/EC)
2004/108/EC
2000/14/EC
71364 Winnenden (Germany)
Tel.: +49 7195 14-0
Fax: +49 7195 14-2212
Table of contents
General instructions SL -1
Safety instructions SL -2
Use SL -3
Description of the device SL -3
Transport SL-7
Storage SL -7
Type: 1.180-xxx 1.181-xxx
Relevant EC directives:
98/37/EC (until 28.12.2009)
71364 Winnenden (Germany)
Tel.: +49 7195 14-0
2006/42/EC (+2009/127/EC)
2004/108/WE
2000/14/WE
71364 Winnenden (Germany)
tel.: +49 7195 14-0
fax: +49 7195 14-2212
Table of contents
Dear customer,

Type: 1.180-xxx 1.181-xxx
Applicable EC Directives:
2006/42/EC (+2009/127/EC)
2004/108/EC
2000/14/EC
Harmonized standards used:
EN 55014-1:2006
EN 55014-2: 1997 + A1: 2001
EN 60335-1
EN 60335-2-79
EN 61000-3-2: 2006
EN 61000-3-3:2008
EN 62233: 2008
71364 Winnenden (Germany)
Tel.: +49 7195 14-0
Fax: +49 7195 14-2212
Contents
Type: 1.180-xxx 1.181-xxx
2006/42/EC (+2009/127/EC)
2004/108/EC
2000/14/EC
71364 Winnenden (Germany)
Tel: +49 7195 14-0
Fax: +49 7195 14-2212
Table of contents
General notes EN - 1
Safety instructions EN - 2
Operation EN - 3
Device description EN - 3
Transport EN - 7
Storage EN - 7
Care and maintenance EN - 7
Troubleshooting EN - 8
Technical data EN - 9
CE declaration EN - 9
Dear customer,

Before first use of your device, read these original operating
instructions, follow them, and keep them for later use or for the next owner.
Operating instructions
Intended use
Type: 1.180-xxx 1.181-xxx
2006/42/EZ (+2009/127/EZ)
2004/108/EZ
2000/14/EZ
Applied harmonized standards:
EN 55014-1:2006
EN 55014-2: 1997 + A1: 2001
EN 60335-1
EN 60335-2-79
EN 61000-3-2: 2006
EN 61000-3-3:2008
EN 62233: 2008
71364 Winnenden (Germany)
Tel.: +49 7195 14-0
Tip: 1.180-xxx 1.181-xxx
2006/42/EZ (+2009/127/EZ)
2004/108/EZ
2000/14/EZ
Applied harmonized standards:
EN 55014-1:2006
EN 55014-2: 1997 + A1: 2001
EN 60335-1
EN 60335-2-79
EN 61000-3-2: 2006
EN 61000-3-3:2008
EN 62233: 2008
71364 Winnenden (Germany)
Tel.: +49 7195 14-0
Insert the hose into the water inlet.
Attach the spray lance to the gun with 26 bolts.
Connect the high-pressure hose for operation under pressure to the rotary nozzle, secure it with the clamp.
Note: Pay attention to the correct direction of the supply hose.
Connecting the spray lance for operation under pressure with the pressure washer
→ Figure B
The spray lance for operation under pressure must be placed in the pressure washer until it clicks into place.
Note: Pay attention to the correct direction of the supply hose.
Check the secure connection by pulling the spray lance for operation under pressure.
Water supply
Warning
According to your local regulations, the device must not be used for drinking water without a separator.

system. Use a suitable separator system from KÄRCHER or alternatively a separator system according to EN 12729 type BA. Water flowing through the separator system is considered non-potable.
Caution
The separator system must be connected to the water supply, never directly to the device!
Warning: Drawing in and spraying water can damage the device under high pressure and accessories. To protect the device, use the KARCHER water filter (special accessory, order no. 4.730-059).
Connecting to the water supply
Observe the regulations of the water supply company.
For connection parameters, see the table in the device/technical parameters.
Suctioning water from open containers
This device for high-pressure operation is suitable for use with KARCHER suction hoses with check valve (special accessory, order no. 4.440-238) for suctioning water from open reservoirs, e.g., rain barrels or water tanks (max. suction height, see technical data).
→ Attach the suction hose with check valve to the water connection and place the end into the water container. → Deaerate the device: Turn on the device without the hose under pressure and let it run (max. 2 minutes) until water comes out without bubbles from the high-pressure connection. Turn off the device and reconnect the hose.
Operation with detergent (Vario Power)
For the most effective cleaning. The working pressure can be adjusted infinitely between "Min" and "Max".
Release the trigger of the spray gun. The detergent operation must be carried out in the correct position.
Warning: When working with detergents, for safety, the pressure must be set to "Min".
Operation with detergent (foam nozzle)
For stubborn dirt.
Caution
Do not spray car tires, paint, or sensitive surfaces such as wood with the dirt blaster, risk of damage.
Procedure for working with the device.
Dosing line
- Instruction: Procedure for working with the device.
Set the dosing regulator to the desired amount of device for spraying.
The dosing line is turned on.
The turned-on dosing line is very similar to automobile line.
Warning
When working with dosing lines, do not have rags or other particles, danger of damage to the tank.
- Instruction: Procedure for working with the device.
Set the dosing regulator to the desired amount of device for spraying.
Delta-Racer D150
Delta-Racer combines the dosing line with a turned-on stream at high pressure.
Protection against freezing
Warning
The device and accessories must be protected from freezing.
The device can be damaged by freezing if it contains water residues. To avoid damage:
Drain the device completely of water:
→ Disconnect the device from the water supply. → Detach the spray gun from the high-pressure hose. → Turn on the device (I/ON) and press the trigger on the spray gun until water comes out (about 1 min.). → Turn off the device. → The device and accessories must be stored in a frost-proof place.
Maintenance and care
Danger
Before carrying out any work on the device, switch it off and pull out the mains plug.
Maintenance
The device does not require maintenance.
Maintenance
For longer storage periods, e.g. in winter:
→ Drain the device completely of water: (see chapter "Frost protection") → Figure
Detach the spray gun from the high-pressure hose with the help of a flat screwdriver and rinse it under running water.
Spare parts
Use only original spare parts from KARCHER. You will find the spare parts list at the end of these operating instructions.
Troubleshooting
Remove the detergent tank and clean it thoroughly, following the instructions below.
In case of malfunction, contact a certified service center.
Danger
Before cleaning the device, unplug it and wait for it to cool down.
Repair work and work on electrical components may only be carried out by authorized service personnel.
Device does not work
→ Pull the trigger of the spray gun, the device switches on. → Check the connection of the high-pressure hose to the water supply. → Check the fuse for tripping.
Device does not reach operating pressure
→ Check the spray gun setting. → Use the device without a spray gun. Connect the device without the spray gun and let it run (max. 2 minutes) until water flows out of the nozzle without air bubbles. Switch off the device and reconnect the spray gun. → Check the water supply. → Remove the nozzle from the high-pressure hose and clean it with a needle and rinse with water.
Device does not start, motor hums
Cause: Voltage drop due to weak electrical grid or when using an extension cord.
→ First pull the trigger of the spray gun for dry running, then set the pressure regulator to "I/ON".
Strong pulsation of the spray jet
Detergent not being drawn in
→ Use the spray gun with pressure regulation (Vario Power) and set the spray gun to "Mix". → Check the setting of the detergent regulator. → Check the suction hose for detergent for blockages.
Type: 1.180-xxx 1.181-xxx
Annex to the Declaration of Conformity to EC Directives:
2006/42/EC (+2009/127/EC)
2004/108/EC
2000/14/EC
Annex to the harmonized standards used:
EN 55014-1:2006
EN 55014-2: 1997 + A1: 2001
EN 60335-1
EN 60335-2-79
EN 61000-3-2: 2006
EN 61000-3-3:2008
EN 62233: 2008
Applied method for conformity assessment:
PpnoKeHne V
HnboHa wym dB(A)
71364 Winnenden (Germany)
Tel.: +49 7195 14-0
Fax: +49 7195 14-2212
Table of contents
General notes ET -1
Safety notes ET -2
Handling ET-3
Parts of the device ET-3
Transport ET-7
Storage ET-7
Water supply from water mains
Product: High-pressure washer
Type: 1.180-xxx 1.181-xxx
S. Reiser Head of Approbation
71364 Winnenden (Germany)
Tel: +49 7195 14-0
Types: 1.180-xxx 1.181-xxx
71364 Winnenden (Germany)
Tel.: +49 7195 14-0
Fax: +49 7195 14-2212
Contents
General instructions LT -1
Type: 1.180-xxx 1.181-xxx
71364 Winnenden (Germany)
Tel.: +49 7195 14-0
Fax: +49 7195 14-2212
The device contains materials that can be reused. Therefore, please dispose of it properly.
Instructions for use of components (REACH)
Current information about components is provided on the website at:
Before starting work
Before starting operation of the device, install all unsecured parts.
Installing the wheels
→ Figure A
Install the wheels in the brackets and secure them with washers equipped with lugs. Check the correct positioning of the wheels.
Assembling the holder for storing the hand sprayer
→ Figure B
Install the lower holder in the recess and slide it forward to the stop. Install the upper holder and press it down until it stops.
Installing the hooks for storing the extension hose
→ Figure C
Pull out the hooks for storage and lock them in the upper position.
Installing the handle for transport
To install, you will need 2 Phillips screws.
→Figure D
Insert the handle for transport into the guide and secure it with screws.
Installing the sprayer trigger
To install, you will need 2 Phillips screws.
→Figure E
Install the switch elements on the sprayer housing. Install the trigger and secure it with 2 screws.
Note: After installation, be sure to check that the trigger locks are present in their slots on the device.
Installing the drum for the high-pressure hose
→Figure F
Feed the end of the high-pressure hose through the slots on the trigger. Install the hose drum in the bracket located on the handle for transport.
Insert the shaft of the drive handle into the guide.
Find the locking plate and secure it with 2 screws.
Insert the union nipple for the short high-pressure hose into the brass fitting and secure it with the nut.
Note: Ensure correct positioning of the union nipple.
Insert the high-pressure hose into the spray gun.
→ Figure B
Insert the high-pressure hose into the spray gun until it clicks into place.
Note: Ensure correct positioning of the locking sleeve.
Check the tightness of the connection by pulling on the high-pressure hose.
Commissioning
Preface
According to the operating instructions, operation of the device without a separator system is prohibited in systems connected to the drinking water supply. Use a suitable separator system from KARCHER or an alternative separator system according to EN 12729 type BA. Water that has flowed through a separator system is considered non-potable.
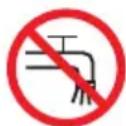
Attention!
The high-pressure cleaner must never be connected to the drinking water supply without a separator system, and never directly to the mains!
Note: Water with impurities can cause damage to the high-pressure pump and the device. To protect against this, use a KARCHER water filter (special accessory, order number 4.730-059).
Water connection
Observe the regulations of the water supply company.
Water quality. See technical data.
→ Use a water hose with a suitable material (not included in the delivery) with a standard coupling. (Diameter: minimum 1/2 inch or 13 mm; recommended length 7.5 m).
Connect the suction hose to the water supply element.
Screw the water hose onto the suction hose connection, then tighten it to the water hose.
Water supply from open containers
The high-pressure cleaner with KARCHER suction hose and check valve (special accessory, order no. 4.440-238) is intended for suctioning water from open reservoirs, e.g., from containers, from a pond or from a cistern (max. suction height see section "Technical data").
Fill the KARCHER suction hose with the check valve with water, connect it to the water supply element and hang it into the water source.
Venting the device: Switch on the device without connecting the high-pressure hose and let it run (no longer than 2 minutes) until water exits the high-pressure hose without air bubbles. Switch off the device and reconnect the high-pressure hose.
Operation
Running dry for more than 2 minutes leads to damage to the high-pressure pump. If the device does not draw water after 2 minutes, switch it off and follow the instructions in the chapter "Troubleshooting".
Pull out and turn the quick-release coupling hose, and secure it by turning it 90°.
Unwind the high-pressure hose from the drum. When doing so, hold the handle for transport.
Note: If the handle is in the locked position, it must first be pulled upwards.
Connect the device to the mains. Insert the plug into the socket. Turn on the device (I/ON).
Operation
Caution!
The water jet coming out of the nozzle under high pressure can cause injury to the hands and feet. For this reason, keep a safe distance and hold the spray gun with the spray lance firmly.
Warning!
Before starting the device, make sure that it is placed on a level surface when operating at high pressure. During operation, use protective goggles and protective clothing.
Unlock the trigger of the spray gun. Pull the trigger, the device switches on.
Note: If the trigger is released again, the device switches off again. High pressure is maintained in the system.
Spray lance with pressure adjustment (Vario Power)
Recommended cleaning methods
Spray a small amount of cleaning agent onto the dry surface and let it act (do not let it dry). Rinse off the dissolved dirt with a high-pressure jet.
Operation
Release the trigger of the spray gun to lock the trigger of the spray gun. During breaks (interruptions), the device must be switched off (O/OFF). Insert the spray gun into the holder.
End of operation
Warning!
Use a clean, dry cloth to wipe the device. Only use a damp cloth, not wet.
Remove the tank for the main substance from the mounting and close it with the cap. Turn the device 180° and install it in the mounting. → Turn the valve handle to the "0/OFF" (0/CLOSED) position. → Close the water supply tap. Disconnect the device from the water supply. Caution: When removing the pressure hose or high-pressure hose during operation, hot water may splash out of the connection. → Press the valve handle to change the pressure in the system. Lock the handle of the manual pressure regulator. → Remove the mains plug.
Transportation
Attention!
To avoid damage and injury during transportation of the device, follow the instructions for the device (see section "Technical Data").
Manual transportation
Hold the device by the handle and carry it. → Pull the handle for transportation.
Transportation by means of transport
→ Before transportation in a horizontal position: Remove the tank for the main substance from the mounting and close it with the cap. Secure the device against slipping and tipping over.
Storage
Attention!
Technical maintenance
The device does not require preventive maintenance.
Faults
Before the storage period, empty the tank:
3. Operating instructions. (INB. ONNC B rnaBi ,3axnCT BiD 3aMeP3aHHA") → Figure N
Clean the filter element with water and rinse it under running water.
Spare parts
Use only original spare parts from KARCHER. For spare parts, see the enclosed operating instructions.
Troubleshooting
You can fix minor malfunctions yourself using the following overview. In case of doubt, contact the competent service department.
Caution!
Before performing any work on the device, switch it off and disconnect the mains plug from the socket.
Repair work and work on electrical components may only be carried out by an authorized service department.
Device does not work
→ Press the trigger of the spray gun, the device switches on. → Check that the voltage matches the rating plate and the power supply voltage. → Check the power cord for damage.
Device does not work under pressure
→ Check the setting of the high-pressure nozzle. → Vent the device. Switch on the device without the high-pressure nozzle and let it run (no more than 2 minutes) until water exits without air bubbles. Switch off the device and reattach the high-pressure nozzle. → Check water supply. → Clean the filter element with water and rinse it under running water.
Device does not switch on, no humming
Cause: The power cord has a weak electrical connection or is damaged.
When switching on the machine, the spray lance must be held firmly. Then set the switch to the "ON" position (I/ON).
High pressure hose
Clean the high pressure nozzle: remove the brush from the nozzle and rinse it with water. Check the amount of water supplied.
Appliance tightness
The appliance's tightness is determined by its technical characteristics. In case of significant leakage, contact an authorized service center.
Cleaning agent metering
Use the spray lance with adjustable pressure (Vario Power). Turn the spray lance to the "Mix" position. Check the metering regulator. Check the metering hose for the cleaning agent.
Technical specifications
Product: High pressure washer Type: 1.180-xxx 1.181-xxx
EC directives
2006/42/EG (+2009/127/EG)
2004/108/EC
2000/14/EC
Applied harmonized standards
EN 55014-1:2006
EN 55014-2: 1997 + A1: 2001
EN 60335-1
EN 60335-2-79
EN 61000-3-2: 2006
EN 61000-3-3:2008
EN 62233: 2008
Conformity assessment methods
Addendum
Sound power level dB(A)
S. Reiser Head of Approbation
71364 Winnenden (Germany)
Tel.: +49 7195 14-0
Fax: +49 7195 14-2212
A Alfred Karcher Ges.m.b.H. Lichtblaustraße 7 1220 Wien (01)250600
AUS
Karcher Pty. Ltd.
40 Koornang Road
Scoresby VIC 3179
(03) 9765 - 2300
B/LUX
Karcher N.V.
Industriebeg 12
2320 Hoogstraten
B:090010027 LUX:003290010027
BR
6975 Creditview Road Unit #2
Mississauga, Ontario L5N 8E9
1-800-465-4980
CH
Kärcher AG
Industriestraße 16
8108 Dallikon
0844 850 863
CZ
Karcher spel s r.o.
Modletice c.p. 141
251 01 Ricany u Prahy
0323606014
D
Kärcher Cleaning Systems A.E.
31-33, Nikitara str. &
Konstantinopoleos str.
13671 Acharnes
210-2316 153
H
Kärcher Hungária Kft
Tormasret ut 2.
2051 Biatorbágy
(023)530640
HK
Kärcher Limited
Unit 10, 17/F.
APEC Plaza
49HoiYuenRoad
Kwun Tong, Kowloon
(02)357-5863
1
Kärcher S.p.A.
Via A.Vespucci 19
21013 Gallarate (VA)
848-998877
IRL
Karcher Limited
12 Willow Business Park
Nangor Road
Clondalkin Dublin 12
(01)4097777
KOR
Karcher Co. Ltd. (South Korea)
Youngjae B/D, 50-1, 51-1
Sansoo-dong, Mapo-ku
Seoul 121-060
032-465-8000
MAL
Karcher Cleaning Systems Sdn. Bhd.
No. 8, Jalan Serindit 2
Bandar Puchong Jaya
47100 Puchong, Selangor
(03) 5882 1148
MEX
Karcher Mexico, SA de CV
Av. Gustavo Baz No. 29-C
Col. Naucalpan Centro
Naucalpan, Edo. de Mexico
C.P. 53000 Mexico
018000241313
N
Karcher AS
Stanseveien 31
0976 Oslo
24177700
NL
Karcher BV
Postbus 474
4870 AL Etten-Leur
0900-3344433
NZ
Karcher Limited
12 Ron Driver Place
East Tamaki, Auckland
(09) 274-4603
P
Neoparts-Com.eInd.Automóvel, S.A.
Av. Infante D. Henrique, Lote 35
1800-218 Lisboa
218558300
P
Karcher Sp. zo.o.
Ul. Stawowa 140
31-346 Krakow
(012)6397-222
PRC
Kärcher Cleaning Systems Co., Ltd.
Part B, Building 30
No.390 AiDu Road
Shanghai Waigaoquiao 200131
(021)5046-3579
RO
Karcher Romania s.r.l.
Sos.Odaii Nr.439
013606 Bucuresti
0372709001
RUS
OOO «Kepxep»
109147, MockBa
yI.TaraHcKa,Ⅱ.34,CTp.3
+74952283945
S
Kärcher AB
Tagenevagen 31
42502 Hisings-Karra
(031)577-300
SGP
Karcher Asia Pacific Pte. Ltd.
5 Toh Guan Road East
01-00 Freight Links
Express Distripark
Singapore 608831
6897-1811
SK
Karcher Slovakia, s.r.o.
Beniakova 2
94901 Nitra
0376555798
TR
Kärcher Servis Ticaret A.S.
9 Eylul Mahallesi
307 Sokak No. 6
Gaziemir / Izmir
(0232) 252-0708
TWN
Karcher Limited
5F/6.No.7
Wu-Chuan 1st Rd
Wu-Ku Industrial Zone
Taipei County
(02) 2299-9626
UA
Kärcher Ukraine
Kilzeva doroga, 9
03191, Kyiv
(044) 594 75 75
UAE
Karcher FZE
Jebel Ali Free Zone
RA 8, XB 1, Jebel Ali, Dubai
(04) 8836-776
USA
Alfred Karcher, Inc
2170 Satellite Blvd
Suite 350
Duluth, GA 30097
678-935-4545;877-527-2437
ZA
Kärcher (Pty.) Limited
144 Kuschke Street
Meadowdale
Edenvale 1614
(011)574-5360

KARCHER