
SIM 7124B - Iron BEKO - Free user manual and instructions
Find the device manual for free SIM 7124B BEKO in PDF.
| Product Type | Steam Iron |
| Brand | Beko |
| Model | SIM 7124B |
| Power Supply | 220-240 V ~ 50-60 Hz |
| Consumption | 2020-2400 W |
| Steam Flow | Up to 150 g/min |
| Main Functions | Steam ironing, steam jet, vertical steam, water spray, dry ironing |
| Auto Shut-off | Yes, after 30 s horizontal, 7-10 min vertical, 30 s tilted |
| Burn Protection | Very hot soleplate, do not touch |
| Cleaning | Wipe with a damp cloth, do not use abrasive products |
| Descaling (self-cleaning) | Yes, every 2-3 weeks |
| Accessories Included | Water measuring cup |
| Intended Use | Household use only |
| Insulation Class | Not specified |
| Weight | Not specified |
| Dimensions | Not specified |
Frequently Asked Questions - SIM 7124B BEKO
User questions about SIM 7124B BEKO
0 question about this device. Answer the ones you know or ask your own.
Ask a new question about this device
Download the instructions for your Iron in PDF format for free! Find your manual SIM 7124B - BEKO and take your electronic device back in hand. On this page are published all the documents necessary for the use of your device. SIM 7124B by BEKO.
USER MANUAL SIM 7124B BEKO
Please read this user manual first!
Dear Customers,
Thank you for selecting a Beko product. We hope that you get the best results from your product which has been manufactured with high quality and state-of-the-art technology. Therefore, please read this entire user manual and all other accompanying documents carefully before using the product and keep it as a reference for future use. If you handover the product to someone else, give the user manual as well. Follow all warnings and information in the user manual.
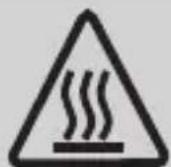
Meanings of the symbols
Following symbols are used in the various section of this manual:

Important information and useful hints about usage.

WARNING:Warnings for dangerous situations concerning the safety of life and property.
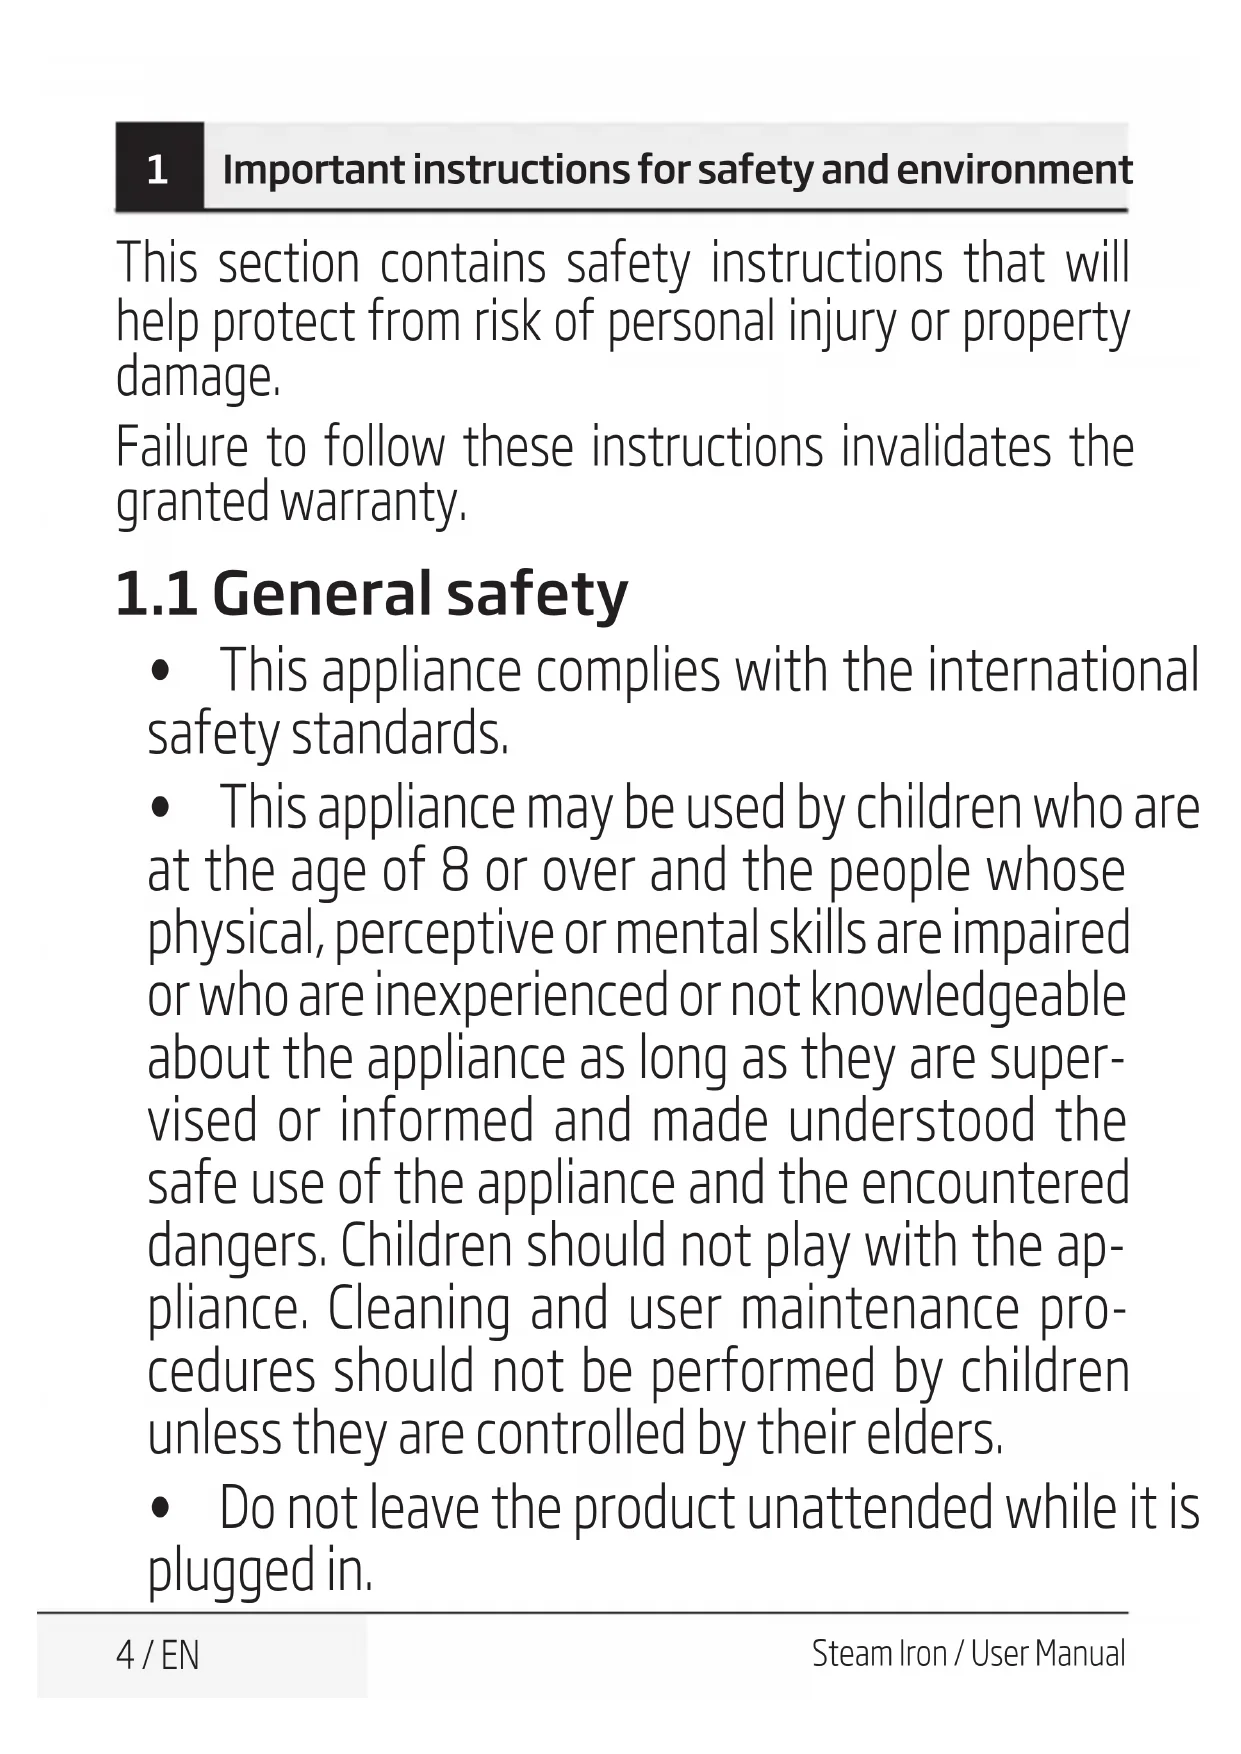
WARNING: Warning for hot surfaces.

This product has been produced in environmentally-friendly, state-of-the-art facilities.
CONTENTS
| ENGLISH | 4-16 |
| DEUTSCH | 17-34 |
| FRANÇAIS | 35-50 |
| TÜRKUAGE | 51-68 |
| ESPÁÑOL | 69-85 |
| POLSKI | 86-102 |
| HRVATSKI | 103-117 |
| ROMANIAN | 118-134 |
| ITALIANO | 135-152 |
| THAI | 153-169 |
1 Important instructions for safety and environment
This section contains safety instructions that will help protect from risk of personal injury or property damage.
Failure to follow these instructions invalidates the granted warranty.
1.1 General safety
- This appliance complies with the international safety standards.
- This appliance may be used by children who are at the age of 8 or over and the people whose physical, perceptive or mental skills are impaired or who are inexperienced or not knowledgeable about the appliance as long as they are supervised or informed and made understood the safe use of the appliance and the encountered dangers. Children should not play with the appliance. Cleaning and user maintenance procedures should not be performed by children unless they are controlled by their elders.
- Do not leave the product unattended while it is plugged in.
1 Important instructions for safety and environment
- Unplug the product before filling the water reservoir with water.
-
Operate and store the appliance on a stable surface.
-
When the appliance is placed on its base plate, ensure that the surface beneath the plate is level.
- Do not use the appliance if the power cable or the appliance itself is damaged. Contact an authorised service.
- If the appliance is dropped or leaks water or has other failures, contact the authorised service. Do not use the appliance until it is repaired.
- When the appliance is not in use or left to cool down keep the appliance and power cable out of reach of children under 8 years old.
-
The appliance is not suitable for using outdoors.
-
Only use the original parts or parts recommended by the manufacturer.
-
Do not attempt to dismantle the appliance.
1 Important instructions for safety and environment
- Your mains power supply should comply with the information supplied on the rating plate of the appliance.
- The mains supply of the appliance must be secured with a minimum 16 A fuse.
- Use the appliance with a grounded outlet only.
- Do not use the appliance with an extension cord.
- Do not pull the power cable when unplugging the appliance.
- Unplug the appliance before cleaning it.
- Do not wrap the cable around the appliance.
- Do not touch the appliance or its plug with wet or damp hands when the appliance is plugged in.
- The soleplate and its surrounding area can be extremely hot. Contacting hot surfaces may cause burns. Therefore while or just after using the appliance, pay attention not to touch the hot surfaces.
1 Important instructions for safety and environment
- Never use the appliance in or near to combustible or inflammable places and materials.
- If you keep the packaging materials, store them out of the reach of children.
- For detailed information on cleaning the appliance, please refer to the section Cleaning and maintenance.
1.2 Compliance with WEEE Directive and Disposing of the Waste Product
This product complies with EU WEEE Directive (2012/19/EU). This product bears a classification symbol for waste electrical and electronic equipment (WEEE).

This symbol indicates that this product shall not be disposed with other household wastes at the end of its service life. Used device must be returned to official collection point for recycling of electrical and electronic devices. To find these collection systems please contact to your local authorities or retailer
where the product was purchased. Each household performs important role in recovering and recycling of old appliance. Appropriate disposal of used appliance helps prevent potential negative consequences for the environment and human health.
1 Important instructions for safety and environment
1.3 Compliance with RoHS Directive
The product you have purchased complies with EU RoHS Directive (2011/65/EU). It does not contain harmful and prohibited materials specified in the Directive.
1.4 Package information
Packaging materials of the product are manufactured from recyclable materials in accordance with our National Environment Regulations. Do not dispose of the packaging materials together
material collection points designated by the local authorities.
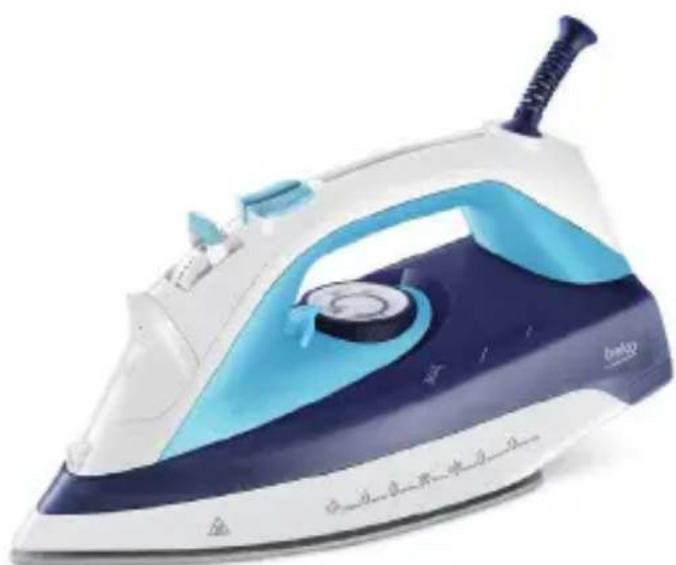
2 Your iron
2.1 Overview
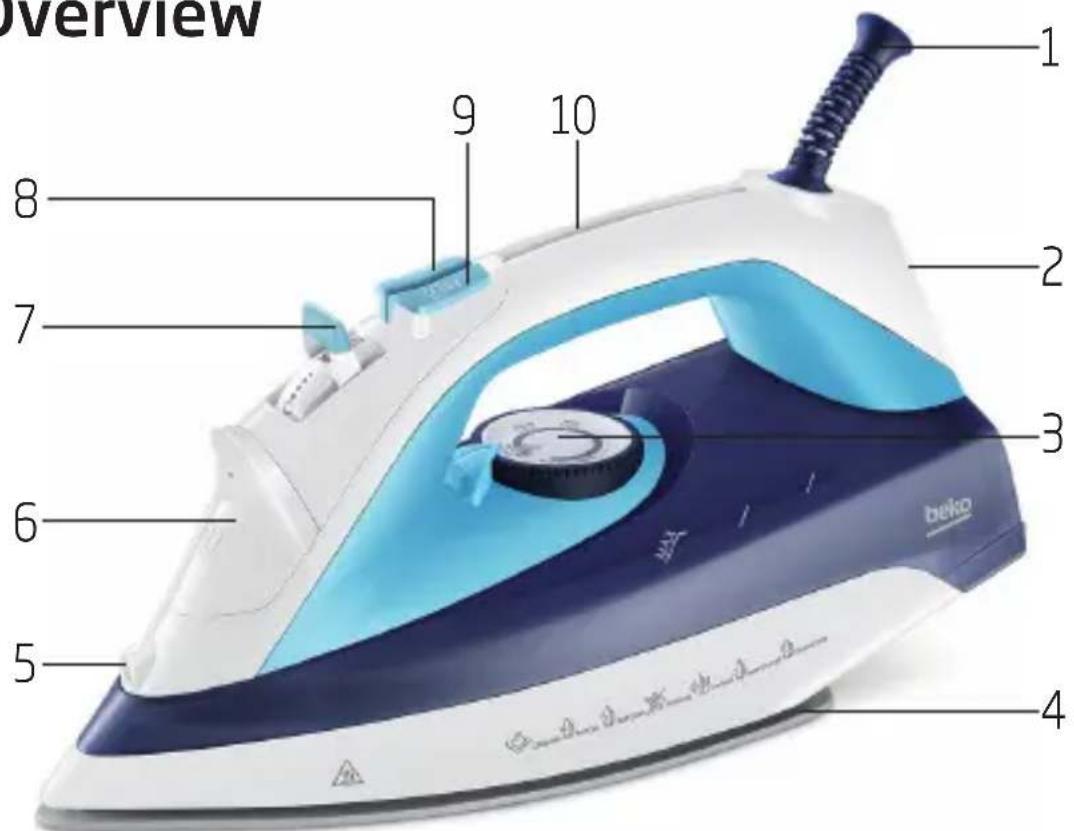
- Power cable
- Iron base plate
- Temperature adjustment knob
- Soleplate
- Water spray nozzle
- Water refill lid
- Steam setting and lime removal button
- Water spraying button
- Shock steam button
- Thermostat indicator and Auto-Off light
2.2 Technical data
Voltage:220-240V~50-60 Hz
Power consumption:
2020-2400W
Shock steam amount:
up to 150 ~g / min
Insulation class :|
Technical and design modification rights are reserved.
The values which are declared in the markings affixed on your appliance or the other printed documents supplied with it represent the values which were obtained in the laboratories pursuant to the pertinent standards. These values may vary according to the usage of the appliance and ambient conditions.
3 Operation
3.1 Intended use
This appliance is intended only for household use and ironing; it is not suitable for professional use.
3.2 Initial use
Prior to initial use, fill twice (see 3.3) and vaporize to remove the manufacturing residues (see 3.6). Meanwhile, use shock steam button (9) frequently.

You can smell a mild odour or see white sediments coming out of the soleplate (4) holes. After performing vaporizing process twice, such odours and sediments will disappear. Also water droplets may form within the water reservoir; this is normal.
3.3 Refilling the water reservoir
- Unplug the appliance.
- Steam setting button (7) off Set to "position.
- Fill the water cup provided with the appliance.
- Open the water refill lid (6) and fill the appliance with water up to MAX level.
- Close the water refill lid (6).

Your appliance is designed for use with tap water. If your tap water is excessively hard, we recommend you to use a mixture of tap water with potable water.
3.4 Setting the temperature
-
After the appliance is plugged in, set the temperature according to the type of your fabric by turning the temperature setting knob (3) in clockwise direction (see. 3.5).
-
Thermostat indicator light (10) will light up.
3 Operation
- When the appliance reaches the set temperature, thermostat indicator light (10) will turn off and the appliance is ready to use.
3.5 Temperature and steam settings table
When setting the temperature of the appliance, consider the following table.
| Fabric Type | Temperature Setting | Steam Setting |
| Synthetic • | Without steam | |
| Silk • | Without steam | |
| Woolen • | Without steam | |
| Cotton | With steam | |
| Linen - Jean Max With steam | ||

WARNING: Before ironing first check the label of the garment.

If you don't know the fabric of your garment, first iron an invisible part of your garment and determine a correct ironing temperature for it.

In order to prevent the bright stains that may form on the synthetic fabrics such as silk, iron on the reverse side of the fabric. Do not use the water spraying feature in order to prevent the stain formation.
3.6 Steam ironing
- Fill the water reservoir (see. 3.3).
- Set the appropriate temperature with the temperature setting knob (see 3.5).
3.3. Set the steam setting button (7) to " position. - After the thermostat indicator light (10) switches off you can start steam ironing.
3 Operation
3.7 Shock steam

When you start to iron, shock steam may not emit in your first couple of presses. In order to obtain shock steam, the temperature setting knob (3) should be at or above the "●●" level.
- Fill the water reservoir (see. 3.3).
- Set the temperature setting knob (3) to max. position by turning it in the clockwise direction. - Thermostat indicator light (10) will light up.
- When the appliance reaches the set temperature, thermostat indicator light (10) will turn off.
- After the thermostat indicator light (10) turns off, you can iron the garments with the powerful steam by pressing the shock steam button (9).

WARNING: If this process is maintained for a prolonged time water may come through the soleplate (4) together with steam.

In order to maintain ideal shock steam quality, set the steam setting button (7) to the OFF position.

WARNING: In order to use the shock steam feature the thermostat indicator light (10) should be turned off.
3.8 Vertical steam
You can also use the shock steam in upright position (see, 3.7). By pressing the shock steam button (9), you can iron your curtains and your garments on the hanger with the steam you will get by pressing the shock steam button. Hold the appliance 15 - 30cm away from the garment and curtains.
3 Operation

WARNING: During the ironing if the thermostat indicator light (10) turns on, before proceeding with the shock steam process wait for the light to turn off.

WARNING: Never direct this steam to people or pets.
3.9 Spraying water
- Fill the water reservoir (see. 3.3).
- Set the temperature (see. 3.5).
- Press the water spraying button (8) to spray water.

You can easily remove creases using the water spraying feature.
3.10 Dry ironing
In order to make dry ironing, set the steam setting button (7) to the OFF position.

Having water in the appliance would be advantageous; you may use the waterspraying button (8) when necessary.
3.11 Automatic Shutdown (Auto-Off)
- If the appliance is hold stationary for 30 seconds while in horizontal position, it will be automatically turned off.
- If the appliance is hold stationary for 7-10 minutes while in upright position, it will be automatically turned off.
- If the appliance is hold stationary for 30 seconds while in a leaned (right or left) position, it will be automatically turned off.

In case of automatic turn off the auto-off light (10) flashes.
- If the appliance is moved in horizontal position it will be turned on.

It may take 60 seconds for the soleplate (4) to reach the previously set temperature.
4 Cleaning and maintenance
4.1 Cleaning

WARNING: When you are finished with ironing, unplug the appliance. You can drain the water in the reservoir by opening the refill lid (6) and tilting the iron to the front.
- Unplug the appliance before cleaning.
- Wait for the appliance to cool down completely.
- Use a slightly damp cloth to clean the outer surface of the appliance. Then dry it thoroughly.
- Wipe the sediments and residues on the soleplate (4) with a slightly damp cloth and soft, nonabrasive liquid cleaner as necessary.

WARNING: Do not use gasoline, solvent and abrasive cleaning agents or hard brush to clean the appliance.
4.2 Lime removal (Self-Clean)
Lime removal function cleans the lime particles accumulated in the steam generator reservoir of the appliance.
Use this function once in every 2 to 3 weeks. If the tap water is very hard (if lime particles fall down from the soleplate (4) of the appliance), use the lime removal function more frequently.
- Unplug the appliance.
- Refill the appliance with water (see. 3.3).
- Steam setting button (7) off Set to "position."
- Plug in the appliance and set the temperature setting knob (2) to max. position by turning it in the clockwise direction.
- When the thermostat indicator light (10) turns off, unplug the appliance.
- Keep the iron in horizontal position over the sink and hold the lime removal button (7) at self-clean "position and shake the iron. Continue until the water in the reservoir is depleted.
4 Cleaning and maintenance

It may take some time for the water to drip from the holes of the soleplate.
- After the reservoir becomes fully empty, release the lime removal button (7).
- If there is still sediment, repeat this process.
- Following the lime removal process, let the appliance cool in upright position. After the appliance cools down, wipe off the soleplate (4) with a cloth.
4.3 Storage
If you do not intend to use the appliance for a long time, store it carefully.
- Before lifting the appliance unplug it and then let it cool completely.
- Empty the water reservoir.
- Keep the appliance and its accessories in their original packages.
- Store it in a cool, dry place.
Always keep the appliance out of the reach of children.
4.4 Handling and transportation
- During handling and transportation, carry the appliance in its original packaging. The packaging of the appliance protects it against physical damages.
- Do not place heavy loads on the appliance or the packaging. The appliance may be damaged.
- Dropping the appliance will render it non-operational or cause permanent damage.
5 Troubleshooting
Although the appliance is plugged in, soleplate (4) does not heat up.
The appliance may be connected improperly. >> Check the plug and power cable (1) of the appliance.
Temperature setting knob (3) may be at the Min. position. >> Turn the temperature setting knob in the clockwise direction up to the steam sign.
The appliance does not generate steam.
The water reservoir may not have enough water. >>>> Fill the water reservoir with water up to Max level (see, 3.3).
Steam setting button (7) may be at without-steam position. Switch the steam setting button to the steam position (see, 3.6).
Shock Steam - Vertical Steam does not function.
These functions may have been used too frequently in a very short period of time. Keep ironing at a horizontal position and wait for a while before using the shock steam function again. Soleplate (4) may not be hot enough. Turn the temperature setting knob (3) in the clockwise direction up to the steam sign.
Seat the appliance in a vertical position and wait for the soleplate to heat up.
Water drops fall down onto the fabric during ironing.
You may not have securely closed the water refill lid (6). >>>> Close the water refill lid securely.
You may be using the shock steam at temperature level or . >> Increase the temperature level (see. 3.7).
During ironing, sediments and residues fall down from the soleplate (4).
If the water you use for your appliance is too hard, such sediments may form. >> Use the self-clean function for once or a few times (see. 4.2). For the subsequent ironings fill the water reservoir of the appliance with a mixture of tap water and potable water.
The appliance drops water after it cools down or stored.
You may have left the appliance on a horizontal position while there is water in its reservoir. >> Empty the water reservoir.
Stains at the soleplate (4).
Wet garments might have been ironed and the soleplate (4) has had lime stains. After the appliance cools enough, wipe the soleplate with a microfiber knitted or cotton cloth soaked in vinegar.
-https://www.youtube.com/user/BekoChannel
- Posta Adresimiz:
-Arcelik A.S. Karaagaç Caddesi No:2-6, 34445, Sutluc /ISTANBUL
- Bayilerimiz,
-https://www.beko.com.tr/ytkili-saticilar/
- knuñvinssəv?b?faJau?luu:niāu uanIw?o?
nonuWoaannauvuaunnuinunn n
·ivua:anuunovuuwnunnu
inovunosovlaikwunvuu wunasau
Knu?uinsovuknaWIsunua KnaaandawusnsnAsunsus
Knnsavuunnaevksouunssosu anssiaou 1kaoaaiinuusnsla sunssusovn BEKO knuovunssv ?bounoovuiuaia
uau uauauauauauauauauuuuuuuuuuuuuuuuuuuuuuuuuuuuuuuuuuuuuuuuuuuuuuuuuuuuuuuuuuuuuuuuuuuuuuuuuuuuuuuuuuuuuuuuuuuuuuuuuuuuuuuuuuuuuuuuuuuuuuuuuuuuuuuuuuuuuuuuuuuuuuuuuuuuuuuuuuuuuuuuuuuuuuuuuuuuuuuuuuuuuuuuuuuuuuuuuuuUU - insoovulukunauanksunsvunana vnuonnns
1 nuiu: u naa ngya Ksunnuuaanna Iia:aVIIa
·Ikivuaau:kaoviauksoauaau:kan Iasunssiu:unwnwaginnu
·Kunanaiuauinov
- Ika'ov'Wk'anuovnuaov'ovaaonnaov nuvaan?KunuuiWuiianovnIwwuov im5a
- IkaivwIwkaanovinSovuovvauoavaaW 16 A
- ト県の変化は状態を分析。
·
·KnuaovnaWiuoadovnsanuaIwao
- kənəuənəaŋnɪsʌnənaŋn nSv
- knuwuanwsouq insaoovnouu:ovnu Ia:Uvnu
KuaanuinsovksouanWuaivsoV 20010kssaouiiaauuaanWia
1 nuiu: u naa ngya Ksunnuuaanna Iia:aVIIa
WuSua:Wosau anunsanonusau avao nsaunwunosauonnK Wokuvku vuu uuu:nvvuksoaovnuunssovuiia Ks:Us:ovaa uwaunuwunnsou
- knuovnuinsavuwwunksənanaanu nksoaqnanonokinannssuukso aIwla
Knauusuaussaunl 1kna ukkovannsivovvian
1 mui:unnaayaksunuuaan Ⅱa:aVIIa
Jauussunuvwannwnuauanuaqunau nukuiu uunnns:uuauauauauuauuauuauauauauauauauauauauauuuuuuuuuuuuuuuuuuuuuuuuuuuuuuuuuuuuuuuuuuuuuuuuuuuuuuuuuuuuuuuuuuuuuuuuuuuuuuuuuuuuuuuuuuuuuuuuuuuuuuuuuuuuuuuuuuuuuuuuuuuuuuuuuuuuuuuuuuuuuuuuuuuuuuuuuuuuuuuuuuuuuuuuuuuuuuuuuuuuuuuuuuuuuuuuuUU
2.1 nWSSU
- anw
- WwUuuaVicSn
- UJUsuAnuknU
- IwUSe
- kōwuaɪsɛʃu
- Wnsauaiu
- uusulun uuvanu Kuuu (naa:ua)
- UwuaIus
- UJauunun
- Iwannu:nosuiiania:W nssuaovau
2.2 Jəyannvinnu
Iisovulw:220-240bai\~ 50-60 ios
nssauuaowawnu: 2020-2400
Usunulauunun: avagv 150 nsu/un
s:auuuaauu:1
uavouannsiunuauuav mvinuaaansaaanniuu
nniiaoviluiuuaovnaoouinssovvovnuonksoiananswwwfo nikwnwsoununosovuiiaovn oovanmnsnoaovkovnauonunasynuninovovnkanunaiuswulauugununsivnu
3.1 nslvunnkual5
SERVICE REQUEST PROCEDURES Please keep the receipt of other items
2. For the service under warranty, please see more details on Box 1
3. Please read the manual for instruction and primary problem solving.
4. If there is any defect of your product, a though it is under warranty, the Company may charge some expense. 5. If you have any problem about service, please contact Boko customer service call center at 024 2356 (BEKO).
Remark:
All c t i a e d s e d e d d d d d d d d d d d d d d d d d d d d d d d d d d d d d d d d d d d d d d d d d d d d d d d d d d
beko
一
n
ununnu
Bako Tshaji Co., Ltd.
55
21120
ununnu
Bako Tshaji Co., Ltd.
55
1
2112
nannnnnnaaennnnnne nnnnne nnnnnnne nnnnne nnnnne nnnnne nnnnne nnnnne nnnnne nnnnne nnnnne nnnnne nnnnne nnnnne nnnnne nnnnne nnnnne nnnnne nnnnne nnnnne nnnnne nnnnne nnnnne nnnnne nnnnne nnnnne nnnnne nnnnne
aennnne nnnnne nnnnne nnnnne nnnnne
Thank you for your purchase of Beko quality product. Please keep the receipt and/or other references of product purchase in an appropriate location. You are requested to present them for warranty service under Beko terms and conditions, valid for 2 years after the purchasing date. The service covers spare parts and labor charge under the determined scope in Thailand.
(PLEASE READ INSTRUCTIONS ON REVERSE SIDE)
RAYONG 21120 THALAND
ATTENTION
ywnn
Beko Thai Co., Ltd. P.O. BOX55
BANKHAI POST OFFICE
RAYONG 21120 THAILAND
n
- disluee 10
n 1
- via 100
mnnnne nnnnne nnnnne nnnnne nnnnne nnnnne nnnnne nnnnne nnnnne nnnnne nnnnne nnnnne nnnnne nnnnne nnnnne nnnnne nnnnne nnnnne nnnnne nnnnne nnnnne nnnnne nnnnne nnnnne nnnnne nnnnne
- 1
unnnnne
| Product Tel. | Warranty Card | beko |
| m#### | n##### | |
| Model | Serial No. | Product No. |
| ### | ####### | |
| Owner's name | Surname | |
| ### | ||
| Address | ||
| Tel. | Mobile | |
| E-mail Address | ||
| ### | ||
| Dealer's name | ||
| ### | ||
| Purchase date | Order No. |
m
Gg
GENERAL WARRANTY TERMS AND CONDITIONS
In products , parts , and accessories this is a useful way to ensure that your equipment is in the proper condition .To be sure you have a good experience with this product , the manufacturer offers a complete package , parts , and how to use this product in other situations .
()000000000000000000000000000000000000000
(1)
1
All rights reserved. All rights reserved.
Nannnd stnndl knt Mtt and Cpmssr y S
"Zed Value Coverage as detal below
Product types Warranty conditions Warranty Period 2018-06-03
Spun ture and hulchage 24
spoc#i# and h##ch
A
A
1
- 4.
a
T
At 00:00 p.m. and 12:00 p.m. (P.O. Box 1365), the survey is mailed by专人, mail to the address listed on the form.
1
All rights reserved. All rights reserved.
Nannnd stnndl knt Mtt and Cpmssr y S
"Zed Value Coverage as detal below
GENERAL WARRANTY TERMS AND CONDITIONS
| Product type | Warranty conditions | Warranty Period |
| 1. Solderless | Spa's pre-heat solder (hot) and hot metal | 1 year |
| Solderless contact solder (hot) and hot metal | 12 years | |
| 1. Staining materials | Spa's pre-heat insulation (lighter) | 5 years |
| Solderless contact insulation (lighter) | 10 years | |
| Solderless contact insulation (lighter) | 4 years | |
| 2. Chitosan layers | Spa's pre-heat and hot change | 3 years |
| Solderless contact with moisture and moisture inpin | 12 years | |
| 3. Rubberizer | Spa's pre-heat and heat change | 2 years |
| Solderless contact on the rubber | 10 years | |
| 4. Allo-collusion | Spa's pre-heat and hot change | 3 years |
| Solderless contact Corrosion | 1 year | |
| Solderless Corrosion | 3 years | |
| 5. Seal | Spa's pre-heat and hot change | 2 years |
| 7. Seal | Hot plastic fin and hot change | 7 year |
| 9. Seal | Hot plastic fin and hot change | 1 year |
| 10. Seal change | Spa's pre-heat and hot change | 2-6-9 |
| 11. Sealer/fixing | Spa's pre-heat and hot change | 1 year |
| 12. Under Breakdown | Spa's pre-heat and hot change | 2 years |
y 11 y I J
J
J
. j
J
J
J
J
J
J
J
J
J
J
J
J
J
J
J
J
J
J
J
J
J
J
J
J
J
J
J
J
J
J
J
J
J
J
J
J
J
J
J
J
J
J
J
J
J
J
J
J
J
J
j

: j 10)

3.8
sliy.3.7. jbi) gdojg 1
iclal ic slwJg jilll s
biill Jc Jss J
slol .9) jll d 15-30 15-30 15-30
J 10
10
10
10

12 4y y: j 10 1 1 1 1 1 1 1

(3) 8 j
8
8
8
8
8
8
8
8
8
8
8
8
8
8
8
8
8
8
8
8
8
8
8
8
8
8
8
8
8
8
8
8
8
8
8
8
8
8
8
8
8
8
8
8
8
8
8
8
8
8
(10) . (10)
J 1 J
J
J
J
J
J
J
J

1..(3.
2.
- 心
i
3.6
1.
(3) 2
(4) (3.5
(7) jIbJ 3
"Y"gJgJ
j10 (10) .4
.10
g 3.5
J
Jg j 1 J 1 1 1 1 1 1
8 8
88888888888888888888888888888888888888888
.
.
iil 1 jai i .
g^ ( x) = 1x - 1 > 0
Jzll
4-15
12gJ 1
J 1
Jg jn Jilll Jl 1 J. Beko Jiai i Jusie Ie 1 Ks Jd Jds 1 1 1 1 1 1 1 1 1 1 1 1 1 1 1 1 1 1 1 1 1 1 1 1 1 1 1 1 1 1 1 1 1 1 1
J. 1 J.
jg
:
joo
( 1 + u) = 1 + u + ( 1 + u) u >

gbi yj 0 jyj 0 g j

i

aaiiia aiee eae 1
0195
pili wall
SIM7124B
AR


- Please read this user manual first!
- Meanings of the symbols
- CONTENTS
- Important instructions for safety and environment
- General safety
- Compliance with WEEE Directive and Disposing of the Waste Product
- Compliance with RoHS Directive
- Package information
- Your iron
- Overview
- Technical data
- Operation
- Intended use
- Initial use
- Refilling the water reservoir
- Setting the temperature
- Temperature and steam settings table
- Steam ironing
- Shock steam
- Vertical steam
- Spraying water
- Dry ironing
- Automatic Shutdown (Auto-Off)
- Cleaning and maintenance
- Cleaning
- Lime removal (Self-Clean)
- Storage
- Handling and transportation
- Troubleshooting
- nuiu: u naa ngya Ksunnuuaanna Iia:aVIIa
- mui:unnaayaksunuuaan Ⅱa:aVIIa
- nWSSU
- Jəyannvinnu
- nslvunnkual5
- 3.8
- 3.6
- g 3.5
- J
Brand : BEKO
Model : SIM 7124B
Category : Iron