
SIM6124B - Iron BEKO - Free user manual and instructions
Find the device manual for free SIM6124B BEKO in PDF.


| Product Type | Steam Iron |
| Brand | Beko |
| Model | SIM6124B |
| Dimensions (approx.) | 30 x 12 x 15 cm |
| Weight (approx.) | 1.2 kg |
| Power Consumption | 2400 W |
| Voltage / Frequency | 220-240 V, 50/60 Hz |
| Water Tank Capacity | 300 ml |
| Soleplate Material | Ceramic |
| Functions | Dry ironing, steam ironing, spray, anti-drip, self-clean, vertical steam |
| Variable Steam Settings | Yes |
| Spray Function | Yes |
| Anti-Drip System | Yes |
| Self-Cleaning System | Yes |
| Vertical Steam | Yes |
| Auto Shut-Off | Yes (after approx. 30 seconds horizontal, 8 minutes vertical) |
| Cord Length (approx.) | 2 m |
| Color | White / Gray |
| Warranty | 2 years |
Frequently Asked Questions - SIM6124B BEKO
User questions about SIM6124B BEKO
0 question about this device. Answer the ones you know or ask your own.
Ask a new question about this device
Download the instructions for your Iron in PDF format for free! Find your manual SIM6124B - BEKO and take your electronic device back in hand. On this page are published all the documents necessary for the use of your device. SIM6124B by BEKO.
USER MANUAL SIM6124B BEKO
natural_image
Exterior view of a white and blue BEKO air iron with visible branding (no text or symbols on body)SIM6124B
EN
Please read this user manual first!
Dear Customers,
Thank you for selecting a Beko product. We hope that you get the best results from your product which has been manufactured with high quality and state-of-the-art technology. Therefore, please read this entire user manual and all other accompanying documents carefully before using the product and keep it as a reference for future use. If you handover the product to someone else, give the user manual as well. Follow all warnings and information in the user manual.
Meanings of the symbols
Following symbols are used in the various section of this manual:

Important information and useful hints about usage.

WARNING: Warnings for dangerous situations concerning the safety of life and property.

WARNING: Warning for hot surfaces.

This product has been produced in environmentally-friendly, state-of-the-art facilities.
1 Important instructions for safety and environment 4-8
1.1 General safety 4
1.2 Compliance with WEEE Directive and Disposing of the Waste Product ....7
1.3 Compliance with RoHS Directive .....7
1.4 Package Information 7
1.5 Plug Wiring 8
2 Your iron 9
2.1 Overview 9
2.2 Technical data....9
3 Operation 10-13
3.1 Intended use 10
3.2 Initial use 10
3.3 Refilling the water reservoir....10
3.4 Setting the temperature 10
3.5 Temperature and steam settings table .....11
3.6 Steam ironing 11
3.7 Shock steam....12
3.8 Vertical steam....12
3.9 Spraying water 13
3.10 Dry ironing 13
3.11 Automatic Shutdown (Auto-Off)....13
4 Cleaning and maintenance 14-15
4.1 Cleaning 14
4.2 Lime removal (Self-Clean) 14
4.3 Storage....15
4.4 Handling and transportation....15
5 Troubleshooting 16
6 Guarantee 17
1 Important instructions for safety and environment
This section contains safety instructions that will help protect from risk of personal injury or property damage.
Failure to follow these instructions invalidates the granted warranty.
1.1 General safety
- This appliance complies with the international safety standards.
- This appliance can be used by children aged from 8 years and above and persons with reduced physical, sensory, or mental capabilities or lack of experience and knowledge if they have been given supervision or instruction concerning use of the appliance in a safe way and understand the hazards involved. Children should not play with the appliance. Cleaning and user maintenance procedures should not be performed by children unless they are supervised by an older person.
1 Important instructions for safety and environment
- Do not leave the product unattended while it is plugged in.
- Unplug the product before filling the water reservoir with water.
- Operate and store the appliance on a stable surface.
- When the appliance is placed on its base plate, ensure that the surface beneath the plate is level.
- Do not use the appliance if the power cable or the appliance itself is damaged. Contact an authorised service centre.
- If the appliance is dropped or leaks water or has other failures, contact an authorised service centre. Do not use the appliance until it is repaired.
- When the appliance is not in use or left to cool down keep the appliance and power cable out of reach of children under 8 years old.
- The appliance is not suitable for using outdoors.
- Only use the original parts or parts recommended by the manufacturer.
1 Important instructions for safety and environment
- Do not attempt to dismantle the appliance.
- Your mains power supply should comply with the information supplied on the rating plate of the appliance.
- The mains plug is fitted with a 13A fuse. Ensure the same rating fused is used should it need replacement.
- Use the appliance with a grounded outlet only.
- Do not use the appliance with an extension cord.
- Do not pull the power cable when unplugging the appliance.
- Unplug the appliance before cleaning it.
- Do not wrap the cable around the appliance.
- Do not touch the appliance or its plug with wet or damp hands when the appliance is plugged in.
- The soleplate and its surrounding area can be extremely hot. Contacting hot surfaces may cause burns. Therefore while or just after using the appliance, pay attention not to touch the hot surfaces.
1 Important instructions for safety and environment
- Never use the appliance in or near to combustible or inflammable places and materials.
- If you keep the packaging materials, store them out of the reach of children.
1.2 Compliance with WEEE Directive and Disposing of the Waste Product
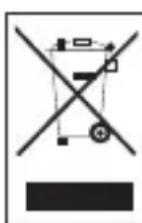
This product complies with EU WEEE Directive (2012/19/EU). This product bears a classification symbol for waste electrical and electronic equipment (WEEE). This product has been manufactured with high quality parts and materials which can be reused and are suitable for recycling. Do not dispose of the waste product with normal domestic and other wastes at the end of its service life. Take it to the collection center for the recycling of electrical and electronic equipment. Please consult your local authorities to learn about these collection centers.
1.3 Compliance with RoHS Directive
The product you have purchased complies with EU RoHS Directive (2011/65/EU). It does not contain harmful and prohibited materials specified in the Directive.
1.4 Package Information

Packaging materials of the product are manufactured from recyclable materials in accordance with our National Environment Regulations. Do not dispose of the packaging materials together with the domestic or other wastes. Take them to the packaging material collection points designated by the local authorities.
1 Important instructions for safety and environment
1.5 Plug Wiring
The moulded plug on this appliance incorporates a 13 A fuse. Should the fuse need to be replaced an ASTA approved BS1362 fuse of the same rating must be used. Do not forget to refit the fuse cover. In the event of losing the fuse cover, the plug must not to be used until a replacement fuse cover has been fitted. Colour of the replacement fuse cover must be the same colour as that visible on the pin face of the plug Fuse covers are available from any good electrical store.
- Fiting a different plug
As the colours of the wires in the mains lead of this appliance may not correspond with the coloured markings identifying the terminals on your plug, proceed as follows:
- Brown cable = L (Live)
- Blue cable = N (Neutral)
- Green/yellow cable must be connected to ground (E) line
With the alternative plugs a 13 A fuse must be fitted either in the plug or adaptore or in the main fuse box. If in doubt contact a qualified electrician.

2 Your iron
2.1 Overview
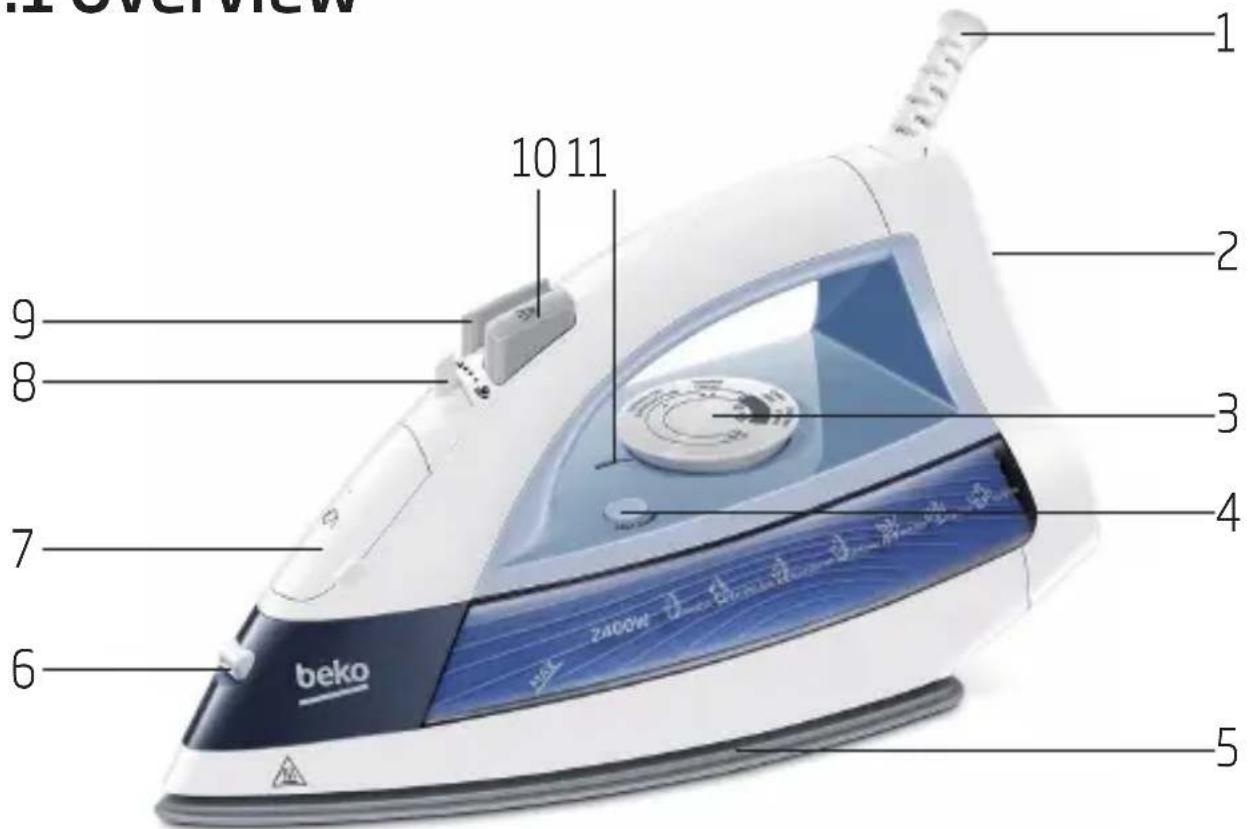
- Power cable
- Iron base plate
- Temperature adjustment button
- Lime removing button
- Soleplate
- Water spray nozzle
- Water refill lid
- Steam adjustment button
- Shock steam button
- Water spraying button
- Thermostat indicator and Auto-Off light
2.2 Technical data
Voltage: 220-240V\~
50/60Hz
Power : 2020-2400 W
consumption
Insulation class: I
Shock steam : up to 150 g/min amount
The values which are declared in the markings affixed on your appliance or the other printed documents supplied with it represent the values which were obtained in the laboratories pursuant to the pertinent standards. These values may vary according to the usage of the appliance and ambient conditions.
3 Operation
3.1 Intended use
This appliance is intended only for household use and ironing; it is not suitable for professional use.
3.2 Initial use
Prior to initial use, fill twice (see 3.3) and perform steam function process to remove the manufacturing residues (see 3.6). Meanwhile, use shock steam button (9) frequently.

You can smell a mild odour or see white sediments coming out of the soleplate holes. After performing steam function process twice, such odours and sediments will disappear. Also water droplets may form within the water reservoir; this is normal.
3.3 Refilling the water reservoir
- Unplug the appliance.
- Steam setting button (8) off Set to "×" position.
- Fill the water cup provided with the appliance.
- Open the water refill lid (7) and fill the appliance with water up to MAX level.
- Close the water refill lid (7).

Your appliance is designed for use with tap water. If your tap water is excessively hard, we recommend you to use a mixture of tap water with drinking water.
3.4 Setting the temperature
- After the appliance is plugged in, set the temperature according to the type of your fabric by turning the temperature setting button (3) in counter clockwise direction (see. 3.5).
- Thermostat indicator light (10) will light up.
3 Operation
- When the appliance reaches the set temperature, thermostat indicator light (11) will turn off and the appliance is ready to use.
3.5 Temperature and steam settings table
When setting the temperature of the appliance, consider the following table.
| Fabric Type | Temperature Setting | Steam Setting |
| Synthetic | ● | Without steam |
| Silk | ● | Without steam |
| Woolen | ●● | Without steam |
| Cotton | ●●● | With steam |
| Linen - Jean | Max | With steam |

WARNING:
Before ironing first check the label of the garment.

If you don't know the fabric of your garment, first iron an invisible part of your garment and determine a correct ironing temperature for it.

In order to prevent bright stains that may form on synthetic fabrics such as silk, iron on the reverse side of the fabric. Do not use the water spraying feature in order to prevent the stain formation.
3.6 Steam ironing
- Fill the water reservoir (see. 3.3).
- Set the appropriate temperature with the temperature setting button (3) (see 3.5).
- Set the steam setting button (8) to "position.
- After the thermostat indicator light (11) switches off you can start steam ironing.
3 Operation
3.7 Shock steam

When you start to iron, shock steam may not emit in your first couple of presses. In order to obtain shock steam, the temperature setting button (3) should be at or above the “•••” level.
- Fill the water reservoir (see. 3.3).
- Set the temperature setting button (3) to max. position by turning it in the counter clockwise direction.
- Thermostat indicator light (11) will light up.
- When the appliance reaches the set temperature, thermostat indicator light (11) will turn off.
- After the thermostat indicator light (11) turns off, you can iron the garments with the powerful steam by pressing the shock steam button (9).

WARNING: If this process is maintained for a prolonged time water may come through the soleplate (5) together with steam.

In order to maintain ideal shock steam quality, set the steam setting button (8) to the OFF " ✉" position.

WARNING: In order to use the shock steam feature the thermostat indicator light (11) should be turned off.
3.8 Vertical steam
You can also use the shock steam in upright position (see. 3.7). By pressing the shock steam button (9), you can iron your curtains and your garments on the hanger. Hold the appliance 15-30 cm away from the garment and curtains.
3 Operation

WARNING:
During ironing if the thermostat indicator light (11) turns on, before proceeding with the shock steam process wait for the light to turn off.

WARNING: Never direct this steam to people or pets.
3.9 Spraying water
- Fill the water reservoir (see. 3.3).
- Set the temperature (see. 3.5).
- Press the water spraying button (10) to spray water.

You can easily remove creases using the water spraying feature.
3.10 Dry ironing
In order to make dry ironing, set the steam setting button (8) to the OFF "position.

Having water in the appliance would be advantageous; you may use the water spraying button (10) when necessary.
3.11 Automatic Shutdown (Auto-Off)
- If the appliance is stationary for 30 seconds while in horizontal position, it will be automatically turned off.
- If the appliance is stationary for 7-10 minutes while in upright position, it will be automatically turned off.
- If the appliance is stationary for 30 seconds while in a leaned (right or left) position, it will be automatically turned off.

In case of automatic turn off the auto-off light (11) flashes.
- If the appliance is moved in a horizontal position it will turn on.

It may take 60 seconds for the soleplate (5) to reach the previously set temperature.
4 Cleaning and maintenance
4.1 Cleaning

WARNING: When you are finished with ironing, unplug the appliance. You can drain the water in the reservoir by opening the refill lid (7) and tilting the iron to the front.
- Unplug the appliance before cleaning.
- Wait for the appliance to cool down completely.
- Use a slightly damp cloth to clean the outer surface of the appliance. Then dry it thoroughly.
- Wipe the sediments and residues on the soleplate (5) with a slightly damp cloth and soft, nonabrasive liquid cleaner as necessary.

WARNING: Do not use gasoline, solvent and abrasive cleaning agents or hard brush to clean the appliance.
4.2 Lime removal (Self-Clean)
Lime removal function cleans the lime particles accumulated in the steam generator reservoir of the appliance.
Use this function once in every 2 to 3 weeks. If the tap water is very hard (if lime particles come out of the soleplate (5) of the appliance), use the lime removal function more frequently.
- Unplug the appliance.
- Refill the appliance with water (see, 3.3).
- Steam setting button (8) off Set to "position."
- Plug in the appliance and set the temperature setting button (3) to max. position by turning it in the counter clockwise direction.
- When the thermostat indicator light (11) turns off, unplug the appliance.
- Keep the appliance in a horizontal position over the sink and shake the appliance while pressing and holding the lime removal button (4). Continue until the water in the reservoir is depleted.
4 Cleaning and maintenance

It may take some time for the water to drip from the holes of the soleplate.
- After the reservoir becomes fully empty, release the lime removal button (4).
- If there is still sediment, repeat this process.
- Following the lime removal process, let the appliance cool in upright position. After the appliance cools down, wipe off the soleplate (5) with a cloth.
4.3 Storage
If you do not intend to use the appliance for a long time, store it carefully.
- Before lifting the appliance unplug it and then let it cool completely.
• Empty the water reservoir. - Keep the appliance and its accessories in their original packages.
- Store it in a cool, dry place.
• Always keep the appliance out of the reach of children.
4.4 Handling and transportation
- During handling and transportation, carry the appliance in its original packaging. The packaging of the appliance protects it against physical damages.
- Do not place heavy loads on the appliance or the packaging. The appliance may be damaged.
- Dropping the appliance will render it non-operational or cause permanent damage.
5 Troubleshooting
Although the appliance is plugged in, soleplate (5) does not heat up.
The appliance may be connected improperly. >>> Check the plug and power cable (1) of the appliance.
Temperature setting button (3) may be at the Min. position. >>> Turn the temperature setting button in the clockwise direction up to the steam sign.
The appliance does not generate steam.
The water reservoir may not have enough water. >>> Fill the water reservoir with water up to Max level (see, 3.3).
Steam setting button (8) may be at without-steam position. >>> Switch the steam setting button to the steam position (see. 3.6).
Shock Steam - Vertical Steam does not function.
These functions may have been used too frequently in a very short period of time.
Keep ironing at a horizontal position and wait for a while before using the shock steam function again. >>> Soleplate (5) may not be hot enough. Turn the temperature setting button (3) in the clockwise direction up to the steam sign.
Seat the appliance in a vertical position and wait for the soleplate to heat up.
Water drops fall down onto the fabric during ironing.
You may not have securely closed the water refill lid (7). >>> Close the water refill lid securely.
You may be using the shock steam at temperature level • or ••.
Increase the temperature level (see. 3.7).
During ironing, sediments and residues fall down from the soleplate (5).
If the water you use for your appliance is too hard, such sediments may form. >> Use the self-clean function for once or a few times (see. 4.2). For the subsequent ironings fill the water reservoir of the appliance with a mixture of tap water and potable water.
The appliance drops water after it cools down or stored.
You may have left the appliance on a horizontal position while there is water in its reservoir. >>> Empty the water reservoir.
Stains at the soleplate (5).
Wet garments might have been ironed and the soleplate (5) has had lime stains. >>> After the appliance cools enough, wipe the soleplate with a microfiber knitted or cotton cloth soaked in vinegar.
Product Guarantee
12 months breakdown and repair guarantee
Guarantor: Beko plc, 1 Greenhill Crescent, Watford, Hertfordshire. WD18 8UF
The guarantee does not in any way diminish your statutory or legal rights.
Your appliance has the benefit of our manufacturer's guarantee which covers the product for 12 months from the date of original purchase.
This gives you reassurance that if within that time, your appliance is proven to be defective because of either workmanship or materials, we will at our discretion either repair or replace your appliance.
The appliance must be correctly installed, located and operated in accordance with the instructions contained in the user manual. The guarantor disclaims any liability for accidental or consequential damage.
The Guarantee is subject to the following conditions:
- Documentary proof of the original purchase date is provided.
- The appliance has been installed and operated correctly and in accordance with our operating and maintenance instructions.
The appliance is used only on the electricity supply on the rating plate.
The appliance has only been used for normal domestic purposes.
The appliance has not been altered, serviced, dismantled or otherwise interfered with by any person.
The appliance is used in the United Kingdom or Republic of Ireland. - Any parts removed during repair work or any product that has been replaced becomes our property.
The guarantee is not transferrable if the product is resold.
The Guarantee does not cover:
- Transit, installation or delivery damage.
- Accidental damage.
- Misuse or abuse.
- Replacement of any consumable item or accessories. These include but are not limited to: plugs, cables, light bulbs, knobs, filters and flaps.
- Repairs or replacements required as a result of unauthorised repairs or inexpert installation that fails to meet the requirements contained in the user guide or instruction book.
■ Repairs to products used in commercial or non-residential household premises.
How to obtain after sales service, help or general advice
Please keep your purchase receipt or other proof of purchase in a safe place as you will need to show us this document if your product requires attention within the guarantee period.
Please also record your product details below, which will allow you to access our services more quickly and help us identify your product. The model number is printed on the front of the user guide and the serial and model number is shown on your products rating plate.
| Model number | Serial number | Purchased from | Date of purchase |
Please call our UK based Customer Service department if you need help or advice from us:
United Kingdom and Northern Ireland: 0845 600 4911 / 0345 600 4911
Republic of Ireland: 01 862 3411
You can also contact us through our website: www.beko.co.uk

natural_image
Abstract geometric design with blue triangular shapes on white background (no text or symbols)

- Please read this user manual first!
- Meanings of the symbols
- Important instructions for safety and environment 4-8
- Your iron 9
- Operation 10-13
- Cleaning and maintenance 14-15
- Troubleshooting 16
- Guarantee 17
- Important instructions for safety and environment
- General safety
- Compliance with WEEE Directive and Disposing of the Waste Product
- Compliance with RoHS Directive
- Package Information
- Plug Wiring
- - Fiting a different plug
- Your iron
- Overview
- Technical data
- Operation
- Intended use
- Initial use
- Refilling the water reservoir
- Setting the temperature
- Temperature and steam settings table
- WARNING:
- Steam ironing
- Shock steam
- Vertical steam
- Spraying water
- Dry ironing
- Automatic Shutdown (Auto-Off)
- Cleaning and maintenance
- Cleaning
- Lime removal (Self-Clean)
- Storage
- Handling and transportation
- Troubleshooting
- Product Guarantee
- months breakdown and repair guarantee
- The Guarantee is subject to the following conditions:
- The Guarantee does not cover:
- How to obtain after sales service, help or general advice
Brand : BEKO
Model : SIM6124B
Category : Iron