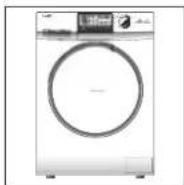
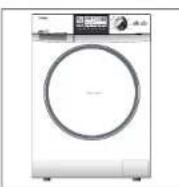
HW70B1426S - Washing machine HAIER - Free user manual and instructions
Find the device manual for free HW70B1426S HAIER in PDF.
| Product type | Washing machine |
| Brand | Haier |
| Model | HW70B1426S |
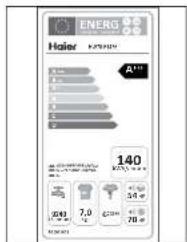
| Rated capacity | 7 kg |
| Maximum spin speed | 1400 rpm |
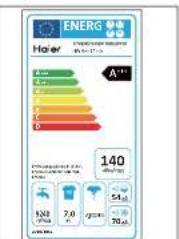
| Energy efficiency class | A+++ |
| Weighted annual energy consumption | 140 kWh/year |
| Weighted annual water consumption | 9240 L/year |
| Spin efficiency class | B |
| Number of programs | 16 |
| Main programs | Hygiene, Jeans, Sport, Lingerie, Wool, Mixed, Synthetic, Cotton, Daily, Ultra white, Express 15', Baby cotton, Delicate, Hand wash, Spin/Drain, Drum clean |
| Dimensions (H × W × D) | 845 × 595 × 600 mm |
| Net weight | 67 kg |
| Power supply | 220-240 V ~ 50 Hz |
| Maximum current | 10 A |
| Maximum power | 2000 W |
| Water pressure | 0.03 – 1 MPa |
| Noise level (wash/spin) | 54 / 70 dB(A) |
| Special functions | Delayed start, Child lock, Memory (M1/M2/M3), Aqua Stop |
| Installation type | Freestanding |
| Safety | Door lock, Overflow protection, Anti-foam |
| Maintenance | Detergent drawer cleaning, Pump filter, Water inlet filter, Drum clean |
Frequently Asked Questions - HW70B1426S HAIER
User questions about HW70B1426S HAIER
0 question about this device. Answer the ones you know or ask your own.
Ask a new question about this device
Download the instructions for your Washing machine in PDF format for free! Find your manual HW70B1426S - HAIER and take your electronic device back in hand. On this page are published all the documents necessary for the use of your device. HW70B1426S by HAIER.
USER MANUAL HW70B1426S HAIER
Thank you for purchasing a Haier product
Please read these instructions carefully before using this appliance. It contains important information which will help you get the best out of your appliance and ensure safe and proper installation, use, care and cleaning.
Keep this manual in a convenient place so you can always refer to it for safe and proper use.
If you sell the appliance, give it away, or leave it behind when you move, make sure you also pass on this manual so that the new owner can become familiar with all features and safety warnings.
Legend
√ Yes
No
i General information and tips
Warning! Important safet
Environmental information
Disposal
The presence of this symbol on the product, accessories or materials that goes with this information indicates that at the end of its useful life the product or its electronic accessories (e.g. cable, Aqua Stop hose) should not be disposed with other household waste. To prevent possible damage to the environment or human health from uncontrolled waste disposal, please separate these items from other types of waste and recycle them. This will promote the sustainable reuse of material resources. Household users should contact either the retailer where they purchased the product or relevant local authorities to find out how they can take this item for environmentally safe recycling and safety. Business users should contact their supplier and check the conditions of the purchase. This product and its electronic accessories should not be mixed with other commercial waste.
3 Index
Safety. 4-5
Product description.. 6
Control panel. 7-10
Programmes 11
Consumption. 12
Daily use. 13-16
Care and cleaning. 17-19
Troubleshooting 20-22
Installation. 23-25
Technical data 26
After sales service 27
Safety
4
Before switching on the appliance for the first time...

...make sure all transport bolts are removed.
...make sure the power cord is not caught under or in the appliance and there is no damage or risk for damaging
...make sure the power circuit fuse is rated for 15A.
...use a separate earthed socket for the power supply.
...make sure the plug is always accessible.
...hold the plug and not the electric cable when unplugging the power supply.
...check that hose joints and connections are firm and by opening tap check for any waterleakage.
...do not switch on the appliance until everything is properly installed!
Do not ...
...allow children or infirm persons to play with the appliance or packing materials.
...install the appliance outdoors in a damp place, or in an area which may be prone to water leaks such as under or near a sink unit. In the event of a water leak cut power supply and allow the machine to dry naturally.
...expose machine to any frost, heat or direct sunlight.
...touch or use the appliance when barefoot or with wet or damp hands or feet.
...use flammable detergent or dry cleaning agent.
...use any flammable sprays in close vicinity to the appliance.
...remove or insert the plug in presence of flammable gas.
...place the appliance directly on a carpet, or close to a wall or furniture.
5
Safety
During daily use of the appliance...
...supervise children.

Ensure that they don't play with the appliance and its packaging.
ensure that appliance is not used by people with reduced physical, sensory or mental capabilities, lack of experience and knowledge.
...pull up zips, fix loose threads and take care for small items to prevent laundry from being entangled. If necessary, use an appropriate bag or net.
...switch off at the wall socket after each wash programme to save electricity and for safety.
...keep the lower part of the porthole clean and open door and detergent drawer if appliance is not in use to prevent odours.
...a damaged power cord is only to be replaced by the manufacturer, his service agent or other specifically qualified people.
Do not ...
...touch the door during the washing process, it gets hot.
...place heavy objects or sources of heat or damp on top of the appliance.
...hot wash foam rubber or sponge-like materials.
...open detergent drawer during any wash cycle.
...force the door to open, it is fitted with a self-lock device and will open shortly after wash cycle end.
...open the door if the water level is visibly over the porthole.
...cover or encase the appliance during operation or after wards to allow any moisture or dampness to evaporate..


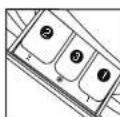
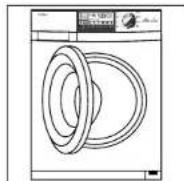
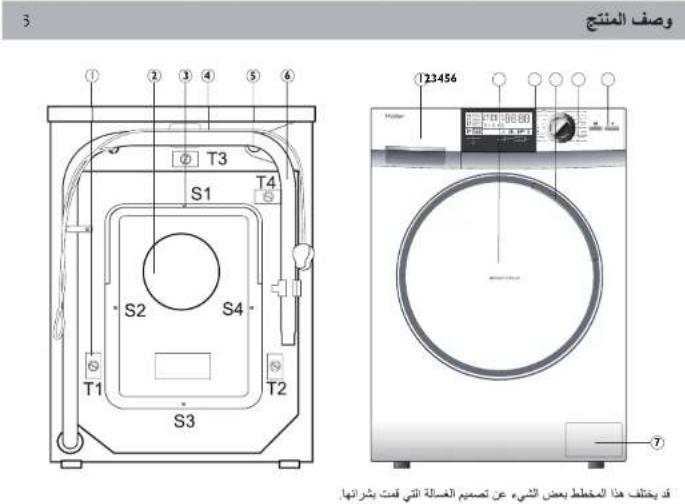
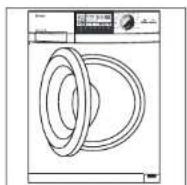
Product description
6
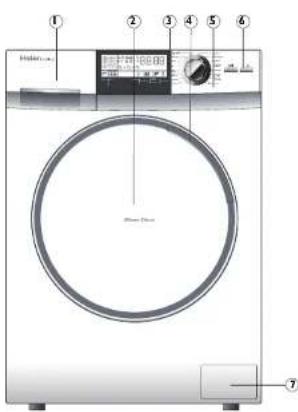
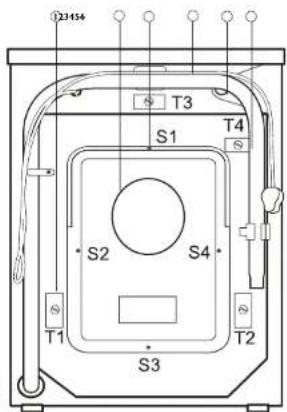
This drawing may be slightly different bc in the layout of the washing machine you have just purchased.
1 Detergent/Softener crawer
Transportation bolts (T1-T4)
2 Door
2 Back cover
3 Worktop
3 Back coverscrews (SI-S4)
4 Door handle
4 Power cord
5 Control panel
5 Water inlet valve
6 On/Off
6 Drain hcase
7 Service flap
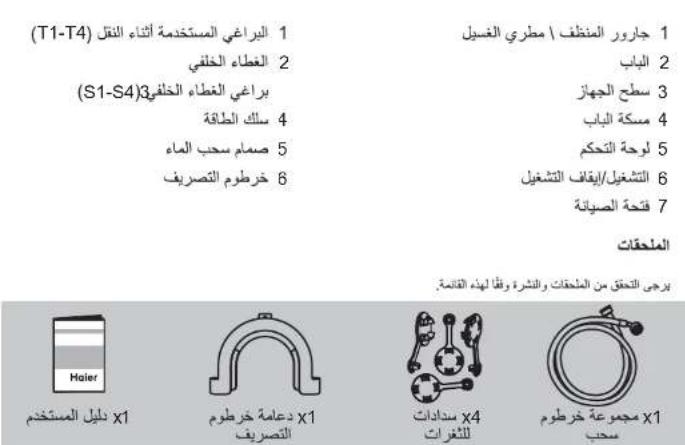
Accessories
Check
riesanciteratine in acudance with this list.
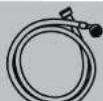
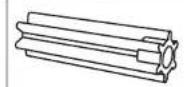
1x Inlet hose assembly

4x Blunking plugs
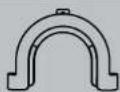
Ix Drain hose bracket

Ix User manual
7
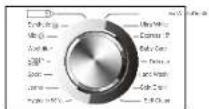
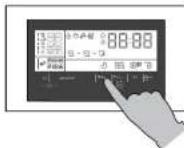
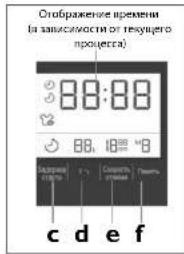
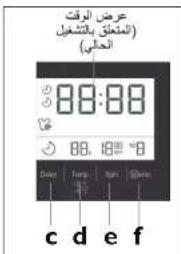
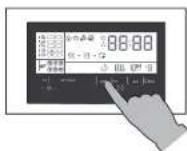
Control panel
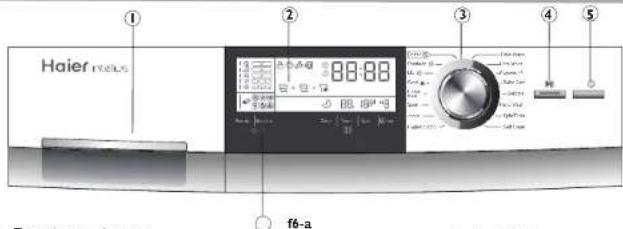
I Cetergent drawer
2 Display
3Programme selector
4 "Start/Pause" button
5 "Ov/Off" butn.cn
6 function buttons (a-f)
a Function
b Selection
C Delay (Endtime delay)
d Temp
Spin (rpm)
f Mero
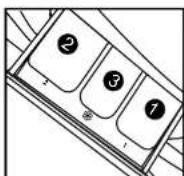
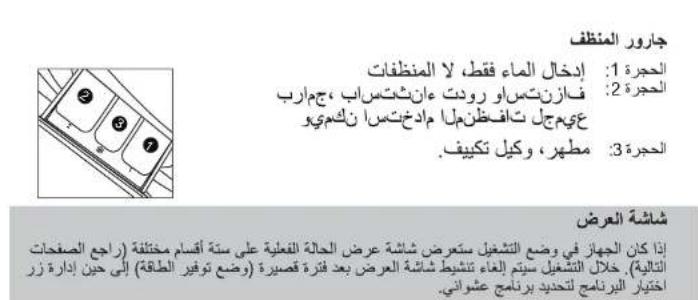
Detergent drawer
Compartment I: Water inlet only no detergent.
Compartment 2: Detergent for programs except spin/drain.
Compartment 3: Softener, conditng agent, prefumet.
The re commendation on the type of detergents is suitable for the various washing empeta-tures, please refer to the manual of detergent
Display
If the appliance is on display will light up the actual status on six different sections (see next pages). During c reration display will be reactivated after a while (Energy saving r code) until programme selection is turned at random.
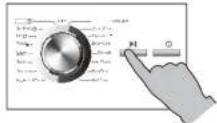
Programme selector
Fy turning the knob one of 16 programmes can be selected, related LED will light up its default settings will be displayed
"Start/Fause" button
Fress this but on gently to start or interrupt the currently displayed programme. During operation its symbol is shining, or if interrupting blinding
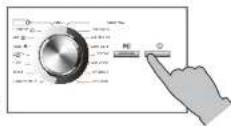
"On/Off" button
Press this button gently to switch on the display is shining. Press again for about 2 seconds to switch off if no panel element or program is activated after a while machine will shut down automatically.
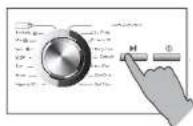
Control panel - function buttons
8
To get best results in each programme Haier has well defined specific default settings. If there is no special requirement default settings are recommended. Accordingly to these factory settings many programme parameters and additional functions could be individually changed (see "programmes" and "function" buttons).
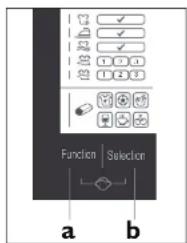
"Function" (button a)
Touch it to select sequentially required functions and settings. The related symbol will shine.
"Selection" (button b)
Touch it to confirm the current chosen "Function", its symbol is blinking. Additionally a "checkmark", a "1"/"2"/"3" symbol, or one of the stain symbols will light up. Function will be activated after 3 seconds or if button a ("Function") is touched.
"Child lock"-control panel lock function (button a + b)
This option blocks all panel elements against activation. After starting, press simultaneously "Function" + "Selection" for about 3 seconds. Panel lock symbol is now displayed. Next repetition deblocks any function.
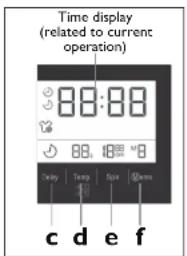
"Delay" - End time delay (button c)
Touch it to light up related symbol and display present programme end time. Accordingly to all programme settings start of wash cycle will be delayed. End time delay could be increased by turning programme selector in steps of 30 minutes from 0,5-24h. For example, display of "6:30" means end of programme cycle will be in 6 hours and 30 minutes. It is not applicable to programme "Spin/Drain". Note: End time must always be longer than programme cycle time. Otherwise operation will start immediately, although chosen end time could not be reached.
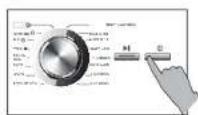
9
function buttons -
nelapolr
"Temp." (button d)
Touch it to adapt maximum of water temperature. Note: Display of "--" stands for "no operational heating".
"Spin" (button e)
Touch it to adapt speed of centrifugation.
"Memo" (button f)
Memory function is available in programme "Cotton" (M1), "Synthetic" (M2), "Mix" (M3). After selecting individual options and related values touch "Memo" button until display shows related "M1"/"M2"/"M3". Start programme, memory is now activated for chosen programme. When that programme will be chosen next, press "Memo" button to activate memorized setting and be at once ready to start.

General information and tips:
To cancel any actual setting change programme or press "On/Off" about 3 seconds. To cancel a running programme touch "Start/Pause" and then "On/Off" for about 3 seconds.
| Control panel - display symbols | ||
| Function | Function (Stains remover) | |
| Reduced programme cycle time | Default setting, no option | |
| Anti wrinkling (after cycle end) | Sport | |
| Anti wrinkling (rinse cycle stop) | Grass | |
| Intensified main wash cycle (1 to 3) | Wine | |
| Additional rinse cycle (1 to 3) | Coffee | |
| Fruit | ||
| Basic status indication | Programme cycle indication | Programme settings |
| Door is locked (in operation) | Running wash cycle | Endtime delay activated |
| Control panel locked Running cycle | Maximum wash- temperatur setting | |
| No water supply | Running spin/ | Maximum speed of rotation setting |
| Door is open | M | Memo setting |
| Programme | Temp. max. | Preset | 2 3 1 | Fibre type | Preset Spin speed |
| 1 Hygienic 95°C | -- 95°C Cotton /Svn. | 100 rpm | |||
| 2 Jeans 0-60°C | 40°C Jeans 1000 rpm | ☐ ☑ ☑ | |||
| 3 Sport 0-40°C | 30°C Sports Wear 1000 rpm ☐ ☑ ☐ | ||||
| 4 Underwear 0-60°C | 40°C Underwear 1000 rpm ☐ ☑ ☐ | ||||
| 5 Wool | 0-40°C | -- ☐ ☑ ☐ Woolen fabrics | 600 rpm | ||
| 6 Mix | 0-60°C | 40°C Cotton /Svn. | 100 rpm | ||
| 7 Synthetic | 0-60°C | 30°C Chemicals | ☐ ☐ ☐ rpm fibre fabrics | ||
| 8 Cotton | 0-90°C | 40°C Cotton /Svn | 100 rpm | ||
| 9 DailyWash | 0-40°C | 40°C | ☐ ☐ ☐ | Cotton fabrics | 1400 rpm |
| 10 Ultra White | 0-60°C | 40°C | ☐ ☐ ☐ | Cotton /Synth | 1000 rpm |
| 11 Express 15' | 0-30°C | 20°C Cotton /Svn | 1000 rpm | ||
| 12 Baby Care | 0-90°C | 90°C Cotton /Svn | 1000 rpm | ||
| 13 Delicate | 0-40°C | 30°C Silk or wool | ☐ ☐ ☐ rpm | ||
| 14 Hand Wash | 0-40°C | 30°C | ☐ ☐ ☐ | Cotton fabrics | 800 rpm |
| 15 Spin/Drain | -- | -- | ☐ ☐ ☐ | --- | 1400 rpm |
| 16 Self Clean | -- | 90°C | ☐ ☐ ☐ | --- | 1000 rpm |
Consumption
12
The indicated consumption values may differ in addition of local conditions.
| Programme | Max. load kg | Energy kWh | Water L | Temp. °C | Washing time h:min | Spin drying performance % |
| Hygienic 95°C | 2 2,00 | 36,0 | 95 Auto | --- | ||
| Jeans 4 | 0,56 | 40,0 | 40 Auto | --- | ||
| Sport | 2 | 0,26 | 35,0 | 30 | 0:25 | --- |
| Underwear | 4 | 0,50 | 40,0 | 40 | 1:19 | --- |
| Wool | 1 | 0,10 | 50,0 | -- | 0:42 | --- |
| Mix | 4 | 0,56 | 34,0 | 40 | Auto | --- |
| Synthetic | 4 | 0,25 | 46,0 | 30 | Auto | --- |
| Cotton 40°C * | 3.5 | 0,47 | 36,0 | 40 Auto | <53 | |
| Cotton 60°C * | 3.5 | 0,68 | 37,0 | 60 Auto | <53 | |
| Cotton 60°C * | 7 | 0,62 | 44,0 | 60 Auto | <53 | |
| Daily Wash | 4 | 0,58 | 46,0 | 40 | 1:20 | --- |
| Ultra White | 2 | 0,60 | 45,0 | 40 | 1:14 | --- |
| Express 15' | 1 | 0,20 | 20,0 | 20 | 0:15 | --- |
| Baby Care | 4 | 2,00 | 67,5 | 90 | 2:05 | --- |
| Delicate | 1 | 0,25 | 50,0 | 30 | 0:56 | --- |
| Hand Wash | 2 | 0,25 | 36,0 | 30 | 0:57 | --- |
| Spin/Drain | 7 | 0,10 | --- | -- | 0:13 | --- |
| Self Clean | --- | 1,80 | 15,0 | 90 | 1:05 | --- |
*General Information and tips:

Standard programme for the Energy Labelling according to 2010/30EU:
Cotton 60^ / 40^ with max. spin speed setting and activated Intensive function (level 3) (others are default setting).
The standard 60^ and 40^ cotton programmes are suitable to clean normally soiled cotton laundry. They are the most efficient programmes in terms of combined energy and water consumption for cotton laundry. Used water temperature may differ from declared cycle temperature.
13
Daily use
This appliance is only for domestic use inside the house. If it is used for commercial, industrial or not intended purposes any Haier guarantee will not be valid anymore. Consider anytime instructions of each garment label and wash only machine-washable laundry.
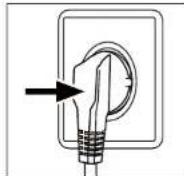
Power supply
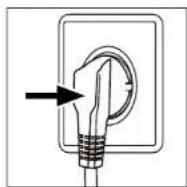
Connect the washing machine to the power supply (220V to 240V~50Hz).
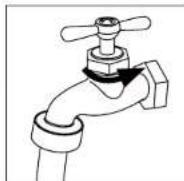
Water connection
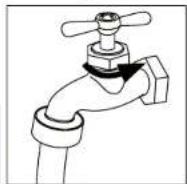
Turn on the tap. The water must be clean and clear.
Warning!

Beforeuse,turntaponandcheckforanyleackage.
Preparing laundry
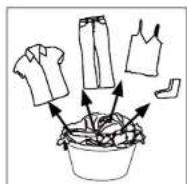
Sort out clothes according to fabric (cotton, synthetics, wool or silk) and to how dirty they are.
Separate white clothes from coloured ones.Wash coloured textiles first by hand to check if they fade or run.
Garments without hems, delicates and finely woven textile such as fine curtains are to be put into a wash bag to care for this delicate laundry (hand or dry cleaning would be better). Close zippers and hooks, make sure the buttons are sewn on tightly and place small items such as socks, belts, bras, etc. in a wash bag.
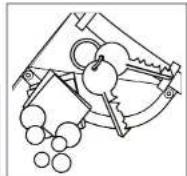
Unfold large pieces of fabric such as bed sheets, bedspreads etc. Turn clothes inside out. Empty pockets (keys, coins, etc.) and remove harder decorative objects (e.g. brooches).
Warning!

Non-textile, oswelllassmalk, looseearsharp-edgeitemsmaycause malfunctions sanddamage ofclothesandappliance.
Daily use
14
Loading the appliance
Open the door and put in the laundrypiece by piece. Don't overload. Check it you can put a hand upright on top of load Close the door carefully.
General information and tips:

After each installation or longer down time run at first programme "Self Clean" with no load and added detergent in washing agent compartment (2) to remove possibly corruptive residues.
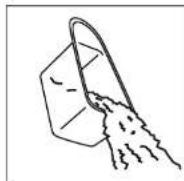
Selecting detergent
Washing efficiency and performance is determined by used detergent quality. Use only machine wash approved detergent and if needed specific detergents, e.g. for synthetic and woolen fabric. Mind always detergent manufacturer recommendations.
General information and tips:

Remove detergent residues before next wash cycle. Please given detergent dosager eommendation from detergent package.
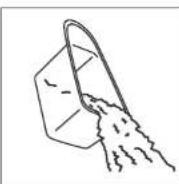
Adding detergent
Slide out the detergent drawer and put the required detergent and softening agent into the corresponding compartments. Push back the drawer gently (Refer to the instructions on the drawer)
Important information:
For prewashing program, detergent should be added to both co-partment 1 and 2.
For other programs, do not add detergent to compartment I. Add liquid detergent to the main drawer, and dilute it first if it is concentrated. Do not overuse detergent; otherwise, it will damage the artificial fibers. So, please follow the instruction on the detergent package. Do not use liquid detergent if the pre-wash mode or "delay" is se lected.
Do not overuse softener; otherwise, it will damage the artificial fibers.
15
Daily use
Select a programme
To get the best washing results, select a programme which fits the degree of soiling and sort of laundry type. Please turn the programme knob to select the right programme.
Select options
Select required options (refer to "Control Panel").
Start wash programme
Touch "Start/Pause" button to start. Appliance operates according to present settings. Changes are only possible by cancelling wash programme. At programme cycle end "End" is displayed, afterwards machine will shut off automatically.
Interrupt - cancel wash programme
To interrupt a running programme press gently "Start/Pause" button Press it again to resume operation.
To cancel a running programme and all its individual settings activate "Start/Pause" and then for about 3 seconds "On/Off".
General information and tips:

Choose programme settings carefully reeling to icons on each laundry label and "Care chart". Removing laundry promptly at cycle end will be gently and minimize wrinkling.
After washing
Turn off the water supply and unplug the power cord. Open the door to prevent formation of moisture and odours. Let it open while not used.
Daily use
16
Care chart
| Washing Process | |||
| 95 | Maximum washing temperature 95°C - normal process | 60 | Maxim um washing temperature 60°C - normal process |
| 40 | Maximum washing temperature 40°C - normal process | 40 | Maxim um washing temperature 40°C - mild process |
| 30 | Maximum washing temperature 30°C - normal process | 30 | Maxim um washing temperature 30°C - mild process |
| Wash by hand max. temp. 40°C | Do not wash | ||
| Bleaching Process | |||
| Any bleaching agent allowed bleach allowed | Only oxygen / non-chlorine | ||
| Tumble Drying Process | |||
| Tumbled drying possible normal temperature line drying | Tumble drying possible lower temp erature Flat drying | ||
| Iron at a maxim um sole-plate temperature of 200°C Do not iron | Iron at a maxim um sole-plate temperature of 150°C | ||
| Professional Textile Care Process | |||
| Professional dry cleaning in tetrachloroethene Professional wet clean | F Fc fessional dry cleaning in hydrocarbons D c not professional wet clean | ||
1/
Care and cleaning
Cleaning the detergent drawer
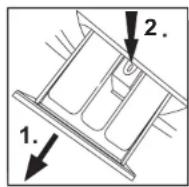
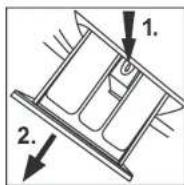
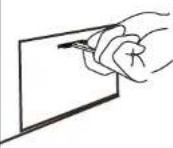
Clean the drawer from detergent residues regularly. Pull out the drawer until it stops (1) and press the release button (2) to remove the drawer. Then flush the drawer with water until it is clean and insert the drawer back in the appliance.

Cleaning the machine
Unplug the machine during cleaning and maintenance. Use a soft cloth with soap liquid to clean the machine case and rubber components. Do not use organic chemicals or corrosive solvents.
i General information and tips: After each installation or longer downtime run at first programme "Self Clean" with no load and added detergent in washing agent compartment (2) to remove possibly corruptive residues.
Environmental information
To achieve best use of energy, water, detergent and time you should use the recommended maximum load size. Do not exceed indicated chemical dosages Choose always lowest washing temperature. Modern detergents are cleaning efficient y below 60^ Only due to heavy soil raise accordingly default settings. Using afterwards a domestic dryer max. spinning speed is recommended.

Care and cleaning
18
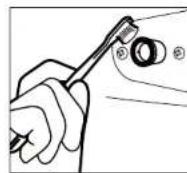
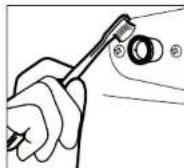
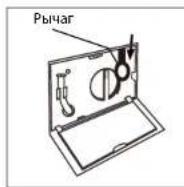
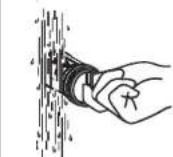
Pump filter
Please check the pump filter regularly and if the appliance
- doesn't drain the water,
doesn't spin, - cause unusual noise while running.
Warning!

Scalding Risk! Water in the pump filter can be very hot! Before any action please ensure water has cooled down.
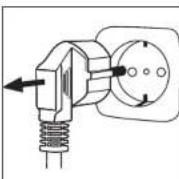
- Turn off and unplug the machine.
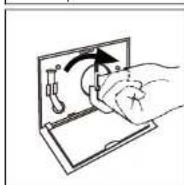
- Open service flap. You can either use a coin or a screwdriver.
- Provide a flat container to catch leach water. There could be bigger amounts!
- Pull the drain hose out and hold its end above the container.
- Take the sealing plug out of the drainhose.
- After complete drainage, unscrew and remove counter clockwise the pump filter.
- Remove contaminants and dirt.
- Clean carefully pump filter, e.g. using running water.
- Refix it thoroughly.
- Close drainhose and push it back into the machine.
- Close service flap
Warning!

Pump filter sealing has to be clean and unhurt.
If the lid is not full tightened, water can escape.
19
Care and cleaning
Water inlet valve and inlet valve filter
To prevent blockage of water supply by foreign substances, clean inlet valve filter regularly.
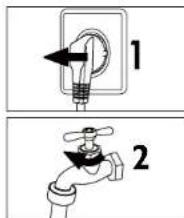
Period of disuse
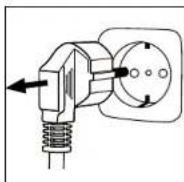
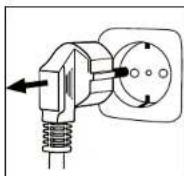
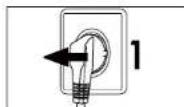
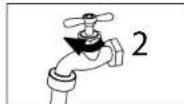
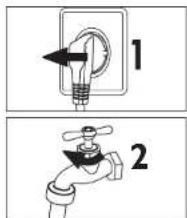
If the appliance is left idle for a longer period, pull out the electrical plug (1) and turn off water supply (2). Open the door to prevent formation of moisture and odours. Let door open while not used.
Before next usage check carefully power cord, water inlet and drain hose. Make sure everything is properly installed and without leakage.
Choose the best Detergent
| Universal | Color | Delicate | Special | Softener | |
| Wool | - | - | - | L | O |
| Mix | L/P | L/P | - | - | O |
| Synthetic | L/P | L/P | L | - | O |
| Cotton | L/P | L/P | - | - | O |
| Express 15' | L | L | - | - | O |
| Delicate | - | - | L | - | O |
| Detergent | Temperatur range in °C | |
| L | Liquid | cold - 60 |
| P | Powder | 40 - 90 |
| o | Optional | --- |
| - | No | --- |
If using liquid detergent, it is not recommended to activate the delayed start. The amount of detergent necessarily choose to package information! Info: Modern washing detergents at low temperatures.
Troubleshooting
20
Display code
Troubleshooting
| Code | Cause | Solution |
| Auto | Automatic load detection. | Laundry weight detection in progress, please wait until program cycle time is displayed. |
| Lo /HALF /FULL /HI | Weighing the laundry load in the drum. | Please wait until program cycle time is displayed: Lo = small load; HALF = half load; FULL = optimized weight load; HI = full load. |
| 1:25 | Remaining wash cycle time. | Refer to additional symbol. |
| 19:30 | Remaining wash cycle time. | End is likely delayed - refer to symbol. |
| Lock | Door cannot be opened due to water level or hot water in the drum. | Wait to the end of program or cancel the program and select the drain program. In case of hot water is in the drum, to avoid scalding, select a handwash program and wash several minutes and then select a draining program before open the door. |
| End End of cycle. | ||
| EI | Drainage error, water not emptied. | Clean pump filter. Check drain hose for blockage and proper installation. |
| E2 | Lock - error. | Shut the door properly. |
| E4 | Water level not reached after 8 minutes. | Check if water supply and water pressure is normal. Drain hose is self-syphoning. |
| E8 | Water protective level - error. | Auto release. Otherwise contact the After sales service. |
| F3 | Temperature sensor - error. | Contact the After sales service. |
| F4 | Heating error (Appears at the end of a cycle). | Contact the After sales service. |
| F7 | Motor - error. | Contact the After sales service. |
| Fb | Water overflow. | Close tap immediately. Contact the After sales service. |
| FA | Water level sensor error. | Contact theAfter sales service. |
| FC | Electronic control - error. | Contact the After sales service. |
| Unb | Unbalanced load and not able to spin. | Check and balance the laundry load in the drum. Also reduce the load if too heavy. Restart with a spin program. |
Warning!

Code Fb: Water-overflow protection is placed on deepest part of appliance. In case of leakage all functions will be shut down automatically except drain pump which will be activated for safety reasons.
21
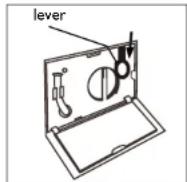
In case of power failure
The current programme and its setting will be saved only for a short time. Probably a new programme cycle start is needed.
If a power failure cuts an operating wash programme door opening is mechanically blocked. To get out any laundry water level should not be seen in the glassy porthole of the door - danger of burns!
Water level has to be lowered as described in "Pump filter". Not till then pull lever beneath service flap until door is unlocked by a gentle click. Afterwards refill all parts.
Troubleshooting without display code
| Problem | Cause | Solution |
| Washing machine Programme is not yet started. Press "Start/Pause" button. fails to operate. Door is not properly closed. Close the door properly. Machine has not been switched on. Switch the machine on. Power failure. Check power supply. | ||
| Washing machine No chosen programme. Set programme and start it. will not be filled No water. Check water tap. with water. | Inlet hose is knicked. | Check inlet hose. |
| Inlet hose filter is blocked. | Unblock inlet hose filter. | |
| Water pressure is less than 0,03 MPa. | Check water pressure. | |
| Water supply failure. | Ensure the water supply. | |
| Machine is draining while being filled | Height of drain hose is below 80 cm. | Make sure that drain hose is properly installed. |
| Drain hose end could reach into water. | ||
Troubleshooting
22
Problem
Cause
Solution
Drainage failure. Pump filter is blocked. Clean pump filter. Drain hose end is higher than Make sure that drain hose 100cm above floor level. is properly installed. Drain hose is blocked. Unblock drain hose.
Strong vibration Machine load is not correct. Adapt amount of laundry, while spinning. Washing machine is located. Make sure that washing on an uneven surface or is machine is on an even surnot levelled. face and levelled. Not all transportation bolts Remove all transportation have been removed. bolts.
Operation stops before completing wash cycle.
Water or electric failure. Check p
and water supply.
Operation stops No for a period of time. Pro
No displayed "error code"?
Programme performs
Activate display - see".display".
Touch "Start/Pause" to resume.
Excessive foam Detergent is not a appropriate. floats drum and/or detergent drawer: Excessive use of detergent.
cancel operation.
Automatic adjustment of washing time.
Washing programme duration will be adjusted.
This is normal and doesn't affect functionality.
Spinning fails.
Unbalance of laundry.
Check machine load and laundry and run a spinning programme again.
General information and tips:

If too much foam is inspected during spin cycle, motor stops and drain pump will be activated for 90 seconds. If that elimination of foam fails up to 3 times, programme ends without spinning.
23
Installation
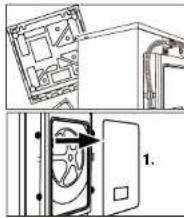
Preparation
Remove all packaging material including polystyrene base. While opening the package, water drops may be seen on plastic bag and porthole. This normal phenomenon results from water tests in the factory.
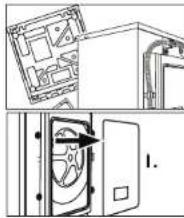
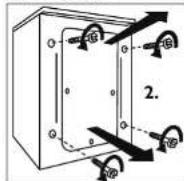
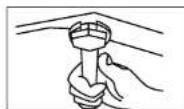
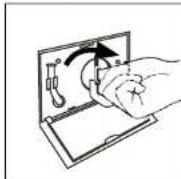
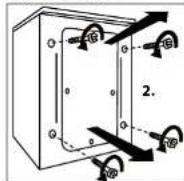
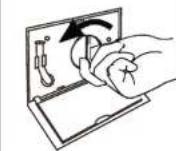
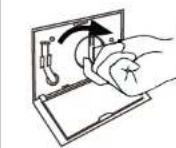
Dismantle the transportation bolts
The transportation bolts are designed for clamping antivibration components inside the appliance during transportation.
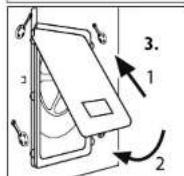
- Remove the back cover.
- Remove bolts on the rear side and take out plastic spacers from inner side of the machine.
General information and tips:

Keep the transportation bolts in a safe place for later use. If the machine is to be moved to another location, replace transportation bolts contrariwise to prevent damage.
- Replace back cover by inserting it in the two gaps its convexity is facing outside
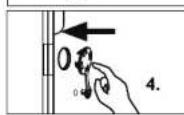
- Fill left holes with blanking plugs.
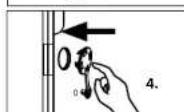
Adjusting the feet
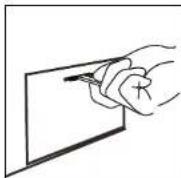
Adjust all feet to achieve a complete level position. This will minimize vibrations and thus noise during use. It will also reduce wear and tear. We recommend to use a spirit level for adjustment. Floor should be as stable and flat as possible.
Installation
24

Inlet hose - Aqua control System
The Aqua Stop inlet hose is an important element for safety and over all control. Its valves are controlling water supply and will interrupt it if the hose is leaking
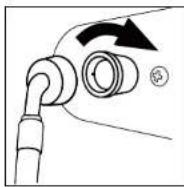
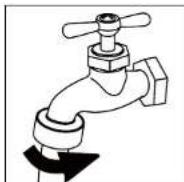
- Connect the nut on the inlet hose to the connector on the water valve.
- Apply inlet hose to a water tap.

Warning!

Appliance is only qualified for cold water supply!
Use the hose-set supplied with the appliance.
Old hose-sets should not be reused.
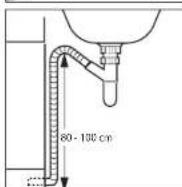
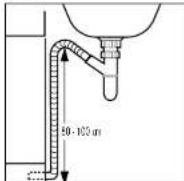
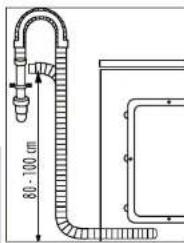
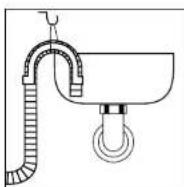
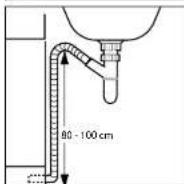
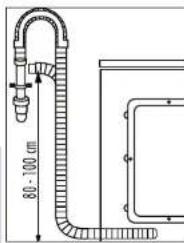
Drain hose
Drainage could be installed in different ways. Nevertheless, level of drain hose has to reach at one point 80 - 100cm If possible keep always drain hose fixed to the clip at the appliance back.
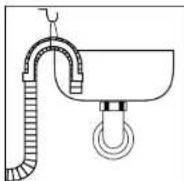
1. Drain hose to sink
Use the drain hose bracket to keep drain hose end retained and out of any water level.
Fix the bracket sufficiently to avoid dropping down due to operational movements.
2. Drain hose to sink siphon
Connection has to be securely sealed and fixed to correspond adapter above the siphoning part!
25
Installation
3. Drain hose to sewage pipe
Use the drain hose bracket to keep drain hose end retained. Fix the bracket sufficiently to avoid dropping down due to operational movements.
Warning!

The drain hose should not be submerged in water and should be securely fixed and leak-free. If the drain hose is placed on the ground or if the pipe is at a height of less than 80cm, the washing machine will continuously drain while being filled (self-siphoning). Drain hose is not to be extended. If necessary contact after sales service.
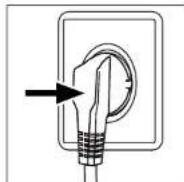
Power supply connection
Before each connection check if:
- socket is adequate for the maximum power of the appliance (safety power circuit fuse should be rated not less than 15A).
- voltage should meet the requirement.
- power outlet should be appropriate to appliance plug.
- used power socket has to be earthed.
Note - only UK: The fuse in a UK 13A plug must comply to BS1362 standard.
Technical data
26
Basic technical information regarding the appliance
HW70-B1426
HW70-B1426S
| zH05/~V042-022ecruosrewoP | |
| Max. working current (A) | 10 |
| Water pressure (MPa) | 0.03≤P≤1 |
| Nominal load (kg) | 7 |
| Spinning speed (rpm) | 1400 |
| Washing programmes | 16 |
| Max. power (W) | 2000 |
| Dimensions (HxDxW mm) | 845 x 600 x 595 |
| Net. weight (kg) | 67 |
| Power consumption of the off-mode (W) | 0,2 |
| Power consumption of the left-on mode (W) | 0,2 |
27
After sales service
In case of trouble, please check the trouble-shooting section of this manual. If required please check your warranty card for after sales service information.
For other countries please refer to: www.haier.com service and support area.
You can find FAQs and can activate service claim.
| Product Fiche (according EU 1061/2010) | |
| Trade mark | Haier |
| Model No. | HW70-B1426/HW70-B1426S |
| Rated capacity(kg) | 7 |
| Energy efficiency class | A+++ |
| Energy consumption per year (kWh)11 | 140 |
| Energy consumption of cotton 60°C, full load | 0.62 |
| Energy consumption of cotton 60°C, partial load | 0.68 |
| Energy consumption of cotton 40°C, partial load | 0.47 |
| Weighted power consumption of the off-mode | 0.2 |
| Weighted power consumption of the left-on mode | 0.2 |
| Water consumption per year (L)21 | 9240 |
| Spin efficiency class31 | B |
| Max spun speed (rpm)31 | 1400 |
| Remaining moisture content (%)41 | 53 |
| standard 60°C cotton program5 | Cotton 60°C with max. spin speed setting and activated intensive function (level 3) |
| standard 40°C cotton program5 | Cotton 40°C with max. spin speed setting and activated intensive function (level 3) |
| Program time of cotton 60°C, full load (min) | 178 |
| Program time of cotton 60°C, partial load(min) | 178 |
| Program time of cotton 40°C, partial load (min) | 172 |
| Duration of the left-on mode (min)6 | - |
| Airborne acoustical noise (washing/spinning)(dB(A))7 | 54/70 |
| Type | front loader freestanding |
| 1) Based on 220 standard washing cycles for cotton programmes at 60°C and 40°C at full and partial load, and the consumption of the low-power modes. Actual energy consumption will depend on how the appliance is used. | |
| 2) Based on 220 standard washing cycles for cotton programmes at 60°C and 40°C at full and partial load. Actual water consumption will depend on how the appliance is used. | |
| 3) Class G is the least efficient and Class A is the most efficient. | |
| 4) Based on the standard 60°C cotton program at full load and the standard 40°C cotton program at partial load | |
| 5) "standard 60°C cotton program" and "standard 40°C cotton program" are the standard washing programmes to which the information in the label and fiche relates. These programmes are suitable to clean normally soiled cotton laundry and they are the most efficient programmes in terms of combined energy and water consumption. | |
| 6) In case there is a power management system | |
| 7) Based on the standard 60°C cotton program at full load | |
Haier
Gebrauchsanleitung
Waschmaschine
HW70-B1426
HW70-B1426S
"Zeitvorwahl" - Endzeitvorwahl (Taste c)
"Schleudern" (Taste e)
Laughter.
Laughter.
Laughter.
Laughter.
Laughter.
Laughter.
Laughter.
Laughter.

wastemperatur 30^ - normal process

Maximale
wastemperatur 30^ - mild process

Maximale
wastemperatuur 30^ - extra mild process

Handwas max.temp. 40^

Niet wassen
Bleken

Bleke
toegestaan

If using liquid detergent, it is not recommended to activate the delayed start. The amount of detergent necessarily choose to package information! Info: Modern washing detergents at low temperatures.
Problemen oplossen
20
Problemen oplossen
Blijen stroomstoring
B-1070 Anderlecht Belgium
Tel.: +32.2.528.05.50
Fax: +32.2.528.05.55
Mail: benelux@haiereurope.com
Haier
92+18-0∠MH 92+18-0∠MH
eennnne
JHDPH
Premere Anything to be done in the program.
1x3aBHHOBJHbAHRC bC60pe

4x 3aynywnk1x kpoHuren
CNBHORO

1xpykoBOc1BO
1016308aTe18
7
PahenbynpaBneHn
1KoHTeHepIraMoIOUeroCpeNCTBa
2 Dmnnne
3CenekTop nporpaMM
4 Khonka "Ctapr/Na3a"
5KhoKa"BKn/BnKn
6 KhoNKn FyHKn (a-f)
aФункшura
Bb6op
3aepkkacapta
(OKOHuaHHCTnPKN)
dTc
eCKopocTb OTKmMa (o6/MnH.)
f narnTb
KontneHep dnia mooero cpeCTBa
OTcek 1:3aNNBbTbTbKO BDOy He HcNOnb3OBaTb MoOuue CpeDCTBA.
OTcE2K:ДЛЯМОИСРССТДСТСВСНБОП (6bTcP8) STNPK, KPOME pnpPMAOt OXmK/CnB
OTcck 3: npdaaHaeHno pceCTb no yxoany 3a 6beBem (KpaxmaaHX CMRAOUX apomatnHpyuNX H.
PekomeHaauu No Tnny Moouero cpeCTBa,coOTBeTcByouero
onpeHENHIO TEMNEPAType CTMPK,CMOTPITE B yPKOBODCTBE NO IINNoBObAHNO MOOJcero cpeCTBA.
Ducnnei
PnBkHHeHHMaHNNbHdNcHneBbBDOHTmHINOpMauO nTeKUYmCOTOHHN, PA3deneHHa HaeCTb6nAtee (cm. Hnke). B npoueece pabtoI dncnnpe Heepes Kekotopoe Bpemn rachet (nepeoxoITB peKHMIOKHOOMHOH3eepn) no IIOBO NOBOPOTA ceneKTopo nporpAMm.
CenekTop nporpamM
BbOpO 16 nPpOgMaM PnOaOaDNTy CmETN NopOBoTpyKuPi; PnBbOpE npORpAMMbI aOpTaCt Co0BeTcBtuOoiy Ie CEBTOION, H Na DInChNE NoABINOTC hAToPOHnO mNoYMOHAnH
Khonnka"Cnpt/nayaa
HAXMTEATKHOKNJUN3anyCKaWNnPNOCTAHOBKNTKUYIeNpORpAMMb,OTo6paKaEMOHHa JNCINee.BnpouceBbIOJIeHNHeNPOrPAMMBe ee CMBBO rOHT NoCTOHHc,ecnIpoPpMA MNPCHAOHBHEA-CMBBO MNAET.
Khonka"Bkn./Bbikn."
Hakmte 3y KHONky dny BkIOUeHnMaMHHb. Pnp BkIOUeHn 3arOpaetc DaNCHne. DnB BkIOUeHn HAKmte N yepKmbaiTe 3y KONky B TeneHne 2 cekHyd. Ecm Hepe3 HEKOtope Bpme NOCNE BkIOUeHn He 6ydt AKTMBVPOBaBH nOHN 3nEMeHT naHenn nnn nporpma, MAHnBAOTOMATWNECKBHKINQAECT.
Pahenb ynpabHeHHa-KhONKMyHKn
8
KoMaHaHHeIaPaa6O7ana IaR KAnQDn IporpamMbI ONIIbAIIbHe HAcTPOKnNo yMOYNaHIO, NOBtANIOUne NOnyHHTb HAMNHyUepe3yBnTaBc.EcnHet KaMIX-NIO cEniPhueckHX TpeG0AHJI, PekOMEHyETBCNTIOBAtB HAcTPOKnNo yMOYNaHIOHO.MHOrHEZABQIDCKnpaMAPETpIbIporpAMmN JOIOHITAEHbIXyHKINMOKHO IMAMEHbI INJINIBUYAIHO (CM,pA3JIEN "TPOpaRMn"ONINCAHNEKHOFyHKIN).
"Функцу" (Khonka a)
KoCHNTBcTbOHTKNHONKINDA Bb6ObaFyHKUINN HACPTOeK NYTEM NOCIEBOATEBnHORepe6Oba.Ppnt aTOMaTOPAOTCR COOTBEETBOnIOEIM CMMONBI.
"Bb6op" (KhoNka b)
KoHHTcBc 30T KHONKINJN DnE nepeXOa KTeKyuei BvBpaHHOH
fYHKUN, COOTBE TByOoHN CmBNH OUYHETMIRAT. ONDOBPEMeHO
3aROpaeTc RCMBO"ranoKaCmBN0172/3" mIn oDNI H3
CMBOBON TNA rAqrbaHHeHH. BvBpaHHAn FyHKUN AKTbHBPeyTC
Uepe3 c3ckyIbNiMo NkAATIKIO KHONK "FyHKUN".
"3aunta oT deTeH -fynKnna 6noknpobKa nane H npapBneHa (Knonka a + b)
3aФyHKINIpeHaHAnEHaJIN6KnPOBKNBCEXNEMTOB ypanAHN HANeHN BO N36KaHnne CnyauHoro nCIOHb30aHN. Pocae 3aaycKa, OJHOBPCMENHO HnKMMte UyepkBeHnKeHTOKN "DyHKINI" ^+ Bb6OpB"8 TeueHHne 3 cekHyD. FOBNTCB CmBNON 6KNOPBOKN PAHEN. INr CHRTN6 BnKpOBKN BnOJIHInTe 3TO neCTBE ue pa3.
"3aepKcctpTa"-3aepKkaOKOHuaHnCTmPK (KNONKa c)
Nocne npnoochOBenK K 30n KHONKE HaHcnnpee 3aogepaercoBtETCTbUOuim CNBOMN OTObopaAetcr Bpma 3aebpuheneyekuynnporpamMb.3anyck cKHaTcPRAk OTKnlaBaeTcH BAbpMa, aBnCuaeeOy TcYtaHOBok nporpamMb. BpMa OKOHCAHn CTnPKy EBNWmHaEBAeTn Pn KaKDM NOBOPTe ceneKToPA nporpamMb HA 30 MnyHT (0,5-24 yaca). HanpMep, HdNKaIa "6:30" oHaHaert, 10oKk 6ydet 3aepuee Hepe3 6.30 MTHN
INIOHJ3OBATB 3OT PEKKIM DYNI PONPAMMb'OTKHM/CJIINBEHOEMMOHDK.
PIMMEAHHE: BPEMOKOHAHNCTMPKNCBcERDaDOLKHO6bBT60NBUE BPEMHN BbMOHNEHN PnporpAMMb. B npoTHOBmCnYyae npOeCC 3aNYCAETCRpaZY, HecMOTpHaTO, TTOoEcecNtBpeSyemoe BPEM OKOHAHNA Heo3MOKHO.
9
KHOHKnFyHKn- NaHEnbynpabHeHn
"T°c"(Khonka d)
KCHOTIECTAOTOHKOHNJINHACTPOKNIMAKCMNAJIHOI TEMPEPATyB ROYU.
PIMeHaeHHe:MHdKaaIe"--03Haayet NoorpeB BoM He npnBbOuTcK."
"CKopoctb OTKIMMA"(KHONKA e)
KoCHNTecb 3TOI KHOKN DnHACTPOHN CKOPOCTN OTKIMA.
"NamrTb" (KhONkaf)
MnHnHnHnHnHnHnHnHnHnHnHnHnHnHnHnHnHnHnHnHnHnHnHnHnHnHnHnHnHnHnHnHnHnHnHnHnHnHnHnHnHnHnHnHnHnHnHnHnHnHn HmHO 10000000000000000000000000000000000000000000000000000000000000000000000000000000000000000

06aaHfopmaaHcoBtbl:
IraOTMeHbIy6oBcTahOBnEHHOHAcTpOeKINpeKIOWHTe nporpAMMy HmYyEepKBaIte KHOKNy BKn/BkN. BTeYHeH3 cKeYHy. IraOCTAHOBKBMONHnEMo nporpAMMbHAKMITE KHOKNy"Ctapt/ Na3ya, a3AETeYpeKBeAte KHOKNy BKn/BkN. bTeYHeH3 cKeYHy.
| Функциа YckopoeHHoe bblonHene nporpamMbI | Функциа (ydalanenhe zarpazheni) |
| Аntисмг themselves (no okonчани цнka) | Пу'monчанio, 6e3 oniiin |
| ANTICSMYTHe (octahOBkaцнka nolockanry) | СпорТ Траа |
| Повьшения ИстенCBHOCb OCHOBHOrOцнka (ot 1 do 3) | Вио |
| Даллнichtелынцлп пОLOCKAHNY (ot 1 do 3) | Кofoe |
| Фукуlt. |
| 11 | |||||
| Table 1: Tâbânça nprpamm | |||||
| 2:门槛 moioux x copéctb ochOBHOB (búctpoj) CTNPK, KPOMe nprpammm OTKIMM/CnIB. | |||||
| 3: npedhaanheho门槛 cpeéctb no yxody 3a 6bělem(KpaxmaJIauxix, CMJg qauouix, apomATIN3puyuOxH N.D.) | |||||
| Iprpamma | Mánc. Temnep. | Ucx. yctahovka | Tin Bonokha | Icx.yct. ckopoc'tb OTKIMM | |
| 1 Kπηγενηne 95°C | -- | 95°C | √ √ √ √ √ √ √ √ √ √ √ √ √ √ √ √ √ √ √ √ √ √ √ √ √ √ √ √ √ √ √ √ √ √ √ √ √ √ √ √ √ √ √ √ √ √ √ √ √ √ √ ∇ | OKnONX CnHTETKIA | 1000 o6/MIH |
| 2 DKKHcB | 0-60°C | 40°C | √ √ √ √ √ √ √ √ √ √ √ √ √ √ √ √ √ √ √ √ √ √ √ √ √ √ √ √ √ √ √ √ √ √ √ √ √ √ √ √ √ √ √ √ √ √ √ √ √ | ||
| 3 Cnoptnabaj OeDkda | 0-40°C | 30°C | √ √ √ √ √ √ √ √ √ √ √ √ √ √ √ √ √ √ √ √ √ √ √ √ √ √ √ √ √ √ √ √ √ √ √ √ √ √ √ √ √ √ √ √ √ √ √ √ ∇ | HARBOPTN00 06/MIH | |
| 4 HIXKHee 6BéB | 0-60°C | 40°C | √ √ √ √ √ √ √ √ √ √ √ √ √ √ √ √ √ √ √ √ √ √ √ √ √ √ √ √ √ √ √ √ √ √ √ √ √ √ √ √ √ √ √ √ | ||
| 5 UepCTb | 0-40°C | -- | √ √ √ √ √ √ √ √ √ √ √ √ √ √ √ √ √ √ √ √ √ √ √ √ √ √ √ √ √ √ √ √ √ √ √ √ √ √ √ √ √ √ √ √ √ √ √ √ √ ∇ | IIepCTaHbte TKH | 600 o6/MIH |
| 6 CmeuHnA CTNPK | 0-60°C | 40°C | √ √ √ √ √ √ √ √ √ √ √ √ √ √ √ √ √ √ √ √ √ √ √ √ √ √ √ √ √ √ √ √ √ √ √ √ √ √ √ √ √ √ √ √ ∇ | IORX CnHTETKIA | 1000 o6/MIH |
| 7 CnHTETKIA | 0-60°C | 30°C | √ √ √ √ √ √ √ √ √ √ √ √ √ √ √ √ √ √ √ √ √ √ √ √ √ √ √ √ √ √ √ √ √ √ √ √ √ √ √ √ √ √ √ √ √ √ ∙ | TKaHb VexMM BONOKH | 1200 o6/MIH |
| 8 Xlonok M | 0-90°C | 40°C | √ √ √ √ √ √ √ √ √ √ √ √ √ √ √ √ √ √ √ √ √ √ √ √ √ √ √ √ √ √ √ √ √ √ √ √ √ √ √ √ √ √ √ √ √ √ ∇ | IORX CnHTETKIA. | 1400 o6/MIH |
| 9 ПовсднБа CTNPK | 0-40°C | 40°C | √ √ √ √ √ √ √ √ √ √ √ √ √ √ √ √ √ √ √ √ √ √ √ √ √ √ √ √ √ √ √ √ √ √ √ √ √ √ √ √ √ √ √ √ √ √ ∙ | TKaHIb 3xIONK | 1400 o6/MIH |
| 10 Bénoe 6bè | 0-60°C | 40°C | √ √ √ √ √ √ √ √ √ √ √ √ √ √ √ √ √ √ √ √ √ √ √ √ √ √ √ √ √ √ √ √ √ √ √ √ √ √ √ √ √ √ √ √ ∙ | IORX CnHTETKIA | 1000 o6/MIH |
| 11 BéICTpaH CTNPK15' | 0-30°C | 20°C | √ √ √ √ √ √ √ √ √ √ √ √ √ √ √ √ √ √ √ √ √ √ √ √ √ √ √ √ √ √ √ √ √ √ √ √ √ √ √ √ √ √ √ √ √ √ √ √ ∗ | IORX CnHTETKIA | 1000 o6/MIH |
| 12 DetCKa OeXda | 0-90°C | 90°C | √ √ √ √ √ √ √ √ √ √ √ √ √ √ √ √ √ √ √ √ √ √ √ √ √ √ √ √ √ √ √ √ √ √ √ √ √ √ √ √ √ √ √ √ √ √ √ √ ∙ | IORX CnHTETKIA. | 1000 o6/MIH |
| 13 DeNKaTHa CTNPK | 0-40°C | 30°C | √ √ √ √ √ √ √ √ √ √ √ √ √ √ √ √ √ √ √ √ √ √ √ √ √ √ √ √ √ √ √ √ √ √ √ √ √ √ √ √ √ √ √ √ ∇ | IeNK mII IePCT | 600 o6/MIH |
| 14PyuHb CTNPK | 0-40°C | 30°C | √ √ √ √ √ √ √ √ √ √ √ √ √ √ √ √ √ √ √ √ √ √ √ √ √ √ √ √ √ √ √ √ √ √ √ √ √ √ √ √ √ √ √ ∇ | TKaHIb 3xIONK | 800 o6/MIH |
| 15 OTKIM/CnIB | -- | -- | √ √ √ √ √ √ √ √ √ √ √ √ √ √ √ √ √ √ √ √ √ √ √ √ √ √ √ √ √ √ √ √ √ √ √ √ √ √ √ √ √ √ √ √ √ √ √ √ ∇ | -- | 1400 o6/MIH |
| 16 OChCTKa | -- | 90°C | √ √ √ √ √ √ √ √ √ √ √ √ √ √ √ √ √ √ √ √ √ √ √ √ √ √ √ √ √ √ √ √ √ √ √ √ √ √ √ √ √ √ √ √ √ √ √ ∇ | -- | 1000 o6/MIH |
TapaMeTpbl paXoJa
12
PnBedeHHbIe 3HaueHn paCXoJa MOry T BapbIpOBaTbC R 3abYcMOCTH OT MeCThblx ycNOBn.
| Погамma | Муж. загука КГ | Зелковая КВТ-н | Вoga n | Temn. °C | Вразma STИРК ЧЕМС | 3фбгмьrostь OTЖмь % |
| Кличесни 95℃ | 2 | 2,00 | 36,0 | 95 | Auto | --- |
| Джинсь | 4 | 0,56 | 40,0 | 40 | Auto | --- |
| Спoptимья | 2 | 0,26 | 35,0 | 30 | 0:25 | --- |
| Ножд骞 велья | 4 | 0,50 | 40,0 | 40 | 1:19 | --- |
| Шерст | 1 | 0,10 | 50,0 | -- | 0:42 | --- |
| Смешаший CTИРКa | 4 | 0,56 | 34,0 | 40 | Auto | --- |
| СиHTETИКa | 4 | 0,25 | 46,0 | 30 | Auto | --- |
| ХлONOK 40℃* | 3.5 | 0,47 | 36,0 | 40 | Auto | <53 |
| XлONOK 60℃* | 3.5 | 0,68 | 37,0 | 60 | Auto | <53 |
| XлONOK 60℃* | 7 | 0,62 | 44,0 | 60 | Auto | <53 |
| Повседnevни CTИРКa | 4 | 0,58 | 46,0 | 40 | 1:20 | --- |
| Бение相关内容 | 2 | 0,60 | 45,0 | 40 | 1:14 | --- |
| БыICTра CTИРКа 15 | 1 | 0,20 | 20,0 | 20 | 0:15 | --- |
| ДetSCКАОдEGДa | 4 | 2,00 | 67,5 | 90 | 2:05 | --- |
| ДелIMKAТWA CTИРКa | 1 | 0,25 | 50,0 | 30 | 0:56 | --- |
| РУЧАСТИРКa | 2 | 0,25 | 36,0 | 30 | 0:57 | --- |
| OTЖМ/СпМВ | 7 | 0,10 | --- | -- | 0:13 | --- |
| ОчECTКa | --- | 1,80 | 15,0 | 90 | 1:05 | --- |

*O6uaa HhOpMaunn coBeTb:
pronotpe6nHm cornacho CTandaTy
XnnoxO 60^ / 40^ nPnR MAK YCTAHENHNO HCNOPCH OTKHMN AKTHNHO BPHKUNHHTEHCNBOH CTHPK (pyoBb3) (3aHbTaTObKO BOJy HE MCNBoB0BaT MOIOUe CpeCTBA).
CtHnPnPHnPnPPnPNnPNnPNnPNnPNnPNnPNnPNnPNnPNnPNnPNnPNnPNnPNnPNnPNnPNnPNnPNnPNnPNnPNnPNnPNnPNnPNnPNnPNnPNnPNnPNnPNnPNnPNnPNnPNnPNnPNnPNnPNnPNnPNnPNnPNnPNnPNnPNnPNnPNnPHNCHNCHNCHNCHNCHNCHNCHNCHNCHNCHNCHNCHNCHNCHNCHNCHNCHNCHNCHNCHNCHNCHNCHNCHNCHNCHNCHNCHNCHNCHNCHNCHNCHNCHNCHNCHNCHNCHNCHNCHNCHNCHNCHNCHNCHNCHNCHNCHNCHNCHN
13
NOBceHHeBHOe NcnoJb30BaHne
MaMHNAI pNDH3aHHeNToIbKO nIbIbTOBO hCNOB3OBAHN BHTpy NOMeUHnE, B cIyue KOMMepuecKoTO, nPOMbIuHEnHO IIObOro dpyrO HeNeEBOHO hCNOB3OBAHn rapaHnHBe 06Ba3TeJIbCTBa KOMmaHn Haier aHHynpTyOCH. BcERda oBauaate HbHMnHa Hae bIpyk KaJdoi BEHn CnTpaTaBE MaMHIn ToBKO hNIOXoHnne IINI TTO pIpeDMt.
Питанne
Доглдунчate STТРььHuO MaSHINу KЛЕКТРСЕТи (220-240Впет. TOKA,50Tu).
NoKnKIOeHn eoau BoAbI
OTKPOIe KpaH. B0a dONJKA 6bIT bYcTcOn n npO3paHOn.
Bhumanee!

He noJnEeKHT cyxOH YNCTke

PinoceccioHnBna HnKnHnNtCa

He npaoexn HpofoecnoHbHO BnaKhoH NCTKe
17
yXoHnOoumCTKa
OuHCTKa KONTeHepa dIy MoIOxnx cpeDCTB
Perynphno OHMauaTE KOHTHeHepOT OCTATKOB MOIOUX CpeCTB. BttTne HOTKeHep Do ynpora (1) n3BNEKeIe 10E, HAKAB KONky fHKCatopra (2).Piocne ETO npOMoTE KOHTHeHep BOOJdo ydananeHBCEX octATKOB NCTABTe ERO o6patHO MAIWHy.
OuNTKa MaunHbI
PepeOnCHKoiNIOcbLYXnAAHMeMaJIHHbOTKIOHTeKa6eBn NITAHIN,AnOcKTHKOKNpyCAMAJIHHbIpe3XIHOBBIXaCTeN IcNOb3yTe MATKTOKAIbMbHbNpactBO. TheNoB3yTeBc oPraHmIECKMIMXMMKAATAMN aRpeCCMBHMn pactBoTIPENIM.
06uaa HFOOPMAaM N COBebTb

Nocye tahobokn Hm nOtrofno PTOCTB BHAVAETb 3aYCTHNE pORpAMMy "OuchTka"6es 3aRpy3kn cMoIOHM cpeCTbOM bOTcEeA rMoIOUero cpeCTBa (2) yndALdIeHaBIO3MOXhHX OTIOKHeH.

3KONORUeCKa 6eOnachOCTb
IIOITMnHOrIOOTpeBnHnIeKtpoAhePIMN,BOB,MOOcero cpedCTBa HpemEHnCneyEToobceuHbTaMbKcHMnABHyO
peKOMeHdyemyo 3aRpy3ky.
He npebbwaIte yka3aHHbIe Do3bl XIMKkATOB.
BbIpaIe camyIO HNkYIO H3O3MOHbIX TEMnepATpy CTIPKN. COBpEMHeMHBE MOHOJIe CpECTBA O6cEeNHBaK T 0fFKeKTHBHyO CTIPKNpy pIN nemETpyPax HNke 60^
NcNtbnO30Ba7bYbcOKne 3Hauheny CnEyt ToIbKnPO npnCnBbHX 3AqrPbnHHnx.
Nocte ctnipn peKOMENyETCRNc HONbOaBt cyuKy pRn MAKCHMABHOB CKOPOTH.
yXoAn ouHcTKa
18
DnBtp Hacoc
Perynphno npobepaTke nbnbTp hacocae;ecnn MaunHa
He Cnmbaet Body,
-HeBpaaaet6apa6aH,
H3aact Heo6bHHyh ym npn pa60Te.
Onoohcmb ouanpauaHua Boda a pumme haooca moem 6bme ouh bopueulpeepb bnonnneuem noobx deucmbu yebumecb, mba oca meia.
1.BbKIOHTMaAMHHyNOTKIOHTe ee OTJNEKTPOCTH.
2. OTKPOJIe cepBnCHI NIOHcE ROMOHO NOIDTeB MOHETON INN OTEBKOIN
3. NpOCTABTE NOH HrO KAKOH NIO60 NIOCKHKOHTHEHP DnCnBaOCTATKOB BOHJ. Ee MOKET BHTM MHOR!
4.BattNHITE HAPNYK cINBHOH NATpy6OK IN DEPKJIte erO KOHeU HAD KOTHEHOPOM.
5.BbTaunTe n3 cMbHOro naTpy6Ka 3aRnyuKy.
6. Oncne nonHoroCnBIA BOIa OTbEPNHTE IN CHAMITE ΦINbTb HACOCA, BPAJAAE eoNPOTHN HACOBON CTPNKEN.
7.YaAnnte noctopoHHne npedMeI rpa3b.
8. TuaTeNHO OHCTHTe OmmbTp Hacoca, HanpHMeP NOI npOTOHNOJIOJ.
9.YctahOBHTe qnIbTp 6paTHO.
10.3akpoTe cinnBHO nATpy6OK nY6cpHTe erO6paTHOB MaunHy.
11.3aKpoTe cepBnchbIIOUOK
BHHMaHHeI

KbIkwIeIhIbmpa HacoCoA doJnka 6bMb YcMou u HenoepeXeHNo.
Ecnu OHa he 6ydem muamembho zammyha, 8o3moKHa npomeka 80dy.
19
yXoAn ouHcTKa
KnanaH noaayn BObbl n HbTp noaun BoDbI
B036ZJAHME 6KIOKOBRAHNOJAQI BOJLO NOCOTOPHNHMAM TACNHUMCNECTYPERYPARHO ONUHTAFTNPONDAOI BOJLO
Nepnoa npocToa
EcnMaHnA HnntbHbOe BpeMn HE nCnNbEyTeCN, BtAnaTea NkETPcNeckn 1) (n OTKnYteNaOyBa y BoD (2).
OTKPOJIte BDEUy BO 636Ekanai OBObOaBHAnO KOJENCATA nIanaAHA. HBa PcEMnPIOCTOR octaBtC BDEUy OTOkTBIyO
Pnep CndyoummmNcnon3oBaHmE BHHMaTeNbHO npOBepeTbe 1nnp nIaHMMnAeNnBDOH mCnBHNOHnAnH.Y6BnTeCb, YTO OHnPAbHbMOHTIOPOBAHn HHe NMeKtNPOTeueK.
Nonck uycpaHne HncnpaBnocTei
20
KoHa duCnnee
KoI PnwnHa
Pewenne
Auto ABTomatueckoe onpeeneHne 3arpy3Kn
3arpyNk, noKanyIcTa,doKnTeBc, kOHa HKnCnE oObaPbTbI cPemB bInOnHnHe NpOrpAMMb
Lo BaeuikBaHne bSeB, 3aqrjKeHHOro /HALF b6a4abA.
NojankynCTa, nozokmite, noka hAnciPHe He oTo6paBtLo: Lo = Mania aIpykza;
/FUL
HALF=cpeHnHn3a#pyka;
FULL = ontmmabha3aarpyka; = nonha3aarpyka.
1:25 OctabueecBpeMnKnaCTnPKn.
CM.DONONHHTeBHeC HMBOJIb.
19:30 OctaWeecBpeMaKnaCTnPK.
Ckopee bcerO,akTHBbPOBaHa 3aepKxKa CTAPa — C. COBTBCTBTOUYIcIM CMBNO
Lock DBePua He MOKER 6bIb OTKbTBA N3-3BbKOKO YPOBBA HbBbKOJI TewinepatyB BObuB 8bOpaHe
JIOKIDTE BOKOHAHN INPORPAMMBH, HIN OTMENHEI
eBbBNOHNHEH NANCTYNE INPORPAMMY CINBA BOJI.
ECNI BODA BHUTPI BAKa ROPAAU, TO, BO IV36ekAHHE
OOKOB, ZANCTYHe HA HECKOBK MHHYTIPORPAMMY
PYHNA CTPKA, 3ATEM PONPAMMY CINBA BOJI..
End Okohyane nporpammb.
E1 Ow6Ka cnBa, B0a He ydanenHa.
OCHITTEH cHbTbHacocA. POBeRbeTc HcOTOTy nPABnBbHOCTb MOHTACA CNBHORO sHaHra.
E2 Omm6ka 6nokpobKn
Tuatahenbno 3akpoTe dpeuy.
E4 Boga He HapaeTcBteHHe 8 MmHT.
Pnepbpehnae nanaa Habne Hbo. Boda CmBaTcTa Hpe3 CmBHO nnHr BCnECTBme CcoHNOO 06KtA.
E8 OuMbKa 3aunmbTb no ypOBNIOBbI.
Abyu Bytnyi, a, b npOnnoBom Chyau.ObpaTneTcS. BOTJNocIePnOdKaHOro Ocb7OyKbMaHIna.
F3 Own6ka daTunKa TemnepaTypa
06paTneB 8atpennoenpoadkHoro 06cykBaHnA
F4 Ouioka Harpeba (noiHnTcB KOnJIe cnKHa)
06paTnTeB 8OTdennncnnpaJxHoro 06cnyKBAHRA
F7 Oun6Ka Dnuratena.
06paTnTEC TnncnnpdaKHO 06cnykBaHn.
Fb NepenonHeHWe BDOH.
HedneJnHO 3AKPOWtK PAK. OAnpIeNcB 8 orden nocnpdoaAHO 6OcbNyKBAHs.
FA Oun6ka daTnka ypoBn BObl.
O6paTntecb B Otnen noCenpenpoaHoro o6cnyKnBaHnA.
FC Ou6ka 3neKtpoHoro 6nokaynpaBHeHn.
O6paTnreB 0rden noennpaHoro o6cnyBaHaHa.
Unb Hec6aanHcnpoBaanHaar 3aryka, OTKIM HEBEOMOHK
Pacpenednre 6elene 600ee npabomepe,nnu ydanite n3baka tch bena,ecm3aypka cinnkOM BeMNKA, 3aTEM 3ANCTYNE nporpammyOTKHM.
BHMaHMeI

KoFb: damukzauum om npenolnoHnur paoonoo H naubonee 2ny6okocuacmuuHn. Bcnyae npomuce kheykuu aamomumuecku omknmoaonc3a uckmoeuem cunhoec Hacoc, komobui ocaemraeknouHHm 8 qneXbeonachcmu.
21
Nouck uycpaHHe HncnpaBnOtei
BcnyaeOTcyTCTBnNTaHn
TeYUaH npORpAMMa nE HAcTPOKn COxPAnBTOC nIuB, B TceHeN KOpOTKO BpEMeHb BO3MOKHO, NOtpe6yETcN 3AHOBO Bb6pTaB npOPAmMy nE HAcTPOKn.
PnO tKIOUHEN HIN TANHIA BO BPEMA PA60Tb NpORpAMMb DBePua
MeAHaHNeCK 6NOKHPyETcA. OTKpbTB DBePcY MoKHO ToNsKO ToTa,
KoRdaB IIOKe He HABNODAeTC yPOBOH b DOI - BO N36EkaHHe
OKOROB!
YPOBHO BJOHIEKOJIMO HNOHTI CIOOCOM,ONCAHMM 8pAaeneoOthnpHacocA,IOcneTO TMOKHOOTNHYb3aBHpaar NOpCEPBCHHMIOKUM,INBUEPLA OTKPOEETCTHXIMUJIHKOM.
3aTeM Heo6xOJIMMO yCTAHOBNTB BCE KOMNHOHTbHa MecTO.
Nonck n yctpanenHeHcnpabHocTe npn OTCyTCTBn KaHa dnCnnee
eHnePePaHmUnpNamEn6opPi
CTnpabnHaMaunHa He paboTaT.
IporpmaHa He 3anyueHa.
Deepa Hennno 3akpbTa.
Maunha He BknoeHa.
OcYCTByeT nTuHaHe.
Haxmte KhoNky"Ctapt/Na?a",
TnHOaKpOteBepuy.
Bknoute MaunHy.
PpOepeTeHaHnue nHTaHn.
CtupnlaHbMauiHaMe HAnnoHJTeRTOyO.
He b6paHa nporpamMa.
3aKpbTnnoDnayBOBbl.
Ipekkatwnahn noaay Bods.
3acopenern pnilbtp nnaHra tonaun BOdb.
Koehc mshHoro wHaHa Ha BbCote MeHee 80 cm. KOehc mshHoro wHaHa MoXET DOCTaH J0 BObl
YSeBjTeTc, YTO CINHIOI shAHIY CTaONAHORN PABINHO.
Nonck n yctpanenne Hncnpabnoctei
22
PpO6nMa PpuuHa PeewHne
He pa6oTaet cnB.
3acop φmnbtpa Hacoc.
Kouei CInHBOO WHaHa HaxoJIN3C 60nee cem Ha 100 cm Blle nona 3abIOKIOKOBAPOBAN CInHBOWnAHI.
OHTTE OINbTp HAcoca.
YcDyTcB,TO CINHNOI HnH CMHTNPOBAHnpAIBHO. YCTpaHnTE 6IOKIMPOBky CINHBOI nHaHFA.
CinbIbIe BnBpaHnn pRnBpaJIenH.
HedonyCTMnARy3KaMaMHNbI. CTHpAihhA MaHHaYcTahOBHeHa HApEOHOHOBEPXHOCTmHHe otperynpoBaHOe eoNOKeHHe He hBnepeHbTpaHCnOpHTbe 60bnI.
3MeHHTeKONHueCTBO6enB
COOTETCTBYUIMMOBpAsOM.
YCTAHOBITE CTnpanbHyMOaMHINH
HaPBOBHNonNtOpyrnnpnyTe
ee NOJOKHE.
IVBNEKITE BCE
tpAHCNOPTNPBOOHNBE 60NTb.
Pnpocc octahabnBaTcRdo 3aBepHueHHuKna CTNPK
Het noaun Bodbu nn
3/NeKTPoPnTaNH.
Поветerveюву boDyI anektoponanien.
Ipoecc OCTAHABNBAeTCH Ha HEKOTOPOE BPEM.
HaJnCnne oTo6paKaTe cKoI OuH6Kn?
3To npOncxOHTB pAMKaX uKNa 3aMaYBaHN?
PipeBaHne npOrpAMMb.
AknBpyrteJnneH Cm.paedn Dnncn. KOHNCTCBKONKnCnTcPrrIy3a 1nn B03O6OBENHHPOecca. PnH neo6xOIMOCTH octanOBHTe paboty MaNNbH.
B6ap6ahe H/nn KOTHEHpeIe I MOUHX cpeCTb 06pa3yETc MHIOI NJIb.
HenoJXoJIuEe MOIOJIeCE cPcICTBO.
Upe3MePHeO KOJIINcTBo MOIOJIeero cpeCTDBA.
PpORepeTe pckOMeHaunn no HcNOJIb3OBaHIMo MOIOUero cpeCTBa. YMeHHIiHTe KOJIYcHcTBo MOHOUeTo cpeCTBa.
ABTOMATMNECKA
KOPPEKUNB PECMNCH
CTIPKNK
Bnpoeae paBoTbOaMOxHaaBOMTaMnueckKa KoppKpIINJNTEJIHOCTNIPoPAMMb.
3TOHOPMBAHOHEOKaBaaEBAIHHNAAHfYHKUHOPoBaanic.
He bHIOINHRETECH OTKIM,HEpAHBOHOMEPHOe paCNpeJelenHe 6bEN.
PnpoeBte 3aepy3ky MauHHN H6b8,3aTeMnyCTHTe npopMaY0KtMAaHBO
06aaHHFOpaunHcoBEBtI:

Ebn npoeceOTKHMnAbnoaTe nOBnHnOTo KNOHcTeBa NEbI, DnRatentb OCTAHabNtca, Hn 90 cekyBnBnIOuAeTc CNBHOHACoc. Ecn yctpaHTb neHy TAKMn 6paOM He ydaTea 3nONNTk, nporpAMMa 3abepeuaTe 66 bInOnHeNAtOHKm.
23
yctahOBka
NoroToBka
YdAnrHeBce yynakOBOHyIbe MaTePmAbIb, B TomcNcne neHOrnnaCToBvIO
DctABKry. IINBCPbTHyYNAKOBKMOXHO ZAMETHTB HANWHE
KaJIeBbBOHa HauTACNkOBOM MEuke NIOKc.3TO HApMaIIbHO
BAHIEHcpe3yblatom TABOQCKMxNCITbAHM HApEMeNTNCHOC.
BbBepHnTe TpaHCnOpTuPoBOuHbIe 6oTbI.
3Tn TPAHCTNPTOPOBOVBH6 BoTH npEHaHAeHbI nDn KpERNEHnAHTINB6paUOMHHX CMNOHEHTOB BYHTP MaUNHbI R pOIECE TPAHCTNPOTPBOKH.
1.CHMMTE3aHIOKpbuKy.
2. BvBepHHTe 0bTbHa haaDhe CTOpOHe n HABeKETIaNCTMCCOBHe paoaeninm3MaMHNb
06aaHooepmaaHncoBtB

NOMECTHE TPAHONOPTROBOHBE 60NTB HADAEKHOE MEO To cnyu noCNEUYOERO HCNLOBZAOHN.
EIN MAAHNY Ntpo6yETe nepeBEST B DpyrOe MeTO, BO Hs36JXAHHE NOBPEXJEH NYCTAHOBHTe TPAHCTOPUPOBOHyBE 60TbI B o6pTHOM NOPAJe.
3.YCTAHOBHTA ZADHIHOK BKPbIKy ObopatHO, BCTABIN Ee 8 Da n3a BByTKNQ TCOPOH HApKY.
4.3aKpOte OTBepCTN 3arnyikamn
PerynnpOBKa HOKeK
OTpyrnpyte HOKKNOONYCHNHYC0TNOHNBOHOTNOONKEHNA3TO 030BONHTMNMMNINPBOBATBnBpaunu, N, KAK CNECTBNE, YWM TNP paBote.KpOmeTORo,3TO CHNKAETNHO.CPEMOENYEOTCBYCTABNTB NOONKEHNC NOMOIOCTPOENTBOHOPOYOBNYCTAHANNBAt BAAMHy CNEETA MAKCMMAIbHOPOHHNI INIOCKNNION.


yCTAHOBKa
24
Uanr noaun BObl -CncreMa KOHTpon BObl
Ullanr Naodn Bovd Asuca St - Baekhry Iaemement 3aunntb, o6ceNnaBwaouo 6eOnaanochtb O uoshoKHTPob.
YCTAHONHEHNE H KEM LIAIJIHNI KOHTPOPIAOTK ONJAI BOJIN A NAMOTATMCKEA NEPEKHPBATOCR PNO NBNHEAPOPTOKEY
- HabeHHTe raiKy Ha IaHRe nOaHy BODHa BODHOH KnaH.
2.PnncoeHHTe WnHaHr NoadaHbKpAHy.
BHHMaHHeI

Maunu paccumama H a noauy monka xonnoho so hoi Nocnlyume Habop uanaeos npunaaeemoo K Maunu KOMNekma.
He cneoyem uonnb3oabmbcmapbte wana.
CnBHOJUHr
BHHHINHJMHNOHO CMHTNPOBAT HEKONKBHMn CNOOCAMn OHNHO NIOOMCNYAe BHCOTA YCTAHOBKNI HUNHARO NOHNHOKDIOCHTAR80-100cmXOTBA6bIBOHNOTOKE.BoMOHNHOHNHCHNEETYAKENPTHA3ADHNECTHEKAHNH
1.CnBhoHwlnrKpaKaOBnHe
3AekPnHTe KOHeC HINHORO 1aHHa C NMOUHcNCHaHbHORO KPOHHTe HA TAKM O6pA3m,4TOb6I OH He 6Bn NorpyKeH B Body. HAdEHO KApENrTe KPOHHTe BO HAcKHe Hn AADKHe npn DnKHeHHx Rnpoee PaobTo.
2.CnBHOHS WAAHR K CnBHOmy CHOHY
CoepHHeHneDopKHO6bHTbHaeKHO3aepMeTHuPBOHa 13a4nKcnpoBaHO HA COOTBETCTBykUeM npeXOHNKe HAD CMFOHOI
25
yCTAHOBKa
3.CnBHOH WAnr K CnBHOH Tpy6e
3aekprrte KOeue CnHoro 1aHa r c nOmoBcpeMaIbHO KPOHHTBHA.
Nadekho 3aekpenite kpoHHTeB BO 36EkaHKeIe erO naJeHn prn DnJIeKHeN B IpoUcEpeBaTOH.
BHHMANHE!

CnHouH uanHe hne doJyKe HbIb nozyjek a body; ezo cndyem HadeKHO zapenptu b u ocbechyeu omcyummeB nompeyek Ecnu cnHouH uanZ okakemcna h onny unu npya 6demyh XadoDumbcBa hBaHcme Mehe 80 cm, 60a dyBeBmuaBamcBz 3u cpauHou MauHHU 8bEPMe 3oanaHHeur (3dEkecm CudhoA).
Bulunene cnaaohno zha hne doyncaoeem. Ipu neo6xodumocmtu 6opamme b amden noocnpadoknho o6cnykueanb.
NoKnIOueHne NHTAHN
Iepen noKIOHcHMeM yEeNTecb B CNEyOIOeM:
PO3E1K COOTBCTYETM KAKMAHBIHO MOUHOCTI, IOTPeBHEMOHADHNPPHEKCOOTBCTYETTOBDAHWM
-CTaHdapt po3eTK COOTBETCTBye TWTENcENI NITaHnMaINHbI.
-po3eTKa mMeet 3a3emnneHne.
Texnueckne daHHbIe
26
OchOBbIeTexHwueckne npaMetpbn3denn
HW70-B1426
HW70-B1426S
Haier Group, Haier Industrial Park, No 1, Haier Road, Hi-tech Zone, 266101, Qingdao, P.R. China
Using Electrical Anliance Com. LTD., Ltd.
Hi-tech Zone, 266101, Qingdao, P.R. China
Hi-tech Zone, 266101, Qingdao, P.R. China
EU Norre Nn33a
Aepe Mmroptepa: 121099, Mockba, Hovhncskn 6-p, d, 8, ocf, 1601
OOO TopoBraKOMnHaHgXaHepPyc
OOO TopoBraK KomnHryA XaIep Pyc
30he,Lindao,266101,KHP
XaepMnndctpwnPank.XaepPoan.Xai-Tey
Yao-Chi Group, Hong Kong, China
No. 100000, Hong Kong, China
266101, Qingdao, P.R. China
Hajer Group, Hajer Industrial Park, No 1, Hajer B
H3rotobutenb:
《XaHep3nKpnKAn AnnnmanceCk Kopn.ⅡI.》
a a a a a a a a a a a a a a a a a a a a a a a a a a a a a
yannnnynnnnynnnnynnnnynnnnynnnnynnnnynnnnynnnnynnnnynnnnynnnnynnnnynnnnynnnnynnnnynnnnynnnnynnnnynnnnynnnnynnnnynnnnynnnnynnnnynnnnynnnnynnnnynnnnynnnnynnnnynnnnynnnnynnnnynn
aaii jyj yj jai jai jai jai jai jai jai jai jai jai jai jai jai jai jai jai jai jai jai jai jai jai jai jai jai jai jai jai jai jai jai jai jai jai jai jai jai jai jai jai jai jai jai jai jai jai jai jai jai jai jali jali jali jali jali jali jali jali jali jali jali jali jali jali jali
aal 5y jai aal qal kay ge bai dai al lal y..
…产
aaiy jaiy jaiy jaiy jaiy jaiy jaiy jaiy jaiy jaiy jaiy jaiy jaiy jaiy jaiy jaiy jaiy jaiy jaiy jaiy jaiy jaiy jaiy jaiy jaiy jaiy jaiy jaiy jaiy jaiy jaiy jaiy jaiy
y j 1
Aa 1 a
002 000000000000000000000000000000000000000
j 1
...
aaii aiaaaaiy jai yaiy
jai jilie jui jialldi jn sll
1 1
15 1
23111 2j0a jia 2j0a jia pia
1
a 234
yolall Duaa yu duaia 1
Aaiae aee eae 4y g y
y
K

…
aii 100
a 1
1
2
yall yll l jal yall jay...
j 1
Jusuui jusuui uuuuui uuuuui uuuuui
Jn jnnn nn nnnn nnnnnnnnnnnnnnnnnnnnnnnnnnnnnnnnnnnnnnnnnnnnnnnnnnnnnnnnnnnnnnnnnnnnnnnnnnnnnnnnnnnnnnnnnnnnnnnnnnnnnnnnn
Jia 1
1 1


aaiy jijj
9
(cjill) 1
a 30 30 30 30 30 30 30 30 30 30 30 30 30 30 30 30 30 30 30 30 30 30 30 30 30 30 30 30 30 30 30 30 30 30
(d) "Temperature"
aalalalalalalalalalalalalalalalalalalalalalalalalalalal
(e j) "Spin"
S1 = 12( a1 + a2 + a3)
(f)
(M2) "SyntheticM1 ( ) "Cotton" 100000000000000000000000000000000000000000000000000000000000000000000000000000000000000

:chaijia jiele cijie
"Ji 1 j 1 j 1 j 1 j 1 j 1 j 1 j 1 j 1 j 1 j 1 j 1 j 1 j 1 j 1 j 1 j 1 j 1 j 1 j 1 j 1 j 1 j 1 j 1 j 1 j 1 j 1 j 1 j 1 j 1 j 1 j 1 j 1 j 1 j
8
1
aiee aee eae ee eae eae eae eae eae eae eae eae eae eae eae eae eae eae eae eae eae eae eae eae eae eae eae eae eae eae eae eae eae eae eae eae eae eae eae eae eae eae eae eae eae eae eae eae eae eae eae eae eae eae e ae
(a) "Function"
y j 1
(b) "Selection"
jag jay jay jay jay jay jay jay jay jay jay jay jay jay jay jay jay jay jay jay jay jay jay jay jay jay jay jay jay jay jay jay jay jay jay jay jay jay jay jay jay jay jay jay jay jay jay jay jay jay jay jjay jay jay jay jay jay jay jay jay jay jay jay jay jay
"Child Lock"
(a+b j)
J 100000000000000000000000000000000000000000000000000000000000000000000
(20
( 4) x = 21
aaii iiaii jaiiaai dai
| % | Cag dang dang dang | S dang dang dang | dang dang dang | dang dang dang | dang dang dang | dang dang dang |
| --- | Auto | 95 | 36,0 | 2,00 | 2 | Hygienic 95°C |
| --- | Auto | 40 | 40,0 | 0,56 | 4 | Jeans |
| --- | 0:25 | 30 | 35,0 | 0,26 | 2 | Sport |
| --- | 1:19 | 40 | 40,0 | 0,50 | 4 | Underwear |
| --- | 0:42 | -- | 50,0 | 0,10 | 1 | Wool |
| --- | Auto | 40 | 34,0 | 0,56 | 4 | Mix |
| --- | Auto | 30 | 46,0 | 0,25 | 4 | Synthetic |
| 53> | Auto | 40 | 36,0 | 0,47 | 3.5 | Cotton 40°C* |
| 53> | Auto | 60 | 37,0 | 0,68 | 3.5 | Cotton 60°C* |
| 53> | Auto | 60 | 44,0 | 0,62 | 7 | Cotton 60°C* |
| --- | 1:20 | 40 | 46,0 | 0,58 | 4 | Daily Wash |
| --- | 1:14 | 40 | 45,0 | 0,60 | 2 | Ultra White |
| --- | 0:15 | 20 | 20,0 | 0,20 | 1 | Express 15' |
| --- | 2:05 | 90 | 67,5 | 2,00 | 4 | Baby Care |
| --- | 0:56 | 30 | 50,0 | 0,25 | 1 | Delicate |
| --- | 0:57 | 30 | 36,0 | 0,25 | 2 | Hand Wash |
| --- | 0:13 | -- | -- | 0,10 | 7 | Spin/Drain |
| --- | 1:05 | 90 | 15,0 | 1,80 | --- | Self Clean |

:
2010/30EU ydaal dabd aagaa (g yaey) 404060 (a)
aaii aai iaiiaaiiaaiiaaiiaaiiaaiiaaiiaaiiaaiiaaiiaaiiaaiiaaiiaaiiaaiiaaiiaaiiaaiiaaiiaaiiaaiiaaiiaaiiaaiiaaiiaaiiaaiiaaiiaaiiaaiiaaiiaaiiaaiiaaiiaaiiaaiiaaiiaaiiaaiiaaiiaaiiaaiiaaiiaaiiaaiiaaiiaaiiaaiiaaiiaaiiaai

(204
15
#
e juii, gaiy jiy jiy jiy jiy jiy jiy jiy jiy jiy jiy jiy jiy jiy jiy jiy jiy jiy jiy jiy jiy jiy jiy jiy jiy jiy jiy jiy jiy jiy jiy jiy jiy jiy jiy jiy jiy jiy jiy jiy jiy jiy jiy jiy jiy jiy jiy jiy
#
(“(Sall 2j))
Jusll
Jalll Jai. aill "Lilie 100" jai jai jai jai jai jai jai jai jai jai jai jai jai jai jai jai jai jai jai jai jai jai jai jai jai jai jai jai jai jai jai jai jai jai jai jai jai jai jai jai jai jai jai jai jai jai jai jai jai jai jali jali jali jali jali jali jali jali jali jali jali jali jali
Jusll
aaii"Caaiy/00"jjcbai jaiil jaiii 100"jjbaiy aaiy aiiaai 15, jaiy aiay yaiy 3
i
y 1
J
Aa a a a a a a a a a a a a a a a a a a a a a a a a a a a a a a a a a a
14
(204
1
a a a a a a a a a a a a a a a a a a a a a a a a a a a a a a a a a a a a a a

:
"Self Clean" 1234567890123456789012345678901234567890123456789012345678901234567890123456789012345678901234567890123456789
#
Jia 100000000000000000000000000000000000000000000000000000000000000000000

gaijie cing
Ae 1
#
paalal ayaaaay aaiy aaiy aaiy aaiy aaiy aaiy aaiy aaiy aaiy aaiy aaiy aaiy aaiy aaiy aaiy aaiy aaiy aaiy aaiy aaiy aaiy aaiy aaiy aaiy aaiy aaiy aaiy aaiy aaiy aaiy aaiy aaiy aaiy aaiy

gaijia hao chuan
"Self Clean" 2 (2)

zui ci jia
cilll, cbiell, 8eell pliwl jil
y
y
1 1
60 2j j j j j j j j j j j j j j j j j j j j j j j j j j j j j j j j j j j j j j j j j j j
1
e jll 1j jll 1jnl i jn jin jni jni jni jni jni jni jni jni jni jni jni jni jni jni jni jni jni jni jni jni jni jni jni jni jni jni jni jni jni jni jni jni jni jni jni jni jni jni jni jni jni jni jni jni jni jni jni jni jni jni jnl
4.4 4
16
(20
jiall jk
paaa aaa aaa aaa aaa aaa aaa aaa aaa
Juaaun1n aoe jie
aJgoljolal
(2) 1 (1)
a a a a a a a a a a a a a a a a a a a a a a a a a a a a a a a a a a a a a a a
18
aaiin gaiin
asall
yll 15 lueaie 15 iiaaii aiee
y = - x^2 + 1
Aeieieie eae yiey jia

1
1
1
a aieae aiee eae aeae 2
1
aaii aai iaae 3
1
j3 4 j3 j3 j3 j3 j3 j3 j3 j3
.
5
aaiaa aaii jia jai jaiy 6
Aedl jie sial
7
8
.9
aill 10
aaii 11

1
i 1
1
(1)
21

aallgss
y
y 1
S OBC = S COD + S BOC - S BOC
1j 1
J 1
aee
C. all 45
aiaaiiege jaojoo
a a a a a a a a a a a a a a a a a a a a a a a a a a a a a
80-100 80-100
aalil 1
i 1
e
y
aal 2
e jll 5
!stell jiaell