RAS10SKVPND - Air-conditioner TOSHIBA - Free user manual and instructions
Find the device manual for free RAS10SKVPND TOSHIBA in PDF.
| Product type | Reversible wall-mounted split air conditioner (reverse cycle) |
| Indoor unit model | RAS-10SKVP-ND |
| Outdoor unit model | RAS-10SAVP-ND |
| Cooling capacity | 2.5 kW |
| Heating capacity | 3.2 kW |
| Power supply | 220–240 V ~ 50 Hz |
| Power consumption (cooling) | Indoor unit: 30 W, outdoor unit: 460 W |
| Power consumption (heating) | Indoor unit: 30 W, outdoor unit: 600 W |
| Current (cooling) | Indoor unit: 0.15 A, outdoor unit: 2.57–2.34 A |
| Current (heating) | Indoor unit: 0.15 A, outdoor unit: 3.15–2.87 A |
| Indoor unit dimensions (W x H x D) | 790 x 250 x 208 mm |
| Outdoor unit dimensions (W x H x D) | 780 x 550 x 290 mm |
| Indoor unit weight | 9 kg |
| Outdoor unit weight | 38 kg |
| Operating modes | Automatic, cooling, heating, dehumidification, fan only |
| Special functions | Hi POWER, sleep mode, timer (combined ON/OFF), PURE air purification, MY COMFORT memory, automatic restart |
| Filter type | Washable air filter + Plasma purifier filter |
| Recommended maintenance | Clean air filters every 15 days; clean Plasma purifier filter every 6 months or when FILTER indicator lights up |
| Safety | 3-minute protection function, automatic stop in case of anomaly, automatic defrosting in heating mode, automatic restart after power failure |
| Remote control | Infrared, range 7 meters, AAA batteries (included) |
| Operating conditions (cooling) | Outdoor temperature: -10°C to 46°C; indoor temperature: 21°C to 32°C |
| Operating conditions (heating) | Outdoor temperature: -15°C to 24°C; indoor temperature: below 28°C |
| Refrigerant | Reverse cycle, refrigerant (not specified in the manual) |
Frequently Asked Questions - RAS10SKVPND TOSHIBA
User questions about RAS10SKVPND TOSHIBA
0 question about this device. Answer the ones you know or ask your own.
Ask a new question about this device
Download the instructions for your Air-conditioner in PDF format for free! Find your manual RAS10SKVPND - TOSHIBA and take your electronic device back in hand. On this page are published all the documents necessary for the use of your device. RAS10SKVPND by TOSHIBA.
USER MANUAL RAS10SKVPND TOSHIBA
LUFTKONDITIONERING (SPLITTYP)
KOHdUcIOHEP (PA3DEJINTEJIbHbI TNI)
ILMASTOINTILAITE (JAETTU)
AIRCONDITIONANLAEG (SPLIT TYPE)
KLIMAANLEGG (DELT TYPE)
For general public use
Thank you for purchasing this TOSHIBA Air Conditioner. Please read this owner's manual carefully before using your Air Conditioner.
COIDEPXAHAHE/SISALTO/INDHOLD/INNHOLD
PYCCKN 83bIK
PINHADNEJEXHOCTN 1
MEPbI IPEDOCTOPOXHOCTN 1
HA3BAHNAYACTEN 3
HA3BAHINIΦYHKUINNHIDNKATOPOBIOPTAHOB
YNPABJIENHA BHVTPEHHEM BIOKE 3
IyblT dy I ERO FyHKUIN 4
HA3BAHnI ΦYHKUIM INHINKATOPOB HA NylbTE Dy....5
IIOIROBKA INPOBEPKA NEPENICNOJIb3OBAHnEM....5
NcnoB3OBAHNE NyIbTA Dv. 7
ABTOMATUNCHECKOE FYHKLIOHINPOBAHNE. 8
ABTOMATNUECKOEΦYHKUNOHNPOBAHNE
(ABTOMATUNHECKOE N3MEHEHNE) 8
ONEPALIN OXIAKDEHNR/OBOTPEBA 9
ONEPALINOCUWEHNA 9
ONEPALIN 8°C 10
ONEPALINPURE 11
ONEPALM Hi POWER 12
SUOMI
TARVIKKEET 1
TURVALLISUUTEEN LIITTYVIARAVOTOIMIA 1
OSIEN NIMET 3
SISAYKSIKON OSOITTIMEN JA SÄATIMEN NIMET JA TOIMINNOT. 3
KAUKOSÄDIN JA SEN TOIMINNOT. 4
KAUKOSÄATIMEN OSOITTIMIEN NIMET JA TOIMINNOT.5
KAYTTOA EDELTAVA VALMISTELU JA TARKASTUS. 5
KAUKOSÄATIMEN KÄYTTÖ 7
AUTOMAATTIKÄYTTÖ 8
AUTOMAATTIKAYTTO (AUTOMAATTIVAIHTO) 8
JAAHDYTYS JA LAMMITYS. 9
KUIVAUS. 9
8°C:n TOIMINTA 10
ILMANPUHDISTUS. 11
DANSK
TILBEHOR. 1
SIKKERHEDSFORSKRIFTER 1
DELENES NAVN. 3
NAVNE OG FUNKTIONER PÄ DEN INDENDORS ENHEDS
INDIKATOROGBETJENINGER 3
FJERNBETJENINGEN OG DENS FUNKTIONER. 4
NAVNE OG FUNKTIONER PAFJERNBETJENINGENS
INDIKATORER. 5
FORBERDEELSE OG KONTROL INDEN ANVENDELSE 5
ANVENDELSE AF FJERNBETJENINGEN 7
AUTOMATISK DRIFT 8
AUTOMATISK DRIFT (AUTOMATISK OMSKIFTNING) 8
AFKOLING/OPVARMINING 9
TORRING 9
8°C-FUNKTION 10
LUFTRENSNING 11
NORSK
TILBEHOR 1
SIKKERHETSANVISNINGER 1
NAVN PÄ DELER 3
NAVIN PÄ INDIKATORO R OG KONTROLLER PÄ
INNENDORSENHETEN,OGDERESFUNKSJONER. 3
FJERNKONTROLLEN OG DENS FUNKSJONER 4
NAVIN PÁ INDIKATORENE PÁ FJERNKONTROLLEN, OG
DERES FUNKSJONER 5
KLARGJORING OG KONTROLL FOR BRUK 5
BRUKE FJERNKONTROLLEN 7
AUTOMATISK DRIFT. 8
AUTOMATISK DRIFT (AUTOMATISK OMKOBLING) 8
KJOLEDRIFT/OPPVARMINGSDRIFT 9
TORR DRIFT 9
8°C DRIFT 10
LUFTRENSEDRIFT 11
TAYMEP 1,3.5.9H OFF 12
ONEPALINRAIIMEPA 13
ONEPALIMEMORY/MY COMFORT. 15
PEYINPOBKA HANPABJIEHN BO3DyUHORO NOTOKA....16
ONEPALINABTOMATUeCKO NOBTOPHO
3ANYCKA 17
KAK PABOTAET KOHIMIOHEP 18
BPEMEHHAR 3KcIyATALUR. 19
ONEPALIN OCHCTK 19
OBbIHyBlyyXoD 20
CNEUHbIyXoI 22
ФУHКЛИОHIPOBAHINE I PABOTA KOHДИЦИОHEPA 24
BbIBJIeHHe N YCTPAHEHHe HEnCnPABHOCTeI. 25
TEXHUYECKNEXAPAKTEPNUCTUKN 27
BbIBJIeHHe N YCTPAHEHHe HEnCnPABHOCTEIN (nyIbT
V) 28
SUURTEHOTOIMINTA. 12
1,3,5,9 TUNNIN POIS-AJASTIN 12
AJASTIMEN KAYTTÖ 13
MUISTI-JA OMAT ASETUKSET-TOIMINTA 15
ILMAVIRRAN SUUNNAN SÄTÄMINEN. 16
AUTOMAATTINEN UUDELLEENKÄYNNISTYS. 17
ILMASTOINTILAITTEEN TOIMINTA 18
VALIAIKAINEN KAYTTO 19
PUHDISTUS 19
TAVANOMAINEN KUNNOSSAPIO. 20
MUU KUNNOSSAPITO 22
ILMASTOINTILAITTEEN TOIMINTA JA SUORITUSKYKY.24
VIANMAARITYS 25
TEKNISET TIEDOT 27
VIANMÄRITYS (kaukosäadin). 28
HOJEFFEKT 12
1,3,5,9TSTOPTIMER 12
TIMERFUNKTION 13
HUKOMMELSE/KOMFORT. 15
JUSTERING AF LUFTSTRÖMMENS RETNING 16
AUTOMATISK GENSTART 17
HVORDAN AIRCONDITIONANLEGGET FUNGERER 18
MIDLERTIDIG BETJENING 19
RENGORINGSFUNKTION 19
ALMINDELIG VEDLIGEHOLDELSE 20
SAERLIG VEDLIGEHOLDELSE 22
AIRCONDITIONANL/EGGETSDRIFTOGYDEEVNE 24
FEJLFINDING 25
SPECIFICATIONER 27
FEJLFINDING (fjembetjening) 28
Hi POWER-DRIFT 12
1-,3-,5-,9-TIMERS TIMER AV. 12
TIMERDRIFT 13
MINNE/MIN KOMFORT-DRIFT 15
JUSTERE RETNINGEN AV LUFTSTRÖMME. 16
AUTOMATISK OMSTARTFUNKSJON (AUTOOMSTART) 17
KLIMAANLEGGGETSVIRKEMATE. 18
MIDLERTIDIG DRIFT 19
RENSESYKLUS. 19
VANLIG VEDLIKEHOLD 20
SPESIALVEDLIKEHOLD 22
KLIMAANLEGGDRIFT OG -YTELSE 24
FEILsOKING. 25
SPESIFIKASJONER 27
FEILSOKING (fjernkontroll) 28
RASeries_OwnersManual_BCV.fm Page 1 Wednesday, January 10, 2007 10:40 AM


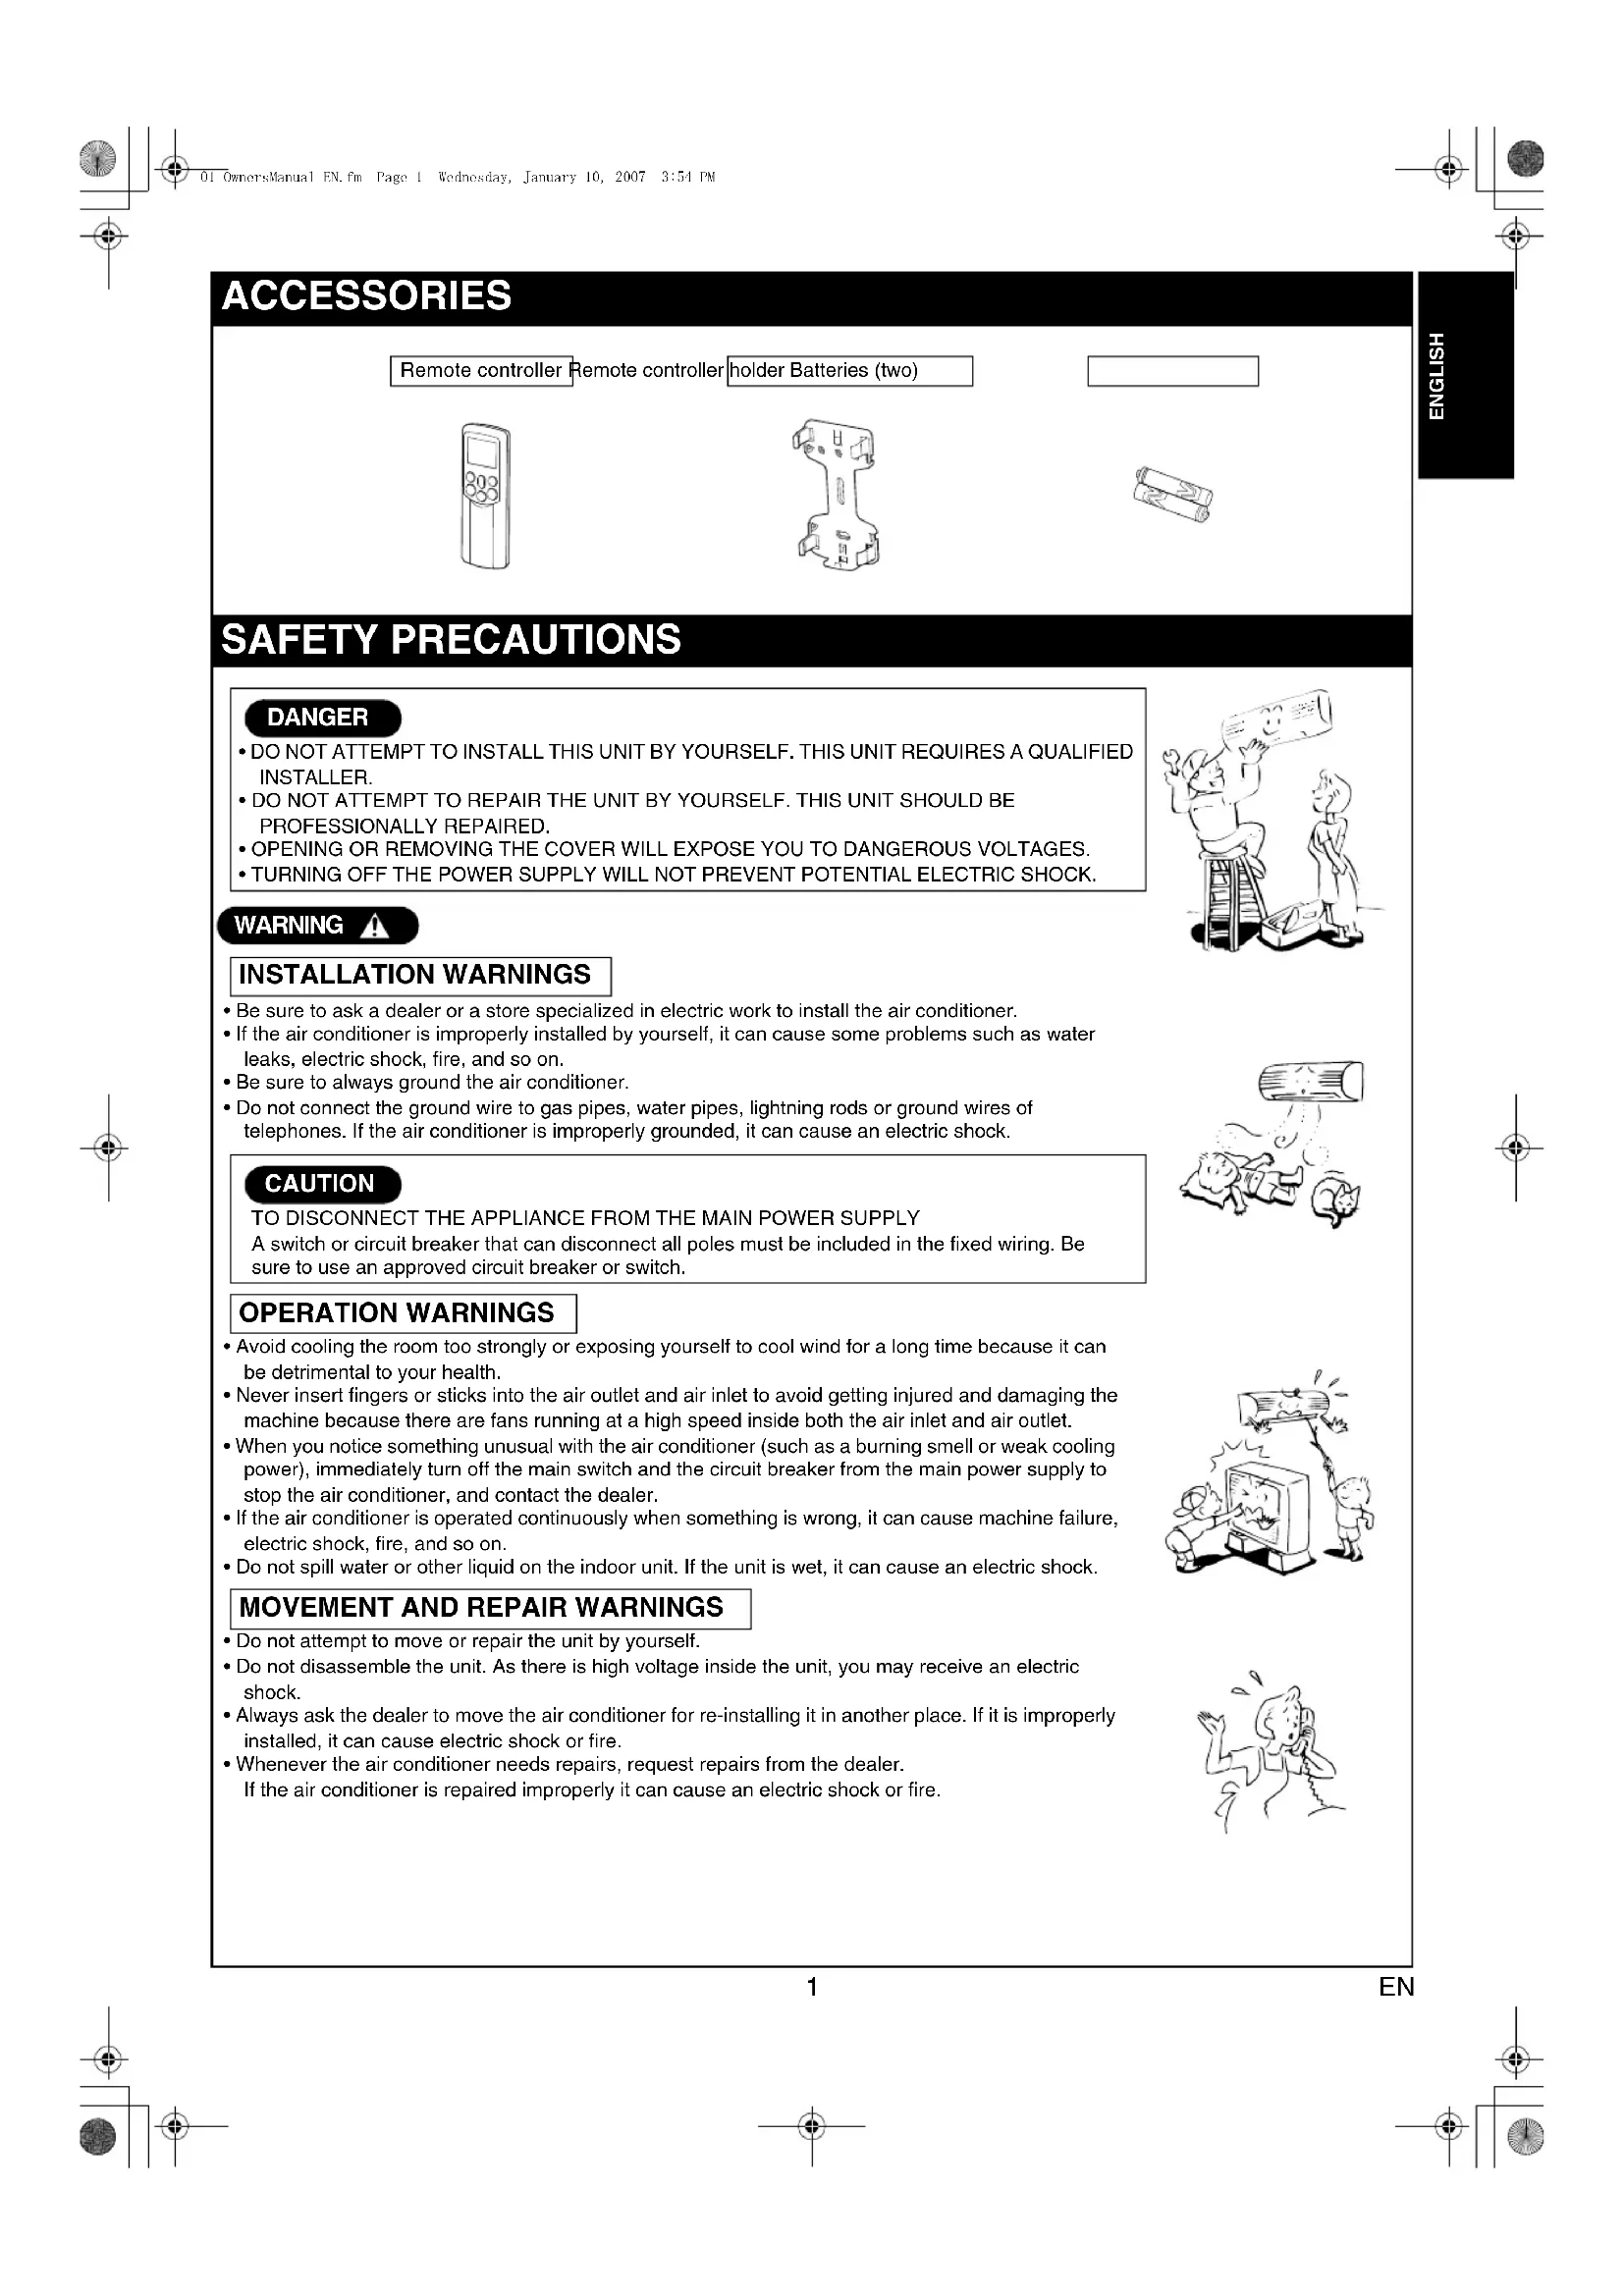
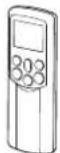
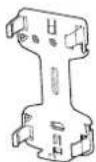
ACCESSORIES
Remote controller Remote controller holder Batteries (two)

SAFETY PRECAUTIONS
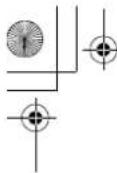
DANGER
DO NOT ATTEMPT TO INSTALL THIS UNIT BY YOURSELF. THIS UNIT REQUIRES A QUALIFIED INSTALLER.
DO NOT ATTEMPT TO REPAIR THE UNIT BY YOURSELF. THIS UNIT SHOULD BE PROFESSIONALLY REPAIRED.
- OPENING OR REMOVIDING THE COVER WILL EXPOSE YOU TO DANGEROUS VOLTAGES.
- TURNOING OFF THE POWER SUPPLY WILL NOT PREVENT POTENTIAL ELECTRIC SHOCK.
WARNING
INSTALLATIONWARNINGS
- Be sure to ask a dealer or a store specialized in electric work to install the air conditioner.
- If the air conditioner is improperly installed by yourself, it can cause some problems such as water leaks, electric shock, fire, and so on.
- Be sure to always ground the air conditioner.
- Do not connect the ground wire to gas pipes, water pipes, lightning rods or ground wires of telephones. If the air conditioner is improperly grounded, it can cause an electric shock.
CAUTION
TO DISCONNECT THE APPLIANCE FROM THE MAIN POWER SUPPLY A switch or circuit breaker that can disconnect all poles must be included in the fixed wiring. Be sure to use an approved circuit breaker or switch.
OPERATION WARNINGS
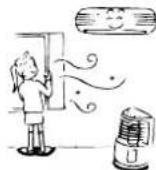
- Avoid cooling the room too strongly or exposing yourself to cool wind for a long time because it can be detrimental to your health.
- Never insert fingers or sticks into the air outlet and air inlet to avoid getting injured and damaging the machine because there are fans running at a high speed inside both the air inlet and air outlet.
- When you notice something unusual with the air conditioner (such as a burning smell or weak cooling power), immediately turn off the main switch and the circuit breaker from the main power supply to stop the air conditioner, and contact the dealer.
If the air conditioner is operated continuously when something is wrong, it can cause machine failure, electric shock, fire, and so on. - Do not spill water or other liquid on the indoor unit. If the unit is wet, it can cause an electric shock.
MOVEMENT AND REPAIR WARNING
- Do not attempt to move or repair the unit by yourself.
- Do not disassemble the unit. As there is high voltage inside the unit, you may receive an electric shock.
- Always ask the dealer to move the air conditioner for re-installing it in another place. If it is improperly installed, it can cause electric shock or fire.
- Whenever the air conditioner needs repairs, request repairs from the dealer. If the air conditioner is repaired improperly it can cause an electric shock or fire.

CAUTION
INSTALLATION CAUTIONS
- Securely lay the drain hose for the best draining results.
-
Incorrect drainage can cause flooding in the house and furniture to get wet.
-
Be sure to connect the air conditioner to a dedicated power supply having the rated voltage. Otherwise, the unit can break down or cause a fire.
-
Do not install the unit in a place where inflammable gas can leak. A fire can result if inflammable gas accumulates around the unit.
- The indoor unit shall be installed so that the top of the indoor unit is at least 2 m in height. Also, avoid putting anything on the top of the indoor unit.
OPERATION CAUTIONS
- Carefully read this manual before starting the air conditioner. The manual includes a lot of important information for daily operation.
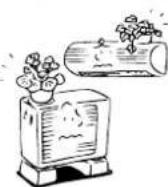
- Do not use this air conditioner for other purposes such as preserving food, precision instruments, art objects, breeding animals, or growing potted plants.
- Do not install this air conditioner in a special-purpose room such as a ship or any kind of vehicle. Doing so could harm machine performance.
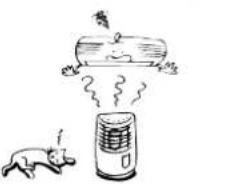
- Avoid exposing potted plants and animals to wind from the air conditioner because it harms their health and growth.
- When the air conditioner is operated in close proximity to a combustion device, pay careful attention to ventilation and let fresh air into the room. Poor ventilation can cause an oxygen shortage.
- When the air conditioner is used in a closed room, pay careful attention to the ventilation of the room. Poor ventilation can cause an oxygen shortage.
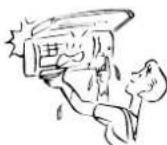
- Do not touch the operation buttons with wet hands. Doing so could cause an electric shock.
- Do not place any combustion device in a place where it is directly exposed to wind from the air conditioner. Doing so could cause incomplete combustion.
- When the air conditioner is not to be used for an extended period of time, turn off the main switch or the circuit breaker for added safety. Disconnecting from the power supply protects the unit from lightning and power surges.
- Do not put a container with water such as a vase on the unit because water can enter into the unit and cause an electric shock due to deterioration in the electric insulation.
- Check the concrete blocks underneath the outdoor unit occasionally. If the base is left damaged or deteriorated, the unit can topple over and could possibly cause an injury.
- Do not wash the unit with water. This could cause an electric shock.
- Do not use alcohol, benzene, thinner, glass cleaner, polishing powder or other solvent for cleaning the unit because they can deteriorate and damage the air conditioner.
- Before cleaning the unit, be sure to turn off the main switch or circuit breaker to prevent injuries from the electric fan running inside.
- For details of the cleaning method, refer to "USUAL MAINTENANCE" and "SPECIAL MAINTENANCE" on pages 20 to 23.
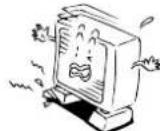
- Do not put anything on or step on the indoor unit and outdoor unit. If you do so, it can topple over and cause an injury.
To allow the air conditioner to operate at maximum performance, operate within the operating temperature range specified in the instructions. Failure to do so can cause a malfunction, break down, or water to leak from the unit. - It is recommended that maintenance be performed by a specialist when the unit has been operated for a long time.


NAMES OF PARTS
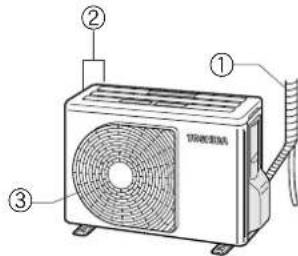
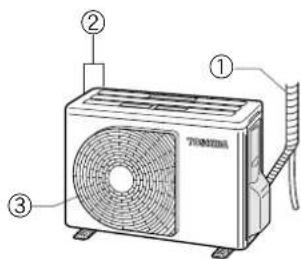
Outdoor unit
① Refrigerant connecting pipe and electric wires
②Air inlet (Side and rear)
③ Airoutlet
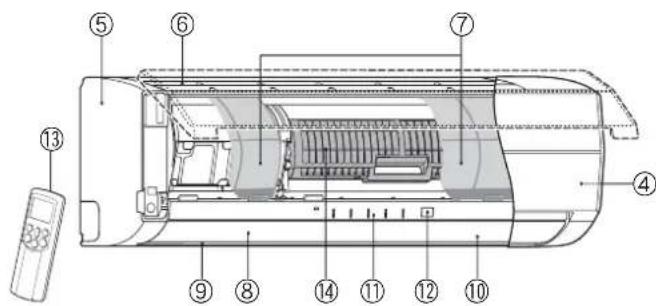
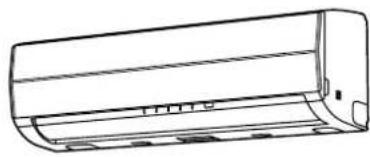
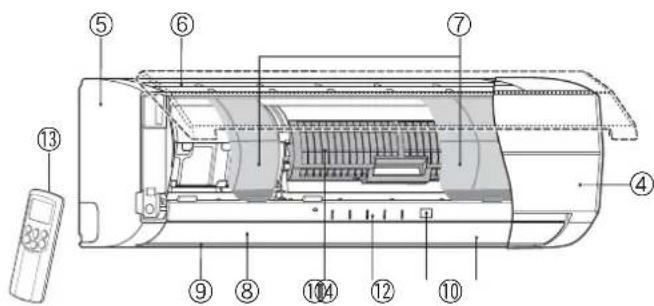
Indoor unit
④ Room temperature sensor
(5)Front panel
⑥ Air inlet grille
⑦Air filter
⑧Air outlet
Horizontal air flow couver
Located at the back of the vertical air flow louver.
Vertical air flow louver
Display panel
12Infrared signal receiver
Remote controller
(14)Plasma pure filter
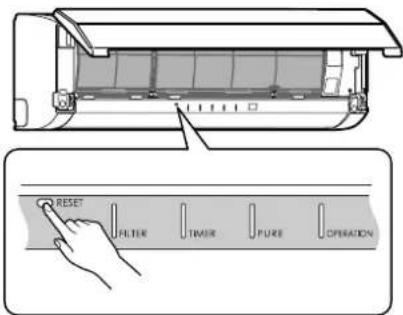
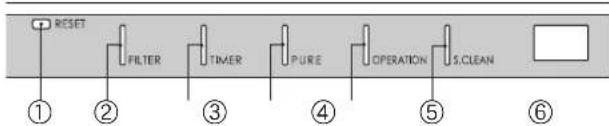
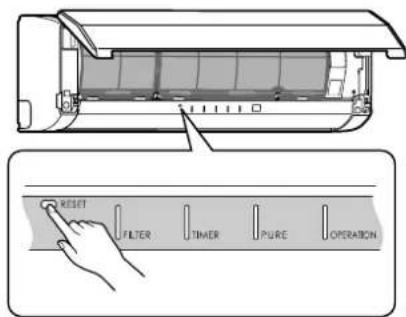
NAMES AND FUNCTIONS OF INDICATORS AND CONTROLS ON INDOOR UNIT
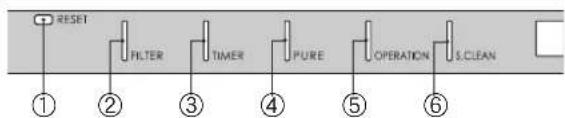
Display panel
The operating states are shown below.
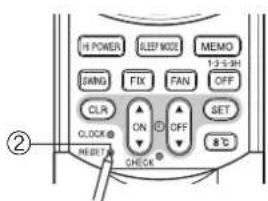
①RESET button
②FILTER indicator (Orange)
③ TIMER indicator (Yellow)
4PURE indicator (Blue)
⑤ OPERATIONindicator(Green)
The operation indicators flash rapidly (5 times per second)
when a safety protection feature is activated.
⑥ S.CLEAN indicator (Green)
When the unit shuts down after having operated for 10 or more
minutes in the cooling or dry mode, the cleaning operation is
started automatically, and the S.CLEAN indicator turns on.
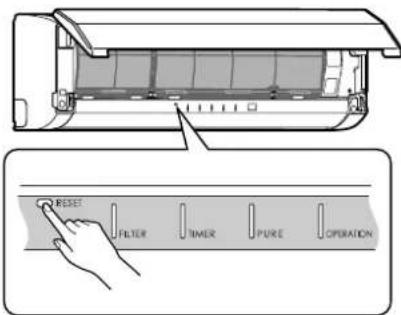
RESET button
The RESET button has the following two functions.
- Reset function
Use when the FILTER indicator (orange) is on. (see page 21.)
Temporary operation function
Use when you misplace or lose the remote controller, or when its
batteries are used up. (see page 19.)
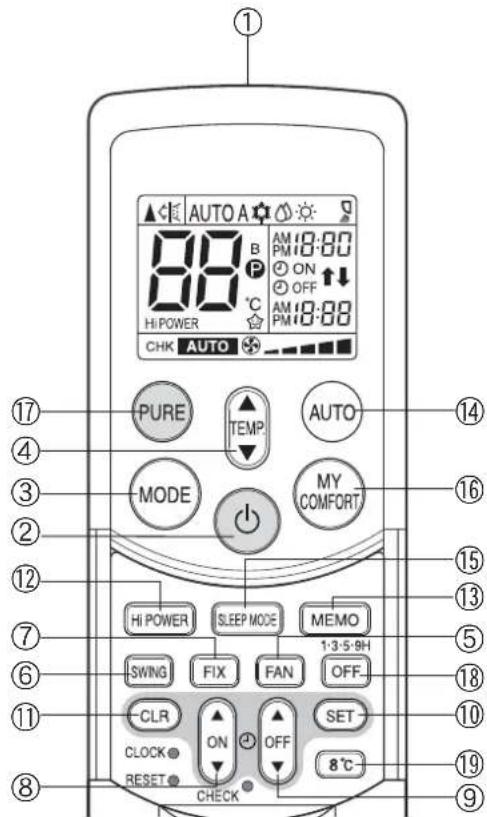
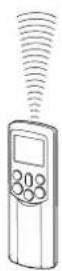
REMOTE CONTROLLER AND ITS FUNCTIONS
① Infrared signal transmitter
Transmits signals to the indoor unit.
② button
Press the button to start operation. (A receiving beep is heard.) Press the button again to stop operation. (A receiving beep is heard.)
If no receiving sound is heard from the indoor unit, press the button again.
③Mode select button (MODE)
Press this button to select a mode. Each time you press the button, the modes cycle in order from A: Auto changeover control, COOL, DRY, HEAT and back to A.
(A receiving beep is heard.)
④ Temperature button ( )
The temperature setting is raised to 30^
The temperature setting is lowered to 17^ (A receiving beep is heard.)
⑤Fan speed button (FAN)
Press this button to select the fan speed. When you select AUTO, the fan speed is automatically adjusted according to the room temperature. You can also manually select the desired fan speed from five available settings.
(LOW,LOW+,MED,MED+
HIGH) (A. beep is heard.)
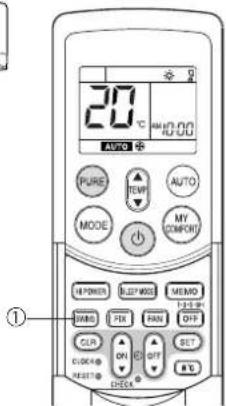
⑥ Auto louver button (SWING)
Press this button to swing the louver. (A receiving beep is heard.)
Press the button again to stop the Louver from swinging. (A receiving beep is heard.) (see page 16.)
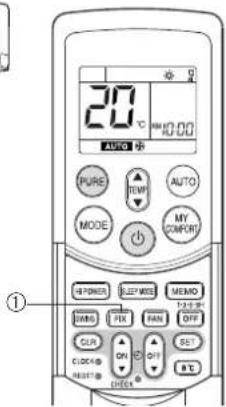
⑦Set louver button (FIX)
Press this button to adjust the air flow direction. (A receiving beep is heard.) (see page 16.)
⑧ON timer button (ON)
Use this button to change the clock and ON timer times.
To move up the time, press of the ON button.
To move down the time, press of the ON button.
OFF timer button (OFF)
Use this button to change the OFF timer times.
To move up the time, press of the OFF button.
To move down the time, press of the OFF button.
Reserve button (SET)
Press this button to store the time settings. (A receiving beep is heard.)
Cancel button (CLR)
Press this button to cancel the ON timer and OFF timer. (A receiving beep is heard.)
High power button (Hi POWER)
Press this button to start high power operation. (see page 18.)
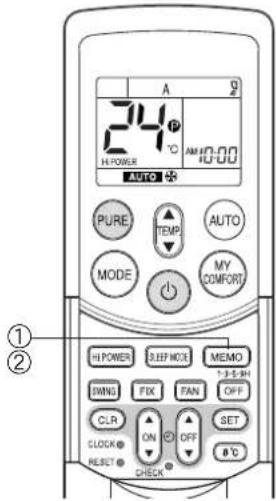
3Memory button (MEMO)
Press this button to ready for storing the settings. Hold down the button for 3 seconds or more to store the setting indicated on the remote controller and until the Pmark is displayed. (see page 15.)
Automatic operation button (AUTO)
Press this button to operate the air conditioner automatically.
(A receiving beep is heard.) (see page 18.)
⑤SLEEP MODE button
Press this button to start sleep mode. (see page 18.)
MY COMFORT button
Press this button to operate the air conditioner according to the settings stored using the MEMO button. (see page 15.)
PURE button (PURE)
Press this button to start the electrical air purifying operation.
Press the button again to stop operation.
Off timer button (OFF)
Press this button to start the OFF timer operation.
You can select the OFF timer time from among four settings (1, 3, 5 or 9 hours).
198°C operation button (8°C)
Press this button to start the 8^ set temperature heating operation. (see page 10.)
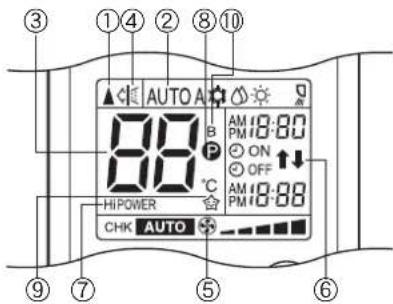
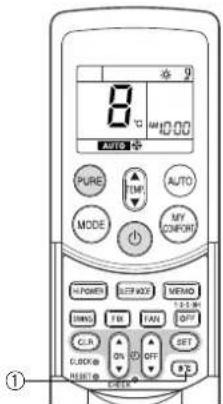
NAMES AND FUNCTIONS OF INDICATORS ON REMOTE CONTROLLER
Display
All indicators, except for the clock time indicator, are displayed by pressing the button.
①Transmission mark
This transmission mark ( indicates when the remote controller transmits signals to the indoor unit.
②Mode indicator
Indicates the current operation mode.
(AUTO: Automatic control, A: Auto changeover control, COOL, DRY, HEAT)
③ Temperature indicator
Indicates the temperature setting (17^ to 30^)
4PURE indicator
Shows that the electrical air purifying operation is in progress.
⑤FAN speed indicator
Indicates the selected fan speed. AUTO or one of five fan speed levels (LOW—, LOW+—, MED—, MED+—, HIGH—) can be shown. Indicates AUTO when the operating mode is either AUTO or DRY.
⑥ TIMER and clock time indicator
The time setting for timer operation or the clock time is indicated. The current time is always indicated except during TIMER operation.
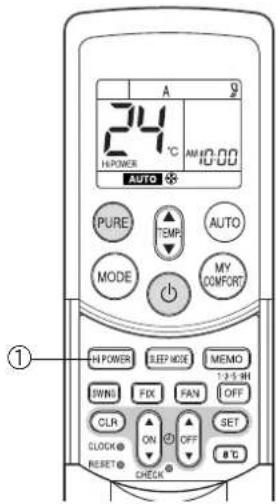
⑦Hi POWER indicator
Indicates when Hi POWER operation starts.
Press the Hi POWER button to start and press it again to stop operation.
(8) (MEMORY) indicator
Flashes for 3 seconds when the MEMO button is pressed during operation.
The mark is shown when holding down the button for 3 seconds or more while the mark is flashing. Press another button to turn off the mark.
⑨ SLEEP MODE indicator
Indicates when the SLEEP MODE is activated.
Press the SLEEP MODE button to start and press it again to stop operation.
A. B change indicator remote controller
- When the remote controller switching function is set, "B" appears in the remote controller display. (When the remote controller setting is "A", there is no indication at this position.)
Remote controller switching function
- In the illustration, all indicators are shown for purposes of explanation. During operation, only the relevant indicators are shown on the remote controller.
If two indoor units are installed in the same room or adjoining rooms, both units may start and stop at the same time when the remote controller is operated. This can be prevented by setting the switching function so that each indoor unit is operated only by the corresponding remote controller.
To use the remote controller switching function, contact the air conditioner dealer or the installation company.
PREPARATION AND CHECK BEFORE USE
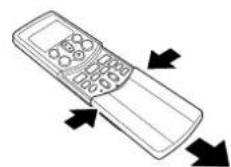
Loading the remote controller batteries
① Remove the cover, and insert the batteries.
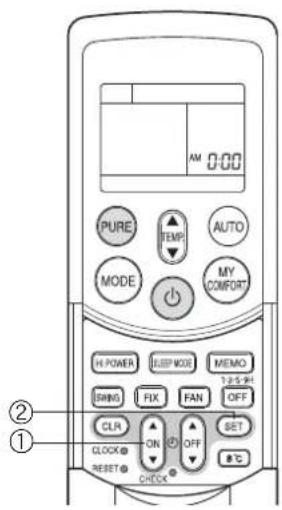
②Press the RESET button.
The clock time indicator flashes. Press the RESET button using an object with a narrow tip.
③Reattach the cover.
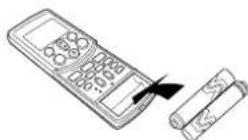
Batteries
To replace the batteries, use two new batteries (AAA type).
The batteries will last about one year under normal usage.
- Replace the batteries if there is no receiving beep from the indoor unit or when the air conditioner cannot be operated using the remote controller.
- To avoid malfunctions due to battery leakage, remove the batteries when not using the remote controller for over one month.
- Slide off the cover while pressing the sides.
- Battery replacement
Be careful not to reverse the (+) position and the (-) position.
Setting the clock
Before you start operating the air conditioner, set the clock of the remote controller using the procedures given in this section. The clock panel on the remote controller will indicate the time regardless of whether the air conditioner is in use or not.
Initial setting
When batteries are inserted in the remote controller, the clock panel displays AM 0:00 and flashes.
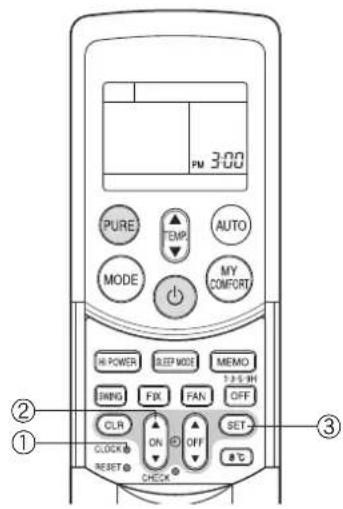
ON button
Press the ON button to set the current time.
Each press of the ON button changes the time in one minute increments. Holding down the ON button changes the time in ten minute increments.
②SET SET button
Press the SET button.
The current time is displayed and the clock starts.
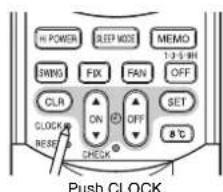
Adjusting the clock
① CLOCK button
Press the CLOCK button.
The clock time indicator flashes.
②ON button
Press the ON button to set the current time.
Each press of the ON button changes the time in one minute increments.
Holding down the ON button changes the time in ten minute increments.
③SET SET button
Press the SET button.
The current time is displayed and the clock starts.
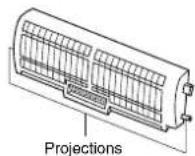
Check that the air filter and the plasma pure filter are correctly installed
- Press the plasma pure filter until the projections on both sides are fully inserted into the holders (tabs). If the installation is not correct, the FILTER indicator (orange) may come on.
The air conditioner will not operate if curtains, doors or other objects block the signals from the remote controller to the indoor unit.
- Be careful that liquids do not spill onto the remote controller.
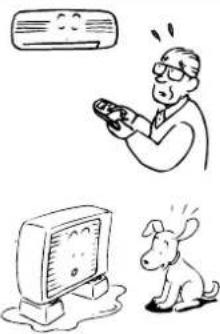
- Do not expose the remote controller to direct sunlight or heat. If the infrared signal receiver on the indoor unit is exposed to direct sunlight, the air conditioner may not function properly. Use curtains to prevent sunlight from reaching the receiver.
- Signals may not be properly received, if the room using the air conditioner has fluorescent lighting with electronic starters. If you plan to use fluorescent lamps, consult with your local dealer.
If other electrical appliances are activated by the remote controller, move these appliances or consult with your local dealer.
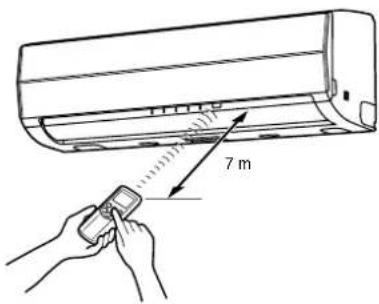
Location of the remote controller
- Keep the remote controller where its signals can reach the receiver of the indoor unit (a distance of up to 7 m is allowed).
- When you select timer operation, the remote controller automatically transmits a signal to the indoor unit at the specified time. If you keep the remote controller in a location where proper signal transmission is blocked, a time lag of up to 15 minutes may occur.
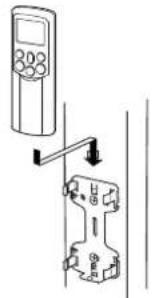
Remote controller holder
Installing the remote controller holder
- Before you actually install the remote controller holder on a wall or pillar, check whether the remote controller signals can be received by the indoor unit.
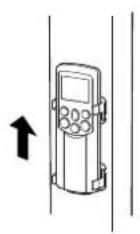
Mounting and removing the remote controller
- To mount the remote controller, hold it parallel to the remote controller holder and push it in fully. To remove the remote controller, slide the remote controller upwards and out from the holder.
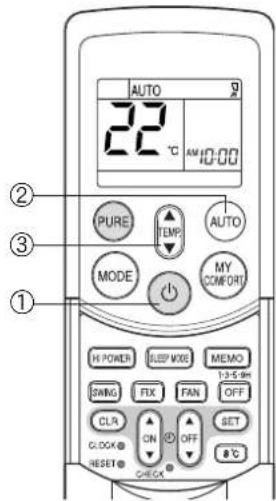
AUTOMATIC OPERATION
When you set the air conditioner to AUTO mode, it automatically selects cooling, heating, or fan only operation depending on the room temperature. (see page 18.)
The fan speed and louver are also automatically controlled.
Start
① button
Press this button to start the air conditioner.
② AUTO button (AUTO)
Press AUTO button.
③Temperature button()
Set the desired temperature.
- The OPERATION indicator (green) on the display panel of the indoor unit lights. The operating mode is selected according to the room temperature and operation starts after approximately 3 minutes.
- If the AUTO mode is uncomfortable, you can select the desired conditions manually. The fan speed and louver position can be changed, and MODE is also changed from AUTO to A when the fan speed or louver position is changed. The fan speed indicator is also shown.
Stop
按钮
Press this button again to stop the air conditioner.
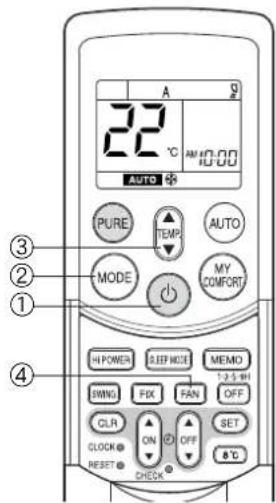
When you set the air conditioner to A mode or switch over from AUTO operation because of a change in settings, the air conditioner automatically selects cooling, heating, or fan only operation depending on the room temperature. (see page 18.)
Start
① button
Press this button to start the air conditioner.
②Mode select button (MODE)
Select A.
③Temper
Set the desired temperature.
④Fan speed button (FAN)
Select one of "AUTO" LOW,LOW+,MED,MED+ HIGH

- The OPERATION indicator (green) on the display panel of the indoor unit lights. The operating mode is selected according to the room temperature and operation starts after approximately 3 minutes.
- The temperature, fan speed and louver position can be changed. You can select the desired conditions manually.
Stop
按钮
Press this button again to stop the air conditioner.
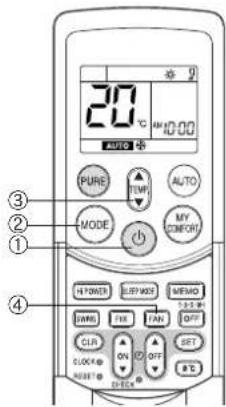
Press this button to start the air conditioner.
②Mode select button (MODE)
Select COOL or HEAT
③Temperature button ( )
Set the desired temperature.
④ Fan speed button (FAN)
Select one of "AUTO" LOW-, LOW+, MED-, MED+
HIGH
- The OPERATION indicator (green) on the display panel of the indoor unit turns on.
Operation starts after approximately 3 minutes.
Stop
按钮
Press this button again to stop the air conditioner.
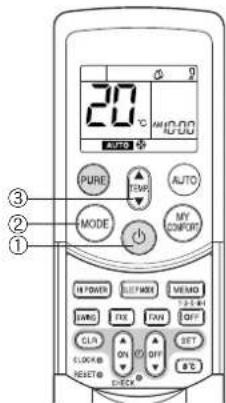
DRY OPERATION
Start
① button
Press this button to start the air conditioner.
②Mode select button (MODE)
Select DRY
③Temperature button()
Set the desired temperature.
- The fan speed setting is fixed to AUTO and the AUTO is displayed.
- The OPERATION indicator (green) on the display panel of the indoor unit turns on, and operation starts after approximately 3 minutes.
Stop
按钮
Press this button again to stop the air conditioner.
8^ C OPERATION
Press this button to start the 8^ set temperature heating operation.
The air conditioner controls the room temperature to about 8^ .
The room temperature may deviate slightly from 8^ depending on the size of the room and the installation condition of the unit.
Starting the 8^ heating operation while the air conditioner is stopped
Start
①8°C button
Press this button to start the 8^ set temperature heating operation.
- The OPERATION indicator (green) on the display panel of the indoor unit turns on.
Operation starts after approximately 3 minutes.
Stop
按钮
Press this button to stop the air conditioner.
If the 8^nC heating operation starts while the air conditioner is stopped, press the 8^nC button again to stop the operation.
Starting the 8^ heating operation while the air conditioner is operating
Start
① 8 ^ C button
Press this button to change to the 8^ set temperature heating operation.
- If the air conditioner performs a cooling (including automatic cooling) or dry operation, it stops and the 8^ set temperature heating operation starts after approximately 3 minutes. If the air conditioner performs a heating operation, it changes immediately to the 8^ heating operation.
- If the air conditioner performs a PURE operation, it performs both the pure operation and 8^ heating.
Stop
按钮
Press this button to stop the air conditioner.
If the 8^ heating operation starts while the air conditioner is operating, press the 8^ button again to return to the previous operating condition.
Check the operating condition on the screen of the remote control.
When a heating operation starts from 8^ heating, it can take approximately 5 minutes for the warm air to start blowing.
CAUTION
The heating performance could worsen if the louver direction is too high during 8^ heating operation.
NOTE
- The fan speed at the start of 8^ heating is operated with AUTO.
- If a timer operation is set to before the 8^ heating operation, the timer operation setting is cancelled. Timer operation settings cannot be made during 8^ heating operation.
- Settings for SWING (louver swing), FIX (louver position), FAN (fan speed) and PURE (pure operation) can be changed during 8^ heating operation. Setting changes cannot be made with other buttons.
- The temperature of the blown air is lower than during normal heating operation.
PURE OPERATION
Press this button to start the electrical air purifying operation.
During air conditioner operation
①PURE button
PURE operation starts by pressing this button.
- The PURE indicator (blue) on the display panel of the indoor unit turns on.
- Plasma pure filter is activated.
To stop only PURE operation
PURE button
PURE operation stops by pressing this button.
- The PURE indicator (blue) on the display panel of the indoor unit turns off.
- Plasma pure filter is deactivated.
To stop air conditioner operation at the same time
按钮
Air conditioner operation and PURE operation stop by pressing this button.
- The OPERATION indicator (green) and PURE indicator (blue) on the display panel of the indoor unit turn off.
CAUTION
- When the button is pressed the next time, operation starts with the combined air conditioner and PURE operation.
- During the combined air conditioner and PURE operation, air conditioner operation only cannot be stopped.

When the air conditioner is stopped
①PURE button
PURE operation starts by pressing this button.
- The PURE indicator (blue) on the display panel of the indoor unit turns on.
INFORMATION
- During PURE operation, a small amount of ozone is produced, and you might notice the smell.
- When the air flow is automatic, it changes between LOW and MED+
LOW operation is performed when the indoor air becomes clean. During operation, the position of the vertical air flow louvers may change if the room temperature is low.
- Opening the air inlet grille during PURE operation sometimes turns on the FILTER indicator (orange).
In this case, stop PURE operation (stop the air conditioner if it is also operating), and then close the air inlet grille.
The FILTER indicator (orange) turns on after PURE operation is performed for about 1000 hours.
When the indicator turns on, clean the plasma pure filter. (see page 22.)
Hi POWER OPERATION
High power (Hi POWER)
- The Hi POWER (high power operation) mode automatically controls room temperature, air flow and the operation mode so that the room is quickly cooled in summer and warmed in winter. (see page 18.)
Setting Hi POWER mode
①Hi POWER button
Press the Hi POWER button. The Hi POWER mark on the remote controller is shown.
Canceling Hi POWER mode
①Hi POWER button
Press the Hi POWER button once again. The Hi POWER mark on the remote controller turns off.
CAUTION
The Hi POWER mode cannot be activated during DRY operation.
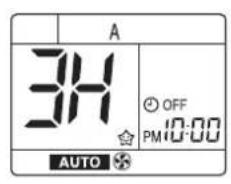
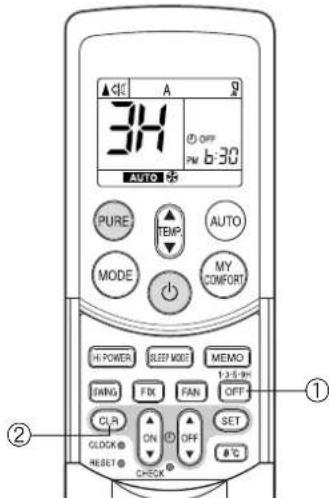
1,3,5,9H OFF TIMER
The air conditioner stops after operating for the set time (1, 3, 5 or 9 hours).
①OFF button
Press the OFF button (during operation).
- There is a short beep and the timer indicator comes on. The time at which the air conditioner will stop is indicated on the remote controller display (1H: about 1 hour after the current time).
- Press the button again while 1H is displayed (about 3 seconds) to change to the 3H indicator, press again to change to the 5H indicator, and press again to change to the 9H indicator.
- After selecting the time you want, do not press this button again. (When the 1H, 3H, etc. indicator goes off the timer is set.)
②CLR button
Press the CLR button to cancel the timer.
The timer is canceled but the air conditioner continues to operate.
- The 1, 3, 5 or 9H OFF timer operation is also canceled if the OFF button is pressed after making a setting.
INFORMATION
- Cleaning operation starts when the time of the 1, 3, 5 or 9H OFF timer is reached. (Cleaning operation is not performed during heating operation or the PURE operation.)
- When using in combination with the ON timer, first set the 1, 3, 5 or 9H OFF timer and then set the ON timer.
- If the OFF button is pressed while the ON (OFF) timer has been set, the ON (OFF) timer is canceled and only the 1, 3, 5 or 9H OFF timer is set.
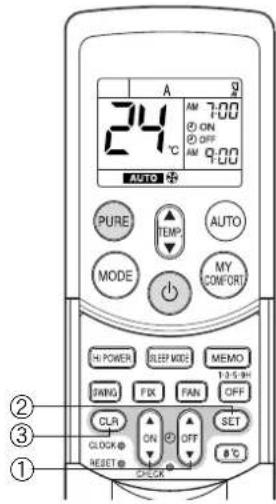
TIMER OPERATION
ON timer and OFF timer
Setting the ON Timer
①ON

button
Press the ON button. Set the timer to the desired time.
Each time the ON button is pressed, the time changes in ten minute increments.
Holding down the ON button changes the time in one hour increments.
②SET

button
Press the SET button to set the timer. The timer time is displayed, and the timer starts.
③CLR

button
Press the CLR button to cancel the timer setting.
Setting OFF Timer
①OFF

button
Press the OFF button.
Set the timer to the desired time.
Each time the OFF button is pressed, the time changes in ten minute increments.
Holding down the OFF button changes the time in one hour increments.
②SET
SET button
Press the SET button to set the timer.
The timer time is displayed, and the timer starts.
③CLR

button
Press the CLR button to cancel the timer setting.
CAUTION
- When you select timer operation, the remote controller automatically transmits the timer signal to the indoor unit at the specified time. Therefore, keep the remote controller in a location where it can transmit the signal to the indoor unit properly.
- If you do not press the SET button within 30 seconds after setting the time, the setting will be cancelled.
Once you select timer operation mode, the settings are saved in the remote controller.
Thereafter, the air conditioner will start operating under the same conditions as you pressed the or button on the remote controller.
You cannot set the timer when the clock display is flashing.
Follow the instructions in the section "Setting the clock" on page 6 to set the clock, and then set the timer.
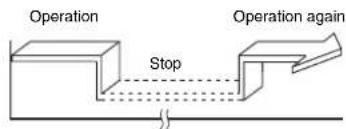
Combined timer (Setting the ON and OFF timers simultaneously)
OFF timer ON timer
(Operation Stop Operation)
This feature is useful when you want to stop the air conditioner after you go to sleep, and start it again in the morning when you wake up or you return home.
Example:
To stop the air conditioner and start it again next morning
Setting combined TIMER
(1) Press the OFF button to set the OFF timer.
(2) Press the ON button to set the ON timer.
(3) Press the SET button.
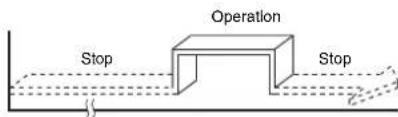
ON timer OFF timer
(Stop Operation Stop)
You can use this setting to start the air conditioner when you wake up and stop it when you leave the house.
Example:
To start the air conditioner the next morning and stop it
Setting combined TIMER
(1) Press the ON button to set the ON timer.
(2) Press the OFF button to set the OFF timer.
(3) Press the SET button.
The ON or OFF timer function that is closer to the current time is activated first.
- If the same time is set for both ON and OFF timers, no timer operation is performed. Also, the air conditioner may stop operating.
CAUTION
Approximately 3 seconds later, the remote controller will transmit the signal to the indoor unit and a receiving beep will sound from the indoor unit after you press the SET button.
Daily combined timer (setting the ON and OFF timers simultaneously and activating every day)
This feature is useful when you want to use the combined timers at the same time every day.
Setting combined TIMER
(1) Press the ON button to set the ON timer.
(2) Press the OFF button to set the OFF timer.
(3) Press the SET button.
(4) After step (3), an arrow mark ( pr ) flashes for about 3 seconds. Press the SET button during this flashing.
- Both arrows ( , ) a# shown while the daily timer is activated.
Cancelling timer operation
Press the CLR button.
Clock display
During TIMER operation (ON-OFF, OFF-ON, OFF timer), the clock time indicator is not shown so the setting time can be displayed. To view the current time, press the SET button briefly and the current time will be displayed for about 3 seconds.

Use the MEMO button to store a frequently used operation setting for convenience. Start the air conditioner in the operation mode that you want the remote controller to store.
Press the button as shown below while the air conditioner is operating.
① MEMO button
Press this button briefly to ready for storing the setting.
All the icons currently shown flash, except for the clock time indicator and mode indicator.
②MEMO button
Hold down the MEMO button for 3 seconds or more while the indicator flashes.
The park is shown and the setting is stored.
- If you do not press the MEMO button within 3 seconds or if you press another button, the MEMORY setting is cancelled.
- Operation modes which can be stored with the MEMO button are MODE, Temperature, FAN, TIMER and Hi POWER.
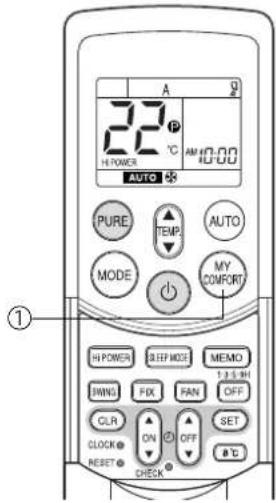
To operate the air conditioner with the setting stored using the MEMO button.
MYCOMFORTbutton
Press the MY COMFORT button. The setting stored with the MEMO button will be shown and the air conditioner operates based on the setting.
(A): When the MY COMFORT button is pressed while operation is stopped
- The OPERATION indicator (green) on the display panel of the indoor unit turns on, and operation starts after approximately 3 minutes.
(B): When the MY COMFORT button is pressed during operation
- The operation mode changes to the setting stored with the MEMO button.
- Initial setting:
MODE: AUTO
Temperature : 22
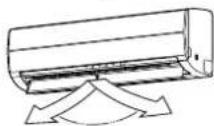
ADJUSTING AIR FLOW DIRECTION
- Adjust the air flow direction properly. Failure to do so could cause discomfort and make an uneven room temperature distribution.
- Adjust the vertical air flow using the remote controller.
- Adjust the horizontal air flow manually.
Adjusting the vertical air flow
The air conditioner automatically adjusts the vertical air flow direction according to the operating conditions when AUTO or A mode is selected.
To set a selected air flow direction
Use this function when the air conditioner is operating.
①FIX button
Hold down or briefly press the FIX button on the remote controller to move the louver in the desired direction.
- Change the vertical air flow louver direction within the range indicated.
- In subsequent operations, the vertical air flow is automatically set to the direction that you set the louver using the FIX button.
To automatically swing the air flow direction
Perform this function when the air conditioner is operating.
① SWING button
Press the SWING button on the remote controller.
- To stop the function, press the SWING button.
To change the swing direction, press the FIX button.
CAUTION
- The FIX and SWING buttons will be disabled when the air conditioner is not operating (including when ON TIMER is set).
- Do not operate the air conditioner for an extended period of time with the air flow direction set downward during the cooling or dry operation. Otherwise, condensation may occur on the surface of the vertical air flow louver and cause water dripping.
- Do not move the vertical air flow louver manually. Always use the FIX button. If you move the louver manually, it may malfunction during operation. If the louver malfunctions, stop the air conditioner once, and restart.
- When the air conditioner is started immediately after it was stopped, the vertical air flow louver might not move for about 10 seconds.
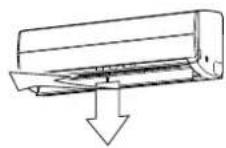
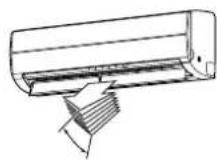
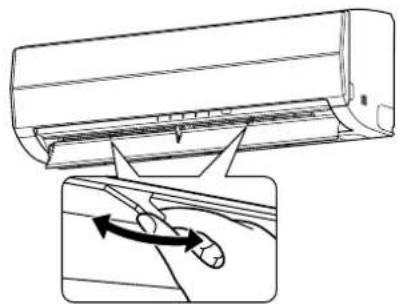
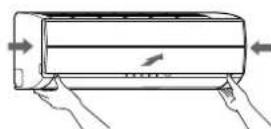
Adjusting the horizontal air flow
Preparation:
- Grasp the lever on the horizontal air flow louver and move them to adjust the air flow direction as required.
- You can adjust the air flow at the left and right locations of the grilles.
AUTO RestartOperation
This air conditioner is equipped with an automatic restarting function which allows the air conditioner to resume without the use of the remote controller under the operating settings in the event of a power shutdown. Operation resumes without warning 3 minutes after power is restored.
INFORMATION
The AUTO RESTART OPERATION is not set to work at factory shipment, and so it is necessary to set it to this function if required.
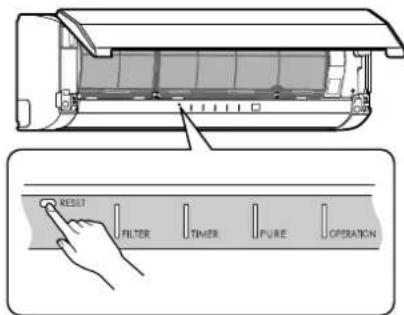
HOW TO SET AUTO START
To set the auto restart function, proceed as follows:
The power supply to the unit must be on. The function will not be set if the power is off.
To enable the auto restart function, hold down the RESET button for 3 seconds.
The air conditioner receives the setting and beeps 3 times. The system now restarts automatically. The auto restart setting is activated.
(1) When the air conditioner is in stand-by (not running). Hold down the RESET button for 3 seconds or more.
The air conditioner starts to operate. The green indicator turns on.
After about 3 seconds, the air conditioner beeps 3 times.
The green indicator flashes for 5 seconds.
The air conditioner is operating.
If the air conditioner is not required to run at this time, push the RESET button again or use the remote controller to stop the air conditioner.
(2) When the air conditioner is operating.
Hold down the RESET button for 3 seconds or more.
The air conditioner stops operating. The green indicator turns off.
- 3 seconds after pushing the button, the air conditioner beeps 3 times.
The green indicator flashes for 5 seconds.
The air conditioner stops.
If you do not need the air conditioner to stop at this time, use the remote controller to restart the air conditioner. During the subsequent operation, the green indicator is turned on.
The auto restart operation will not accept a command if timer operation with the remote controller is activated.
After restarting the air conditioner by the AUTO RESTART OPERATION, the louver swing (AUTO) operation resumes.
RESET button
HOW TO CANCEL AUTO START
To cancel the auto restart operation, proceed as follows:
Repeat the setting procedure. The air conditioner receives the setting and beeps 3 times.
The air conditioner now needs to be manually restarted with the remote controller after the main supply is turned off.
The auto restart setting is cancelled.
(1) When the air conditioner is in stand-by (not running). Hold down the RESET button for 3 seconds or more.
The air conditioner starts to operate.
The green indicator will turn on.
After about 3 seconds, the air conditioner beeps 3 times.
The air conditioner is operating.
If the air conditioner is not required to run at this time, push the RESET button again or use remote controller to stop the air conditioner.
(2) When the air conditioner is operating.
Hold down the RESET button for 3 seconds or more.
The air conditioner stops operating.
The green indicator is turned off.
After about 3 seconds, the air conditioner beeps 3 times.
The air conditioner stops.
If you do not need the air conditioner to stop at this time, use the remote controller
to restart the air conditioner.
During subsequent operation, the green indicator is turned on.
RESET button
HOW THE AIR CONDITIONER WORKS
Automatic Operation
As shown in Figure 1, Automatic Operation mode selects the operation based on the room temperature data (Ta) when operation begins.
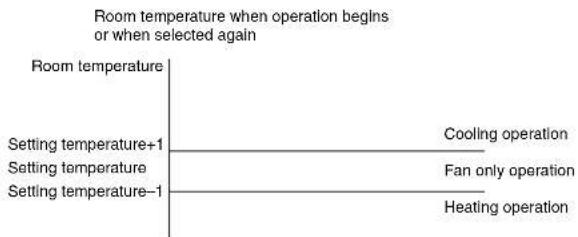
Figure 1
The operation mode is selected again after the compressor has remained stopped for 15 minutes.
Hi POWER operation
When you press the Hi POWER button during cooling, heating or A operation, the air conditioner starts the following operation.
- Cooling operation
The cooling operation is performed at 1^ lower than the temperature setting.
The fan speed is also set to high*.
- The noise level raises, according to the fan speed.
Heating operation
The heating operation is performed at 2^ higher than the temperature setting.
The fan speed is automatically switched according to the operating condition.
SLEEP MODE operation
The air conditioner automatically controls the room temperature, air flow and noise level, to prevent overcooling in summer and maintain a warm and comfortable room in winter.
INFORMATION
The power and noise level are reduced during sleep mode, so the room may not be cooled (or heated) sufficiently if the mode is used for a long period of time.
- The sleep mode cannot be used during dry operation or PURE operation (independent operation).
(PURE operation (independent operation) is when the PURE button is pressed while the air conditioner is stopped to perform
PURE operation by itself. The air conditioner does not operate at this time.)
- If the FAN button is pressed during sleep mode, the sleep mode is canceled.
- Sleep mode is not a timer operation.
Dry operation (D)
The dry mode automatically selects the cooling dry operation based on the difference between the temperature setting and the actual room temperature.
The fan speed indicator shows AUTO, and low speed is used.
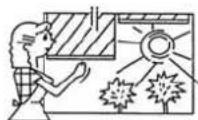
Maintain room temperature at a comfortable level
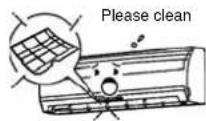
Clean the air filters
Clogged air filters impair the performance of the air conditioner. Clean them every two weeks.
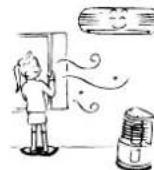
Never open doors and windows more than necessary
To keep cool or warm air in the room, never open doors and windows more than necessary.
Window curtains
During cooling operation, close the curtains to avoid direct sunlight. During heating operation, close the curtains to keep the heat in.
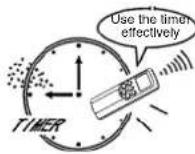
Use the timer effectively
Set the timer for the desired operating time.
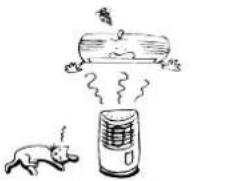
Allow uniform circulation of room air
Adjust the air flow direction for even circulation of room air.
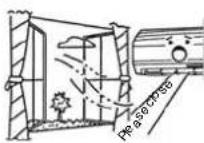


Blows upward
Blows downward
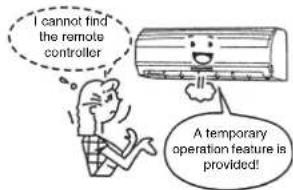
TEMPORARY OPERATION
Temporary operation
This function is used to operate the unit temporarily in case you misplace the remote controller or the batteries are used up.
- Push the RESET button to start the automatic operation (AUTO).
- While the temporary operation is activated, the remote controller operation is disabled.
- Hold down the button for 10 seconds to start the cooling operation.
CLEANING OPERATION
Cleaning operation
This function is used to dry the inside of the air conditioner to reduce the growth of mold, etc. inside the air conditioner.
- When the unit shuts down after having operated for 10 or more minutes in the cooling or dry mode, the cleaning operation is started automatically, and the S.CLEAN indicator on the unit's display panel turns on.
Cleaning operation duration
The cleaning operation lasts for 4 hours if the unit has been operating in the cooling or dry mode for 10 minutes or more.
About the cleaning operation
- The cleaning operation will not make the room cleaner or remove the mold and dust already inside the air conditioner.
- During operation, a small amount of frost may be visible: this is normal and does not indicate a malfunction.
The vertical airflow louvers open slightly. - If an ongoing cleaning operation is suspended, the effect of the cleaning will be compromised.
- To forcibly stop the cleaning operation, press the button twice during the cleaning operation.
USUAL MAINTENANCE
WARNING
Before you clean the air conditioner, be sure to turn off the circuit breaker or main power switch.
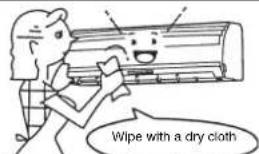
Cleaning of indoor unit and remote controller
CAUTION
- Use a dry cloth to wipe the indoor unit and remote controller.
- When the air conditioner is extremely dirty, use a cloth dipped in cold water to wipe the indoor unit.
- Never use a damp cloth on the remote controller.
- Do not use a chemical-based duster for wiping or leave such materials on the unit for extended periods of time. Doing so could damage or cause the surface of the unit to fade.
- Do not use benzine, thinner, polishing powder, or other solvents for cleaning. These can cause the plastic surface to crack or deform.
When not using the unit for at least 1 month
(1) Perform fan operation for 3 to 4 hours to dry the inside of the unit.
- If a high temperature setting is used with cooling operation, fan operation is performed.
(2) Stop the air conditioner and turn off the circuit breaker.
(3) Clean the air filters.
(4) Remove the batteries from the remote controller.
Check before operation
CAUTION
- Check that the air filters are installed
- Check that the air outlet and inlet of the outdoor unit are not blocked.
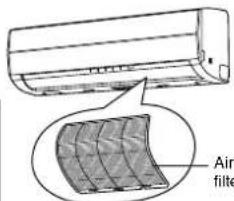
Cleaning the air filter
Clean the air filters every 2 weeks.
The performance of the air conditioner will degrade if the air filters are covered with dust.
Clean the air filters as often as possible.
Preparation:
- Turn off the air conditioner using the remote controller.
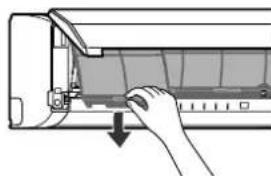
- Open the air inlet grille.
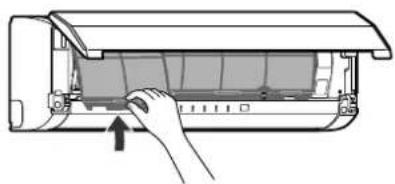
1 Open the air inlet grille.
Lift the air inlet grille up to the horizontal position.
2 Grasp the left and right handles of the air filter and lift it up slightly, and then pull it downward to take it out from the filter holder.
3 Use a vacuum cleaner to remove the dust from the filters or wash them with water. After washing the air filters, dry them in the shade.


4 Insert the top section of the air filter so that its right and left edges fit on the indoor unit and it is firmly set.
5 Close the air inlet grille.
* If the FILTER indicator on the indoor unit is shown, press the RESET button on the indoor unit to turn off the indicator.
Cleaning the air inlet grille
Preparation:
- Turn off the air conditioner using the remote controller.
- Open the air inlet grille.
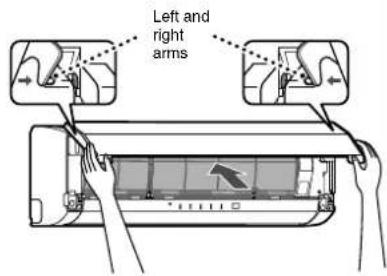
1 Remove the air inlet grille.
Hold the two sides of the air inlet grille and open upwards. Remove the left (or right) arm by pushing it toward the outside and then pulling it toward you.
2 Wash it with water using a soft sponge or towel.
(Do not use a metallic scrubbing brush or other hard brushes.)
- Use of such hard objects will cause scratches on the surface of the grille and the metal coating to peel off.
- If extremely dirty, clean the air inlet grille with a neutral kitchen detergent and rinse it off with water.
3 Wipe off the water from the air inlet grille and dry it.
4 Fit the left and right arms of the air inlet grille to the shafts on the two sides of the air conditioner and push them in completely.
5 Pull the air inlet grille downward.
- Push the arrow locations (four) at the bottom of the air inlet grille to check that the grille is completely closed.
NOTE
Cleaning and maintenance of the indoor/outdoor units are strongly recommended for air conditioning systems which are used regularly.
Failure to clean the indoor/outdoor units regularly will result in poor cooling performance, icing, water leakage and even premature compressor failure.


SPECIAL MAINTENANCE
Cleaning the plasma pure filter
Preparation:
- Turn off the air conditioner using the remote controller.
-
Turn off the power supply.
-
Clean the plasma pure filter when the FILTER indicator (orange) turns on. (This indicator turns on after PURE operation of about 1000 hours.)
- After cleaning is finished, push the RESET button on the indoor unit.
Perform cleaning every six months or so. - Even if the FILTER indicator does not turn on, clean the plasma pure filter whenever the unit makes a humming, clicking, or buzzing sound. If the indicator turns on during the night, the air conditioner can still be used until the morning without a problem, but be sure to perform cleaning as soon as possible.
1 Open the air inlet grille.
Lift up the air inlet grille until it clicks into place.
2 Grasp the left and right handles of the air filter and lift up slightly and then pull downward to remove the filter from the filter holder.
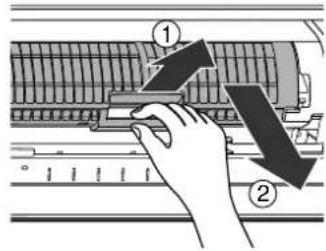
3 Take out the plasma pure filter.
- Grasp the handles, and then pull out as shown in ① and ②.
Checks after cleaning the plasma pure filter
- Confirm the FILTER indicator does not turn on by activating PURE operation for one hour or more.
- If the FILTER indicator turns on, recheck the following.
a) Fitting of the plasma pure filter
b) Fitting of the air inlet grille
And, reconfirm the FILTER indicator does not turn on by activating PURE operation for another one hour or more.
- In case the FILTER indicator does turn on, please call a service representative.
4 Wash and then dry.
(1) Soak in hot water at 40 to 50^ for about 10 to 15 minutes. If the staining is particularly severe, use a washing detergent compound (weak basic or neutral) at 10 to 15 times the standard concentration.
(2) Rub up and down, and rub left and right. Also, rub the surface gently with a sponge.
(3) Rinse with running water.
(4) Shake thoroughly, and allow the unit to drain. (If oil or smoke strains are particularly hard to remove, repeat steps (1) to (4) 2 or 3 times.)
(5) Dry thoroughly in the shade.

CAUTION
- Never use any products marked as "bleach".
- Do not attempt to disassemble the unit.
- Do not rub with a scrubbing brush or similar implement.
- Do not utilize washing devices or equipment.
- Do not dry with a hair dryer or other appliance that uses hot air. (The heat can cause the unit to deform.)
After cleaning, wait until the unit is completely dried before attaching. The FILTER indicator may turn on if the unit is used while wet.
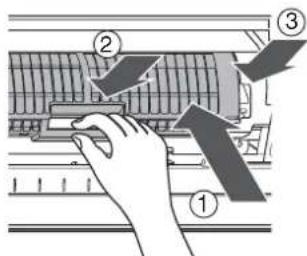
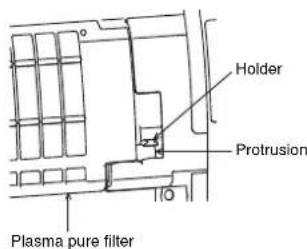
5 Attach the plasma pure filter.
- Grasp the handles, and then insert as shown in ①. Insert into the right and left guide rails, and then press in the direction of ② after it is all the way in.
- Press both ends of the plasma pure filter in the direction of ③ until the protrusions on both sides of the plasma pure filter are completely inserted into the holders.
Press in the plasma pure filter until the protrusions on both sides are completely inserted into the holders. If installation is incomplete, the FILTER indicator (orange) may light.
6 Attach the air filter, and then close the air inlet grille.
AIR CONDITIONER OPERATION AND PERFORMANCE
Three-minute protection feature
A protection feature is provided that prevents the air conditioner from being activated for approximately 3 minutes when it is restarted immediately after operation or when the power supply switch is set to on. This is used to protect the machine.
Heating characteristics
Preheating operation
The air conditioner does not deliver warm air immediately after it is started. Warm air flows out after approximately 5 minutes when the indoor heat exchanger has warmed up.
Warm air control
When the room temperature reaches the temperature setting, the fan indoor speed is automatically reduced. The outdoor unit is stopped at this time.
Defrosting
If frost has formed on the outdoor unit during the heating operation, defrosting is started automatically (for approximately 5 to 10 minutes) to maintain the heating effect.
- The fans in both the indoor and outdoor units stop during the defrost operation.
- During the defrost operation, defrosted water is drained from the bottom plate of the outdoor unit.
Heating capacity
In the heating operation, heat is absorbed from outdoors and released into the room. That is called the heat pump system. When the outdoor temperature is too low, usage of another heating apparatus in combination with the air conditioner is recommended.
Consideration for accumulated snow
Select the position for the outdoor unit where it will not be subjected to snow drifts, accumulation of leaves or other seasonal debris. It is important that the air flow of the outdoor unit is not blocked as this will result in reduced heating or cooling performance. During the heating mode and at sub-zero temperatures, the water drained off the outdoor unit as a result of the automatic defrost may accumulate and freeze. It is important that adequate drainage or a soak-way be provided.
Power failure
Power failure during operation stops the unit completely.
- The OPERATION indicator (green) on the indoor unit starts flashing when power is restored.
- To restart operation, push the button on the remote controller.
Lightning or a car wireless telephone operating nearby may cause the unit to malfunction. Turn the power supply switch off and then on again. Push the button on the remote controller to restart.
Air conditioner operating conditions
For proper performance, operate the air conditioner under the following temperature conditions.
| Cooling operation Outdoor temperature: | -10°C to 46°C |
| Room temperature: 21°C to 32°C | |
| CAUTION Room relative humidity — less than 80%. If the air conditioner operates outside this range, the surface of the air conditioner may attract condensation. | |
| Heating operation Outdoor temperature: | -15°C to 24°C |
| Room temperature: Less than 28°C | |
| Dry operation Outdoor temperature: -10°C to 46°C | |
| Room temperature: 17°C to 32°C | |
If the air conditioner is used in conditions other than above, the safety protection functions may be activated.
TROUBLESHOOTING
CAUTION
If any of the following conditions occur, stop the air conditioner immediately, turn off the main power switch and contact the dealer.
- The indicators flash at short intervals (5 Hz). Reset the circuit breaker 2 to 3 minutes after the power main switch is turned off. Despite the resetting operation, the indicators still continue turning on and off.
- The main power fuse often blows, or the circuit breaker is often activated.
Foreign matter or water has fallen inside the air conditioner.
Any other unusual conditions are observed.
Before asking for servicing or repairs, check the following points.
| Recheck | Inoperative ·The power main switch is turned off. ·The circuit breaker is activated to cut off the power supply. ·The main power fuse has blown. ·The electric current has stopped. ·The batteries in the remote controller used up. ·The ON timer is set. ·As a protective mechanism for the air conditioner, it does not operate for 3 minutes immediately after restarting operation or turning on the main power. | |
| Poor cooling or heating performance ·The air inlet or outlet of the outdoor unit is blocked. ·Doors or windows are opened. ·The air filter is clogged with dust. ·The louver is not at the correct position. ·The fan speed is set to low. ·The air conditioner is set to the DRY or SLEEP MODE. ·The temperature setting is too high (during cooling operation). ·The temperature setting is too low (during heating operation). | ||
| These are not defects. | Condensation forms on the back of the indoor unit. ·Condensation on the back of the indoor unit is automatically collected and drained out. | |
| Indoor unit or outdoor unit makes a strange noise. ·When the temperature changes sharply, the indoor or outdoor unit may make a strange noise (such as a tit-tack noise or flowing noise) because of the expansion/contraction of parts or change in refrigerant flow. | ||
| The room air smells. A bad odor comes from the air conditioner. ·Smells absorbed in the wall, carpet, furniture, clothing, or furs are coming out. ·During PURE operation, a small amount of ozone is produced, and you might notice the smell. |
Before asking for servicing or repairs, check the following points.
The OPERATION indicator turns on and off.
- The indicator turns on and off (1 Hz) when power is restored after a power failure or when the power main switch is set to on. Reset the circuit breaker to ON.
Frost forms on the outdoor unit during heating operation.
Water is drained from the outdoor unit.
-
Frost sometimes forms on the outdoor unit during heating operation. In that case, the unit automatically performs defrosting (for 2 to 10 minutes) for improving the heating efficiency.
-
In the defrosting operation, the airflow from both the indoor and outdoor units stops.
-
A hiss sound is heard when the flow of the refrigerant is changed for defrosting.
-
The water resulting from automatic defrosting during the heating operation is drained from the outdoor unit.
The air flow changes even though the FAN button is not set to the AUTO mode.
- When the temperature of the blown air goes down during heating operation, the air conditioner automatically changes or stops the air flow from the indoor unit so that the people in the room do not feel chilly.
A white mist of chilled air or water is generated from the outdoor unit.
- Steam is sometimes generated from the indoor unit during cooling operation or the outdoor unit during defrosting operation.
Automatic operation of vertical air flow louvers
- When the room temperature or outdoor temperature is high during the heating operation, the vertical air flow louvers close once and then set themselves automatically to the original position setting again.
The FILTER indicator turns on.
This indicator turns on after PURE operation has been performed for approximately 1000 hours.
- The indicator may turn on if the front panel is not firmly closed.
The indicator may turn on if the plasma pure filter is not securely attached.
Sounds made from the indoor unit
- The plasma pure filter may make a humming, clicking, or buzzing sound when it is dirty.
- When the power is turned on or the air conditioner is stopped, the vertical air louvers may make a rattling sound or shuttling sound.
- Some parts may expand or shrink due to temperature fluctuations, and this can result in a slapping sound.
- When the refrigerant is flowing, a hissing sound or gurgling sound can result.
- A hissing sound can be made when the air conditioner is switched to defrosting operation during heating operation.
Sounds made from the outdoor unit
- A rustling sound can be made when the air conditioner is switched to defrosting operation during heating operation.

SPECIFICATIONS
| TypeReverse cycle, Split type | |||||
| Model | Indoor Unit | Outdoor Unit | Indoor Unit | Outdoor Unit | |
| RAS-10SKVP-ND | RAS-10SAVP-ND | RAS-13SKVP-ND | RAS-13SAVP-ND | ||
| Power supply | 220-240 V ~50 Hz | 220-240 V ~50 Hz | |||
| Cooling capacity | (kW) CAPA. | 2.5 | 3.5 | ||
| Heating capacity | (kW) CAPA. | 3.2 | 4.2 | ||
| Cooling current | (A) AMP. | 0.15 | 2.57-2.34 | 0.15 | 4.00-3.66 |
| Cooling power | (W) WATT. | 30 | 460 | 30 | 820 |
| Heating current | (A) AMP. | 0.15 | 3.15-2.87 | 0.15 | 4.40-4.02 |
| Heating power | (W) WATT. | 30 | 600 | 30 | 920 |
| Dimensions | Width (mm) | 790 | 780 | 790 | 780 |
| Height (mm) | 250 | 550 | 250 | 550 | |
| Depth (mm) | 208 | 290 | 208 | 290 | |
| Net weight (kg) | 9 | 38 | 9 | 38 | |
| Type | Reverse cycle, Split type | ||||
| Model | Indoor Unit | Outdoor Unit | |||
| RAS-16SKVP-ND | RAS-16SAVP-ND | ||||
| Power supply | 220-240 V ~50 Hz | ||||
| Cooling capacity | (kW) CAPA. | 4.5 | |||
| Heating capacity | (kW) CAPA. | 5.5 | |||
| Cooling current | (A) AMP. | 0.15 | 6.18-5.65 | ||
| Cooling power | (W) WATT. | 30 | 1,320 | ||
| Heating current | (A) AMP. | 0.15 | 6.83-6.25 | ||
| Heating power | (W) WATT. | 30 | 1,460 | ||
| Dimensions | Width (mm) | 790 | 780 | ||
| Height (mm) | 250 | 550 | |||
| Depth (mm) | 208 | 290 | |||
| Net weight (kg) | 9 | 38 | |||
ENGLISH
- These specifications are subject to change without notice for the purpose of incorporating technical improvements.
The specified air-conditioning performance is based on the data determined under the following conditions.
For cooling
| Air inlet temperature °C | |||
| Indoor coil assembly | Outdoor coil assembly | ||
| Dry bulb | Wet bulb | Dry bulb | Wet bulb |
| 27 | 19 | 35 | 24 |
For heating
| Air inlet temperature °C | |||
| Indoor coil assembly | Outdoor coil assembly | ||
| Dry bulb | Wet bulb | Dry bulb | Wet bulb |
| 20 | - | 7 | 6 |
INFORMATION
When the outside temperature drops, power is supplied to the de-icing heater of the outdoor unit even if the air conditioner is off. At this time the power consumption is approximately 100 W.
TROUBLESHOOTING (Remote Controller)
Before asking for servicing or repairs, check the following points.
| The remote controller does not operate correctly. | ||
| Symptoms Causes Possible Solution | ||
| The operating mode switches. Check whether the MODE indicated on the display is AUTO. AUTO | The fan speed and louver direction cannot be changed in AUTO mode. When the SWING, FIX or FAN buttons are pressed in AUTO mode, the mode changes to A mode. | |
| The fan speed cannot be changed. | Check whether the MODE indicated on the display is DRY. : DRY | When dry operation is selected, the air conditioner automatically selects the fan speed. The fan speed can be selected duringcool, heat, and A. |
| The Display Goes Off | ||
| Symptoms Causes Description | ||
| The indicators on the display are not shown after a short time. | Check whether the timer operation is over when the OFF TIMER is shown on the display. | The air conditioner stops since the setting time has elapsed. |
| The TIMER display turns off after a certain period of time. | Check whether the timer operation has started when the ON TIMER is shown on the display. ①:ON | When the time reaches the time setting for the ON timer operation, the air conditioner starts to operate automatically and the ON timer display turns off. |
| The Signal Receiving Tone Does Not Sound | ||
| Symptoms Causes Description | ||
| No receiving tone is made from the indoor unit even when the button is pushed. | Check whether the infrared signal transmitter of the remote controller is properly pointed towards the receiver of the indoor unit when the button is pushed. | Point the infrared signal transmitter of the remote controller towards the receiver of the indoor unit, and then press the button repeatedly. |
ACCESSOIRES
MINUTERIE D'ARRET (OFF) 1, 3, 5, 9H
MODE MEMOIRE/CONFORT
⑤Flakthastighetsknapp (FAN)
Tryck pa den har knappen for att valja flakthastiget. Nar du valjer AUTO justeras flaktens hastiget automatiske after rummets temperatur. Du kan aven manuellt valja mellan fem olica hastighetsinstallninger.
(LAG+AG+,MEDUM)

MEDIUM+ HOGTT

bekraftelsepip hors.)
Knapp for automatisk luftspjällsstyrrning (SWING)
Tryck pa knappen for att svanga luftspjallet. (Ett bekräftelsepip hors.)
Tryck en gang till pa knappen for att stoppa luftspjallets svangande rorelse. (Ett bekraltelsepip hors.) (se sidan 16.)
⑦ Knapp for installing ng av luftspjallet (FIX)
9Knapp for timeravstangning (OFF)
Tryck pa SET-knappen SET
④ Flakthastighetsknapp (FAN)
Valj nagon av installingarna "AUTO" LAG 一 _ i LAG ^+ , MEBIUM,
MEDIUM+ HOG
④Flakthastighetsknapp (FAN)
Tryck pa SET-knappen (at stalla in timern.
IPEDOCTPEXEHNAIPIYCTAHOBKE
-ДяуctанOBКондион�epa cneDyET obpaTntbca K dIepy mN B MaCTepckyIO, cneuaan3npuOiooc no 3NEKTPnueCKM pa6oTaM.
- Ecnn KOHmUHOep HnpabunbNo yctahOBHeh Bamn, OH MOKET BblBaTb HeKOTOpBle np6nmbi, TaKne, KaNPoTEKaHHe BOdbI, nopaxKeHHe 3NEkTPuYeCKM TokOM, NOxap N.T.D.
Cneyet Bcerda 3a3eMnTb KOHnmoHep.
He nOc0eDnHnRE npOoB 3a3eMNEHn K ra3OBbIM Tpy6am, Tpy6am IIN BDObl, MONHEOTBOdAM IN PPOBOdAM 3a3eMNEHnTepeHOB. EcnI KOHNIOHep 3a3eMJIe HnnpabINbHO, 3TO MOKeT Bb3BaTb NopaxKeHne 3JEKTPYHECKIM TOKOM.
IINRAOTCOEINHEHINOBAHNORCTEBOFOVICTOHNIKAJNEKTPONITAHINpekknouateNBnnpbBATENBcNN,KOTOpBMOXETOKNIOUATBCENOJHOeBNXODNTcoCTABpIKCNPOBAHNO npoBokN。Oba3aTeNbHOncnONb3yTe aadantPobAHNBnpbBaTeNBcNpekKnIOateNB.
PNEOCTEPEXEHNA PNI 3KCNJYATAUIN
- 136eaiTe CNiXkOM CnIbHOrO OxnaKdEHn NOMEeHHN IIN BO3eCTBnHa BAC XoIOHO BETpa B TeEHNE DInTeJIbHOrO BpeMeHn, TAK KAK 3TO MOKeT HaHeCTu Bpe Bawemy 3doPoBbIoo.
Hikorda He BCTABNATE naIbIi nnIaNkB NO3dyXobByNCYCKHOE OTBepCTHe BO 36exHne TPAmbI ni NOBpeKdHnAnnapata, TaK KAEBHNIATOpbl paOtaOK C bKOcKo CKOPcTb BOHTPN O0xIV Bo3dyXo3bOpHOrO TOBcPTbN IO3dyXobByNCYCKHOrOTBepCTHa - ECnBb3aMHTNE TO-TO C KOHdNIOHOPEPOM NPOCXOINT YTO-TO HEO6BHNOE (Tako, KAK 3anax rpeNoI INI cIa6Ba MOHCTb OXJAKDeHNE, HEMeDNeHNO OTKNIIOHTeCeBOBb BIKHIOATEb I ABtOMaTHeCKN BbIKHIOATeNBOTc SETN 3NEKTPONTANHIN DQNCTAHOBKN KOHdNIOHOPEa N O6PATNTTeCB KINInepy.
- EcnI KOnHnIIOHOpe pa6oTaet HEnpepbIBHO B COCTOHN HEnCnPaBHOCTN, 3TO MOKeT npNBecTN K NOIOMKe annapata, nopaxeHHIO 3NeKtpueckm TOKOM, NOXApY I T.D.
He npolnbaite Boody nIpyrme KIOKCTn Ha BHytpHHN 6JOK.EcII 6JOK cTahET MOKpbIM,30 MoKet Bb3BaTb npaKeHne 3NEKTpueckm TOKOM.
PPEOCTEPEXEHNE PNI NEPEMEUHIN I PEOHTE
He nbTaIeTcB nepemeeaTb mnpoBaTb annapat camOCToTeJbHO.
- He pa36npaIe annapaT. TaK KaB Bnytpn annapaTa NmEeTcB BbICOKOE HAnpAKeHHe, Bbl MoXeTe nOyUHTb nopaxHHe 3NeKTPnueCKM TOKOM.
C zelbno nepemeeHn KOHNIOHepa Iy ctaHOBKn er Bpyrom MeTe BCerda obaaunTecb K dInepy. Ecn OH yctahOBnH HnpabunBHo, 3To MoKET npMBCTN K nopaxeHHO 3NeKTpueckm TOKOM NIN NOxapy.
- Пи НeoБхДИМСТИ ремоTRA KOнДИМОHEа Oбратись KДИМЕР.
Eсг с KoнДИМОHE от佩moHTIчOBaH HePpAINbHo, 3TO MOKeT pIpAxeHIO 3JIeKTPUeCKIM TOKOM nI INI NOKApay.
PNEyPEXKDEHNE
PNEUYPPEKDEHNA PNYUCTAHOBKE
- PpONoXnTe CnBHOI HAIHr 6e3oNaChbIM CnOCOBm Ia HAnyUxNIX Pe3yNbTaTOB NO cINBy.
- HenpaBnIbHbI CNIB MOKET npNBecT K 3aTOnNHeHIO DOMa N 3aMOKaHNIO Me6eJI.
CnEeYet NOcDOeHHbT KOnHdNtHHeK PnEeH3aHHeHOMy IcToHNNyIJIeKTPoNITAHn, IMeEOUeMy HOMHaHbHO HeHapRJaHE. B nPoTHOB HcMcyAe, annapat MoKet cNoMaTbCSn, mNIOKet cyNTHTBcNOxApak.
He yctahabnbae annapat B mece, rde moket npoteb BO3ropaemb ra3. EcnB 03ropaemb ra3 HAKONITCBOKpyr annapata, MOKET CNYHTbCR NOxap.
BHTypeHnH 6N0LcNeYteTAYctaOBHTb TaK, YOb6b ByEePbHrEoB6NoKa HaxOuINcHa BbICote NO KaHIne Mepe 2 M. K ToM yKe, 3z6BaIeA taeMaeeHueK aKaXu-7n6o ppeMeTOB cBepxY BHTypeHnEoB6NoKa.
PNEyPEXKDEHNA PNI 3KcNJYATAUIN
- Pene3aynckom KOHnIOHepe BHMATEIbHO IPOHTaTE 3Ty INCTpyKcIO. INCTpyKcIR BKJIIOHaET MHOBaxHO IHDPOMAUINI NOBCEHEBHO 3KcNnyatauIN.
- He nCnoB3yIte 3OT KOHdMIOHOp dIraDpyRnx ceIe, TaKHX, KaK npedoxpAHene eIb, ToOHbIX INCHPTymENTOB, pEIMETOB NCKCYCTBa, pa3BeDEHnX JNBOThbIX WIN poCTa paCTehn BROPkax.
Ye tctahabnBnAeTcOTKOHIOHoeN B OmeueHHaRf CNEOIE, TAKIN, KAK cynHOI INI NIOBOB VND TPAHCNPHTORC pCTDA. 30 MOKET HAECTN BPED pa6OBE MAHN. - Ⅲ63eBAIte BO3dEINCTBnB BETpa OT KOHmIOHOhepa Ha pAcTeHN B TropKax n Ha XmBOTHbIX, TAK KaK 3TO HAHeCet Bpe IN 3DopOBbHn POcTy.
Korda KOHdHIOHOep 3cNpyTcB6n3n np60pa dna rropeHHno obaaane BHHMAHHe HBeHTNAHIO nOyck CBEKO 8Odyxa B NOMEeHNE.1oXoAeBHTNAHMOKET pNBECTK K HeNDOTATky KICNOPoDA.
KoJ4a KOHUNIOHEP ICNONB3yETCR B 3AOKbTOM ONEUMEHNIO, NOCTHOHO BOpaIae BHIMAHNE HA BEHTNUNIO NOMEUHINIO. IIOXAAB BENTUNIO MOKET PnBECTN K HEOCTATKY KICNOPODA.
IeKpAaieTcB KfHKnIOHaJIbHbIM KHONKAM MOKpbIMyPKAM. 3To MOKeT npBVEcTI NopaxEHHO 3JekTmueKIM TOKOM.
He nomeaute Hnkae np6opbl nra ropeHH B MeCTe, KOtOpe HeNoCpeDCTBeHHo NoBepraTcBO3dEChTBIO BETPAOT KOHduiohepa.3To MOKET PnBBCTN K HENOLHOMCY CROPAHIO.
EcnKoHdMnOHe He 6yET NcNb3OBaTcB TteHHe NnTEnbHorpoNDA BpEMHe, C cenIbO 6e3nacHOCTn BkIOHTe CeTeBOB KInIOHaTeB Hn ABToMaTHeCKn BkIOHcTeB. OTOeINHEMeOT cTeiNtEKPTONATAH npeDOxPAHET annapat OT MOnHHN C6oeB JtKPTONATAH.
He cTabeHa annapaT cocyblc BOOn, TAKne, KaK Ba3bl, TaK KaK BODa MOXe IPOHKNHyb AnnapaT Bb3BaTb nopaxHeHNE 3NEKTpuyeCKM TOKOM BCJeDCTBNe yxyDuHnE 3NEKTPOUNLIM.
BpMaO T BpEmH npOBepaTe 6eToHHbe 6nKn NoHapyKbHm 6nOKom. Ecn OCHoBa octahetcnoBpeXeHHoN INI N3HOweHHo, 6nOK MoK eTOnpOKHyTBcN BO3MOKHO, pINBecTN K TpaBme.
He MoTe annapat BDOJ.3To MOKeT npBecTu K nopaxeHHIO 3NeKtpnueckm TokOM
He nnonb3yIe Ia HnCTKn annapata CnnpT, 6en3Hn, pactBopntel, ONCTNTel dna CTKNa, NCTAun npoWOK mI npryne pactBopntel, TAK KAK OHMOYr NCNPOTNB NOBpeNTb KOHNIOHep.
Ipeed nctkoi annapata cneyET BIKIOHTb ceTeBOB BIKIOHATen bN ABOTMAINHECKN BIKIOHATen bnn PnepoTbpauene Hn TpAM OT 3NEKTPnEeKO BENTnAITopa,paOtaioeero BHTpn.
3a noopobnoctammo metode qn cokn obaaatecck paanam to "OBbIHbI yXoD" n "CNEUJIbHbI YXOD" na ctpanuax c 20 no 23.
He ctabte Hmero n He hactynaute Ha BHTpeHHn annapat n Ha HApyKbH annapat. EcnB bTo cdaetae, OH Moryr nepebepHyTcR n Bbl3BaTb TpaBMy.
Ira TOrO, YTO6bI KOHINMOHep yHKIOHOHPOBaC MAKcIMaBnHO 3oepKTHNBCHbO, 3KcNpyATpyTe E0 B npedexnAna3oHa paoohx TempepTyP, 3aadHORo HnHTpykUn. HeBBINONHEHe 3TOr OycOBnM, MOKET Bb3Bbte HeNCnPABHOCTb, NOJOMKy mYTEyKByDbU nAnnapaTa.
Korda annapat dIIO 3KcNpyATnpOBanca, peKOMeHdyETcBbINHITb TexHnueckoe O6cnykBAHne npi NOMOUI cNEUAnmCTA.


HA3BAHЯчACTEJ
HapxKn6nok
①Tpy6a noDbOda xoIodnIbHoro areHTa n3eKtpnueckne npOBoA
②Bo3nyxo3a60pHoeOTBepcTne (c60ky n c3aDn)
③Bo3DxyOxBbInyCckHoeOTBepCTne
BHyTpEnHH6JOK
④Cenhop TEmnepaTpyB NOMeueHm
(5)PepednnaHnB
6PeWetKa BO3dyx03a6pHoro OTBepCTn
⑦Bo3nyuHbIyΦnIbTp
⑧Bo3dyXOBbInyckHoeOTBepCTne
9EJEMO3N IOPM3OHTaBnHORo BO3dUyHORo nOTOKaPacnONoXeHb c3aDnKaIIO3eBepTKaAHLBO3dUyHORo nOTOKa
10KeknBepTnKaIbHOro Bo3dyuHoro nToKa
(1)McnnneHnaHnB
12PnEMMnK INHpaKpaHOrO CnHa
13IyblT Dv
(4)ΦnNbTp pNla3MOOuHCTKN
HA3BAHЯИФУHKLIMNHДNKATOPOBIOPAHOBYYPABJIEHЯHA BHYTPEHHEMBJIOKE
DucnneHnaHneB
CoCTOHHHpyHKuHnHPOBAAHnNOKa3aHbHnXe.
(1)Khonka RESET
②ИнданkaTOp FILTER (opaHkeBbI)
③ИндкаTop TIMER (Желтын)
④MHdkaTopPURE (cHnn)
⑤MnIKATOP OPERATION(3eneHbI) PnA kTNB3aunm fyHKun 3aunTbI 6eONACHOCTn FyHKUOAnbHbIe MHdkaTopbl MraIOT Yacto (5pa3B CEkyHdy).
6VNnKATOP S.CLEAN (eeneb) KOrda annapat BkNIOaehTc nocne cyHKUHOHPOBaHnB TceHeHn 10nn 6oJeE MmHT B pexKIme OxlanKeHn INn OcyuHnA, onePAUNOCHTK NaHnHaETCn ABtOMATnHEKn, INkIOuHaTeCN HnNKiATOP S.CLEAN.
Khonka RESET
Khonka RESET nmeet cneyuouine Dbe yHKm.
-Функисбрoca
Ucnno3yute, KOrda BkNoueH HnDnKaTOp FILTER (opahKebbl. (^ cm.ctp.21.)
ΦyHKnIbRbpeMHHOrOФyHKUHOHpOBaHnIcNoJIb3yIte,ecnBbHe nIOxNnHa MeCTo nnNotepnnnytDy,nnNCTek cpoK cnYk6bl erO 6aTapei.(cm.CTp.19.)
NYJIbT DY I ERO ΦYHKUIN
1IpeepaHTNHPaKpachoroCnHana
NpeepaetcHnhaBbHTpeHHn6nok.
② KHD1kA
HaKMMTe KKNKy DnI 3anycka fynHKmHNOHPOBaHN. (CnblweH CnHn npEMa.) HaKMTe KONKY CHOba OCTAHOBKn FyHKUHOHPOBAHN. (Cnblwe H CNrHn npEMa.) EcIn C BHyTpeHero 6noka He CbluHo CnHnna npEMa, HAKMMTe KNONK Eeepa3.
③Khonka BbIbopa pexmma (MODE)
Hakmte 3ty KhoNky Dnla Bb6opa pexnma. Pn KaKdOM Haxatnn KHONKn pexm NepnoHeckn NOBTOPReTcB NpRKe O AT: ABOTMaTHeCKn KOHTpObl N3MeHeHH
O:OXIAKDEHNE,OCYUHEHNE,OBOTPEBn
06paTHO K A.
(CJIbIeHcIrHAn pIeMa.)
...YcTaHOBkA TeMnepaTpybI yBeJIuHnBaEca Do 30^
...YCTaHOBKa TEMnepaTypbI YMeHbwaetcA Do 17°C.
(Cnbien CnHan npnaMa.)
5KhoNka ckopoCTn BeHTnAToPA (FAN)
HaKMMTE 3Ty KONKY DnA Bb6opA CKOpOCTN BEHTNIATOPA.Ecnn BbBb6epNTe NOJXKeHne AUTO,CKOpOCTb BEHTNIATOPa ABtOMaTHNeCKn peYynPcyTcB COOTBETCTBnC TEmnepaTPOB BByTPn NOMEeHn. Bbl MoKeTe TAKKe BpyHyIO Bb6paTb XeJaEMyKOpOCTb BEHTNIATOPa IV NITN DOCTYNbIX yCTAHOBOK.
(HN3KAR,HN3KAR+,CPENHRA
CPEDHRA+BLIOO(CnbIweH
CnHAn npneMa.)
6KhONka aBtOMaTnuecknx XaJIIO3eN (SWING)
Haxmnte 3ty KhoNky dna Kaaynna KaIHOe. (CbIeH cHnHa npema.)
Hakmtte 3ty KhoNky ChOBA dIa octaHOBKn KaaHnKaanIO3e. (Cblwe HcHn npEma.) (cm. ctp. 16.)
⑦Khonka yctahOBKn kanaIO3eI (FIX)
HaxMMTe 3Ty KhoNkY dny perynipOBKn HanpaBneHHa
BO3dyuHoro noToka. (CnblueH CNrHaH npneMa.) (CM. ctp. 16.)
8KhoNka BKnIoueHn TaMepa (ON)
NcnoB3yIe 3Ty KONky DnI N3MeHHeH BpEmHn BpEmHn BKIOUeyHn TaIMepa (ON).
IyBENHHeN BpEmEH HaxMnTE HONK ON

YMeHbEHHBpEmEH HaxMNTe HONK ON

⑨KhONKa BbIKIIOHeHn TaIMepa(OFF)
NcnoBsynte 3ty KhoNky IINI N3MeHnBpEmHn BbIKIOyeHn Taimepa(OFF).
12KhONKa BbICOKO MoHOCr (Hi POWER)
HaKMMTe 3Ty KONKY dIaYyCKa BbICOKOMOuHOrO
fhyHKmoHnpoBaHa. (CM.CTp.18.)
13KHONKa nAMrTn (MEMO)
HaxMMTE 3TY KHONKY DnI rTOBHOCTN COXAHEH N yCTAHOBOK. DePKHTE HAXKATO 3TY KNONKY B TEOHNE 6OeEE 3 CekyHd nI cxPAHEH N yCTAHOBKN, yka3aHHoHa NpybTe N V, n Do TEX nop, NOKA BYBCBEHNAETCR 3HAOK P cm. ctp.15.)
14KhoNka aBtOMaTmueckoro fynkuHnHpOBaHHA (AUTO)
HaKMTE 3Ty KONky dHnABTOMaTHeCKOrO FyHKUHOHPOBaHN KOHmIOHePA.
(CnblweH CNrHan npMa.) (CM. ctp. 18.)
15Khonka peXmca cHa (SLEEP MODE)
HaxMMTE 3Ty KhoNkIy IaHaIaIaI cyHKUHOHPOBaHINpeKIMa CHa. (cm. ctp. 18.)
16KhoNka Moi KOMΦoPT (MY COMFORT)
HAKMMTE3NY KONKUY DIAI DYHKUMHOHNPOBAHINKOHDIIOHEPA B COOTBECTBNN C YCTAHOBKAMN, COXPAHEHHBMIMCNONLNOBAHEM KONIKM MEMO. (°CM. ctp. 15.)
⑦KhONka OuHCTKN Bo3dyxa (PURE)
HaxMMTE 3Ty KhoNky dIy 3aNycka oIepaun 3neKtpueckoOnHCTKN BO3dyxa.
HaKMTe KNONy DnA OCTaHOBKn yHKUHNOHPOBAHn.
18KhONKa BbIKJIOUeHn TaIMepa (OFF)
HaxMMTE3Ty KhoNky DnHa Hauana FyHKUHOHPOBaHNr TaMepa BbIKIOUeHNr (OFF).
Bb moke Te Bbip Taepa Taimepa Cha n3 cneyioux
yctbipex yctahOBOK (1,3,5nn9acob).
③MнdkaTop TemnepaTpybI
Toka3bibaet yctaHOBky TEMnepaTypbi (17°C-30°C).
④MHdkaTOp OChCTKn BO3dyxa (PURE)
Noka3bBaet, TTO BInONHATCA Oepaunno 3neKtpueeCKO uHCTKe BO3dyxa.
Yka3bIaBt Bb6paHHyO CKOpocTb BeHTnIaTopa.MoKet Noka3bIaBcA ABToMaTuCheckn peXIM (AUTO) nnn Ondn H3 nTn yPoBHeN CKOpocTb BeHTnIaTopa (HN3KAH, HN3KAH+ CPEHRA, CPEHRA
BbICOKAR
Poka3bBAeTcAUTO,ecnФункционьнpexHm yCTaHOBHeB nnoXeHne LIOAO AUTO,ni6O OOCYUHEHIE.
⑥MHdkatop TaMepa TIMER IN BpemeH yacOB
Poka3bIbaeTc yTaHOBKa BpeMeHn dnyfHKIOHOUPoBaHn TaImepa UuBpeMa YacOB. 3a NckIOHeHem paOToB TaImepa TIMER BcerDa noka3bIbaeTc Tekyuee BpeMa.
⑦HнdkaTop Hi POWER
Kok3bBaTeTc, KOrJa HauHHeTaTc Opeaun Hi POWER. HaxMMte KOnKy HI POWER dHa Na, a 3aTeM HaxMMte e e ChObA nO octaHOBKn Opeaun.
8 P INHdkaTop (MEMORY)
Miraert B TeHnE3 cekyHn np HAKATIN KHONK MEMO Bo BPem FyHKUNHOPOBAHn. 3HaOK P nokazbIaebTc np yJeepKbAHm HaxaToH KONKn B TeeHHe 6oJee 3 cekyHd BO BPem MMrAHA 3HAkA.
HaKMTe APyryIO KNONKY DnB BbIKNIOUeHn3HaQKa.
⑨ндкаторpeхma cha (SLEEP MODE)
Iok3aBbAeTc npn akTbH3aun yHKUN SLEEP MODE. HxKMTe KONky SLEEP MODE nna haana, a 3aTeM HxKMTe e CHOBA nra OCTaHOBNKOn onepaun.
10MHdkaTop n3MeHnnylbTa DY (A.B)
Koja yctahOBHeHa yHKnna nepeKnHcHnnybTa DY,Ha dncnnee nybTa DY noBHeTc 3aHcok B" (Ecny yCTaHOBko nIbTa DY ABnHcTcA A,B 3Toi no3uHN HtNduKaun.)
FHyHKnna nepeKnHcHnnybTa DY
EcnBBA BHTPENH6bNOA cTahOBnHO B OaHOM NMOUeHN HIN COCEHNX NOMEUHARX, pnp paObe npbTa DY 06a 6bNOA MORYT 3anyckatbca n octahabNtbaBCB a OIOHO n To Xe BpMa. 3To MOKHO ppeoTbpATNTy, yCTAHOBNB FHKUNIO peKKnOHeHNAK TTO KAKdb BYHTPENH6bNOFHKUHPOYET TOhBO kpo COOTBETCTBYOUEM NpyTe DY
-ДИнспльбогангфункиперклоченnyntaДу,порokтaktpуteCдпepOMKOnMuHOpOBmKOMnHaHNoTOyCTaHOBKe.
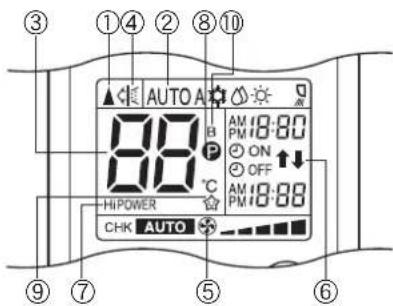
Ha pncyHke Bce HndkaTOpbl nok3aHbI c 函No obSbcHeHHa.Bo Bpem AynKIOHOHPoBaHHa HnytBe DY NOKa3bBAIOTCR ToBko COOTBETCTByOuine nHndKaTOpbl.
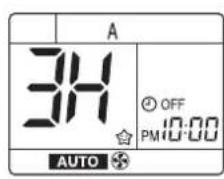
EcnBnybT Dy yctaHOBHeHb6atapen,Ha naHEn YacOB BbICBeHbAeTcN Mmraet HnDnKaUAM 0:00.
①Khonka ON
Haxmte KhoNky ON yctaHOBKn TeKyuero BpemeHn.
Pn KaKdAm HkataM KHONK ON Bpem 3MeHReTc C ODHOMHYTHbIMM INHTepBaAMn. Pn yepxmbAHm HkatoN KHONK ON Bpem 3MeHHETC C DECRTMHHyTHbIMN INHTepBAAMn.
② Khonka SET
HaxmTe KhoNky SET
BbcBeynBaETeKyuuee Bpem,HaunHaeTc pa6oTa yacob.

Perynnpobka BpeMeHn Ha yacax
① Khonka CLOCK
HaKMMTe KONKY CLOCK.
Muraet HndkaTOp BpeMeH Ha yacax.
②Khonka ON
HaxmTe KhoNky ON yctahOBKn TeKyuero
BpemeHn.
PnKaJOM HaxaTmKHOIKN ON BpMa N3MeHReTcOHNMOHYThbIMNHTepBaAMN.
Pn ydepxBaHn HaxaToK Honk ON BpMa
N3MEHRETCA DECATMHNHYthbIMN INHTEPBAJAMN.
③ Khonka SET
HaxMMTe KhoNky SET
BbCBeHbAeTcTeKyuuee BpemR, nHaunhaetcpa6oTa yacob.
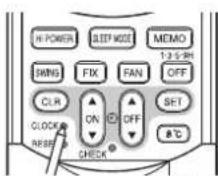
Haxmnte KHonky CLOCK
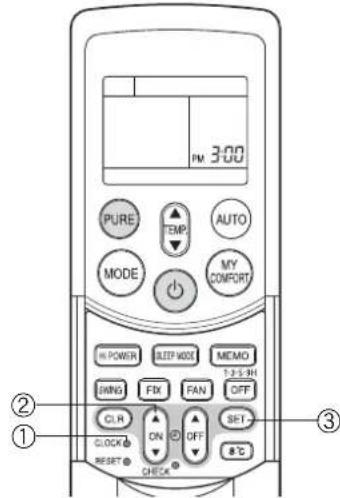
PpOBepbTe npaBnHocb yCTaHOBKn BO3dUshoro qNJIbTpap nJa3MOOChcTk.
Haxmtepnna3moocntkn,noKaBbctynha06eHXCTopoHxHEBoaHTNOHOCbBO B depkaTei (yrybneHn).Ecni yctahOBKa BblONHeHa HnnpabInbHO,MOKeT 3arOpetbcnHdkatop FILTER (opahKebbl).
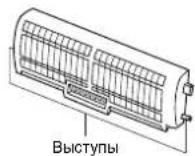
NCHOJIb3OBAHNE IVJIbTA Dv
PENYUNPEXDEHNE
- Ecnn wtopb, DBeepn nn npyme oobektbI boknpuyot CnHablc nyta YHa BHTpeHHm 6nok, KOHNMOHe He 6ydt paB0TaTb.
- Bybte octopokhbl, yTo6bl Ha nylbT Dy He npolnncjxdkoctn.
He noDBepraTe NybT YB O3DeIcTBIO npAMoro cOnHeuHoro CBeta nn Tenna.
EcnnpMHNHnHpapacnHO CnHana Ha BHTpeHHem 6Ioke NoDBepraeTcB O3deCTBNO pPmoro cOnHeHOro CBeta, KOHNIOHEp MoKET cyHKUHPOBaT HnPaBnBHo.
NcnoJIb3yTe wTOpbl dne pOToBpaueHn DOctXkeHn npMHNka cOnHeHbIM CBTOM.
CnHbI Moryr npHHMaTbC HnepaBnHbO, eCN B N OMeueHmN, B KOtOpOM nONlb3yTeCR KOHdMIOHeP, IMeTEc rIOHMHeCzEHTOE 0CEBHeHc CnKToPOHbIM NyckatEnem. Ecn Bbl PnaHpyTe nCNOB3oBaHme IOMNHecEHTbIX naMn, npokOHcybTpyTeCB BaAMM MeCTbHbIM dIeHOPerm.
Ecnn c nomoubio nybTa DY aKTHBn3npyTOCA pyrtne 3NeKTPNueCKHe yCTPOICTBa, npeMeCTHte 3TN yCTPOICTBa nn npOKOHcyNbTIPyTEcB BaAMM MeCTbIM dInepoM.
MectonoJoxKeHne nyIbTa Dy
XpaHHTe npbT Dy tam, rde ero ciHnbl Moryd octmhytb npemHKa BHYtpHeRo 6noka (DonycKaetca pacctOHaHne do 7M).
EcnBbBb6epnpepa0y TaMepa,nybT DY aBTOMaHEeKn nepeaET CnHnHa BHYPTEHNI 6NOK B3aADHHe BPEMa. EcnBbXpAnthe Nyt DY B MecTe, rde 6NOKpyETc npabInbHa npeaHa CNHana, MOxET HbNoDaTBC BPEMa 3aIepKk Do 15 MNHT.
DepkataB nybTa D
YcTaHOBKa dEpxaTeNaynbTa D
IpeaDnCTBnTbHOYcTAHOKOBNepKaTeHNaNbTaDYHa CTHe NnKOHO, npOBepbTe, BO3MOXHO NnPnHnTEcHnAOB NoNbTa DY BHTpeHHM 60KOM.
MONTAX ydaene Hne npnbTa D
Ду MOHTaKa NynbTa DY DEpXnTe erO npaIenBHo DEpkATEH NOy bTa DY nNoHOCtBO NaKmTE Ha Hero.Ду ydaNEHa NynbTa DY cDbHbTe NynbT DY BBePx N BbTaunite n3 DepeKatEnr.
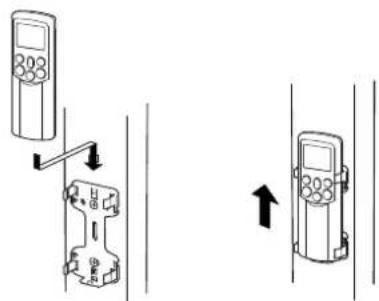
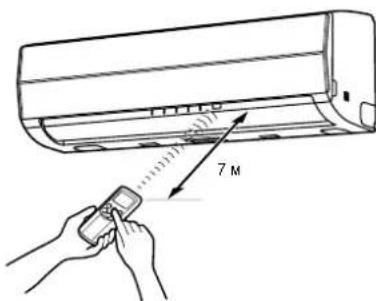
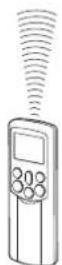
ABTOMATNUECKOEФYHKLIOHNOPOBAHNE
EcnBbYCTAHOBITE KOHNIOHOEP BpeKIM AUTO, OH ABTOMATueeckn BblBepeT OpeaIO OxlanKeHH, o6orpeBa NIN TOnbKO BeHTNIArTopa B 3aBNCMOCTN OT TEMNEpatpy BHytpn NOMEUH. (cM. cTp. 18.)
CKopoctb BEHTNtAToP a N KaIIO3eT TAKKe KOHTpONIpIpyOTcABTOMaTHeCKn.
3anyck
①KHOHKA
Haxmnte 3ty KhoNky dna 3anycka KOHNmuOhepa.
② Khonka AUTO (AUTO)
Haxmnte KhoNky AUTO.
YcTaHOBnTe KeNaemyTo Tempepatypy.
Ha DnncneHNOH naeHn BHyTPHeHrO 6noKa BicBcEaHTc HnHdkatOP OPERATION (3eHbI).ФнHkuOHaHbI pexm BblpaeTc B3abNCMOCTn OTemnpaTpby BHyTPn NOMeueHHN, n HAHMaETcФнHcuOHPOBaHNe pRn6MnTeJIbHO Hepe3 3MHytBu.
- Ecln peXm AUTO RbIReTcH HeyD6bIM, Bbl MoXeTe BbIbpaTb XeJaemBie yCNOBnBpyHyIO. Bo3MOxHO N3MeHEHeN TEmpeApTybl, CKOpOCTu BEHTUNrTOPA u NOnOKeHNJ XaJIIO3e, TaKkepeXm MODE MeHETc H A HaA, KOrDa N3MeHEnTc CKOpOCTb BEHTUNrTOPA uNIN NOONOHEHe XaJIIO3eI.
Ioka3bBAeTcTaKke HnDkaTop CKOpOCTu BEHTnAToPA.
OctaHOBka
KHONKa
Haxmnte 3Ty KhoNky CHOBA nIra octaHOBKn KOHNIOHepa.
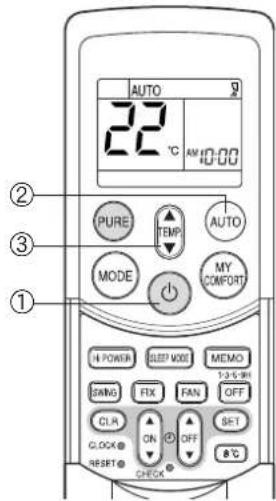
ABTOMATNUCHECKOE ΦУHKЦИОНЮBAHNE (ABTOMATNUCHECKOE И3MEHEHNE)
ECIN Bbl yctahOBHT KOHNIOHOEP B pEXIM A INN INPEKNIQUHTE ERO IN3 PEXIMMA AUTO BCNEIDCTBNE INMMEHENH yCTAHOBOK, KOHNIOHOEP ABOTMATUeCKN BbIbepeT onepaIO OXnAekDeHRA, OBORPBA INN TOLBKO BEHTNlARTOPA B 3ABNCIMOCN OT TEMNEPATyPB BYHTPN NOMEeHIN. (Cm. ctr. 18).
3anyck
①KHOHKA
HaKMTe 3Ty KHOKny dna 3anycka KOHdNIOhepa.
②KhONKa BbIbopapeXmAmo(MODE)
Bb6epntA.
③Khonka TemnepaTypbI()
YcTaHOBtE XeNaEmyIOTempeAtypy.
④ KhonkaCKopocTuBeHTnIaTopa(FAN)
Bb6epntoOdynHyyctaHOBOK“AUTO”HN3KAR-HN3KAR+,CPERHR
CPEDHRA+

HaDnneHnAnenBHyTPHeHrO6NOKaBcBeHbAeTc HnHdkatOP OPERATION (3eHbI).ФнHKUHOHAHbIpeKmBbIbpaTeC BABNCMOCTOn TEmnpaTpbyBHyTPn NOMeHnn,NaHnHaHTcФнHKUHOHPoBaHne NpM6NInTeJIbHO epe3 3MHytb.
Bo3MOxHO 3MHeHHe TempeaTybl, CKOpOCTu BEHTnIaTopa n NOXKeHua XaJIIOSe. Bb MoXeTe BBopTaB XeNaemble ycNoBnBpyHyIO.
OctaHOBka
KHONKA
HaxmTe 3Ty KhoNky ChOba dIra octaHOBKn KOHdIuioHepa.
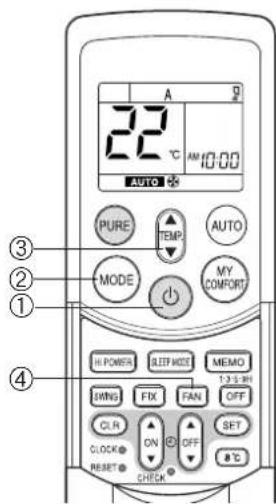
ONEPAU OXJIAXDEHNA/OBOPPEBA
3anyck
1KHOKA
HaxMMTe 3Ty KONky dny 3anycka KOHNmuHepa.
②KhONKa BbIbopapeXMa(MODE)
Bb6epTe yctahOBky OXJIAXDEHNE 0BOFPEB
YcTaHOBtTe KeNaemyIO TemnepaTpy.
④ Khonka ckopoctn BeHTnIaTopa (FAN)
Bb6epTe Ondy n3 yctahOBok "AUTO" HN3KAR, HN3KAR+, CPEHRA
CPEDHRA+BLGCHRA
Ha nncnno hno naen Bnytpnerho 6noka Bknoaetc HnndkaTOp OPERATION (3eHbnnn opankeB).Opeaunna HauHnaeTc np6nntelHo yepe3 Mmhytbl.
OctahOBka
KHONKa
Haxmte 3Ty KhoNky ChOba dHa octaHObKn KOHNMOhepa.
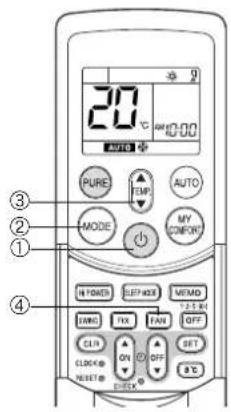
ONEPAÇNЯ OCYWEHNY
3anyck
TKHOKA
Haxmnte 3Ty KhoNky dJa 3aNycka KOHdNcNoHepa.
② Khonka Bb6opa pexima (MODE)
BbIepe Te yCTaHOBy OCUJEHNE
YcTaHOBnTe Kenaemyo Tempepatypy.
YCTAHOBKaCKOPoCTNBEHTNIATOpaΦHKcnpyETcHaAUTO,HByCBeHbAeTcHnDnKaUAAUTO.
Ha nncnneHno naheBn BHTpeHrero 6noka BKJIOaTc HmNkAtoP OPERATION (3eneHb), n Oepaunna NaHnAeTc np6bnntelbHo Upe3 MMHytbl.
OctahOBka
KHONKa
HaxmTe 3Ty KhoNky ChOba dHaOCTaHOBKn KOHdInoHepa.

ONEPAÇΥ 8°C
Haxmnte 3ty KhoNky dna Hauana onepaunn HarpebaHH npy yctahOBneHHoT emnepatype 8^ KOHNHOEP KOHTpOPIpyET Temepatypy B nomuehen Ha ypoBHe np6bn3. 8^
Temnepatypa B NOMeHIM MOKET HEMHOOT OTHUATbCA OT 8°C B 3abNCMOCTN OT pa3mepa NOMeHIN yCNOB IN yCTAHOBKN annapata.
Haayao onepaunn HarpBaHn8°C npBbIKIOueHHOM KOHNIOHepe
3anyck
①Khonka 8^
HaxmTe 3Ty KONky dna Hauana onepaunn HarpeBaHH npu yctahOBHeHH TeMtnepaType 8^
HaHnCnneHn HnHeHn BHyTpeHrero 6noka BkIouaTec HnDkaTOp OPEration (3eHb).
OctaHOBKa
Khonka
Haxmte 3ty KhONkY dN BbIKIOyehn KOHNMOhepa.
Ecnn Opeaun HapReBaHn8°C NaHnHaETC npn BbIKNoeHHOM KOHNIOHepe, HAXMNTe KONKy 8°C eue pa3 nnn BbIKNoeHn Opeaun.
Haayao onepaun HarpebaHn 8°C npa paboToueem KOHNIOHepe
3anyck
①Khonka 8^
HaKMMTe 3Ty KONky dNn H3MeHHeHr Ha onepaunu HarpeBaHH npy yctahOBHeHHo Temnepatype 8^
Ecn KOHNIOHep BnONHRET ONEpaHIO OxNAXDEHNI (BKNIOAH ABOTMATHECKOE OxNAXDEHNI) NIN OCUYHNI, OH BkNIOAHTC, I ONePAHARNAI npy ctaHOHeHNO TEMNEpata type 8°C NaHmHaTc np6n3. Chepe3 MmHyb. Ecn KOHNIOHep BnONHRET ONEpaHIO HArpeBAHNO HnEMeDnHO pneXoNDn HAonepaHIO HARpeBAHNO 8°C.
- Ecn KOnDnIOHep BbINONHaET OepaunIO PURE, OH BbINONHaET OHNOBpeMeHHO OepaunIO OcNCTKn HArpeBaHH 8°C.
OctahOBka
Khonka
HaxMnte 3Ty KhoNky DnBbIKIOHeHr KOHmIOHepea.
Ecn onepaHn HapbaHn 8°C HauHaTc npBknoeHHOM KOHNIOHepe, HaxMMTe KhoNky 8°C eue pa3 dnn Bo3BaPaKa npebduuonepaun.
PpOBepbTe ycNoBn pa6Otbl Ha 3KpaH e npIbTa DY.
Koanda onepaun HaraepaHn HauHaetc HaraepaHn 8°C,do Hauana o6yBa Tenblm Bo3dyom Tpe6yTcn npn6n3ntbHo 5 MnHyT.
PNEDyPPEXDEHNE
BbnoHHeMoBpeBa MoKet yxydunTbcra,ecnBo Bpema onepaun HarpeBaHH 8°C Jauo3n HappaBneHb cnWko.
PIMMEUAHNE
- Ckopoctb BeHTnIaTopa B HaHane HarpeBaHnR 8°C ynpabnreTc c NOMOsbio fHyHKm AUTO.
- Ecn yHKuHPOBaHne TaMepa ycTaHOHeNo Do onepaHn HarpeBaHn 8°C, HAcTpoKa yHKUHOHPoBaHn TaMepa OTMeHReTcA.
HactpoKn cyHKuOHPOBaHHa TaMepa HeBO3MOXHO BbIOJNHb BO BpEMr Opepaun HarpeBaHHa 8°C.
HactpoKn DNJ SWNG (KAHAnHe XaJIOn3), FIX (NONOcBbBHTINrTOpA) n PURE (onePauZm OYUeHHa) MoXHO IMeHARbTO BPOBEM onepAun HArpeBaHNb8C NCHAOHACTPOEK Heo3MOxHO BbIIOHbTc h oMOnuO bDpytnx KHONOK. - TemnepaTpya BbIyBaEMORO Bo3dyxa HIXe, Yem npn onepaunn HopMaIbHoro oborpeBa.
ONEPALUNA PURE
Haxmte 3ty KhoNkY dna 3anycka onepaunn 3neKtpuecko OOcntkn Bo3dyxa.
Bo BpemaФyHKUHnPOBaHnKoHnNoHepa
①KhONKa PURE
Haxatae 3toi khoKn 3anyckaet onepaumo PURE.
Ha nncnneHno naHenn BHyTppeHero 6NoKa BKnHouaetc HndkaTOp PURE (Cnnn).
AKTNBn3npyETcHnIbTp nIaSMOoNCTKn.
ДлэocтановкToьko onepaun PURE
Khonka PURE
HaxaTne 3ToK KhoNKn OCTaHaBJIbAeT onepauu POURE.
Ha nCnneHoi naHEnB HByTpEHHero 6noka BbIKIOaETCH INMkATOp PURE (cnnn).
-ДeзakTNBn3npyetcФньtpПлa3MоOuHcTkn.
IINRAOCTAHOBKUyHKUHOHPOBAHNA KOHNIOHEPA BTO Xe camoe BPEMR
KHONKA
Функшонроваиke konДишонера onepaPure octaHabnBaHTc npHaxaTIN 3toKHOKN.
Ha nncnneHoi naHEn BHytpenHero 6noKa BBkIOuAOTc HndKATOpbI OPERATION (3eHb) u HndKATop PURE (Cnn).
PNEUYPNPEXDEHNE
- Pn HaxaTm KhoNk CneDyOuPn pa3, onepaun HaunHaetc c KOM6Hau n cyHKUHOHPOBaHM KOHNIOHePA n onepaun PURE.
Bo Bpem KOMbHaHm FyHKUHOHPoBaHn KOHUNOHepa n Opeaun PURE octahOBka TOIbKO FyHKUHOHPoBaHn KOHNIOHepa HeBO3MOxHa.
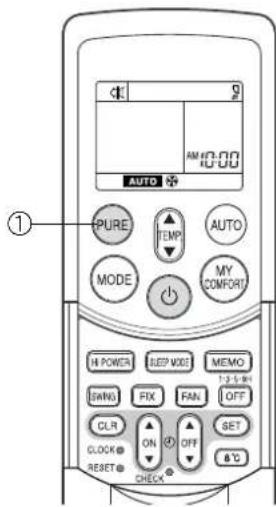
EcnKoHdunOHep octaHOBJeH
(1)Khonka PURE
Haxatme 3ToK hONk 3anyckaet onepaqIO PURE.
- Ha dinneHoi naneBHytpenHero 6noka BKnioaetra HndkaTOp PURE (cHm).
MF
-BoBpEMrOepaunOuHcTKnBO3dyxaIpon3BODnTCHe6oJbwoeKoJIueCTBO O30Ha,a Bbl MoXeTe 3aMeNTb HAIyue 3anaxa.
-ECNBO3dyhblnOTOKABHReTcABTOMaTHueckmOHIN3MeHReTcMeJyonepaunAmHN3KAHPCEHRA+
Onepaun HIN3KAR bINONHRETC, KOrda BO3dyx BHTPN NOMEeHn CTAHOBITcN CTbIM. Bo BPema BblNOJHEHn Opeapun nnoJeHn KaIO3eBepTNkANbHOBO 03dyuHORO NOTOKa MOXET N3MeHHTbcR, ECIN TEMNEpATpya BHTPN NOMEeHn RBNETCR H3KOI.
- OtkpbBaHne PeewKa Bo3dyXo3a6OpHOro OTBepCTn BO BpMa onepaun PURE HOrda npuBoNT K BKIOueHIO INmKTopa FILTER (opAnKeBOrO).
B 3TOM cnuyae, ocTaHOBnTe opeaIO PURE (ocTaHOBnTe KOHmIoHep, ecn OH taKxe fynKmoHpye), a 3aTeM 3akpoIe PeWETKa BO3dyxo3a6OpHOrO OTBepCTnI. - INHKTOP FILTER (opahkebb) Bknoaetc noce onepaPn PURE, eOnn Oha BInonHnAacB TeueHne oKono 1000 yacob.
PnBkIIOeHnn HNDNKaTOpa ONUCTNe FpNbTp PNa3MOOuCTKn. (cm. cTp. 22.)
ONEPALUNHi POWER
BbICOKa MoHoctb (Hi POWER)
B pexmHi POwER (bIcOKOMouHAn Oepaun) ATOmatnueckn KOHTPOINpHyOTc TEmpepaTpya BHTpyn NOMEeHnO,BOyduHnN TOKn OFyHKUHOHaJIbHbN peXmTAK,TO NOMEeHnE b6CTPO OxANkdaTeCn TeoM INOBORpeBaTaCn 3HM0.(cm.CTP.18.)
YctaHOBka pexHMa Hi POWER
①Khonka Hi POWER
HaxmTe KONky Hi POWER. Ha nyIbTe Dnyoka3bBaetc 3aOK Hi POWER.
OTmeHa peXIma Hi POWER
①Khonka Hi POWER
HaxMnTe KhoNky Hi POWER CHOba Odn pa3. Ha nyIbte Dny BbIKNoaetc3HaOk Hi POWER.
PNEUYPNPEXDEHNE
Pexm Hi POWER He moxet 6bItb akTnBn3npoBaH Bo Bpema onepaun OCYUHEHME.

TANMEP 1,3,5,9H OFF
Bo3dyuHbKoHdunOHep octaHaBnBaetc nocne yCTaHOBJIeHHoro BpeMeH pa60tbi (1, 3, 5 nn 9 acob).
①KHONKA OFF
HaKMMTe KHOIIKy OFF (BO BpEMyDyHKUHOpOBaHN).
CnBbWHTC KOPOTKNI 38yKOBOI CINHAN IN BkIOUOaETcN IHNKATOp TAIMePA. BpEMBAIKIOHENKAIOIOHOPEAka3bBaTaTcNA HINCIepeyTA (1H: np6nntBHOuepe3 1 acn OT TEKUYeero BPeMHe).
- POKA BILCEBUEBAETC1H (Pn6N3MNTENBHO 3 cekyHDbI), CHOBA HAKMITE KONKY, YTO6bI NOMEHATb HA INDHKAATOP 3H, CHOBAAHKMTE KHONKY, YTO6bI NOMEHATb HA INDHKAATOP 5H, INCHOMAHKMTE KHONKY, YTO6bI NOMEHATb HA INDHKAATOP 9H.
Pocne Bb6opa HxKHO BpEmHe HaXmaeTe CHOBA 3Ty KONky. (Korda HnDnKaTOp 1H,3H nT.D. rachET, TaMep ycTaHOBneH.)
②Khonka CLR
HaxmTe KhoNky CLR nIa OTMeHbI TaMepa.
TainmepOTMeHReTcH,HO B03dyuHbIKOHdUInOHeP npoDOnJkaETyHKUINOpOBaTb.
Taimep 1,3,5 nnn 9H OFF taKke oTMehaetc,ecn KhoNka OFF haxmaetc noCne BbINOJIHeHH yCTaHOBOK.
HF
Korda noDxOanBpeMa TaMepa 1,3,5nHgH OFF,HaunhaetcOnepaoun OuncTk. (Oepaoun OuncTKe He BbInonHaertcBOpeMa onepaoun oboPeba nIn oepaoun PURE.)
- PnCOBMEcTHOM HcNOLb3OBaHm C TaIMepOM ON ChauAna yCTaHOBtE TaIMep 1,3,5 INH OFF,a 3aTeM yCTaHOBtE TaIMep ON.
- Ecnn npn yctaHOBHeHOM TaHMepe ON (OFF) HaxkMaTeC KhoNka OFF, TaMep ON (OFF) OTMeHReTc N yCTaHaBbMaTeC TOnbKO TaMep 1,3,5 nJN 9H OFF.
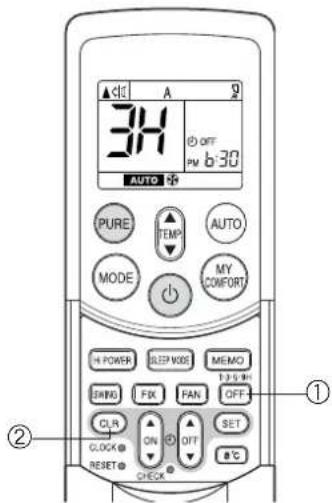
ONEPALU TAI MEPA
Taimep BKIOueHn (ON) n Taimep BbIKIOueHn (OFF)
YcTaHOBka TaMepa BKKNoeHn (ON)
① KhonkaON

y ON VctahOBuTe XeNaEMoe BpMa TaMepa.
Pn KaKdOM HaxaTN KONK ON Bpema N3MeHReTcC DecATMmHyThbIM INHTepBaJAMN.
Pn ydepknBaHH HaxaToH KhoNk ON Bpema N3MeHaETc C nHTepBaIamn B OdnHac.
② Khonka SET

SET yctahOBKa TaMepa.
BbcBceuBaetc Bpem Taumepa, n 3anyckaetc TaMep.
③ KhonkaCLR

CLR THTOTMehbI yCTAHOBK TaMePA
YcTaHOBkA TaMepa BbIKHoueHH (OFF)
①Khonka OFF


YcTaHOBnTe KeJaemoe BpEm TaMepa.
Pn KaKdom HaxkTN KOnrN OFF Bpema n3MeHReTc C DecaTmMHyTHbIMN INHTepBaJAMN.
Pny ydepknBaHn HaxaToi KhoNk OFF BpeMa N3MeHaETC nHTepBaIamB OOnH qac.
② Khonka SET

SET yctaHOBKa TaMepa.
BbCBeuBaETcBpMa TaMepa, 3anyckaTcTaMep.
③ KhonkaCLR

CLR DOR OTMeHbI yCTaHOBKn TaMepa.
PNEVDYNPEXXDEHNE
- EcnBbBb6epntonepeauHt TaMePA,nyLTyABOMATnuecknnepeaetCnHnTaimepaHa BHTpeHHn 6NkBa3aHHOeBpMa. CnEOBATEbHO, DEPXTe npBnHo nepeabatc HnHnBaHTpeHHn annapat.
- EcnBbHe HaxMeTe KhoNky SET 3eHHe 30 cekyHn nocne yctaHOBKn BpeMeHN, yCTaHOBKa 6ydet OTMeHeHa.
Kak tonbko Bbl bblpapan pexm onepaun TaMepa, yCTAHOBKn coxpanhotcB nyltbe DY.
BdAaHeIeM, KOHnUIOHOep HauHHT FoHKUIOHMPOBaTb BTex Xe YcNOBx, ecn Bb Haxan KhoNky ON nKhoNky OF nybTa D.
Ecnn Mrraet HnDnkaun BpeMeHH Ha Yacax, Bb He moKeTe yctahOBnt TaHmep.
IyctAHOBKnBpeMeHnHa Yacax CneDyTe INCTpykUAM Bpa3dene "YCTAHOBKa BpeMeHn Ha Yacax" Ha cTp.6, a 3aTeM yCTAHOBNTe TaIMep.
KoM6HnHPOBaHHbI TaMep (OdHOBpeMeHHa YcTaHOBka TaIMePoB ON n OFF)
Taumep OFF->taumep ON
(1)HaKMITE KhoNky ON yctaHOBk TaIMepa BKnIOueHnA ON.
(2)Haxmte Khonky OFF yctahOBKa TaMepa BbIKIOueHHA OFF.
(3) Haxmite KhoNky SET 2E1
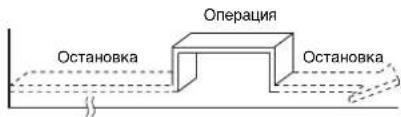
Функця таимета ON nnn OFF,КOTOPAN 6nKe K Tekyuemy BpeMeHn AKTNBUN3NpyETc npBoi.
EcnI IIO BOxN TaimepoON N OFF YCTAHOBNEHO OINHAKOBOB BPEM, Opeaun Taimepa He BbINONHIAOTcK. K TOMY KE, BO3MOJHA OCTAHOBKa FyHKIOHNPOBAHON KOHNIOHEpa.
PENyPEXKHeH
Pn6bn3ntbno 3ceynbnybT Dy dyet npeabatb CnHnHa BnHTpeHHnBnOK, n3BykoBo CnHn npMa 6dyet CnBuWeh C BnHTpeHHero 6noka do Tx nop, noka BHe Haxkmete KhoNky SET
HHeBHOI KOM6HnHPOBaHHbI TaIMep (OJHOBpeMeHHaYcTaHOBKa TaIMepoB ON n OFF n aKTHBn3aun KaKdIeHb.)
3Ta yHKUH RAHNEcnoeH,ecn BbXoTHe NcNoJIb3OBAbK COMBHHPOBaHHbIe TaIMepbI B OINHAKOoe BpeMa KaKdbIe Hb.
YcTaHOBka KOM6HHPoBAHHORo TaIMepa TIMER
(1)Haxmte KhoNky ON yctahOBKa TaIMepa BKnIOeHnA ON.
(2) Haxmte Khonky OFF yctahOBKa TaMepa BbIKNoHcHnOFF.
(3) Haxmte KhoNky SET 857
(4) Nocne nykta (3) Mnaet 3nauok cTpekn ( nnn ) B TeueHne OKoN 3 cekyHa. Haxmte KhoNKy SET 56Bpemr 3TOrO MrrAHn.
- 06e ctpelen(nka3bBAIOCTBO BpEMaAKTNBn3aMnDHeBHoro TaHmepa.
OTmeHa onepaun TaMepa
onepaHnHaHnHaetc np6Jn3nteBHOepe3 MmHyTbI.
(B):Korda KhoNka MY COMFORT Haxata BO BpeM FyHKUHOHPOBAHH
-Функиональьн ржим 3мeнeтся Ha yctaHOBky, coxpaehHHyO C nCnONb30BaHmE KHOJIK
MEMO.
Hauanbna yctahOBka:
MODE (PEKIM) : AUTO
Temnepa typa: 22
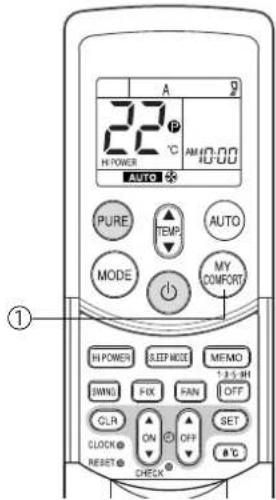
PEYJINPOBKA HANPABJIENBA03dUshHOI NOTOKA
PraBnIbHO NOpErpyNpyTe HnapBaHneHRe BO3DyUshoro NOTOKa. HeBbINONHeHRe 3TOYcNOBm MOeT npBBeCTn KDCKOMΦOpTy INIu Bb3BaTb HEoINHaKOBoe pacnpedeneHRe TEmepatpyB BHTpy NOMeHEna.
- PndpernynpyTe BeptnkaHbHbB O3dyHbHnnotOK, nCnOlb3y npnbT y.
- Póperynpuyte ropuHOTaIbHbI BO3dyuHbI nOTOK BpyHyko.
PerynupobKa BepTKKaIbHOro Bo3dyuHoro notoka
KoJaBb6paH pexm AUTO INN A, KOHInuHOep ABTOMATHECKI peryINpyET BepTKaJIbHOe HApapBJIeHHe BO3dyuHOrO NOTOKA B COOTBETCTBN C yCNOBnMRfHyKUHOHPOBAHn.
IyctaHOBKn Bbl6paHOrO HnPaBHeHH BO3dyHOrO NOTOKa
IcnoIb3yIte 3Ty cyHKUIO npn dyHKUIOHUPOBaHH KOHNIOHOpa.
① Khonka FIX
DepKNTe HaxaToHn KpATKObpeMeHHo HaxMITE KHONKY FIX Ha npIbTe Dy dna nepemseHn XaJIIO3e B XeJaEMoe HappaBHeHne.
- I3MeHHeIe NOIOXeHHe XaJIIO3eB BepTnKaNbHOrO HAnpABInHn BO3dUHOro NOTOKA B npedexyka3aHHoro dnaana3oHa.
B nocne dyuix onepaiax ABToMaTHueckn yCTaHaBnBaetcRBeptkAJIbHbBo3dyuHb noTOK, KOTOpB Bbl yctaHOBNI drr kAnIO3e, mCOnb3yKnONky FIX.
ДЯВТOMATNUCHECKOROKaayHnHaNpaBJIeHnBO3dUshoroNOTOKa
BbINONHInTe 3Ty cyHKuHIO BO BPemr cyHKUHOHPOBaHH KOHNIOHepa.
①Khonka SWING
HaKMMTe KONky SWING ha nyIbte Dv.
-ДЯ OCTaHOBKmФyHKuHaxMUTe KhONky SWING.
-ДЯнИЗМЕHENHЯНИРАБЛЕHЯΚAчAHЯнHAЖМЛТE KHOнКY FIX.
PENYPNPEXDEHNE
Ecnn KOHmnohe He cyHKnOHHpyet (BKnOa, npy yctahOBKe ON TIMER), KhoKn FIX n SWING bydYt OTMeHeHbI.
He 3KcIpyaTpyiTe KOHdIIOHOep B TeHeHne IInTeIbHorO BpeMeHH C HnapBnHEHM Bo3DyUHORo NToKA, yCTAHOBHeHbIM BH3M BO BpEma OxnaJKeHHN Nm OcyuHHe. B IpOTINBHOM CnyHae, MoKet Ha6NIOaTBcR KOHDeHCAuaH NaOBepHXOHTX KaIO3e BePTEKAbHOrO Bo3DyUHORo NToKA, nTO MOKET Bb3BbT KanaHBe BObl.
He nepemeeaute XaHIO3n BepTKaIbHOrO BO3dyuHOro nToKa BpyHyIO. Bcerda HcnoIb3yTe KhoNky FIX.
Ecnn Bn nepemectnte XaIIO3N BPyHyO, 3TO MOKeT PnBecT N C60HO BO Bpema
fHKnHnHPOBaHn.
Ecn npon3oienct c60n kaiokoe, octahOBITE KOHNIOHep oINH pa3, 3aTeM 3anyctnte erO CHOBA.
EcnKoHnHOpH 3anyuH HEmdAeHNO nOcNE erO octaHOBKn, XaHIO3n BepKanbHoro Bo3dyuHoro noToKa he 6yuyt nepemeeTaBcB TeueHne Okono 10 cekyHd.
PerynpoBka ropu3oHTaIbHoro Bo3duuHoro noToka
Iodrotobka:
3axbnte puyar Ha kaHIOx npu3HOATAIbHORO BO3duHORO NOtOKa INepMeCTnE IN DPERyINPOBKN HapabJeHHRAO3duHORO NOtOKa KAK Tpe6yETC.
BbMOKTeNoDpeRyInpOBaTbBO3dyuHbINOTOKBNEBOMnnpABOMNNOXKeHARPEwETOK.
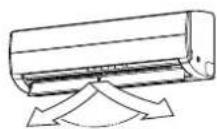
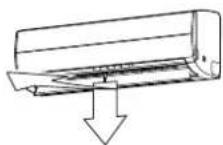
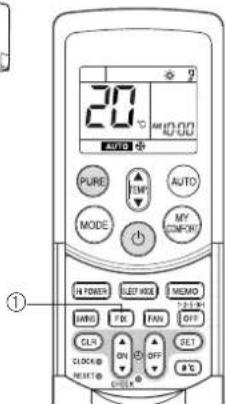
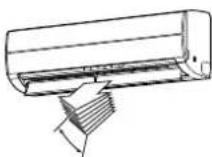
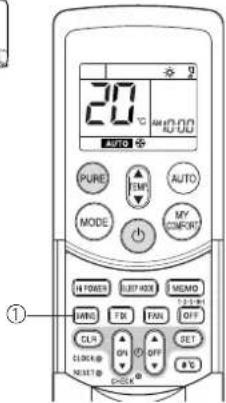
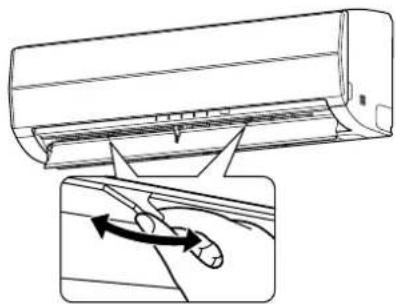
ONEPAÇΥA BOTOMATΥECKOΓΟ ΝOBTOPHOTO 3ΑΝΥΚΑ
3TOT KOHNIOHOEP Chabxeh FyHKUeABTOMATNueCKORO NOBTOPOHOro 3anycka, KOTOPaI NO3BOJnE9 KOHNIOHOEPy BO306HOBNtB FyHKUOHIOPOBAHMe 6e3 NcONb3OBAHnnybTa IV npn FyHKUOHaJIbHbX yCTaHOBkX BO BpEmr c6o3NeKTponNTAHn. FyHKUOHOPOBAHme BO306HOBnRETCa 6e3 npdynpeKJeHnuepe3 3MHyTb Iocne BO306HOBnEHn 3NeKTponNTAHn.
#
ONEPALINABTOMATUHECKOIO NOBTOPHOIO 3AUYCKA He yctahOBnHe IaI paobToI npI OTnpBaKc KOHNIOHepa C 3aBoJa, N03TOMY Heo6xOIMO yCTAHOBNTy fynKuHO HA annapate, ecIn 3TO Tpe6yETC.
KAK YCTAHOBNT ABTOMATUeCKN IOBTOPHbI 3Anyck
JyctahOBKn 6yHKUAMTOMATMueCKORO NOBTOPHORO 3anyCkBa BInONHnTE CNEdyOooee: Annapat DOnKHeh 6bItb NOKHIOHOe KcTn EeNtKpONTuHaE. Ecn nEeKTpONTuHaNe BbIKNoHEno, 3Ta 6yHKUHnEO He 6dET yCTaOHBOHa.
IINAKTINB3aUHmFyHKuAABOTAMHeCKORNOBTOPHO3anyckaepKHTeHaKaToI KHOIKY RESET BTeueHMe 3 cekHyd.
KoHdIaIOHeP pInHHMaET yCTAHOBky HnJaEt 3BvKOBo CnHAn 3 pa3a. CeHAc CImCTeMA NOBOTpO 3anyCkAeTc ABTomateckn. AKTNbNtUpBaHa YCTAHOBKa ABTomATneCKORO NOBOTPHORO 3anyCKa.
(1)Korda KOHdMIOHeP HaxoDITcB PEXIMe roTOBHOCTn (He pa60TaET). DePKTe HaKaToI KNkny RESET B TeueHne 6onee 3 cekyH.
- KOHdMIOHOep HaHHaet cyHKIOHPOBaTb. BkIOHaeTc3eJIeHbI INHMKAtOp.
- PnBn3nteBHO Hepe3 3cekyHbI KOHNIOHep H3aet 3 3byKOBbIX CnHaJa. 3eneHbNnDnKaTOp Muraet B TeueHne 5 cekyHd.
-KoHmnoHep yHKnOHHpyeT.
Ecnpa60ta KOHINIOHEpe He Tpe6yETCB 3TO BpEMHaKMMTe KHOKNY RESET CHOBA HINNCNOBJeIyTneNytDYNnOCTAHOBKN KOHNIOHEpa.
(2)Korda KOHdNIOHep yHKUHOHpyeT.
Depxnte HaxaToN KHONky RESET B TeHHe 60nee 3 cekyHd.
- KOHdnoHep ocTaHaBnBaet yHKUHOHPoBaHne. 3eHeh b HnDnKaTOp BbIKNoaETcA
Yepe3 TpN CEkyHbI NocHe HaxKaTH KHOHKn KOHNmuOHe n3daet 3ByKOBoi CmHan 3 pa3a. 3eneHb INHdkatop Muraet B TeueHne 5 ckyHd
KOHdMIOHepOCTaHaBnBaetcA.
Ecnn Bb Hc xOHTe octaHabImBaTb KOHmIOHOep B 3TO BpEMR, nCnONb3yIte npblr DY nIN NOBtPOHO 3anycka KOHmIOHOepa. 3enehmy INIKATOP BKIOUaETCR BO BpEMR CNEdyIOuE ONepauMn.
- Ecn n c noo bio nybta Dy akTmbn3npoBaHa onepaun TaMepa, onepaun ABtoMaTHueckoro NOBTOPHORO 3anycka He 6ydt npHmAtb KOMAHND.
- Pocne noBtropHoro 3anycka konDmiohepa c nmooub o npaun ABTOMATUeCKOFO IOBTOPHO 3AUYCKA, onepaun Kaahn Jkauo3e (AUTO) BO306HOBnEETc.
KAK OTMEHHTb ABTOMATUeCKN IOBTOPHbI 3ANYCK
ITN OTMHeI ONepaun ABOTOMaTHeCKORO NOBTOPHORO 3anycka BbINONHInTe CNeyHOuee:
Tobtpnte npcepyy ctaHOBN. KOHnIOHOep npHHMaet ycTaHOBky n 3daet 3ByKOBOc rHan 3 pa3a.
Cenac KOHnIOHeP CneyET NOBTOPO H 3anyCTNb BpyHyIO C nOMOsbIO npIbTa DY NOcNE BbIKIOHcHrN CTeBOrO 3NeKTPoNTaHrA.
YCTAHOBKa ABTOMaTuCeCKOro NOBToPHoro 3anycka OTMeHReTcR.
(1)Korda KOHdIIOHeP HaxOHTcBpeXmE rTOBHOCTn (He pa6oTaET).
Depxnte haxaon kHONky RESET B Teehne 6onee 3 cekyhd.
-KOHUNMOHep HauHHaet dyHKUHOHPOBaTb.
Bknnoaetc3eHbHnHdkatop.
- Pn6JIIN3NTeIbHO uepe3 3cekyHdbI KOHNIOHep n3daet 3ByKObbix CnHana.
-KoHdIuNoHep fynKUOnHpyeT
Ecnpa60ta KOHnIOHOpe Hte Tpe6yETcB 3TO BpEMRAHXMMTE CHOBAKHONKY RESET INN nCNOb3yTe nybT DYN OCTAHOBKN KOHnIOHOpe.
(2)Korda KOHdNIOHep yHKUOHNpyET.
Depxnte haxaToN KHONky RESET B Teehne 6onee 3 cekyHd.
- KOHdMIOHeP ocTaHaBnBaet yHKUHOHPOBaHne.
3eJIeHbI INHmKaTOp BbIKnIOuChaTcA.
- Pn6n3ntenbHO uepe3 3cekyHdbi KOHNIOHep n3daet 3 3ByKObbix CnHa.
KoHnUHOHeP OCTaHaBnBaEeTcR.
EcnBbHxOHTe OCTaHaBnBaTb KOHNIOHOEP B3TO BpEMA,NCN0JIb3yTe NylbT DYN NOBtOPHO 3anycka KOHNIOHOepa.
3eHbI HnDkaTOp BkIOuOaETcBO BpMa CneDyIOuE onepaun.
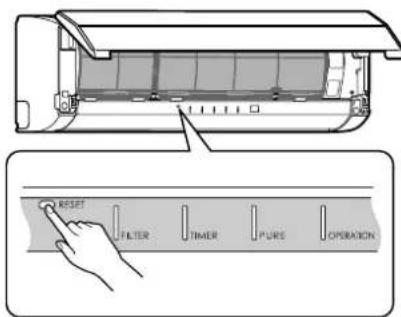
Khoinka RESET

Khonka RESET
KAK PABOTAET KOHДИЦИОHEP
ABTomatHeckoeФyHKUHOHPOBaHne
Kak noka3aHO ha pucyHke 1, pexMM aBtOMaTneckoro cyHKUOHPOBAHH BbIbpaet cyHKUOHPOBAHH, OCHOBAHoe Ha daHHbx TemnepaTypbBHTpni NOMEeHN (Ta) npn Hauane cyHKUOHPOBAHH.
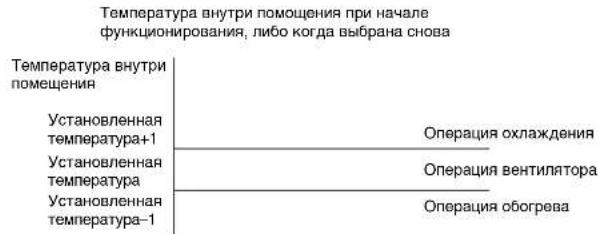
PcyHOK1
CKopoCtB BeHTnIaTopa ToXe yCTaHOBnHeHa BaBbICOKyIO
YPOBHeHb Wyma NOBblAeTc B COOTBETCTBm CO CKOPOctbIO BEHTNlRtopa.
-Операцьяоборрва
Onepaunna obopeba BbnoJnHraTeHa 2°C Bblwe, yem ycTaHOBka TemnepaTpybl.
CKopoctbBENTnIATopa aBTOMaTneckn nepeKIOaETcB COOTBETCTBm CpyHKUHOHaJIbHbIMN yCNOBAMM.
OepaSNEET SLEEP MODE
Bo3dyuHbKoHmUHOhe ABToMaTHueCKn perynnyet KOMHaTHyHO TemnepaTy, BO3duHbNnotOK n ypoBeHb Wyma, TTO6bl PpeDoTbaTaB neepoxnaJxHeHne IeTOM N NOdEpxmbaTB TeNo N KOMΦOPT B NOMEuEHN 3HMOn.
HF
IopTe6JIeHHe 3Heprn m ypoBeH yMa yMeHbAioTcBpeKHe cHa, TaK TTO NOMEeHMe MOKeT He OxnaKaTaBCa (mN HArpeBaTbcR) BdoCTaTOHO Mepe, eCN pexHM nCIOB3yETcB TEeHne dINTEbHO rnpOda BpemEH.
Pexim CHa He Moxtn CnoBocBa Bw Bpme OpeaepocOyehn Hmone paeum PURE (He3abcmna Opeaepn) (Opeaepur PURE (He3abcmna Opeaepn) BbinoHHTcTgOr, KORa KHOnA PURE HaKmuaTeCn npn octaHOBneHOM KOHNIOHepe, TOb6bnpom3BeCTc mny OpeaepuPURE. BoDyubhKoHKnUdoHOpHe (fHyKIOHOpHpyET 3TO BPEM.)
- EcnKnKhONKa FAN HaxkMaetcB peXkMeh Cha, To peXkM CHa OTMeHReTcA.
Pexm cha He ABnTcOnepauee TaMepor.
Onepaunocyuene()
PexmOcyyehnABTOMATNueeCKN BbIpaet OepaHIO XONODHORO Ocyehn, OCHOBbBaRcB Ha pa3HnE MEXKdy yCTAHOBKO TEmnpaTypbN DeICTBtBHeo TMnpaTpyo BHyTPn NOMEeHH.
Noka3bBaetn Hndnkatop cKOpocTn BeHTnIaTopa AUTO, nncnonb3yETcHn3Kaar cKOpocTb.
COBETblДЛЯ3KOHOMNHYO3KCNJYATAUIN
Iopdepxbae KOMfopTa6ebHbHypOBeHb TemnepaTpybBHyTp nomeeHn
PpOuHCTnTE BO3dUshhIe FJIbTpbl
3acopeHHbIe BO3dyHbIe 0nJIbTpbl npBODaK yxyduHNO 3oΦeKTMBHOCTN KOHNIOHepa. IpOuuaIte Ix pa3 B DBe HeDen.
HnKorda He OTKpbBaIte DBePn NOKHa Ha 6oNbWee Bpem, Yem 3To HEO6xOdmo
IIN COXpAHEN XOLOHORO HUN TENNORO BO3DyxA B NOMEeEHMN HOKOra HE OTKpbBaIte DBePN IN OKHa H 60nBWee BpeM, YEM 3TO Heo6xOIMO.
OKOHbIe wTOPbi
Bo BpMn Opeaun OxnaKdEHH 3akpoTe WtOtpb BO n66eHne npAMORO COnHeHcHOro CBeta.
Bo Bpem onepaunn o6orpeBa 3akpoTne wTopbI dNr coxpanenr Tennna.
3ΦΦeKTHBHO HcNoIb3yIte TaHMeP
YcTaHOBnTe TaHMeP Ha KEnaEMoe BpEmr FyHKUHOHPOBaHnR.
Co3daIte paBHomepyu npKynauu BO3dyxa B nomeueHH
Pnperynpye Hnpanpablenne B03dyuHoro nOToKa dnn OdnHaKOBu npkynuB03yxa B NOMeueHHN.
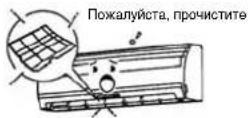
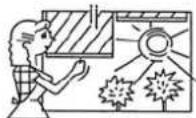
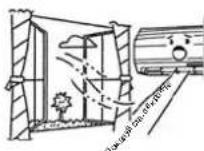
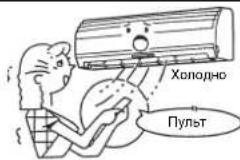
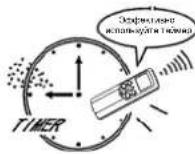
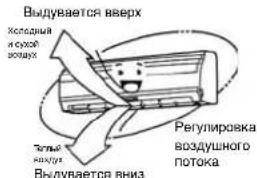
BPEMEHHAR 3KcπIyATAU
BpemHHa 3KcNJyataun
3Ta cyHKnHcNoJIb3yETcIaBpEMeHHoI 3KcNpyataun annapata Bcnyae,ecnBHe nnoJnnHa MeTo npblT IV,nn6atapen pa3paHmncb.
- Haxmte KhoNky RESET dna 3anycka aBtOMaTHeCKnOro yHKUHOHPOBaHnA (AUTO).
Bo BpeMa aKTHBn3aUu BpeMeHHo 3KcNlyaTaUu ONepaunyJbTa DY OTMeHReTCA.
-ДерхиTe HaxKToI KhONky B TeueHne 10 cekyHd nla 3anycka onepaun oxnaKeHHa.
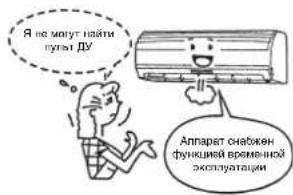
ONEPALIIMOYNCTKN
Oepaun Ounchkn
3Ta cykHnncnonb3yETcTOnbKO dNlOcyHeHHBHyTpKoHNuHOhepaDnYMeHbWeHHPOCTa NnecEHn T.D.BHYtpKOHmnoHepa.
KoIa annapat bkyknoaetc noce cyHKmHOBaHH B TeueHe 10 mN 6onee MHyT B pexMme OxnaekdeHn nOcyuKn, onepaun OCHTKn HauHaetc abTomatneckn, n Ha dncneHoi naehn annapata BkNoaetc nHdkatop S.CLEAN.
PpOdoJXHTeBHOCTb Oepaun OoHcTkn
- Ecnn annapat 10 nnn 6onee mnyt B pexn moxnaekdehna nno ocwehna B teehne 6onee odhoro yaca, onepaunn ouictkn npodonkaetcB teuehe 4 yacob.
06 onepaunn ouhctkn
Onepaunr ouctn He ouctnt nomeuene Hne ydaunr nnecenb n nbil, yke haoauiyocBHTPN KOHdnohepa.
Bo Bpema onepaun Moket 6bItb BnHO He6oBloe KOINcCTBO H3MOpO3N: 3To RBAHETCR HOPMaIbHbIM IN He YKa3bBaEaT Ha HEnCnpaBHOCTb.
KanHOBepTKaNbHOrO BO3DyHoro NOTOKa CnerKa OTKpbTbl.
- Ecni Tekyuza onepaun OuycTkn OTMeHReTCA, 300000000000000000000000000000000000000000
- HACINbCTBeHHOc OCTaHOBKn ONepaunn OHCTKN HAKMTe KONKY BaXdbI BO BpEMn ONEpaunn ONUCTKn.
OБычнын ухов
IPEIOCTPEXEHNE
IpeaHcTKoKOHmIoHOepa cneyET BbIKIOHTb ABTOMATUeCKn BbIKIOHaTeB INN CTeBOB BBIKIOaTeB.
HcTka BHTpeHHero 6loKa n nyIbTa D
PNEyPEXKDEHNE
- IVcnoIb3yIte cyxyIO TKaHb IINpOTnPAHn BHYTpEHnro 6NOKu nnybTa DY.
- Ecnn KOHmUHOep CnBHo 3aRpa3HeN, nCnOb3yIe TkaHb, CMOeHHyIO B XOnoHOBoE Dn npotupanu BHpypeHrero 6NoKa.
- Hnkorda He ncoNb3yTe BnaXHyTo TkaHb Dna nybTa DY.
He nCNOB3yIe IINI pOITAPAHn PAcblntEnb HxMMueckOn OCHOB IN He OCTaJIraTe TAKHE MaTePnAInbI Na 6Noke B TeHne HInTeBHO rpeMoDA BpEmH. 3To MOKET PnBcT N IOBpeKdHIO INo ObScBeVBAHHIO NOBepXHOCTN 6NoKA.
He nCnOb3yIe dHn HcTkn 6eH3HH, pactBOpHTJIb, nonpyoQm npooWk mN dpyrne pactBopNTEN. 3To moKET npBecTN K TpeuHAM Nn DeOpMaun PnactMacBOB NOBepxHOCTN.
Ecn annapat He nCnoB3yETc B TeueHne no KpaHe Mepe 1 Mecua
(1)BbnoHnIe OepaMQ BENTINrTopa B TceHHe 3-4 cAcob dNcOyUeHN BHyTp nAnpata. Ecnn nn Oepaun OxnaKdEHH NcOnb3yETcA yCTAHOBKa BbcOKoI Tempeatpybl, BbInONJIHTCR onepaqA BEHTINrTopa.
(2)OCTaHOBInTe KOHNiUHOHeN BvIKIOHIne ABOMaTHeCKn BvIKIOuHaTeNs.
(3)PpoHCTnTe BO3DyHbIe QnIbTpbl.
(4) YdaJIte 6aIapen n3 nybTa D
PpOBepe Tepeed 3KcnIyataauei
PNEyPEXKDEHNE
- PpOBePbTe, YTO yCTaHOBnEhBi BO3dyHnBHe qINbTpbl.
- PpOBepbTe, TTO BO3dyxO3a6OpHoe N BO3dyXOBblIyCKHOE OTBepCTn He 6JIOKpOBaHbI.
YnCTKa BO3dyuHbIX fNlBtpoB
PpouuauTe BO3dyuHbIe qnIbTpbi KaKdbie 2 HeDen.
Ecni Bo3dyhBle qnIbTpbl nokpbbl nbIbIO, 3ΦΦeKTHBHOCTb KOHdNIOHepa 6yET yMeHbEHa.
IpoHuaTe Bo3dyuHbIe QnIbTpbl, KaK MoXHOaJe.
Iodrotobka:
1.BbIKHouTe KOHNuHnOHeP,INcNoJIb3yIyIbT dy.
2. OtkpoIe peWETky BO3dyxO3a6OpHOro OTBepCTnA
1 OTKpoIte peuETky BO3dyXoa6pHOrO oTbePcTIN.
IIOHNMTpeewety BO3dyx03a6pHOrO OTBepCTnB ROpN3oHTaNbHoe nONOXeHHe.
2 3axBaTnTe neByko npabyko pyuKn BO3dyuHoro fNtpa NODHMnTe erO cnerKa, a 3aTEM NotAHnEero BHm3 nBBAHHMaHn H3 depXkateRn Fnhbtpa.
3 NcnoB3yIte NbIeCoc DnI ydAJIeHnN bINn C pINbTPOB IN PpOMOITe IN BODOI. Pocne npomblaHn HnTPOB BbcUyInTe IN B TeHN.
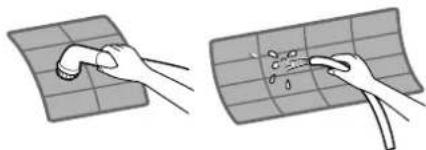
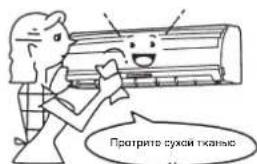
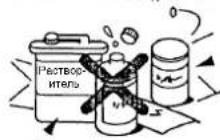
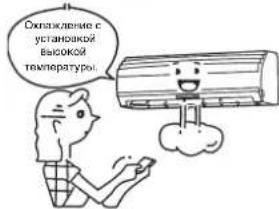
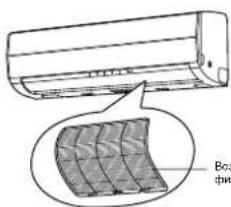
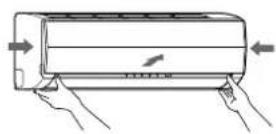
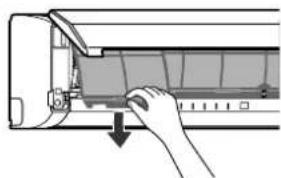
BCTABBe BepxHm yAcTOK BO3dyuHoro fnoIpaTak, Yo6bI erO npabBn IeBbI KpaB BCTABINCb BO BYTpEHHM 6IOK n HAdExHO YcTAHOBNiNCb HA MecTO.
5 3aKpOTepeWETkyB03dyx03a6OpHOroOTBepCTn.
*EcHn Ha BHytpenHem 6Ioke NOKa3bBaetc HNdkatop FILTER, HaxMITE KhoNky RESET Ha BHytpenHem 6Ioke dnn BbIKNoeHn HNdkatopa.
HcTka pewetkn Bo3dyxo3abophoro OTbepctna
Ioprotobka:
- BbIKHouTe KOHNIOHOEP, INcNoIb3yry NylbT Dv.
- OTKpoTe peWETky BO3dyxo3a6OpHOro OTBepCTna.
1 YdaIne peWeyKy Bo3dyXo3abOpHoro OTBepCTn.
DepxNte DBe CTOpOHb peWeyTK Bo3dyXo3abOpHoro OTBepCTn nOTKpoTe BBepx.
YdaIne neByIO (mN npabyIO) pyKy, naKab ee B HappaBHeHH HApxy, a 3aTeM
BbTaunB peWeyKy B HappaBHeHH K Ce6e.
2PpOmoTe eBDOJ,HCNoJIb3yMRKyoMoayAnkynnNONOTHe. (He nCnoJIb3yIte MetaJIHnCeCKyIO YnCTAUYo 5eTKy nnDpynE JxctKne 5eTKn.)
IcnoIbSObaHae TaKIN XeCTKIN ppeMeTOB npuBEET K capanHAM Ha NOBepXHOCTn peWetKN IN CHATNIO METAJIIMHeCKORO NOKpBTNA.
Ecn peewetka Bo3dyoxo3abopHOrO oTBePcTHn CInbHo 3aqr3HeHa, npOuHCTnTe e c nOMouHbNo HeITpaBHorO KxOHHO rpooKa n PpOmoTe e BOIO.
3IpoTpNTe BOy CpeWetKn BOaDyxo3abOpHOro OTBepCTnN BbCyUHTe e.
BCTABbTe NcByu H npabyu pyuynpeWetkn Bo3dyx03a6pHOro OTBepTn B BaIb Ha DByx CTOpOHax KOHNIOHOepa H HXN NOHOCbIO.
5 NotAHInTepeIeTKyBO3dyX03a6OpHOrOOTBepCTNBAH3.
HaxMMte MeCTa CTpeLOK (HTbIpe) CH3y peWETKN BO3dyXo3abOpHOrO OTBepTnA DnnpOBePK TOrO, YTO peWETKa NOnHOCTbIO 3aKpbTa.
PIMMEUAHNE
HCTKa HxO BHTpeHHero/HapyXHO 6JIOKOB CINbHO peKOMeHdyTc DnCnCTEM KOHNIOHMPOBAHNA B03Dyxa, KOTOpBIE NcNOb3yOKoTc PerynPHo. HeBbONHeHne perynHOH CYTKBHTpeHHero/HapyXHO 6JIOKOB MOKeT npHBecTNI POXO 3aJIeHHeHIO, yTeYKe BOblI dAke npEeBpEmEHOMy c60IO KomPecoppa.

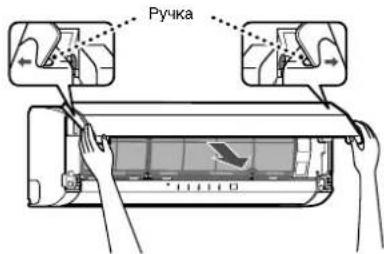
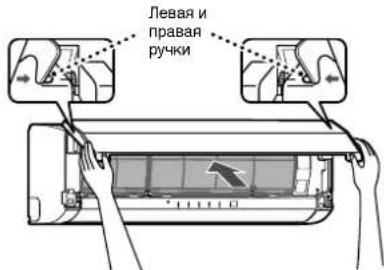
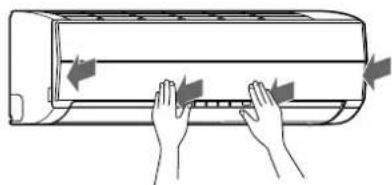
CNEUAAJIbHbIyXoD
Ynctka qmnbtpa nna3mo0uynctkn
Iodrotobka:
- BbIKIOUHTe KOHNIOHOEP, INONB3yNyIbT Dv.
-
BbIKIOUHTe 3JIeKTPoNTaHHe.
-
EcnBkIIOyaeTcHnDnKaTOp FILTER (opahKebb), npOuHCTnTe pInbTp nna3MoOuHCTKn.
(3TOT INDnKATOP BKJIOaETcNocne BbINONHeHnO npaPUN PUREB TeeHne OKoNo 1000 YacOB.) - No OKOHaHHn YHCTKn HaxMNTe KHOHky RESET Ha BHyTppeHHem 6Noke.
BbInonHnTe YcKTy Odn pa3 KaKdIbe WeecTb MecaueB.
JaXe EcnHnHnKATOP FILTER HE BKNIOHaeTcR, npOHTIte pINbTp nN3MOoHCTKn BcERda, KOHa aNnapat N3aET cyuAun, uEJIKAooUnn JyKxKaUaU 3BcY. Ecn HnKdAeTb BKNIOHaeTc HOBHO, MOXHO BCE eue HCnNoB30BaTB KOHNzUHOep DO yTPa 6e3 npOsbem, HO cIeDyeT pON3BecTe NcHTCkY, KAK MOXHO CKepe.
1 OTKpoTe peewkTy Bo3dyx03a6pHoro oTbpctn.
POnHmntpepeTky Bo3dyx03a6OpHOro OTBepCTnDo Tex nop, noka OHa He
3aueJIKHETCH HA MECTE.
2 3axBaTNTe JEBYIO npaBvO pyuKn BO3DyUHOro fNbTpna NODHMnTe erO cnerKa, a
3aTEM NOTAHHTE ERO BHN3 DnB BbHMaHnI 3 DEpKaTeN qunbtpa.
3BbTaunTeFnHbTpNna3MoOoHCTKN.
3axBaTnTe pyK, a 3aTEM BbTaunTe, KaK nokaHa Ha ① n ②.

PpOBepKn nocne qnCTkn 1nBtpa nna3moOuHcTkn
1.Y6eHNTecbTOM,HTOHHdkaTopHaIamna FILTER He BkHouaETc npn AKTNBaau
onepaun pure B teueHne oDHoro nn 60nee yaca.
2. Ecnn Hndnkatopha naMa FILTER Bknoaetc, noBtpho npOBepbTe cneDyiooe.
a)YCTAHOBKaΦNtBtpa NnA3MOOCHKTK
b) YcTaHOBKa peWetKn Bo3dyX03a6OpHOro OTBepCTn
A TaKKe, noBToPHO y6eIntecb B TOM, YTO nHnDnKaToPHa JAmna FILTER He BKnIOaTeC npn AKTINBa3aun OnepauuN PURE B TeueHne
nocnyoux Ondoro nno bonee yaca.
3. B cnyuae, ecn HndkaTophna lamna FILTER BknoaetcB, bbl3oBnte, noxanyuCTa, cneuaancta no Tex06cnykaHbHIO.
4PpOMOHTe,a3aTeM BbCyUHTe.
(1) 3AmOHTBE ROPRHE BOCDE CTEMEPATyPO40-C-50C B TceHNE OKNO 10-15 MHyT. EcmNTHAR RBNHOCTC OEHCBNHBIMN,INCNBJ3yTE CTnPAIbHYIO NCTHNOYACT (cna6yO OHOBHNY INMNEHETPaNBHy)np10-15 PA3 OT cTAHADTPOH KOHNHTPAUIMN.
(2)NotPNTe BBePx INBn3, NNOTPNTe BNEBO INBnpaBO. K TOMy JKe, AKKypaTHO NOTPNTe NOBepxHOCTb C NOMOuBIO MOaANK.
(3)PpOMoHTe npoTOUHO BDOH
(1-4)2nn3pa3a.)
(5) DaIte nonHOCTbIO BbICOXHyTB TEHN.
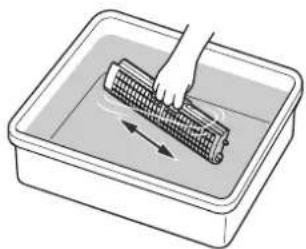
NPEUYPEXDEHME
HnKorda He nCnONb3yIte HnKaKne n3dennr, npomapKnpoBaHHbe, KaK "OT6eINBaTeNb"
He nbitaTecb pa3bupatb 6nok.
He Tpnte YnCTauei eTKoHnn NOO6hBIM PpeMetOM.
He nCnoB3yTe np6Opbln O6OpdyOBAHne dMbTbR.
He cyuHte c nOmoIbCyuMnKn dNra BOnoc mN pyrOro npnbopa,ncnoB3yUoero ropnBo3dyx. (Tenno moKet npuebctn K deepopmaun 6noka.)
NcIe NCTKIO NOOxDITNE, NOKA 6NOKHe BbCXOHET NOHOCBTOpeNEr eoPnCOEOHNHEHEM.ECN 6NOK cNOONbEyTCB BMOKOP BUNE, INMHKATOP FILTER MOKET KBNIOVHTCB.
5PnncoeDnHHTe nIbtpa nna3MOOCHCTK.
3aBHTe pyk, a 3aTEM BCTaBbTe, KAK NOKsAHO Ha ①. BCTaBBte B npabyo nnebyio HnpaBnIOUe peBcbl, 3aTEM HaxMMTE B HnpaBnEHH ② nocne TORO, KAK OH BCTABUNC NOHOCBtIO.
HaKMTe Ha 06 Ka OHua PnIbTpna Ia3MOOHCTKN B HappaBneHIM ③ Do Tex nop, noka BbCTynb Ha 06nx CTopoHax PnIbTpna Ia3MOOHCTKN NOnHOCTbO HE BCTABATCR B DEpKaTeH.
Haxmnte Ha nIbTp INa3MoOuNCTKn Do Tex Nop, NOKa BbCTynbl Ha 06EHX CTOPOHAX NOHOCbIO He bCTABATcB DEpKaTeH. Ecn yctaHObKaHe 3aBepeHa, MOKeT BbCBeuBaTaCn HndkaTOp FILTER (opaHkebb).
6 PnncoeDInHte BO3dyuHbI pInbTp, a 3aTeM 3akpoTe peWETky BO3dyxO3abOpHoro OTBepCTn.
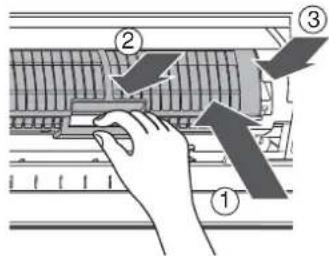
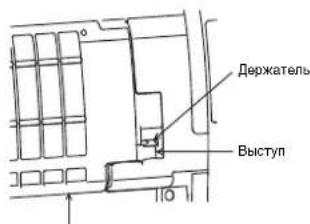
ΦnIbTp nIa3MoOuMCTKN
ФУHKЦИОНЮBAHAнЕ И PABOTA KOHДИЦИОHEPA
TpexmHytha3aunthar yHKnur
3aunTHaH cyHKnua ObcneHema dnn npedotBpaueHHA AKTNb3auu KOHNduoHepa B TeueHne np6bnnteIbHO 3 MHyT,ecn OH aanyuenOBTOPO HEMeDNEHNO nOcne 3Kcnlyataun IN npn BKNIOHcHm CTeBOrO BkNIOHcTae. OHa IcnoJb3yETC Dn 3aunTb annapata.
Операць обогревa
Onepaun npedbapntelhoro oborpeBa
KoHnIuHep He MoXeT DoCTaBnTb Tennb Bo3dyx cpa3y Xe nocne er0 3anycka.
EcnBHytpenHn Tepnoo6MeHHNK pa3orpenc, Tepnb Bo3dy BbyBaETcpe3 np6n3ntbHo 5 MnhyT.
KoHTponb Tennoro Bo3dyxa
Ecn TMepaTpa BHTPNnmeHn DOCTnna yCTaHOBHeHn TMepaTpybl, CKOpocb BHyTpHeHrBoBHTnIaTopa ABTomatuecknyMehbaeTcA.
Hapyxhbl 6nK B3TO BpMaOCTaHaBnBaETCA.
Pa3mopaxnBaHne
EcnH3M0P03bΦopMpyETcHa HApYKHom 6nOke Bo BpeMa onepaunm OborpeBa, pa3MopaxNBAHne 3anyckaetra ABTomatueckn (B TeHeHne np6nnntenbHO 5-10 MnHT) dna coxpanehn 3pfekTa oborpeBa.
-
Bo Bpemr onepaun pa3mopaknbaHn BHTnIaTOpbl Ha 6oovx BHytpHeHem n HapyKHM 6nokax OCTaHaBnBaIOCTA.
-
Bo Bpem onepaun pa3MopaxuBaHn pa3MOpoxeHHa BOa CNBaetc C HxKHe NactnHb HapyKHO 6JOKa.
06orpBaTeIbHaR MOHOCtB
Pn onepaunon 6oRpeBa Tennno Nornoaetc H3BHe IN BHCBO60KJaTeC B NOMEUeHHe. 3To H3bIbaeTc CNTTEM Oienno Bo HAKuHc. Ecnny HApyKHaN Temepatpya HbAETcCR CNiHKOM Hn3KO, peKOMeHNyETc NcONb3OBAHne DpyrTO HarpeBaTeNBHO Annapata B COeTaHm C KOHNIOHOHPo.
PaccmOTpeHne OTHOCHTeNbHO HAKONNEHCHera
Bb6epnTe noIoxKeHne dI HApKHOro 6NOKa, Ie OH He 6yET NOBeprTaBC CHEROBIM HAOCAM, HAKONJIeHHIO JNCTBeB INpyROMy Ce3OHBMOMKAM. BxHo, 0TOb6 Bo3DyuHbI NOTOK HApKHOro 6NOKa HE 6NOKUPoBAcN, TAK KAK 3TO MOKeT PmEeCTIN K YMEHeuHHeHNO 3OpeKtMHoCTN O6orpeBa IIN oxIaxKeHn. BO BpempeKxMua o6orpeBa n npn 6JInkKxN K Hynio TempepaTypA, BOda CnBaetcN 3 HApKHyHOro 6NOKa, TAK KaK pe3yIbTaI b AOTMAtUeCKORO pa3mOpaxKbaHnM Oryf HAKONITCBa N3aMePCHyTb. BaxHo 06ceCveHHe aDeKbATHOro CNBa NnnoIoueHn.
C60J 3JIeKTPoNTaHnA
PnC6oe 3neKtpoNTaHn BO BpemF yHKUHOHPOBaHn annapa nOJHoCTbO OCTaHaBnBaETca.
BoBpEMBOcCTaHOBHeHnHaJIeKTPoNTaHnHa BHyTpEHem 6IOKe HaHnHaet MIRatb HnNkAtOp OPERATION (3eneHb).
-IOBTOPOHO3aNYcKadyHKUHOHPOBaHHaHXMTe KHOHNyIyTe DY.
- Monnna pabota 6ecnpoBDHO rABOMOBHoro TeneoHa NObN3OCTM MoKET npBecTu K c60o annapata. BbIKIOHTe ceTeBOB BBKIOHTeNB, a 3aTEM BKNIOHTe erO CHOBA. HAXMITE KNONky aynIbe D'ny nnoBTOHPORO 3anycka.
YcnoBna 3KcnnyatauMH KOHNIOHepa
CueIbIO npabnBHOO fHyKNUOHPOBaHn3KcnnyATnpyTe KOHNIOHep np CneDyUOnx TEMpepaTbpHbX yCNOBnX.
| Операима оллаждени Temпература ве | номошени: -10°C - 46°C |
| Temпература витуриnomошени: 21°C - 32°C | |
| ПРЕДУПЕХДECHИЕ ОтROSOTIELСА ВLAЖноctь витуриnomошени - мени 80%.Если кONDITSIOHER ЕкStPЛУТИРУЕТСВЕ ЗТОТО ДИANA3OHA, на РовERCHOCTN KOHDITSIOHERа может пОНЗOIТС КONDETHCAUЯ. | |
| Операима обогрева Temпература ве倘若 | номошени: -15°C - 24°C |
| Temпература витуриnomошени: мени чem 28°C | |
| Операима.ocsuшия Temпература ве倘若 | номошени: -10°C - 46°C |
| Temпература витуриnomошени: 17°C - 32°C |
EcnKoHnUHep nOJb3OBaIc npu ycNoBHX,OTnUHbIX OT pNBeEHbIX Bblwe, MoryT 6bITb aKTNB3npBaHbI cyHKuIN 3auNTbI 6e3oNAchocTn.
BbIABJIeHnE N YCTPAHEHnE HENCnPABHOCTeN
NPEDYNPEXDEHME
Ecmn mmeTc nio6e n3 cnekyuux ycnoBn, HEmeDneHNO OCTaHOBNTe KOHNIOHEp, BbIKIIOHTe CTeBOB BbIKIOUATEB INpOKoHTaKTIpyTE C dIpOpom.
IHKATOpB MHaOT C KOPOTKMM INTEPpaJAMM (5 T). NOBTOPHO yCTAHOBHTe ABtOMATHECKH BbIKIOHATENB Hepe3 2-3 MMHyTbNOCNE BbIKIOHcHnCETEBORo BbIKIOHcTeJI. HecmOTpHa Na oneaumIO NOBTOPHO yCTAHOBKN, INIDKAtoPb BCE eue npdoONKaOT BkIOHAtCBN BbIKIOHcTbCR.
CeteBOn npedeoxpAHntEnb qacto neperopaet, n60 cacto akTNBn3pyeTcABOTOMaTueckm BblKIOHATENB.
- NocToPOHHee BeueCTBO INN BODa nonaIN BHyTpB KOHNIOHepa.
HaBnIOaIOTcHIObIe dpyTne HeoobHbIe ycIOBna.
IpepeTEm, kak 6paTb3a Texo6cnykubHem n peMOHTOM, npOBepbTe CneDyIOUe nyKtbl.
He cyHKUOHpyeT
CetebOBBbIKIOHcATEbBbIKIOUeH.
- ABTomatueckn BbIKIOaTeIb aKTHB3NIOBaH C cIeIbIO OTKIOOeHn 3JIeKTPoNTaHn.
Cetebn npdoxpanntb nperopen.
-3JNeKtpnueckn TOK OCTaHOBUNCA.
Batapeu Bnynte Dyaepnnncb.
- YcTaHOBnEe TaIMep BkHIOueHnON
B KaueCTe 3aunTHoro MExAHmMa IIN KOHNIOHepa, OH He cyHKUHOHPyET B TeueHne 3MHTHeMeIeHHO NOcNE NOBtOPHO 3anyCKa cyHKUHOHPoBaHH INN BKHOeHH NJIeKTPoNTuTAHIN.
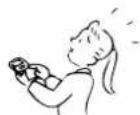
PpOBepntb noBtOpHo
IIOXAn 3ΦΦeKTHBHOCTb OXnAaXeHnN nn OboRpeBa
-БлOKирOBaHbI B03dYxO3a6OpHoe mNn B03dYxO8bInyCkHoe OTBepCTHa HApyXHoro 6Ioka.
- OTKpbItbI DBeepn OKHa.
Bo3dyuHbI qnIbTp 3acopen nbIbIO.
XaJIIO3H He HAXOJRTB IIpaBnIbHOM NOIOXKeHN.
CKOPOCTB BEHTUNrTopa yCTaHOBJIeHa Ha Hn3KyIO.
- KoHdunnohep yctaHOBJIeN BpeKIM OCYUJEHNE nnSLEEP MODE.
- YCTAHOBKa TEMNepaTypbI ABNAETCnMIUKOM BbICOKO(Bo BPemAn Opepaun OxnaXeHHa
- YctahOBka Tempepatpyb ABnREcCnHsKOM H3Ko (BO BpMa onepaun oborpeBa).


3To HE ABJHETCR DepeKToM.
KoHdecaunf opMpyeTc c3aDn BHyTeHHero 6NoKa.
- KOHdEHCaUN C3aDN BHyTpENHrO 6nOKa cOBnPaETcA ABToMaTHueeCKN CNBaETcHApyKy.
BHytpHHH6nOK n HapyKhb6nOK n3daIOT cpaHHbI yM.
- Ecn TMepepatypa pe3ko M3MeHReTcB, BHTpyEHnn 6n HApYXhbl 6nOK Moryr n3daBaTaBc TcpanHHb yM (TakOH, KaK "TKn-Tak" yM nn YM TEHeN) BCNECTBne paCuppeHn/ COkPAeHnA qACTn Nm INM3eHHeN NOTOKA XONODINBHorO aREHTa.
Bo3dyx B nOmeueHn naxHeT.
I3 KOHNIOHepa noctynaeT HnPnTHbI 3anax.
3anaxn, nornnoeHHbE B CTeHe, KOBepe, MeBEN, OdekJe nn Mexax NoctynaHOT HApKy.
BvpeMa oepaun PURE npo3bOaHTcH He60JIbOe KOJIueCTBO O3OHa, N Bb MoKeTe 3aMeTtB 3anax.
Ipeep TEM, kak o6paTntbcr 3a texo6cnykuaHem npmoHTOM, npoBepbTe cJeDyIOme nyHKtbl.
HdNKaTOp OPERATION BkJIOHaeTcN BBKJIIOHaeTcN.
EcnIITAHNE BOCCTAABINBAeTcN ONCe C608 3NEKTPONITAHNA, INN ECNI BKNIOaETcC cTeBOB BYKIOHauateb, INNDKATOp BKNIOaETcN bIKIOaETcN (1F). NOBTOPO yCTAHOBITE AOTMATmEckn BBKIOHauATEB NNONOKeHNE ON.
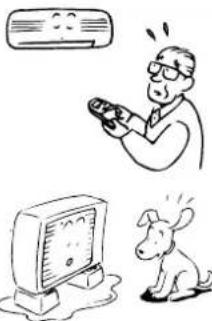
Bo Bpem onepaun o6orpba Ha hapyXHom 6noke fopmnpyetca n3Mopo3b. Boda cnaBaetc h hapyXHoro 6noka.
-13M003bHNOHaDPoHpyTeCnHa HApyXHOM 6Noke Bo BpEma Opepaun OOBPBA.B 3OTM Cnyae annapat BbINOHNATBOMaTHueckoe pa3mOpaxuBaHne (B TeueHee2-10 MHyT) dnn ynuHueHHAeFekHTBHOCTOOBPBA.
P1I neoparaaP3aMOPaXaMBAHnB O3dUbHn NTOK c 6o0nx BHyTpEHHero HApyKHO6IOKOB octAhabJNAeTCA.
- EcnnnotOK xonodnmbHoro areHTa n3MeHReTc dna pa3MopaxkuaHn, cnblweH uinrau 3ByK.
Boda,6pO3aBaHnA nPRA ABTOMATUHeCKOM Pa3MopAkaHbAN BO BPEM onepaUN OboIpeBa, cInBaTeC hApyXHOrO 6noka.
Bo3dyhblnnotOKn3MeHaeTcnaXe cNkHONka FAN he yctaHOBneHa BpeKm AUTO.
KorJaTeMnepaTpyBaBbIyBaEMoBO3dyXaNoHJxaeTcBO BpMaONepaunO6OrpeBa, KOHNIOHOEPABATOAMtHeCKNImEHReNTNINCTAHABJIINAeBT03dyuHbNNOTOKCBHYTpHHeRo 5nokaTK,TTOBJLIOJNBI NOUMeEHNI HeYUcTBOBaUNXOJNO.
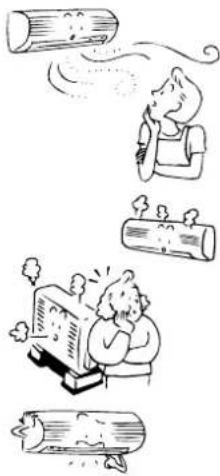
Bebi TymaH oxnKaHHeHHoro BO3dyxa HnN BODa reHepnpyETc HapyXHO 6noka.
-ПарИногдагенгсьВутгснгблOKAвВрмОпаци oxлaxдени nHapyxHorO 6lOKAвВрмОпаци pa3MopaxnBaHIN.

ABTOMaTHueckn OepauH JaHIO3e BepTKaIbHOrO BO3dyuHOro Notoka
Korda TemnepaTypa BHTpyn NOMeHINI Nm TEmpeTApTyA BNE NOMeHIN NOBILaaTeCBO BpEMr OnepaunOOBpe, kAnIO3N BEPTNKAInHO BO3DyHOrO NOToKa 3aKpbBaIoTc ODNH pA,a 3aTEM CHOBABOTMAnHeCKN yCTaHbNAIOCTBO INPnAIBHoE NOONKeHn.
BkHIOaETcHmdkatop FILTER.
- 3TOT INHДКATOP BKJIOUaETcnoNe TOrO, KaK onepaun PURE 6bIna BbINOHeHa B TeueHne Oko1 Ooo yacob.
- Ecnn nepeHnHa nAHeB He 3aKpbIta NIOTHO, BO3MOXHO BKNIOueHne INHnKaTopa.
- Ecnn pnnbtp nna3moocntkne npncoeuHnHnnotHO, moKET BKNHouaTbca HnNkAtoP.
3ByKn, mdaBaembIe BHYTppeHHM 6NOKOM
- Ecnn pfnbtp nna3moocntkn 3arpa3HeH, OH MOxET n3daBaTb CTyuauN, uenkaIOuN nnNxKxaun 3Byk.
- PnB BKIOHoeHH 3NEKTPoNTaHm HIN Pn OCTaHOBKe KOHdNIOHepa XaJIIO3n BEPTNKaJIbHO BO3dyuHOrO NOTOKa MOryT N3daBaTb rpeMn 3Byk INI 3Byk 3aRpy3Kn.
- HeKoTOpBie aactn Moryt paCunPntbocnn cy3ntbocn BcneCTbnpe nykTuauu TmnpaTybl, n 30m MoKeT npnbecTn K cTuauemy 3Byky.
- Pnp npoTeKaHn XoNoDnIbHoro areHTa MoXeT CblIaTbCa IwnAun 3ByK Jnn NIOOKeTaJIbHbI 3ByK.
- PnB KIOUeHm KOHNIOHepa dna Oepaun pa3MopaxBaHnBa BO BpeMa Oepaum oObrpeBa MoKet N3DaBaTbC HnnAum 3ByK.
3Byknu, n3daBaemble HapxHbIM 6nokom
- PnB KIOHcHn KOHcHIOHepa DnIe OEPaun Pa3MopaxnBaHn BO Bpem OEPaun OOBpeBa MoKet I3daBaTbCn 3ByK.
TEXHINUeCKNE XAPAKTEPNCNTUKN
KAUKOSÄADIN JA SEN TOIMINNOT
⑤ Puhaltimen noeuspainike (FAN)
④ Puhaltimen noeuspainike (FAN)
Valitse "AUTO" HIDAS-HIDAS + , KECKINOPEA ,
KESKINOPEA + tai NOPEA .

JAAHDYTYS JA LAMMITYS
Kännistys
①-palnike
Valitse JAAHDYTS dai LAMMITYS
③Lampotilapainike()
Aseta haluttu lamptila
④ Puhaltimen noeuspainike (FAN)
Valitse "AUTO" HIDAS-HIDAS + , KEKINOPEA ,
KESKINOPEA + tai-NOPEA .
Nar anlaegget lukker ned after at have varet i gang i 10
minutter erler laengere i akolings-ller torringstilstand,startes
rensefungkionen automatisk, og S.CLEAN-indikatoren tendes.
RESET-knap
⑫ Hojeffect-knap (Hi POWER)
Tryk pa donne knap for at starte drift med hoj effekt. (se side 18.)
Tryk pA ON happen for at indstille uret.
Hvert ryk pa ON-knappen eendrer tiden i forogelser pa et minut.
Holder du ON-knappen nede ndres tiden i forogelser pa ti minutter.
②SET knap
Tryk pa SET knappen.
Vaelg AFKOLING 1iter OPVARMNING
③Temperaturknap()
Indstil den onskedete temperatur.
④Ventilatorhastighedsknap (FAN)
Vaelg en af "AUTO" LAV-, LAV+, MEDIUM-, MEDIUM+, HOJ
Driften starter after cirka 3 minutter.
Stop
- knap
Tryk pa donne knapigen for at stoppe airconditionanlaegget.
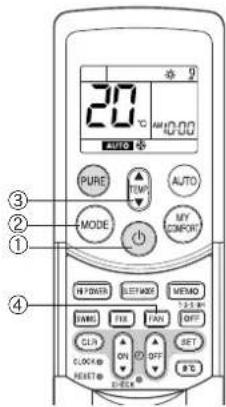
TORRING
Start
①-kdap
Driften starter after cirka 3 minutter.
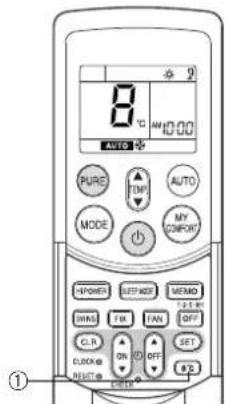
Stop
- knap
Tryk pådenne knap for at stoppe airconditionanlaegget.
Rengoring at luftfilteret
Rengor luftfiltrene hver,anden uge.
Airconditionanlaeggets ydeevne vil degraderes, hvis luftftiltre er daekket af stov.
⑨Timer AV-knapp (OFF)
Bruk denne knappen til á endre timer AV-tidene.
⑧Timer AV-knapp (OFF)
Trykk pa donne knappen for a starte timer AV-drift. Du kan velge timer AV-tiden blant fire innstlinger (1, 3, 5 erer 9 timer).
198°C drift-knapp (8°C)
④ Viftehastighethtsnapp (FAN)
Velgnavinnstillingene"AUTO"LAV,LAV+,MED, MED+HOY
OPERATION-indikatoren (grann) pa kontrollpanelet pa innendarsenheten. Driftsmodusen velges i samsvar med romtemperatures, og driften starter etter ca. 3 minutur.
- Temperaturen, vitheastigheten og lamellstillingen kan endres. Du kan velge de onskede forholdene manuelt.
Stopp
-knappen
Trykk pa donne knappen en gang til for a stoppe klimaanlegget.
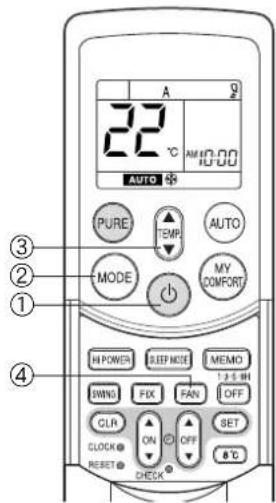
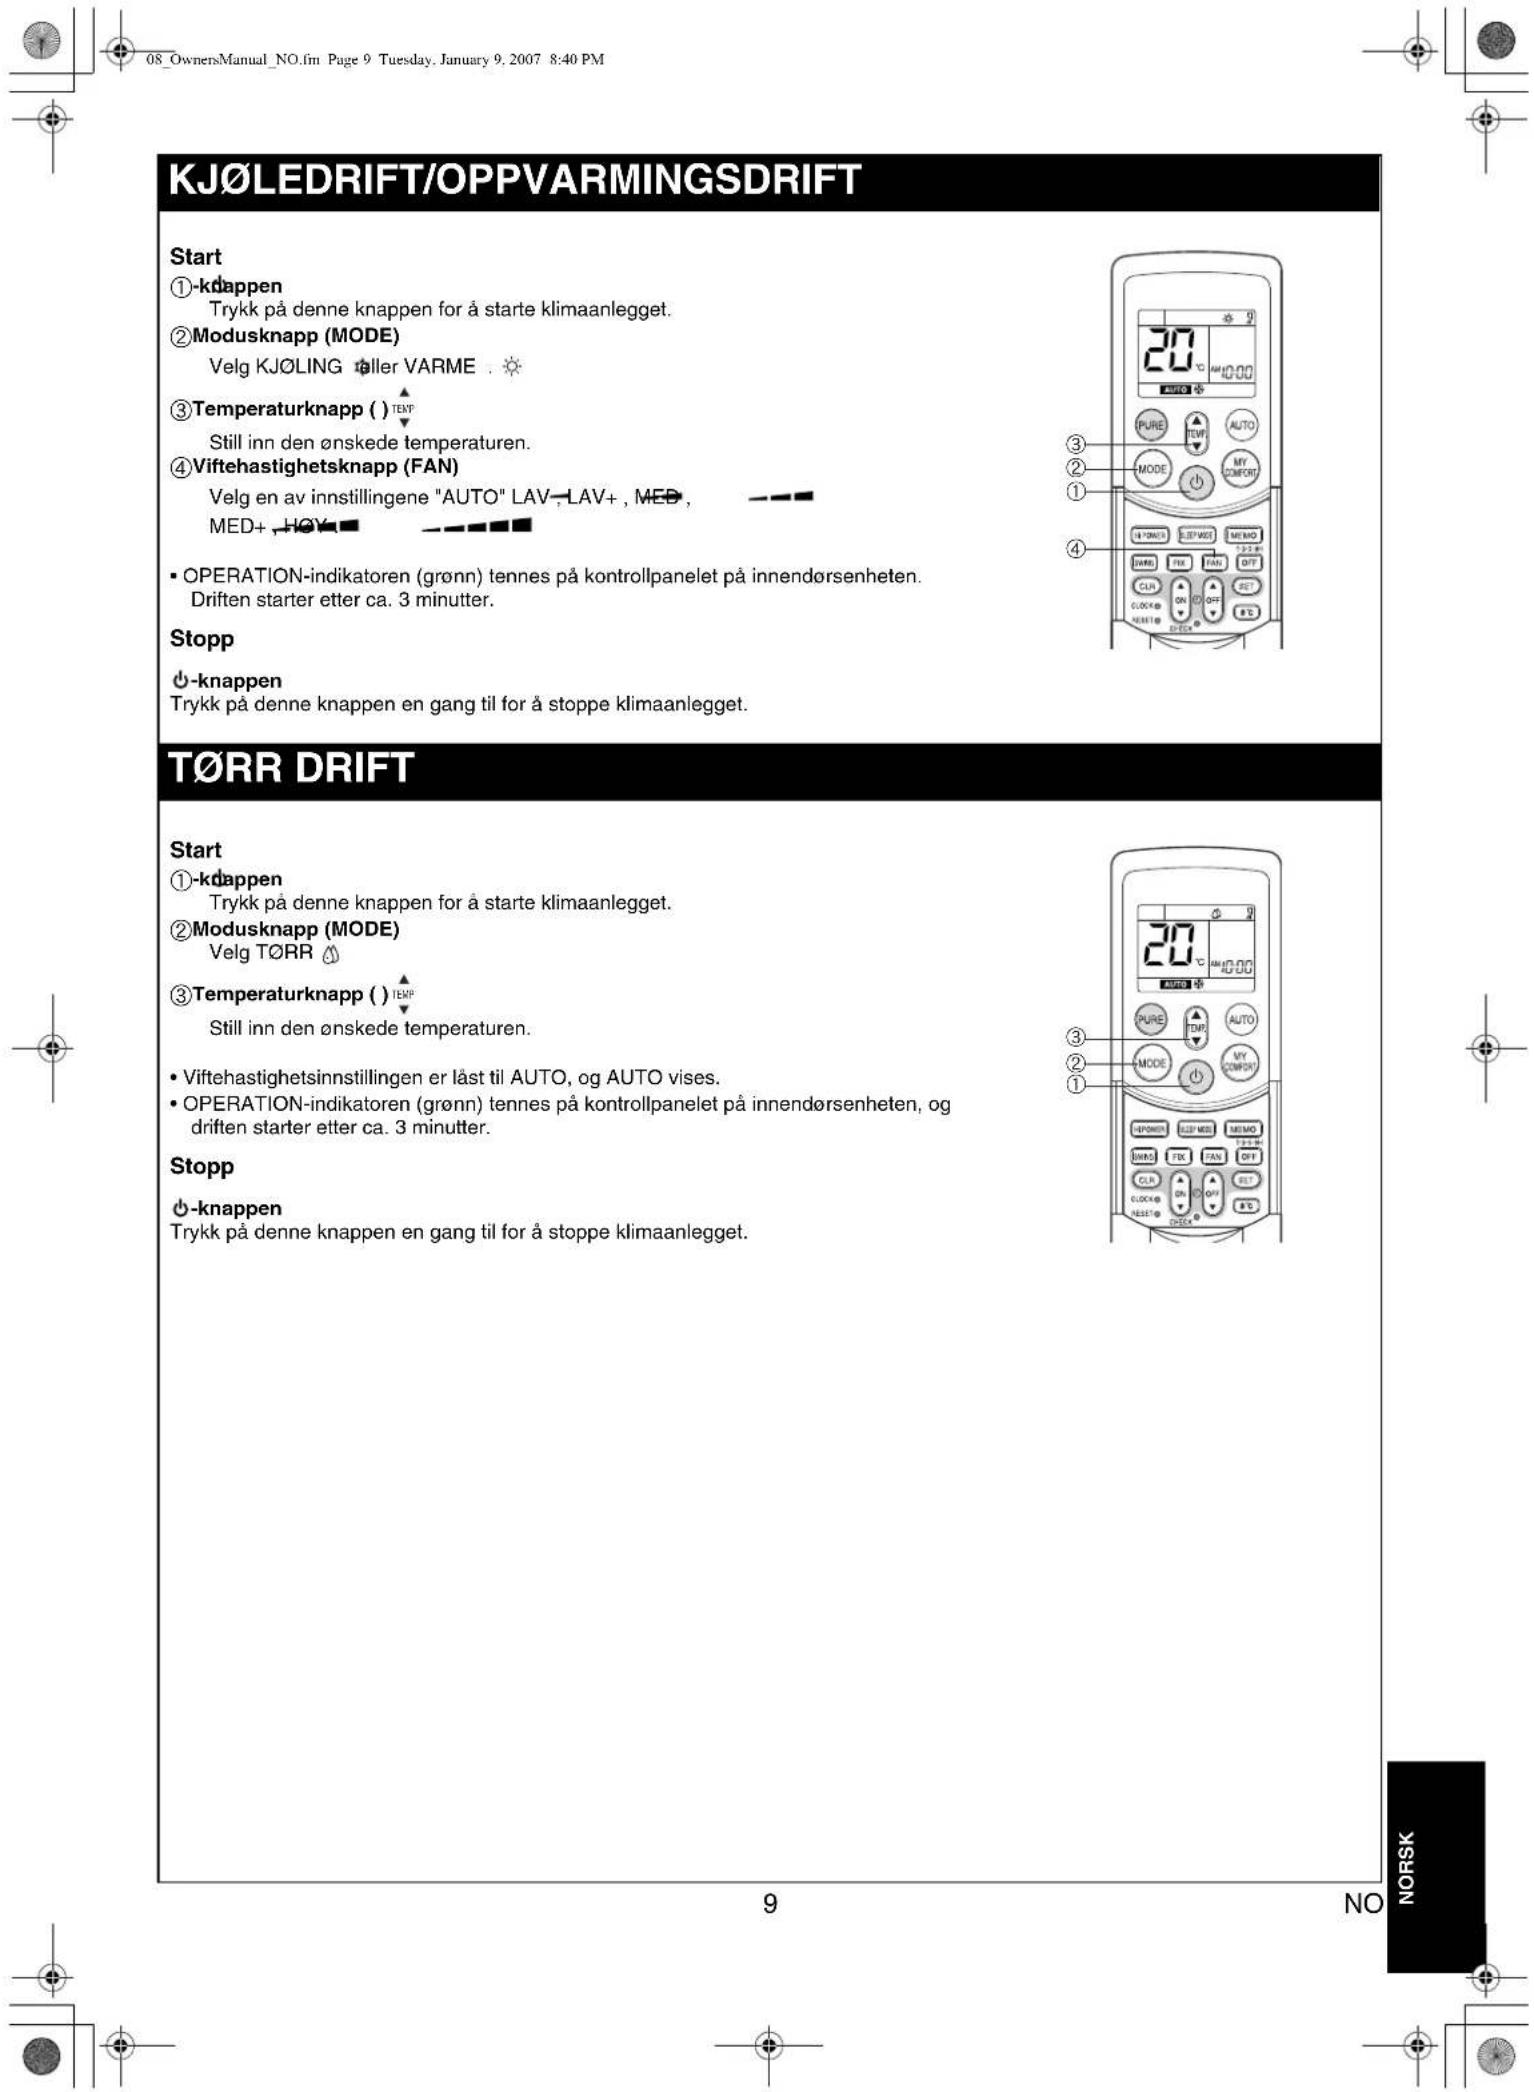
8^ C DRIFT
Trykk pa OFF-knappen (under drift).
Trykk pa SET knappen for a stille inn timeren.
Trykk pa SET knappen for a stille inn timeren.
(1) Trykk pa OFF happen for a stille inn timer AV (OFF).
(2) Trykk pa ON happen for a stille inn timer PA.
(3) Trykk pa SET knappen.
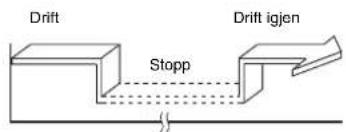
Timer PAA timer AV
(Stopp Drift Stopp)
(1) Trykk pa ON happen for a stille inn timer PA.
(2) Trykk pa OFF happen for a stille inn timer AV (OFF).
(3) Trykk pa SET knappen.
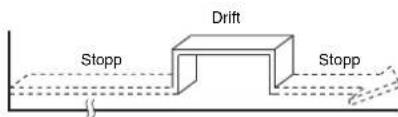
MINNE/MIN KOMFORT-DRIFT
Bruk MEMO-knappen til à lagre en ofté brukt driftsinstilling, noe som kan vare praktisk. Start klimaanlegget i den driftsmodusen du vil lagre i fjernkontrollen. Trykk pa knappen nedenfor mens klimaanlegget er i gang.
① MEMO-knapp
Trykk kort på这部分 knappen for Å forberede lagring av innstillingen. Alle ikonene som vises på det aktuelle tidspunktet, blinker, unntatt klokketidsindikatoren og modusindikatoren.
② MEMO-knapp
Hold MEMO-knappen nede i 3 sekunder aller mer, mens indikatoren blinker.
Symbolet sises, og innstillingen er lagret.
Hvis du ici trykker pa MEMO-knappen i Iopet av 3 sekunder, eller hvis du trykker pa en annen knapp, vil MINNE-innstillingen avbrytes.
- Driftsmodi som kan lagres med MEMO-knappen, er MODUS, temperatur, VIFTE, TIMER og Hi POWER.
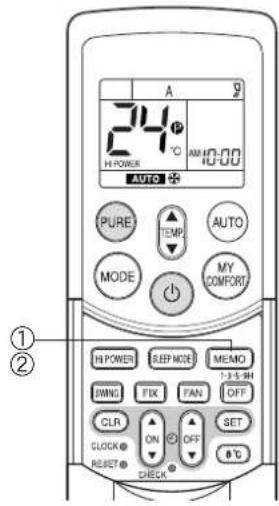
RASeries_OwnersManual_BCV.fm Page 1 Wednesday, January 10, 2007 10:40 AM