Spot - Drone Revell - Free user manual and instructions
Find the device manual for free Spot Revell in PDF.
User questions about Spot Revell
0 question about this device. Answer the ones you know or ask your own.
Ask a new question about this device
Download the instructions for your Drone in PDF format for free! Find your manual Spot - Revell and take your electronic device back in hand. On this page are published all the documents necessary for the use of your device. Spot by Revell.
USER MANUAL Spot Revell
Electrical and electronic waste
ordinance: After the end of use, remove all batteries and separately dispose of all electrically operated devices at the communal collection centres for electrical and electronic waste. Dispose of the remaining parts with household waste. Thank you for your cooperation!
Attention: Risk from heat development and rotating parts during operation! Adult supervision is required!
Revell GmbH hereby declares that this product conforms with the basic requirements and the additional applicable provisions of Directive 1999/5/EC. The Declaration of Conformity can be found at www.revell-control.de.
natural_image
Black-and-white photo of a quadcopter drone with four propellers and a central body (no visible text or symbols)Quadrocopter
Quadrocopter
Quadrocoptère
Quadrocopter
Quadrocóptero
Quadrocottero
natural_image
Two black propeller-like drones with four blades, shown against a white background (no text or symbols visible)Replacement propeller, Protective rings
natural_image
Two electronic devices with USB connectors and a small battery cover (no visible text or symbols)Ladegerät und Akku
Charging unit and battery
natural_image
Close-up of a black electronic device with dual speakers and control buttons (no readable text or symbols)Fernsteuerung
Remote control
Télécommande
Zender
Emisora
Radiocomando
natural_image
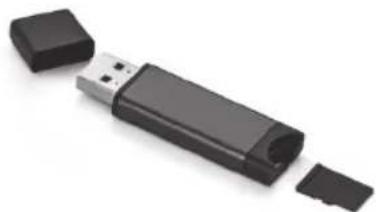
Black USB flash drive with two plastic clips, isolated on white background (no text or symbols)Micro-SD card (2GB), USB card reader
natural_image
Top-down view of a quadcopter drone with labeled parts (1F, 1G, H, 1), no readable text or symbols beyond labels.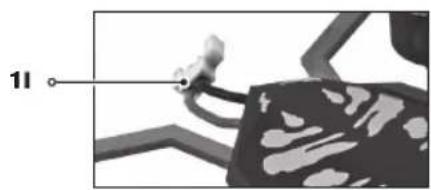
natural_image
Close-up of a mechanical component with a labeled connection point '11' (no readable text or symbols beyond the label)2
text_image
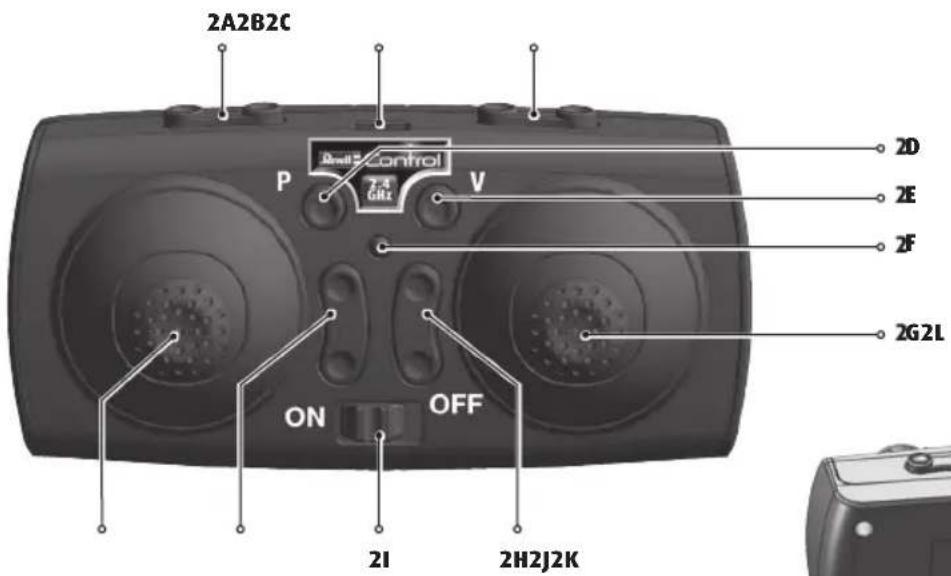
2A2B2C P 2.4 GHz V ON OFF 2I 2H2J2K 2D 2E 2F 2G2L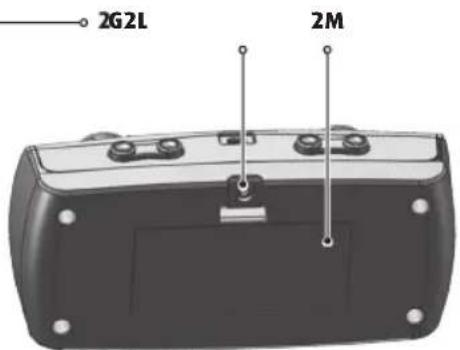
text_image
2G2L 2M3
natural_image
Close-up of a black electronic device casing with buttons and a white arrow pointing to a button (no text or symbols visible)3A3B3C
natural_image
Close-up of a black remote control device with a cylindrical battery inserted (no text or symbols visible)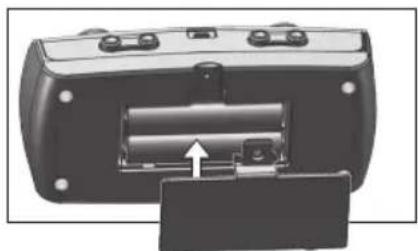
natural_image
Close-up of a black remote control device showing battery and socket (no text or symbols visible)3
4

natural_image
Illustration of three different electronic devices: a USB cable, a USB plug, and a black-and-white charging plug (no text or symbols present)5
text_image
MD2 M01 QWBS COH Frol V 5A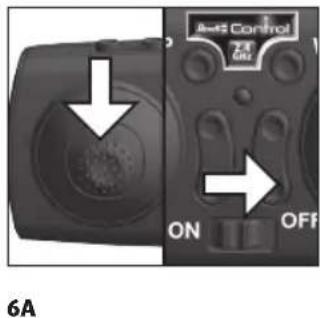
text_image
6A On OFF Anti Control6
text_image
6B 2 x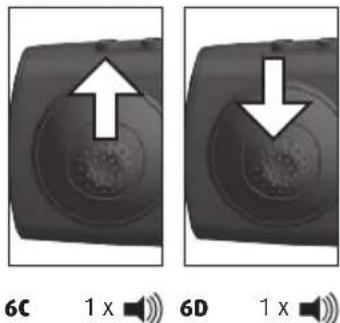
text_image
6C 1 x 6D 1 x7
text_image
7A Build Control 20 N OFF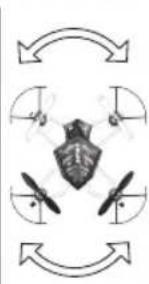
natural_image
Diagram showing a shield with four propellers inside a circular arrow pattern (no text or symbols)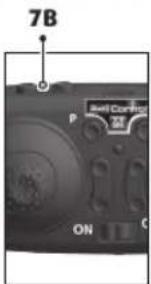
text_image
7B P ON Self Control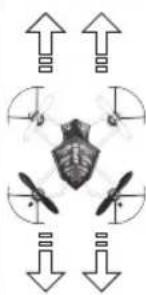
natural_image
Diagram of a drone with four propellers and directional arrows indicating flight or movement (no text or symbols)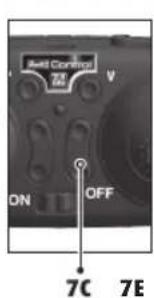
text_image
Anti Control ON OFF 7C 7E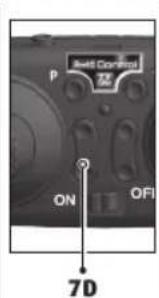
text_image
P Build Control ON OFI 7D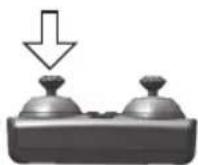
8
natural_image
Diagram of a drone with an upward arrow indicating flight direction (no text or symbols)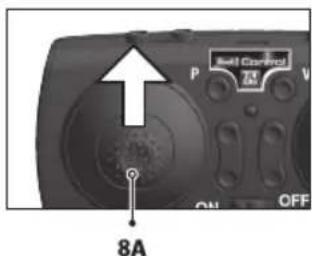
text_image
8A P M V ON OFF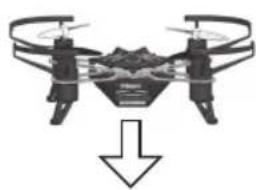
natural_image
Drone with two propellers and a downward arrow indicating motion (no text or symbols)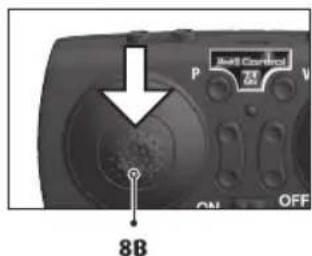
text_image
Audio Control 8B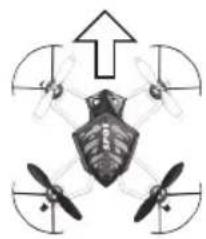
natural_image
Diagram of a drone with four propellers and an upward arrow, no text or symbols present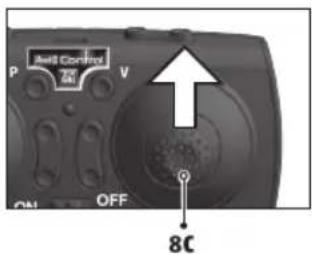
text_image
P ON OFF V Ball Control 8C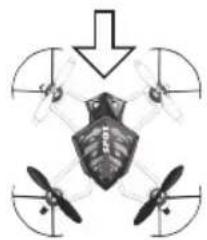
natural_image
Diagram of a drone with four propellers and a central cockpit, no text or symbols present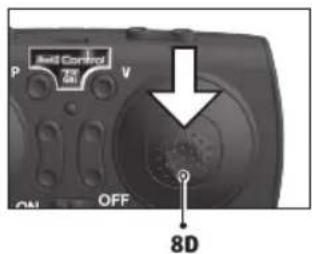
text_image
Bell Control P V ON OFF 8D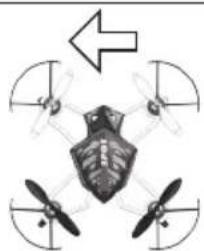
natural_image
Diagram of a drone with four propellers and an arrow indicating direction (no text or symbols)
text_image
P Well Control V ON OFF 8E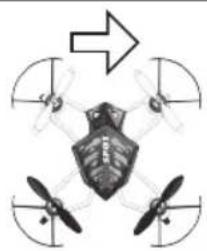
natural_image
Diagram of a drone with four propellers and an arrow indicating direction (no text or symbols)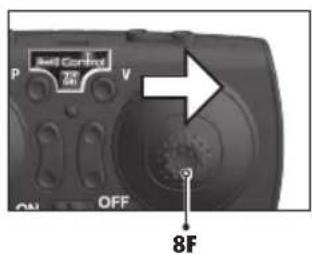
text_image
P Bell Control V ON OFF 8F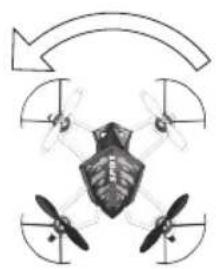
natural_image
Diagram of a drone with four propellers and a central body, enclosed in a circular arrow (no text or symbols)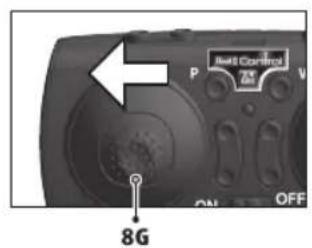
text_image
8G P R4 Control V ON OFF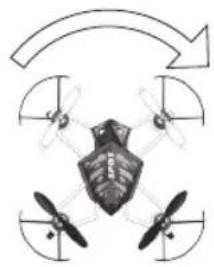
natural_image
Diagram of a four-blade helicopter with propellers and directional arrows indicating rotation (no text or symbols)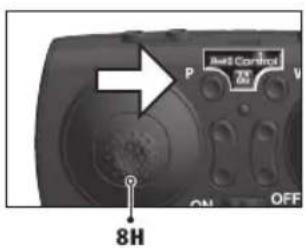
text_image
Anti Control 70% P V ON OFF 8H9
Looping
text_image
oping9A
natural_image
Diagram of a drone with bidirectional arrows indicating rotational or directional motion (no text or symbols)9B
text_image
Shell Control OFF10
natural_image
Black-and-white photo of a futuristic eVTOL aircraft with propellers and control arms, labeled '10A' at the bottom (no other text or symbols visible)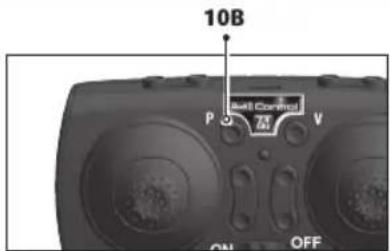
text_image
10B P 3 7V ON OFF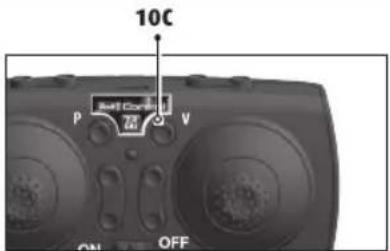
text_image
10C P 24 V ON OFF11
natural_image
Three identical drone diagrams showing mechanical components and directional arrows, no text or symbols present.12
natural_image
Close-up of a hand operating a drone with a propeller, no visible text or symbols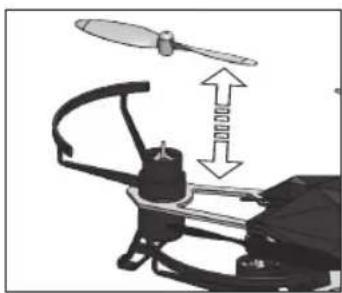
natural_image
Diagram of a helicopter with propeller and gear assembly (no text or symbols)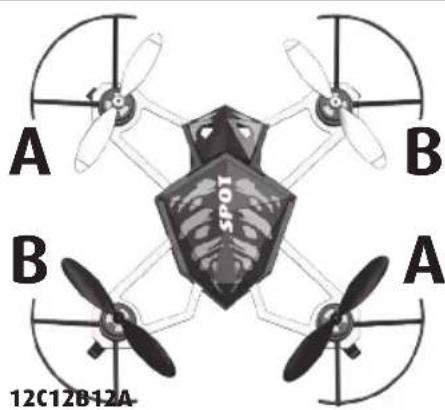
natural_image
Top-down view of a four-blade drone with propellers and a skull-shaped central body, labeled A and B (no text or symbols on the diagram itself)WICHTIGE MERKMALE
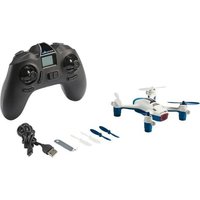
Camera Quadrocopter:
natural_image
Black-and-white photo of a quadcopter drone with visible propellers and control panel (no text or symbols)FEHLERBEHEBUNG
- Flip function (looping)
• LED lighting
Safety instructions:
• This model is suitable for pilots who are at least 14 years of age. Parental supervision is required when flying it.
- This model is suitable for use indoors and in dry outdoor areas.
- Keep your hands, face and loose clothing away from the model during operation.
- Switch off the remote control and model when they are not in use.
- Remove the batteries from the remote control and the model when they are not in use.
• Always maintain visual contact with the model in order to avoid losing control of it. Inattentive and careless use can lead to considerable damage.
- Please keep this operating manual safe for later use.
- The user should only operate this model in accordance with the instructions for use in this operating manual.
- Do not use the model near people, animals, bodies of water or power lines.
• This model is not suitable for people with physical or mental disabilities. We recommend that people who are unfamiliar with model helicopters operate the model under the guidance of an experienced user.
• In general, it must be ensured that the model cannot injure anyone in consideration of potential malfunctions and defects.
• The product may only be repaired or modified with approved original parts. Otherwise, the model can be damaged or pose a danger.
• In order to prevent risks, always operate the model from a position which provides an easy line of retreat, if necessary.
Remote control safety instructions:
- Rechargeable batteries must be removed from the remote control prior to recharging.
• Non-rechargeable batteries may not be charged.
- Rechargeable batteries may only be charged under the supervision of an adult.
• The combination of different types of batteries as well as new and used batteries must be avoided.
- Only recommended batteries or those of an equivalent type may be used.
• We recommend new alkali manganese batteries for the remote control. Single-use batteries for this remote control and other electrical devices operated in the home can be replaced with environmentally-friendly rechargeable batteries.
- Batteries must be inserted according to the correct polarity (+ and -).
- Depleted batteries must be removed from the remote control.
- The connection terminals may not be short-circuited. Please remove the batteries from the remote control if it is not to be used for an extended period of time.
• As soon as the remote control no longer functions reliably, new batteries
should be inserted and/or the batteries should be charged.
Charging unit safety instructions:
- Non-rechargeable batteries may not be charged.
- This charging unit is not suitable for people (including children) with physical or mental limitations, or those with insufficient knowledge and experience of charging units, unless under supervision or following proper directions from a parent or legal guardian.
- Children must be supervised - the charging unit is not a toy!
- The charging unit for the LiPo battery is specially designed for the charging of the model battery. The charging unit may only be used to charge the model battery, not other batteries.
The model is equipped with a rechargeable lithium polymer battery. Please observe the following safety instructions:
- Never throw LiPo batteries into a fire or store them in a hot location.
- Only use the supplied charger to charge the battery. The use of a different charger may lead to the permanent damage of the battery and neighbouring parts, as well as physical injury!
- Never use a charger for NiCd/NiMH batteries!
• Always ensure that the charging process takes place on a fireproof surface in a fire-resistant environment. - Do not leave the battery unsupervised during the charging process.
- Never disassemble or alter the battery contacts. Do not damage or puncture the battery cells. There is a risk of explosion!
- The LiPo battery must be kept out of reach of children.
- When disposing of batteries, they must be discharged or their capacity must be fully depleted. Cover exposed terminals with adhesive tape in order to prevent short-circuiting!
Maintenance and care:
- Please only use a clean, damp cloth to wipe off the model.
- Protect the model and batteries from direct sunlight and/or direct heat.
- Never allow the model, the remote control and charging unit to come into contact with water. This may result in its electronics becoming damaged.
• Transformers, power supplies or battery chargers used with the model are to be regularly examined for damage to the cord, plug, enclosure and other parts, and in the event of such damage, they must not be used until the damage has been repaired.
Required batteries for the quadrocopter:
Power supply: ===
Rated output: DC 3,7 V / 1,37 Wh
Batteries: 1 x 3,7 V rechargeable
LiPo battery (interchangeable)
Capacity: 370 mAh
Battery requirement for the remote control:
Power supply: ===
DC 3 V
Batteries: 2 x 1.5 V "AAA"
(not included)
Charger:
Input: DC 5 V
Output: DC 4,2 V = 500 mA
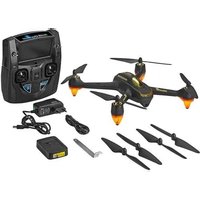
1 QUADROCOPTER
1A Rotors
1B Cap
1C Landing skid
1D Lens
1E Gears and outdrives
1F Protective rings
1G Micro-SD card slot
1H Battery compartment
11 Battery plug
2 REMOTE CONTROL
2A Yaw trim
2B Control mode switch
2C Roll trim
2D Photo button
2E Video button
2F Power LED
2G Control for nick and roll
2H Nick trim
21 ON/OFF switch
2J Thrust trim
2K Control for thrust and yaw
2L Battery compartment securing screw
2M Battery compartment
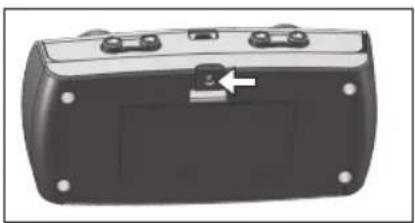
3 INSERTING BATTERIES (REMOTE CONTROL)
3A To open the battery compartment, unscrew the locking screw counter-clockwise and open the flap.
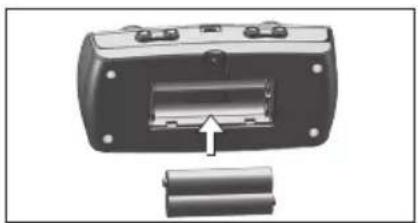
3B Insert 2 x 1.5 V AAA batteries and pay attention to the polarity, as shown in the battery compartment.
3C Replace the cover and screw in the securing screw clockwise.
4 CHARGING THE QUADROCOPTER
Attention: The battery and motor must cool down for 10 to 15 minutes before charging and after every flight. Otherwise they can be damaged. The charging process must be constantly monitored. Always ensure that the charging process takes place on a fireproof surface in a fire-resistant environment.
- Unplug the quadrocopter from the battery and switch off the remote control (4A).
- Remove the battery from the battery compartment (do not hold by the cable!) (4B).
- Plug the charger into a free USB port and connect the battery to the charger (4C). The charger flashes.
- The charging process starts automatically and must be continuously monitored. The charger flashes slowly during the charging process. (quick flashing indicates a malfunction – the charging process must be stopped immediately.) As soon as the charging process is complete, the charger lights up continuously.
- Disconnect the battery from the charger and disconnect the charger from the USB port once charging is complete.
After a charge time of approx. 70 minutes the quadrocopter can fly for approx. 5-7 minutes.
Warning notice: The battery does not normally heat up while charging. If it should become warm and/or changes to the surface begin to appear, immediately discontinue the charging process!
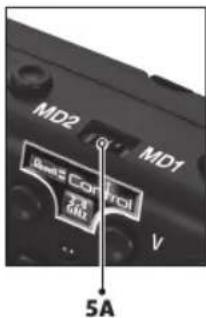
5 MODE 1 AND MODE 2 SWITCH
The remote control can be switched from Mode 1 (thrust/yaw on the right stick, nick/roll on the left stick) to Mode 2 (thrust/yaw on the left stick, nick/roll on the right stick).
To do this, push the mode switch (5A) for Mode 2 to the left (standard). Push the switch for Mode 1 to the right and turn the remote control 180°.
Important: Only switch with the remote control turned off.
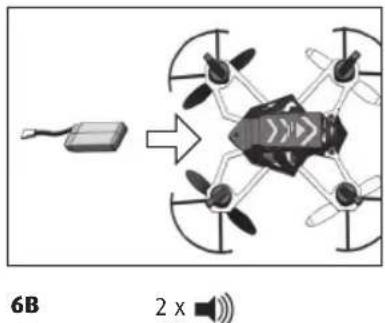
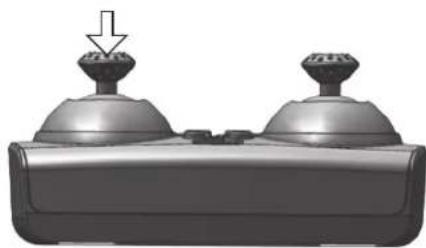
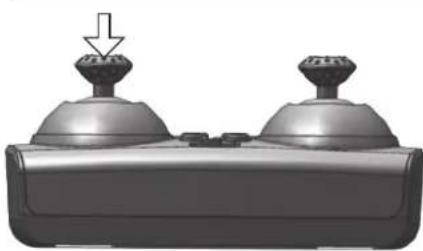
6 START PREPARATION
The thrust controller (the left controller on the remote control) must point down before being switched on (6A). Then set the ON/OFF switch of the remote control to the "ON" position: the Power LED will flash red (6B) Place the quadrocopter on the ground so that the tail points toward you - WITHOUT connecting the battery! (6C). Only connect the battery with the connection cable when the quadcopter is standing level (e.g. on a table) Do not move the quadcopter when connecting the battery - otherwise, the quadcopter will not fly! (6D). Now the LEDs on the quadrocopter start to flash. Do not move the quadrocopter while the LEDs are flashing. The quadrocopter needs around 5-10 seconds to initialize the gyro and to establish the connection to the remote control. Once the LEDs on the quadrocopter are continuously lit, the connection to the remote control has been established. Now move the thrust controller forwards once all the way and back to zero again, the remote control beeps once and the quadrocopter is ready for use.
Warning! Always place your quadrocopter on an even horizontal surface – the control electronics aligns its neutral position to the subsurface!
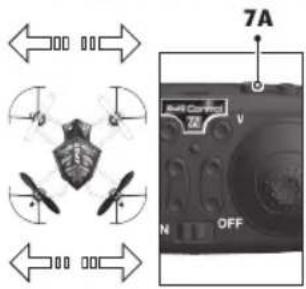
7 TRIM ADJUSTMENT OF THE CONTROL
The correct trim is a basic requirement for fault-free flying behaviour of the quadrocopter. Its adjustment is simple, but it requires some patience and a feel for it. Please observe the following instructions precisely: Carefully move the thrust control up and raise the quadrocopter approximately 0.5 to 1 metre in altitude.
7A If the quadrocopter moves by itself slowly or quickly to the left or right ... press the roll trim gradually in the opposite direction.
7B If the quadrocopter moves by itself slowly or quickly around its own axis ... press the yaw trim in the opposite direction.
7C If the quadrocopter moves by itself slowly or quickly forwards or backwards ... press the nick trim gradually in the opposite direction.
7D If the quadrocopter rises too quickly or slowly ... press the thrust trim gradually in the opposite direction.
Control adjustment: By pressing the control for thrust and yaw (2g), the sensitivity of the control can be adjusted in three steps (Minimum (standard), Medium and Maximum). The remote control beeps once for Minimum, twice for Medium and three times for Maximum.
Warning! Only switch to a higher level when you have mastered the lower
| Minimum (default) | = | 1 x beep |
| Medium | = | 2 x beeps |
| Maximum | = | 3 x beeps |
8 FLIGHT CONTROL (MODE 2)
Note: Only minimal corrections of the controls are necessary for a smooth flying behaviour of the quadrocopter! The direction information applies if the quadrocopter is viewed from behind. If the quadrocopter is flying towards the pilot, it must be moved in the opposite direction.
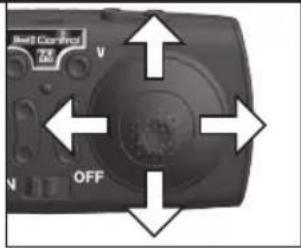
8A Take off or increase altitude by carefully moving the control for thrust and yaw forward.
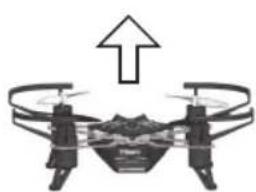
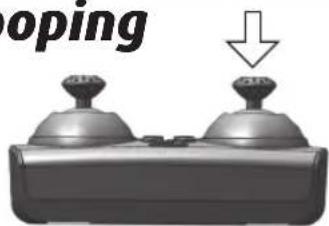
8B Land or decrease altitude by moving the control for thrust and yaw backward.
8C Fly forward by moving the controller for pitching and rolling carefully forward.
8D Fly backward by moving the controller for pitching and rolling carefully backward.
8E Fly to the left by moving the controller for pitching and rolling carefully to the left.
8F Fly to the right by moving the controller for pitching and rolling carefully to the right.
8G Turn the quadrocopter around to the left by moving the controller for thrust and yaw to the left.
8H Turn the quadrocopter around to the right by moving the controller for thrust and yaw to the right.
9 FLY LOOPS - ADVANCED USERS ONLY!
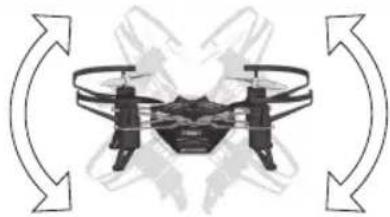
Once you have mastered your quadcopter, you can try your hand at the stunt flying function. To do so, briefly press on the right joystick on the remote control (9A).
Now the next control input forwards/backwards or sideways will turn into a loop (9B). Make sure that you have sufficient room in each direction (at least 10 meters). Also comply with the safety height - fly at a height of at least 5 m, as your quadcopter loses height when rolling over and has to be caught and corrected afterwards.
Please note: Looping is more successful when the battery is still relatively full.
10 CAMERA FUNCTION
The quadcopter has a camera for photos and videos and a slot for MicroSD cards.
Disconnect the quadcopter from the battery before inserting or removing a MicroSD card.
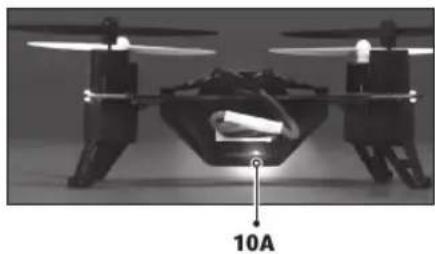
If the MicroSD card is inserted correctly, the quadcopter is connected correctly and a connection with the remote control is in place, a blue LED lights up over the card slot (10A).
Photos: Press the photo button to take a photo. The remote control sounds a short beep and the LED above the MicroSD card slot lights up red briefly (10B).
Videos: Press the video button to record a video. The remote control sounds a long beep and the LED above the MicroSD card slot flashes red. Press the video button again to end the recording (10C).
Note: No photos can be taken while a video is being recorded.
INSTRUCTIONS FOR SAFE FLYING
GENERAL FLYING TIPS:
• Always place the quadrocopter on a level surface. An inclined surface can, under certain circumstances, have a negative impact on the starting behaviour of the quadrocopter.
• Always operate the controls slowly and with a gentle touch.
• Always maintain visual contact with the quadrocopter and do not look at the remote control!
- Move the thrust control down again somewhat as soon as the quadrocopter lifts off from the ground. Maintain flying altitude by adjusting the thrust controller.
- If the quadrocopter lowers, move the thrust control slightly upward again.
- If the quadrocopter climbs, move the thrust controller down slightly.
• To fly along a curve, tapping the directional controller very slightly in the respective direction often suffices. There is a general tendency during preliminary attempts at flight to operate the quadrocopter's controls too aggressively. Always operate the controls slowly and carefully. Never fast and fitfully.
- Beginners should first master trimming before attempting to master the thrust controller. The quadrocopter does not necessarily have to fly straight at the beginning - initially, it is more important to maintain a constant height of approximately one metre above the ground by repeatedly tapping the thrust control. Only then should the pilot practice steering the quadrocopter left and right.
BATTERY STATUS:
- If the battery is empty, the LEDs on the model start to flash. Land immediately in order to avoid crashing.
ATTENTION!
Flying model aircraft and helicopters outdoors has required mandatory liability insurance since 2005. Contact your private liability insurer and make sure that your new and earlier models are included in your insurance coverage. Request written confirmation and keep this in a safe place. Alternatively, the DMFV offers a trial membership free of charge online at www.dmfv.aero, which includes insurance.
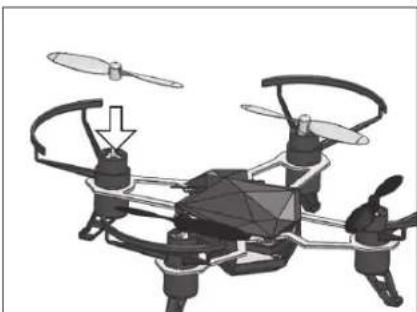
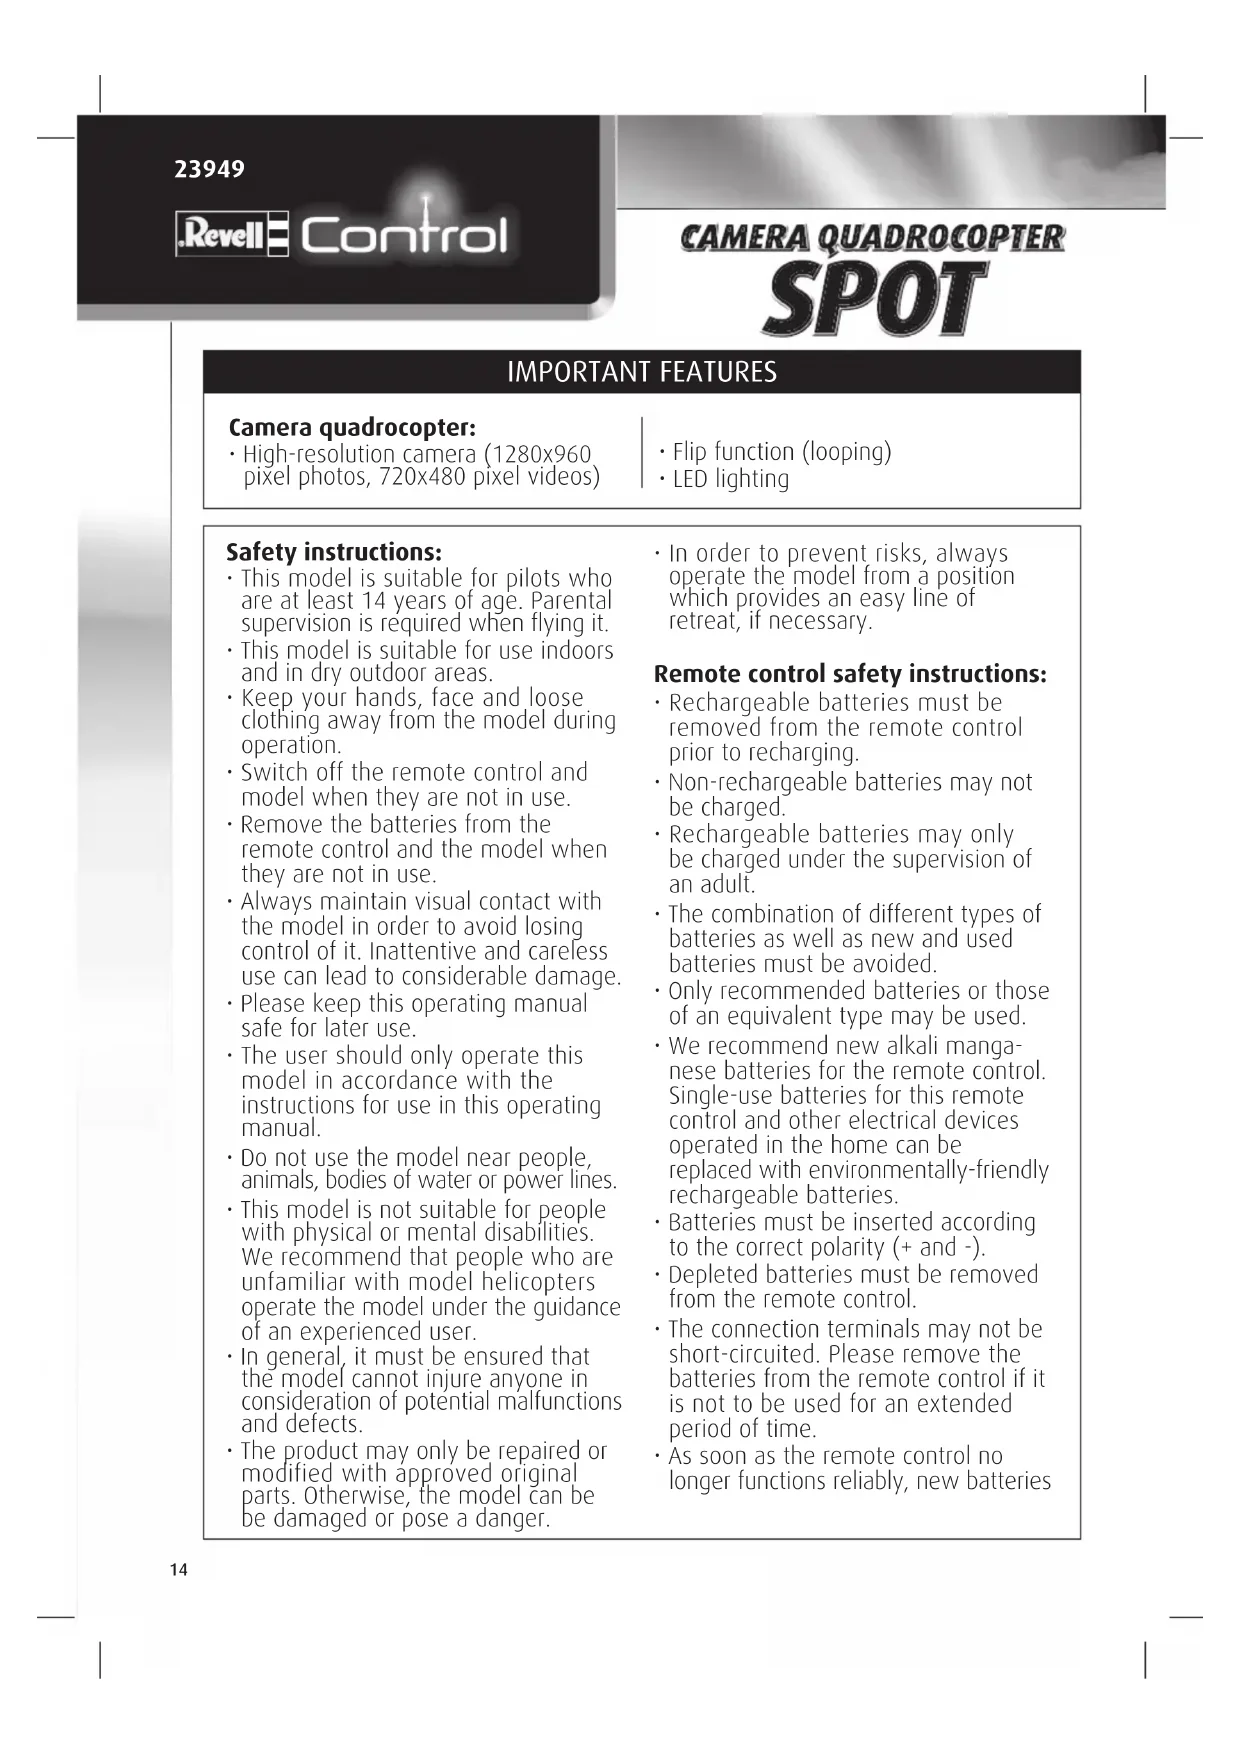
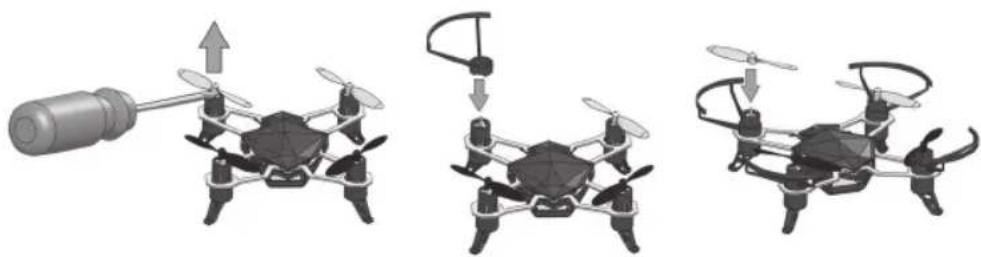
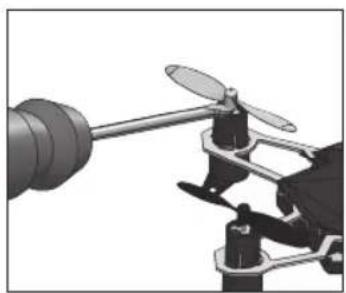
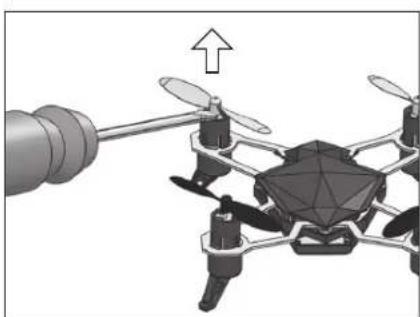
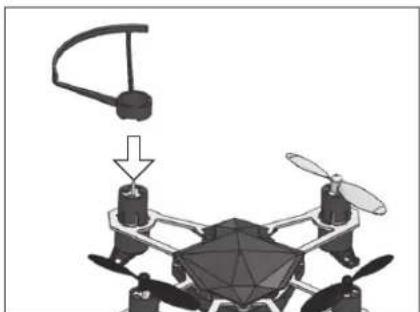
11 PROP GUARD INSTALLATION
To protect the propellers from crash damage, attach the prop guards before flight.
- Carefully pry off the prop using a screwdriver.
NOTE: Do one corner at a time so you don't accidentally mix up the props. - Push the prop guard in place.
- Push the prop onto the motor so it is tight on the shaft.
12 CHANGING THE PROPELLERS
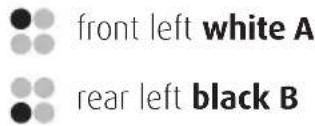
Prior to installation, make sure that you do not mix up the propellers. The quadro-copter has 4 different propellers, which differ in color and direction of rotation. If the propellers are mixed up, the multicopter will not fly.
12A Carefully lever the propeller off with a screwdriver.
12B Push the new propeller back on to the motor shaft.
12C Arrangement of the propellers:
text_image
front left white A rear left black B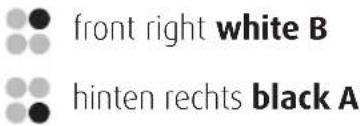
natural_image
Black-and-white photo of a camouflaged drone with four propellers and a visible 'SAR' patch, no text or symbols present.TROUBLESHOOTING
Problem: The quadcopter does not react to control commands.
Remedy: Charge or replace the battery of the quadcopter. Switch the remote control and the model off and on again (see 5. Preparing for take-off). Ensure that the battery is fully charged.
Problem: Red LED is flashing on the remote control.
Remedy: Replace the AAA batteries in the remote control.
Problem: The model will no longer fly loops.
Remedy: The battery charge level is too low.
Problem: The model will not remain level in the air.
Remedy: Battery power is too low - charge the battery! Switch the remote control and the model off and on again. Land, wait 3 seconds and start again.
Problem: The model does not take off.
Remedy: Propellers are not mounted in the correct position. Observe chapter 12 "Changing the propellers". Ensure that the battery is fully charged.
Problem: The model flounders in the air.
Remedy: Check the cabin cover, the motors and the propellers for damage.
Problem: The model overturns when starting.
Remedy: Check that the propellers are mounted correctly, see chapter 12. Re-calibrate the gyro in the model - chapter 6
Problem: The model pulls heavily in one direction or flies the opposite way.
Remedy: Re-calibrate the gyro in the model - chapter 6
Additional tips and tricks can be found online at www.revell-control.de.
SERVICE NOTES
Go to www.revell-control.de for ordering information and tips on replacing spare parts, plus other useful information on all Revell Control models.

www.revell-control.de
CARACTÉRISTIQUES PRINCIPALES
natural_image
Black-and-white photo of a quadcopter drone with visible propellers and control buttons (no text or symbols)DÉPANNAGE
INDICATIONS DE SERVICE
natural_image
Black-and-white photo of a camouflaged drone with propellers and control panels (no visible text or symbols)PROBLEEMOPLOSSING
natural_image
Black-and-white photo of a quadcopter drone with visible propellers and control panel (no text or symbols)natural_image
Black-and-white photo of a quadcopter drone with visible propellers and control panels (no text or symbols)natural_image
Abstract grayscale image with dark and light regions, no visible text or symbolsVor Inbetriebnahme aufmerksam lesen! Read this notice and the instructions before flying! Lisez ce complément et les instructions avant de voler !
D WICHTIG!
- Use the lowest sensitivity (default) setting for your first flights.
- Arm the motor by moving the throttle slowly up until you hear a beep and then down until you hear a beep. Note: The motor won't run during arming.
- Advance the throttle slowly until the Spot lifts off.
• The throttle is very reactive! Make small movements until you get used to this control.
F IMPORTANT!
natural_image
3D rendering of a quadcopter drone hovering above a flat surface (no text or symbols visible)D FLUGVORBEREITUNG: Wichtig! Der Spot muss flach und eben auf einem Tisch stehen, wenn der Akku angeschlossen wird. Bewegen Sie den Spot nicht, bis die LEDs aufhören zu blinken.
68 PREPARING TO FLY: Important! It is imperative that the Spot be flat on a table and level when the battery is plugged in. Holding it at an angle will cause the Spot to fly poorly.
F PRÉPARATION AU VOL: Important ! Il est impératif de poser le Spot à plat sur une table parfaitement horizontale lors du branchement de l'accu. Tenir le Spot incliné conduit à mauvais comportement en vol.
natural_image
3D rendered mechanical component with two dome-shaped ports and a downward arrow indicating a feature (no text or symbols)natural_image
3D rendering of a drone with propellers and a mechanical component, no visible text or symbolsnatural_image
Diagram of a drone with propellers and a helicopter above it, showing no text or symbols.natural_image
3D rendering of a quadcopter drone with propellers and control panels (no text or symbols)natural_image
3D rendering of a drone with four propellers flying above a flat surface (no text or symbols visible)NL VOORBEREIDINGEN OM TE VLIEGEN: Belangrijk! De Spot moet rechtop en horizontaal op een lafel staan wanneer de accu wordt aangesloten. Verplaats de Spot niet, tot de led's ophouden met knipperen.
E PREPARACIÓN PARA EL VUELO: ¡Importante! El Spot debe situarse en una mesa en posición completamente horizontal cuando la batería esté cargando. No mueva el Spot hasta que el piloto LED no deje de parpadear.
PREPARAZIONE AL VOLO: Importante! Lo spot deve stare su un tavolo in modo piano e orizzontale, quando la batteria è collegata. Non spostare lo spot, finché i LED non smettono di lampeggiare.
natural_image
3D rendered mechanical component with two domed parts and a downward arrow indicator (no text or symbols)Minima (preimpostata) = 1 x beep Media = 2 x beep Massima = 3 x beep
natural_image
3D rendering of a quadcopter drone with propellers and a cylindrical sensor, showing no text or symbolsNL DE ROTORBESCHERMING MONTEREN: Om de roloren le beschermen legen schade als de quadrocopter neerstort, monteert u voor het vliegen de rotorbescherming.
Schuif met een schroevendraaier de rotor voorzichtig van zijn as. Opmerking: De vier rotoren verschillen onderling. Werk steeds aan één motor tegelijk, zodat u de rotoren niet verwisselt
E MONTAJE DEL PROTECTOR DE HÉLICES: Con el fin de evitar que las hélices sufran daños en una caída, instale el proteclor antes de volar.
Saque la hélice con cuidado haciendo palanca con un destornillador. Nota: Saque las hélices una a una para evitar confundirlas.
MONTAGGIO DELLA PROTEZIONE ELICHE: Per proteggere le eliche da danni in caso di collisione, prima del volo montare la relativa protezione.
Sollevare con attenzione le eliche con un cacciavite. Suggerimento: Intervenire sempre su un motore alla volta, in modo che le quattro diverse eliche non vengano scambiate.
natural_image
Diagram of a drone with propellers and a helicopter overhead, showing no text or symbolsNL Breng de rotorbescherming van bovenaf aan op de motor.
E Sitúe el protector en el motor y encájelo.
Montare la protezione eliche sul motore dall'alto.