Curbb - Car seat QUINNY - Free user manual and instructions
Find the device manual for free Curbb QUINNY in PDF.

User questions about Curbb QUINNY
0 question about this device. Answer the ones you know or ask your own.
Ask a new question about this device
Download the instructions for your Car seat in PDF format for free! Find your manual Curbb - QUINNY and take your electronic device back in hand. On this page are published all the documents necessary for the use of your device. Curbb by QUINNY.
USER MANUAL Curbb QUINNY
Instructions for use & Warranty
| AUSTRALIATGA United6 Espa Cour,Mt Wavery 3148, VictoriaAustraliaTel. 101 3 956 281 14Fax. 101 3 956 271 62E-mail: tgabatry@tgavunlimited.com.au | CHILEMundo pncAv. Nueva Costanera 3986, Interior,VizcamaSantiago, ChileTel. 158 22 415 9103 / 415 9064Tel. 158 22 2409628Fax. +56 02 356 4749www.mundoportti.com | DUBAIDuritKid-zz Co.P.O Box 33374!Duba,United Arab EmiratesTel. 100371 50 42 99 038www.alodlket.com | HUNGARYReconsta KftBotasconyiu, 241113 BudapestTel. 101 269 26 52/209 26 38Fax. 101 206 25 34Email: reconsta@reconsta.hu | Instructions for use/Warranty 4 - 9 |
| BELGIÉ-BELGIQUEDone GenevaBrussels Int. Trade MartPostbus/R. 301Aquarelle 3661000 BrusselsBruxellesTel. 0800 1 117 40Fax. 431 492 578 122www.balimy.com | CROATIAMedia Commerce do.oCXP Soccer SandMajstorius i10000 ZagrebTel. 00385 1 2406-560Tel. 00385 1 2406-561Fax. 00385 1 2406-499 | BESTIAS GreiftoPärvi mint, 150C1317 TallinnTel. 40 55 32 06Fax. 04 56 33 11E-mail: greflo@datametee | ICELANDHiis ed.HungagahollinBhlsbolda 20, 15-110 ReyjakivTel. +50 552/552Fax.E-mail: hlsbolda.iewww.fiia.b | Mode d'emploi/Garantie 10 - 15 |
| BRASILEuro Impokato Ltda - BIBIrenckAl, Gabriel Montero da Silva, 235JardinsSan Paulo SP - BrasilCeq.01 401-000Tel. +55 11 3377 9200Email: BIBIrenck@Birends.com.brwww.BBirends.com.br | CURACOMom & Co.Premenade Shopping Center C3Tel. 00 5909 7360 755Fax. 00 5909 7360 744E-mail: giylam@coura.net | ESPARADone/Hispania S.A.BuRticke Ulec CenterCI Pare Rodei, 26 - Torre A &a Planta88208 Sabadell (Barclamps)Tel. 932 243 270Fax. 937 243 271 | INDONESIAF. Sumter Aneka Karya AbadiIL Data Coeur No: 2 B-C/EJakarta 10120Tel. +62 21 3850444Fax. 462 -21-3402617E-mail: sakainonnesu@gmail.com | Gebrauchsanweisung/Garantie 16 - 21 |
| BULGARIARedelchev & Redelchev Ltd.compl., "Gorte Dolchev"Ul. Silvesto 16Spita 1404Tel. 02 958 26 29Fax. 02 958 26 51E-mail: infoikem.hg.comwww.zn-eq.com | CYPRUSXue J. Demeiodes & San Ltd.156, Amantiasia Street3694 LemonscTel. 95 72 55 65 761Fax. 35 72 53 52 692Email: xdl@spikemel.com.cywww.demei/sides.com.cy | FINLANDLastentanovkeSuRakie 31720 Vantara - FinlandTel. 1358 8552/6526Fax. +338 9852/6426www.instentanovke.rewebmaster@lastentanovke.fi | IRANKonzouz KiaMiocamed Ave-Vallier AveEstan-shopping CenterNo. 13 Eikan - Mari CoolRAIN 19 056 TerzanTel. +98 -21-888 87 378Fax. 1 98 -21-8877 57 02Email: maricosinia@yahoo.com | Gebruiksaanwijzing/Garantie 22 - 27 |
| CANADADone Dist London Canada873 Hodge StreetSt. Laurent, QCCanadaHNW261 | DANMARKBabysami A.M.B.A.England A 27 296500 AthennasTel. 74 63 25 10Fax. 74 63 25 11E-mail: babysami@abysam.dk | FRANCEDone/France S.A.21 - 7 9 bid de Reitou - BP 90549309 - KIOLET CODEXTel. 09 33 2-41 49 22 23Fax. 00 33 2-41 56-17 13 | ISRAELShirek Ltd.2BB Restshi StreetBree Brak 51300IsraelTel. 972 5 5775 133Fax. 972 3 5775 138E-mail: finitsh@ashlaw.com | Modo de empleo/Garantia 28 - 33 |
| CESKA REPUBLICALDullin s.s.o.270 C. KinkinkTel. +420 315 621 061Fax. +420 515 628 330E-mail: infojubllm.czwww.holm.cz | DEUTSCHLANDDorel GermanyAugustinustedite 11b50/26 Frechen KongpsdorfTel. 0079 020 27341 716 63 81Fax. 0099 010 272567/62 45 43 53www.gunny.com | GREECECDrome 24N/A Asportolous Str13671 ArandesAthensTel. 13 210 2419582Fax. +4 210 2404298E-mail: infoikumid.grwww.aridg.gr | ITALIADone Italia S.P.A.Via Verdi, 142400 Telgate (Bergamo)P.I. 07 0300003161Tel. 035 44 21055Fax. 035 44 21 048E-mail: infoikimid-come | Istruzioni per l'uso/Garanzia 34 - 39 |
| DUBAIGolden TopsD.R. Box 6781, U.A.E.Tel. 09714 - 226 8448Tel. +9714 - 225 1166Fax. +9714 - 225 7336E-mail: geldoy@demrates.net.ac | HONG KONGChip Ring Trading Co.Ltd.Block A, 757, ShuiJ25-31 Kwal Fang CrescentMarvel Industrial BuildingKwai Chung N.LTel. (852) 24 22 21 01Fax. (852) 24 89 10 92 | JAPANOlde International Co. LtdKMF, 1-19-3, Tomicaya, Srituga-KuTanya, 8151-063, JapanTel. +81 357 581 051Fax. 181 357 381 052E-mail: infoikimid-gay.com | Modo de emprego/Garantia 40 - 45 |
CONGRATULATIONS
Congratulations on your purchase of the Quincy Corbb.
The main emphasis in the development of the Quirny Curbo was on safety, user-friendliness, comfort and design. This product fulils the strictest safety requirements.
Studies have shown that many hip carers are not used correctly. It is therefore important that you take the time to read these instructions through carefully.
Continuous research by our product development department, the use of test panels and consumer feedback ensure that our products are always kept up-to-date in the field of child safety.
Dcrel
TABLE OF CONTENTS
- IMPORTANT: READ FIRST
2 GENERAL INSTRUCTIONS
3 PRODUCT DESCRIPTION
4 USE OF THE QUINNY CURBB
4.1 Gelling ready
5 CARRYING THE CHILD
5.1 General
3.2 Checklist
3.3 Taking the third set
6 MAINTENANCE
6.1 Faults
6.2 Remedying faults by maintenance
7 WASTE SEPARATION
E WARRANTY
9 QUESTIONS
1 IMPORTANT: READ FIRST!
WARNING
Read these instructions through carefully and keep them for reference together with the packaging. The safety of the child may be seriously endangered if the instructions are not followed.
- WARNING
Do not make any modifications to the product. Contact your supplier or importer if you have any complaints or problems.
WARNING
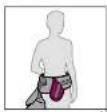
The Quinny Curb is a hip carrier intended for carrying a child on the hip and not for carrying on the stomach or back.
WARNING
Your balance may be affected by your own movements or those of your child.
- WARNING
Be careful when stepping or bending down
- WARNING
This carrier is not designed for use during sporting activities.
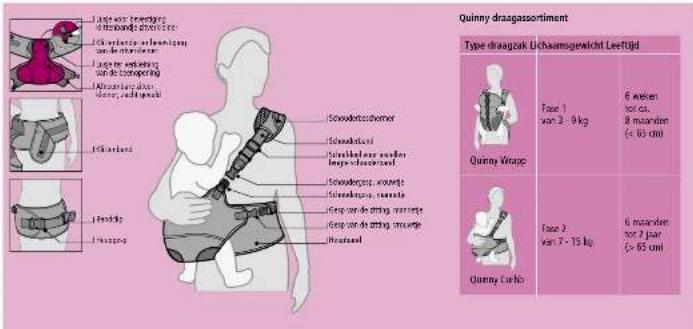
The Quirny Currb has been approved in accordance with the latest European guideline EN 13209-2:2005 for carriers and can be used for children from about 6 months to about 24 months (min.7 kg - max. 15 kg).
2 GENERAL INSTRUCTIONS
- You must use a hip carrier that has been adjusted to the size of the child.
- Never use the Quirny Curb in a car, on a bicycle, while skiing or skating, etc.
- Never let the child sit or lie in the hip carer unsupervised.
- All fasteners must be locked during use.
- Only use the Quincy Curbh as a hip carrier. The hip carrier was not designed for carrying on the back or stomach.
Before use check that the Quirny Curth is not damaged. Under no circumstances should the Quirny Curth be used if it is damaged! - Do not remove the logos and instructions from the cover as this may damage the cover.
-
On longer journeys take regular breaks to give the child and yourself some freedom of movement.
-
In order to increase carrying comfort for both parent and child. It is recommended to regularly vary sides.
- Only use original parts that have been endorsed by the manufacturer.
- When used for a prolonged period of time, the fit of the carrier may become looser, adjust if necessary.
- I'm not make any modifications to the product. Contact your supplier or importer if you have any complaints or problems.
3 PRODUCT DESCRIPTION

4 USE OF THE QUINNY CURBB
4.1 Getting ready
How to use the seat insert
- Important! Make the cancer smaller for babies from 6 months up to 1 year of age using the earset insert
-
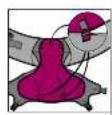
The seat part can be made smaller by the use of the seat insert. Attach the seat insert at the top by putting the Velcro listenings through the icons and fastening them. Do the same at the bottom (II. 1).
-
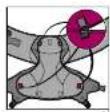
When using the seat insert, the leg opening may be decreased in size. While the child is in the carrier, push the Vetro fastenings through the loops on the sides of the seat insert and close them. Do this on both sides (il. 5).
Adjusting the Quinny Curbb
The Quinny Curb has been developed for carrying on the left or the right hip.
Warning: Only use the Galaxy Cubb as a hip cancer. Always carry the child in the manner specified!
Warning: The correct timing of the adjustment straps is vital for the safety of your child. For this see also the label on the inside of the carrier strap.
- NOTE1 When using the Quincy Cnbc the child should be able to support higher own head.
-
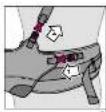
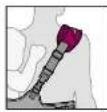
Fold the hip strap around the hips. The Velcro listening should be on the left to carry the child on the right hip (II. 3).
-
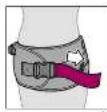
Full the hip strap high (II. 4).
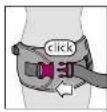
- Fosten the class and then tighten the strap again securely (II. 5).
- Hook the strap into the strap dip (II. 6).
- NOTE! Make sure that the big swap is not twisted.
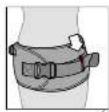
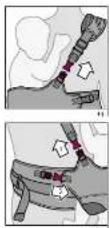
NOTE: If the hip strap is fitted properly on the hip, the seat part of the child is moved slightly forward, at the height of the hip bore
- NOTER Make sure that the hip strap has been put on properly and is tight. The hip clasp should be fastened.
-
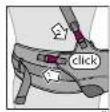
On the stomach side, open both the seat clasp (ill. 7.1) and the shoulder clasp (ill. 7.2). Do this before the child is put in the corner (ill. 7).
-
On the back faster both the seat clasp and the shoulder clasp. The seat clasp fills on the hip strap (ill. 8.1) and the shoulder clasp on the shoulder strap (ill. 8.2). Do this before the child is put in the carer (ill. 8).
NOTE! The child should always sit with the stomach towards you!
-
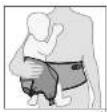
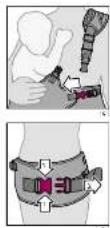
Lift the child up and place him/her on the hip on which the seat is positioned. Part 1 leg through the leg opening on the back (II, %).
-
Make sure that the child is sitting in the middle and fasten the front hip clasp on the hip strap. When using the seat insert, the leg opening may be decreased in size. While the child is in the carer, push the Velcro fastenings through the loops on the sides of the seat insert and close them. On this on both sides (ll. 10).
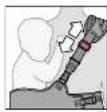
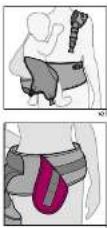
- If the carer is placed on the right hip, place the shoulder strap over the left shoulder and if the child is to be carried on the left, the strap over the right shoulder. Attach the front shoulder strap to the shoulder strap (ll. 11).
- NOTE! Make sure that the shoulder strap is not twisted.
-
Check that the shoulder strap is the right length, if necessary adjust with the sliding part on the shoulder strap (ill. 12).
-
The shoulder protector should always be in the centre of the shoulder with the hollow, soft side towards the neck. Make sure that the shoulder strap is at the top (il. 13).
5.2 Checklist
After fitting for safety purposes and for the optimum safety of the child check once more that:
the hip strap has been tightened properly, is not twisted and the hip clasp is fastened.
- the child is sitting properly in the middle of the seat.
- all clasps are listened securely.
- the shoulder strap is not twisted and has been adjusted to the correct length. - the shoulder protector is positioned properly in the centre of the shoulder.
Warning
- If the counter strap and the child are positioned correctly, the weight should be distributed properly. If the shoulder weight is too great, it may be the case that either the hip strap is not tight enough or that the shoulder strap has been adjusted too tightly. The hip strap should also not be positioned too high up the waist. If you are unable to fasten the clips properly, under no circumstances should the Quincy Turbo be used. - Always use the shoulder protector, this is important for the weight distribution. Never let your child play with the fasteners.
5.3 Taking the child out
- NOTE: Hold the child family
- Lussen the shoulder strap at the front by unlocking the shoulder clasp (II. 14).
- Support the child and open the hip deep (II. 15)
- The third run of the Quirsey Church [m. 16];
- With a heavier child the nearmost clamps of the seal can also be loosened. The child then has to be fitted on higher than the hip (51–72).
- To take off the bin strip open the bin clean, Pull on the limit flap to open the
- To date on the lap and upon the lap, except in the 12 half lap to April the Velcro fastening (il. 18).
- Remove the carrier strap from the hips (ill. 19).
[Non-Text]
6 MAINTENANCE
Warning:
NOTE! Never advocate the Quinny Carb fasteners!
Wash the cover and shoulder protectors by hand (maximum 30°C). Do not use a drier. See also the washing instructions on the label on the inside of the Quinny Curbo. Faster all claps when washing.
The proper listening of the clasp is vital for the safety of the child. If the clasp will not close, this is generally due to contamination (must, dirt, etc.). A number of possible faults together with the appropriate solution are given in the list below.
6.1 Faults
- The casp will only open with a great deal of force.
- The casp does not click shut easily (a lot of resistance).
- The male part of the clasp does not stay shot in the female part.
There is no clear "click" audible when fastening the clasp.
6.2 Remedying faults by maintenance
- Rinse the clasp (unlocked) well with luke-warm water and allow to dry property.
- NOTE! Do not use any lubricants and/or silicone?
If you are unable to fasten the clasp properly or if you are not sure that the problem has been solved, contact the supplier or importer immediately (see user instructions). Do not use the Quincy Curb in any circumstances in this case!
7 WASTE SEPARATION
For environmental purposes, please separate the waste at the start (packaging) and at the end (product parts) of the file of the Quirny Carbb.
Warning:
Keep plastic packaging away from children to avoid danger of suffocation.
Packaging
Cardboard box Paper waste
Textile bag Residual waste
Product parts
Textile cover Residual waste
Scraps Residual waste
Claps Residual waste
8 WARRANTY
Dore Netherlands guarantees that this product complies with all safety requirements as described in the European standard. Thus, this product is free from defects in part and manufacture at the time of purchase, if, after purchase and during the warranty period, this product shows any material manufacturing defects farther normal use as described in this instruction manuscript. Dore Netherlands will assume the responsibility to repair or replace the product. The guarantee period is 24 consecutive months on material and manufacturing faults and 12 consecutive months on parts susceptible to wear. This does not include, of course, the normal wear that may be expected with the daily use of a product.
The guarantee is not valid in the following cases:
-
The product is not supplied via the retailer and/or the importer.
The product is not supplied to the manufacturer with the original purchase receipt (via the retailer and/or importer). -
The faults are caused by incorrect, careless use or maintenance, elevating from that stated in the user instructions.
- Repairs were carried out by third parties.
- The defect is due to negligence or impact damage to textile.
The fault has been caused by an accident. - The parts show normal wear that may be expected from daily use.
The above guarantee conditions are otherwise not fulfilled.
Date of effect:
- The warranty becomes effective on the date of purchase of the product.
Warranty period:
- The guarantee period applies for a period of 24 consecutive months. For parts susceptible to wear a period of 12 consecutive months applies. The guarantee only applies for the first owner and is not transferable.
What to do if you have a complaint:
- In the case of faults, contact your seller. If the fault cannot be rectified, the seller will send the product, together with a description of the complaint and the original dated motion, back to the manufacturer. Exchange or taking back of the product cannot be requested. Repairs do not give entitlement to extension of the warranty. Products that are returned directly to the manufacturer are NOT eligible for guarantees.
This Guarantee condition is in accordance with the European Guideline 1999/44/EG dated 25 May 1999.
9 QUESTIONS
If you have any questions, please ring your supplier or importer (see user instructions).
FÉLICITATIONS
3 PRODUCTBESCHRIJVING
- Let up! Hand let kind good vast.