
KR 2 - Food Processor TEAM - Free user manual and instructions
Find the device manual for free KR 2 TEAM in PDF.
| Product Type | Multifunction food processor |
| Brand | Team |
| Model | KR 2 |
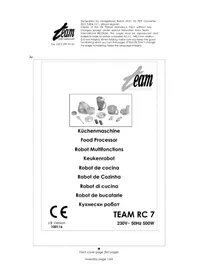
| Power | 230 V ~ 300 W |
| Speeds | 2 speeds (low/high) + Pulse and Auto Clean function |
| Bowl capacity | Approximately 1 L (maxi bowl) |
| Main functions | Grate, slice, chop, press (citrus), juicer, blend |
| Included accessories | Maxi bowl, lid with chute, pusher, reversible grating/slicing disc, chopping knife, blender, citrus press set (cone, filter, shaft), juicer set (collar, filter band, extractor), spatula |
| Safety | Lid locking with safety housing; cannot start if bowl or lid not properly assembled |
| Maintenance and cleaning | Motor unit: damp cloth; bowl and accessories: hand wash or dishwasher (except motor unit) |
| Usage intervals | Max continuous duration indicated on the plate; minimum 10-minute pause between cycles |
| Bowl material | Plastic (dishwasher safe) |
| Dimensions (approx.) | Approximately 25 x 20 x 30 cm (estimate) |
| Weight (approx.) | Approximately 2 kg |
Frequently Asked Questions - KR 2 TEAM
User questions about KR 2 TEAM
0 question about this device. Answer the ones you know or ask your own.
Ask a new question about this device
Download the instructions for your Food Processor in PDF format for free! Find your manual KR 2 - TEAM and take your electronic device back in hand. On this page are published all the documents necessary for the use of your device. KR 2 by TEAM.
USER MANUAL KR 2 TEAM
Generated by Unregistered Batch DOC TO PDF Converter 2011.3.804.1511, please register!
Copies of the I/B. Please reproduce them without any changes except under special instruction from Team International BELGIUM. The page must reproduced and folded in order to obtain a mini booklet B5 (+ / - 150mm width x 210~mm height). The page must be folded in order to keep the good numbering when you turn the page of the I/B. Don't change the page numbering. Keep the languages integrity.


Kuchenmaschine
Food Processor
Generated by Unregistered Batch DOC TO PDF Converter 2011.3.804.1511, please register!
Copies of the I/B. Please reproduce them without any changes except under special instruction from Team International BELGIUM. The page must reproduced and folded in order to obtain a mini booklet B5 (+/- 150 mm width x 210 mm height). The page must be folded in order to keep the good numbering when you turn the page of the I/B. Don't change the page numbering. Keep the languages integrity.


Fax +32 23599550
Generated by Unregistered Batch DOC TO PDF Converter 2011.3.804.1511, please register!
Copies of the I/B. Please reproduce them without any changes except under special instruction from Team International BELGIUM. The page must reproduced and folded in order to obtain a mini booklet B5 (+ / - 150mm width x 210~mm height). The page must be folded in order to keep the good numbering when you turn the page of the I/B. Don't change the page numbering. Keep the languages integrity.

BEDIENUNG/HOWTOUSE/UTILISATION/GEBRUK/USO


Fax +32 23599550
Generated by Unregistered Batch DOC TO PDF Converter 2011.3.804.1511, please register!
Copies of the I/B. Please reproduce them without any changes except under special instruction from Team International BELGIUM. The page must reproduced and folded in order to obtain a mini booklet B5 (+ / - 150mm width x 210~mm height). The page must be folded in order to keep the good numbering when you turn the page of the I/B. Don't change the page numbering. Keep the languages integrity.
D
A.Motoreinheit
- Bowl lid locking slot
- Bowl shaft
- Motor unit
- On/Off & speed control switch
- Auto clean button
- Pulse button
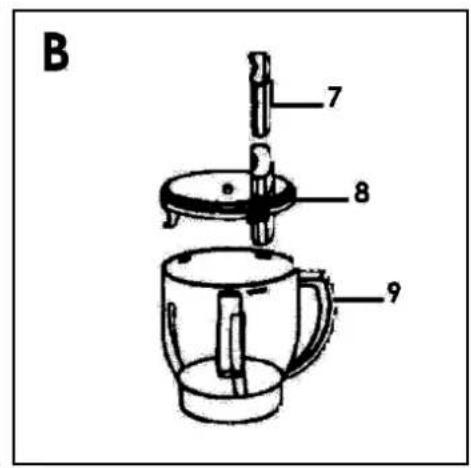
- Pusher
- Bowl lid with funnel
- Bowl
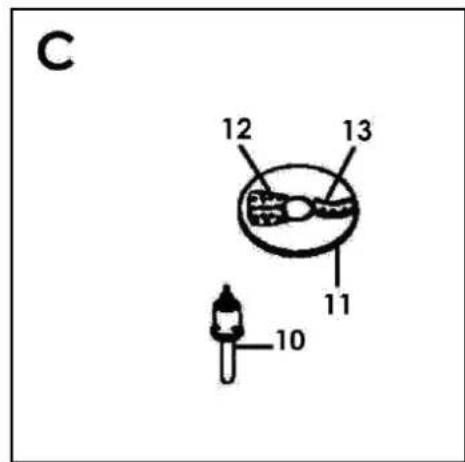
- Spindle
- Reversible grating/slicing disk
- Grating blade
- Slicing blade
D. Citrus press set - Cone
- Strainer
- Citrus Press Shaft
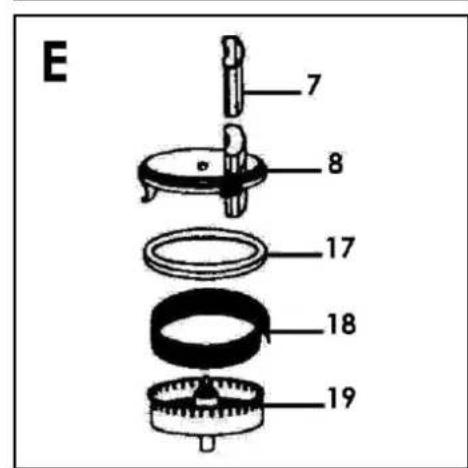
E. Juice Extractor set - Collar
- Filter Band
- Extractor
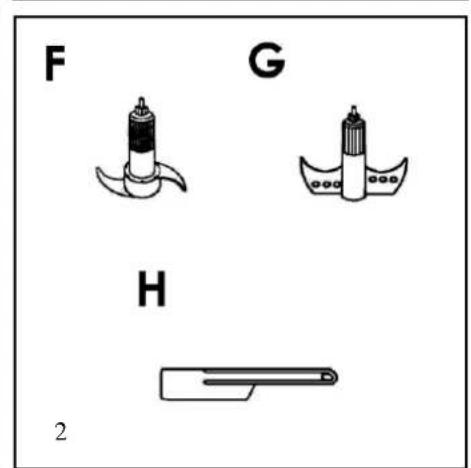
F. Metal Chopping Blade
G. Whisk Stick
H. Spatula

Fax +32 23599550
Generated by Unregistered Batch DOC TO PDF Converter 2011.3.804.1511, please register!
Copies of the I/B. Please reproduce them without any changes except under special instruction from Team International BELGIUM. The page must reproduced and folded in order to obtain a mini booklet B5 (+ / - 150mm width x 210~mm height). The page must be folded in order to keep the good numbering when you turn the page of the I/B. Don't change the page numbering. Keep the languages integrity.
F
A. Bloc moteur
Generated by Unregistered Batch DOC TO PDF Converter 2011.3.804.1511, please register!
Copies of the I/B. Please reproduce them without any changes except under special instruction from Team International BELGIUM. The page must reproduced and folded in order to obtain a mini booklet B5 (+/- 150 mm width x 210 mm height). The page must be folded in order to keep the good numbering when you turn the page of the I/B. Don't change the page numbering. Keep the languages integrity.
Generated by Unregistered Batch DOC TO PDF Converter 2011.3.804.1511, please register!
Copies of the I/B. Please reproduce them without any changes except under special instruction from Team International BELGIUM. The page must reproduced and folded in order to obtain a mini booklet B5 (+ / - 150mm width x 210~mm height). The page must be folded in order to keep the good numbering when you turn the page of the I/B. Don't change the page numbering. Keep the languages integrity.

GEBRAUCHSANLEITUNG
Generated by Unregistered Batch DOC TO PDF Converter 2011.3.804.1511, please register!
Copies of the I/B. Please reproduce them without any changes except under special instruction from Team International BELGIUM. The page must reproduced and folded in order to obtain a mini booklet B5 (+ / - 150mm width x 210~mm height). The page must be folded in order to keep the good numbering when you turn the page of the I/B. Don't change the page numbering. Keep the languages integrity.
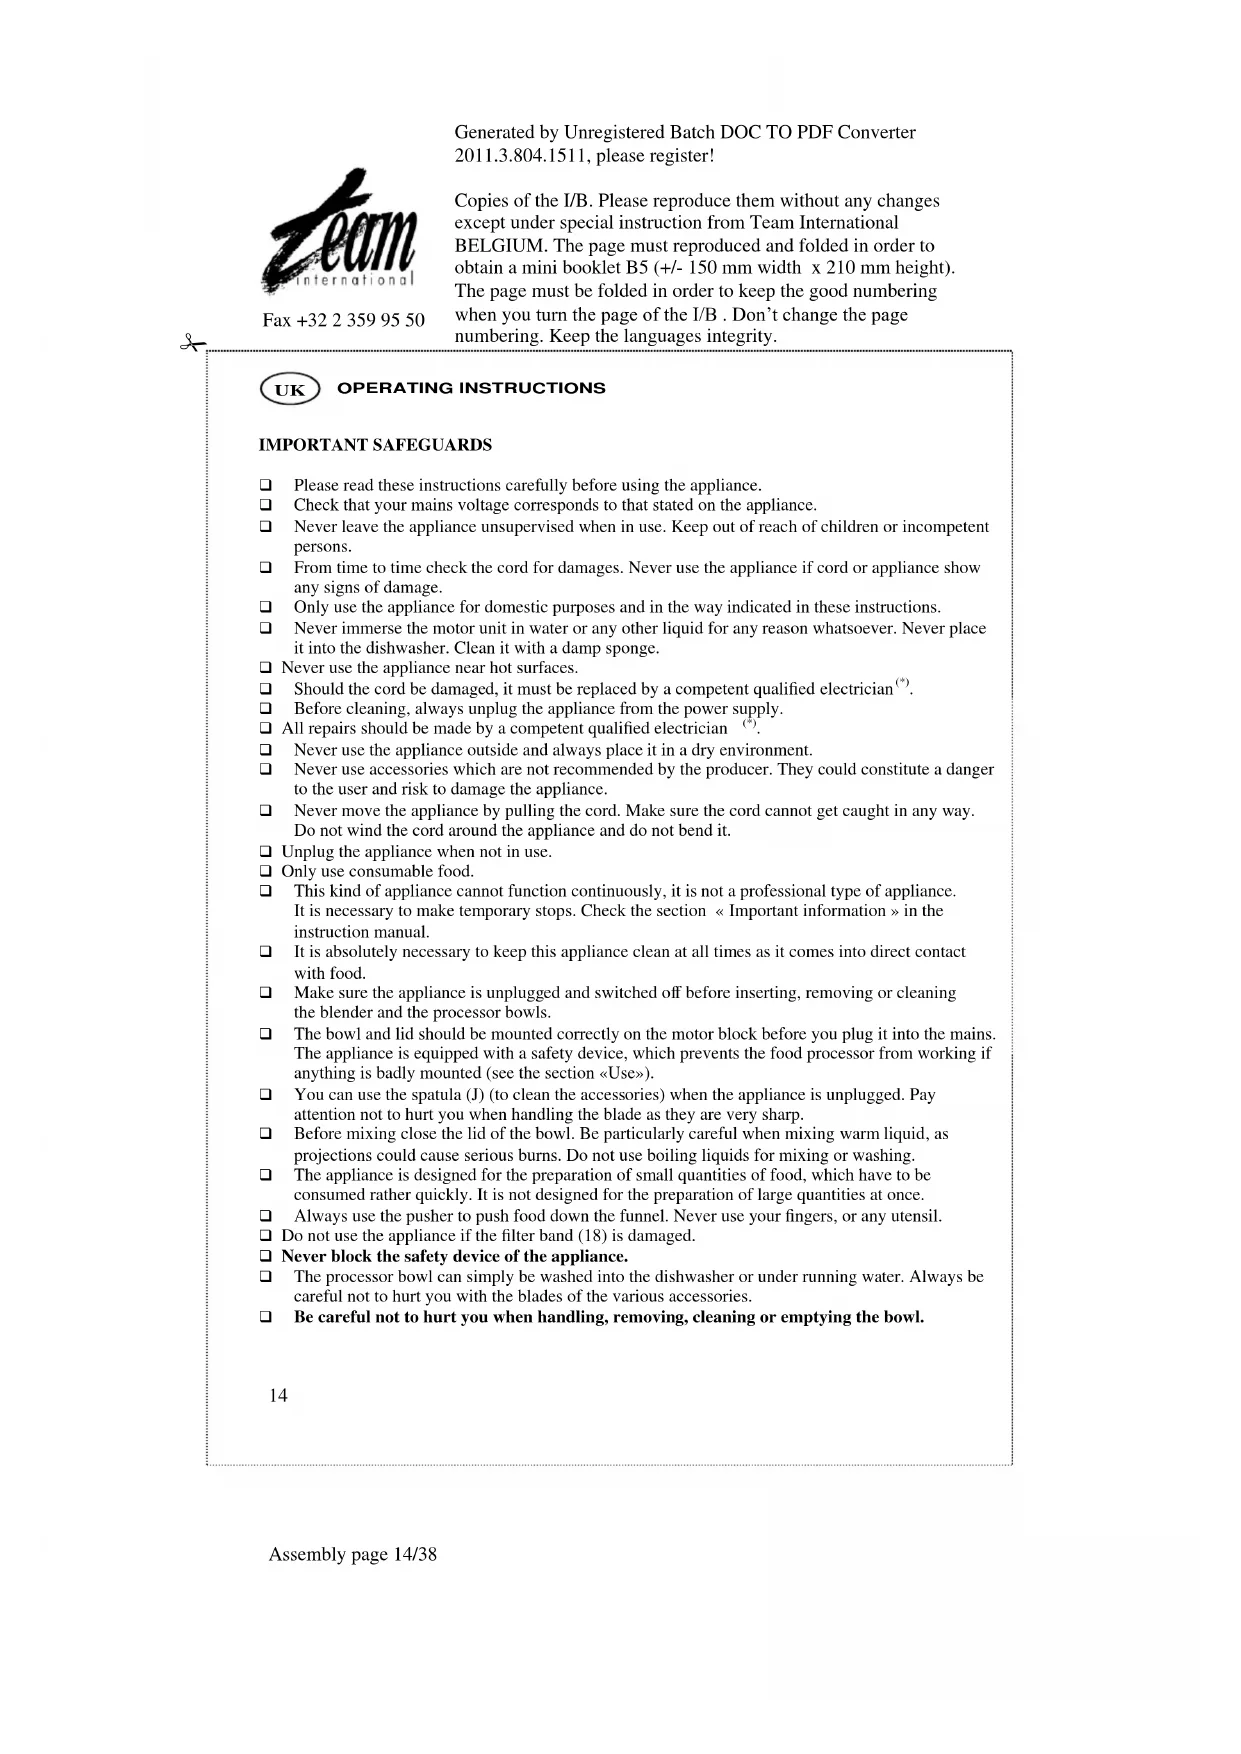
Please read these instructions carefully before using the appliance.
Check that your mains voltage corresponds to that stated on the appliance.
Never leave the appliance unsupervised when in use. Keep out of reach of children or incompetent persons.
From time to time check the cord for damages. Never use the appliance if cord or appliance show any signs of damage.
Only use the appliance for domestic purposes and in the way indicated in these instructions.
Never immerse the motor unit in water or any other liquid for any reason whatsoever. Never place it into the dishwasher. Clean it with a damp sponge.
Never use the appliance near hot surfaces.
Should the cord be damaged, it must be replaced by a competent qualified electrician (^*)
Before cleaning, always unplug the appliance from the power supply.
All repairs should be made by a competent qualified electrician
Never use the appliance outside and always place it in a dry environment.
- Never use accessories which are not recommended by the producer. They could constitute a danger to the user and risk to damage the appliance.
Never move the appliance by pulling the cord. Make sure the cord cannot get caught in any way. Do not wind the cord around the appliance and do not bend it.
Unplug the appliance when not in use.
Only use consumable food.
This kind of appliance cannot function continuously, it is not a professional type of appliance. It is necessary to make temporary stops. Check the section « Important information » in the instruction manual.
It is absolutely necessary to keep this appliance clean at all times as it comes into direct contact with food.
Make sure the appliance is unplugged and switched off before inserting, removing or cleaning the blender and the processor bowls.
The bowl and lid should be mounted correctly on the motor block before you plug it into the mains. The appliance is equipped with a safety device, which prevents the food processor from working if anything is badly mounted (see the section «Use»).
You can use the spatula (J) (to clean the accessories) when the appliance is unplugged. Pay attention not to hurt you when handling the blade as they are very sharp.
Before mixing close the lid of the bowl. Be particularly careful when mixing warm liquid, as projections could cause serious burns. Do not use boiling liquids for mixing or washing.
The appliance is designed for the preparation of small quantities of food, which have to be consumed rather quickly. It is not designed for the preparation of large quantities at once.
Always use the pusher to push food down the funnel. Never use your fingers, or any utensil.
Do not use the appliance if the filter band (18) is damaged.
Never block the safety device of the appliance.
The processor bowl can simply be washed into the dishwasher or under running water. Always be careful not to hurt you with the blades of the various accessories.
Be careful not to hurt you when handling, removing, cleaning or emptying the bowl.

Fax +32 23599550
Generated by Unregistered Batch DOC TO PDF Converter 2011.3.804.1511, please register!
Copies of the I/B. Please reproduce them without any changes except under special instruction from Team International BELGIUM. The page must reproduced and folded in order to obtain a mini booklet B5 (+ / - 150mm width x 210~mm height). The page must be folded in order to keep the good numbering when you turn the page of the I/B. Don't change the page numbering. Keep the languages integrity.
(^*) Competent qualified electrician : after sales department of the producer or importer or any person who is qualified, approved and competent to perform this kind of repairs in order to avoid all danger. In any case you should return the appliance to this electrician.
UK STYLE PLUG WIRING INSTRUCTIONS (IN THE UK ONLY)
This product must only be used from a 13 amp power socket. If a BS1363 approved 13 amp plug is used, it should be fitted with a 13 amp fuse. The wires on the power cord are colour coded: blue = neutral, brown = live, green or green & yellow = earth.
The blue wire must be connected to the terminal marked N or coloured in black.
The brown wire must be connected to the terminal marked L or coloured in red.
The green (& yellow) wire must be connected to the terminal marked E or coloured in green (& yellow).
IMPORTANT INFORMATION
This appliance is not for professional use. You should follow the requested breaks. Failure to follow this instruction carefully may result in damage to the motor. Please refer to the rating label for the maximum continuous usage time (KB xx min where xx is the maximum usage time). The breaks should last at least 10 minutes.
USE AND FUNCTIONS
Use
- Place the processor bowl (9) onto the bowl shaft (2).
- Make sure the three tips around the bowl shaft are inserted into the three slots on the bottom of the processor bowl.
The bowl lid with funnel (8) must be locked into the bowl lid locking slot (1). - Connect the appliance.
- Turn the ON/OFF & speed control switch (4) either to "I" (slow speed) or to "II" (fast speed), depending on the preparation you make.
- You can also use the pulse button (6) but only if you turn the ON/OFF speed control switch to "0". Press this button to use the appliance punctually. A light press will make the motor work slowly, while a heavy press will make it work faster.
- You can also use the auto clean button (5) but only if you turn the ON/OFF speed control switch to "0". With this function, the motor will only work slowly. This button is used to clean the blender bowl (see the section «Cleaning»).
Depending on the type of usage, different accessories should be used, according to the below instructions.
Grating / Slicing
- Unplug the appliance.
- Place the processor bowl onto the bowl shaft. Make sure the three tips around the bowl shaft are inserted into the three slots on the bottom of the processor bowl.
- For grating, insert the spindle (10) into the center of the reversible grating/slicing disk (10), with the grating blade (12) side facing the lid with funnel. For that the three tips around the spindle have to penetrate the three slots around the center of the disk. Then rotate the disk anti-clockwise by gripping the spindle as shown in the figure and go as far as it can in order to lock it into the disk.
For slicing, the slicing blade (13) side must be facing the lid with funnel (8). - Once mounted, place the disk on the bowl shaft and add the lid with funnel as described in the section «Use».

Fax +32 23599550
Generated by Unregistered Batch DOC TO PDF Converter 2011.3.804.1511, please register!
Copies of the I/B. Please reproduce them without any changes except under special instruction from Team International BELGIUM. The page must reproduced and folded in order to obtain a mini booklet B5 (+ / - 150mm width x 210~mm height). The page must be folded in order to keep the good numbering when you turn the page of the I/B. Don't change the page numbering. Keep the languages integrity.
Cut the potatoes, carrots, cucumbers etc... into pieces and place the ingredients into the funnel of the bowl lid.
Use the pusher (7) to push food down the funnel. Never use your fingers or any other utensil.
- Connect the appliance and turn the ON/OFF & speed control switch to "I" (slow speed) to start.
Depending on the type of food, you can prepare up to 1kg within one and a half minute. The operation can be carried out 5 times, with rest periods between each use.
Always turn the ON/OFF & speed control switch to "0" and unplug the appliance before emptying the bowl as blades are very sharp.
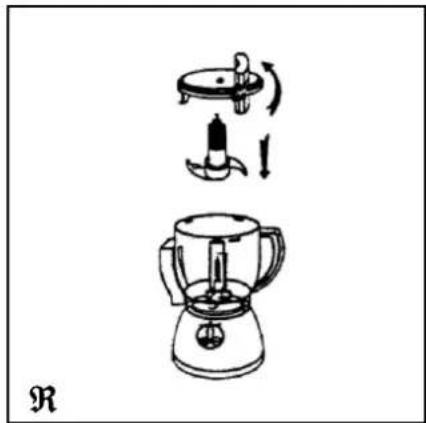
Chopping / Blending / Kneading
- Unplug the appliance.
- With the processor bowl already into position, place the metal chopping blade (F) on the bowl shaft as shown in figure . Then, put the ingredients in the bowl. To obtain a better result, cut ingredients such as meat or vegetables first.
- Place the bowl lid on the top of the processor bowl as described in the section «Use». Make sure the shaft of the blade goes into the hole which is in the center of the lid.
Depending on the type of food, you can chop up to 1kg of foodstuff, including vegetables, raw or cooked meat, and raw or cooked fish. - For chopping, turn the ON/OFF & speed control switch to "II" (fast speed).
CAUTION: Do not try to chop products that are very hard (ice, sugar, coffee beans...).
Citus Press Set
- Unplug the appliance.
- With the processor bowl already into position, place the citrus press shaft (16) on the bowl shaft as shown in figure .
- Place the strainer (15) on the processor bowl, then turn the handle until the lid locks into the bowl lid locking slot. After this operation, one should not be able to lift the strainer.
- Place the cone (14) into the hole which is in the strainer as shown in figure .
Cut the fruit in half, and put it on to the cone (the inner part against the cone). - Turn ON/OFF & speed control switch to "T" (slow speed) to start the appliance. For greater control, you can use the pulse button (6) but only if you turn the ON/OFF speed control switch to "0". A light press will make the motor work slowly.
- You can squeeze the two halves of the fruit for 30 seconds maximum each time. This operation can be carried out 10 times, with rest periods between each use.
- Be careful, when the cone does not rotate as it should, lightly release the pressure on the fruit before pressing again. Do not insist too much on pressing as this could damage this accessory.
- Be careful not to exceed the maximum level marked on the bowl and unplug after use.
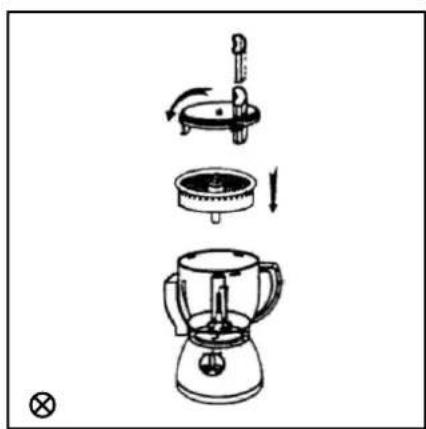
Juice Extractor Set
- Unplug the appliance.
- Place the filter band (18) into the extractor (19). Make sure it is placed correctly.
- Insert the collar (17) into the extractor to block the filter band.
- With the processor bowl already into position, place the extractor assembly (17 + 18 + 19) on to the bowl shaft as shown in figure.
17

Fax +32 23599550
Generated by Unregistered Batch DOC TO PDF Converter 2011.3.804.1511, please register!
Copies of the I/B. Please reproduce them without any changes except under special instruction from Team International BELGIUM. The page must reproduced and folded in order to obtain a mini booklet B5 (+ / - 150mm width x 210~mm height). The page must be folded in order to keep the good numbering when you turn the page of the I/B. Don't change the page numbering. Keep the languages integrity.
- Place the lid with funnel on the top of the bowl as described in the section «Use».
Cut the ingredients (apples, pears, carrots, cucumbers etc,...) into pieces and place them into the funnel of the bowl lid.
If necessary, use the pusher to push food down the funnel. Never use your fingers or any utensil. - Turn the ON/OFF & speed control switch to "II" (fast speed) to start the appliance.
You can extract juice from apples, pears, carrots, celery, grapes, strawberries etc... - Some fruits may have stones. Remove the stones before extracting.
- Wash, and peel ingredients if necessary.
In order to get the best result, cut ingredients into small pieces so that approximately half of the funnel contains 4 to 5 pieces of food. After extracting this first quantity of food, turn off the appliance. Then put 4 to 5 new pieces into the funnel and turn on again. - When the extractor is stuffed with residues, stop and unplug the appliance to remove and clean the filter band (see section «Cleaning»).
The operation can be carried out 10 times, with rest periods between each use. CAUTION: Do not use the appliance if the filter band (18) is damaged.
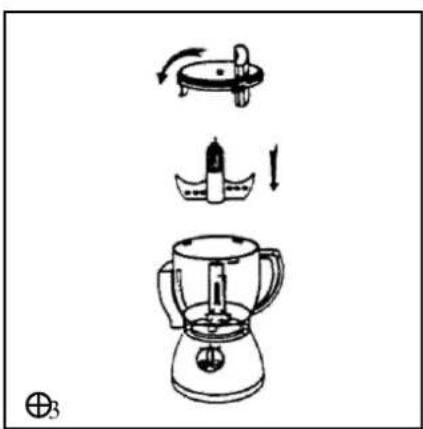
Whisk Stick
Never use the whisk stick (G) to knead heavy dough or prepare mixtures such as pizza dough or shortcrust pastry.
- Unplug the appliance.
- With the processor bowl already into position, place the whisk stick on the bowl shaft as shown in figure ± .
- Place the ingredients in the bowl.
- Place the lid with funnel on the top of the processor bowl as described in the section «Use». Make sure the shaft of the stick goes into the hole which is in the center of the lid.
This accessory has to be used only to whisk the whites of eggs and prepare sauces like mayonnaise or custard. You can whisk up to 0.5L of cream each time. - Turn the ON/OFF & speed control switch to "I" (slow speed) to start the appliance.
It is possible to add ingredients during process thanks to the funnel of the lid.
The operation can be carried out 5 times, with rest periods between each use.
CLEANING THE PROCESSOR BOWL AND ACCESSORIES
- Unplug the appliance.
- Turn the bowl lid clockwise to unlock it from the bowl lid locking slot.
- Remove the accessories and the processor bowl. Be careful not to hurt when handling the blades.
- Rinse the processor bowl and the accessories under running water and let dry.
Use a sponge if necessary, paying attention not to hurt with the blades. - Wipe clean the motor unit only with a damp cloth.
The processor bowl can also be washed into the dishwasher.
IMPORTANT
! Never put the motor unit under running water or into the dishwasher, but clean it with a damp sponge.
! Handle the blades carefully when cleaning. They are extremely sharp.

MODE D'EMPLOI
POUR VOTRE SÉCURITÉ
R Hacher/Mixer/Petrir
Generated by Unregistered Batch DOC TO PDF Converter 2011.3.804.1511, please register!
Copies of the I/B. Please reproduce them without any changes except under special instruction from Team International BELGIUM. The page must reproduced and folded in order to obtain a mini booklet B5 (+ / - 150mm width x 210~mm height). The page must be folded in order to keep the good numbering when you turn the page of the I/B. Don't change the page numbering. Keep the languages integrity.

Fax +32 23599550
Generated by Unregistered Batch DOC TO PDF Converter 2011.3.804.1511, please register!
Copies of the I/B. Please reproduce them without any changes except under special instruction from Team International BELGIUM. The page must reproduced and folded in order to obtain a mini booklet B5 (+ / - 150mm width x 210~mm height). The page must be folded in order to keep the good numbering when you turn the page of the I/B. Don't change the page numbering. Keep the languages integrity.
TEAM KR 2
| Deutsch | 7 |
| English | 12 |
| Français | 16 |
| Nederlands | 21 |
| Italiano | 26 |


- D
- A.Motoreinheit
- Spatula
- F
- Bloc moteur
- GEBRAUCHSANLEITUNG
- UK STYLE PLUG WIRING INSTRUCTIONS (IN THE UK ONLY)
- IMPORTANT INFORMATION
- USE AND FUNCTIONS
- Use
- Grating / Slicing
- Chopping / Blending / Kneading
- Citus Press Set
- Juice Extractor Set
- Whisk Stick
- Never use the whisk stick (G) to knead heavy dough or prepare mixtures such as pizza dough or shortcrust pastry.
- CLEANING THE PROCESSOR BOWL AND ACCESSORIES
- IMPORTANT
- MODE D'EMPLOI
- POUR VOTRE SÉCURITÉ
- R Hacher/Mixer/Petrir
- TEAM KR 2
Brand : TEAM
Model : KR 2
Category : Food Processor