
SIS 3 - Iron TEAM - Free user manual and instructions
Find the device manual for free SIS 3 TEAM in PDF.
| Product type | Steam iron with steam station |
| Brand | Team |
| Model | SIS 3 |
| Power supply | 230 V ~ 50 Hz |
| Power | 2400 W |
| Main functions | Steam ironing, dry ironing, vertical steaming |
| Temperature adjustment | Adjustable thermostat (Min, ●, ●●, Max) |
| Steam flow adjustment | 3 levels (low, medium, high) with indicator lights |
| Continuous steam lock | Yes, via lock button |
| Automatic shutdown | Yes, 15 minutes without use |
| Indicator lights | Operation, iron control, base control, steam flow |
| Removable tank | Yes |
| Anti-scale cartridge | Yes, replacement approximately every 6 months |
| Cleaning | Plastic parts: damp cloth; soleplate: specific product, do not immerse in water |
| Safety | Automatic shutdown, grounded plug, power cord |
| Included accessories | Table fixation bracket, anti-scale cartridge |
| Use | Household only |
| Spare parts | Anti-scale cartridge available |
Frequently Asked Questions - SIS 3 TEAM
User questions about SIS 3 TEAM
0 question about this device. Answer the ones you know or ask your own.
Ask a new question about this device
Download the instructions for your Iron in PDF format for free! Find your manual SIS 3 - TEAM and take your electronic device back in hand. On this page are published all the documents necessary for the use of your device. SIS 3 by TEAM.
USER MANUAL SIS 3 TEAM
Dampfbügelstation
Steam Ironing Station
Centrale Vapeur
Stoomgenerator
Central de planchado
Caldeira a vapor
Sistema stirante

D
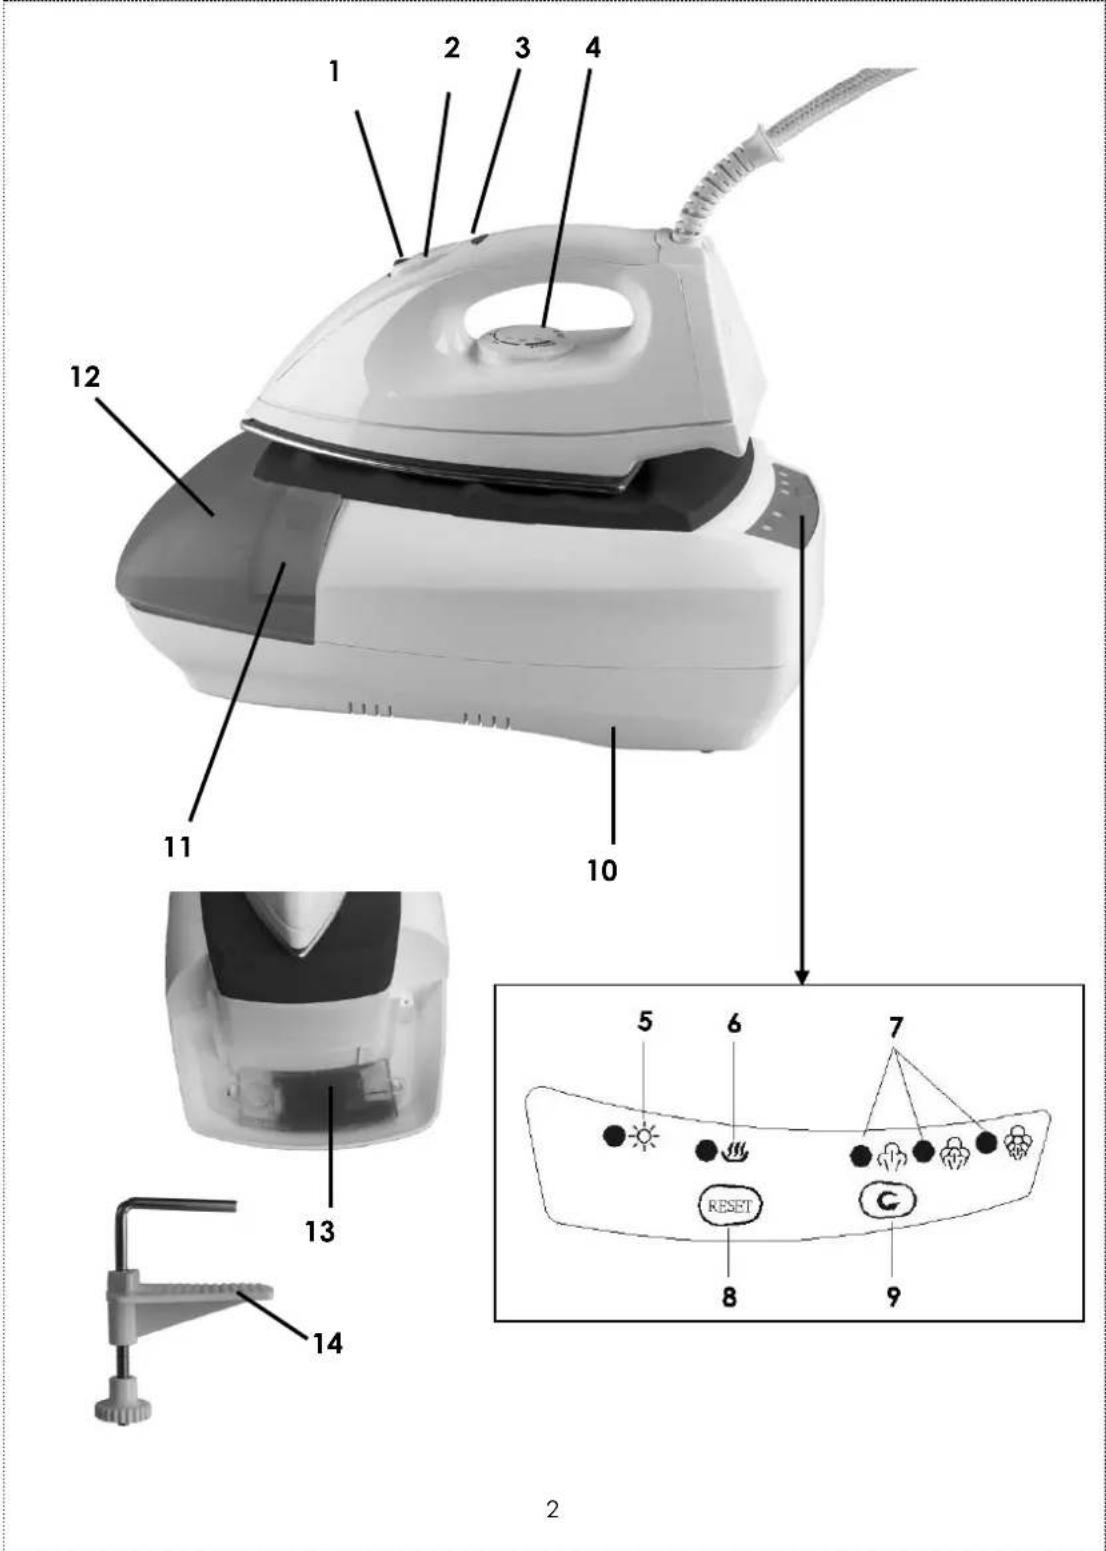
- Lock-on feature of the steam button
- Steam button
- Pilot light of the iron
- Temperature dial
- Power light
- Pilot light of the base
- Pilot lights of the steam output
- Reset button
- Steam regulator
- Base of the appliance
- Lid of the water tank
- Removable water tank
- Anti-scale cartridge
- Fixing bracket
F
Please read these instructions carefully before using the appliance.
Always place the base of the appliance on a stable ironing board, table or on the ground.
Check that your mains voltage corresponds to that stated on the rating plate of the appliance.
Only connect the appliance to a mains earthed wall socket.
To avoid a circuit overload, do not operate another high wattage appliance on the same circuit.
If an extension cord is absolutely necessary, a 10-ampere or higher cord should be used. Never use cords rated for less than 10-ampere. Care should be taken to arrange the cord so that it cannot be pulled or tripped over.
Never leave the appliance unsupervised when switched on and especially the steam iron when it is heating. Keep out of reach of children or incompetent persons.
From time to time check the cord for damages. Never use the appliance if cord or appliance shows any signs of damage. In that case, repairs should be made by a competent qualified electrician! Should the cord be damaged, it must be replaced by a competent qualified service!.
Only use the appliance for domestic purposes and in the way indicated in these instructions.
- Never immerse the iron or the base in water or any other liquid for any reason whatsoever.
- Never use the appliance near hot surfaces.
Do not allow power cord and cord binding the base to the steam iron to touch hot surfaces.
Never use the appliance outside and always place it in a dry environment.
Never use accessories that are not recommended by the producer. They could constitute a danger to the user and risk to damage the appliance.
Never move the appliance by pulling the cord. Make sure the cord cannot get caught in any way. Do not wind the cord around the appliance and do not bend it.
Fully unwind the mains cord and supply hose before starting to iron.
Always unplug the appliance when it is not in use.
Burns can occur from touching hot metal parts, hot water, or steam.
Always place the iron on the base of the appliance, on the therefore foreseen place. Do not place iron by its rear cover. Be sure that it does not come in contact with flammable materials or with the mains cord.
Never fill the steam tank with vinegar, descending agents or other chemicals.
Before using for the first time remove any sticker or protective foil from the soleplate. Clean the soleplate with a soft cloth.
Some parts of the iron have been slightly greased and as a result the iron might slightly smoke when switched on for the first time. After a short while, however, this will cease.
Competent qualified service: after sales department of the producer or importer or any person who is qualified, approved and competent to perform this kind of repairs in order to avoid all danger. In any case you should return the appliance to this service.
UK STYLE PLUG WIRING INSTRUCTIONS (IN THE UK ONLY)
This product must only be used from a 13 amp power socket. If a BS1363 approved 13 amp plug is used, it should be fitted with a 13 amp fuse. The wires on the power cord are colour coded:
blue = neutral, brown = live, green or green & yellow = earth.
The blue wire must be connected to the terminal marked N or coloured in black.
The brown wire must be connected to the terminal marked L or coloured in red.
The green (& yellow) wire must be connected to the terminal marked E or coloured in green (& yellow).
INSTALLATION
- To avoid that the appliance falls, it is possible to attach it to a table or other stable surface with the fixing bracket (14) supplied. To do so, insert the metal pole into the whole foreseen for that purpose in the back of the appliance and make sure that the plastic plate of the bracket is underneath the table or other surface (see step 1, page 5). Then tighten the screw situated under the plate until the plate is tightened properly against the table or other surface. It should not be possible to move the appliance. (see step 2, page 5).
To remove the fixing bracket, proceed inversely.
STEAM IRON: USE PRECAUTION AND TEMPERATURES
Always check first if a label with ironing instructions is attached to the article to be ironed. Follow these ironing instructions in all cases.
If ironing instructions are missing but you know the kind of fabric, then see the table for recommended ironing temperatures.
| Kind of textile | Temperature dial | Steam ironing |
| Synthetic (e.g. acetate, acrylic, viscose, Polyamide, polyester, ...) Silk | MIN | NO |
| ● | ||
| Wool | ●● | or |
| Cotton Linen | ●●● MAX | or |
- Plug in the appliance. The power light (5) will come on, indicating that the appliance is supplied. The base is now in standby mode. To be able to operate the iron, press the reset button (8) so that the base comes in initial mode and then in working mode (see "Steam Ironing" section below). Set the temperature dial of the iron (4) to the desired position. The pilot light of the iron (3) will come on, indicating that the iron is heating. As soon as the desired temperature is reached, the pilot light will go out, you can start ironing.

During ironing this pilot light (3) will come on from time to time. When this happens, the soleplate is being heated-up to the required temperature again. You can continue ironing.
The table is valid for the fibre materials only. If some kind of finish has been applied (gloss, wrinkle, relief etc), the textile can best be ironed at a lower temperature. First sort out the fabrics according to ironing temperature: wool with wool, cotton with cotton, etc.
The iron heats up quicker than it cools down. Therefore, start ironing the articles requiring the lowest temperature such as those make of synthetic fibres. Then progress to the higher temperatures.
If the article is made of a mixture of different fibre, you must always select the lowest ironing temperature of the composition of those fibres. (E.g. an article consisting of 60% polyester and 40% cotton should be ironed at the temperature indicated for polyester and without steam).
If you do not know what kind(s) of fabric(s) the article has been made of, find a spot, which will be invisible when wearing or using the article to try out the ironing temperature. (Always start at a low temperature and increase to one, which gives the required results).
Pure woollen fabrics (100% wool) may be pressed with the iron set to a steam position. It is recommended to apply shot-of-steam and use a dry pressing cloth.
When steam-ironing woollen fabrics, shining of the fabric may occur. This can be prevented by turning the article inside out and ironing the inside or by interposing a light damp cloth.
- Velvet and other textures that rapidly acquire shiny spots should be ironed in one direction only (with the nap), applying only light pressure.
Always keep the iron moving. - Iron the reverse side of synthetic materials and silk, it is not advisable to use steam as this may cause stains.
FILLING WITH WATER (FOR STEAM-IRONING)
- Put the base on a stable surface.
- Open the cap of the water tank and fill it with clear water up to its "Max" level. You can use tap water, but we advise you to use demineralised water.
- Close the cap of the water tank
or
- You can detach the water tank by lifting it, and then fill it as described by steps 2 and 3 above.
- Put the water tank back in the base correctly. Caution, if the water tank is not positioned correctly, a safety device will prevent the pump from operating and as a result, it will prevent the steam production. If this happens, check whether the water tank is placed correctly on the base.
- Never use vinegar, detergents or other chemical products.
Caution: always make sure that the anti-scale cartridge situated underneath the water tank is well into place. Never use the appliance without anti-scale cartridge.
FILLING THE WATER TANK DURING USE
As the water tank of this appliance is not under pressure, you can refill it during use. To dos o, just proceed as described above in the "Filling with water" section).
STEAM-IRONING
- Fill the water tank with water and insert the mains plug into a wall socket.
- As indicated on the temperature dial (4) and the table, steam ironing is only possible at higher ironing temperatures, so set the dial to or .
- When you plug in the appliance, the power light (5) of the control panel will go on and will stay on permanently (= standby mode) whereas the pilot light (6) will be off. Pres the reset button (8) so that the water starts to heat. The pilot light (6) will start blinking (= initial mode). As soon as the temperature necessary for steam production is reached, the pilot light will stop blinking and stay on (= working mode). The 15-minute auto shut off function switches on (see "Auto shut off function" section below). In the meantime the pilot light of
the lowest steam output will go on. You can now use the steam function.
- Press the steam button (2) to release steam from the soleplate of the iron. Release the button and the steam will stop. If you want a continuous jet of steam, slide the central part of the steam button backwards till it blocks the steam button. To stop the steam, slide the lock-on button (1) forward to block the steam button. To stop the steam, slide the lock-on button backward to release the steam button.
To set the desired steam output, press the steam regulator (9). Each time you press the button the steam output will switch to another output in the following order:
(medium), - (high), you will hear a beep and the corresponding pilot light will come on on the control panel, indicating the set steam output. To come back to a low steam output, press the steam regulator (9) once more.
- When ironing, the pilot light of the iron (3) will go on and off from time to time. This means that the temperature of the iron is regulated by its thermostat. You can continue ironing.
- When you use a lot of steam in a very short time, the steam output is lightly reduced until your appliance produces enough steam to reduce the difference. This phenomenon also happens when there isn't enough water in the water tank.
- When the water tank is running empty, you will hear more noise when pressing the steam button. If you want to go on using the steam function, you will have to refill the water tank.
STEAMING IN A VERTICAL POSITION
You have to hang the cloth you want to smooth out avoiding the creases and place the iron in a vertical position at a few centimetres from the piece of cloth. Then move the iron by pressing the burst of steam button.
DRY IRONING
- For ironing without steam, do not press the steam button (2) and do not pres the lock-on button (1).
Take the "Auto shut off function" section below into consideration.
AUTO SHUT OFF FUNCTION
- When the pilot light of the base (6) switches from off to blinking (= initial mode) and then to on (= working mode), the 15-minute auto shut off function is activated.
- In working mode, if you do not press the steam button within 15 minutes, the appliance will be switched off. Only the power light (5) will stay on.
- In working mode, if you have pressed the steam button within these 15 minutes, the auto shut off function will only start the countdown after the last time you pressed the steam button.
- If you press the reset button after the countdown has started but before the 15 minutes have elapsed, the appliance will switch off and only the power light (5) will stay on. The appliance will be in standby mode, no other function will be active. If you want to continue to use the appliance, press the reset button (8) and the base will switch to its initial mode or working mode (according to the parameters explained under steps 5 and 6 below).
- If the appliance has been switched of for a period longer than 10 minutes and 10 seconds, pressing the reset button will switch the appliance on in initial mode.
- If the appliance has been switched of for a period shorter than 10 minutes and 10 seconds, pressing the reset button will switch the appliance on in working mode.
- In working mode, when the auto shut off function has been activated, you will hear a beep 30 seconds before the 15 minutes are elapsed. After these 30 seconds the power light will start blinking, indicating that the auto shut off function is still active. If you want to continue ironing, press the reset button once. If you want to stop using the appliance, press the reset button twice. Only the power light will be on, you can unplug the appliance.
WHEN FINISHED IRONING
- Unplug the appliance and let it cool down.
- It is not necessary to empty the water tank.
We recommend placing the iron on its base when you store it. The therefore foreseen place is non-slip and will not damage the soleplate of the iron.
ANTI-SCALE CARTRIDGE
- Your appliance is equipped with an anti-scale cartridge (13) situated underneath the water tank. As a result, you can use tap water as it will be filtered by the cartridge.
It is necessary to replace the cartridge approximately every 6 months. However this period may vary depending on the frequency of use and of the scale content of the water in your area. If the water contains much scale, you will have to replace the cartridge more frequently.
To take it out, press the pins situated at both ends of the cartridge and raise the latter.
To buy a new cartridge, please contact the nearest customer service. - Never use the appliances without anti-scale cartridge!
CLEANING
The plastic parts of the appliance can be cleaned with a damp cloth.
To clean the soleplate of the iron, you will find specific products in the shops. Please also read the instructions of use. Never use abrasive products to clean it.
- Never immerse the appliance in water or any other liquid.
FR MODE D'EMPLOI
POUR VOTRE SECURITE
WATERRESERVOIR VULLEN (OM MET STOOM TE STRIJKEN)

- D
- F
- UK STYLE PLUG WIRING INSTRUCTIONS (IN THE UK ONLY)
- INSTALLATION
- STEAM IRON: USE PRECAUTION AND TEMPERATURES
- FILLING WITH WATER (FOR STEAM-IRONING)
- FILLING THE WATER TANK DURING USE
- STEAM-IRONING
- STEAMING IN A VERTICAL POSITION
- DRY IRONING
- AUTO SHUT OFF FUNCTION
- WHEN FINISHED IRONING
- ANTI-SCALE CARTRIDGE
- CLEANING
- FR MODE D'EMPLOI
- POUR VOTRE SECURITE
- WATERRESERVOIR VULLEN (OM MET STOOM TE STRIJKEN)
Brand : TEAM
Model : SIS 3
Category : Iron