
CCTVprom 9 - Surveillance Camera VELLEMAN - Free user manual and instructions
Find the device manual for free CCTVprom 9 VELLEMAN in PDF.
| Product Type | 4-channel DVR surveillance system with 4 IR bullet cameras |
| Brand | Velleman |
| Model | CCTVprom 9 |
| DVR Dimensions | 345 x 225 x 68.3 mm |
| Camera Dimensions | Ø60 x 91 mm |
| Camera Weight | 250 g (with bracket) |
| DVR Power Supply | 19 VDC, < 42 W |
| Camera Power Supply | 12 VDC ±10%, 70 mA (IR off), 200 mA (IR on) |
| Camera Water Resistance | IP67 |
| Number of IR LEDs per Camera | 14 |
| Infrared Range | 15 m |
| Video Compression | H.264 (CIF) |
| Max Recording Resolution | CIF 352 x 288 pixels @ 100 IPS (PAL) |
| Video Inputs | 4 channels, BNC, 1 Vpp/75 Ω |
| Video Outputs | Composite BNC + VGA |
| Audio Inputs/Outputs | 1 input, 1 output (mono) |
| Internal Hard Drive | 1 x SATA (500 GB included, expandable up to 1 TB) |
| Network Connectivity | Ethernet 10/100 Base-T, TCP/IP, PPPoE, DHCP, DDNS |
| Main Functions | Manual/scheduled/motion/network recording, motion detection, email notification, remote viewing (iPhone, BlackBerry, WinCE, J2ME), PTZ control (PELCO-D), USB backup, multilingual OSD |
| Operating Temperature | 10°C to 40°C |
| Care and Cleaning | Disconnect before cleaning, use a dry cloth. Do not use liquids. |
| Safety | Do not open the housing (risk of electric shock). Use only the supplied power adapter. Protect from rain, moisture, heat and shocks. |
| Warranty | 24 months for consumers (EU), according to Velleman conditions |
| Package Contents | 1 DVR, 1 500 GB hard drive (internal), 4 IR bullet cameras, 4 camera cables 20 m, 1 19 V adapter, 1 DC-DC converter, 1 CD-ROM with full manual |
Frequently Asked Questions - CCTVprom 9 VELLEMAN
User questions about CCTVprom 9 VELLEMAN
0 question about this device. Answer the ones you know or ask your own.
Ask a new question about this device
Download the instructions for your Surveillance Camera in PDF format for free! Find your manual CCTVprom 9 - VELLEMAN and take your electronic device back in hand. On this page are published all the documents necessary for the use of your device. CCTVprom 9 by VELLEMAN.
USER MANUAL CCTVprom 9 VELLEMAN
ALL-ROUND SECURITY SET
MULTIFUNCTIONE BEVEILIGINGSSET
ENSEMBLE VIDEOSURVEILLANCE MULTIFONCTIONNEL
JUEGO DE VIDEOVIGILANCIA MULTIFUNCION
Note: images in this manual are for illustrative purposes only.
1 DC 12V input terminal
2 Video output connector
1 DC 12V ingangsaansluiting
2 Video-uitgangsaansluiting
1 Connexion d'entrée CC 12V
2 Connexion de sortie video
1 DC 12V-Eingangsanschluss
2 Video-Ausgangsanschluss
1 Conexión de entrada CC 12V
2 Conexión de calidad de video

The copyright to this manual is owned by Velleman nv. All worldwide rights reserved. No part of this manual or may be copied, reproduced, translated or reduced to any electronic medium or otherwise without the prior written consent of the copyright holder.
© AUTEURSrecht
To all residents of the European Union
Important environmental information about this product

This symbol on the device or the package indicates that disposal of the device after its lifecycle could harm the environment. Do not dispose of the unit (or batteries) as unsorted municipal waste; it should be taken to a specialized company for recycling. This device should be returned to your distributor or to a local recycling service. Respect the local environmental rules.
If in doubt, contact your local waste disposal authorities.
Thank you for choosing Velleman! Please read the manual thoroughly before bringing this device into service. If the device was damaged in transit, do not install or use it and contact your dealer. Damage caused by disregard of certain guidelines in this manual is not covered by the warranty and the dealer will not accept responsibility for any ensuing defects or problems.
NOTICE:
This document is a Quick installation guide. For more details, refer to the full user manual which can be found on the included CD-ROM.
Package content:
1 x CIF DVR with built-in SATA connection
1 x Hard Disk 500GB (built-in)
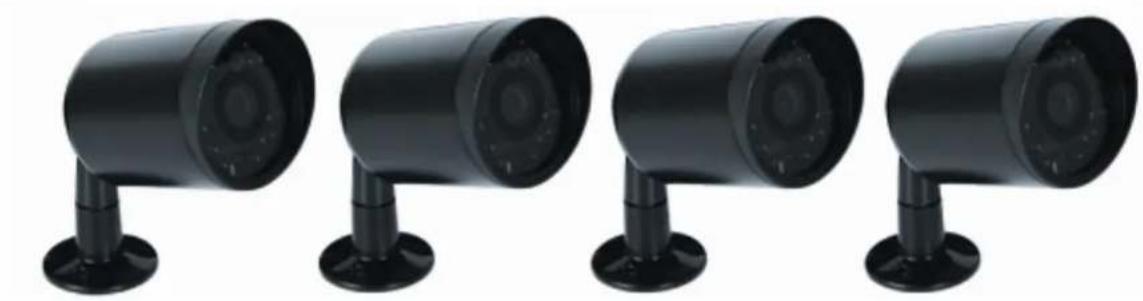
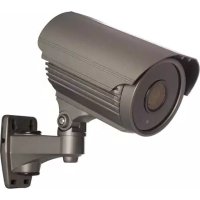
- 4 × IR bullet colour cameras
4x20m ca mera cables
1x19VPSU
- 1 × high-efficiency DC-DC converter for DVR and 4 cameras
- 1x CD-ROM containing the full user manual
Optional (not incl.):
composite video & VGA monitor: MONSCA3, MONSCA6
VGA & DVI monitor: MONSCA4, MCONSCA5
Router:PCRT1
2. Safety Instructions

Keep the device away from children and unauthorised users.

Risk of electroshock when opening the cover. Touching live wires can cause life-threatening electroshocks.

Always disconnect mains power when the device is not in use or when servicing or maintenance activities are performed. Handle the power cord by the plug only.
3. General Guidelines
Refer to the Velleman® Service and Quality Warranty on the last pages of this manual.
| Indoor use only Keep this device away from dust, moisture, splashing and dripping liquids. Never put object filled with liquid on top. | |
| Keep this device away from dust. | |
| Keep this device away from extreme heat. Make sure the ventilation openings are clear at all times. For sufficient air circulation, leave at least 1" (±2.5 cm) in front of the openings. | |
| Protect this device from shocks and abuse. Avoid brute force when operating the device. |
- Familiarise yourself with the functions of the device before actually using it.
- All modifications of the device are forbidden for safety reasons.
- Only use the device for its intended purpose. Using the device in an un authorised way will void the warranty.
- Damage caused by disregard of certain guidelines in this manual is not covered by the warranty and the dealer will not accept responsibility for any ensuing defects or problems.
- Do not use this product to violate privacy laws or perform other illegal activities.
4. Features
GUI (Graphical User Interface) display and USB mouse control
- Gmail integration supports notification through Google mail server and any other mail support
- local and remote control completely independent
H.264 video compression technology
highly improves video quality for live viewing and recording
recording file size is m inimized for longest recording time
lower bit rate required for fastest network transfer
CCTVPROM9
VGA interface built-in
- backup function: supports USB 2.0 flash drive backup
remote surveillance on mobile phone via 3G/GPRS or on PC through internet connection
- motion trigger recording
- multi-language OSD: English, French, Dutch, German, Portuguese, Spanish, Czech, Hungarian, Greek, Italian, Arabic, Polish, Vietnamese and Chinese
- A/V support: supports 4 audio inputs and 1 audio output for sound recording
- supports SATA HDD
- PTZ control: supports PELCO-D protocol
- alarm I/O: 4 inputs, 1 output
- supports daylight-saving function
- supports manual / timer / motion / network recording functions
- system auto recovery after power reconnected
supports TCP/IP, PPPoE, DHCP and DDNS network connection
- optional monitor (not incl.): MONSCA4, MONSCA5
- 4x IR bullet colour cameras
5. Overview
Refer to the illustrations on page 2 of this manual.
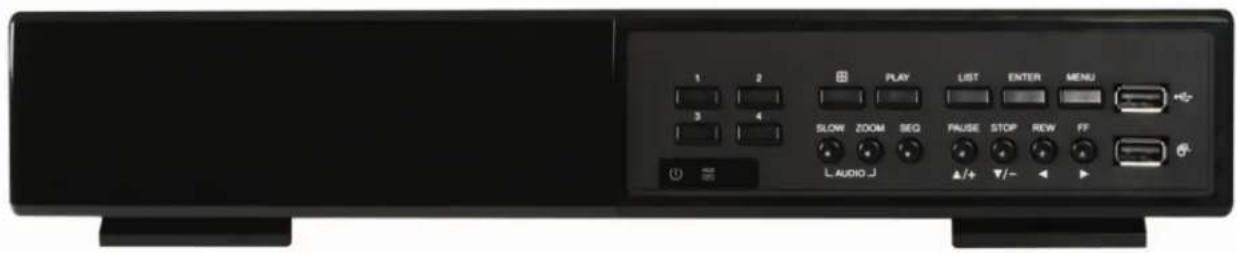
Front panel
| LED indications | HDD | HDD reading or recording activities on the hard disk |
| USB | POWER DVR power is on | |
| 1 ~4 Press a button to select the corresponding channel. | ||
| 田 | 4CH: Press to show the 4 channel display mode. | |
| PLAY Press to play the recorded video. | ||
| LIST | List the information of the recorded files. QUICK SEARCH / RECORD / MOTION / ALARM / TIMER / FULL LIST | |
| ENTER Press to confirm settings | ||
| MENU Press to enter the main menu. | ||
| SLOW In playback mode, press to play the recorded file slowly. | ||
| ZOOM Press to enlarge the image of the selected channel. | ||
| AUDIO = SLOW + ZOOM Press SLOW and ZOOM simultaneous to select live or play-back sounds. | ||
| SEQ Press to show all screens sequentially in full screen mode. Press again to quit. | ||
| PAUSE ▲ / + | Press to pause, press again to continue playback. Press to move up (▲) or increase value (+) | |
| STOP ▼ / - | Press to stop playback. Press to move down (▼) or decrease value (-) | |
| REW ▲ | Press to rewind. Press to move left (▲). | |
| FF ▲ | Press for fast forward. Press to move right (▲). | |
| USB | Connect a USB flash drive for video backup to this USB port. | |
| Connect a USB mouse to this USB port. | ||
| Note: do not connect two USB flash drives or USB mice at the same time. | ||
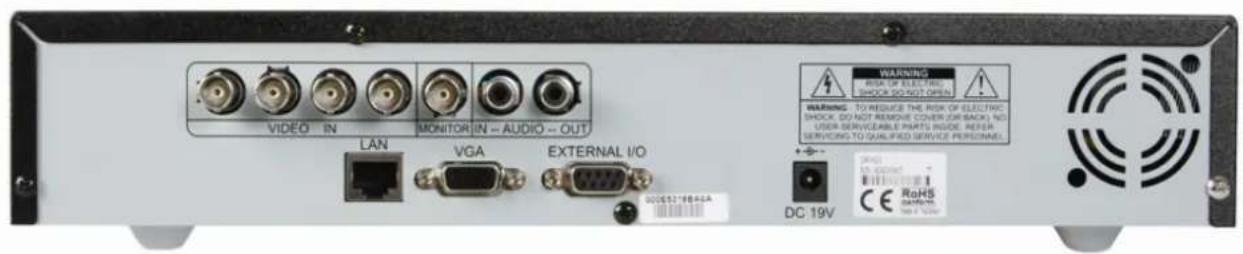
rear panel
| VIDEO IN 4 video input channels to connect 4 external video sources. | |
| MONITOR connect a CRT monitor to this output | |
| AUDIO IN | 1 audio input channel to connect an external audio source e.g. from a camera with audio. |
| AUDIO OUT 1 audio output to connect to an audio device, e.g. a speaker (mono). | |
| LAN port | Connect the DVR to a local network by plugging a network cable into this port. |
| VGA | connector for video monitor |
| EXTERNAL I/O | use a 9 pin DSUB connector to connect external signals e.g. alarm, sensor, ... |
| 19V DC | Power supply input. |
6. Hardware setup
Connecting a video monitor
- Obtain a suitable monitor (not included) and connect it to the BNC or VGA video output port on the back of the DVR.
Note: when both a CRT and VGA monitor are connected, press and hold the button during start-up to force the output to the CRT monitor port.
CCTVPROM9
Connecting the power supply
- Plug the DC output connector of the included power adaptor into the 19VDC power input at the back of the DVR.
WARNING: only use the included adaptor.
- Plug the included power cable into the adaptor input connector and plug the other end into the mains. Do not switch the DVR on yet.
Connecting a camera
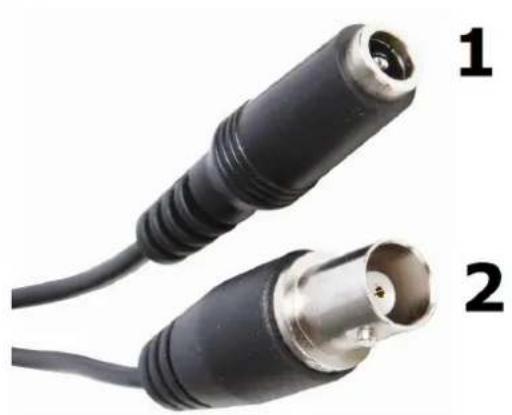
- Connect the video output of the camera to either video input at the back of the DVR. Connector type is BNC. Note: video system is detected automatically; therefore it is important that the cameras are power-supplied before the DVR is powered-on.
Connecting audio
- The DVR supports one audio input. Connect the audio output of an audio source to the audio input of the DVR. Connector type is RCA.
- There is also an audio output connector. Connect an audio device e.g. a speaker to this connector when desired. Connector type is RCA.
Connecting Local Area Network (LAN)
- Connect the DVR to a local network by plugging a network cable into the LAN port at the back of the DVR. Connector type is 8P8C (RJ45). Setup is done through the OSD.
7. Preliminary settings
- Make sure the connected cameras are on and set the power switch at the rear of the device to the on-position. It takes about 15 to 30 seconds to start up.
Menu overview
- Press the MENU button and enter the password to go into the menu list.
Note: default admin password is "0000" (4 times zero).
For more details, refer to the full user manual.
Setting date and time
- Before using the DVR the time and date should be set to get a valid time stamp.
- Press the MENU button and enter the admin password to go into the menu list.
- Select the QUICK START menu item with the , , or buttons.
- Move to the TIME SETUP menu item. Select it to set date and time.
Note: once recording started, do not change date or time as this will make it very difficult to find back the recorded files.
Note: when using the DVR for the first time and the correct time is set, leave it on for at least 48 hours.
Password setting
- Press the MENU button and enter the password to go into the menu list.
- Select the SYSTEM menu item.
- Go to TOOLS, select ADMIN PASSWORD (or OPERATOR PASSWORD) and press the ENTER button to set the password.
Note: an operator can not access the main menu, only the quick menu bar (see below).
- Press the cursor up (▲) or down (▼) button to select the value of the first number and press enter to save and go to the next character, or use the mouse to select the desired value. Repeat this for all four password numbers.
Note: default admin password is "0000" (4 times zero).
Record settings
- Press the MENU button and enter the password to go into the menu list.
- Select the QUICK START menu item using the , , or buttons.
- Select the GENERAL menu item.
- Set the image quality and images per second for recording.
Refer to the full user manual on the included CD-ROM for more details.
Audio playback
- Press the SLOW and ZOOM button simultaneously to select the desired audio channel or use the quick menu bar (see below). The current audio channel is indicated in the status bar.
User profile selection
- It is possible to log on to the system as administrator (♂) or regular user (♀). An icon is shown in the status bar.
- Switch between user profiles by clicking on the icon (or). The lock-icon (o) is now displayed.
- Click on the lock-icon and enter the password of the desired user profile.
8. Operation
Display
The following image shows the screen layout.
CCTVPROM9
| A | B | C | |
| CH1 | CH2 | ||
| CH3 | CH4 | ||
| A | system date and time |
| B | general system status |
| C | available HDD capacity |
| live audio channel enabled | playback audio channel enabled (yellow) | ||
| audio channel disabled | timer recording | ||
| digital zoom on (yellow) / off | USB mouse connected | ||
| USB flash drive connected | Hard disk overwrite (default) | ||
| key lock on | PTZ mode | ||
| sequence mode | motion mode | ||
| recording mode alarm mode | |||
| administrator logged on | operator logged on | ||
| LAN connected / Internet connected / no network connection | |||
Note that actual screen icons might differ slightly from the ones shown above.
Quick menu bar
Note: only available when USB mouse is connected.
- Move the pointer towards the left of the monitor to open the quick menu bar.
Recording
- Check whether the camera(s) is (are) properly connected and a HDD is present inside the device.
- When the auto-recording and pre-alarm functions are enabled, the device will start recording images.
- Default the recording icon ( ) is shown.
- In case the motion or alarm detection is activated and a motion or alarm is detected, the motion ( ) resp. alarm ( ) is shown.
- When timed recording is enabled, the timed recording icon ( ) is showed and the timed recording LED is on.
- Default, the device is in HDD overwrite mode and the icon (G) is shown.
Play-back
- Make sure the control panel is not locked and press the PLAY button on the control panel or use the quick menu bar to open the playback control panel.
Note: play-back needs at least 8192 recorded images to work properly (e.g. with IPS=30, the recording must be at least 273 seconds long). - The fast forward (FF) and fast rewind (REW) buttons will increase resp. decrease the play-back speed. Repeatedly pressing the button will increase/decrease speed to 4x, 8x 16x or 32x (max.).
- Press the PAUSE button to temporary suspend video play-back.
- Press the STOP button to return to live monitoring.
Press the SLOW button once to set play-back speed to 1/4^th and twice for 1/8^th .
Search
There are four ways to search recorded files: by record list, motion list, alarm list or by timer list.
- To search an event, press the LIST button on the front panel (make sure the control panel is not locked). An overview of the recorded file types (ALARM, MANUAL, MOTION, SYSTEM and FULL LIST) is shown.
CCTVPROM9
- Select the desired list and recording from the list.
- Press ENTER to start play-back.
Note: the recorded files can also be searched via the included Video Viewer software or Internet Explorer.
9. Technical specifications
DVR
| video system PAL | |
| video compression H.264 (CIF) | |
| video input 4 channels, composite video signal 1Vpp / 75 ohms BNC | |
| video output composite video signal 1Vpp / 75 ohms BNC + VGA | |
| maximum recording rate (PAL) CIF 352 x 288 pixels with 100 IPS (PAL) | |
| image quality setting best - high - normal - basic | |
| hard disk storage built-in SATA type, support 1x HDD, support HDD capacity over 1TB (HDD not incl) | |
| recording mode manual / timer / motion / network / alarm controlled | |
| refresh rate 100 IPS for PAL | |
| audio I/O 1x audio in, 1x audio out (mono) | |
| motion detection area 16 x 12 grids per channel | |
| motion detection sensitivity | 3 sensitivity levels (low - normal - high) |
| pre-alarm recording | 8MB |
| backup device | USB 2.0 flash drive (for backup and firmware updates) |
| web transmitting / compression format | H.264 |
| Ethernet | 10/100 Base-T, supports network control and VLCView via Ethernet |
| web interface | supports licensed "video viewer" software & Internet Explorer |
| network connection | supports TCP/IP, PPPoE, DHCP and DDNS function |
| digital zoom | 2x (live & playback) |
| key lock | yes |
| video loss detection | yes |
| camera title | up to 6 characters |
| video adjustments | hue / colour / contrast / brightness |
| date display format | YY/MM/DD, DD/MM/YY, MM/DD/YY, and off |
| power source | 19VDC |
| power consumption | < 42W |
| operating temperature | 10°C ~ 40°C (50°F ~ 104°F) |
| system recovery | system auto recovery after power reconnected |
| dimensions | 345 x 225 x 68.3mm |
IR BULLET COLOUR CAMERAS
| pick-up element | 1/3" colour CCD image sensor |
| number of pixels | 712(H) x 582(V) - PAL - |
| Resolution | 420 TV lines |
| min. Illumination | 0.05 Lux (F2.0); 0 Lux (IR on) |
| S/N ratio | > 48dB (AGC off) |
| electronic shutter | 1/50 to 1/100000 sec. |
| white balance | automatic |
| AGC | yes |
| standard board lens | f3.6mm / F2.0 |
| lens angle | 92.6° |
| video output 1.0Vpp composite, 75 ohm | |
| power supply DC 12V ± 10% | |
| current consumption | 70mA (IR off), 200mA (IR on) |
| water-resistance | IP67 |
| IR LEDs | 14 |
| IR range | 15m |
| Dimensions | Ø60 x 91mm |
| Weight | 250g (including bracket) |
Use this device with original accessories only. Velleman nv cannot be held responsible in the event of damage or injury resulted from (incorrect) use of this device.
For more info concerning this product and the latest version of this user manual, please visit our website www.velleman.eu.
The information in this manual is subject to change without prior notice.
CCTVPROM9
Beknopte installmentehandleiding
1. Inleiding
Velleman® Service and Quality Warranty
Velleman® has over 35 years of experience in the electronics world and distributes its products in more than 85 countries.
All our products fulfil strict quality requirements and legal stipulations in the EU. In order to ensure the quality, our products regularly go through an extra quality check, both by an internal quality department and by specialized external organisations. If, all precautionary measures notwithstanding, problems should occur, please make appeal to our warranty (see guarantee conditions).
General Warranty Conditions Concerning Consumer Products (for EU):
-
All consumer products are subject to a 24-month warranty on production flaws and defective material as from the original date of purchase.
-
Velleman® can decide to replace an article with an equivalent article, or to refund the retail value totally or partially when the complaint is valid and a free repair or replacement of the article is impossible, or if the expenses are out of proportion.
You will be delivered a replacing article or a refund at the value of 100% of the purchase price in case of a flaw occurred in the first year after the date of purchase and delivery, or a replacing article at 50% of the purchase price or a refund at the value of 50% of the retail value in case of a flaw occurred in the second year after the date of purchase and delivery.
- Not covered by warranty:
-
all direct or indirect damage caused after delivery to the article (e.g. by oxidation, shocks, falls, dust, dirt, humidity...), and by the article, as well as its contents (e.g. data loss), compensation for loss of profits;
-
frequently replaced consumable goods, parts or accessories such as batteries, lamps, rubber parts, drive belts... (unlimited list);
-
flaws resulting from fire, water damage, lightning, accident, natural disaster, etc. ...;
-
flaws caused deliberately, negligently or resulting from improper handling, negligent maintenance, abusive use or use contrary to the manufacturer's instructions;
-
damage caused by a commercial, professional or collective use of the article (the warranty validity will be reduced to six (6) months when the article is used professionally);
-
damage resulting from an inappropriate packing and shipping of the article;
-
all damage caused by modification, repair or alteration performed by a third party without written permission by Velleman®.
- Articles to be repaired must be delivered to your Velleman® dealer, solidly packed (preferably in the original packaging), and be completed with the original receipt of purchase and a clear flaw description.
- Hint: In order to save on cost and time, please reread the manual and check if the flaw is caused by obvious causes prior to presenting the article for repair. Note that returning a non-defective article can also involve handling costs.
- Repairs occurring after warranty expiration are subject to shipping costs.
- The above conditions are without prejudice to all commercial warranties.
The above enumeration is subject to modification according to the article (see article's manual).
NL


- © AUTEURSrecht
- To all residents of the European Union
- If in doubt, contact your local waste disposal authorities.
- NOTICE:
- Package content:
- Optional (not incl.):
- Safety Instructions
- General Guidelines
- Features
- CCTVPROM9
- Overview
- Hardware setup
- Connecting a video monitor
- Connecting the power supply
- Connecting a camera
- Connecting audio
- Connecting Local Area Network (LAN)
- Preliminary settings
- Menu overview
- Setting date and time
- Password setting
- Record settings
- Audio playback
- User profile selection
- Operation
- Display
- Quick menu bar
- Recording
- Play-back
- Search
- Technical specifications
- Beknopte installmentehandleiding
- Inleiding
- Velleman® Service and Quality Warranty
- General Warranty Conditions Concerning Consumer Products (for EU):
- - Not covered by warranty:
- The above enumeration is subject to modification according to the article (see article's manual).
- NL
Brand : VELLEMAN
Model : CCTVprom 9
Category : Surveillance Camera