UM 2510 - Mixer CLATRONIC - Free user manual and instructions
Find the device manual for free UM 2510 CLATRONIC in PDF.

| Product Type | Blender / Food Chopper |
| Brand | Clatronic |
| Model | UM 2510 |
| Power Supply | 230 V ~ 50 Hz |
| Functions | On/Off (speeds 1, 2), Pulse function |
| Safety | Safety switch preventing operation if the bowl is not correctly installed |
| Bowl Capacity | Approximately 1.5 L (estimated) |
| Bowl Material | Glass or plastic (not specified) |
| Blade Material | Stainless steel |
| Cable Length | Approximately 1 m (estimated) |
| Cleaning | Wash removable parts with soapy water; do not immerse the motor base |
| Warranty | 24 months |
| Included Accessories | Blender jar, main lid, small lid, blade base, rubber protection |
| Intended Use | Chopping, blending, mixing soft to medium-hard foods |
| Maximum Liquid Temperature | 60°C |
| Safety Instructions | Do not operate unattended; do not chop hard foods like ice cubes |
| Country of Origin | China (estimated) |
Frequently Asked Questions - UM 2510 CLATRONIC
User questions about UM 2510 CLATRONIC
0 question about this device. Answer the ones you know or ask your own.
Ask a new question about this device
Download the instructions for your Mixer in PDF format for free! Find your manual UM 2510 - CLATRONIC and take your electronic device back in hand. On this page are published all the documents necessary for the use of your device. UM 2510 by CLATRONIC.
USER MANUAL UM 2510 CLATRONIC
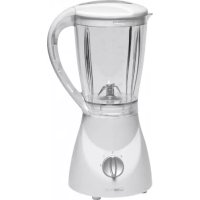
natural_image
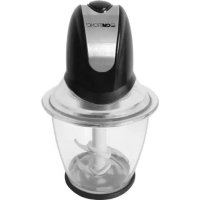
White blender with visible contents and a handle, no text or symbols presentUM 2510
CE
D
General safety instructions
GB
- Before commissioning this device please read the instruction manual carefully.
- Please keep these instructions, the guaranty certificate, the sales receipt and, if possible, the carton with the inner packaging!
- The device is intended exclusively for private and not for commercial use!
- Always remove the plug from the socket whenever the device is not in use, when attaching accessory parts, cleaning the device or whenever a disturbance occurs. Switch off the device beforehand. Pull on the plug, not on the cable.
- In order to protect children from the dangers of electrical appliances, never leave them unsupervised with the device. Consequently, when selecting the location for your device, do so in such a way that children do not have access to the device. Take care to ensure that the cable does not hang down.
- Test the device and the cable regularly for damage. If there is damage of any kind, the device should not be used.
- Do not repair the device yourself, but rather consult an authorised expert.
- For safety reasons a broken or damaged mains lead may only be replaced by an equivalent lead from the manufacturer, our customer service department or a similar qualified person.
- Keep the device and the cable away from heat, direct sunlight, moisture, sharp edges and suchlike.
- Never use the device unsupervised! Switch off the device whenever you are not using it, even if this is only for a moment.
- Use only original accessories.
- Do not use the device outdoors.
- Under no circumstances must the device be placed in water or other liquid, or come into contact with such. Do not use the device with wet or moist hands.
- Should the device become moist or wet, remove the mains plug from the socket immediately. Do not reach into the water.
- Use the device only for the intended purpose.
Special Safety Instructions for this Machine
- The machine should only be used under supervision!
- Do not manipulate any of the safety switches!
- Do not remove the lid during operation.
- When mixing, keep your hands and other objects out of the jug!
- Attention, the cutting blades are extremely sharp! Handle with extreme care when using the appliance and when cleaning the blades!
• Never pour liquids hotter than 60^ C into the jug! - Never use the mixer when it is empty!
- Do not put hard foods such as ice cubes, nutmeg or large pieces of chocolate into the container! The blade can be damaged!
GB
Operation
-
Assemble the appliance (disassembled) as follows:
-
Pull the sealing ring CAREFULLY over the blades and press it onto the blade base.
- Insert the blade base from above into the lower part of the mixer container.
- Fasten the lower part of the mixer container by turning it clockwise on the upper part of the mixer container (until it touches).
WARNING! Safety switch! The machine only works if the mixing bowl is correctly installed. Turn the mixing bowl in a clockwise direction until it locks in place.
- Cut the food to be mixed into small pieces.
- Now place the ingredients to be mixed in the mixing vessel and close the lid.
- Ensure that the function switch is in the "0/OFF" position.
- Connect the machine to a 230V/50Hz socket.
- Switch the machine ON (1, 2) or use the pulsed operation.
- In order to insert more food to be mixed the small lid may be removed. Please switch off the machine before doing so.
- In order to remove the mixer jug turn it counterclockwise.
Cleaning
- Fill half of the jug with water and press the push button for approximately 10 seconds. Then pour out the liquid. Leave the vessel to dry.
-
In order to clean the mixer properly disassemble the appliance as follows:
-
turn the lower part of the mixer vessel counterclockwise and pull it out of the mixer container.
- Lift the blade base out of the lower part of the mixer vessel.
- Pull the sealing ring CAREFULLY over the blades.
Clean the individual parts in the usual way in soapy water. Please take care with the sharp knives!
- The mains lead can be wound up on the base of the machine when not in use.
This appliance conforms with the CE directives for radio interference suppression and low-voltage safety and has been built to meet current safety requirements. Subject to technical changes without prior notice!
Warranty
We undertake to guarantee the appliance sold by our company for 24 months as of the date of purchase (cash receipt).
During the life of the warranty we shall provide for the repair or replacement of the appliance owing to material or manufacturing defects absolutely free of charge.
Proof for the warranty is provided by the purchase document. The replacement and repair will not be performed free of charge without this proof of purchase.
Should the warranty be valid, please consign the complete appliance in its original packing together with the cash receipt to your local dealer.
GB
You are not entitled to the replacement of the appliance owing to broken glass parts and faulty accessories. However, said parts will be replaced free of charge. In this case only the faulty accessory needs to be ordered without sending back the whole appliance!
The cleaning, servicing and replacement of wear parts are not covered by this warranty and hence are to be paid for.
The warranty is terminated in case of handling on the part of Third parties.
After the warranty
Once the warranty has expired, repairs can be carried out by specialized technicians or repair services against the payment of the service.