
BS 1255 - Vacuum Cleaner CLATRONIC - Free user manual and instructions
Find the device manual for free BS 1255 CLATRONIC in PDF.
| Brand | Clatronic |
| Model | BS 1255 |
| Product type | Canister vacuum cleaner |
| Power supply | 230 V, 50 Hz |
| Rated power | 1300 W |
| Maximum power | 1800 W |
| Protection class | II |
| Dust collection type | Bagless, 2 L transparent container (estimated) |
| Filtration system | Main filter, auxiliary filter, motor protection filter, exhaust filter |
| Telescopic tube | Yes, height adjustable |
| Floor brush | Yes, with height adjustment for different floors |
| Cable length | 5 m (estimated) |
| Operating radius | 7 m (estimated) |
| Weight | 4 kg (estimated) |
| Dimensions (W x D x H) | 35 x 25 x 25 cm (estimated) |
| Noise level | 76 dB (estimated) |
| Safety | Motor overheat protection |
| Filter maintenance | Wash with water, dry completely before reassembly |
| Included accessories | Floor nozzle, furniture nozzle (not listed but standard) |
| Warranty | 24 months |
Frequently Asked Questions - BS 1255 CLATRONIC
User questions about BS 1255 CLATRONIC
0 question about this device. Answer the ones you know or ask your own.
Ask a new question about this device
Download the instructions for your Vacuum Cleaner in PDF format for free! Find your manual BS 1255 - CLATRONIC and take your electronic device back in hand. On this page are published all the documents necessary for the use of your device. BS 1255 by CLATRONIC.
USER MANUAL BS 1255 CLATRONIC
Overview of the Components.. 3
8Instruction Manual . Page 31
Technical Data.. Page 33
Guarantee.. Page 33
FRANÇAIS
JE ZYK POLSKI
Sommaire
Listedesifferenténelémentsdecommande......Page3
General Safety Instructions
- Read the operating instructions carefully before putting the appliance into operation and keep the instructions including the warranty, the receipt and, if possible, the box with the internal packing.
- The appliance is designed exclusively for private use and for the envisaged purpose. This appliance is not fit for commercial use. Do not use it outdoors (except if it is designed to be used outdoors). Keep it away from sources of heat, direct sunlight, humidity (never dip it into any liquid) and sharp edges. Do not use the appliance with wet hands. If the appliance is humid or wet, unplug it immediately. Do not put it in water.
- When cleaning or putting it away, switch off the appliance and always pull out the plug from the socket (pull on the plug, not the cable) if the appliance is not being used and remove the attached accessories.
- Do not operate the machine without supervision. If you should leave the workplace, always switch the machine off or remove the plug from the socket (pull the plug itself, not the lead).
- To protect children from the dangers posed by electrical appliances, make sure that the cable is hanging low and that children do not have access to the appliance.
- Check the appliance and the cable for damage on a regular basis. Do not use the appliance if it is damaged.
- Do not try to repair the appliance on your own. Always contact an authorized technician. To avoid the exposure to danger, always have a faulty cable be replaced only by the manufacturer, by our customer service or by a qualified person and with a cable of the same type.
- Use only original spare parts.
- Pay careful attention to the following "Special Safety Instructions".
Special Safety Instructions
- Do not suck up liquids!
- Do not suck up hot ashes or pointed or sharp objects!
- Do not use the appliance in humid rooms!
- Never use without the fi tter. Check that the fi tter is inserted correctly!
- hair, clothing and body parts away from the vacuum nozzle during use!
- Keep the vacuum cleaner away from sources of heat like radiators, ovens, etc.!.
Symbols in these Instructions for Use
Important information for your safety is specially marked. It is essential to comply with these instructions in order to avoid accidents and prevent damage to the machine:

WARNING:
This warns you of dangers to your health and indicates possible injury risks.

CAUTION:
This refers to possible hazards to the machine or other objects.

NOTE:
This highlights tips and information.
Overview of the Components
1 Unlocking button
2 Hose connection
3 Opener
4 Ventilation slits
5 Floor brush height adjustment
6 Floor brush
7 Handle
8 Suction hose
9 Cable take-up
10 On/off switch
11 Carrying handle
12 Telescopic handle release
13 Telescopic tube
14 Dust container
Initial and General Use of the Device
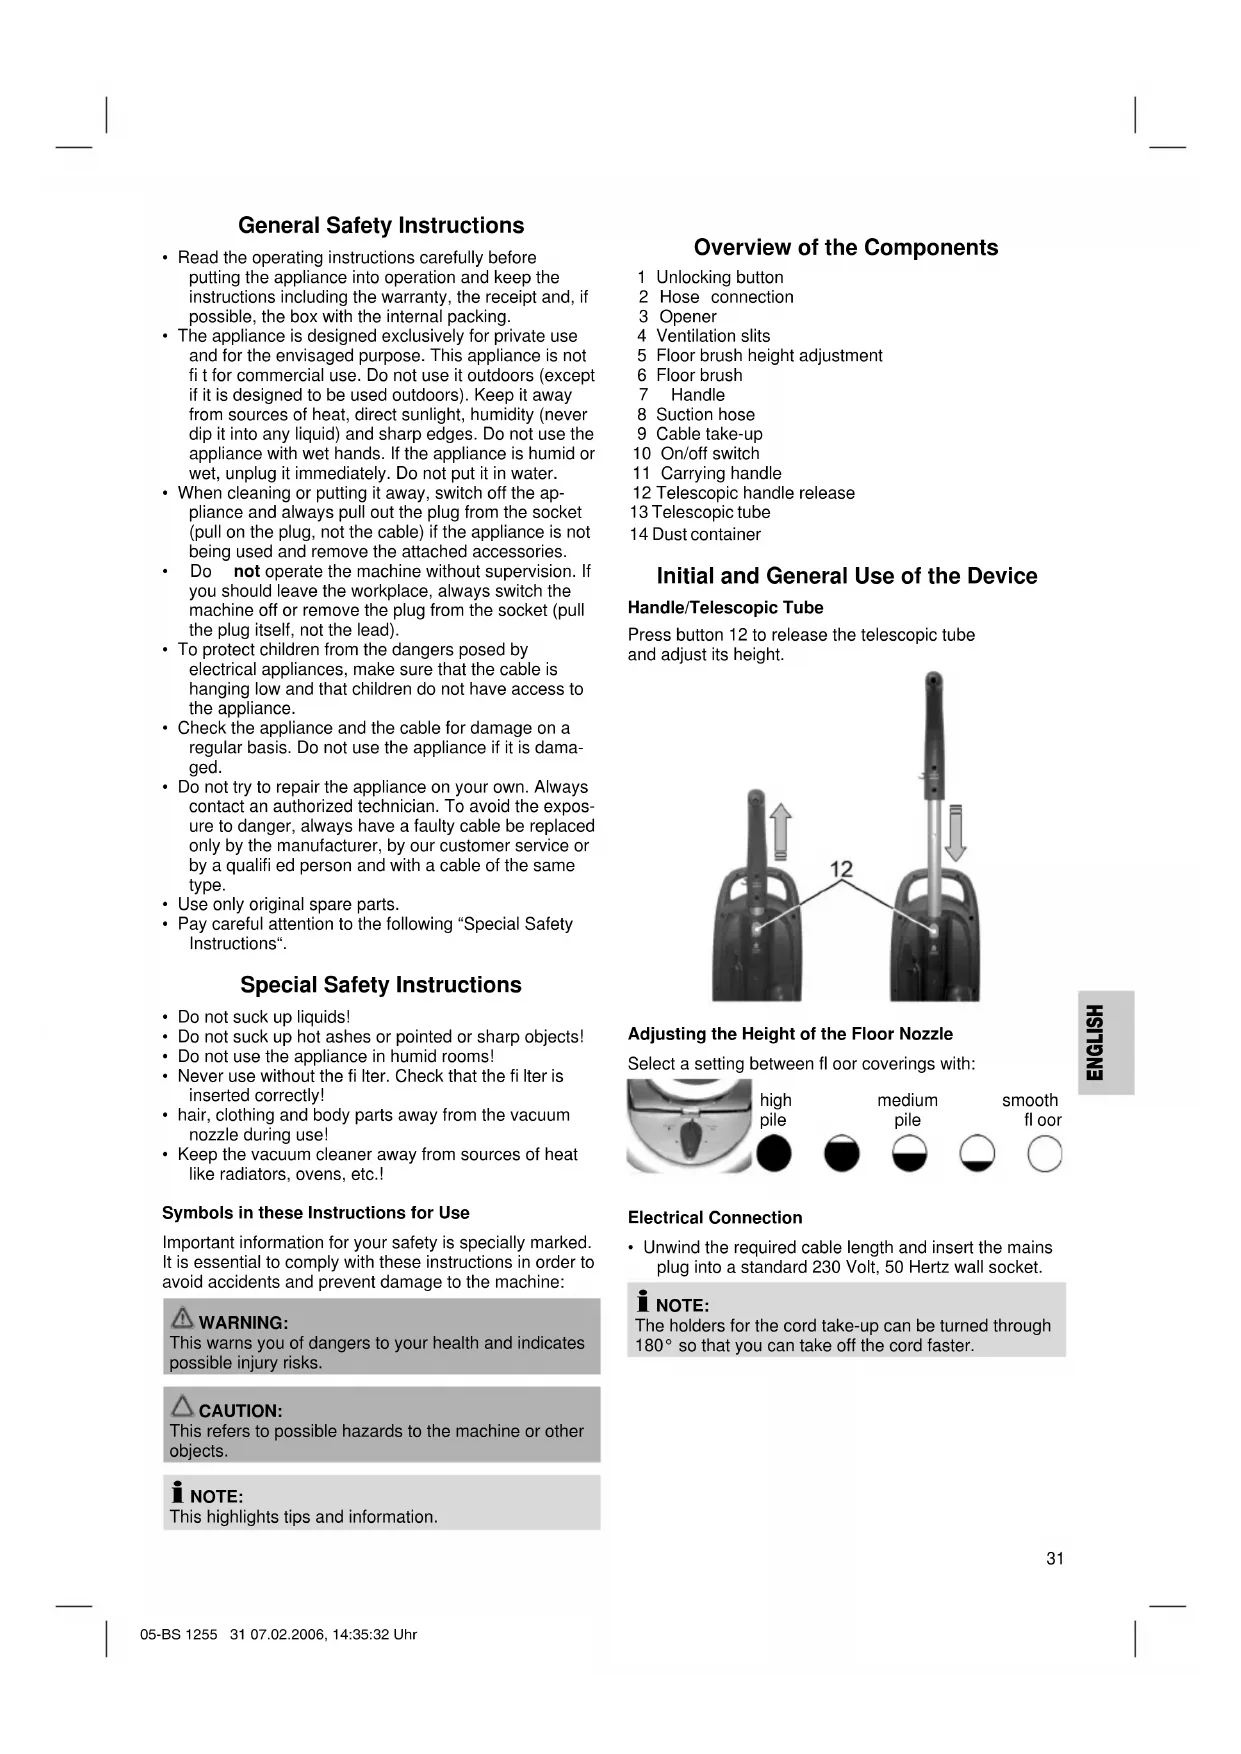
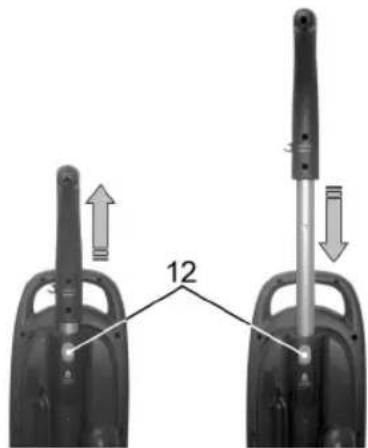
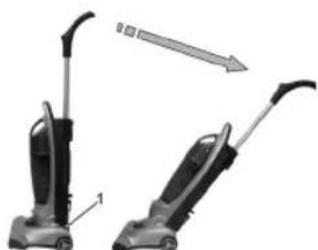
Handle/Telescopic Tube
Press button 12 to release the telescopic tube and adjust its height.
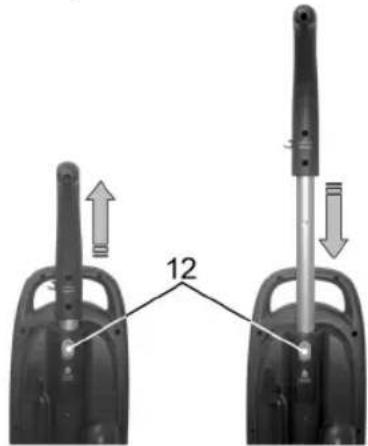
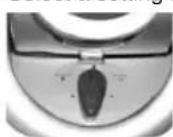
Adjusting the Height of the Floor Nozzle
Select a setting between floor coverings with:
high
pile


medium
pile


smooth
floor

Electrical Connection
- Unwind the required cable length and insert the mains plug into a standard 230 Volt, 50 Hertz wall socket.

NOTE:
The holders for the cord take-up can be turned through 180^ so that you can take off the cord faster.
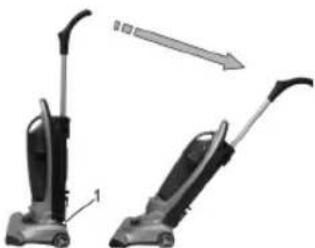
Position in Use
- Place your foot on the unlocking button (1) to move the handle into the required position.
- Switch the device on with the on/off switch (10).
Instructions for Use
i NOTE:
Now you should vacuum at an even speed. Pressing hard is not necessary.
CAUTION:
Pay attention to the restricted range due to the length of the cable!
Avoid damaging the surface being cleaned:
- Do not set the brushes too low!
- Do not allow the machine to remain stationary when switched on!
Switching off
- Move the handle to a vertical position.
- Switch the device off using the on/off switch.
- Remove the plug connector from the plug socket.
Use the cable take-up to stow away the cable.
Filter
Your machine has three filter systems.
1. Transparent dust collection container
The traditional dust bag system has been replaced by a transparent dust collection container in which coarse dirt particles and tiny particles floating in the air are swirled out of the suction air by the high speed of the air current.
The quantity of dust can be easily read off at any time on the container, which is also very easy to empty.
The purchase of dust bags is no longer necessary.
2. Main Filter, Pre-filter (in the Dust Container)
WARNING:
Before removing and cleaning the fi iters switch the device off and remove the plug from the socket.
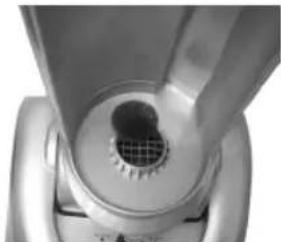
Once the dust level has reached the MAX mark of the dust container, please proceed as follows:
- Press the button (3).
- Remove the dust container.
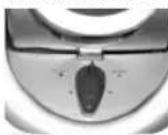
- Empty the contents of the dust container into suitable receptacle by pressing button on the dust container (See illustration a).
i NOTE:
Every third time that the fi lters are emptied, or in the case of severe soiling, clean the fi lters by allowing water to flow through them against the direction in which the air blows. The fi lters should only be re-inserted when they are completely dry!
- To do so, release the lid with the main filter (b).
NOTE:
By means of short turns in a clockwise or anticlockwise direction the following components can be removed or separated.
- Remove the main fi lter (c). This fi tter can also be cleaned from time to time with the brush.
- Remove the pre-fi lter (d). These components can be separated once more (e).
- When the components have been cleaned and dried they can be reinstalled. Connect the components again by short turns in a clockwise or anticlockwise direction.
3. Motor Protection Filter
Clean the fiiter felt on the bottom of the dust housing every time you empty the vacuum.
i NOTE:
Every third time that the fi iters are emptied, or in the case of severe soiling, clean the fi iters by allowing water to flow through them against the direction in which the air blows. The fi iters should only be re-inserted when they are completely dry!
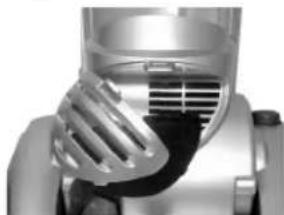
Outlet fi lter
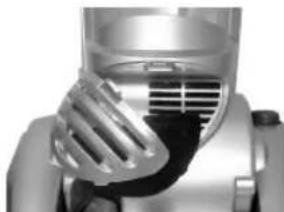
We recommend that this fi tter should be cleaned every fi th time the vacuum cleaner is emptied.
This fi lter is located behind the ventilation grille (4) of the front cover. Pull the fi lter out. Clean the fi lter as described above.
Cleaning and storage
Cleaning
- Pull the plug out of the socket before cleaning!
- Clean the casing with a dry cloth.
- Cleaning of the dust container and filters is described in detail under the "Filters" section.
Storage
- Move the handle to a vertical position.
- Wind the cable completely.
Troubleshooting
Weak Suction
- Even if the MAX mark on the dust container has not yet been reached the suction power of your vacuum cleaner may deteriorate. Please clean the fi iters as described in the operating instructions under "Filters".
Depending on the conditions of use, for example vacuuming fine dust, this may also be necessary after a shorter time. - If the motor suddenly stops during operation this may indicate that the filters are blocked.
Possible Cause
The excess temperature protection of the motor has been activated. Switch the device off and allow it to cool down for approximately 20 min. Clean the fiilters in the meantime. Continue to use the vacuum only with dry fi filters.
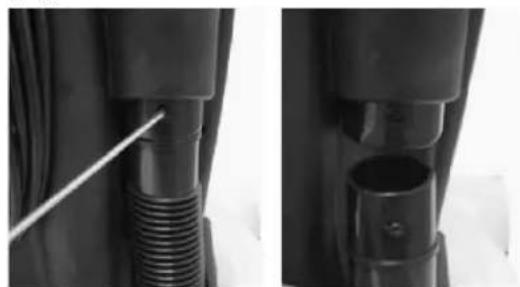
Foreign Bodies
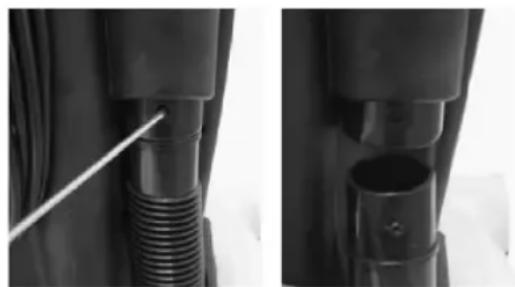
- Foreign bodies in the suction system can be removed more easily if you remove the hose from the hose connection (2). Please use a screwdriver to help you.
- When you have removed the foreign bodies please reconnect the hose.
Technical Data
Model: BS 1255
Power supply: 230 V, 50 Hz
Power consumption:
Pnom. 1300W
Pmax: 1800W
Protection class: II
This device has been tested according to all relevant current CE guidelines, such as electromagnetic compatibility and low voltage directives, and has been constructed in accordance with the latest safety regulations.
Subject to technical changes without prior notice!
Guarantee
The device supplied by our Company is covered by a 24 month guarantee starting on the date of purchase (receipt).
During the life of the guarantee any fault of the device or its accessories *) ascribable to material or manufacturing defects will be eliminated free of charge by repairing or, at our discretion, by replacing it. The guarantee services do not entail an extension of the life of the guarantee nor do they give rise to any right to a new guarantee!
Proof of the guarantee is provided by the proof of purchase. Without proof of purchase no free replacement or repair will be carried out.
If you wish to make a claim under the guarantee please return the entire machine in the original packaging to your dealer together with the receipt.
*) Damage to accessories does not mean automatic free replacement of the whole machine. In such cases please contact our hotline. Broken glass or breakage of plastic parts are always subject to a charge.
Defects to consumables or parts subject to wearing (e.g. motor pistons, kneading blades, drive shafts, spare remote control, spare toothbrushes, saw blades, etc.) as well as cleaning, maintenance or the replacement of said parts are not covered by the guarantee and hence are to be paid!
The guarantee lapses in case of unauthorized tampering.
After the expiry of the guarantee
After the expiry of the guarantee repairs can be carried by the competent dealer or repair service against the payment of the ensuing costs.

Meaning of the "Dustbin" Symbol
Protect our environment: do not dispose of electrical equipment in the domestic waste.
Please return any electrical equipment that you will no longer use to the collection points provided for their disposal.
This helps avoid the potential effects of incorrect disposal on the environment and human health.
This will contribute to the recycling and other forms of reutilisation of electrical and electronic equipment.
Information concerning where the equipment can be disposed of can be obtained from your local authority.
Yka3bIbAeHbO3MOxHyIOOnaCHOCTbIIN3dEINnI dpyrNkOKpyKaHOuNXPiPeDMetOB.
I INPHMEUYAHHE:
JaetcoBtbiHnHOpMaunIO.
IpeuehB Detane npno6opa
1 BnOKnPOBOOyHaK HONKa
2 PnoknueHne Wnahra
3 OtkpbBaWka
4 BeHTnIaHIOHHbIe OTBepCTN
5 PerynipobKa BbICotbI cTeTkn
6 ⅢeTka
7 PyKoRTka
8 NbIeCOCHbI WnHa
9 MexaHn3M HamOTKn Ka6eIa
10 BbIKIOuateIb BKn./BbIK.
11 Puyka dans nepeHockn
12 Pa36bokpOBkA pyKoTkn TeneckOnueecko Tpy6b
13 Teneckonnueckan Tpyba
14Пьilenc60bOpHnK
PnroTOBka Kpa6oTe NnpaOK PONb3OBaHHN 3JIeKTPponpnoOpom
PykoTka/Teleckonnueckan Tpy6a
HaKMMTe KNONky 12, qTO6bI pa36nOKnPOBaTb coeINHeHne TeneCKONuHeCKoN Tpy6bI n OtperynIpOBAt b ee dNNHy.
PerynpoBka BbICOTbl 1eTKH
Bb6epHTe HeoXOdmyU yCTaHOKBy B COOTBeTCTBnC Oc06EHHOCTMNI NOJBOrO NOKpbITH:

ДИМНHBI BOPC

CpeHnBOPc

Tn

DKNE OJBI
3neKtpoHtAnHe
OTMotaTe Ka6eBHa HeoXoHMyO nnHy n BCTaBbTe BNky Bpo3eTKy C HAprrKeHnem CeTn 230B,50r,yCTaHOBJEHHyBOoTBcTbN C npedncaHHMa.
I PnIMeUAHNE:
Дерхаел МexанзmaHamOTknKa6eЯВpaauotcna 180°,taKIM o6pa3oM erO moKHO 6bICTppo pa3MOTaTb/CHATb.
Paboya nozunna
HaKMTe HOroHa 6IOKINPOBOHyIO KHOKNy (1),YTO6bI YCTAHOBNTb pyKOHTKy B ONDHy n3 paOCHN N03n.
BknIOuHTe BblneCoc npn NOMOUs BbIKIouaTeHa Bk/ByKn (10).
PnmeaHnno nolb3OBAHNO
I PIMMEUAHNE:
PbineocbTe c paBHOMePHo CKOpocTbIO. DaBHTb HET HeO6XoDMoCTn.
BHUMAHNE:
He BixOndte n3 paAnyca DeIcTBn, orpaHnueHHoro dnnHO Ka6e!
He noBpeHte ouHuaeMbIe noBepxHocTn:
He onyckaTe ueTky cInuKoM Hn3ko!
He octabnIte uetky Ha oHOM MeCTe,ecnPiBineCOC BkHoueH!
BbIKIOueHne
- YctaHOBtE pyKoRTy B BepTKaJIbHoe NOJIOKeHne.
BbIKIOHOTe NbIeOCn npN IOMOuIN BbIKIOHATeIN BKn/BbIK. - BbHbTe BnKny n3 pO3eTKn.
-TO6bI CMOTaTB Ka6eNb BOCNOJb3yITecb MEXAHN3MOMHAMOTKNKa6eN.
ΦnNbTp
IbIeCOC OcHaueH CnCTEmo3-X KpaTHOrO ΦIbTPOBaHn.
1. PpO3paHbI KOHTeHep-ntleC6OpHNK
O6bIyHnCnCTema CΦNbTpOM-NbIeNC6OpHnKOM 3aMeHeHa Ipo03paHbIM KOHTeHepOM-NbIeNC6OpHnKOM.KpyHnA N MeJIkA nbIb
OTHbTPOBbBAeTc,6NaROpApaMoHHO, 3aKpyeHHoCTpye BO3dyxa.
YpOBeHb 3aONHeHHa KOnTeHepa BcERda BnHO, OH JERKO OuHuaetc.
3aKyika HObIx pa3OBbIX ΦnIbTPOB OTnadaet.
2. TnabHbI ΦHbTp, npeBapHTeNbHbI ΦHbTp (BHyTpN KOHTeHepa Nblnc6OpHNka)
PNEyUNPEKHEHNE:
IpeTeKak ChrBfNbTp IaYCTKn, BbIKIOHTe NblNEcOC N BbITaNTe WTeNCeJIb N3 pO3eTKn.
Korda nblnc6opHnKa HanoHHTcN IOCTHRET MetKu MAX"noctynaTe cneDyoum 06pa3oM:
- HaxmTe KhoNky (3).
- BbHbTe nbIeC6OpHNK.
- OnopokHnTE nblnc6OpHNB noDxOaHyo EMKocb.HaxMNTe dIa 3TOr KOHONky Ha nbInec6OpHnke.(Cm.pnc.a).
I INPIMEYAHNE:
Iocne kaxdo ro Tpebero onopoxhenn, a TaKke nocne CnBHO 3aPra3HeHn, npomoe fNt, NOCTABHB eO NO CTpyo npotouho BObl npOTNB HAnpaBHeHn BCacbBaHn. Nocne IONHO BbcixAHn BCTaBBte eO obaTHO.
4.ДЯЗTOO OTKPOIte KpbIaKу ГlaBHorOФиIbItpa(b).
I INPIMEYAHNE:
KopOTKIM NOBOPOTOM NO INN NPOTHB YACOBI CTpeJIke CHINMAOTCR CNeDyUOUINE Detann.
- CHMNTe rnaBHybHnIbTp (c).Ero Heo6xOHNMO nepeoDnueckn npouuatab npn nmoun KNCTOUKN.
- CHIMTE npedBapnteHbHbI pHbTp (d). OH pa3bnpaetcnaJbwe (e).
7.ПослесчсTKIиВьсьханЯДетаиВстабгOTс образно.3aФИКСИРУТЕДETАИОпТБжЕ рп nomоши КОРТКОТ NOBOPOTЯ NO ИН ПОТИ Часов CTpeнke.
3. 3aunTHbH ΦnIbTp MOTOPa
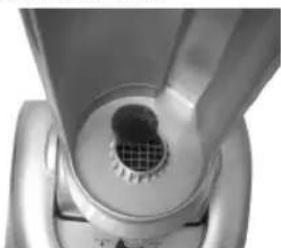
Iocne kaxdo ro onopoxhenn npouuatae BOpC ha DHe Kopnyca nbinecoca.
I INPIMEYAHNE:
Nocne KaKDoRo TpeTbero OnopoKHeHnra, a TaKHe Nocne CnIbHOro 3aRpa3HeHnra, npOMoITe PhIbTp, NOCTABHB ERO NOCTpyIO pTOUHOB BOdbI npOTNB HAnpaBHeHnRA BcAcbBaHnra. Nocne NoNHO R BbcixAHnRA BCTaBBTe ERO O6paTHO.
BbinyckHOHΦnIbTp
PekomeHnyetc npouuatab 3TOT fNbTp nocne KaKdoRo IITORO ONOPOKHeHn.
3TOTΦnIbTp HaxoINTcNOD 3aunTHO PeWetKoI (4) nepeHne NaHeN. BbTaUNTeΦnIbTp. PpOuNCHTe erO, KAK 3TO yKe 6blno OINCAHO.
UncTkaH xpaHeHne
UHCTka
-Пеледчнстковыньшебе сетeByu BnIky n3po3eKn!
- IpoTpnte Kopnyc cyxO trpIKoN.
- YnctKa KOHTeHepa NbIine6OpHnKa nΦnIbTp a NoDpO6Ho OINcHa B rIabe ,ΦnIbTp"
XpaHHeHne
- YctaHOBHTe pyKoRTky B BepTKKaJIbHoe NOJIOXKeHne.
- PONHOCTbO CMOTaTe Ka6eIb.
YctpaHHe HEnoJaOK HEnCnpaBHOCTe
Cna6a moHocTb
JaKe ecn yka3aTeNb HAnOnHeHnI NbIeC6OpHnKa eue He cToNT Ha MeTke MAX, MoUHOCTb NbIeCOcA MOXET CHNHTbcr. B 3TOM cnYuae npOuHCTnTE FNBTP, KAK 3TO ONCaHO B pyKOBODCTBe NOlb3OBaTeNB B rnaBE "HnIbT".
3TO TaKKe Heo6xOaHMo DeIaTb B 3aBNCMOCTn OT YcNoBn pa60tbl, HapnMep OueHb MeNkA nnbl.
JaKe ECIN BO Bpemra paObTb HEOXnDaHNO OCTaHOBNTcMOTOp,3TO MOKeT 6bTb npuHOn 3aNoBaHHnΦnTbToA
Bo3MOHHbI npHnHbI
Cpa6otana 3aunita neperpeBa motopa. BbIKIOUHTe nbIeocn DaTe Emy npMepHo 20 MNHyT noCToRb. 3a 3TO BpEM npOuHCTne FnhBtpbl. BKNIOHaTE nbIeococ TOnbko nocne nonHoro npocbixAHn FnhBtpOB.
HnopoNbIe Tena
HOpOHeIe Ta,nonaBwne B nbIeCoc,JeKo ydaIHOCTc,eCNOTCOeDHHITbNbIEcoCHbI WHaHR y pa3bema (2).Bo3bMITE B NOMOuB OTBePTKy.
- Pocne ydaenHH HOpOHO Tena nOdkHouHTe 1bIlecoCHn IHaHr OpaTHo.
TexHnueckne daHHbIe
Modelb: BS 1255
3neKtponHtAHHe: 230B,50
Iotppe6nemma MoHoctb:
Pnom: 1300 bar
Pmax. 1800baT
Klacc 3aunrbl:
3To n3deneHne npoJno BCE Heo6xOdmMbIe n aKtyaJIbHbIe npOBepKn, npEaINcaHHbIe DnpeKTHBOI CE,K npIM.Ha 3eNtPOMaHTHyIO COBMeCTHMOCb N COOTBETCTBHe Tpe6OBAHnAM K Hn3KOBoJbTHOH TEXHKe, OHO bIIO TaKke CkOHCTpyuPoBaHO IN NOcTpoEHO C yUeTOM NoCNeDnHX Tpe6OBAHn IO TEXHKe BE3OnaCHOCTN.
Mbl octabnem 3a c06o npabo Ha texhueckne H3MeHHeH!
TapaHTHnHOe 06raTeNbCTBO
TapaHTnHbI cPOk Ha TePPHTOpN PocChckOeepaun yCTaHaBnBaETc nonHomOuHbIMnpedctaBnteMn.
Kaccobbyuek ABnreTc rapaHTnHbIM TaHOOM.63 HeRo HBeO3MOKeH 6ecnlaTHb peMOHT nnn 3ameHa n3dennr.
B cnyae BO3HKNHOHN npHTeHn no rapaHTn, npeIbIaBte H3dEIne B NOJHOKOMJIeKTAuH, C opHHaHbHO yNakOBKO IN KACCObIM YekOM TOPROBO TOKe, npOdaBWe 3TO H3dEIne.
*) Depektb npnHaIeKHOCTe He cnykat npnHNOI
dIABTOMATNueCKO 3aMeHb BCero H3dJIy. B 3tOM
clyuae no3BOHHTe Ham, noKaIyIcTa, no ropRHe IINHN!
Pa3bIbe CTekJIHHbIe n NOnOMaHbIe nlaCTMaCCOBIE
TeTANI BO3MeUaOTc TaIbKO 3a DonoJIHrTeBHyO
ONlAty!
DeΦeKTBn3HaunBaembIX npHnAdneKHOCTe HnI TPuuxxCn DeTanei (HaPnIMep KOHTKThie uetkn MOTOPOB, CmecnteBhble KpOKN, pnpBOdHble peMHN, 3aNaChbIe NylbTb IynpaBneHn, 3anaChbIe 3y6HbIe 5eTKN, nIbHbIe NIOtHa n T.D.), a TaKKe YnCTKa, TEXo6cnykBAHHe Nn3aMeHa TpyuxxCn DeTanei He nonaHOT NOr rapaHTNO, INoTOMy PPOBOdATCn 3a OTdeNbHyO ONnATy!
TapaHTn TepTeCTn Pn BCKpbTn N3dJIIN NOCTOPOHHmN IuaAMn.
Pocne rapaHTn
Iocne OOKHuaHn Cpoka rapaHTn,peMOHT n3denn npOn3BOJNTc 3a ONlATy, COOTBeTCTByIOUHMM MaCTepCKHMn IIN NyHKTAMC cepBnCHOO o6CnyKbAHn.

CAtRONICINTERNATIONAL GMBH
D-47906 Kempen/Germany · Industriering Ost 40
Telefon 02152/2006-888
Internet: http://www.clatronic.de · email: info@clatronic.de

- FRANÇAIS
- JE ZYK POLSKI
- Sommaire
- General Safety Instructions
- Special Safety Instructions
- Symbols in these Instructions for Use
- WARNING:
- CAUTION:
- NOTE:
- Overview of the Components
- Initial and General Use of the Device
- Handle/Telescopic Tube
- Adjusting the Height of the Floor Nozzle
- Electrical Connection
- Position in Use
- Instructions for Use
- i NOTE:
- Switching off
- Filter
- Transparent dust collection container
- Main Filter, Pre-filter (in the Dust Container)
- Motor Protection Filter
- Outlet fi lter
- Cleaning and storage
- Cleaning
- Storage
- Troubleshooting
- Weak Suction
- Possible Cause
- Foreign Bodies
- Technical Data
- Guarantee
- After the expiry of the guarantee
- Meaning of the "Dustbin" Symbol
- I INPHMEUYAHHE:
- IpeuehB Detane npno6opa
- PnroTOBka Kpa6oTe NnpaOK PONb3OBaHHN 3JIeKTPponpnoOpom
- PykoTka/Teleckonnueckan Tpy6a
- PerynpoBka BbICOTbl 1eTKH
- 3neKtpoHtAnHe
- I PnIMeUAHNE:
- Paboya nozunna
- PnmeaHnno nolb3OBAHNO
- I PIMMEUAHNE:
- BHUMAHNE:
- BbIKIOueHne
- ΦnNbTp
- PpO3paHbI KOHTeHep-ntleC6OpHNK
- TnabHbI ΦHbTp, npeBapHTeNbHbI ΦHbTp (BHyTpN KOHTeHepa Nblnc6OpHNka)
- PNEyUNPEKHEHNE:
- I INPIMEYAHNE:
- 3aunTHbH ΦnIbTp MOTOPa
- BbinyckHOHΦnIbTp
- UncTkaH xpaHeHne
- UHCTka
- XpaHHeHne
- YctpaHHe HEnoJaOK HEnCnpaBHOCTe
- Cna6a moHocTb
- Bo3MOHHbI npHnHbI
- HnopoNbIe Tena
- TexHnueckne daHHbIe
- TapaHTHnHOe 06raTeNbCTBO
- Pocne rapaHTn
Brand : CLATRONIC
Model : BS 1255
Category : Vacuum Cleaner