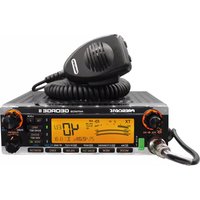
Teddy - Talkie Walkie PRESIDENT - Free user manual and instructions
Find the device manual for free Teddy PRESIDENT in PDF.


User questions about Teddy PRESIDENT
0 question about this device. Answer the ones you know or ask your own.
Ask a new question about this device
Download the instructions for your Talkie Walkie in PDF format for free! Find your manual Teddy - PRESIDENT and take your electronic device back in hand. On this page are published all the documents necessary for the use of your device. Teddy by PRESIDENT.
USER MANUAL Teddy PRESIDENT
H Hotel
1 India
J Jullett
K Kilo
L Lima
M Mike
N November
Oscar
P Papa
Quebec
R Romeo
S Sierra
V Victor
W Whiskey
X X-ray
YYankee
Z Zulu
LANGUAGE TECHNIQUE
AM : Amplitude Modulation (modulation d'amplitude)
CW:Continuous waves (morse)
GP: Ground plane (antenna vertical)
SWR:Standing Waves Ratio
SWL:Short waves listening (ecoute en ondes courtes)
SW : Short waves (ondes courtes)
CITY NUMBER :Code postal
COPIER : Fcouter, capter, receiveo
FIXEMOBILE ;Stationmobilearréee
FB : Fine business (bon, excellent)
TVI :InterferencesTV
VISU : Se volr
VX :Vieux copains
WHISKY :Watts
Type: radio CB TEDDY ASC
N° de série :

SANS LE CACHET DU DISTRIBUTEUR LA GARANTIE SERA NILLE
QUESTIONNAIRE CB CONFIDENTIELVOLET A RE
VOYEI
Groupe

SERVICE DES GARANTIES
Route de SÉTE - BP 100
34540 BALARUC - FRANCE
H Hotel
1 India
J Jullett
K Kilo
L Lima
M Mike
N November
Oscar
P Papa
Q Quebec
R Rome
Sierra
VVictor
WWhiskey
X X-ray
YYankee
Z Zulu
TERMINOS DEL ARGOT CEBEISTA
Tip: Radio CB TEDDY ASC
N^o de Serie:

SIN SELLO DEL DISTRIBUTOR LA GARANTIA NO SERA VALIDA
Nombre
Apellidos
Dicho
- Codig postal
Tel
- Desirable when Vd is interested in the CB?
Que emisora tenia antes ?
2 Que marca de antenna utilize?
Before using, be careful never to transmit without first having connected the antenna (connection «B» situated on the back panel of the equipment) or without having set the SWR (Standing Wave Ratio)! Failure to do so may result in destruction of the power amplifier, which is not covered by the guarantee.
MULTI-NORMS TRANSCEIVER!
See function "F" on page 32 and the Configuration table on page 50.
The guarantee of this transceiver is valid only in the country of purchase.
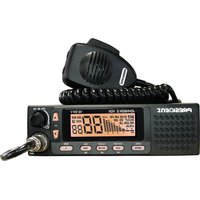
Welcome to the world of the new generation of CB radios. The new PRESIDENT range gives you access to top performance CB equipment. With the use of up-to-date technology, which guarantees unprecedented quality, your PRESIDENT TEDDY ASC is a new step in personal communication and is the surest choice for the most demanding of professional CB radio users. To ensure that you make the most of all its capacities, we advise you to read carefully this manual before installing and using your PRESIDENT TEDDY ASC.
A) INSTALLATION
1) WHERE AND HOW TO MOUNT YOUR MOBILE CB RADIO
(a) You should choose the most appropriate setting from a simple and practical point of view.
b) Your CB radio should not interfere with the driver or the passengers.
c) Remember to provide for the passing and protection of different wires (e.g. power, antenna, accessory cabling) so that they do not in any way interfere with the driving of the vehicle.
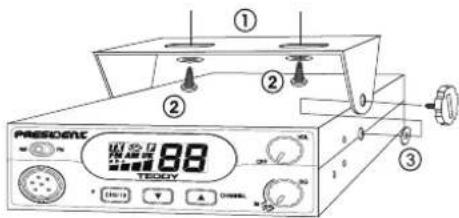
MOUNTING DIAGRAM
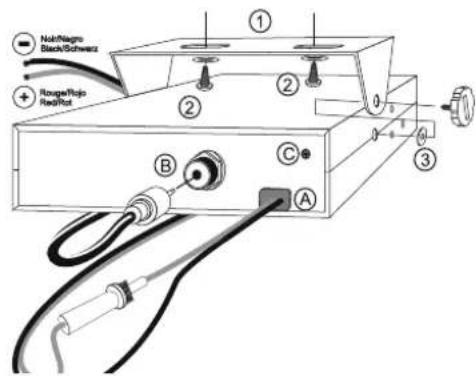
d) To install your equipment, use the cradle (1) and the self-tapping screws (2) provided (drilling diameter 3.2 mm). Take care not to damage the vehicle's electrical system while drilling the dash board.
6) Do not forget to Insert the rubber joints (3) between the CB and its support as these have a shock-absorbing effect which permits gentle orientation and tightening of the set.
1) Choose where to place the microphone support and remember that the microphone cord must stretch to the driver without interfering with the controls of the vehicle.
N.B.: As the transceiver has a frontal microphone socket, it can be set into the dash board. In this case, you will need to add an external loud speaker to improve the sound quality of communications (connector EXTSP situated on the back panel: C). Ask your dealer for advice on mounting your CB radio.
2) ANTENNA INSTALLATION
a) Choosing your antenna
- For CB radios, the longer the antenna, the better its results. Your dealer will be able to help you with your choice of antenna.
b) Mobile antenna
- Must be fixed to the vehicle where there is a maximum of metallic surface (ground plane), away from windscreen mountings.
- If you already have a radio-telephone antenna installed, the CB antenna should be higher than this.
There are two types of antenna: pre-regulated which should be used on a good ground plane (e.g. car roof or lid of the boot), and adjustable which offer a much larger range and can be used on a smaller ground plane (see § 5, Adjustment of SWR). - For an antenna which must be fixed by drilling, you will need a good contact between the antenna and the ground plane. To obtain this, you should lightly scratch the surface where the screw and tightening star are to be placed.
- Be careful not to pinch or flatten the coaxial cable (as this runs the risk of break down and/or short-circuiting).
- Connect the antenna (B).
c) Fixed antenna
- A fixed antenna should be installed in a clear space as possible. If it is fixed to a mast, it will perhaps be necessary to stay it, according to the laws in force (you should
seek professional advice). All PRESIDENT antennas and accessories are designed to give maximum efficiency to each CB radio within the range.
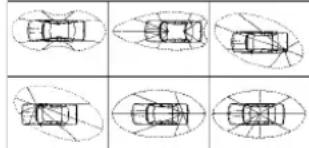
OUTPUT RADIUS PATTERN
3) POWER CONNECTION
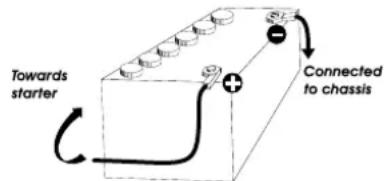
Your PRESIDENT TEDDY ASC is protected against an inversion of polarities. However, before switching it on, you are advised to check all the connections. Your equipment must be supplied with a continued current of 12 volts (A). Today, most cars and lorries are negative earth. You can check this by making sure that the negative terminal of the battery is connected either to the engine block or to the chassis. If this is not the case, you should consult your dealer.
WARNING: Lorries generally have two batteries and an electrical installation of 24 volts, in which case it will be necessary to insert a 24/12 volt converter (type CV 24/12 PRESIDENT) into the electrical circuit. The following connection steps should be carried out with the power cable disconnected from the set:
a) Check that the battery is of 12 volts.
b) Locate the positive and negative terminals of the battery (+ is red and - is black). Should it be necessary to lengthen the power cable, you should use the same or a superior type of cable.
c) It is necessary to connect your CB to a permanent (+) and (-) . We advise you to connect the power cable directly to the battery (as the connection of the CB cable to the wiring of the car-radio or other parts of the electrical circuit may, in some cases, increase the likelihood of interference).
d) Connect the red wire (+) to the positive terminal of the battery and the black (·) wire to the negative terminal of
the battery
e) Connect the power cable to your CB radio.
WARNING: Never replace the original fuse (2 A) by one of a different value.
4) BASIC OPERATIONS TO BE CARRIED OUT BEFORE USING YOUR SET FOR THE FIRST TIME (without transmitting and without using the "push-to-talk" switch on the microphone)
a) Connect the microphone
b) Check the antenna connections
c) Turn the set on by turning the volume knob (1) clockwise.
d) Turn the squelch SQ knob (2) to minimum (M position).
e) Adjust the volume to a comfortable level.
Go to channel 20 by using the and keys(3).
5) ADJUSTMENT OF SWR (Standing wave ratio)
WARNING: This must be carried out when you use your CB radio for the first time (and whenever you re-position your antenna). The adjustment must be carried out in an obstacle-free area.
- Adjustment with external SWR-meter (e.g. TOS-1 PRESIDENT)
a) To connect the SWR meter ; - Connect the SWR meter between the CB radio and the antenna as close as possible to the CB (use a maximum of 40~cm cable, type President CA 2C).
b) To adjust the SWR meter: - Set the CB to channel 20.
- put the switch on the SWR-meter to position CAL (calibration).
- Press the "push-to-talk" switch on the microphone to transmit.
- Bring the Index needle to by using the calibration key.
- Change the switch to position SWR (reading of the SWR level). The reading on the Meter should be as near as possible to 1. If this is not the case, re-adjust your antenna to obtain a reading as close as possible to 1. (An SWR reading between 1 and 1.8 is acceptable).
- It will be necessary to re-calibrate the SWR meter after each adjustment of the antenna.
WARNING: In order to avoid any losses and attenuations in cables used for connection between the radio and its accessories, PRESIDENT recommends to use a cable with a length inferior to 3m.
Your CB is now ready for use.
a) To turn the set on, turn the knob (1) clockwise.
b) To increase the sound level, turn the same knob further clockwise.
2) ASC (Automatic Squelch Control)/SQUEELCH
Suppresses undesirable background noises when there is no communication. Squelch does not affect neither sound nor transmission power, but allows a considerable improvement in listening comfort.
a) ASC: AUTOMATIC SQUEELCH CONTROL
Worldwide patent, a PRESIDENT exclusivity.
Turn the SQ knob (2) anti-clockwise into ASC position. "ASC" appears on the display. No repetitive manual adjustment and a permanent improvement between the sensitivity and the listening comfort when ASC is active. This function can be disconnected by turning the switch clockwise. In this case the squelch adjustment becomes manual again. "ASC" disappears from the display.
b) MANUAL SQUEELCH
Turn the knob clockwise to the exact point where all background noise disappears. This adjustment should be done with precision as, if set to maximum (fully clockwise), only the strongest signals will be received.
3) CHANNEL SELECTOR ~ BEEP
CHANNEL SELECTOR: ▲ and ▼ on front panel
These buttons allow increasing or decreasing a channel. A «beep» sounds each time the channel changes if the BEEP function is activated.
BEEP Beep on changing the channel, buttons etc.
Beep function enable : turn on the power while pressing the (up) button.
Beep function disable: turn on the power while pressing the (down) button.
4) CH9/19 ~ F
CH9/19 BUTTON
Channels 9 and 19 are automatically selected by pressing this button. A push activates channel 9. A second push activates channel 19. A new push returns to the previous configuration.
F - FREQUENCY BAND SELECTION
(configuratiOn:EUPLd;ECU).
The frequency bands have to be chosen according to the country of use. Don't use any other configuration. Some countries need a user's licence. See table page 50.
Proceeding: switch off the transceiver. Keep the key F pressed and switch on again.
F and the letter corresponding to the configuration are blinking.
- In order to change the configuration, use the and keys on front panel.
- When the configuration is selected, press 1 second on the F key, and the letter corresponding to the configuration are continuously displayed, a beep sounds. At this point, confirm the selection by switching off the transceiver and then switching it on again. See the configurations / frequency bands table at page 47 to 49.
5) DISPLAY
It shows all functions:

The BARGRAPH shows the reception level and the output power level.
6) AM / FM
This switch allows to select the modulation mode AM or FM.
Your modulation mode must correspond with the one of the person you are speaking to.
AM/ Amplitude Modulation (AM) is for communications in areas where there are obstacles and over medium distances.
FM/ Frequency Modulation (FM) is for nearby communications in flat, open areas.
AM/FM 2^nd function (only in U configuration)
Allows to alternate the frequency bands CEPT and ENG in the U configuration. When the ENG frequency band is selected, «UK» is displayed.
7) 6 PIN MICROPHONE PLUG
The plug is located on the front panel of the transceiver and makes the settling of the equipment into the dashboard easier.
See cabling diagram page 49.
8)PTT
Transmission key, press to transmit a message, displayed and release to listen to an Incoming communication.
ANL FILTER (Automatic Noise Limiter)
The transceiver is equipped with an automatic filter which reduces back ground noises and some reception interferences.
Frequency ranges : from 26.965 MHz to 27.405 MHz
-
Antenna impedance : 50 ohms
-
Power supply : 13.2 V
-
Dimensions (in mm) : 125 (W) x 170 (D) x 45 (H)
-Weight: 20
- Accessories supplied
-Filter
:ANL (Automatic Noise Limiter) built-in
2) TRANSMISSION
Frequency allowance
- Carrier power
- Transmission interference
- Audio response
- Emitted power in the adj. channel
- Microphone sensitivity
-Drain
Modulated signal distortion
3) RECEPTION
Maxi, sensitivity at 20 dB sinad
Frequency response
- Adjacent channel selectivity
Maximum audio power
Squelch sensitivity
Frequency image rejection rate
- Intermodulation rejection
-Drain
:+/-200Hz
:4WAM/4WFM
: inferior to 4 nW (-54 dBm)
: 300 Hz to 3 KHz
: Inferior to 20 W
:7mV
:1,8A(withmodulation)
:2%
:0.5uV-113dBm
300Hzto3kHz
:60d8
:2W
; minimum 0.2 uV - 120 dBm
maximum 1 mV - 47 dBm
:60dB
:48dB
: 600 mA nominal / 950 mA maximum
D) TROUBLE SHOOTING
1) YOUR CB RADIO WILL NOT TRANSMIT OR YOUR TRANSMISSION IS OF POOR QUALITY
- Check that the antenna is correctly connected and that the SWR is properly adjusted.
- Check that the microphone is properly plugged in.
- Check that the programmed configuration is the correct one (see table page 50).
2) YOUR CB RADIO WILL NOT RECEIVE OR RECEPTION IS POOR
-
Check that the squelch level is properly adjusted.
-
Check that the programmed configuration is the correct one (see table page 50).
- Check that the volume is set to a comfortable listening level.
- Check that the microphone is properly plugged in.
- Check that the antenna is correctly connected and that the SWR is properly adjusted.
- Check that you are using the same modulation mode as your correspondent.
3) YOUR CB WILL NOT LIGHT UP
- Check the power supply
- Check the connection wiring
- Check the fuse.
E) HOW TO TRANSMIT OR RECEIVE AMESSAGE
Now that you have read the manual, make sure that your CB Radio is ready for use (i.e. check that your antenna is connected).
Choose your channel (19, 27).
Choose your mode (AM/FM) which must be the same as that of your correspondent.
Press the "push-to-talk" switch and announce your message «Attention stations,
transmission testing' which will allow you to check the cleamess and the power of your signal. Release the switch and wait for a reply. You should receive a reply like, 'Strong and clean'.
If you use a calling channel (19, 27) and you have established communication with someone, it is common practice to choose another available channel so as not to block the calling channel.
F) GLOSSARY
Below you will find some of the most frequently used CB radio expressions. Remember this is meant for fun and that you are by no means obliged to use them. In an emergency, you should be as clear as possible.
INTERNATIONAL PHONETIC ALPHABET
A Alpha
B Bravo
C Charl
D Delta
E Echo
F Foxtrott
G Golf
H Hotel
1 India
J Juliett
K Killo
L Lima
M Mike
N November
Oscar
P Papa
Q Quebec
R Romeo
S Sierra
V Victor
W Whisky
X X-ray
YYankee
Z Zulu
TECHNICAL VOCABULARY
AM
CB
CH
CW
DX
DW
Amplitude Modulation
: Citizen's Band
: Channel
:Continuous Wave
: Long Distance Liaison
: Dual Watch
FM : Frequency Modulation
GMT : Greenwich Meantime
HF : High Frequency
LF : Low Frequency
LSB : Lower Side Band
RX:Receiver
SSB : Single Side Band
SWR:Standing Wave Ratio
SWL : Short Wave Listening
SW : Short Wave
TX : CB Transceiver
UHF : Ultra High Frequency
USB : Upper Side Band
VHF : Very High Frequency
CB LANGUAGE
Advertising : Flashing lights of police car
Back off : Slow down
Base station : A CB set in fixed location
Bear :Policeman
Bear bite : Speeding fine
Bear cage
Bigslab :Motorway
Big 10-4 : Absolutely
Bleeding : Signal from an adjacent channel interfering with the
transmission
Blocking the channel
Blue boys :Police
Break Used to ask permission to join a conversation
Breaker : A Cber wishing to join a channel
Clean and green
Cleaner channel
Coming in loud and proud
Doughnut
Down and gone
Down one
Do you copy?
DX
Eighty eights
Eye ball
Good buddy
Hammer
Handle
Harvey wall banger
How am I hitting you?
Keyling the mike
Kojac with a kodak
Land line
Lunch box
Man with a gun
Mayday
Meat wagon
Midnight shopper
Modulatio
Negative copy
Over your shoulder
Part your hai
Pull your hammer back.
Rat race
Rubberbander
Sail boat fuel
Clear of police
: Channel with less interference
Good reception
: Tyre
:Turning CB off
: Go to a lower channel
:Understand?
: Long distance
: Love and kisses
: Cbers meeting together
: Fellow CBer
:Accelerator
: CBer's nickname
:Dangerous driver
How are you receiving me?
: Pressing the PTT switch without talking
:Police radar
:Telephone
:CBse
:Police radar
SOS
: Ambulance
: Thlef
:Conversalion
: No reply
: Right behind you
Behave yourself - police ahead
: Slow down
Congested traffic
:New CBer
:Wind
Smokey dozing : Parked police car
Smokey with a camera : Police radar
Spaghetti bowl : Interchange
Stlinger : Antenna
Turkey : Dumb CBer
Up one : Go up one channel
Wall to wall : All over/everywhere
What am I putting to you? : Please give me an S-meter reading
CERTIFICATE OF CONFORMITY
We, GROUPE PRESIDENT ELECTRONICS, Route de Sète, BP 100 - 34540 Balaruc - FRANCE, declare, on our own responsibility that the CB radio-communication transceiver
Brand : PRESIDENT
Model:TEDDY
Manufactured in PRC
is in conformity with the essential requirements of the Directive 1999/5/CE (Article 3) adapted to the national law, as well as with the following
EN 300 433-1 V1.3.1 (2011-07)
EN 300 433-2 V1.3.1 (2011-07)
EN 301 489-1 V1.8.1 (2010-1) EN 301 489-13 V1.2.1 (2002-8)
EN 60215 (1996)
Balaruc, the 2011-07-30
Jean-Gilbert MULLER
General Manager
UWAGA!
ZANIM ZACZNIESZ UZYTKOWAC RADIO, UWAZAJ, ABY NIE NADAWAC BEZ PODLACZONEJ ANTENY (PRZYLACZE "B"NA TYLNEJ SCIENCE URZADZENIA), ANI BEZ SPRAWDZENIA SWR ANTENY (WSPOcZYNNIK FALI STOJACEJ), W PRZECIWNY RAZIE RZYKUJESZ ZNISZCZENIEM WZMACNIACZA MOCY, CO NIE JEST OBJECTE GWARANCJA
URZADZENIE SPELNIA WYMAGANE PRAWEM NORMY!
ZOBACZ FUNKCJA "F" NA STRONIE 42 ORAZ TABELE KONFIGURACJI NA STRONIE 50.
WAZNE
H Hotel
I India J Juliet
K Kilo
L Lima
M Mlike
NNovember
Oscar
P Papa
Q Quebec
R Rome
$ Sierg
Tango
Uniform
VVictor
W Whiskey
X X-ray
YYankee
Z Zulu
SLOWNIK TECHNICZNY
AM
CB
CH
CW
DW
DX
EM
PM GMT
The frequency band and the transmission power of your transceiver must correspond with the configuration authorized in the country where it is used.
Note: In U configuration : In order to select the frequency band ENG. Move the AM/FM switch (6) Into FM position. When the frequency band is ENG, «UK» appears on the display. Move the AM/FM switch (6) into AM position for select the frequency band CEPT. «UK» disappears from the display.
Countries in which there are particular restrictions (Licence / Register)