MiniTiger - Scale Mettler Toledo - Free user manual and instructions
Find the device manual for free MiniTiger Mettler Toledo in PDF.
| Product type | Compact countertop scale |
| Brand | Mettler Toledo |
| Model | MiniTiger |
| Capacity | 6 kg or 15 kg depending on version |
| Accuracy | 2 g or 5 g |
| Weight display | 5 digits |
| Unit price display | 5 digits |
| Total amount display | 6 digits |
| Operating temperature range | -10 °C to +40 °C |
| Storage temperature range | -25 °C to +50 °C |
| Power supply | 12 Vdc, 200 mA (consumption), 230 VAC / 12 VDC 800 mA power adapter included |
| Main functions | Weighing, zeroing, tare, PLU (25 prices), totalization, ECO function, integrated rechargeable battery |
| PLU memory | 25 storable unit prices |
| Battery type | Rechargeable 6 V / 5 Ah (depending on version) |
| Battery life | Approximately 15 minutes after low battery indicator lights up |
| Care and cleaning | Slightly damp soft cloth; do not use solvents or corrosive products |
| Installation precautions | Stable support, away from vibrations, drafts, and friction; level with 4 feet |
| Safety | Do not disassemble the device; contact technical service for any repairs |
| Error messages | RAM, ROM, EEPROM, overload, price overflow, PLU not found |
| Country of origin | Switzerland (Mettler Toledo brand) |
Frequently Asked Questions - MiniTiger Mettler Toledo
User questions about MiniTiger Mettler Toledo
0 question about this device. Answer the ones you know or ask your own.
Ask a new question about this device
Download the instructions for your Scale in PDF format for free! Find your manual MiniTiger - Mettler Toledo and take your electronic device back in hand. On this page are published all the documents necessary for the use of your device. MiniTiger by Mettler Toledo.
USER MANUAL MiniTiger Mettler Toledo
Printed in China 03/01
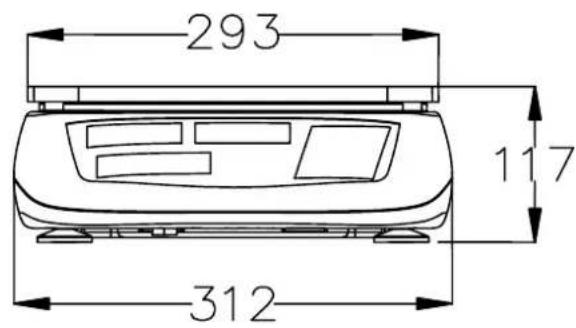
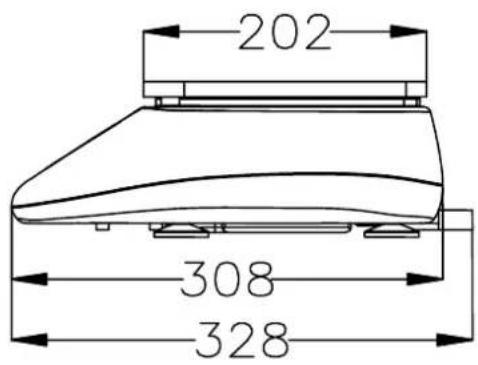
Dimensions Abmessungen Dimensioni Dimensionen Afmetingen Dimensione Dimensoes
GEO-Value table
| GB GEO-Value | The GEO-Value of verified balances explains for which location of use the balance has been verified. This GEO-Value is shown on the balance weight display shortly after switch on the balance. Further details see „GEO-Value table". |
| DE GEO-Wert | Der GEO-Wert gibt bei vom Hersteller geeichen Waagen an, für welchen Aufstellungsord die Waage geeicht ist. Dieser GEO-Wert wird kurz nach dem Einsatz der Waage im Gewichtsfeld des Display angezeigt. Genaueres ist der folgenden Tabelle „GEO-Value Table" zu entnahmen. |
| FR Valeur GEO | La valeur GEO de balances poinconnées indique pour chaque localisation la balance a été approuvée. Cette valeur GEO est indiquée sur l'afficheur de poids de la balance peu de temps après sa mise en marche. Pour de plus amples détails, consultez le tableau des valeurs GEO (GEO-VALUE TABLE). |
| IT Valore-GEO | Il volore di GEO delle bilance omologate, identifica per quale area le bilance sono state verificate all'uso. All'accensione dello strumento quello valoriore viene moltoromo brevamente sul display del peso. Per ulteriori informazioni vedere la tabella „GEO-Value Table". |
| NL GEO-waarde | De GEO-waarde gefft aan voor welke lokatie de weegschaal door de fabrikant geleikt is. De GEO-waarde wordt kort na het aanzetten van de weegschaal in de gewichtsuitlezing zichtaar. Meer informatie over de Geo-waarde kan in de bijgevoegde tabel „GEO-Value Table" worden gelezen. |
| ES Valor GEO | El valor GEO indica, para las balanzas verificables, las ubicaciones para las cuales han sido verificadas por el fabricante. Este valor GEO aparece brevamente en el Campo de peso del display tras la conexión de la balanza. Para más detalles, ver tabla de valeurs GEO (GEO-VALUE TABLE). |
| PT VALOR GEO | O valor GEO de balações verificadas explicá que cada local de utilização destas foi verificado. Este valor GEO aparecerá no display de peso da balança durante o arranque da mesma. Para mais detalles consulutar „A TABELA DE VALORES GEO" (GEO-VALUE TABLE). |
| Country | Geo-Width | Geo-Value |
| Austria 46°22' - 49°01' 18 | ||
| Belgium 49°30' - 51°30' 20 | ||
| Bulgaria 41°41' - 44°13' 16 | ||
| Croatia 42°24' - 46°32' 18 | ||
| Czechia 48°34' - 51°03' 20 | ||
| Denmark 54°34' - 57°45' 23 | ||
| France 41°20' - 51°00' 19 | ||
| Finland 59°48' - 70°05' 25 | ||
| Germany 47°00' - 55°00' 20 | ||
| Greece | 34°48' - 41°45' 15 | |
| Hungary | 45°45' - 48°35' 19 | |
| Ireland | 51°05' - 55°05' 22 | |
| Iceland | 63°17' - 67°09' 26 | |
| Italy | 35°47' - 47°05' | 17 |
| Latvia | 55°30' - 58°04' 23 | |
| Luxembourg | 49°27' - 50°11' 20 | |
| Liechtenstein | 47°03' - 47°14' 18 | |
| Lithuania | 53°54' - 56°24' 22 | |
| Netherland | 50°46' - 53°32' 20 | |
| Norway 57°57' - 7°11' | 24 | |
| Poland 49°00' - 54°30' 21 | ||
| Portugal 36°58' - 42°10' 15 | ||
| Romania 43°37' - 48°15' 18 | ||
| Sweden | 55°20' - 69°04' 24 | |
| Switzerland | 45°49' - 47°49' 18 | |
| Slovakia | 47°44' - 49°46' 19 | |
| Slovenia | 45°26' - 46°35' 18 | |
| Spain | 36°00' - 43°47' 15 | |
| Turkey | 35°51' - 42°06' 16 | |
| United Kingdom | 49°00' - 62°00' 21 |
(default)
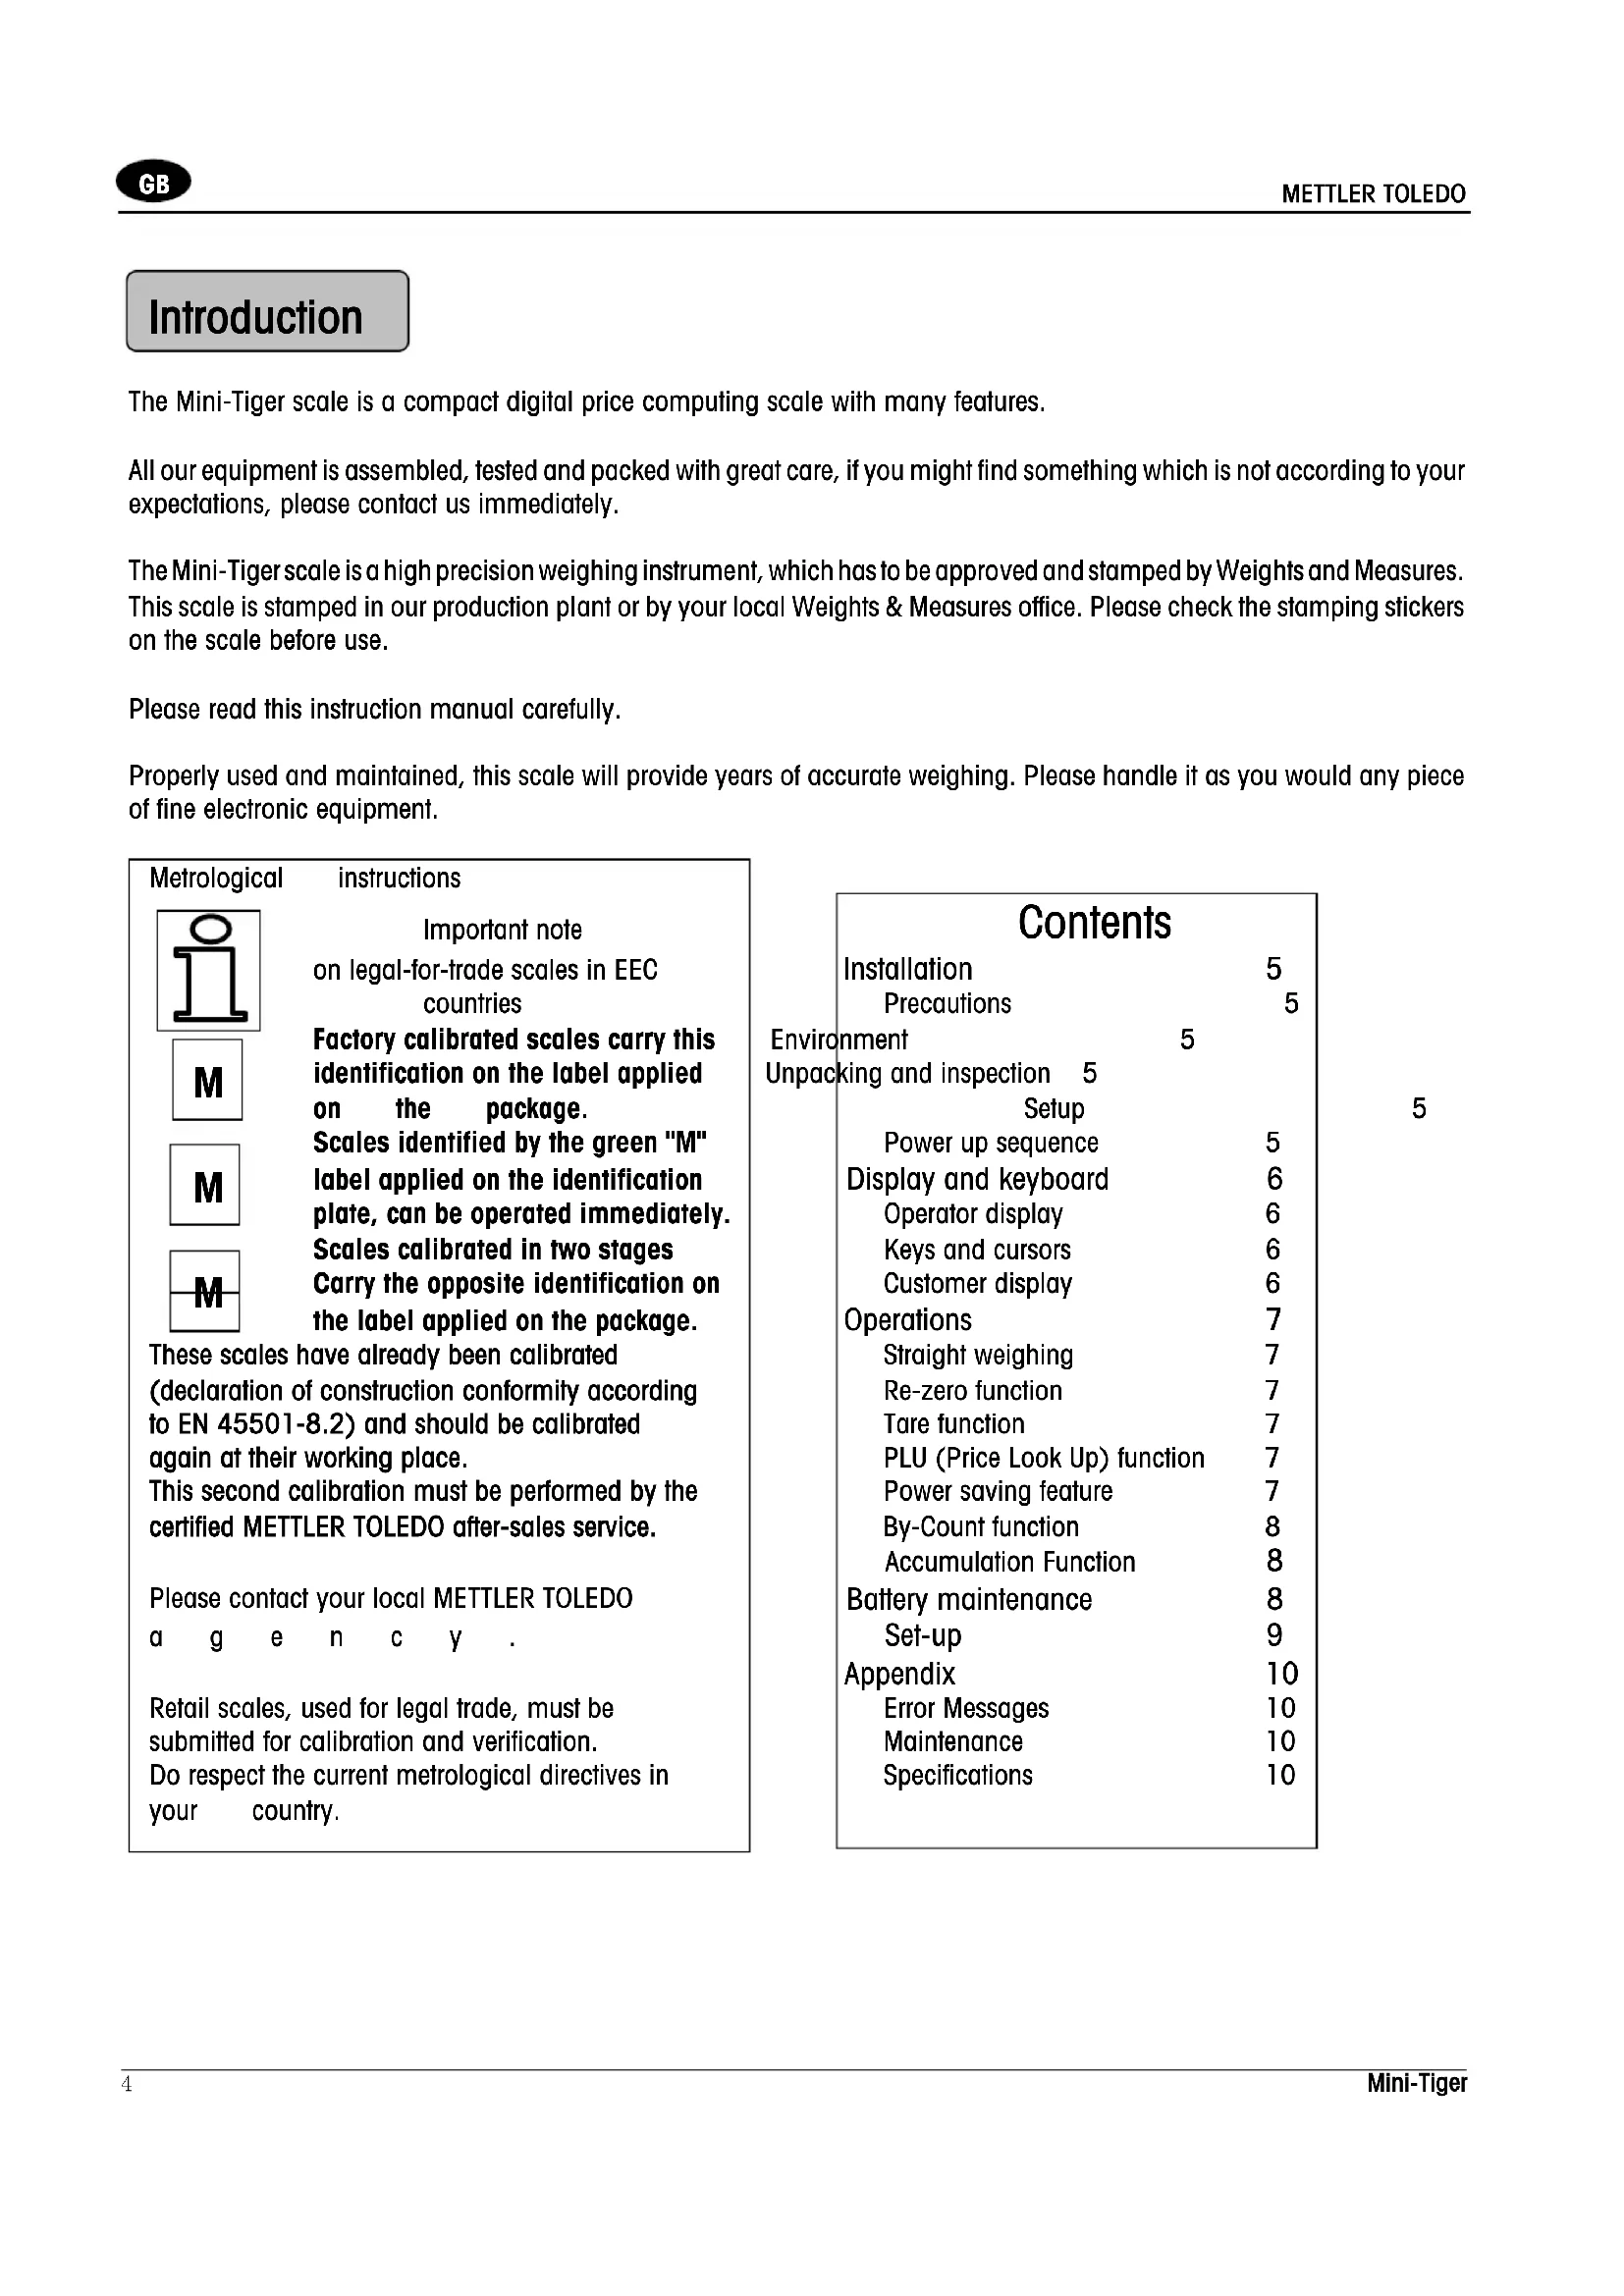
Introduction
The Mini-Tiger scale is a compact digital price computing scale with many features.
All our equipment is assembled, tested and packed with great care, if you might find something which is not according to your expectations, please contact us immediately.
The Mini-Tiger scale is a high precision weighing instrument, which has to be approved and stamped by Weights and Measures. This scale is stamped in our production plant or by your local Weights & Measures office. Please check the stamping stickers on the scale before use.
Please read this instruction manual carefully.
Properly used and maintained, this scale will provide years of accurate weighing. Please handle it as you would any piece of fine electronic equipment.
Metrological


instructions
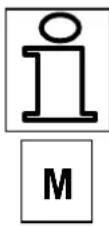
Important note on legal-for-trade scales in EEC countries
Factory calibrated scales carry this identification on the label applied on the package.
Scales identified by the green "M" label applied on the identification plate, can be operated immediately.
Scales calibrated in two stages Carry the opposite identification on the label applied on the package.
These scales have already been calibrated (declaration of construction conformity according to EN 45501-8.2) and should be calibrated again at their working place.
This second calibration must be performed by the certified METTLER TOLEDO after-sales service.
Please contact your local METTLER TOLEDO
a g e n C y
Retail scales, used for legal trade, must be submitted for calibration and verification. Do respect the current metrological directives in your country.
Contents
Installation 5
Precautions 5
Environment 5 Unpacking and inspection 5
Setup
Power up sequence 5
Display and keyboard 6
Operator display 6
Keys and cursors 6
Customer display 6
Operations 7
Straight weighing 7
Re-zero function 7
Tare function 7
PLU (Price Look Up) function 7
Power saving feature 7
By-Count function 8
Accumulation Function 8
Battery maintenance 8
Set-up 9
Appendix 10
Error Messages 10
Maintenance 10
Specifications 10
5
Installation
Precautions
This chapter gives detailed instructions and important information to install the Mini-Tiger scale successfully.
Environment
Before you install your Mini-Tiger scale, identify the best location for the equipment. The proper environment enhances the operation and longevity of the scale. Keep in mind the following factors, which might have a negative influence on the scale's operation:
Vibration
Vibration diminishes the scale's ability to measure accurately. Electrical machinery such as conveyors and drill presses can cause inaccurate and non-rerepeatable readings. The scale may also read inaccurately if it is not leveled properly.
Air current
Moving air can cause the scale to read an additional force (add. weight) and have the same effect as vibration.
Friction
A scale cannot measure accurately if an object is rubbing or pressing against the platter.
Unpacking and inspection
Please inspect the package as it is delivered by the carrier. If the shipping container is damaged, check for internal damage and file a freight claim with the carrier if necessary. If the container is undamaged, open the box, remove the scale and place it on a solid, flat surface. Please keep the packing material and shipping insert in case you need to return the scale to METTLER TOLEDO. The Mini-Tiger is a precision instrument and may be permanently damaged if not shipped in factory approved packaging.
Package contents for all Mini-Tiger units include:
Mini-Tiger scale
platter
AC-DC power adapter
operation manual
Setup
Open the box and pull up the scale, including the packing material. Remove the packing material from each side of the scale. Set the unit on a sturdy, level surface. Level the scale by turning the adjustable feet on the bottom of the unit. When the bubble indicator is in the centre of the circle, Mini-Tiger is levelled correctly.
Bubble indicator: Good


All four feet must touch the surface to make sure that Mini-Tiger does not rock.
Put the platter on top of Mini-Tiger.
Unpack the power adapter and plug it into the bottom of the scale. Plug the line cord into a properly grounded AC power outlet.
Power up sequence
Press the power key to turn on the Mini-Tiger. The Mini-Tiger goes through a series of self-tests when it is turned on. The scale performs a diagnostic test on its ROM and RAM, and proceeds to normal operating mode. The power-up sequence is as follows:
- Light all segments of the display characters. This verifies operation of all segments.
- Display the software revision and part number.
- Display GEO value in weight window.
- Capture zero and be ready for normal operation.
Note: Before switching on the Mini-Tiger scale, always make sure there is nothing on the platter.
Display and keyboard
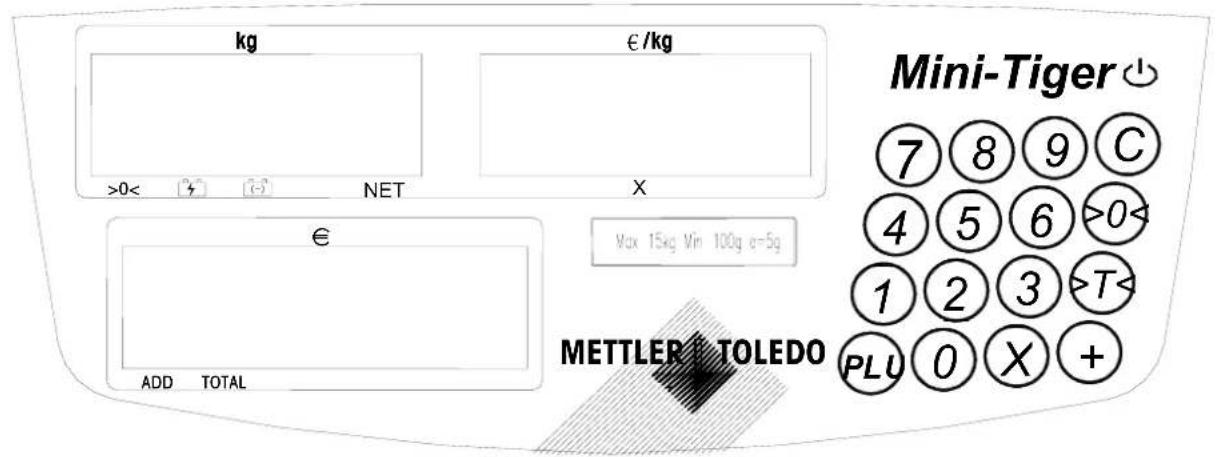
Operator display
Keys and Cursor
Not all scales have all following functions, please check the overlay of your scale to see which keys it has.
| Key | Name | Function |
| 0 through 9 | Numeric Key To enter | unit price, plu number and other data |
| >0< | Zero Key To return the scale to gross zero if drifting occurs | |
| >T< | Tare Key To tare the scale | |
| C | Clear Key To clear unit price or accumulator*. | |
| PLU | PLU Key To enter or recall a PLU | |
| +* | Accumulation Key* | To add current total price into accumulation memory |
| Enter key* To enter data | ||
| X* | By-count Key* | To calculate the price of non-weighing item |
| Cursor | Description |
| >0< | To be lit when weight is gross 0. |
| 3 | To be lit when power is AC or battery is fully charged. |
| (-) | To be lit when power is battery, it blinks to indicate the voltage of battery is lower than the required. |
| Net | To be lit when fare is existed. |
| X* | To be lit in by-count mode. |
| Add* | To be lit when total price is added to accumulation memory. |
| Total* | To be lit when accumulation memory is not zero. |
- These functions and cursors are not available in the scale to EU countries.

Customer display
Operations
Straight weighing
Place the item to be weighed on the platter.
Enter the unit price (The price to pay will come up in the total price display simultaneously).
Remove the item from the platter, all displays will return to 0.
Re-zero function
There are two ways to re-zero the scale:
- Power-up Zero
- Push button Zero
Power-up Zero
The scale will automatically capture zero when it is turned on. The power-up zero capture range is +/-10% of the scale capacity. When the scale is turned on with a weight on the platter of more than +/-10% of the capacity, the scale will not capture zero (the weight display will show "----") and the scale will not be ready for use. After removing the weight the scale will capture "zero".

Pushbutton Zero
The ZERO key re-zeros the scale over a range of +/-2% of the scale capacity. To use this function, the scale must be in the gross weighing mode (NET cursor must be off) and in a no motion condition. When the weight on the platter is more than +/-2% of the scale capacity the depression of the zero key will not be accepted.
Tare Function
The Tare key subtracts the weight of the wrapping material.
Pushbutton Tare

Place the empty container or wrapping material on the platter.
Press _T^>T< key.
Place the item to be weighed in the container or on the wrapping material and then onto the platter.
Enter the unit price.
Remove the weighed item, as well as the container or wrapping material from the platter, the displays will show all 0.
PLU (Price Look Up) Function
The PLU function stores 25 PLU's in the scale's memory. They can be used for frequently sold goods, where the prices can be looked up by simply entering the PLU number.
Storing a PLU
Enter the required unit price.
Press and hold the PLU key until two beeps is heard.
In the weight display appears: "PLU".
Enter the PLU number (between 1 and 25) and wait for approx. 3 seconds, until the scale beeps twice.
Recalling a PLU

Press the (PLU) key followed by the desired one or two-digit number. The stored unit price will appear in the unit price display.
Power Saving Feature
Power saving feature is used to save battery power.
When using the battery and the scale is idle for 2 minutes, both the price and total price displays will turn off, the weight display will only display one O on the right and the battery in use cursor is lit. This indicates that the scale is in the power saving cycle. When weight is placed on the platter or a key is pressed, the scale will wake up
automatically.
If there is still no key operation and weight change 15 minutes after power saving status occurred, the scale will be turned off automatically. This function can be enabled or disabled through setting of the softswitch (group 1, step
4: "Automatic Power Off").
By-Count function*

By-Count function is used to calculate the price of non-weighing items.
1) Enter deal quantity (1-99), press By-Count key, then enter the deal price.
2) Press enter key. The scale is now ready for by-count operation. The by-count cursor* is illuminated.
3) Enter the quantity to be sold, the scale will display the total price.
4) Press clear key to return the scale to weighing mode.

Accumulation Function*
Perform a transaction as described in straight weighing, by-count or tare mode sections.
Press the accumulation key. The total price will be added to the accumulated total. The illuminated cursors will point to "TOTAL" and "ADD". The weight display will show message "totAL", the unit price display will show the number of accumulations and the total price display will show the accumulated total price.
Repeat the above two steps until all desired transactions are accumulated.
There are three ways to return the scale back to the normal weigh mode:
1: Pressing the clear key to clear an accumulator, and return to weighing mode.
2: Press tare key to tare and back to weighing mode.
3: Press numeric key to enter new price and return to weighing mode.
Press accumulation key to recall accumulation when total price is zero or total price field is blank.
- These functions and cursors are not available in the scale to EU countries.
Battery Maintenance
Rechargeable lead-acid battery
If charging kit is installed, the scale can charge the lead-acid battery (6V/5Ah). To charge a lead-acid battery, connect the scale to the external power supply. The battery will be charged regardless the scale is on or off.
It usually takes not more than 12 hours to charge the battery to full capacity depending on the voltage of the battery. If the battery is has been deep-discharged, a prolonged charging time is required to bring the battery back to full capacity.
There are two battery cursors, one is 3 , and the other is 4 . Cursor 1 lit to indicate the battery capacity is full and current power source is power supply, and it flashes to indicate that battery is being charged. Cursor (-) is lit to indicate that current power source is battery, and it flashes to indicate that voltage of the battery is lower than the required.
The scale shows "L Bat" in the weight window and stop weighing when the cursor begins blinking, and the scale will be turned off automatically about 10 seconds later. In this case, please charge the batteries.
If the unit is plugged into the wall outlet when battery power is used, the power source will automatically switch to the wall transformer. And when the AC power is off, power source will automatically switch to battery.
Notice
The battery should be recharged at least every 5 months regardless it is used or not. After a long time storage, e.g. over 3 months, it is desired to cycle (charge/discharge) the battery 3 times to let it restore to full capacity.
When replacing the battery, pay much attention to the poles. The positive (+) terminal must be connected to the red connector and the negative (-) terminal must be connected to the black connector. If connected wrongly, the battery will be damaged.
Setup
Several parameters in the scale can be changed to enable you to set up the scale to your individual needs.
In setting mode, >T< is called toggle key, ④ is called enter key. Press toggle key to choose the required parameter. Press enter key to step to the next function.
Access to operator set-up mode
Press and hold key until "grP 1" is displayed when turn on the scale.
| kg | €/kg | € |
| GRP 1 | X | ADD TOTAL |
Press the enter key.
| kg | €/kg | € |
| GRP 1 | STEP 3 ON | |
| >0< | X | ADD TOTAL |
With step 3 the Beep can be switched on or off.
ON -The scale will beep when a key is pressed.
OFF-No sound is made when a key is pressed.
Press toggle key to toggle between on and off.
Press enter key to step to the next function.
| kg | €/kg | € |
| GRP 1 | STEP 4 ON | |
| >0< | X | ADD TOTAL |
With step 4 the auto power off can be set.
OFF- Disable automatic power-off function.
ON -Enable automatic power-off function.
Press entry key to step to the next function.
| kg | €/kg | € |
| GRP 1 | STEP 6 ON | |
| >0< | X | ADD TOTAL |
With step 6 Auto clear of tare and unit price can be switched on or off.
ON-Enable automatic clearing when weight is removed from platter.
OFF-Disable automatic clearing when weight is removed from platter.
Press enter key twice to step to the next function.
| kg | €/kg | € |
| GRP 2 | STEP 7 0 | |
| >0< | X | ADD TOTAL |
With group 2 step 7 way to output data can be selected.
O- outside command from PC or printer.
The command format is "P".
1-Command output
2- Stable output
3- Continuous output
Press enter key to step to the next function.
| kg €/kg | € | |
| GRP 2 | STEP 8 2 | |
| >0< | X | ADD TOTAL |
With group 2 step 8 content of output can be selected.
0- weight only
1- weight and unit price or weight and item number
2- weight and unit price and total price
Press enter key to step to the next function.
| kg €/kg | € | |
| GRP 2 | STEP 8 OFF | |
| >0< NET | X | ADD TOTAL |
With group 2 step 9 content of entry can be selected.
OFF- enter unit price
ON- enter item number
When "on" is selected, price computing function is disabled, the entry in the unit price window is item number up to 5 digit, and the total price window will be blank.
Press enter key to step to the next function.
| kg €/kg | € | |
| GRP 2 | STEP 10 | OFF |
| >0< | X | ADD TOTAL |
With group 2 step 10 output format can be selected.
OFF-Single line
ON - multi-line
Press enter key twice to step to the next function.
| kg €/kg | € | |
| GRP 3 | STEP 1 | 1 |
| >0< | X | ADD TOTAL |
Depending on the environment a filter can be set to get a stable reading of the weight.
0 - No digital filtering.
1 - Light digital filtering.
2-Heavy digital filtering.
Press enter key to step to the next function.
| kg €/kg | € | |
| SAVE | ||
| >0< | NET X | ADD TOTAL |
Now select if you want to save the previous setting, if yes depress enter key. If not, press toggle key.
| kg C/kg | C | |
| ABORT | ||
| >0< | NET | X |
| ADD TOTAL |
Press enter key to abort the settings.
Appendix
Error Messages
The 8434 will display an error message if a scale problem or incorrect keyboard entry is sensed. The error codes are:
| E11 | RAM error | METTLER TOLEDO Service |
| E16 | ROM error | |
| E18 | EEPROM error | |
| E33 | Total price >9999.99 or the number of transaction >99 | Clear total display |
| E34 PLU number >25 PLU nuber 1~25 | ||
| No PLU No PLU is found Program PLU | ||
| nnnnn in weight window Weight is more than full capacity plus 9e | Remove items from platter | |
| nnnnnnn in total price window Total price is more than 9999.99 | ||
| uuuuu in weight display can not capture zero | Remove items from platter or calibrate the scale | |
Maintenance
Remove power by removing the line cord or transformer from the wall outlet.
Use a clean, damp cloth to wipe the exterior surfaces.
DO NOT use solvents and chemicals to clean the unit.
DO NOT attempt to remove the cover or perform service or maintenance on the internal parts of the scale.
Specifications
Capacity : 6 kg or 15 kg
Divisions : 2 or 5 gram
Weight display : 5 digits
Unit price display : 5 digits
Total price display : 6 digits
Operating temperature : -10°C to +40°C
Storage temperature : -25°C to +50°C
Power supply : 12Vdc
Power consumption : 200mA
Charging current : 400mA
Plug in Power supply:
I/P :230VAC50Hz
O/P : 12VDC 800mA
Specifications subject to change without notice.
Einführung
| kg | €/kg | € |
| GRP 1 | X | ADD TOTAL |
| kg | c/kg | c |
| GRP 2 | STEP 7 | 0 |
| >0< [ ] [ ] NET | X | ADD TOTAL |
| kg €/kg | € | |
| GRP 2 | STEP 10 | OFF |
| >0< [ ] [ ] [ ] NET | X | ADD TOTAL |
| kg €/kg | € | |
| ABORT | ||
| >0< | NKT | X |
| ADD TOTAL |
| Kg | €/kg | € |
| GRP 1 | X | ADD TOTAL |
Appuyer sur
| Kg | C/kg | C |
| GRP 1 | STEP 3 ON | |
| >0< | X | ADD TOTAL. |
| Kg | €/kg | € |
| SAVE | ||
| >0< [ ] [ ] NET | X ADD TOTAL | |
| kg | €/kg |
| GRP 1 | STEP 3 ON |
| >0< | X ADD TOTAL |
| kg | €/kg |
| GRP 1 | STEP 6 ON |
| >0< | X ADD TOTAL |
| kg | €/kg | € |
| GRP 3 | STEP 1 | 1 |
| >0< [ ] [ ] [ ] NET | X ADD TOT AL | |
| c/kg |
| STEP 3 ON |
| X ADD TOTAL |
| C |
| e/kg |
| STEP 4 ON |
| X ADD TOTAL |
| C |
| €/kg |
| STEP 6 ON X ADD TOTAL |
| € |
| €/kg |
| STEP 7 0 |
| X ADD TOTAL |
| € |
No grupo 2 passo 7, selección-se o tipo de saía p/ RS.
| C/kg |
| STEP 1 |
| X ADD TO |
| C |
| 1 |
| A1. |
declare under our sole responsibility, that the product,
to which this declaration relates, is in conformity with the following standards and normative document(s):
1) T6050 EC Type approval certificate
Changzhou, Jan, 2003 METTLER TOLEDO (CHANGZHOU) SCALE & SYSTEM LTD.

David Zheng President
Chu Jinlan Quality Assurance Manager
AT Mettler-Toledo Gesellschaft mbH., Favoritner Gewerbering 17, 1100 Wien, Tel. (0222) 604 19 80, Telefax (0222) 604 28 80, Telex 111302
BE Mettler-Toledo S. A., Frans Walravenstraat 84, 1651 Lot (Beersel), Tel. (2) 334 02 11, Fox (2) 378 16 65
CH Mettler-Toledo (Schweiz) AG, Im Langacher, 8606 Greifensee, Tel. (01) 944 45 45, Telefax (01) 944 45 10
DE Mettler-Toledo GmbH, Postfach 110840, 35353 Giessen, Tel. (0641) 507-555, Telefax (0641) 507-218, Telex 482912
ES Mettler-Toledo S.A.E., Avda. San Pablo 28, 28820 Coslada (Madrid), Tel. (91) 674.89.30, Fax (91) 669 33 47
FR Mettler-Toledo S.A., 18/20 Avenue de la Péginière, 78222 Viroflay Cedex, Tél. 01 30 97 17 17, Fax 01 30 97 16 16
IT Mettler-Toledo S.p.A., Via Vialba 42, 20026 Novate Milanese, Tel. (02) 33 332.1, Telefax (02) 35 62 973
NL Mettler-Toledo B.V., Postbus 6006, 4000 HA Tiel, Tel. (0344) 63 83 63, Telefax (0344) 63 83 90
PT Biporto, Lda, Rua da Industria Lote 13 4760-758 Vila Nova, Famalicao, PORTO Tel.252 330 840 Fax. 252 330 843 Tecnica n°. Unico 707 200 141
GB Mettler-Toledo Ltd.,64 Boston Road,Beaumont Leys,Leicester LE4 1AW, Tel.01162357070