PCEKI 1062 - Pan PROFICOOK - Free user manual and instructions
Find the device manual for free PCEKI 1062 PROFICOOK in PDF.

| Product type | Portable induction hob |
| Brand | ProfiCook |
| Model | PCEKI 1062 |
| Power supply | 220-240 V ~ 50/60 Hz |
| Maximum power | 2000 W |
| Net weight | Approximately 2.98 kg |
| Dimensions (W x D x H) | Approximately 29 x 36 x 6 cm |
| Cooking surface material | Ceramic glass |
| Housing material | Plastic |
| Number of cooking zones | 1 |
| Cooking type | Induction |
| Functions | Boost, Timer, 6 power/temperature levels, automatic shut-off |
| Timer range | 1 minute to 3 hours |
| Automatic shut-off | After 120 minutes without interaction; 8 hours at level 1 |
| Pan detection | Yes, with audible alarm if absent or unsuitable |
| Display | LED screen with standby, temperature/power, timer indicators |
| Residual heat indicator | Yes (shows "H") |
| Ventilation | Air inlet and outlet; fan continues after shutdown |
| Care and cleaning | Clean the ceramic glass surface with a damp cloth and special cleaner; housing with a slightly damp cloth; do not immerse |
| Safety | Automatic shut-off, pan detection, overheat protection, hot surface indication |
| Included parts | Induction hob, instruction manual |
| Optional accessories | None mentioned |
| Protection class | II |
| Color | Black (typical) |
| Warranty | See manufacturer's conditions |
Frequently Asked Questions - PCEKI 1062 PROFICOOK
User questions about PCEKI 1062 PROFICOOK
0 question about this device. Answer the ones you know or ask your own.
Ask a new question about this device
Download the instructions for your Pan in PDF format for free! Find your manual PCEKI 1062 - PROFICOOK and take your electronic device back in hand. On this page are published all the documents necessary for the use of your device. PCEKI 1062 by PROFICOOK.
USER MANUAL PCEKI 1062 PROFICOOK
natural_image
Three simple line drawings of cooking pots with crossed x marks, no text or symbols presentLocation of Controls ....3
General Safety Instructions ....40
Specific safety notes for induction hot plates 41
Intended Use 41
Supplied parts 41
Unpacking the appliance ....41
Description of parts....41
General information 42
Electrical Connection....42
Operation 42
Cleaning 44
Storage 44
Troubleshooting 45
Error messages 45
Technical Data 45
Disposal -
Meaning of the "Wheelie Bin" Symbol ....45
General Safety Instructions
Read the operating instructions carefully before putting the appliance into operation and keep the instructions including the warranty, the receipt and, if possible, the box with the internal packing. If you give this device to other people, please also pass on the operating instructions.
- The appliance is designed exclusively for private use and for the envisaged purpose. This appliance is not fit for commercial use. Do not use it outdoors. Keep it away from sources of heat, direct sunlight, humidity (never dip it into any liquid) and sharp edges. Do not use the appliance with wet hands. If the appliance is humid or wet, unplug it immediately.
- When cleaning or putting it away, switch off the appliance and always pull out the plug from the socket (pull the plug itself, not the lead) if the appliance is not being used and remove the attached accessories.
- Do not operate the machine without supervision. If you leave the room you should always turn the device off. Remove the plug from the socket.
- The device and the mains lead have to be checked regularly for signs of damage. If damage is found the device must not be used.
- Do not try to repair the appliance on your own. Always contact an authorized technician. To avoid the exposure to danger, always have faulty cable be replaced only by the manufacturer, by our customer service or by qualified person and with a cable of the same type.
• Use only original spare parts. - Pay careful attention to the following "Special Safety Instructions".
Symbols in these Instructions for Use
Important information for your safety is specially marked. It is essential to comply with these instructions in order to avoid accidents and prevent damage to the machine:
WARNING:
This warns you of dangers to your health and indicates possible injury risks.
CAUTION:
This refers to possible hazards to the machine or other objects.
i NOTE:
This highlights tips and information.
Children and Frail Individuals
- In order to ensure your children's safety, please keep all packaging (plastic bags, boxes, polystyrene etc.) out of their reach.
WARNING!
Don't let small children play with foils for danger of suffocation!
- This device is not intended to be used by individuals (including children) who have restricted physical, sensory or mental abilities and/or insufficient knowledge and/or experience, unless they are supervised by an individual who is responsible for their safety or have received instructions on how to use the device.
- Children should be supervised at all times in order to ensure that they do not play with the device.
Specific safety notes for induction hot plates
Symbols on the Product
On the products you will find symbols that indicate warnings or provide information:

WARNING: Hot surface! Danger of burns!
During operation the temperature of the exposed surface may be very hot.

WARNING:
- Glass-ceramic surface! If the surface is damaged or has cracks the device must be switched off to avoid the hazard of electrical shocks.
- Induction heat! Metal objects as, e.g., knives, forks, spoons and pot lids should not be placed on the cooking zone as they may get hot.
- Hot surface! The induction cooker initially heats only the base of the cooking utensils used, not the cooking zone itself. However, because of the heat radiated during coo-king, dangerously high temperatures may also occur at the cooking zone after the cooking cycle. Hazard of burns!
-
Potential damage to your health! People wearing pacemakers must not use this cooker.
-
Please do not operate the device with an external timer or a separate remote control system.
- Place the appliance on an even, moisture and heat-resistant surface.
- Use a heat resistant plate when placing on sensitive surfaces.
- Do not move the device when it is in operation.
- Only grip the handles which are intended for this.
-
Due to the rising heat and vapours the device should not be operated under wall cupboards.
-
Keep the unit at a safe distance from easily inflammable objects such as furniture, curtains, etc. (30 cm) Under no circumstances should the device be installed in cupboards.
- Keep a safety distance of 10cm to the walls.
- Do not heat empty pots on the cooking zone as this may lead to dangerous overheating.
- Ventilation: Always keep the ventilation slots free from any obstructions and dirt.
Intended Use
This appliance is intended for preparing foodstuffs in induction cookware.
It is intended for the use in private households and similar applications. The appliance is only to be used as described in the user manual. Do not use the appliance for any other purpose.
Any other use is not intended and can result in damages or personal injuries.
The manufacturer assumes no liability for damages caused by improper use.
Supplied parts
1 User Manual
1 Single Induction Cooking Plate
Unpacking the appliance
- Remove the appliance from its packaging.
- Remove all packaging materials such as films, filler material, cable clips and carton.
- Check the contents for completeness.
i NOTE:
Production residue or dust may have collected on the appliance. We recommend cleaning the appliance according to chapter "Cleaning".
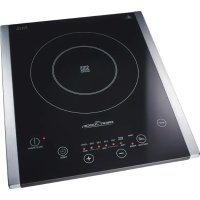
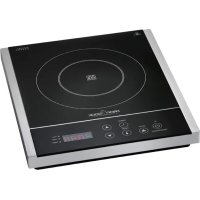
Description of parts
1 BOOST button with indicator lamp
2 FUNCTION button with indicator lamps TEMP. and POWER
3 “” button (power/temperature down)
4 "button (power/temperature up)
5 TIMER button (set time) with indicator lamp
6 ON/STANDBY button
7 Air outlet
8 Mains power cable
9 Housing
10 Air inlet
General information
Cooking with induction technology
When cooking with induction technology, heat is only generated by means of magnetic power, if a pot or pan with a magnetisable base is placed on a switched-on cooking zone. The induction cooker heats only the base of the cooking utensils used, not the cooking zone itself. Under the glass-ceramics surface, the induction coil is located. If the coil is supplied with electrical power a magnetic field develops generating whirls in the pot's base. This results in the heating of the base material. The induction process saves energy as heat is solely produced where it is needed.
What cooking utensils may I use?
For induction cooking plates cookware made from magnetisable material is needed. Today, cooking utensils appropriate for induction cooking usually bear a note saying 'Suitable for induction hob' or similar.
But principally you may use any iron-based cooking utensils; to find out whether a pot or pan is suitable, i.e., magnetisable just try the following: Place the relevant cookware on the cooking plate. The cookware is not suitable if a beep tone sounds after selecting the cooking function and switching the appliance on.
i NOTE:
For safety reasons the appliance returns with unsuitable cookware after approx. 1 minute to standby mode.
Cooking utensils made of the following materials are not suitable for induction hobs:
Clay, glass or aluminium.
Do not use the following types of pots:
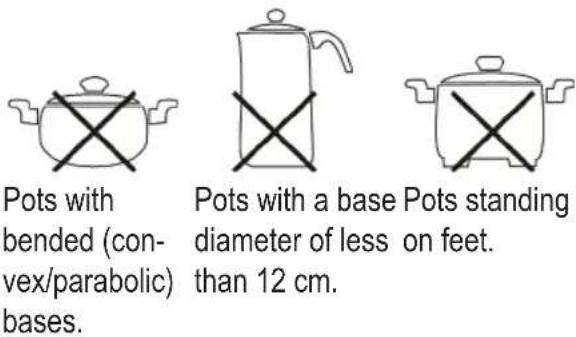
Pots with bended (convex/parabolic) bases.
Pots with a base Pots standing diameter of less on feet. than 12 cm.
Electrical Connection
Connected load/wattage
The hob can take up an overall load of 2000 W. Because of this high connected load it is recommended to use a separate connection protected over a 16 A safety switch.
△ CAUTION: Overload!
Do not use extension cables or multiple sockets as the power consumption of this device is too high for these.
Connection
- Before inserting the mains plug into the socket check whether the voltage which you intend to use corresponds to that of the machine. Please see the label on the machine for details.
- Only connect the machine to a correctly installed safety socket, 220 – 240 V\~ 50 Hz.
Operation
Standby mode:
After you have connected the device's plug to the mains supply, the hub is in standby mode. A signal sounds and the indicator lamp on the ON/STAND-BY button (6) flashes. "S" for standby flashes on the display.
- Put a suitable pot on the cooking zone.
- Press the ON/STANDBY button (6), to start cooking. The indicator lamp on the ON/STAND-BY button (6) will be on continuously.
i NOTE:
Press the FUNCTION button within 1 minute; otherwise the cooking plate will return to standby mode.
Select Temperature or Power As Function
- Press the FUNCTION (2) button to select temperature or power control. The indicator lamps TEMP. and/or POWER show the options.
Select Temperature or Power For The Cooking Plate
- Repeatedly press the “—” or “+” (3 or 4) button to select one of the six power or temperature settings.
i NOTE:
- The cooking plate always starts on temperature 180^ or power level 4 respectively.
- The indicator lamps show selected level / temperature.
- The cooking plate automatically turns off after 120 minutes if no further input is detected.
- On power level 1 food can be kept warm for 8 hours. Then the cooking plate turns off automatically.
BOOST Button
The BOOST function can be separately activated to quickly heat up on the highest power or temperature setting. The BOOST button (1) indicator lamp lights up.
The function can be deactivated by decreasing power or temperature with the "button" or by pressing the BOOST button again.
In this case the temperature is reset to 180^ C.
Enter Off Time
The TIMER button is used to limit the cooking time.
- Switch the appliance on and select the desired setting.
- Press the TIMER (5) button. The TIMER (5) indicator lamp lights up.
- Set the off time between 1 minute and 3:00 hours with the “/+” buttons.
i NOTE:
- Briefly press the “=” or “+button to set the time in 1-minute steps.
- Press and hold the “=” or “+button to set the time in 10-minute steps.
- Pressing the “=” button sets the timer to 3:00 hours. In this way you can set the time in reverse.
- The time value first flashes a few seconds after setting, then lights up continuously.
- The cooking plate turns off automatically after the preset time and a beep tone sounds.
- Once the time is set it cannot be changed. In this case clear the timer and programme again.
Delete the time
- If you would like to delete the preset times, press the TIMER (5) button, so that the control lamp goes off.
Automatic shut-off
The hot plate turns off automatically after 120 minutes, if no input was given over the operator control panel during this time. This switching serves as security for you.
i NOTE:
On power level 1 food can be kept warm for 8 hours. Then the cooking plate turns off automatically.
Switching off
- Press the ON/STANDBY button (6).
i NOTE:
- The hot plate is reset from its operational state to standby mode. The fan may continue to run for a period of time.
- A signal sounds and the indicator lamp on the ON/STANDBY button (6) flashes.
-
As long as the hot plate is still hot, a "H" flashes on the display.
-
Pull the plug.
- Let the device cool down, before you put it away.
Pan recognition
The device has a pot recognition function. The cooking plate sounds a continuous beep tone to communicate that the pot was removed and returns to standby mode. The fan may continue running.
In this context, please pay attention to the following:
WARNING:
After use, the hot plate is to be switched off by means of its regulation and control devices [ON/STANDBY button (6)] and not just by pan recognition.
⚠ WARNING: Hazard of burns!
Because of the heat radiated during cooking, dangerously high temperatures may occur at the cooking zone after the cooking cycle.
Cleaning
WARNING:
• Always remove the mains lead before cleaning!
- Wait until the machine has cooled down completely.
- Under no circumstances should you immerse the device in water for cleaning purposes. Otherwise this might result in an electric shock or fire.
WARNING:
- Under no circumstances should you immerse the device in water for cleaning purposes. Otherwise this might result in an electric shock or fire.
CAUTION:
- Do not use a wire brush or any abrasive items.
- Do not use any acidic or abrasive detergents.
Ceramic Hob
- Clean the surface from food remains when it's still warm using a moist cloth or tissue.
- Wash the hob using a soft sponge and some water, then wipe dry with a soft cloth.
- Cleaning agent for glass-ceramics surfaces: In case of stubborn, baked-in remains, use suitable cleaning products available at special departments of department stores.
Housing
- Clean the housing after use using a slightly moist cloth.
• Make sure that no fluid matter gets into any of the openings of the housing. This might damage the device or result in an electric shock.
Storage
- Only store the appliance clean and after it has cooled down.
- During longer periods of non-use we recommend storing the appliance in its original packaging.
• Always store the appliance in a well-ventilated and dry place out of reach of children.
△ CAUTION: Risk of breakage!
Please remember that the CERAN surface can be damaged by heavy or falling objects.
Troubleshooting
- Device does not function, no indication on the display.
Remedy:
Check the mains connection.
- There is a sound after I have selected a cooking function and switched the device on.
Possible cause:
No or unsuitable cookware was placed on the cooking plate.
i HINWEIS:
For safety reasons the appliance returns after approx. 1 minute to standby mode.
Remedy:
Put a pot on the hob that is suitable for induction hobs.
- The hob suddenly switches off during operation.
Possible cause:
The thermal cut-off is activated.
Remedy:
Disconnect the appliance from mains power supply and let it cool down for approx. 20 minutes. Then start operating the device again.
Further cause:
The ventilation slots are obstructed.
Remedy:
Free the ventilation slots from any obstructions.
Further cause:
The hot plate was automatically switched off after 120 minutes.
Error messages
During operation the following error messages can be displayed:
| Security instruction | |
| E1, E2 | In this case, there is a problem with the electronic control. Send the appliance with a description of the problem to our service centre. |
| E4, E5, Eb, EC | |
| E3, E6 Overheating. See further details in chapter Troubleshooting. | |
| E7, E8 Overvoltage or undervoltage. Check the power supply system! | |
Technical Data
Model: PC-EKI 1016
Power supply: 220-240 V\~ 50/60 Hz
Power consumption: 2000 W
Protection class: ...... II
Net weight: ....approx. 2.98 kg
Subject to technical changes without prior notice!
This device has been tested according to all relevant current CE guidelines, such as electromagnetic compatibility and low voltage directives, and has been constructed in accordance with the latest safety regulations.
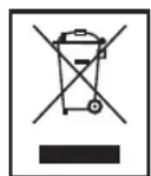
Disposal - Meaning of the "Wheelie Bin" Symbol
Take care of our environment, do not dispose of electrical appliances via the household waste.
Dispose of obsolete or defective electrical appliances via municipal collection points.
Please help to avoid potential environmental and health impacts through improper waste disposal.
You contribute to recycling and other forms of utilization of old electric and electronic appliances.
Your municipality provides you with information about collecting points.