Balnea Silence SO6220 - Heating ROWENTA - Free user manual and instructions
Find the device manual for free Balnea Silence SO6220 ROWENTA in PDF.
User questions about Balnea Silence SO6220 ROWENTA
0 question about this device. Answer the ones you know or ask your own.
Ask a new question about this device
Download the instructions for your Heating in PDF format for free! Find your manual Balnea Silence SO6220 - ROWENTA and take your electronic device back in hand. On this page are published all the documents necessary for the use of your device. Balnea Silence SO6220 by ROWENTA.
USER MANUAL Balnea Silence SO6220 ROWENTA
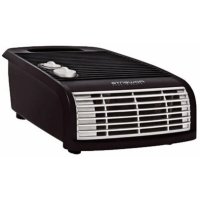
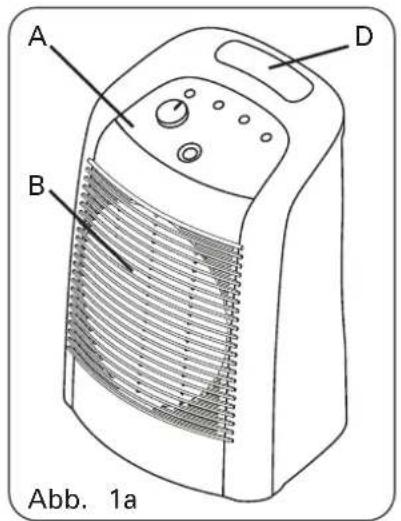
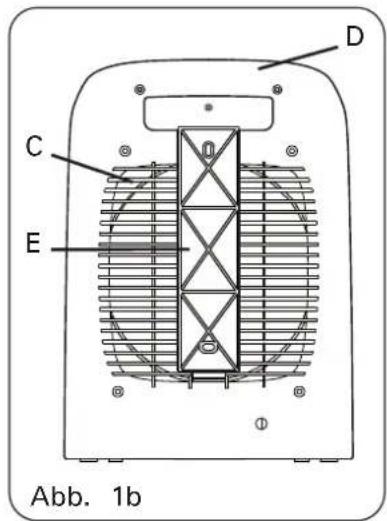
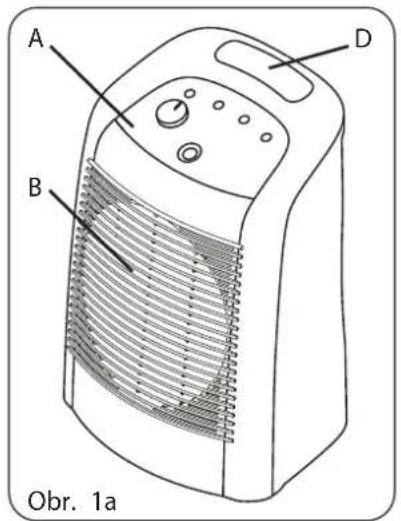
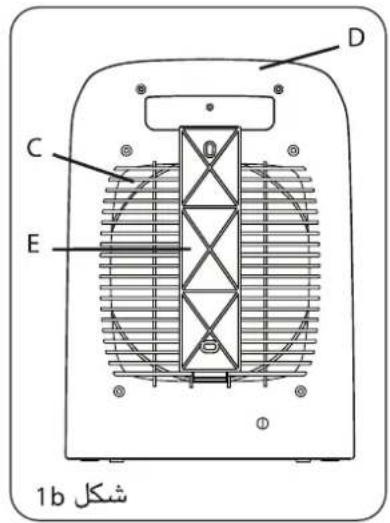
A. Control panel
B. Air outlet screen
C. Air intake screen
D. Transport handle
E. Wall bracket
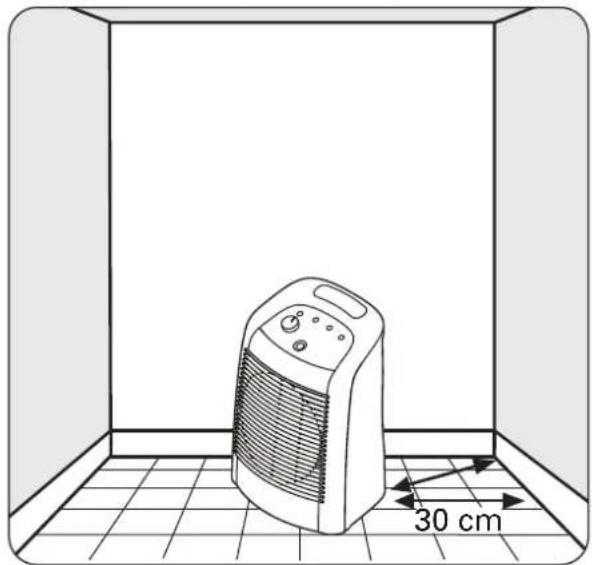
Fig 2. Mobile position Fig 3. Stationary position
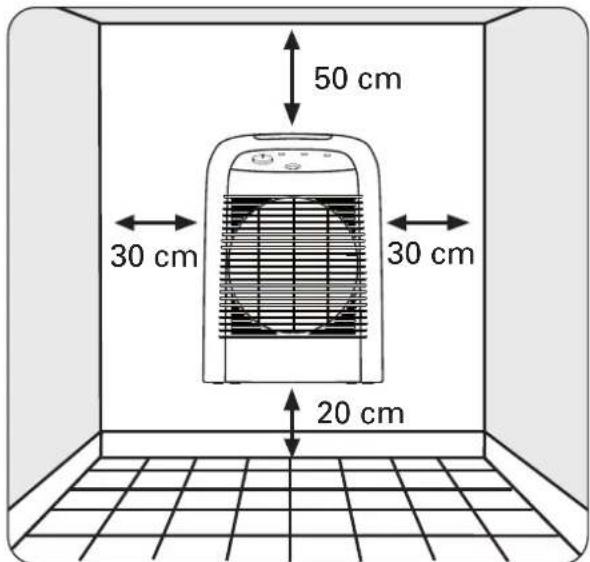
Fig 4a Fig 4b
WARNING

Please read carefully and keep in a safe place.
-
For your safety, this appliance complies with the applicable standards and regulations or commercial (Low Voltage, Electromagnetic Compatibility, Environmental Directives, etc.).
-
This appliance is not intended for use by persons (including children) with reduced physical, sensory or mental capabilities, or lack of experience and knowledge, unless they have been given a supervision or instruction concerning use of the appliance by a person responsible for their safety. Children should be supervised to ensure that they do not play with the appliance.
-
Do not place your appliance just below a wall socket.
-
The appliance must be placed so that the plug is accessible.
-
Do not use in industrial environments or in environments that are corrosive, dusty or explosive
-
Do not use the appliance close to inflammable objects or products (curtains, aerosols, solvents etc.
-
Your appliance is designed for domestic use only. It may not be used for professional applica
-
Do not insert any objects into the appliance (e.g.: needles...)
-
If the power cord is damaged, it must be replaced by the manufacturer, the after-sales servic.
similarly qualified person to avoid any danger. -
Your appliance must be installed so that the switches or other commands cannot be touched person in a shower or a bath.
-
Check that the voltage and the rated power of your electrical system matches those marked on the appliance. Any incorrect connection may cause irreversible damage that is not covered by the warranty.
-
Your appliance may operate with a plug that does not have an earth pin. It is a class II ap (double electrical insulatio).
-
Unwind the power cord completely each time before use.
-
Do not immerse the appliance, or place it under water, even when cleaning it.
-
Do not pull on the power cord of the appliance even just to unplug it from the wall socket.
-
Do not touch the appliance with wet hands.
-
Do not let water penetrate into the appliance.
-
Do not use the appliance close to a bath, shower, sink or swimming pool.
-
Do not use the appliance when tilted or laid flat.
-
If the appliance is not in use: Switch off and unplug the appliance.
-
Warning:
To avoid overheating, DO NOT COVER THE HEATING APPLIANCE
The warranty will be null and void if the instructions for use are not respected.
USE IN THE BATHROOM (protection against splashing with water)
-
This "IP21" unit has been specially designed so that it can be used in any room in your ho- ding those where there is a risk of water being splashed onto it from above (kitchen, bathroo
-
However, the electrical installation in the room, the installation of the unit and the way the used must all comply with the safety standards in force in your country.
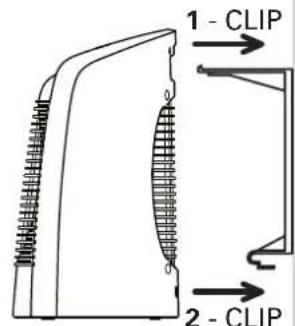
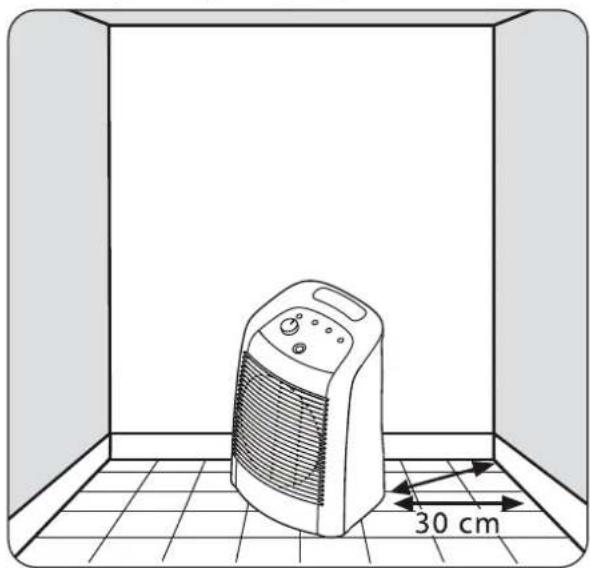
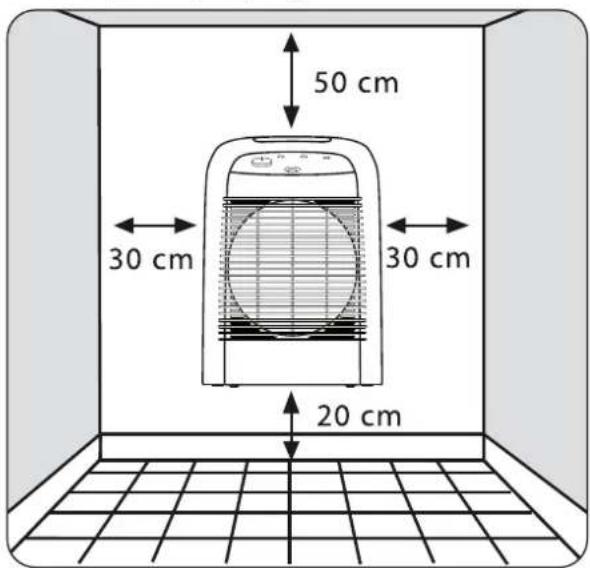
WALL INSTALLATION
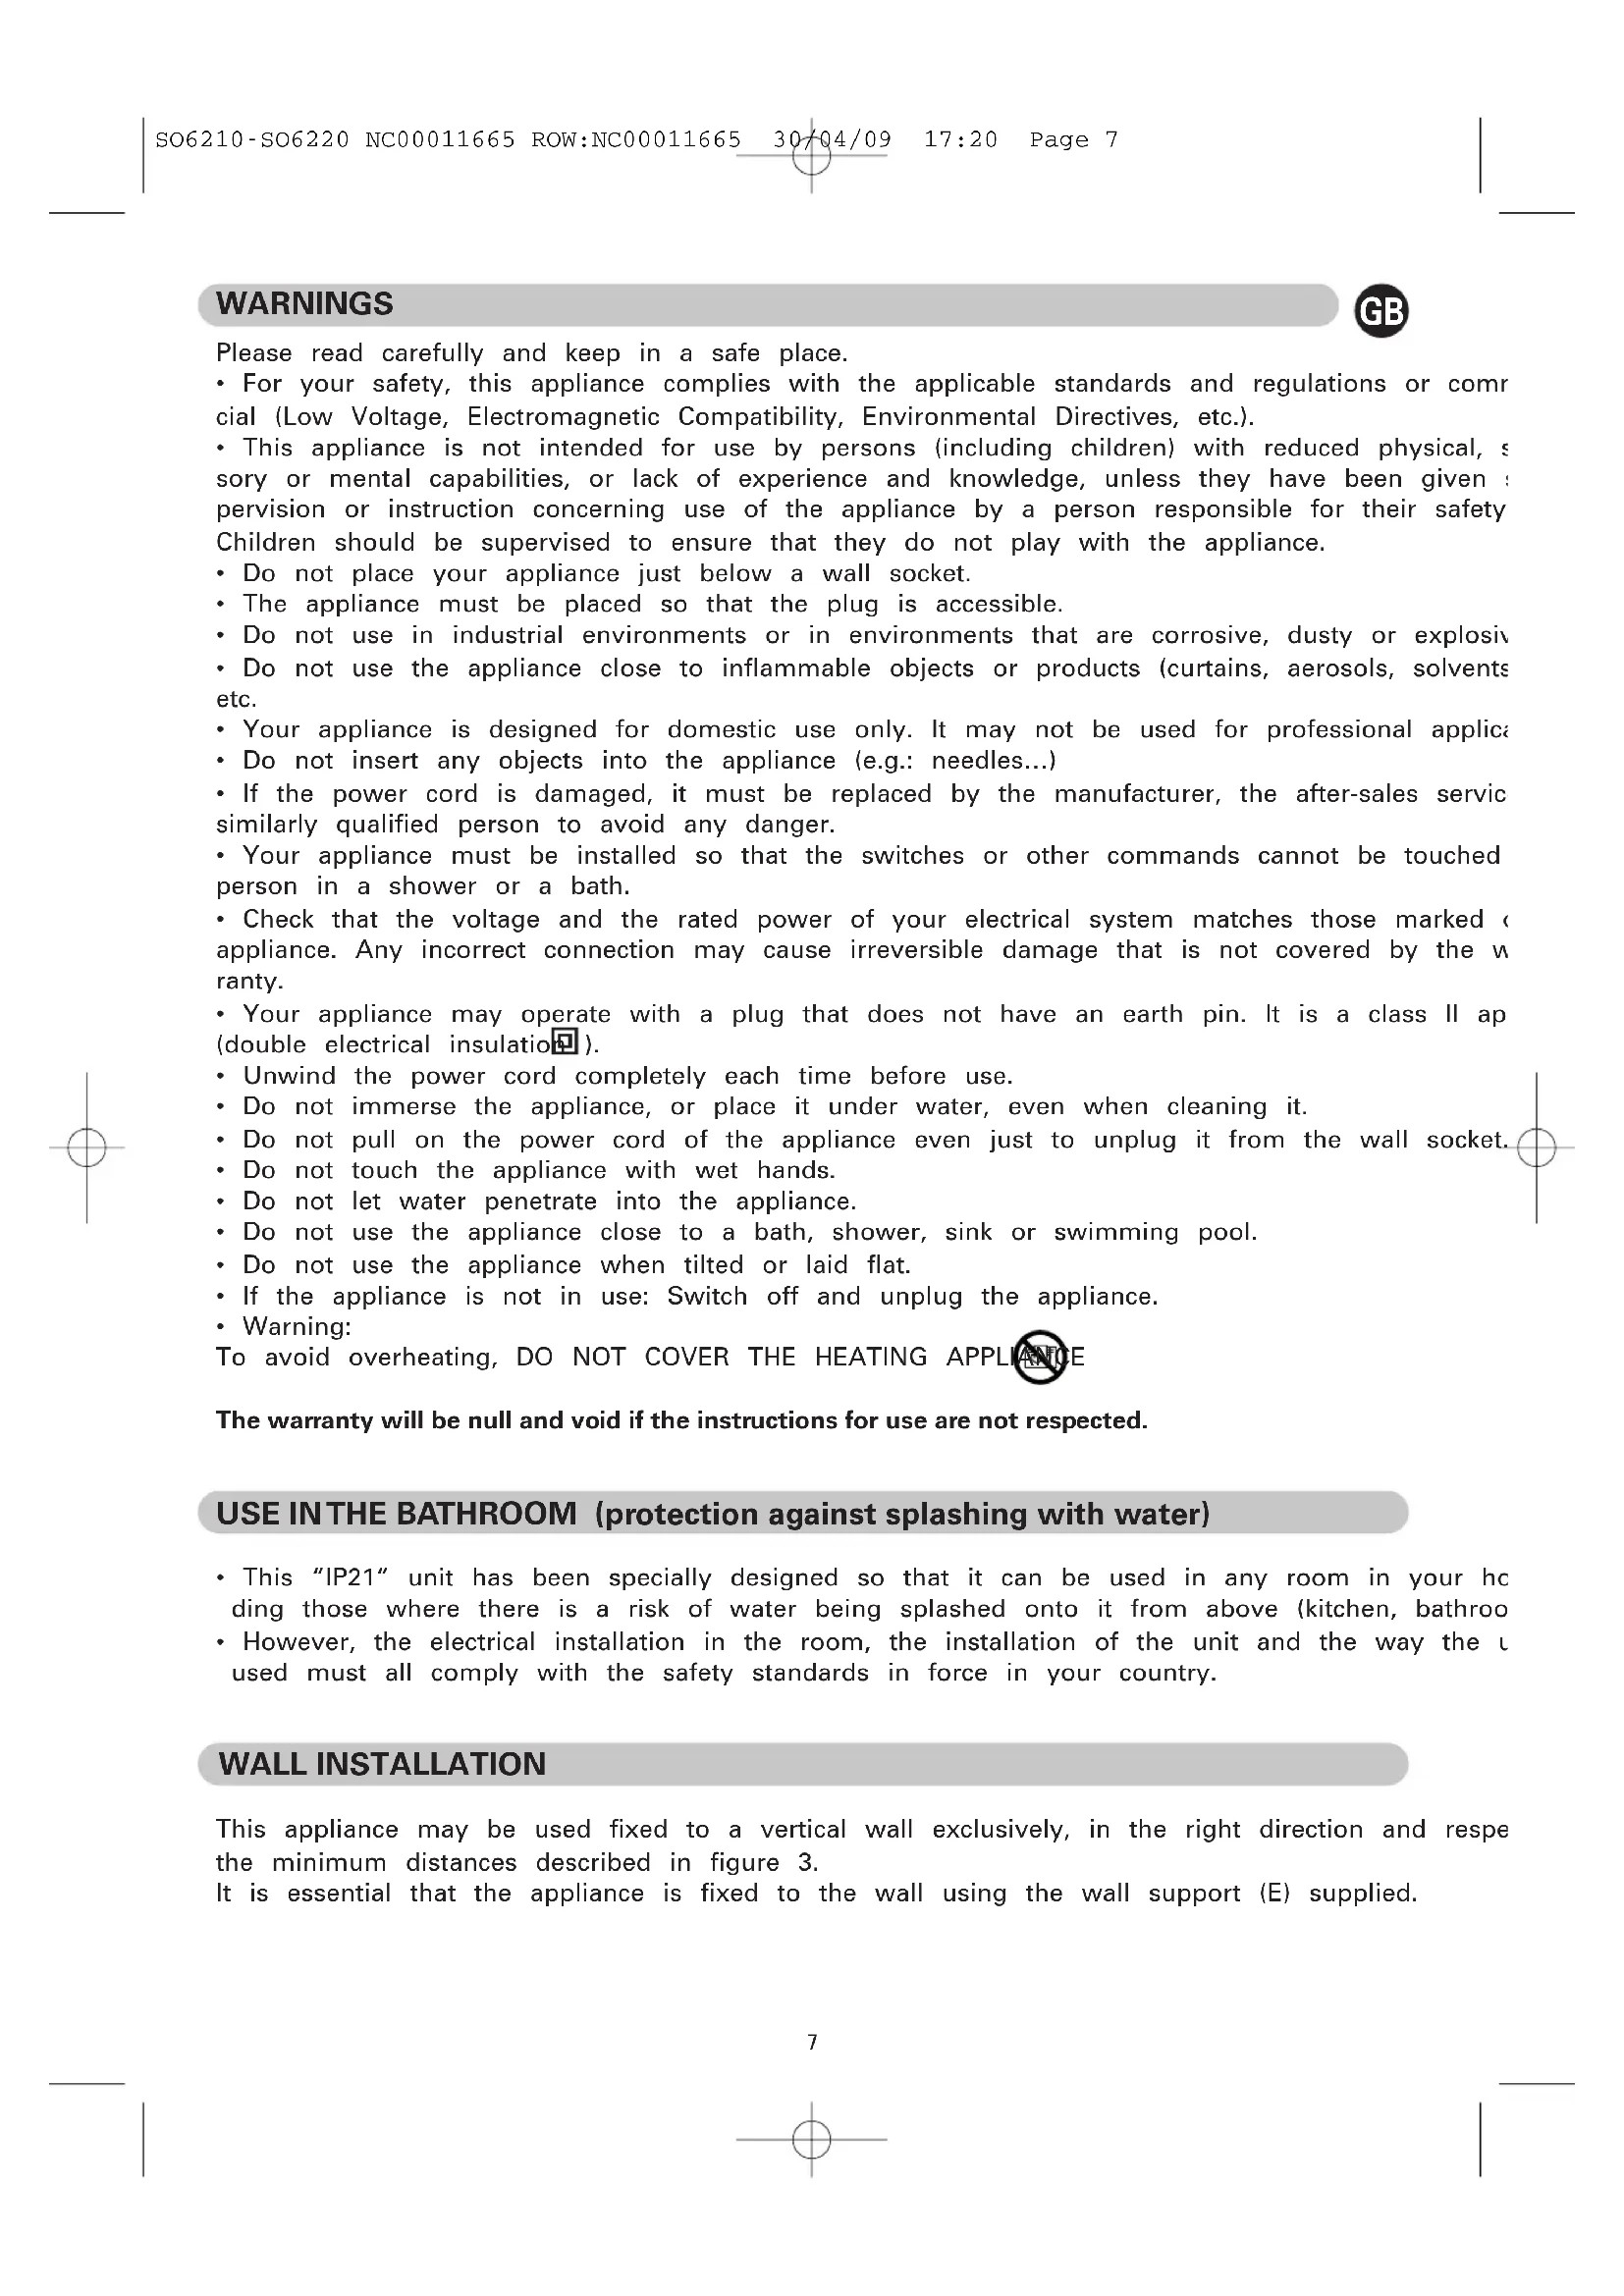
This appliance may be used fixed to a vertical wall exclusively, in the right direction and respe the minimum distances described in figure 3.
It is essential that the appliance is fixed to the wall using the wall support (E) supplied.
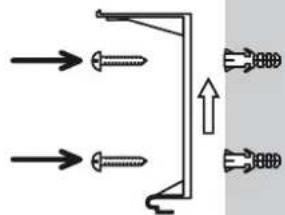
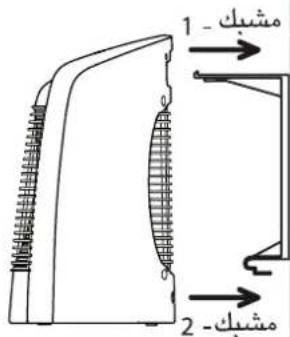
Wall Attachment: see fig. 4a.
- Attach the wall bracket with appropriate screws and plugs following the direction of the arrow
- Insert the upper wall-bracket hook in the unit's transport handle, and clip the lower wall-brack hook onto the unit.
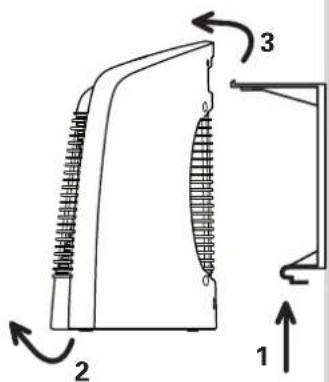
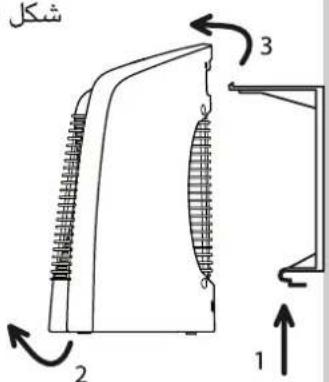
Taking Down the Unit: see fig. 4b.
- Maintain a solid grip on the unit and push down upon the lower tongue of the wall bracket
- Pull the unit out from the bottom.
- Lift the unit up and remove it from the upper hook.
SAFETY
In the event of abnormal overheating, a safety device shuts down the appliance and then autor cally restarts it once ithas cooled. If the fault persists or gets worse, a thermal fuse shuts the pliance down definitively and it must then be taken to an approved service centre.
OPERATION
Each time before use, check that the appliance is in good condition.
Especially check that:
- the position of the appliance described in these instructions is respected.
- the air inlet and outlet grids are in no way obstructed.
- the appliance is placed on a horizontal, stable surface.
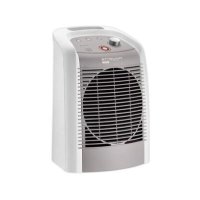
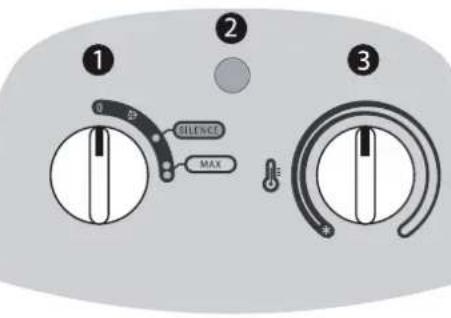
MODEL SO6210 :
Button 1: Operating mode selector:
0 : OFF Position
Cold ventilation position
: "Silence" position, 1200W ventilated and regulated
- 2400W position, ventilated and regulated
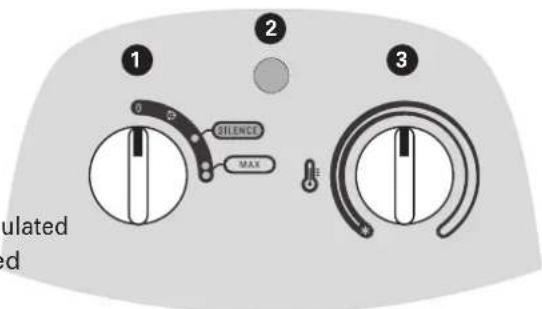
Indicator light 2: The indicator light is lit when the appliance is operated with the knob 1.
Button 3 : Thermostat (knob 1 must be in the ● or ●● position).
-
Adjust the temperature setting, according to your own comfort.
-
Frost-free setting: This setting enables you to automatically maintain the temperature above 0^ in a normally insulated room, whose volume corresponds to the power of your appliance.
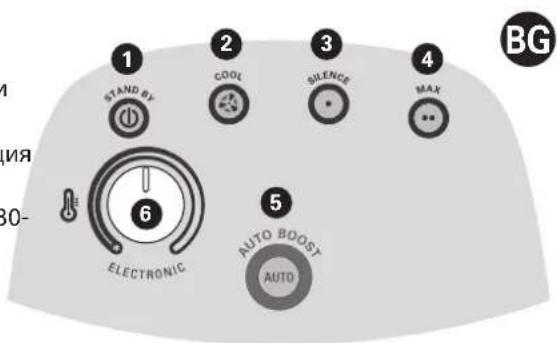
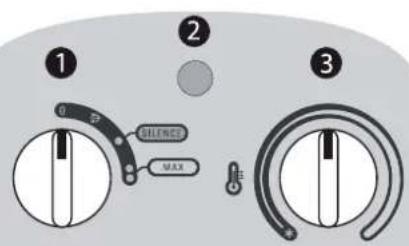
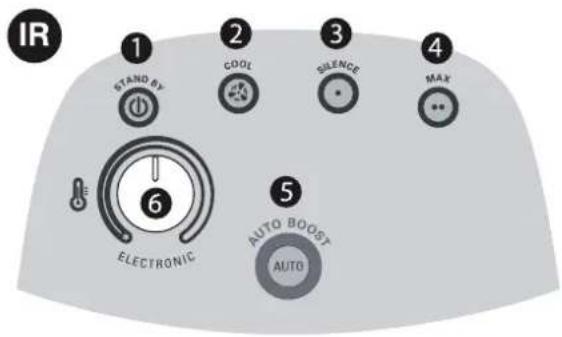
MODEL SO6220 :
When switching on the power to the appliance (appliance plugged into the mains), the appliance in the "STOP" mode, and the knob 1 is lit.
The appliance makes a beep every time the control knobs are moved.
Button 1 "STAND-BY": Switching off the appliance (a cooling cycle of a few seconds is carried out automatically each time before it is switched off; during this cycle, the button flashes)
Button 2 "COOL": Cold ventilation position.
Button 3 "SILENCE": "Silence" position, 1200W ventilated and regulated.
Button 4 « MAX »: 2400W position ventilated and regulated.
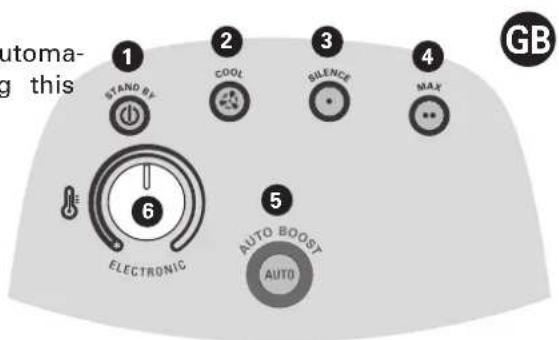
Button 5 "AUTO BOOST": Automatic operation mode
- 10 minutes: 2400W ventilated unregulated
- 20 minutes: 1200W ventilated and regulated (depending on the position of the button
- Stops automatically after the 30 minutes of operation.
Button 6 : Thermostat (on the SILENCE, MAX and AUTO-BOOST functions).
- Adjust the temperature setting, according to your own comfort.
- Frost-free setting: This setting enables you to automatically maintain the temperature above 0 in a normally insulated room, whose volume corresponds to the power of your appliance.
TAKING CARE OF YOUR APPLIANCE
The appliance must be unplugged and left to cool down before carrying out any work on it.
- Do not clean it with abrasive or corrosive products.
- Clean with a damp cloth.
- Clean the air inlet and outlet grids at least once a year (with a vacuum cleaner if necessary)
STORAGE
- It is extremely important that the unit be allowed to cool down before it is put away.
- The power cord can be rewound for storage.
- When you are not using your appliance, store it in a dry place.
INTHE EVENT OF PROBLEMS
- Never dismantle your appliance yourself. A poorly repaired appliance may be dangerous for th
- Stop using your appliance and contact an Authorized Service Centre if :
- your appliance has fallen
- it does not work correctly
Before contacting one of our Approved Service Centres (see enclosed list), ensure that: - the appliance is set to normal operating mode;
- the air inlet and outlet grills are totally clear.
ENVIRONMENT PROTECTION FIRST!
① Your appliance contains valuable materials which can be recovered or recycled.
Leave it at a local civic waste collection point.
BESCHREIBUNG

VEDLIKEHOLD AV APPARATET
DAK IKKE VARMEAPPARATET TIL for at undgå overopvarm.
PnBcKaHOHaTnCKaHe KaOMaHdHInTe 6yToHn Ce cyBa 3ByKOB cnHAn.
6yToH 1,STAND-BY":N3KIIIOUBaHe Ha ypeHa (IpeDN BCaKO N3KJIIOUBaHE aBOMaTNUHO Ce 3aJeCTBa peKIM Ha OXJaKaHa C npOdbJxNtHIOCT O T HAKONKO CEkyHn,KaTO ppe3 TOBA BpeMe 6yToHbT Mira).
BytoH 2,COOL: IonoKeHne,CTydeHa BeHTnlaucna".
ByToH 3,SILENCE":IonoJxHeHne, Silence",MoUHocOT 1200W npu BeHTnuaa.
ByToH 4,MAX: MoUHOCT O T 2400W npn BEHTUNaIua.
BytoH 5" AUTO BOOST": Pexm Ha aBtOMaTnUHO 3aJe-CTBaHe
-10 MNHyTn: HEnoCToHHa MoUHocT 2400W npnBEHTnlaa
-20 MInHyTn: MOUHOCT OT 1200W npn BeHTnlaucn (B 3aBNCUMOCT OT NOLOXKeHHeTO Ha 6yToH 6)
- ABTomTuHO N3KIOUbaHe CneI N3TuHa He Ha 30-Te MInHyTn FyHKUOHnpaHe.
Bytoh 6: Tepmoctat (npu yHKun, SILENCE", MAX" u AUTO-BOOST").
Bne 36bnpate Tempepatypca cnoepa BaWeto KeJaanHe ype3 6yToHa 3a BkIOUcbHe 6
-ПложенеHa TemnepatypataHaTockataHa 3aMbP3BaHe * : Toba noloxhene daBa Bb3MoKHOCT 3a ABTomATuHPO perynipaneHa TemnepatypataHaD 0^ B cTaeC c HopMaIbHa TemnepaTyPha nOlaun, HInTO pa3Mepn OTROBAPrHa MoUHocTTHa Bauny ypeJ.
IOndPbXKKA HA ypeDA
- 3aIbIKNTeHNO I3KIIIOUBAIte ypeDa OT 3axpaHbaHeTo I rO OCTaBnTe Da I3CTnHe npeDn BCaKaBn DeHOCn NO NOIDpbXkA.
He n3non3BaIte a6pa3nBn nn Kopo3nBn npenapaTn.
-Поуностваite c Лев Кьрпа.
-Почиствашипеше peшеткину OTВОРИТЕ 3a Вьздушна стуг пою недньж рогишно (ako e Heo6xOДМо - с пахOCMукая).
CbXPAHEHNE
- ObesateHNO da ce ocTabn da nctnHe anapata npedn da ce npn6pe.
- UHpybT My MoKe Da ce HaMoTae npEi npBnpuHaTo Ha anapata.
Korato ypeda He ce ynoTpe6Ba,Toi Tp8Ba da 6bde cbxpaHbHa h cyxo McTo.
ПОНБЛЕМИ ПОВРЕДИ
- Hnkora He pa3rno6raBaYte ypeDa camn. loo nonpaBEN ypeD moeJa 6bJe onaceH 3a noTpe6nteMy.
- He n3non3baIte ypeDa n Ce CBpKTe C oO6peH cepBn3e H eHTbp, B cnyaH ue ypeBt e npan nn He pa60Tu HopMaHIO.
-Прдддддддддддддддддддддддддддддддддддддддддддддддддддддддддддддддддддддддддддддддддддддддддддддддддддд徳н (почт eпилжен cпськ) повереу:
-Даиурдт ce hamnpa B HopmaHNo noLoXeHne 3a ФунконlpaHe.
-Дали Мржнкite 3a 3acMyKbaHe Ии3dYBaHe Ha Bb3dyXа caи3uIIO npoxoDnM.
DA yuACTBAME B ONA3BAHETO HA OKOJIHATA CPEDA!
YpeBt e n3pa6oTeH OT pa3nUHN MaTePnaN, KOnTo MoT a Da Ce npedaT Ha BTOpUHN CypOBuH Nn da Ce peuKnIpaT.
PpeaTe ro B cneuaJen ceHTbp nnn, aKO HMa TaKbB, B Odo6peh cepBn3, 3a da 6bde npepa6oTeH.
POPIS


UZSTADISHANA PIE SIENAS
Si ierie var darboties ari piestiprinata pie vertikalas sienas, ja vien ta ir uzstadita pareiza stavokli un ir ieveroti 3. attela noraditie minimale attalumi.
Lai ieri piestiprinatu pie sienas, obligati izmantojiet komplekta ieklauto fiksatoru (E).
Uzstadisana: skatiet 4.a attelu.
- Uzstadiet fiksatoru E ar bultu noraditaja virziena, izmantojot skruves un dibelus.
- Fiskatora augsejo izvirzijumu ivietojiet spruga zem roktura ierices parnesasaanai, pec tam ar fiksatora apaksejo izvirzijumu nostipriniet erici.
Nonem'sana: skatiet 4.b attelu.
- Satveriet ierici un piespiediet fiksatora apaksëja izvirzijuma meliti.
- Vispirms atbrivojiet ierices apaksejo dalu.
- Pacelet nonemiet to no fiksatora augsejā izvirzijuma.

DROŠIBA
Ja icer ic parak uzkarsusi, droibas mehanisms to automatiski izsledz, bet velak - kad icer atdzusui - iedarbin no jauna. Ja icer pastavigi paskarst, termiskais drosinatajs to atsledz pavisam. Tada gadijum a icer janogadapill varota apkopes dienestra.
DARBIBA
Pirms lietosanas vienmér parliecinieties, vai ierie ir darba kartib. Parliecinieties,
$$ \therefore \max = 4 $$
AUTO BOOST"5
aBio ygj,blr.:gla1.-(6j j0 ) pii ggi,blr.:gai r.
(AUTO BOOST MAX),SILENCE 6
J 1
ii 1
4a jaojLae 1JgJdSg jg jll Jc
abil gai jia jiall algall gai jn eg y biy
iJb jlaaababwJy
()
#
Laijia Lai Jd j 1
Ji jSo jj, Jooaiy1 8e iall jS y Loaic
aLgJg
Lalac Jai 8 jai jai jai jai jai jai jai jai jai jai jai jai jai jai
:Jia 1
i
J 1
-:y lao sill jyj(jIrallaowlyiai)doao and jSyy Juaai
sall jaiill aayo ge bao s cull 1
Lolai aabibcglg jlaog cjjoo
15gai
g j 1111111111111111111111111111111
①


4a kai jai: laall
aalolololololololololololololololololololololololololololololololololololololololololololololololololololololololol
4b Jkll jbj: aegjij
ailll no aaiiil aaiie 1e Jaiyll gia, gao kla ydai
aalll aalil noaaal
aall aell jL 1
a0xuilljzjoo
1 1
ai = 70,12ai^2 = 1270
S_ OBC = S_ COD + S_ BOC
.111 111 111 111 111
: j 1
.8aall o0g 8g all yy jai g jka
aagaae aee
yai 1
:SO6210:
:1
Jusill jc gssg 0
auiiieeaiieae:
Silence
Jzaiy aagb.1g 1
loic gai all jgall L: gai
1 ciaial 1auiy Jaoi yaiil 1
()
iiooljlo wss, jallbuagj
g 1
aaii
SO6220:
LTOO STOP
1gagall
1 1

#
()

aaii iolgall
$$ \cos \angle A = A $$
$$ \therefore \angle B A C = 1 8 0 ^ {\circ} - \angle B $$
$$ \therefore \text {g a l l} \text {j i s o} \text {i t i t} - C $$
$$ j a \overline {{a}} \overline {{i}} \overline {{i}} \overline {{i}} \overline {{o}} - D $$
$$ j _ {1} j _ {2} \dots j _ {n} j _ {n + 1} \dots j _ {n + 1} \dots j _ {n + 1} \dots j _ {n + 1} \dots j _ {n + 1} \dots j _ {n + 1} \dots j _ {n + 1} \dots j _ {n + 1} \dots j _ {n + 1} \dots j _ {n + 1} \dots j _ {n + 1} \tag {E} $$
2. K1 = ( a1 + a2) = a1 + 2b
3. Kii "i"
4a
4b
Sis Sj) 05uus jss 1: "Stand by" 1 a
10 0 0 0 0 0 0 0 0 0 0 0 0 0 0 0 0 0 0 0 0 0 0 0 0 0 0
cuiolokunu juiu
Laiolssj
iS gduo oiiuolgduoLulgojusai j
()
#
J1J1J1Jg 0 g aai chw (sg) oSiu

: 1450
0
Jyw 4gj Cuaa:
1200(S)"Silence"
2400
Jisss 1 aos oos JIs
()3
aikpki 100 100 100
4 14451100000000000000000000000000000000000000000
Culaios
:SO6220:J
"STOP"
. 1
IR
b < a
15 15
JiLoo Joc (Ojic 3 cunj Iaio slgaia
15 15
jia jia 005 Si y
SgJyjzjI jLg Ss yS,0150000000000000000000000000000000
1 1
Sgduo 1
j 1 j 1 j 1 j 1 j 1 j 1 j 1 j 1 j 1 j 1 j 1
jai jy gai 4 yjao ly bly