BL 319 - Battery charger ALECTO - Free user manual and instructions
Find the device manual for free BL 319 ALECTO in PDF.
User questions about BL 319 ALECTO
0 question about this device. Answer the ones you know or ask your own.
Ask a new question about this device
Download the instructions for your Battery charger in PDF format for free! Find your manual BL 319 - ALECTO and take your electronic device back in hand. On this page are published all the documents necessary for the use of your device. BL 319 by ALECTO.
USER MANUAL BL 319 ALECTO
natural_image
Symbol of a trash bin crossed with a diagonal line, no text or numbers presentIntroductie:
natural_image
Simple line drawing of a trash bin with two crossed x-axes (no text or symbols)
En général :
natural_image
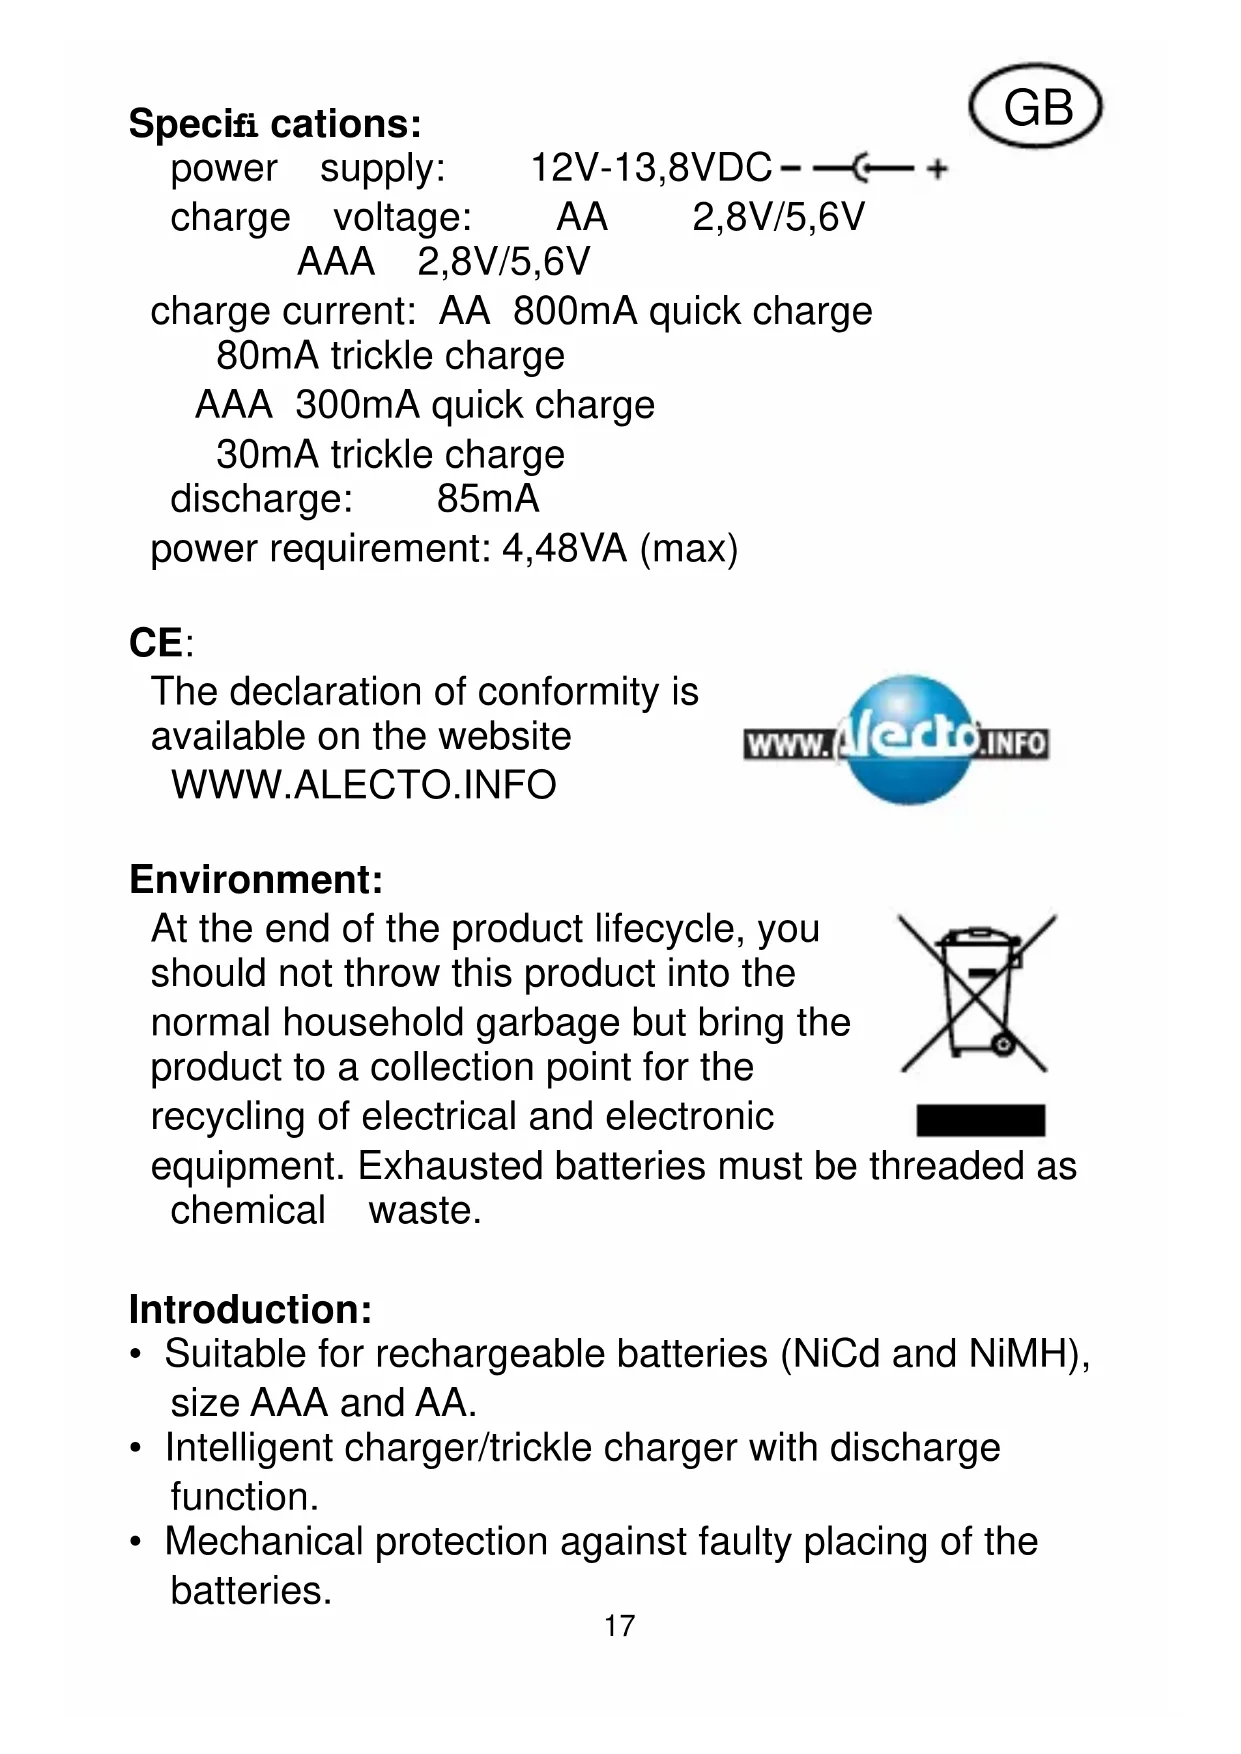
Symbol of a trash bin crossed with no text or labels, accompanied by a black rectangular block below (no readable text or symbols)power supply: 12V-13,8VDC - ← +
charge voltage: AA 2,8V/5,6V
AAA 2,8V/5,6V
charge current: AA 800mA quick charge
80mA trickle charge
AAA 300mA quick charge
30mA trickle charge
discharge: 85mA
power requirement: 4,48VA (max)
CE:
The declaration of conformity is available on the website
WWW.ALECTO.INFO

text_image
WWW.Alecto.INFOEnvironment:
At the end of the product lifecycle, you should not throw this product into the normal household garbage but bring the product to a collection point for the recycling of electrical and electronic equipment. Exhausted batteries must be threaded as chemical waste.
natural_image
Simple line drawing of a trash bin with two crossed lines indicating no waste or prohibition (no text or symbols)
Introduction:
- Suitable for rechargeable batteries (NiCd and NiMH), size AAA and AA.
- Intelligent charger/trickle charger with discharge function.
-
Mechanical protection against faulty placing of the batteries.
-
Batteries are kept 'ready for use'.
- Including a 230 Volt power adapter for indoor use and a 12 Volt power cord with lighter-plug for mobile use in a car.
Attention:
- Suitable for rechargeable NiCd or NiMH batteries only, size AA or AAA.
• Always install 2 or 4 batteries to charge / discharge - Never mix battery types in each bank. When charging batteries in Bank 1 or Bank 2, the batteries must be of the same type, size, and capacity.
- Use the charger in a car or indoor only, avoid moisture.
- Avoid dropping or damaging of the charger, in case of a suspected problem consult your dealer. Repairs to be carried out by qualified personnel only.
- If the charger is not in use, disconnect it from the power source.
Charge table :
Charge times depend on the capacity and the condition of the installed batteries. The following table is for reference only :
| battersize: capacity: time: | charge | |
| AAA 600mAh | appr. 2.8 hr | |
| AA 800mAh | appr. 1.4 hr | |
| AA 2400mAh | appr. 4.2 hr | |
How to use:
- Connect the power adapter or the 12V DC power cord with the charger.
- Install 2 batteries on the left side of the charger and slide the switch into position '2' or install 4 batteries and slide the switch into position '4'.
- Plug the power adapter in a 230 Volt power outlet or plug the 12 Volt lighter plug into the concerning jack in your car. After some seconds the DISCHARGE/CHARGE LED will glow red and the charging begins.
- Press button DISCHARGE/CHARGE to first discharge the batteries to a reference voltage of 1V prior to continue the charge cycle. The DISCHARGE/CHARGE LED will turn yellow.
This discharge-mode will take a wile, depending on the capacity of the installed batteries. To interrupt the discharge-mode and return to the charge-mode, press the DISCHARGE/CHARGE button. - When the batteries are discharged to 1V, the BL-319 automatically switches over to the charge-mode. The DISCHARGE/CHARGE LED turns red again.
- As soon as the batteries are fully charged, the BL-319 constantly measures the batteries using delta-V measurements, the charger switches over to trickle-charge, the DISCHARGE/CHARGE LED turns green. The batteries are kept charged in this mode and are ready for use when needed.
Possible problems and solutions:
First always check whether the power adapter is plugged in a 230 AC wall socket or the 12 V DC plug is connected with the cigar-lighter in your car.
| Problem: | Possible cause: | Solution: |
| The red LED on the power adapter does not light. | No power on the wall-socket. | Check the mains power by connecting another device with the wall socket. |
| The “discharge/ charge” LED does not light in the charge-mode. | Bad electrical contact. | Clean the chargers' contacts as well as the contacts of the batteries. |
| The batteries are installed incorrectly. | Re-install the batteries in the correct way. | |
| The switch is not set in the correct position. | The switch should be set in the left position (2 batteries) or in the right position (4 batteries). | |
| When charging only 2 batteries, these are not installed in the 2 left banks. | Re-install the 2 batteries into the 2 most left banks. | |
| Only one battery is installed. | Install a second battery (same type and capacity). | |
| Only three batteries are installed and the switch is set to 4 batteries.The batteries are complete empty because:* they are not used for a longer period* they were empty and still installed in an apparatus | Install a 4th battery or remove one battery. Check the switch position (2 or 4 batteries).Keep the batteries in the charger. If they are not defect, the charging will effect in a couple of minutes. | |
| One or more batteries are defect. | Replace the defective batteries. | |
| Batteries getting hot. | In the quick-charge-mode, a high current flows through the batteries and they will get warm. The maximum allowable temperature of 65°C feels like hot but is acceptable for batteries. | N.a. |