USER MANUAL EGS 2600 EINHELL
Please read the directions for use carefully and observe the information provided. It is important to consult these instructions in order to acquaint yourself with the appliance, its proper use and safety precautions.


● The energy station for signs of damage before each use.
- Observe the mains voltage (230 V (50 Hz).
- Please remember that improper handling of electrical equipment may result in hazards which are not always recognized by children.
- Keep children away from the car battery and the energy station.
● Have defective or damaged parts repaired or replaced by a customer service workshop unless otherwise stated in these operating instructions. Damaged switches have to be replaced by a customer service workshop.
- Protect from rain, splashing water and damp conditions.
- Do not place on heated surfaces.
● Always switch off the energy station when it is not being used.
- Wear acid-proof safety gloves and goggles whenever you connect up and charge the battery and whenever you fill in acid or top up with distilled water. There is a high risk of injury from the corrosive acid!
- Caution! Battery acid is corrosive.
If any acid is splashed on your skin or clothes, wash it off immediately with soap suds. If acid is splashed in your eyes, rinse them immediately with water (for 15 minutes) and consult a doctor.
● To prevent sparking due to electrostatic discharge, never wear clothes made of synthetic materials when charging the battery.
● Danger! Avoid flames and sparks. Explosive electrolytic gas is released during charging.
- The energy station contains components such as the switch and fuse that may cause arcing and sparking. Mark sure the garage or room is well ventilated!
- Danger! There is an acute risk of explosion if there is a pungent smell of gas. Do not switch off the appliance. Do not disconnect the charging clamps. Ventilate the room immediately and thoroughly. Have the battery inspected by a customer service workshop.
- Do not charge several batteries simultaneously.
● Never charge non-chargeable batteries.
● Note the instructions published by the battery manufacturer.
- Note the data and instructions published by the vehicle manufacturer concerning the charging of batteries.
Disposal
● Batteries: Dispose of unwanted batteries only via automotive workshops, special battery collection stations or special waste collection centres. Ask your local authorities for details.
Important
● The energy station is equipped with a maintenance-free storage battery, which is only partially charged when delivered.
- The energy station's storage battery needs to be fully charged before the unit is used for the first time!
- The storage battery discharges automatically when the energy station is not used for a long time.
- Use only the supplied power supply unit for charging purposes.
Compressor
- Never use the compressed air to clean your clothing.
- Do not blast persons or animals with compressed air.
- Keep all ventilation slots clean and free of dirt.
● Take steps to ensure that the compressor does not draw in any dust or contaminants.
- Do not use the compressor to fill high-pressure tires, such as those on heavy duty trucks, tractors and trailers.
- If you want to fill several tires, let the compressor rest for approximately 10 minutes between each filling. The maximum operation time of the unit is 10 minutes. Do not exceed this limit!
GB
Environmental protection
Please remember that packaging, old batteries and defective storage batteries do not belong in your household refuse. Dispose of these items through the proper channels.
2. Items supplied
1 energy station with compressor
1 energy station
1 power supply unit for charging
1 connecting cable with cigarette lighter plug
1 valve adapter set
3. Technical data
Storage battery: 12 V / 17 Ah
Output voltages / 12 V / 10 A via 1 cigarette
max. current consumption: lighter socket
Starting aid: 12 V / 600 A max. 5 sec.
Mains voltage: 230 V \~ 50 Hz
Output from power supply unit:
Nominal voltage: 12 V
Nominal current: 1000 mA
Nominal power: 12 VA
Lamp 12 V / 3 W
Compressor 12 V/18 bar
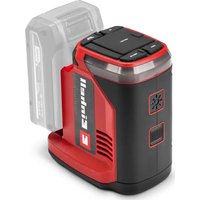
4. Charging the energy station
(Important! Move the ON/OFF switch (Fig. 1/Item 1) to „OFF“.)
4.1 Charging the energy station with the power supply unit
- Plug the connecting cable of the supplied power supply unit in the charging socket „RECHARGE“ (Figure 1 / Item 2) on the unit.
- Plug the power supply unit into a mains socket outlet for 230 V \~ 50 Hz. The red LED indicator (Fig. 1/Item 3) flashes.
- It takes around 30 hours to charge the energy station.
- Pressing the red pushbutton (Fig. 1/Item 4) displays the charge state of the built-in battery on the voltage meter (Fig. 1/Item 5).
4.2 Charging the energy station with the
automobile adapter cable
The energy station can be charged through the automobile's cigarette lighter socket.
IMPORTANT: The energy station battery has a 12 volt charge capacity. You should only charge the energy station when en route, as otherwise the unit will run down the vehicle's battery.
Never start the vehicle as long as the automobile adapter cable is connected to the cigarette lighter socket.
- Insert the 12 volt plug of the automobile adapter cable into the automobile's cigarette lighter socket and insert the other end of the cable into the charging jack of the energy station marked "Recharge".
5. Outputs
Output 12 V cigarette lighter socket. max 10 A.
- The 12 V output (Figure 1 / Item 8) can be loaded with max. 10 A, i.e. you have max. 10 A at your disposal.
- Check the power and power consumption values of the consumer to ensure that you do not overload the energy station. If you only know the power data of the consumer you can calculate the max. current very easily.
Consumer: 12 V / 50 W
The current consumption is 50 W / 12 V = 4.17 A
- Use the supplied connecting cable to link the 12V output socket with a suitable consumer
- Remove the caps to use the 12 V output and connect the consumer.
6. Operating hours of typical consumers
The appliances listed below are typical 12V consumers. Their actual operating time depends on the power consumption of the particular model and the battery charge level.
Consumer Amperage Provisional
uninterrupted operation
Halogen lamp
(HL 12-55,
Art. No. 10.955.00) 4.5 A 4 h
Car vacuum
cleaner 7 A 2.5 h
TV with satellite
receiver 4 A 4.5 h
Cool-box 4 A 4.5 h
12V immersion
pump 4.5 A 4 h
Check that the voltage and current ratings of the consumer units will not overload the energy station.
Overloading may destroy the energy station.
7. To operate the lamp
Proceed as follows to switch on the lamp:
● The lamp (Figure 1 / Item 6) is switched on and off using the switch (Figure 1 / Item 7).
8. Starting aid for motor vehicles
● The charging cable with the pole clamps is located on the side of the unit.
- When the jumper cables are not in use, do not remove them from the energy station.
- Caution! Risk of short-circuiting if the pole clamps touch each other.
- Use the energy station as a source of starting aid only when the vehicle battery is partially discharged. The energy station is designed to provide the car battery with only a limited charge
- The energy station is not suitable for starting a vehicle with a fully discharged battery.
The energy station's starting aid function provides welcome help when a vehicle's battery lacks sufficient charge to start the vehicle without difficulty. We wish to point out that even standard vehicle models are equipped with numerous electric modules
(e.g. ABS, ASC, fuel injection pump, on-board computer and car phone). The higher starting voltage and voltage peaks may cause damage to electronic components. No product liability can be accepted for any damage resulting from the energy station's starting aid function. Please read the information in the operating manuals of your vehicle, radio, car phone, etc. Important! The energy station has to be charged to full capacity in order to be able to draw a current of 600 A for 5 seconds.
How to use the energy station to start a vehicle
- Connect the red cable (+) of the energy station to the POSITIVE pole (+) of the vehicle battery.
- Connect the black cable (-) of the energy station to the vehicle's earthing strip or any other bare point on the engine block (earth). Choose a point as far away as possible from the battery in order to prevent ignition of any explosive electrolytic gas which may develop.
- The switch (Figure 1 / Item 1) must be set to "ON" position.
- Turn the ignition key over to start position and wait approx. 2 minutes.
DO NOT START THE ENGINE!
- With the energy station connected, you can now try to start the engine. Do not attempt to start the vehicle for longer than 5 seconds because of the very high current involved.
- First disconnect the pole clamp from the vehicle's earthing strip (negative pole).
- Then disconnect the jumper cable from the POSITIVE pole (+) of the vehicle battery.
- The energy station will need to be recharged after giving this starting aid.
9. Battery status monitoring
The voltage meter (Fig. 1/Item 5) keeps you constantly informed as to the charge status of the battery.
The red LED (Figure 1 / Item 4) lights up as soon as you start to charge the energy station.
- Green
The battery is 50 - 100 % full.
● Yellow
The battery is 0 - 50 % full and should be recharged.
• Red
The battery is completely run down. The battery can reach this state after jump starting a vehicle, for example. The battery must be recharged. Continuing to operate the unit from this point
GB
may damage the battery.
In order to preserve the operating life of the battery, it should be recharged at least once
every 3 - 5 months, irrespective of the amount of usage.
10. Replacing the lamp
Important! The lamp must be switched off.
Proceed as follows to replace the lamp.
- Using both hands, squeeze the lamp cover (Fig. 1/Item 6) together slightly from the sides, then pull the cover off.
- Turn the lamp socket anti-clockwise.
- Replace the lamp with the same style of bulb (i.e. 12 V/0.3 A).
- To install the new lamp, proceed in reverse order.
- Snap the light cover (Fig. 1/Item 6) back on.
11. 12-volt compressor
11.1 Filling tires
Note! Use a tire pressure gauge to check the actual tire pressure at the nozzle. Observe the information in the vehicle's owner manual concerning the filling of tires.
- Remove the valve cap from the valve.
- Push the connector piece of the compressor all the way down over the valve (Fig. 2/Item 1).
- Secure the connector piece by flipping back the locking lever on top of the connector (Fig. 2/Item 2).
11.2 Filling air mattresses, etc.
Important! Because of the material composition of air mattresses, rubber rafts, etc., obtaining an exact air pressure read-out is not possible. Therefore, pay special attention to ensure that you do not overfill these objects, as they will burst!
- Select the appropriate adapter and insert it into the connector piece of the air hose.
Adapter 1 (Fig. 3/Item 1): for air mattresses
Adapter 2 (Fig. 3/Item 2): for sporting balls
Adapter 3 (Fig. 3/Item 3): for beach balls
- Secure the connector piece by flipping back the locking lever on top of the connector (Fig. 2/Item 2).
12
11.3 Starting up the compressor
Important! Please read the bulleted items listed under "1. Important Notes" prior to starting up the compressor. Ensure that the compressor cools down for 10 minutes after it has run for 10 minutes.
- Check the pressure gauge (Fig. 4/Item 2) prior to switching on.
- To switch on, flip the ON/OFF switch (Fig. 4/Item 1) to „I“.
- To switch off, flip the ON/OFF switch (Fig. 4/Item 1) to „0“.
12. Maintenance and care
- Be sure to switch off the energy station and disconnect all cables from the unit whenever you perform any cleaning or maintenance work.
- As far as possible, use only a soft dry cloth without any aggressive solvents to clean the surface. If absolutely necessary, use a slightly dampened rag to remove dirt.
13. Repair
Should the tool experience problems beyond those mentioned above, let only an authorized professional or a customer service shop perform an inspection.
14. Disposal
The tool, accessories and packaging should be disposed of in an environmentally-friendly fashion. Plastic parts are coded for purposes of separation when recycling.
12
The guarantee period begins on the sales date and is valid for 2 years.
Responsibility is assumed for faulty construction
or material or functional defects
Any necessary replacement parts an necessary
repair work are free of charge.
We do not assume responsibility for
consequential damage.
Your customer service partner
NL EINHELL-GARANTIE
Eschenstraße 6 - D-94405 Landau/Isar (Germany)
Technical changes subject to change
©CZ Poker Plus S.R.O.
Areal Vu Bechovice
Budava 10B
CZ-19011 Praha - Bechovice 911
Tel.+Fax 02579 10204
yu MP Trading d.o.o.
Cika Ljubína 8/IV
YU 11000 Beograd
GR An. Mayrofidopoulos S.A
Technical & Commercial company
12, Papastratou & Asklipiou Str.
GR 18545 Piräus
Tel 0210 4136155, Fax 0210 4137692
RUS Bermas
Altufyevskoye shosse, 2A
RUS 127273 Moscowi
Tel 095 3639580, Fax 095 3639581
EH 04/2003