
DBS 792 CB - Iron BOMANN - Free user manual and instructions
Find the device manual for free DBS 792 CB BOMANN in PDF.
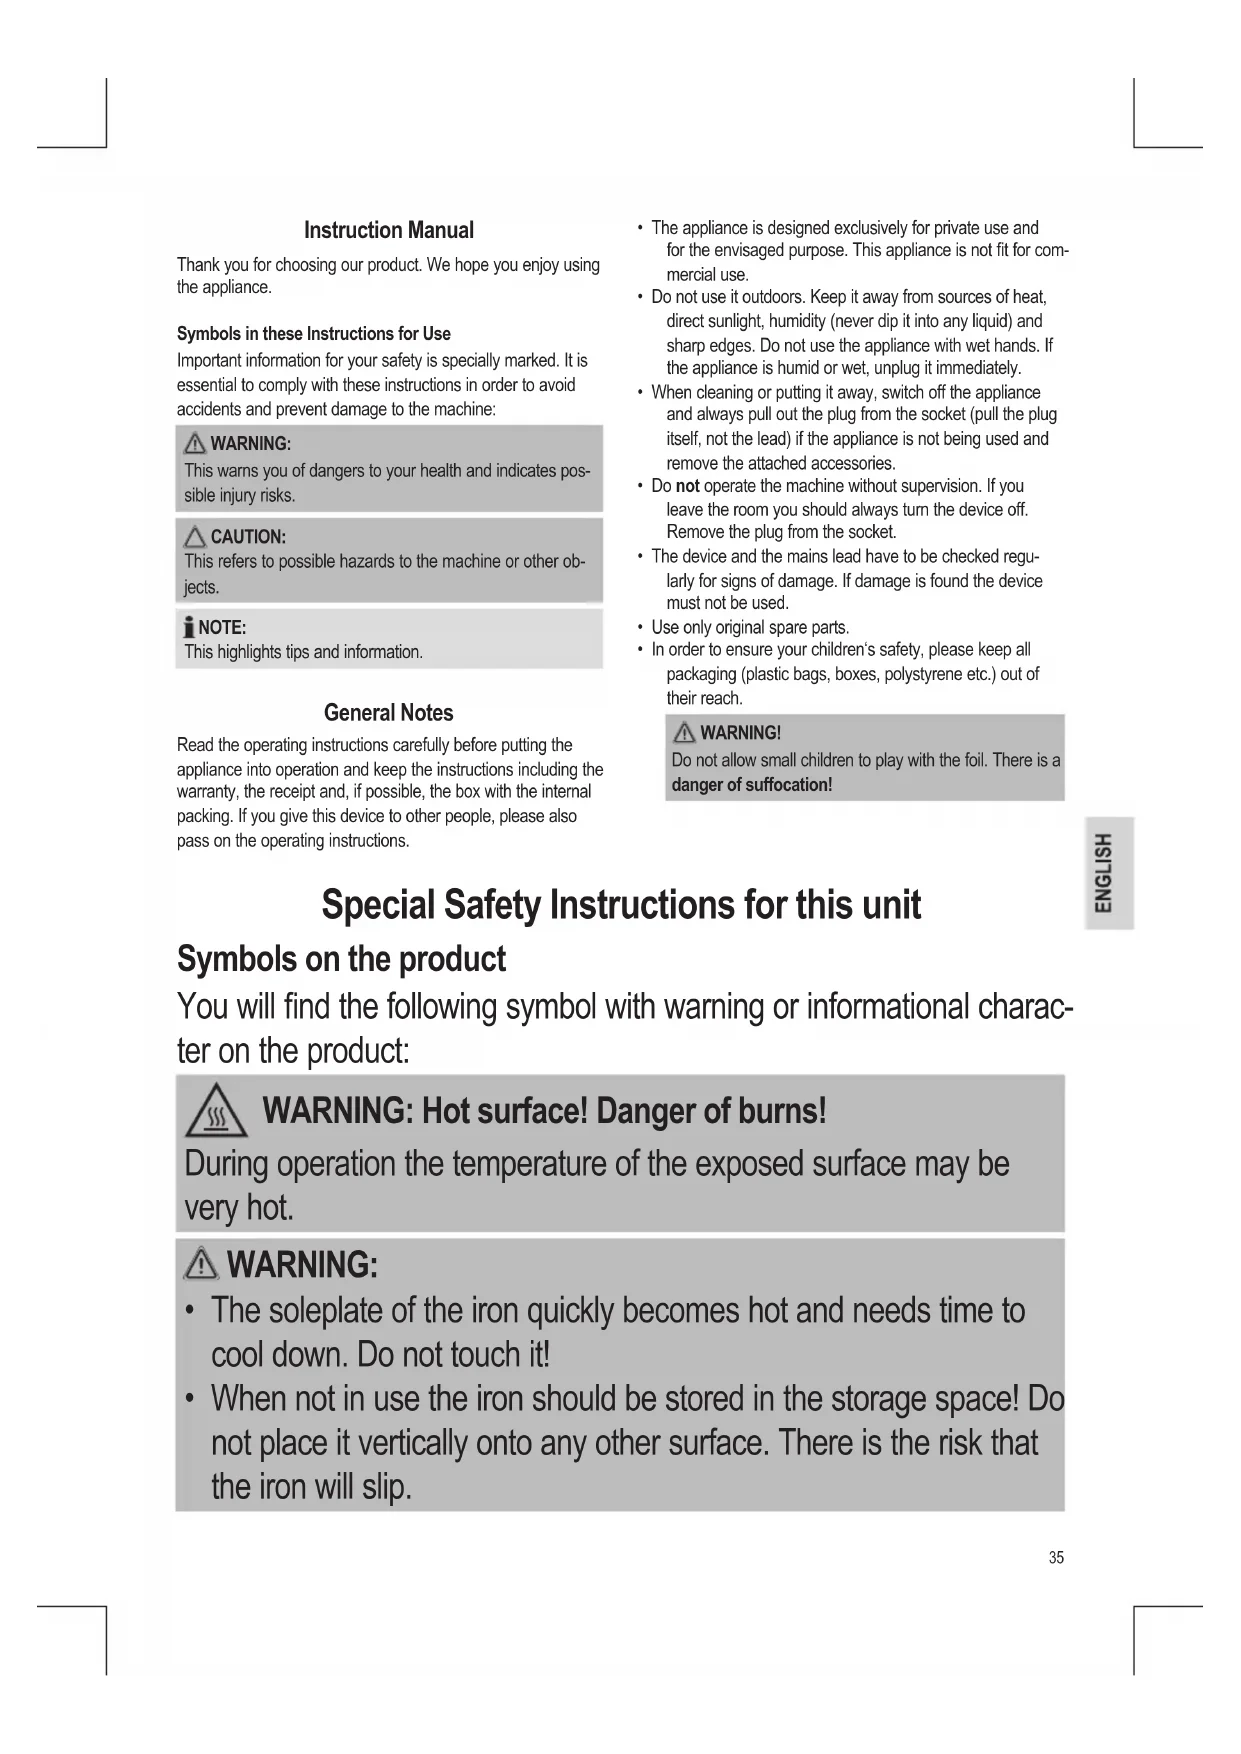
| Product type | Steam station with iron |
| Brand | Bomann |
| Model | DBS 792 CB |
| Power supply | 230 V~, 50/60 Hz |
| Power | 2200 W |
| Water tank capacity | 2.3 liters |
| Net weight | Approx. 2.90 kg |
| Steam function | Continuous steam and vertical steam shot |
| Temperature adjustment | Temperature dial with positions for synthetic, silk, rayon, wool, cotton, linen |
| Anti-scale filter | Removable filter cartridge, replace after approx. 18 liters |
| Carrying handle | Integrated handle with UNLOCK lock |
| Resting surface | Stable heat-resistant surface on the base |
| Care and cleaning | Clean the soleplate with a slightly damp cloth, do not immerse, use tap or distilled water |
| Safety | Unplug before filling, hot surface, do not leave unattended, keep out of reach of children under 8 years |
| Cable and hose storage | Wrap in the groove at the base of the unit, clip to secure the cable |
| Warranty | Keep the warranty card and receipt |
Frequently Asked Questions - DBS 792 CB BOMANN
User questions about DBS 792 CB BOMANN
0 question about this device. Answer the ones you know or ask your own.
Ask a new question about this device
Download the instructions for your Iron in PDF format for free! Find your manual DBS 792 CB - BOMANN and take your electronic device back in hand. On this page are published all the documents necessary for the use of your device. DBS 792 CB by BOMANN.
USER MANUAL DBS 792 CB BOMANN
DAMPFBÜGELSTATON DBS 792 CB
Stoomstrijkijzer · Station fer a repasser · Estacion para planchar a vapor
Sistema stirante a vapore • Steam Ironing Unit • Želazko z generatorem pary
Gözölós vasaló · Napoba npacka · Pn6bop dny rnaxkenna c o6pa6oTKo npamo
Thank you for choosing our product. We hope you enjoy using the appliance.
Symbols in these Instructions for Use
Important information for your safety is specially marked. It is essential to comply with these instructions in order to avoid accidents and prevent damage to the machine:

WARNING:
This warns you of dangers to your health and indicates possible injury risks.

CAUTION:
This refers to possible hazards to the machine or other objects.

OTE:
This highlights tips and information.
General Notes
Read the operating instructions carefully before putting the appliance into operation and keep the instructions including the warranty, the receipt and, if possible, the box with the internal packing. If you give this device to other people, please also pass on the operating instructions.
- The appliance is designed exclusively for private use and for the envisaged purpose. This appliance is not fit for commercial use.
- Do not use it outdoors. Keep it away from sources of heat, direct sunlight, humidity (never dip it into any liquid) and sharp edges. Do not use the appliance with wet hands. If the appliance is humid or wet, unplug it immediately.
- When cleaning or putting it away, switch off the appliance and always pull out the plug from the socket (pull the plug itself, not the lead) if the appliance is not being used and remove the attached accessories.
- Do not operate the machine without supervision. If you leave the room you should always turn the device off. Remove the plug from the socket.
- The device and the mains lead have to be checked regularly for signs of damage. If damage is found the device must not be used.
- Use only original spare parts.
- In order to ensure your children's safety, please keep all packaging (plastic bags, boxes, polystyrene etc.) out of their reach.

WARNING!
Do not allow small children to play with the foil. There is a danger of suffocation!
Special Safety Instructions for this unit
Symbols on the product
You will find the following symbol with warning or informational character on the product:

WARNING: Hot surface! Danger of burns!
During operation the temperature of the exposed surface may be very hot.

WARNING:
- The soleplate of the iron quickly becomes hot and needs time to cool down. Do not touch it!
- When not in use the iron should be stored in the storage space! Do not place it vertically onto any other surface. There is the risk that the iron will slip.
WARNING:
- Choose a secure surface for the stand! The surface must be level and stable. Check the surface again for stability.
- The iron must be used and rested on a stable, heat-resistant surface.
- Before filling the water tank remove the mains lead.
- The iron must not be left unsupervised while it is connected to the mains.
- Do not use the iron if it was dropped, has visible damages or leaks.
- Do not try to repair the appliance on your own. Always contact an authorized technician. To avoid the exposure to danger, always have a faulty cable be replaced only by the manufacturer, by our customer service or by a qualified person and with a cable of the same type.
- While the iron is switched on and while it cools down, the iron and its connection cable must be outside the reach of children younger than 8 years.
- This appliance can be used by children aged from 8 years and above and persons with reduced physical, sensory or mental capabilities or lack of experience and knowledge if they have been given supervision or instruction concerning use of the appliance in a safe way and understand the hazards involved.
Children shall not play with the appliance. - Cleaning and user maintenance shall not be made by children without supervision.
- The tank should only be filled up to the maximum mark. Do not overfill! Maximum water filling quantity: 2.3 litres.
- Do not bend the connecting hose (4)!
Intended Use
This appliance is intended for ironing of clothing and textiles.
It is intended for use in households.
Any other use shall be considered as not intended use and can lead to material damage or even personal injury.
Overview of the Components
1 Handle
2 Steam jet button
3 Temperature control
4 Connecting tube
5 "Temperature" control lamp
6 Iron rest
7 Base
8 Cord clip
9 Releasing device for handle "UNLOCK"
10 Water tank with lime filter
11 Button below the water tank. Releasing device of the water tank
12 Lime filter cartridge
13 Fill opening
Instructions
Unpacking
- Remove any protective foils and stickers from the soleplate.
- Please unwind the lead completely.
Electrical connection
- Make sure that the iron voltage (see name plate) and the line voltage match.
- The mains plug should only be inserted into a correctly installed socket with earthing contact.
Power Requirements
The station has a total maximum wattage of 2200 W. With this connected load a separate supply line protected by a 16 A household circuit breaker is recommended.

CAUTION: Overload!
- If you use extension leads, these should have a cable cross-section of at least 1.5mm^2
- Do not use any multiple sockets, as this device is too powerful.
Turn on and off
Turn on: Ensure that the temperature control is in the "MIN" position. Connect the mains plug to a properly installed safety socket. The appliance is immediately switched to operating mode.
Turn off: Ensure that the temperature control is in the "MIN" position. Disconnect the mains plug from the socket.
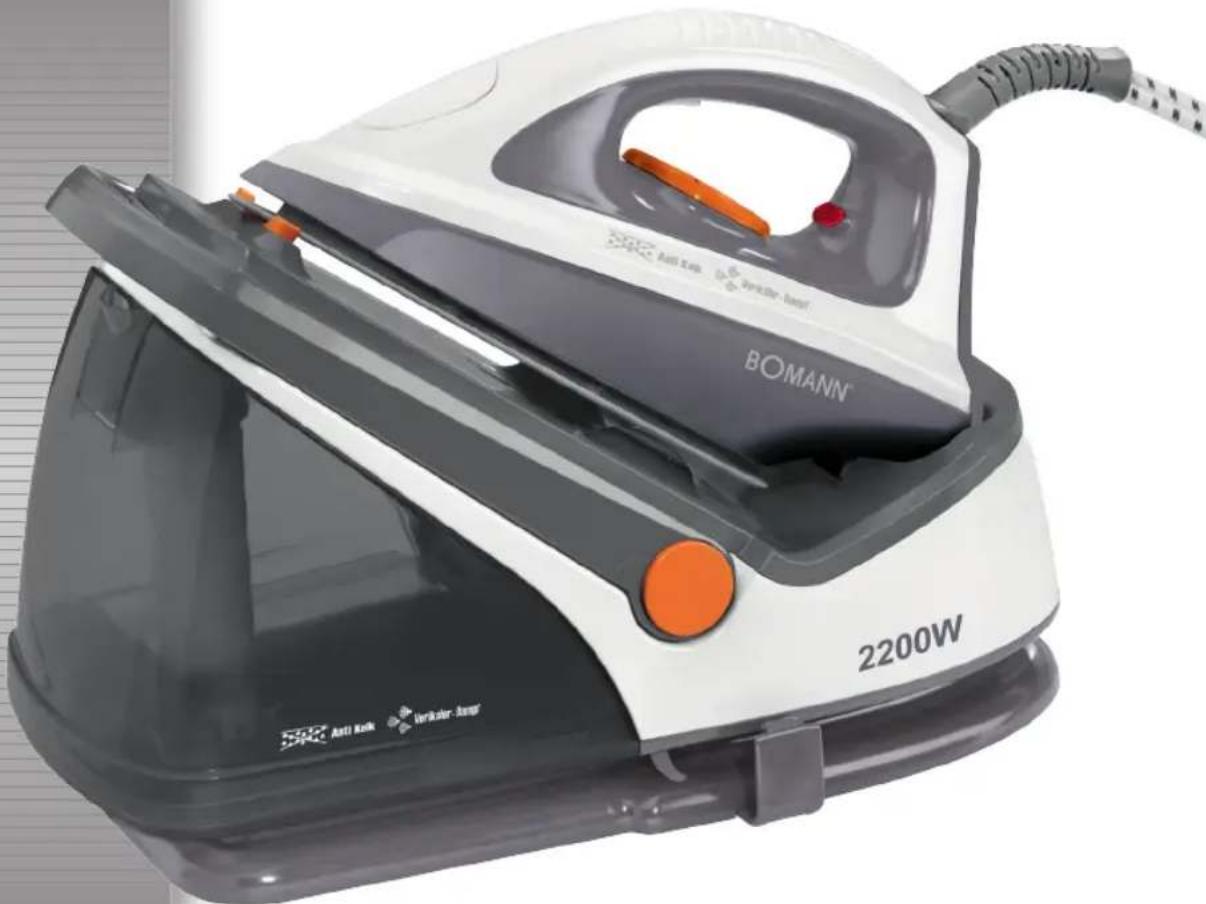
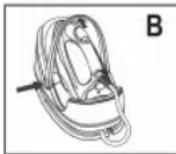
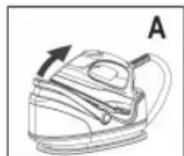
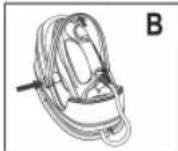
Function of the Handle (1)
The handle attached to the base serves for carrying the appliance when the mains plug has been pulled from the outlet.
To carry the appliance, raise the handle until it engages (Fig. A). A "click" confirms that the handle has been locked. You can use the handle for transport of the appliance.
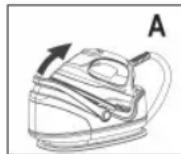
To release the handle lock, press the "UNLOCK" button (9) and put the handle down (Fig. B).
Temperature control on the iron (3)
The symbols on the control correspond to the following settings:
(synthetics, silk) low temperature
- - (rayon, wool) medium temperature
cotton, linen) high temperature
- Turn woolen clothes inside out to avoid shiny spots on the fabric due to steam ironing. In addition, lay a thin cotton cloth onto the fabric.
- Select a low temperature setting for fabrics with additional surface treatment and iron them inside out.
i NOTE:
The iron heats up faster than it cools down. Start ironing with the lowest temperature setting.
Water Tank (10)
- The water tank has a recessed grip on the bottom so that it can be removed. Press the button (11), to pull out the tank.
- When sliding the tank back into the base, it must audiably click into place.
- The fill opening (13) enables you to fill with water even when the water tank is fitted into the base.
- The "MAX" mark is located below the fill opening. Do not fill the tank above this mark. The tank volume is 2.3 litres.
Water
Use only tap water or distilled water.
Do not fill battery water, water from the clothes dryer and water containing additives (such as starch, perfume, softener or other chemicals) into the water reservoir.
This could damage the iron due to residues forming in the steam chamber. These residues may cause impurities to the fabric when dropping out of the holes in the soleplate.
Operation
Before Initial Use
- Clean the ironing base with a slightly damp cloth.
- In order to remove all residues before initial use, please pass the iron a few times over an old clean cloth.
Ironing without steam

NOTE:
Sort out the garments according to their ironing temperatures.
- If the handle should still be in the carrying position, unlock the lock as described above under "Function of the Handle".
- Place the iron on the rest (6).
- Only connect the machine to a properly installed safety socket.
- Adjust the temperature on the temperature control (3). If you have sensitive items to iron, please begin with the lowest temperature.

NOTE:
The control lamp (5) on the iron indicates the heating process. As soon as this goes out, the operating temperature is reached. You can now begin ironing.
Steam Ironing

WARNING:
The iron expels a large quantity of hot steam. Danger of bums.

CAUTION:
- When using the steam iron please ensure that the water tank is always filled to the required level.
- The lime filter cartridge always has to be positioned in the water tank, even if you use distilled water.

CAUTION: Initial use:
Please proceed as follows:
- The tank should only be filled up to the maximum mark. Do not overfill!
- Close the water tank and place it back in the base.
- Connect the base station to a socket with earthing contact.
- If the handle is still in the carrying position, release the lock as described under "Function of the Handle".
- Set the required temperature in the range " to " The control lamp on the iron lights up.
- Wait until the sole plate has heated up. If the temperature has been reached, the control lamp goes out.
- Now press the steam jet button (2) for at least 60 seconds or until the steam comes out of the soleplate. This time is needed for the steam to reach the iron. A slightly louder noise of the pump is normal with this.

NOTE ON STEAM IRONING:
If the temperature is set to less than , no steam will be produced.
Vertical Steam function
This can be used to produce a jet of steam in a vertical direction. This function can be used to remove creases from hanging clothes or from curtains.

WARNING:
Never point the steam jet at other people. Danger of burns.
Hang the washing on a hanger. Guide the iron closely over the material as specified by the material.
How can I replenish the water during operation?
Refill with water before the tank is completely empty. A loud noise of the pump during operation indicates that the water level is too low.
- Place the iron on the rest (6).
- Set the temperature control to "MIN".
- Remove the mains plug from the socket.
- Open the fill opening (13).
- Fill the tank up to the maximum mark. Do not overfill!
- Close the fill opening.
- You can now continue ironing.
When you have finished
- Always set the temperature control to "MIN" after use. Remove the mains plug from the socket.
- Allow the device to cool down before you put it away.
Cord and pipe storage
- Wind the mains cord around the cord groove on the foot of the base.
- Place the connection pipe in the cord clip.
Anti-scale filter
Your steam iron station is fitted with an anti-scale filter. The anti-scale filter cartridge becomes spent after filtering approximately 18 litres of water, depending on the hardness of your water. It then loses its effectiveness and must be replaced.
- Turn off the appliance.
- Disconnect the mains plug from the mains.
- Remove the water tank.
- Remove the anti-scale filter cartridge.
- Fill the tank up to the maximum mark. Do not overfill!
- Insert a new anti-scale filter cartridge.
- Slide the tank back into the base. A "click" sound confirms that the water tank is correctly fitted.
- Before turning on the appliance, wait a few minutes until the new filter cartridge is saturated with water.
NOTE:
If you do not have a new anti-scale filter cartridge, you can still iron with the used cartridge and distilled water.
Cleaning
WARNING:
- Always remove the mains lead before cleaning!
- Wait until the machine has cooled down completely!
- Under no circumstances should you immerse the device in water for cleaning purposes. Otherwise this might result in an electric shock or fire.
CAUTION:
- Do not use a wire brush or any abrasive items.
- Do not use any acidic or abrasive detergents.
Children shall not perform cleaning without supervision.
- Clean the casing with a slightly damp cloth.
- Clean the sole plate and the rest with a slightly damp cloth.
- Any residual water can remain in the water tank, but should be poured out if it has been in the tank for a prolonged period.
Troubleshooting
| Fault Possible Cause Remedy | ||
| Device does not work. | Faulty mains socket | Try another socket. |
| The device suddenly stops working during operation. | Is the electric circuit overloaded? | Check the house fuse. |
| No steam is generated. | The lime filter cartridge is mission or has not been set correctly. | Check the position of the lime filter cartridge. |
| The water tank has not been installed correctly. | A "click" confirms that the water tank has been set correctly. | |
| The temperature is set too low. | Select a temperature between "●●" and "●●●" | |
| Loud noises during steam operation | The tank is empty. | Check the tank. Fill tank with water. |
Technical Data
Model: DBS 792 CB
Power supply: 230 V~, 50/60 Hz
Power consumption: 2200 W
Protection class:
Maximum filling quantity of the water tank: 2.3 litres
Net weight: approx. 2.90 kg
The right to make technical and design modifications in the course of continuous product development remains reserved.
This device has been tested according to all relevant current CE guidelines, such as electromagnetic compatibility and low voltage directives, and has been constructed in accordance with the latest safety regulations.
Disposal
Meaning of the "Dustbin" Symbol
Protect our environment: do not dispose of electrical equipment in the domestic waste.
Please return any electrical equipment that you will no longer use to the collection points provided for their disposal.
This helps avoid the potential effects of incorrect disposal on the environment and human health.
This will contribute to the recycling and other forms of reutilisation of electrical and electronic equipment.
Information concerning where the equipment can be disposed of can be obtained from your local authority.
Instrukcje obstrugi
CTC Clatronic Sp. z o.o
YbIMKHeHHI bIMKHeHHI
YbIMKHeHH: YneBHITcB, 10 peryIaTOp TEMpeAtypn nepe6yBaE y noJoxKeHNI MIN".PiEdHaNte uTEkep Ka6eHIO XuBHeHNo Do HaneXHO BCTaHOBNeHOi po3eTKn. Pnpad HeraiHo yBIMKHeTB CBAPEKMIp o6oTN.
BnMKHeHH: YneBHITbC, 10 pepyIaTOp TempeAtypn nepe6yBaE y noJoxeHHi "MIN". BnIMtB uTeKeP KaBeIIIO XINBHeHH 3 po3eTKN.
Функш руки (1)
Pyka, 10 npnkpinnha do 6a3n-niDCTABKN, cnkyntb npeheceHH npnilady, konl Ka6eb JxNBHeHH BID'edHaHIN BiD po3eKn.
Дпя посьнгпрладу
пдимь рчк, доКи BOH He
Зафikcytбa (MaI. A).Якpo noHy-
ETbC"Кlaцанн, ue o3hae, zuo
pyka 3a6nokobana. PPyKу мохнa
ВИКОПСТОВУВАТИ Дпя посьн
нгпрладу.
- Ⅲo6 po36nokybatny,HaTmchitb KhoNky "UNLOCK" (9) i onycitb pyKy (MaI. B).

PerynIOBaHHaTeMnepeAtpn npackn (3)
CIMBOJH NapeyIaTopi BiINOBiJaOTb Bka3AHM HIXYe HaJIaUHTyBaHHM.
(CNHTeMka,WOBK)Hm3bKaTeMnepaTpya
(BICKO3a, BOBHa) cepedn TaemepaTpa
- - - (6aobbHa, IboH) BnCOKa TemnepaTpa
BnBepHbBoBNHmOJr,Ioo3ano6iITnNorBi 6nckyHnxIIaHaTKAHHi ypaizi npacyBaHHa 3napoIO.KpIM TORO,NOKlaTbHaTKAHHy TOkHy 6abOBHnyTKAHHy.
ДяTKaHH, NOBepxHЯKIMMaEOdaTkoByObpo6ky, BnBepiHT H3bKy TEMpepatyip npacyte II HABNOpit.
I P N M I T K A.
IpaKa HarpiaBcBc WbDwE, HIX OXONODyETbC. No- HnHaTe npacyBaTN, BCTAHOBNBUN MIIHIMaJIbHe 3HaueHHa Tempepatypn.
Emhictb DnB Odn (10)
Pe3epByap nIy BoIN MaBn3y BmMky IpyHoro BNIMaHnRAKIO Bu MoKeTe 3rAIn NOro 3 Micra. HATNCHTb KHONKY (11), uO6 BnTITn pe3epByap.
KoIN Bn BCTaBnaTe pe3epByap y Kopnyc, BiH Mae rOnocHO KNaHyTn Ha MicuJ.
- OTrbip dIa 3aIINBaHH BOn (13)do3B0Jae 3aJIINBaTH BOny, HABITb KOIN pe3epByap IIN BOn 3HAxOoNTbcra B OCHOBI.
-No3haKa“MAX"3haoDntbCn iD OTBOPM nIaIiBaH H BODn. He HanOBHouTe pe3epByap NoHaI NO3hauKy. CMHCTb BMiuye 2,3JItpn.
Boda
3actocobyTe tInbKn BOy i3 BOOnpoBOy a6o ncttnboBaHy BOy.
Body 3 6atapei, i3 cyuapkn a6o B0dy 3 doaHnM ximikatib (Taknx kpoxmanb, npqymm, noabkn dny 3m'kweHHN B0dy a6o iHui) 3abopohreBc 3aJIbATB n EMHICTb npackn.
PpntaMDoK6yTnNoIkoDKeHnOckIbKnBnapoBnKaMePi MoxytcbCTBOPBOATNCrOcAaN.LiocAdmMOxyt3aImuatn CnIDnHaTKaHNH,KOINBVXODNTMMyTbYepe3OTBOPnIpaN.
06cnyroByBaHHa
IpeepipuHm3actocyBaHHM
OuHCTITb DnHsE npackn BOIoroIO TKaHIHOIO.
- ⅢO6 BuaJIHTI nepeI nepuIM 3aCTOCyBaHnM BCI 3a6pydHeHH, cIi npacyBAtn CNoHaTKy CTapY uNCTy TKAHHy.
IpaCyBaHnHa6e3napi
PUMITKA.
Biicopryte 6iin3Hy 3a TnnaMn TkAHINn dnn pi3Hx Tempepatyp npacybaHH.
- 阿卡图 3xoxoHbB nOIOXeHHI dNnpeHeceHH, po36noKyTe 3amok, kONICAHO B po3diJi "FyHKuI pyKn".
- BicntabTe npacky Ha nictabky (6).
3.BkHouItbBnkyBpo3eKy,uo nikIIOueHa HaneXHM HINOMIBIDNObiaTexHiHIMBMORM. - BldpernyIIOte TemnepaTy pHa peryIaTopi (3). JaKuo Bu npacyBaTMete 6iIN3Hy, 0u OYtINBa DO BnCOKOI Tempepatyn, noHnaTe 3 MINImajbHOI Tempepatyn.
TPMMITKA:
IIndikatop (5) Ha npacui Bkaye Ha npoec HarpiBaHH. RaTinbKn BiH BmKHeBcR, ce 03Haue. LIO doCnHyTo pObooi TemepaTyPi. Tenep MoXHa NoaTu npacyBaTN.
IpacyBaHHa 3 npao
TIONEPEDKENHRA.
Ipaacka Bpuo6nre Bemky kibkictb rapaoi nap. IcHye He6e3neka onikib.

YBATA.
KoIbnpaioeBpekimi npaoboro npacybaHH, 3BeptaTe yBarHa Te, uO6 emHcTb 3BOIO 3ABXn 6yJa 3anOBHeHOIOCTaTHBoHO KJIbKICTO BOIN.
- PAnpoH fInbTpIy IaIra 3axnctIpy npOtn BAnHa MaE 3abXdN 3hAxoDHTncBpeepByapi, TaKoJy Tomy BnnaKy, Konn Bn 3actocobyeTe dInCTINbOBaHbY BoDN.
BAΓA. Npατοκ npαι.
TouHHaTe npauObaTHB TaKOMy IopRky:
1. 3anobhit emhictb do no03haek maksymmy. He nepe6inbuyte kibkiectb BODI!
2. 3akpnte pe3epByap nBn i noCTaBte noro Ha niCTaBky.
3.Плкнчьба306у CTaHIOdo po3eTKI 3axnCHMNI KOHTAKTAMN.
4. 阿图 puyika 3haxoindtbcB nnonoxeHHi dny nepheceHHa, po36nokyute 3amok, kONcaHO B po3di "Функii pyu"
5.BctahOBiB Tempeatpy B iana3oHi BiD 3acBITbCra IHnKaTOp Ha npacui.
6. 3aekaiTe, nki niOuBa hariptbca. KOnn notpiibhoi Temepatypu 6yde doocarhyTo, iHmkaTOp BIMKHeTbca.
7. Tenep Hatncihk Honky imnybchoi noa hi napu (2) i ytpmyte ii Bnpoob60 cekynd a6o nokn 3 niOWBn BHXoNTb npa. Leyac e Heo6xidnM, o6 napa noTpanna do npackn. He3nHm 3Byk npictroo noa hi napu- ce HOpMaIbHO.
BKA3IBKA DO IPIPACYBAHHRA 3ACTOCYBAHHRIMIAPN.
KIOI TEMNepaTpy Bn6paHO HAIaHTyBaHHa, MeHwe 3a
PiDcBte Ha rAOK. PiDheCtB npacky do TkaHHN 3 ypaxyBaHnM peKoMeHdaui Ha TKAHHI.
AkoDAtnBOnBEmHicThiNac npacyBaHHa?
Iodabai Te Bovy B EMHCTb 3aBXn Do TOROMeHTy, NOKI BOa He 3akHunacr NobHcTNo. KIOo nJ cac po60TuYKtbcra UyMn 3 pncToPO IOaui napu, ue O3Haue, oio pibeHb Boi 3aHaTO Hn3bKn.
- Biéctabte npacky ha niictabky (6).
- BctahOBiB peYyIaTOp tempeatpy y noLoXeHHA MIN
- BntnHtB bNkny 3 po3eTkn.
-
BiiKpniTe OTBip IaI3aINBaHnBBoN (13).
-
3anOBHnTe EMHicTb TlBKn Do No3HaKn MaKcMMy. He nepenOBHnTe EMHicTb BDOIO!
- 3akpiTe OTBip IaIra 3aIbHaHH BODn.
- Bm moxete npoobkntn npacybATn.
3aikHueHH npaui
- TICN BIKOPUCTAHH 3aBxDN BCTAHOBJIOte peryIATOp TEMNEPATy u noLoXeHHA MIN.BuTnHiB BuNKy 3 po3-etKN.
2.Пелед.TIMЯСТавИTNпpackуHaMICUE,ДeBOHA36epira-ETbca,CIIIDOCYUDNTIINIOBHCIO.
36epirahanhunhypa Ta Tpy6kn
- O6MToaTe Ka6eBbXbIeHHaHbKOIO na3a B HxKHi 即CTnHi NiDCTaBKn.
BctaHOBiB 3'EDHyBaIbHy Tpy6ky y φikcataOp dIy shHypa.
ΦinbTp BiD Hakiny
Pntctabky dny napoboi npackn 6nndhaHO pInbtpom Bid HAnky. YpeepzipbTp bID hakiny moxna nponyctmtn npin6n3Ho
18 nirpiB BOi3aIeXHO BiJ XOpCTKoCTI BOi. IicnlaIbero pecypc fInbTpa BUnepnyTeBcra i Joro cnid 3amHHTN.
- BumkhHb npucTpii.
- Bmmitb tkepk KaebJIO KMBnEHH 3 pO3eTKM
- Bi'ednaipe pe3epByap nBovn.
- BnMItb KapTpDxK pfJbTpa BiH hKnIy.
- 3anOBHITbpeepByap BOIO IO MAKCImaJIbHOI NO3HAUKN. He 3aINBaIte HADTO 6arato BOn!
- BCTABTE HOBIN KAPTPINK fIbtpa BiH hKnny.
- BctaHOBiB pe3epByap B oCHOby. Ha no3haeHHHaJIeXHO BCTaHOBJIeHHpe3epByapa IIN BOHN ONUyETbcKNaUAHN.
8.ПершИнВМКATNприсгд,3auekaTe KJIbKa XBINH,ДОПОКИ HOBIM KapTpIdK φiЛьтpa He 3aONOBHTbc BOIOU.
I PIMITKA.
KuO y Bac HMaE HOBOr KApTpNJa DnI φinbTa Bid HAKnIy, MoXHa BnKOpNCtOBaTn npacky 3i CTapIM KApTpNJxKeM, OJHak TOni CnId 3aJIbATn DInCTINlboBaHy BOy.
OuHueHHa
IIOPEIXEHHJ.
PoaHnXuBHeHH: 230B\~,50/60T
CnoxmbHH noTyXHOCTI: 2200BT
Ipyna eJekrpo6e3neuHocri:
MaKcImaNbHa KjIbKiCtB BOnB EmHOCTi: 2,3 JITPN
Bara HETTO: npn6n.2,90 K
IpaBOHaTexHHi3MIHN Ta 3MIHN yDn3aHi 36epiraetbcra npoDBK npoeccy po3pO6kn npoDkyT.
Ley npnad 6yno nepebipeho 3riDNo Bcix BiNobiHNx, AKtyaIbHnx DnpekTNB CE, HapnKnad uOdo eNeKtpomarHITHO CymiHOCTI Ta Hn3bKOBoNTHO DnpeKTNB, Ta 36yDoBaHO 3 a HOBITHM NNOXeHHMn TEXHki 6e3neKn.
PykoBOCTBO no 3KcnJnyataun
Blaorapn3a noknyhnaero n3dein. Mblnaneemc, TTO BbC yD0BOJIbCTBnEM 6ynde NOnb3OBAIbCnM
CNMBOJIbI,NCIOJIb3yEmbIeB3TnxMHCTpyKUHX
BaxnnaIbacnHOpmaunO6o3HaaeTcneuaJIbHBIM 6pa3om.Heo5xoDMoCo6JIOaTb3TNHCTpyKUINIO n3- 6exkHHe HeCuaCThIX CnyaeB INN NOBpeXdHn np6opa.

PENEYIPPEXDEHNE:
IpeDynpexKHeHne 60nacHOCTn IaBawero3doPobBny yka3aHHe BO3MOKHBx PNCOB NOyueHn TpaBMbl.

BHIMAHNE:
O6o3Haayet Bo3MOxHbIe onaChIbe ycIOBnI nI np6opa IIN OkpyKaHOux IpEIMTOB.

ПОНМЕЧАЙ:
Obpaaaet BHHMaHHe Ha peKOMeHaaunn HINHOpMaunIO.
06uaHhOpMaun
Ipeep nCnoIb3ObaHnem np6opa BHnmaTeIbHO npOHTne IHCTpyKuIN NO 3KcPnyatauIM IN COxpaHIne INHCTpyKuIM BMe-CTe C rapaHTmeN KBNTaHmE N, NO BO3MOXHOCTM, YNAKOBYC BHyTpeHHIM COdePKMbIM. Pnp nepeDAe np6opa DpynM TaKke pepeaTe INHCTpyKUIM NO 3KcPnyatauIM.
- Pπb6op npedna3nauhen NcKIIouHTeJIbHO nIaNcNoIb3OBAHnB 6byTu n dIpyneYcMOTpeHHbIX cIeNe. OH hepaccuTah HA KOMMepeCKeOE NcNoJIb3OBaHHe.
He nolbytecbnBHE nomeeHna. PpeoxpaHnTe np6op OT nctOHHKOB Tenn, pRmBX COHHeHbIX LyHe, BO3dEChTBn BnaxHOCTN (HnKOrDa He nIpykaTe B KnkocTb) n OCTpbX KpOMok. He paobTaIe C np6OpM MOKpbIM pykAMn. Ecn np6op cTahET BlaXkbIM nIM MOKpbIM, HEmdJIeHNOOTKnIOHTe erO OT ceTI.
-ДЯчNTKINYbOpKNHaXpaHHeBbIKIOHTePn6OpN BbIHbTe BUNKy IN3po3ETKN(BbIHMaIte BUNKy 3a KOpNyc,a He 3a npOBOD).EcInnp6Op He 6yDet NcNoIb3ObaTbcr,OTCOEHNHTE BCE pInHaIqExHOCTN.
He octabnIte np6op 6e3 npncmOTpa.Ecn Bbl BbIXOHTe n3 KOMHaTb,TO BCerda BbIKIOaHTe np6Op.BbHbTe BNkY n3 p0eTKN. - Perynphno npoBepyTe np6Op n cTeBoi Ka6eIb Ha np3HaKn NobpeKDeHn. Pn o6HapyeHn NobpeKDeHn He noIb3yIteCb np6Opom.
- IcnoIb3yIte 3anaChbIe DetaJIOn TOnbKO OTn3rTOBInTeJ.
-ДябezонachocTN Baunx DeTei DePKeTte Bce ynaKOBOHyIe MaTePnAblI (NnactIKOBbIe MeUKN, Kopo6Kn, NOINCTnPOJNI T.D.) B HEDOCTyHOM DnI HNX McTe.

PENYIPPEXDEHNEI
BHHMaHHe! He pa3peWaaTe MaIeHbKIM DeTAMIrpaTaB c nHeKoN, TAK KAc cyuecTByeT onaChocT b yduhenia!
CneuNbHbIe HnCTpyKcNn PO TexHnke 6e3OnaCHocTn CmBolbI Ha n3dJIIn
Ha n3dennn nmeotcrae duoune npedynpejdaoune n HOpma- zuoHHbIe CmBOJI:

I P E D U N P E X J D E H N E:
- Bыбираіte 6e3опасную NOBepxHocTB ДЯ 6a3bl! NOBepxHocTBdoJXHa 6bITb POBHOИ yCTOuHBOI. Y6eДNTecbВ HaJeKHOCTN ONOPHOI NOBepxHocTn.
- YTJOrOM Heo6xOДIMO NOIb3OBaTbCЯ I DepeXaTb Ha yCTOuYHBOI TepMOCTOiKOI NOBepxHOCTN.
- Пара Запоннем Воряноаьчka OTсоeINHITe ceTeBOJ Ka-6eNB.
He octabnay Te yTOr 6e3 npncMOtpa, KOrda OH BkHoueH B po3eTky.
He noIb3yITeCb yTIOROM, ecn OH naJaI nMeet 3aMeTHbIe NOBpeXdEHHa IIN TeuN.
He nbitaTecb peMOHTPOBaTb np6op camocToIbHo. Bcerda obpaaiaTecb K cneuaHncty. Bo n36exaHne onacbix cnTyauu Bcerda 3aMeHnTe NOBpeXdEHHbI Ka6eIb TOnbKO y n3rTOBOTeJI, B peMOHTHOcLyX6e IIN y cneuaHnCTa Ha Ka6eJIb TORO JKe Tnna. - Пoka утог вкlioуни oxлaxдаetс, He podnyckaite DeTei do 8 net K yTury n ero coeHHTbHOMy ka6eIIO.
- ΘТИМ Рпбором могут NOьБ3OBaTbСЯ DeTи OT 8 Лети Лиca C OгразиЧьим ФиЗИчЕСКIMN, OсЯЗTeЛьнБIM ИПИ ПСИХИЧЕСКИ MСПОСБHOCТЯМ, a ТАКЖЕ C HeДОCTaTOUHbIM ONБITOM И 3HaHN-YAMN, TOЛБКО ПОД НадЗОРом ИПИ ПОЛУЧЕНЯ INHCTpyKцIN ПО БEZОпаС"HОй pa6OTE C Рпбором И CBЯЗHьIM C 3ТИМ ONaCHOCTeI.
He no3B0Jte DeTm nIgpaTb c np6Opom.
-ЧИстку и объжнынке пибopa DeТMогуТ BыПОЛНЯТь Тольko по писмOTРМ.
3aONHnIe 6aOK TOnbKO Do MaKcImaJIbHOJ OTMeTKn. He nepe-nHnIte ero! MaKcImaJIbHbI Osbem BoIbI: 2,3 Jntpa.
He nepereh6aTe coeHHTbHbI shnaHr (4)!
Ha3haeHne
3ToT npn6op npedHa3NaueH dna IaXeHnO dexdby TkaHe.
OH npedHa3HaeH dIy IcNoJIb3OBaHnB B DOMaUHnx ycNOBn-ax.
JIIO6oe Dpyoe npIMHeHHe OOTKHO CHNTaTbCnICNOB3OBAHNEM He No Ha3HaueHmIO N MOKe TpNBeCTN K NOpYe MaTePnaJIOB INI DaKe K JINHOr TpaBME.
063op dTeanen np6bopa
1 Puyka
2 KhoIka nOdaun cTpyn npa
3 PerynlTop TemnepaTpybl
4 CoedinHtBnA Tpy6ka
5 INDnKaTOp HArpeBa
6IoNCTaBkA DnYyTHOra
7 Ba3a
8 3aKIM DnTnHypa
9.YctpoiCTBOOCB60xdenpyuKN"UNLOCK"
10 BoJHOH 6aOK C npOTUBON3BecKOBbIM HJIbTPOM
11 KhoNka OcBO6OKeHnHaXoDITCn IOBdHbIM BaKOM. YcTpoIcTB0 OcBO6OKeHn BOaHOrO BaKa
12 PatoH npOTIBON3BcTkoBOToФnIbTpA
13 3aIIMBHOe OTBepCTVE
Hnctpykun
PacnaKOBka
- Y6epnte BCE 3aunthbIe nTeHKn HnakNeKn C npOoBbI.
-ПОЛНOCьpo pa3MOTaIte ka6eIb nITaHnIa.
PoiKJIIOUeHHe K 3JIeKTPoCeTn
- Y6eIntecb B COOTBETCTBn HAnpJxKHeN NITaHnYyTOra (Ha nacnpToHn Ta6mUKe) HAnpJxKHeN cTeN NITaHn.
- CeTeByu BnIky Heo6xOIMMo BKIOUaTb B npAunBHO yCTaHOJIeHHyO p03ETKyc 3a3EMIAOHUM KOHTAKTOM.
Tpe6oBaHnK nctOuHnky nntaHn
067aMAKcIMMaJIbHaM OMOHOCbCTAHm COCTaBnEET 2200BT. Tn TaKo HArpy3Kn peKOMeHdyETcOtJeBHaJ IINHnIITAHn, 3aUuIeHHa 6bITOBbIM ABTOMATOM 3auNTbI cenn16A.
BHUMAHNE: Neperpy3ka!
- Pn Heo6xOJIMOCTN NCIOB3OBAHn yDINHITeNe OHN D0JXHbI NMeTb CeHeHc XuNbI He MeHee 1,5 MM2.
He nIOnIb3yIte HeckoJIbKO pO3eTOK, TAK KaK 3TO yCTPOJCTBO CnIMUKOM MOUHoe.
BkJIOUeHHe N BbIKJIOUeHn
BkIIOUeHHe:Y6eIITecb,yTO peryIaTOp TEMpepaTypbI HaxoIITcB nONOKeHm MIN.BkIIOuHTe CTeBEyIO BnIKy B npAunIbHO yCTaHOBJIeH Hyo 3a3EmHeHHy po3EtKy. Pp6Op cpa3y BKIOUHTcB pa6OHy peKIM.
BbIKIOHHe:Y6eIITecb,TO peryIaTOp TEMnepaTpybI HaxoITcB NOIOKeHH MIN.BbIHbTe BUNKy n3 po3ETKn.
Ha3HaueHne pyuKn (1)
Pyka, npknneHHa K 6a3e, cnKIT npeHocKn npbopa B OTKNIOEHHom OT cTn COCTOHN.
-Пяпенихочи рибoga погнIMITEpyknydoФИКcaUNI(pnc.A).ФИКcaUNIpyKINCOPOBOXdaetc"цeЛчКOM".PykaMoKETNcNoJIb3OBaTbCЯДПЯпенихочи рибoga.
- TTo6bl OTKpbItb fNkCaTOp pyKoRT-KH, HaxMMTe KhoNkY UNLOCK (9) nOnyCTnTE pyKu BHN3 (pnc. B).
PernyarTop temnepaytpbHa ythore (3)
CIMBOIbHa peryIaTope COOTBeTCTByIOT CneDyUOzIM Ha-CTpOiKAM:
(CNHTeNka,JIENK)HIM3KA TeMnepaTpa
(BINCKO3a, WepcTb) cpeHra TeMnepaTypa
(xionok,en)BbICOKaTeMnepaTypa
- UepctHbIe TkaHbBbOpaHbAte Hau3HaHky, YTo6bl N36ExKaTb NOBnEHHIOChuIXxCnTe BpeyNbTaTe rJaKeHn Cnapom. KpOme TORo, nOd ToHkne XIOHTaTObymaxKbIe TkaHn NODKnAdbIaBe Te ObIcHyHO TkaHb.
-ДЯТКАнС ДОПONHITeNBHOI OТДENKOВ BbIbIpaIte HN3KyIO TemnepaTpyu INaIbTe INC N3HaHKn.
IIPIMMEUAHNA:
YTOH HArpeBaetc6bIcTpee, YEm OcTBiBaTe. HaunHaTe TnJaXeHne Ipn yCTaHOBKe cAmO Hn3Ko TeMnepaTybl.
Bodnoi6aok(10)
BodHOH 6aOH IMeET yIy6JIeHHb3 aXBaT B DHe dIe BO3MOxHocTH CHrTna. HaxMITE KhoNkY (11), YTO6bl N3-BNeCb EMKOCtB DnI BOdbl.
- Pn yctaHOBKe EMKoCTN Dn BODbI B OCHOBaHne DOJKeH pa3daTbcS IeHNOK FmKCaTopa.
3aJIINBHOEOTBepCTHe(13)no3BOJREHaJIIBaTbBOyD DaXeByCtAHOBnEHHyO BOCHOBAHHe EMKoCTb.
- MeTka MAX paTOnIOxKeHa HnKe 3aJIbHOrO OTBepCTnHe 3aJIbAaIe BDoY BEmKOcTb BblIe 3ToI MetKn.ObBeM 6aUka coCTaBnIeT2,3Jntpa.
Boga
IcnoB3yTe ToIbKO BOOpOBoHOHy IOIN DnCTmNIpOBAH Hyo BDOy.
He 3aONHnIte BoJHO BauOK BoOu n3 BaTapeu OTOnneHn, BoOu n3 cyuINKn dnn 6eBn BDOU, cOepKauee IobABKn (HaNPIMep, KpaxMaI, napΦHOpEpiu, yMraHTeB N npYrme XmMKaTbI).
3TO MOKET NOBpeDnTb yTOr B pe3yNtate o6pa3oBaHnO cAkoB B napOBou Kamepe. 3Tu OCAkN MoYr 3aPra3Hry TkaHb npn nonadannn n3 OTBepCTn B nOdoWbe.
McNoB3OBAHnE
IpeepnepBIM nCOnNoB3OBAHNEM
- Pnpnte OCHOBHnE yTIOr cNerKa BnaxHoN TkAhBIO.
-ДЯнудаменьССХОCTaTKOBпepEDпрБВIMИСПОЛБ3OBAHnEMПORnaIbTeYTHOrOMHECKONbKOpa3CTapyUQHCTyTOKahb.
TlaekHeIe 6e3 npa
ITPIMMEAHNAI:
PaccoptnpyTe npemetbI OeKdbI cornaCHO TemnepaTy- pam Dnra nnaxehna.
- Ecn pyka eue haxoitcB nooxhen nnepehockn, onyctnte ee, kak onicaHO ba3dene "Ha3haehme pyku
- NocTabBe yTnHa NoCTabKy (6).
- BknoaTe np6op TOnbko B npabnBHO yCTAHOBHeHHyPo3eTKy.
- 3aaiTe TEMepatypy c nmooBHO peryTota TEMpepatpybI (3).EcJIeCTb DeJIHKaTHbI BeuIN dIra IaXKeHn, HauHHTe C camOu Hn3KoTtemepatypbl.
IINPMMEAHNAH:
HnDkaTOp (5) Ha ythore yka3bIbaeT ha npoecc HarpBa. Iocne doCTNKeHnry yTHorm 3aDaHHo TMnpepaTypbHnDkaTOp rachet. MoXHO hauHHaTb TnaKky.
TnaKeHne cnapom
IPEyIpyEKeXDEHNE:
YTHOR BbIyckaet 60nbOe KOINyecTBO ropryero npa. Onachoctb oxorob!
BHIMAHINE:
- Penei nCnoJIb3OBAHnEM yTOra Cnapom y6eIntecb, YTO B BOJAROM BaUKe npCcyTCTByET BODa B Heo6xOINMOM KOINHECTBE.
BHIMAHNE:
- PAnpoH npOuBOm3BecTKOBOro fNbTpA BcERda DoJKeH 6bITb yCTaHOBnE H BOJaHO B aQOK, daKe ecIN NcNoJIb- 3yETcI INIIIpOBaHHa BOJa.
BHIMAHHE: NepBoe nCNoB3OBAHHe:
BbInonHnTe cneDykoJIee:
- Baoyok Donykeh 6bityb 3aonHHe H0 MaKcMaJIbHOI OT-MeTKn. He nepenONHJte 6aOk!
- 3akpoTe BOJHOH 6aOH N yCTaHOBnTe erHa 6a3y.
3.BKIOHTe 6a3OByIO CTAHIO B PO3ETky C 3a3emnIOUIM KOHTAKTOM. - Ecnn pyka ehe haxoDntcB noloxeHn Dn nepeHocKn, ocbo6Onte fKCaTOp, kak onncAoB pa3dene "Ha3naueHne pykN".
- 3aainTe Temnepatpy B Dnaia3oHe OT " ● ● Do " ● ● Ha ythore 3aropaeTc HndkaTOp.
- NIOOKDNTe, NOKa NOOUBa YTOHa He HArpeETcR. Nocne DOCTXKeHn3aADHHoT EMMepaTypbI INHINKATOp rachET.
- Tenepb HaxMITE u ydepXmbaTE HaxaTOH KONky NOda-yn npap (2) He Mehee 60 cekyHn Nn Noka n3 nooBbI yTora He noiDet nap. 3To Bpemr Heo6xOIMo, YTO6bl npdoWeI Do yTora. Pn 3OM HEMHO NOBbIeHHbI Wym HacocA ABnEeTcHOpMaIbHbIM.
3AMEUAHN O TJIAXEHN C IAPOM:
Ecnn 3aana TemnepaTpya MeHee ,nap He BbipabaBtBaETcR.
Функць ВерпкальHoro napa
3TaФункия NO3BOJRETNyUHbCTpyIOnapaBBePTKakbHOM HANpABJIeHN. OHa MoKET INCNOJIb3OBAtbcrДnydaneHncknok Ha BnCraIUX ODEkDax NIN UTopax.
PENyPENKDEHNE:
HmKorJa He HnpaBnIe cTpyo npa Ha JIOJe. OnacHOCTb OXOROB!
Iobecbte BbictupahHoe 6be Ha PnueuKn. IpopoBOnTe yTOROM prdOM B COOTBETCTBm C INHCTpykUraMn DInr DaHHORo MaTePnAna.
Kak donntb Body Bo Bpempa60tbi?
BoBpMa DOLINBaIe BoNy, POKa 6aOcK He OyctEn. CunbHbI Uym HAcocA Bo BpMa pa6oTbI NOKa3bIBaE, YTO yPoBeHb BObl Man.
- NocTabbTe yHr Ha NoCTabKy (6).
2.YctaHOBITEperyIaTOpTEMpePaTypbIBNOIOKeHMeMIN. - BbHbTe cTeBvIy BmIKy n3 po3ETK.
- OtkpoTe 3aJIbHbOe OTBepCTne (13).
- 3aene Te Body B 6aok Do MAKcmaJIbHOI OTMeTKn. He nepenonHnTe 6aok!
- 3aKpoTe 3aJIbHoe OTBepCTme.
- Tenebp MOxHNO npoDnKntb rnaKeHne.
Tocne3aBepueHnpa6oTbI
- Tocne nCnoJIb3OBAHnB CERda yCTaHaBnBaIte peryIaTOp TemnepaTypbI B NOIOKeHHe MIN.BbIHbTe cTeByIO BNIKY n3 pOeTKN.
2.ДаTe np6bOpO ocTbIb nepeD y6OpKoHa xpaHeHne.
Xpahene ceteBoro uHpya n Tpy6kn
- HamotaTe ceteBoiU hyp BOKpy yTtora, pa3meuaera erO b CneuHbHom XeI06Ke OCHOBaHn.
- Pa3mecTHTe coedHnHrTeIbHyIO TpyKa B 3axKIMe shHypa.
PpOtnBOn3BeCTKOBbI ΦnIbTp
IapOBaI cTAHnI O6OpUObAHa IpoTbON3BecTKOBbIM fNtPOM. IatpOHa IpoTbON3BecTKOBOro fNtPpa XBATAET dIg fNtPraun IpMepHO 18 NITPOB BObI B 3aBNCIMOCTN OT ee JcEeKCTKoCTN. IocNe 3TOr OH cTaHOBITcR He3ΦΦeKTINBEH n DOJKeH 6bIT 3aMeHeH.
- BbiknHouTe np6op.
- BbIbTe cTeByu BuIky u3 po3ETKn.
- CHMnITE BOJHOH 6aOH.
- BbHbTe NaTPOH npOTBON3BecTKOB0BO fNtIbTa.
- 3aONHnTE 6aOK BOoJ DO MAKcMaJIbHOJ OTMeTKN. He nepenONHnTE 6aOK!
- BCTaBtE HOBbI nATPOH nPOTnBOu3BecTkoBOrO fNlBtpa.
- BCTaBbTe EMKOCTb DnIa BOdI b OCHOBaHne. PpI npaBnB-HoY yCTaHOBKe EMKOCTn DOJXKeH IPO3ByaTb UeJIyOK fNkCaTopa.
- IpeE BKNIOUeHHeM pnp6p noOJQdIte HeckOnbKO MHyT, YTO6bI HOBbI NaTPOH cNbTpA npONITANC BOIOJ.
ПРИМЕЧАНО:
Ecnn y Bac Het HOBOR npOTnBOu3BcCTKOBOrO pInIbTpTa, Bbl eue MoKET npOJOnKINb TJIaKeHne C NcNIOJIb3OBAHnEM CTaporo NaTPOHa NdCTUINIPOBAHHO BObI.
UncTka
I PENEYIPPEXDEHNE:
Bcerda otKlouaTe cTeBOkabeIpeed nCtkoI
-ДождntecbпОнHorO octbIBaHnЯ npnbopa.
- Hn B koem cnyuae He norgykaite npnbop B Body dny chctkn. 3To MoXeT npNBecTN K nopaxeHNO 3JIeKTPnueCKM TOKOM IIN BO3roPaHIO.
BHIMAHINE:
He nIOnb3yInTe npOBOnuHyIO uETky IIN a6pa3nBhie cpeIcTba.
He nCnOJIb3yIte KNCIOITHbIe IIN a6pa3NHBIe YIcTt- Ⅲne cpeCTBa.
- UcTky npn60pa DeT MOryT POn3BODHTb TOnbKO nOd PnCMOTPOM.
- Pnpnte Kopnyc CneKa BnaXhoT KAnbI.
IpoTpnte nooWBy yHora nnoCTabKy cnerKa BnaXHOI TKaHbIO.
OCTaTKI BOJBI MOKHO OCTaBHT B BOJHOM 6aUKe, HO ee CJIeDyET BblNTb, ECJN OHa HaxoJnIacb B 6aUKe IINTeJIb-HOE Bpemr.
YcTpaHHeHne HncnPaBHOCTe
Laiy jaiy baij y jaiy jaiy jaiy jaiy jaiy jaiy jaiy jaiy jaiy jaiy jaiy jaiy jaiy jaiy jaiy jaiy jaiy jaiy jaiy jaiy jaiy jaiy jaiy jaiy jaiy jaiy jaiy jaiy jaiy jaiy jaiy jaiy jaiy jaiy
iisll oig: aolil aolll
i 10000000000000000000000000000
i 1
!i j !j
i
:
A
1234567890
j j j j j j j j j j j j j j j j j j j j j j j j j j j j j j j j j j j j j j j j j
= S_ OJJ
gaii gaii i jaiin jn jj 1il
1
1
- 12 的一个零点
3
GARANTIEKARTE
warranty card · garantiekaart · carte de garantie · schedadi garanzia · tarjeta de garantia · cartao de garantia · garantikort · karta gwarancjna · zarucni list · kartica jamstva · carte de garantie · rapaunonha Kapta · zarucny list · garancijski list · garancajegy · rapaHTnHmΦOpMynap · rapaHTnHbI TaONH
DBS 792CB
24 Monate Garantie gemäß Garantieerklarung · 24 months warranty according to warranty declaration · 24 maanden garantie volgens garantieverklarung · 24 mois de garantie selon la déclaration de garantie · 24 mési di garanzia seconde la dichiarazione di garanzia · 24 meses de garantia de acuero con la déclaración de garantía · 24 meses de garantía, de accordo con a déclaration de garantía · 24 manedes garanti i henhold til garantibetingelse · 24 misiage gwarancji na podstawie oswiadczenia gwarancynego · záruka 24 mésicu podle prohláseni o záruke · 24 mjesecno jamstvo u skladu s jamstvenom deklaracionj · 24 luni garante conform déclaratietie de garantie · 24 meça rapaunu b cbotbctBme c rapaunonHATA deknapau · 24-mezačna záruka podla vyhlasenia o záruke · 24-mesečna garanci, skladnogo zarancijsko Ijavo · 24 honap garancia a garanciaféltetelekben leirtak szerint · rapanha na 24 Mcaui BiiouboDIOI npo raptanio · raptanma 24 mcaua corlanacho zabienHHBM raptamTmHIMnpabnAm
Kaufdatum, Handlsterpmel, Unterschied - date of purchase, dealer stamp, signature - rankoopdatum, dealerstemel, handsteigerung - date d'achat, tampon du concessionaire, signature - data del acquisto, timbo del rivendatore, firma - fecha de compra, sello del distribuidor, forn - data del compra, carinbo do distribuidor, assinata - kopsdato, forhandsterlmel, signatu - data zekupu, pieczei spreadawy, podis - datum zakoupeni, ranzika produceje, podis - datum kapowine, zig trogovce, podis - data of achiptje, stampa fumtorizuri, semmatura - Data ha noynkma, Nechar ha npodauva, pioan - datum napuku, peciatka obchodniki/rodajcu, podis - datum napku, zig trogovce, podis - vasiats dihakr, keresikidko belyegzje alairs - datra prudbanna, nezmka npodauva, nizimac - Data prnobepeneria, Zlatrnnpodauva, Pnoanab
BOMANN® www.bomann.de
BOMANN®
C. Bomann GmbH
Internet: www.bomann.de

- Symbols in these Instructions for Use
- WARNING:
- CAUTION:
- OTE:
- General Notes
- WARNING!
- Special Safety Instructions for this unit
- Symbols on the product
- WARNING: Hot surface! Danger of burns!
- Intended Use
- Overview of the Components
- Instructions
- Unpacking
- Electrical connection
- Power Requirements
- CAUTION: Overload!
- Turn on and off
- Function of the Handle (1)
- Temperature control on the iron (3)
- i NOTE:
- Water Tank (10)
- Water
- Operation
- Before Initial Use
- Ironing without steam
- NOTE:
- Steam Ironing
- CAUTION: Initial use:
- NOTE ON STEAM IRONING:
- Vertical Steam function
- How can I replenish the water during operation?
- When you have finished
- Cord and pipe storage
- Anti-scale filter
- Cleaning
- Technical Data
- Meaning of the "Dustbin" Symbol
- Instrukcje obstrugi
- YbIMKHeHHI bIMKHeHHI
- Функш руки (1)
- PerynIOBaHHaTeMnepeAtpn npackn (3)
- I P N M I T K A.
- Emhictb DnB Odn (10)
- Boda
- 06cnyroByBaHHa
- IpeepipuHm3actocyBaHHM
- IpaCyBaHnHa6e3napi
- PUMITKA.
- TPMMITKA:
- IpacyBaHHa 3 npao
- TIONEPEDKENHRA.
- YBATA.
- BAΓA. Npατοκ npαι.
- BKA3IBKA DO IPIPACYBAHHRA 3ACTOCYBAHHRIMIAPN.
- AkoDAtnBOnBEmHicThiNac npacyBaHHa?
- 3aikHueHH npaui
- 36epirahanhunhypa Ta Tpy6kn
- ΦinbTp BiD Hakiny
- I PIMITKA.
- OuHueHHa
- IIOPEIXEHHJ.
- PykoBOCTBO no 3KcnJnyataun
- CNMBOJIbI,NCIOJIb3yEmbIeB3TnxMHCTpyKUHX
- PENEYIPPEXDEHNE:
- BHIMAHNE:
- ПОНМЕЧАЙ:
- 06uaHhOpMaun
- PENYIPPEXDEHNEI
- CneuNbHbIe HnCTpyKcNn PO TexHnke 6e3OnaCHocTn CmBolbI Ha n3dJIIn
- I P E D U N P E X J D E H N E:
- Ha3haeHne
- 063op dTeanen np6bopa
- Hnctpykun
- PacnaKOBka
- PoiKJIIOUeHHe K 3JIeKTPoCeTn
- Tpe6oBaHnK nctOuHnky nntaHn
- BHUMAHNE: Neperpy3ka!
- BkJIOUeHHe N BbIKJIOUeHn
- Ha3HaueHne pyuKn (1)
- PernyarTop temnepaytpbHa ythore (3)
- IIPIMMEUAHNA:
- Bodnoi6aok(10)
- Boga
- McNoB3OBAHnE
- IpeepnepBIM nCOnNoB3OBAHNEM
- TlaekHeIe 6e3 npa
- ITPIMMEAHNAI:
- IINPMMEAHNAH:
- TnaKeHne cnapom
- IPEyIpyEKeXDEHNE:
- BHIMAHINE:
- BHIMAHHE: NepBoe nCNoB3OBAHHe:
- 3AMEUAHN O TJIAXEHN C IAPOM:
- Функць ВерпкальHoro napa
- PENyPENKDEHNE:
- Kak donntb Body Bo Bpempa60tbi?
- Tocne3aBepueHnpa6oTbI
- Xpahene ceteBoro uHpya n Tpy6kn
- PpOtnBOn3BeCTKOBbI ΦnIbTp
- ПРИМЕЧАНО:
- UncTka
- I PENEYIPPEXDEHNE:
- YcTpaHHeHne HncnPaBHOCTe
- iisll oig: aolil aolll
- GARANTIEKARTE
- DBS 792CB
- BOMANN® www.bomann.de
Brand : BOMANN
Model : DBS 792 CB
Category : Iron