
HA 500 CB - Fondue, raclette and wok appliance BOMANN - Free user manual and instructions
Find the device manual for free HA 500 CB BOMANN in PDF.

| Brand | Bomann |
| Model | HA 500 CB |
| Product type | Fondue, raclette and wok appliance |
| Power supply | 230 V, 50 Hz |
| Power | 1200 W (estimated) |
| Dimensions (L x W x H) | Approx. 30 x 20 x 15 cm |
| Weight | Approx. 2 kg |
| Plate material | Non-stick coating |
| Main functions | Cooking ice cream cones, waffles, and raclette or fondue dishes |
| Thermostat | Adjustable with heating indicator light |
| Number of persons | 2 to 4 persons (estimated) |
| Included accessories | Cone mold |
| Care and cleaning | Clean with a damp cloth after cooling; do not immerse in water |
| Safety | Hot surfaces, do not touch the plates; do not use near flammable materials |
| Intended use | Household use only |
| Warranty | 24 months (on manufacturing defects) |
| Spare parts and repairability | Do not repair yourself; contact a qualified technician or customer service |
Frequently Asked Questions - HA 500 CB BOMANN
User questions about HA 500 CB BOMANN
0 question about this device. Answer the ones you know or ask your own.
Ask a new question about this device
Download the instructions for your Fondue, raclette and wok appliance in PDF format for free! Find your manual HA 500 CB - BOMANN and take your electronic device back in hand. On this page are published all the documents necessary for the use of your device. HA 500 CB by BOMANN.
USER MANUAL HA 500 CB BOMANN
250g boter of margarine
500g suiker
3 eieren
500g bloem
Dar forma as bolchas
General Safety Instructions
- Read the operating instructions carefully before putting the appliance into operation and keep the instructions including the warranty, the receipt and, if possible, the box with the internal packing.
- The appliance is designed exclusively for private use and for the envisaged purpose. This appliance is not fit for commercial use. Do not use it outdoors (except if it is designed to be used outdoors). Keep it away from sources of heat, direct sunlight, humidity (never dip it into any liquid) and sharp edges. Do not use the appliance with wet hands. If the appliance is humid or wet, unplug it immediately. Do not put it in water.
- When cleaning or putting it away, switch off the appliance and always pull out the plug from the socket (pull on the plug, not the cable) if the appliance is not being used and remove the attached accessories.
- Do not operate the machine without supervision. If you should leave the workplace, always switch the machine off or remove the plug from the socket (pull the plug itself, not the lead).
- To protect children from the dangers posed by electrical appliances, make sure that the cable is hanging low and that children do not have access to the appliance.
- Check the appliance and the cable for damage on a regular basis. Do not use the appliance if it is damaged.
- Do not try to repair the appliance on your own. Always contact an authorized technician. To avoid the exposure to danger, always have a faulty cable be replaced only by the manufacturer, by our customer service or by a qualified person and with a cable of the same type.
- Use only original spare parts.
- Pay careful attention to the following "Special Safety Instructions".
Special safety notes
- The baking surfaces and the lid become very hot (danger of burns!). Touch the handles only.
- Put the unit down onto a heat-resistant surface or mat.
- In order to prevent heat from building up, do not put the unit directly underneath a cupboard. Ensure that there is enough space all around.
- Beware of steam coming out when you open the baking section.
- The device must never be used near to or underneath curtains and other combustible materials!
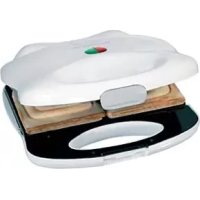
Overview of the Components
- Lid 3. Temperature control
- Pilot lights 4. Thermo-insulated handle
Accessories: Cornet cone/shaper
Starting-up the unit
GB
NON-STICK COATING
Lightly grease the baking surfaces before the unit is used for the first time. Use the appliance for about 10 minutes with the toasting surfaces closed (see „Using the device"). Then wipe it down with a damp cloth.
Please do not eat the first cornets that are made.
Using the device
- Please unwind the lead completely.
- Insert the plug in a duly installed 230V/50Hz protective contact socket. The red and green control lamps light up.
- Turn the temperature control to the desired level (for heating usually level MAX).
- Keep the baking surfaces closed while heating. When the green LED switches off, the baking temperature is reached.
- Open the lid and add approximately 1 tbsp. of dough into the centre of the baking surface. The dough should be added quickly as otherwise the cornets will not brown evenly.
- Close the lid gently and keep it closed by pressing lightly. Increase the pressure on the upper handle and wait until most of the steam has escaped. In this way the cornet will be thin and brown. Please ensure that you correctly meter the quantity of dough as excess dough will flow over the side and soil the machine. The green LED lights up after a few seconds.
- The desired baking temperature can be set with the selector. If the cornets become too dark please turn the temperature control to a lower level.
- The green LED switches off again. The baking is now over (This may vary depending on the thickness and consistency of the cornets).
- Open the lid and remove the fi nished cornet with a wooden fork or similar object. Do not use sharp objects to avoid ruining the coating of the baking surface. Place the fi nished cornet on a serving platter or plate. Roll it into the desired shape (note: the cornet is hot, danger of burns!). If you would like to use our recipe suggestion for ice cream cornets the cornet will retain its fi nal shape after cooling down.
- After each baking process, grease the baking surfaces against lightly as required.
- The baking surfaces must always be kept closed during pauses in the baking.
GB
Shaping the Pastry
You can use the cornet cone supplied. Please roll the cone into the pastry or select another shape. Tube-shaped cornets are obtained if you quickly turn the pastry while it is still hot around a spoon handle. Cone-shaped cornets are produced by allowing the hot cornet to slide into a goblet-shaped vessel, while dish-shaped ones are obtained by allowing it to slide into a dessert bowl. The cornet will shape itself, become hard and shorten when it has cooled down.
Recipe Suggestions
Ice Cream Cornets
1/4 cup of butter or margarine
1/2 cup of icing sugar
1/4 cup of milk
7/8 cup of flour
1/2 teaspoon of vanilla sugar
Stir the butter/margarine until it is frothy. Gradually stir in the icing sugar and the milk. Add the vanilla sugar and fl our. Stir all the ingredients to form a smooth dough. Distribute the dough with a tablespoon or ladle over the baking surfaces.
East Friesian Cornets
250 g butter or margarine
500 g sugar
3 eggs
500 g fl our
2 packets of vanilla sugar
Stir the butter/margarine, sugar and eggs until frothy. Gradually stir in the fl our. Dilute with lukewarm water. Mix the dough approximately two hours before baking. Stir all the ingredients to form a smooth dough.
Cinnamon Cornets
125 g butter or margarine
250 g sugar
4-5 eggs
200 g fl our
1 tsp. of rum
1 tsp. of cinnamon
1 pinch of salt
Stir the butter/margarine, sugar and eggs until frothy. Gradually stir in the other ingredients. Stir the dough until it is smooth.
Cleaning & maintenance
- Pull out the mains plug and allow the unit to cool down.
- Brush off any crumbs or residues from the baking surfaces and edges.
- Clean the machine only with a slightly damp cloth.
- Do not use abrasive detergents.
- The machine must never be immersed in water!
This device has been tested according to all relevant current CE guidelines, such as electromagnetic compatibility and low voltage directives, and has been constructed in accordance with the latest safety regulations.
Subject to technical changes without prior notice!
Guarantee
The device supplied by our Company is covered by a 24 month guarantee starting on the date of purchase (receipt).
During the life of the guarantee any fault of the device or its accessories *) ascribable to material or manufacturing defects will be eliminated free of charge by repairing or, at our discretion, by replacing it. The guarantee services do not entail an extension of the life of the guarantee nor do they give rise to any right to a new guarantee!
Proof of the guarantee is provided by the proof of purchase. Without proof of purchase no free replacement or repair will be carried out.
If you wish to make a claim under the guarantee please return the entire machine in the original packaging to your dealer together with the receipt.
*) Damage to accessories does not mean automatic free replacement of the whole machine. In such cases please contact our hotline. Broken glass or breakage of plastic parts are always subject to a charge.
Defects to consumables or parts subject to wearing (e.g. motor pistons, kneading blades, drive shafts, spare remote control, spare toothbrushes, saw blades, etc.) as well as cleaning, maintenance or the replacement of said parts are not covered by the guarantee and hence are to be paid!
The guarantee lapses in case of unauthorized tampering.
After the expiry of the guarantee
After the expiry of the guarantee repairs can be carried by the competent dealer or repair service against the payment of the ensuing costs.
PL
TapaHTnHbI cPOK Ha TeppntOpu N PoCCnCKo Φeepaun yCTaHaBnBaETcN NOHOMOHyIMN ppeDCTaBNTeJAMN.
Kaccobb yek yBJIeTc rapaHTnHbIM TaIOHOM. Be3 HrO HeBO3MOXeH 6ecnlaTHbI pEMOH TIN 3aMeHa n3dEIny.
B cnyuae BO3HnKHOBXHnI npnteH3nIO rapaHTn, npeDbYBITE u3dJIne B NOHOKOMNKeTauu, COpHnHaJIbHOyNAKOBOKoN KACCOBbIM YeKOM TOPROBOI TOKe, npOdaBweJ 3TO n3dJIne.
*) Defekti npHaJnxHocTe He cIyXaT npuHOn IJIa ABTomatuecko 3amehbl Bcero n3dEInn. B 3tOM cIyuae no3BOHnte Ham, noXaIyIcTa, no ropayei liHH! Pa3bntbIe CTEKJIHbIe I NOJOMAHbIe PIACTMaCCOBBe DEtaJIb BO3MeauOTc TOLbKO 3a DOnOJIHNTeBHyIO ONlAty!
Deefekti n3HaunBaembix npHaJnxHocTei nn TpyuxxCa DeTalei (HaNPmep KOHTaKTHbIe 5eTKMOTOPOB, CMEcITbHbIE KpIKN, PnIBoDhbie peMHN, 3aNaChbIe NylbTbI ynpabHeHn, 3aNaChbIe 3y6HbIe 5eTKN, NlNbHbIe NOLOTHa I T.D.), a TaKxe YnCTKa, TexO6ClyXNBaHne NN 3aMeHa TpyuxxCa DeTalei He NOnaAdIoT NoI rapaHTnIO, IN OToMv npBOdoTcR 3a OTdeJIbHyIO ONlaty!
TapaHTnA TepaETc npB BCKpbITnN 3dEJIy NOCTOpHHM NIuamN.
Pocne rapaHTnn
Pocne OKOHuaHnca cpoKa rapaHTnn, peMOHT n3deJn npON3BOIDTCa 3a ONlaTy, COOTBETCTByIOUIMM MaCTepCKmN nn pNYKtAmN cepBnCHOrO 06cnyXnBaHn.
Technische Daten
Modell: CB 500

- Dar forma as bolchas
- General Safety Instructions
- Special safety notes
- Overview of the Components
- Starting-up the unit
- NON-STICK COATING
- Using the device
- GB
- Shaping the Pastry
- Recipe Suggestions
- Ice Cream Cornets
- East Friesian Cornets
- Cinnamon Cornets
- Cleaning & maintenance
- Guarantee
- After the expiry of the guarantee
- PL
- Pocne rapaHTnn
- Technische Daten
Brand : BOMANN
Model : HA 500 CB
Category : Fondue, raclette and wok appliance