DR 52 CA - Radio ALBRECHT - Free user manual and instructions
Find the device manual for free DR 52 CA ALBRECHT in PDF.
Download the instructions for your Radio in PDF format for free! Find your manual DR 52 CA - ALBRECHT and take your electronic device back in hand. On this page are published all the documents necessary for the use of your device. DR 52 CA by ALBRECHT.
USER MANUAL DR 52 CA ALBRECHT
- Do not drop the DR 52 CA and do not expose it to liquid, mois- ture or humidity. These might lead to damage to the device.
- If the DR 52 CA is moved from a cold environment into a warm- er one, do let it adapt to the new temperature before operating the device. Otherwise it might lead to condensation and cause malfunctions in the device.
- Do not use the DR 52 CA in a dusty environment as dust can damage the interior electronic components and lead to malfunc- tions in the device.
- Do not attempt to disassemble the DR 52 CA.
- Only use the power adaptor delivered with the DR 52 CA.
- Never touch the power plug with wet hands and never pull on the power cable when pulling the plug out of the power socket.
- Make sure the electrical voltage specied on the DR 52 CA and its power plug is corresponding to the voltage of the power socket. Incorrect voltage will destroy the device.
- If the DR 52 CA is not used for a long period of time, disconnect it from the power supply by unplugging the power plug. This is to avoid the risk of re.
- Always power off the DR 52 CA when cleaning it.
- Never use any harsh or strong solvents to clean the DR 52 CA since these may damage the surface of the device. Dry, soft cloth is appropriate; however, if the DR 52 CA is ex- tremely dirty, it may be wiped off with a slightly moist cloth. Make sure the device is dried off after cleaning.
- When you have to ship the DR 52 CA, store it in its original package. Save the package for this purpose.
- If you have to dispose the device in the future, note that it should not be disposed with household waste. Bring it to a re- ception point for the recycling of electrical devices. Consult your local authority or retailer for recycling advice.25English
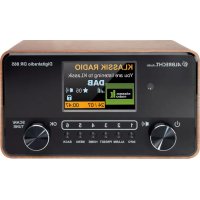
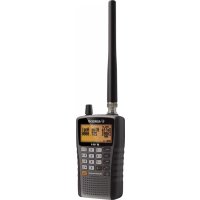
2. Appearance and Key Descriptions
No. Desription Functions 1 TFT screen Display 2 Standby button Standby on/off 3 Antenna connector For the supplied cable antenna or an external DAB / FM antenna 4 DC In Power supply 5 Audio Out RCA L/R jacks for audio out26 English Install two AAA batteries into the battery compartment. Take care to insert it with proper polar sign as indicated inside the compart- ment.
The packaging box contains the following items: DR 52 CA RCA to RCA audio cable RCA to 3.5mm audio adaptor Remote control Cable antenna Power adaptor User manual27English
- Connect the supplied cable antenna or an external DAB/FM antenna, as well as the power adaptor to the back of the DR 52 CA and plug it into a power socket.
- The time, date and any active alarm icon are then displayed on the screen. The time and date are also updated automatically from radio (DAB or FM) by default. If time and date are set man- ually, auto update will then be disabled. Press to turn the device to standby mode.
- During standby mode, press to turn the device to operation mode.
- If it is the rst time you enter the DAB mode, the device will automatically scan for DAB/DAB+ stations.28 English
- Press „Mode“ to go to the main menu, press „Tuning p/q“ to select different operation modes (DAB or FM).
- At any operation mode, press „back“ to go to the previous screen.
Note: Before listening to the radio, ensure that the DAB/FM An- tenna is adjusted in a proper direction. The icon on the top right corner of the display shows the strength of the DAB/DAB+ signal detected by the device. 4.1. Scanning for DAB+ stations Auto scanning: Press „Scan“ to run full scan of all stations. Alternatively, press „Menu“ to enter the menu where you can select „SCAN“ to run the same operation. All stations are shown in the Station List after scanning. 4.2. Station List Press „Menu“ to enter the menu, then select „Station List“ to view the list of stations already scanned. Press „Tuning p/q“ to select the station you want to listen and press „OK“ to con- rm. 4.3. Manual Tune If the device cannot receive the DAB+ station you are loOKing for, press „Tuning p/q“ to select station frequency manually. Once selected, press „OK“ to conrm and the station frequency will be put on the station list.29English 4.4. Prune Invaild Enter to remove the stations that are listed but not available. Press „Menu“ to go to system menu. Press „Tuning p/q“ to „Prune Invalid“ and then choose „Yes“. Press „OK“ to conrm. 4.5. DRC If you are listening to music with a high dynamic range in a noisy environment, you may wish to compress the audio dynamic range. This makes quiet sounds louder and loud sounds quieter. Press „Tuning p/q“ to select DRC (high/low/off) and press „OK“ to conrm. 4.6. Station Order The stations are listed by Alphanumeric/ Ensemble/ Valid. Press „Tuning p/q“ to select and press „OK“ to conrm. 4.7. Preset the DAB+ stations While listening to a DAB+ station, long press until the „Preset Store“ Menu opens, or press „Menu“ to go to the menu, then select „Preset Store“ to save the current station. Press „Tuning p/q“ to choose the number and then press „OK“ to store the station. Alternatively the current station can be stored to a preset by pressing and holding „1“ to „10“ respectively. Up to 10 presets can be stored in DAB mode. 4.8. Recall the preset DAB+ stations Short press to go to the „Preset Recall“ Menu, or press „Menu“ to go to system menu, then select „Preset Recall“ to recall the desired preset station. Press „Tuning p/q“ to choose the number and then press „OK“ to recall the station. A preset can also be recalled by pressing its corresponding „1“ to „10“ key.30 English 4.9. DAB+ information Display You can view the DAB+ service information. Press „Info“ to view the programme information, the programme type of the station, the frequency, signal strength, bit rate, codec, audio type, chan- nels, the date. If there is a picture shown for the station, you can press „OK“ to enlarge the picture to full screen. Press it again, the display will go back to the playing screen.
Note: Before listening to the radio, ensure that the antenna is adjusted in a proper direction. The icon on the top right corner of the display shows the strength of the FM signal detected by the device. 5.1. Scanning for FM stations Press „Tuning p/q“ to tune with 0.05MHz per step or press „Scan“ to search for the next FM station. 5.2. Scan setting Set to receive strong signal stations only. If the radio scans and receives many poor signal stations, set to „Yes“ to get strong signal stations only. 5.3. Audio setting Set to receive the FM signal in mono or stereo.31English 5.4. Preset the FM stations While listening to a FM station, long press until the „Preset Store“ Menu opens, or press „Menu“ to go to the menu, then select „Preset Store“ to save the current station. Press „Tuning p/q“ to choose the number and then press „OK“ to store the station. Alternatively the current station can be stored to a preset by pressing and holding „1“ to „10“ respectively. Up to 10 presets can be stored in FM mode. 5.5. Recall the preset FM stations Short press to go to the „Preset Recall“ Menu, or press „Menu“ to go to system menu, then select „Preset Recall“ to recall the desired preset station. Press „Tuning p/q“ to choose the number and then press „OK“ to recall the station. A preset can also be recalled by pressing its corresponding „1“ to „10“ key. 5.6. RDS (Radio Data System) Receiption You can view the information of FM stations which broadcast added data compatible with RDS. Press „Info“ to view the pro- gramme information, the programme type, frequency or the date if available.32 English
6. Main Menu and Settings
At any operation mode, press „Menu“ to enter the system menu in order to change the device congurations. Press „Tuning p/q“ to select the submenu and then press „OK“ to conrm. 6.1. Equalizer Press „Tuning p/q“ to choose EQ: Normal, Classic, Pop, Jazz, Rock, Flat, Movie or News. Press „OK“ to conrm. You can press „EQ“ to enter the equalizer menu.33English 6.2. Backlight Select illuminated level of backlight (High/ Medium/ Low) and the duration of timeout (Always On/ 10/ 20/ 30/ 45/ 60/ 90/ 120/ 180 sec). With setting the timeout, the backlight will automatically change to dim if the device is not operated for the set amount of time. Note: You can also press the „Light“ button anytime to adjust the backlight of the screen directly. 6.3. Setting Time/Date Set Time/Date: The Day digits will ash and are ready for set- ting. Press „Tuning p/q“ to adjust the day and press „OK“ to conrm. Repeat this process to set the Month, Year, Hours and Min- utes.34 English Set Format: Change the display of time to 12-hour mode or 24- hour mode. Press „Tuning p/q“ to adjust and press „OK“ to conrm. Auto update: Select to update time and date automatically from Radio (DAB or FM). Press „Tuning p/q“ to adjust and press „OK“ to conrm. The device will automatically be updated to the current time when receiving a signal from a DAB station or FM station with RDS. „No Update“ is also available for selection. 6.4. Alarms There are two alarms available. Press „Tuning p/q“ to choose setting up Alarm 1 or Alarm 2. Press „OK“ to enter the detailed settings. Alarm Mode: Press „Tuning p/q“ to schedule the alarm to Off/ Daily/ Once/ Weekend/ Weekday, press „OK“ to conrm. Alarm Time: The alarm time can be set with the same procedure as setting the clock. Press „Tuning p/q“ to set the alarm time and press „OK“ to conrm.35English Alarm Sound: Set the alarm sound (Buzzer/DAB/FM). Press „Tuning p/q“ to select the mode and press „OK“ to conrm. Volume: Press „Tuning p/q“ or „+ / -“ to adjust the volume and press „OK“ to conrm. Press „back“ to complete the setting. When the alarm is set and saved, a clock icon will appear at the bottom of the display. The clock icon is also displayed on the screen at standby mode. When alarm is ON, press „On/Off“ to stop the alarm or press any other key to enter snooze mode. The device will alarm again in 5 minutes after entering snooze mode. The 5-minute countdown will appear on the display. In snooze mode, the snooze time can be changed to 5/10/15/30 by press „Tuning p/q“. To turn snooze off, simply press „On/Off“.36 English 6.5. Sleep Press „Tuning p/q“ to select the sleep time of 15/ 30/ 45/ 60/ 75/ 90/ 105/ 120 minutes or set the sleep time to „Off“. Press „OK“ to conrm. 6.6. Factory Reset Press „Tuning p/q“ to select „Yes/No“ to reset the DR 52 CA to the factory default settings. Press „OK“ to conrm. The system will then restart after reset. Note: all customised settings (except current time/date setting) and stored preset stations will be erased after factory reset. 6.7. Info Enter to view the version of rmware of the system. 6.8. Language Press „Tuning p/q“ to control to select the desired language: English / Français / Deutsch / Italiano. Press „OK“ to conrm.37English
Error Solution The device free- zes
1. Disconnect the power plug for 1 minute,
then restart the device.
2. If the error has not yet been resolved,
reset the unit to the factory setting (see
The device does not switch on.
1. Check if the power adaptor is connected
properly with the power supply.
2. The normal function of the product may
be disturbed by strong Electro-Magnetic Interference. Try to use the product in ano- ther location No sound. 1. Turn on the sound as it may be muted.
2. Increase the volume.
3. The audio cable to the speaker system
may not be connected properly. No signal in DAB or hiss in FM mode.
1. Check/move the antenna.
2. Move the radio to another location.
1. Switch on the alarm.
2. The volume may not be properly set, re-
fer to the solutions of “No sound”.
3. The source of alarm was set to a sta-
tion without signal. Change the source of alarm or refer to “No signal in DAB or hiss in FM mode” No action from remote control
1. Low battery. Replace the battery.38 English
9. Warranty and Recycling Information
We are legally obliged to include disposal and warranty infor- mation as well as EU declaration of conformity with the use in- structions in different countries for every unit. Please nd this information on the following pages. 2-Year Warranty From Date Of Purchase The manufacturer/retailer guarantees this product for two years from date of purchase. This warranty inclu- des all malfunctions caused by defective components or incorrect functions within the warranty period ex- cluding wear and tear, such as exhausted batteries, scratches on the display, defective casing, broken antenna cable and defects due to external effects such as corro- sion, over voltage through improper external power supply or the use of unsuitable accessories. Defects due to unintended use are also excluded from the warranty. Please contact your local dealer for warranty claims. The dealer will repair or exchange the product or forward it to an authorized service center. You can also contact our service partner directly. Please include your proof of purchase with the product and describe the mal- function as clearly as possible.
10. CE Declaration of Conformity
Standards and Regulations Hereby, Alan Electronics GmbH declares that the radio equipment type DR 52 CA is in compliance with Directive 2014/53/EU. The full text of the EU declaration of conformity is available at the fol- lowing internet address: www.alan-electronics.de/download.aspx40 English WEEE and Recycling The European laws do not allow any more the disposal of old or defective electric or electronic devices with the household waste. Return your product to a municipal collection point for recycling to dispose of it. This system is nanced by the industry and en- sures environmentally responsible disposal and the recycling of valuable raw materials.
And Technical Hotline (for units sold in Germany) Alan Electronics GmbH Service Daimlerstraße 1k D-63303 Dreieich Germany Contact our service hotline by phone +49 (0) 6103 / 9481 - 66 (regular costs for German xed network) or e-mail at service@alan-electronics.de Before returning the product, check the chapter “Trouble- shooting” for some easy steps and tests or contact our hotline. Printing errors reserved. Information in this user manual are subject to change with- out prior notice. © 2017 Alan Electronics GmbH Daimlerstraße 1K - 63303 DreieichGuide d’utilisation Français DR 52 CASommaire