
Keystone - Docking station ION - Free user manual and instructions
Find the device manual for free Keystone ION in PDF.
| Product Type | Wireless Docking Station |
| Brand | ION |
| Model | Keystone |
| Weight | 3.8 kg |
| Power Supply | Integrated rechargeable lead-acid battery + solar panel (optional) |
| AC Adapter | Charging adapter included |
| Connectivity | Bluetooth 5.0 (9 m range) |
| Main Functions | Wireless audio playback, stereo pairing between two speakers, IR remote, solar panel |
| Solar Panel | Integrated on top, extends battery life after full charge |
| Wall Mount | Wall mount bracket included (screws provided), installation possible |
| Water Resistance | Splash resistant, moderate outdoor use |
| Battery Life | Varies by use; solar panel optimizes daily battery life |
| Charging Time | Full charge recommended before first use |
| Maintenance and Cleaning | Store indoors during bad weather, avoid standing water, do not use adapter in wet environment |
| Safety | Ensure wall mount capacity (3.8 kg), do not expose to extreme temperatures |
| Spare Parts and Repairability | Battery not user-replaceable; bracket and remote available |
| General Information | 28-page user manual available in multiple languages |
Frequently Asked Questions - Keystone ION
User questions about Keystone ION
0 question about this device. Answer the ones you know or ask your own.
Ask a new question about this device
Download the instructions for your Docking station in PDF format for free! Find your manual Keystone - ION and take your electronic device back in hand. On this page are published all the documents necessary for the use of your device. Keystone by ION.
USER MANUAL Keystone ION
Quickstart Guide English (3-6)
Guía de inizio=rápido Espanol (7-10)
Snelstartgids Netherlands (23-26)
Appendix English (27)
Quickstart Guide (English)
Introduction
Box Contents
(2) Keystone Speakers
(2) Wall Mounts
(2) Charging Adapters
(1) Remote Control
(8) 1.5" (38 mm) #10 Screws
Quickstart Guide
Safety & Warranty Manual
Support
For the latest information about this product (system requirements, compatibility information, etc.) and product registration, visit ionaudio.com.
Rechargeable Batteries
Rechargeable lead-acid batteries are the same type used in automobiles. As with your car battery, how you use this battery has a significant impact on its lifespan. With proper use and treatment, a lead-acid battery can last for years. Here are some recommendations for getting the longest life from the internal battery.
General Usage Fully charge the battery before using it.
Charge the battery completely after each use.
Storage For best product longevity, do not store at exceedingly hot (greater than 90^/ 32^) or exceedingly cold (less than 32^ / 0^) temperatures.
It is acceptable to leave your sound system plugged in. This will not overcharge the battery.
If you leave the battery level low and do not charge it for 6 months, it may permanently lose capacity.
Repair If the battery fails to charge, contact ION Audio at ionaudio.com.
Disposal Bring the unit to a recycling center or dispose of in accordance with local ordinances.
Outdoor Use and Care
Though Keystone is water-resistant and able to tolerate splashing water, please review the tips below to get the best performance from Keystone:
Bring Keystone indoors during extreme weather.
Please do not place Keystone in standing water.
- Please do not connect the charging adapter to Keystone in a wet environment.
WARNING: Keep any non-water-resistant devices (phones, music players, etc.) in a dry place where they will not be affected by water and cause a risk of electric shock.
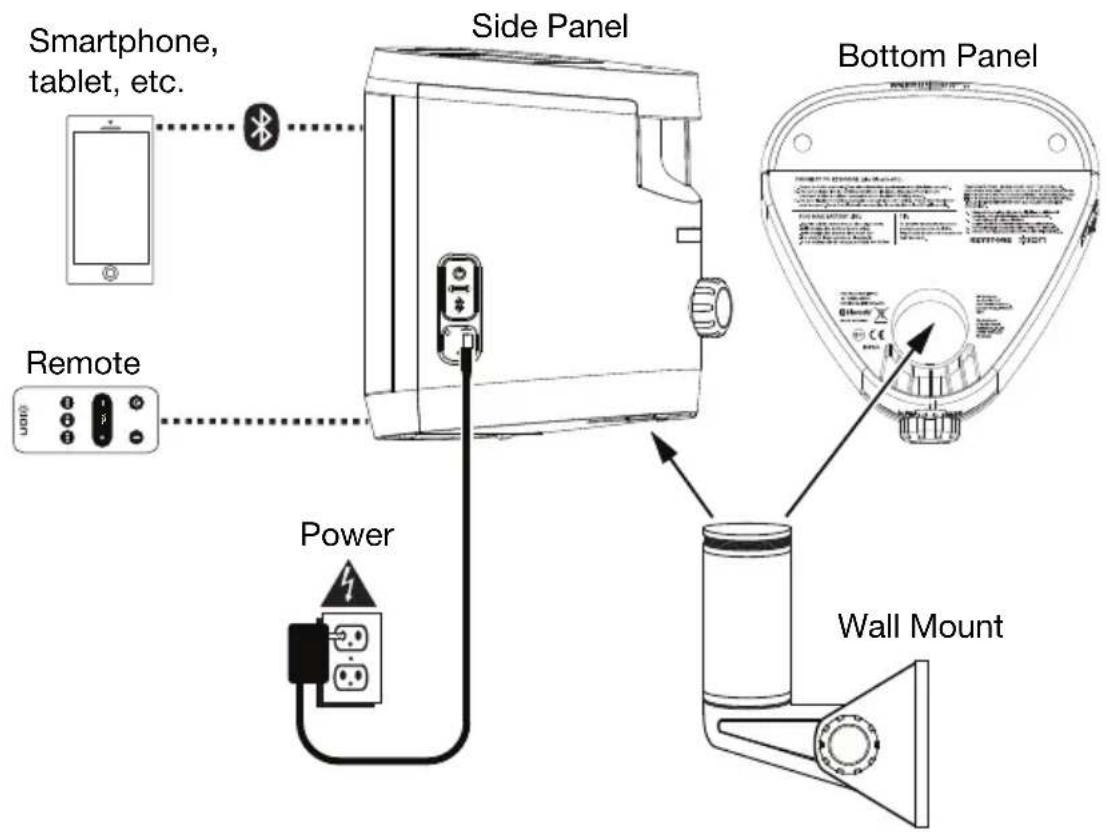
Quick Setup
Connection Diagram
Items not listed under Introduction > Box Contents are sold separately.
Installation
Keystone may be used freestanding or mounted. When used freestanding, the rubber feet on the bottom of the speaker allow Keystone to sit comfortably on any flat surface. To mount Keystone using the included wall mount, follow the instructions below. If using the solar panel to prolong battery life between charges, place Keystone in an area that receives at least 3 hours of direct sunlight a day for best results.
To use Keystone with the included wall mount, first inspect the area where you would like to install the speakers. Confirm that the surface you are mounting Keystone on can safely hold the weight of the speaker (8.4 lbs. / 3.8 kg). If you are unsure whether you can safely install Keystone in your desired location, please consult a professional contractor.
To install the wall mount:
- Insert screws into the 4 holes on the wall mount base. Fully tighten all screws so the wall mount base is flush with the surface before placing the speaker on the mount. Do not use the included screws to mount Keystone on surfaces such as concrete or drywall, as these may require special tools and/or hardware.
- Loosen the mount knob to adjust the angle of the mounting post. Once the desired angle is achieved, tighten the mount knob, ensuring that the adjustment teeth are fully interlocked.
- Loosen the speaker attachment knob on the back of Keystone enough to allow the unit to slide onto the mounting post.
- Slide Keystone onto the mount so that the mounting post is fully inserted into the mounting hole on the bottom of the speaker. Make sure it is unobstructed on all sides for optimal performance.
- Tighten the speaker attachment knob to secure Keystone to the wall mount at the desired rotational orientation.
Bluetooth Connecting with Keystone
- Power on each Keystone by pressing their power buttons. You will hear "Power On" for confirmation.*
- The speakers will automatically, wirelessly link for stereo sound. The speakers will search for each other while playing an intermittent tone. Once the stereo pair is successfully linked, you will hear "Pairing successful, connected" followed by "Left channel" and "Right channel" on the respective speakers. *
This process may take up to 2 minutes the first time two speakers are linked. Speakers that were previously linked will relink automatically in a few seconds if powered on in range of one another.
Note: Keystone speakers should be within 30 ft. (9 m) of each other to Link properly.
- When the stereo link is confirmed by the solid green LED, press the Bluetooth Connect button on either speaker or the included remote to enter Bluetooth Pairing Mode.
Note: The Left channel will be the "master" speaker, and the unit from which the Bluetooth range will be determined. - On your Bluetooth device, navigate to your Bluetooth settings menu, find Keystone, and connect. Once the Bluetooth connection is made, the blue LED will be solid. You will hear "Connected" for confirmation. *
Note: If you experience trouble in connecting, select "Forget this Device" for Keystone on your Bluetooth device and try to connect again. -
If your Bluetooth device is not able to connect to Keystone, hold the Bluetooth Connect button on the speaker to break previous Bluetooth connections and reset the Bluetooth module.
-
Tip: If you would like to disable (or enable) the voice prompts, press and hold the Play/Pause button on the remote for 3 seconds.
Features
Speaker (Side View)
- Charging Adapter Input: Insert the included charging adapter here to charge the Keystone battery.
Important: Keystone should be fully charged prior to first use for maximum battery life.
-
Power: Press this button to turn on the Keystone. Press and hold this button to power the unit off.
-
Bluetooth: Press this button to enter Bluetooth Pairing mode. Press and hold to disconnect a connected Bluetooth device.
Note: When Bluetooth is connected, Keystone will automatically power off after 30 minutes if no audio is playing.
- Reset: If Keystone is working abnormally, shut down the unit by placing a paper clip into the Reset hole located on the Keystone control panel and
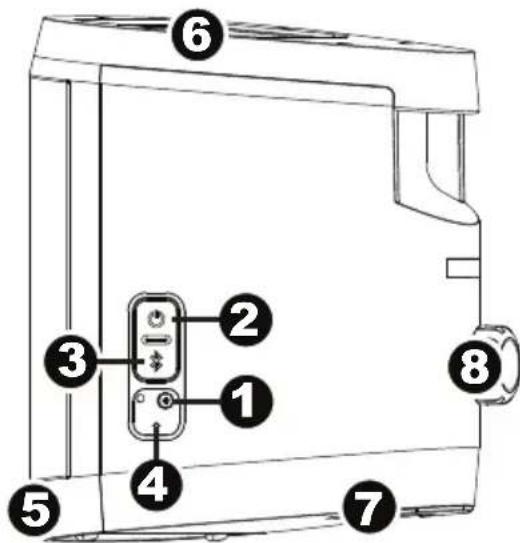
gently push until the unit turns off. Try this only after you have first attempted to reboot Keystone using the Power button.
- IR Receiver (Front): When using the remote, point it toward the IR Receiver located on the front face of the speaker.
Note: If Keystone has not been used in a week, the IR Receiver will power down to conserve battery. At this point, the remote will no longer communicate with the speaker. When this happens, use the speaker's Power button to turn on the unit and re-enable the IR Receiver. - Solar Panel (Top): Once fully charged, Keystone's solar panel can provide suitable power for typical daily use without the need to connect the charging adapter. Results will vary depending on daily number of hours Keystone is exposed to direct sunlight.
- Mount (Bottom): Insert the wall mount post here, and then tighten the Set Screw to secure the speaker to it.
- Attachment Knob (Back): This knob is used to secure Keystone to the wall mount post. Make sure it is properly tightened.
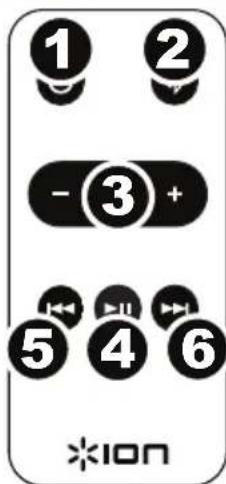
Remote
Important: Before using the remote for the first time, remove the plastic pull tab from the battery compartment to engage the battery.
When using the remote, point it toward the IR Receiver located on the front face of the speaker.
- Power Button: Press this button to power the unit on and off.
- Bluetooth Button: Press this button to enter Bluetooth Pairing mode.
- Volume - / + : Press these buttons to decrease (-) or increase (+) the volume.
- Play/Pause: Press this button to play or pause the streaming audio.
Tip: Press and hold this button for 3 seconds to disable (or enable) the voice prompts.
- Prev: Press this button to go to the previous track on your device.
Note: In some apps, pressing Prev may go to another playlist or music genre.
- Next: Press this button to advance to the next track on your device.
Note: In some apps, pressing Next may go to another playlist or music genre.
Technical Specifications
Specifications are subject to change without notice.
| Power | Via power adapter or solar panel Power adapter: 15 V DC, 2000 mA, center-positive Solar panel: 1 W output |
| Battery | Built-in rechargeable 12 V lead-acid battery |
| Battery Life | Up to 50 hours * |
| Recharge Time | 8 hours with AC adapter; 120 hours with solar panel ** |
| Speaker Output | 80 W (40 W x 2) |
| Driver | 4" woofer 1" tweeter |
| Frequency Response | 70 Hz – 20 kHz |
| Water-resistant Class | IPX4 |
| Supported Bluetooth Profile | A2DP |
| Bluetooth Range | Up to 100 ft. / 30.5 m *** |
| Linked Stereo Range | Up to 30 ft. / 9 m between 2 linked Keystones *** |
| Remote Control Range | Up to 32.8 ft. / 10 m *** **** |
| Dimensions (width x depth x height) | 7.7" x 7.7" x 9.25" 19.5 cm x 19.5 cm x 23.5 cm |
| Weight | 8.4 lbs. 3.8 kg |
- Battery life may vary based on temperature, age, and volume usage of product.
To determine if the Solar Panel is providing charge to the battery, press and hold the Bluetooth button on the speaker (not on the remote) for 5 seconds. Once a tone is heard, release the button. If the tone continues to play after release, then the solar panel is providing charge to the battery. If the tone does not continue to play after release, the solar panel is not providing charge to the battery. To optimize solar charge, expose panel to direct sunlight.
Available range is affected by walls, obstructions, and movement. For optimal performance, place the product so it is unobstructed by walls, furniture, etc.
*** If the remote control sensor is exposed to direct sunlight, strong artificial light (like from an inverter-type fluorescent lamp), or infrared light, the unit or remote control may not function properly.
Trademarks & Licenses
ION Audio is a trademark of ION Audio, LLC, registered in the U.S. and other countries.
The Bluetooth word mark and logos are owned by the Bluetooth SIG, Inc. and any use of such marks by ION Audio is under license.
All other product or company names are trademarks or registered trademarks of their respective owners.
ionaudio.com
- Quickstart Guide (English)
- Introduction
- Box Contents
- Support
- Rechargeable Batteries
- Outdoor Use and Care
- Quick Setup
- Connection Diagram
- Installation
- To install the wall mount:
- Bluetooth Connecting with Keystone
- Features
- Speaker (Side View)
- Remote
- Technical Specifications
- Trademarks & Licenses
- ionaudio.com
Brand : ION
Model : Keystone
Category : Docking station