
Ascent A2500i - Blender Vitamix - Free user manual and instructions
Find the device manual for free Ascent A2500i Vitamix in PDF.
| Product Type | High-end Blender |
| Brand | Vitamix |
| Model | Ascent A2500i |
| Dimensions (with 2 L container) | Height: 43.2 cm, Width: 20.3 cm, Depth: 28 cm |
| Weight (approx.) | 5.4 kg (approx.) |
| Power Supply | 220-240 V, 50-60 Hz, 1200-1400 W |
| Wireless Technology | Bluetooth 2.402-2.480 MHz, max power 0.001 W; RFID 13.56 MHz |
| Automatic Programs | Smoothies, Frozen Desserts, Soup |
| Variable Speeds | 1 to 10 + Pulse |
| Timer | Digital display, auto-stop after max time |
| Compatible Containers | 64 oz (2 L) container, 20 oz (0.6 L) cup, 8 oz (240 ml) container (optional) |
| Container Detection | Yes, via wireless technology |
| Container Material | BPA-free Tritan plastic |
| Blades | Stainless steel blades, removable blade assembly |
| Safety | Auto-stop if lid removed, overheat protection, lid lock |
| Care and Cleaning | Self-cleaning cycle (water + soap), dishwasher-safe parts |
| Warranty | 10 years (household use) |
| Certifications | Directive 2014/53/EU |
| Included Accessories | 64 oz container, 2-piece lid, measuring cap, tamper |
| Repairability | Repairs exclusively by Vitamix or authorized service center |
Frequently Asked Questions - Ascent A2500i Vitamix
User questions about Ascent A2500i Vitamix
0 question about this device. Answer the ones you know or ask your own.
Ask a new question about this device
Download the instructions for your Blender in PDF format for free! Find your manual Ascent A2500i - Vitamix and take your electronic device back in hand. On this page are published all the documents necessary for the use of your device. Ascent A2500i by Vitamix.
USER MANUAL Ascent A2500i Vitamix
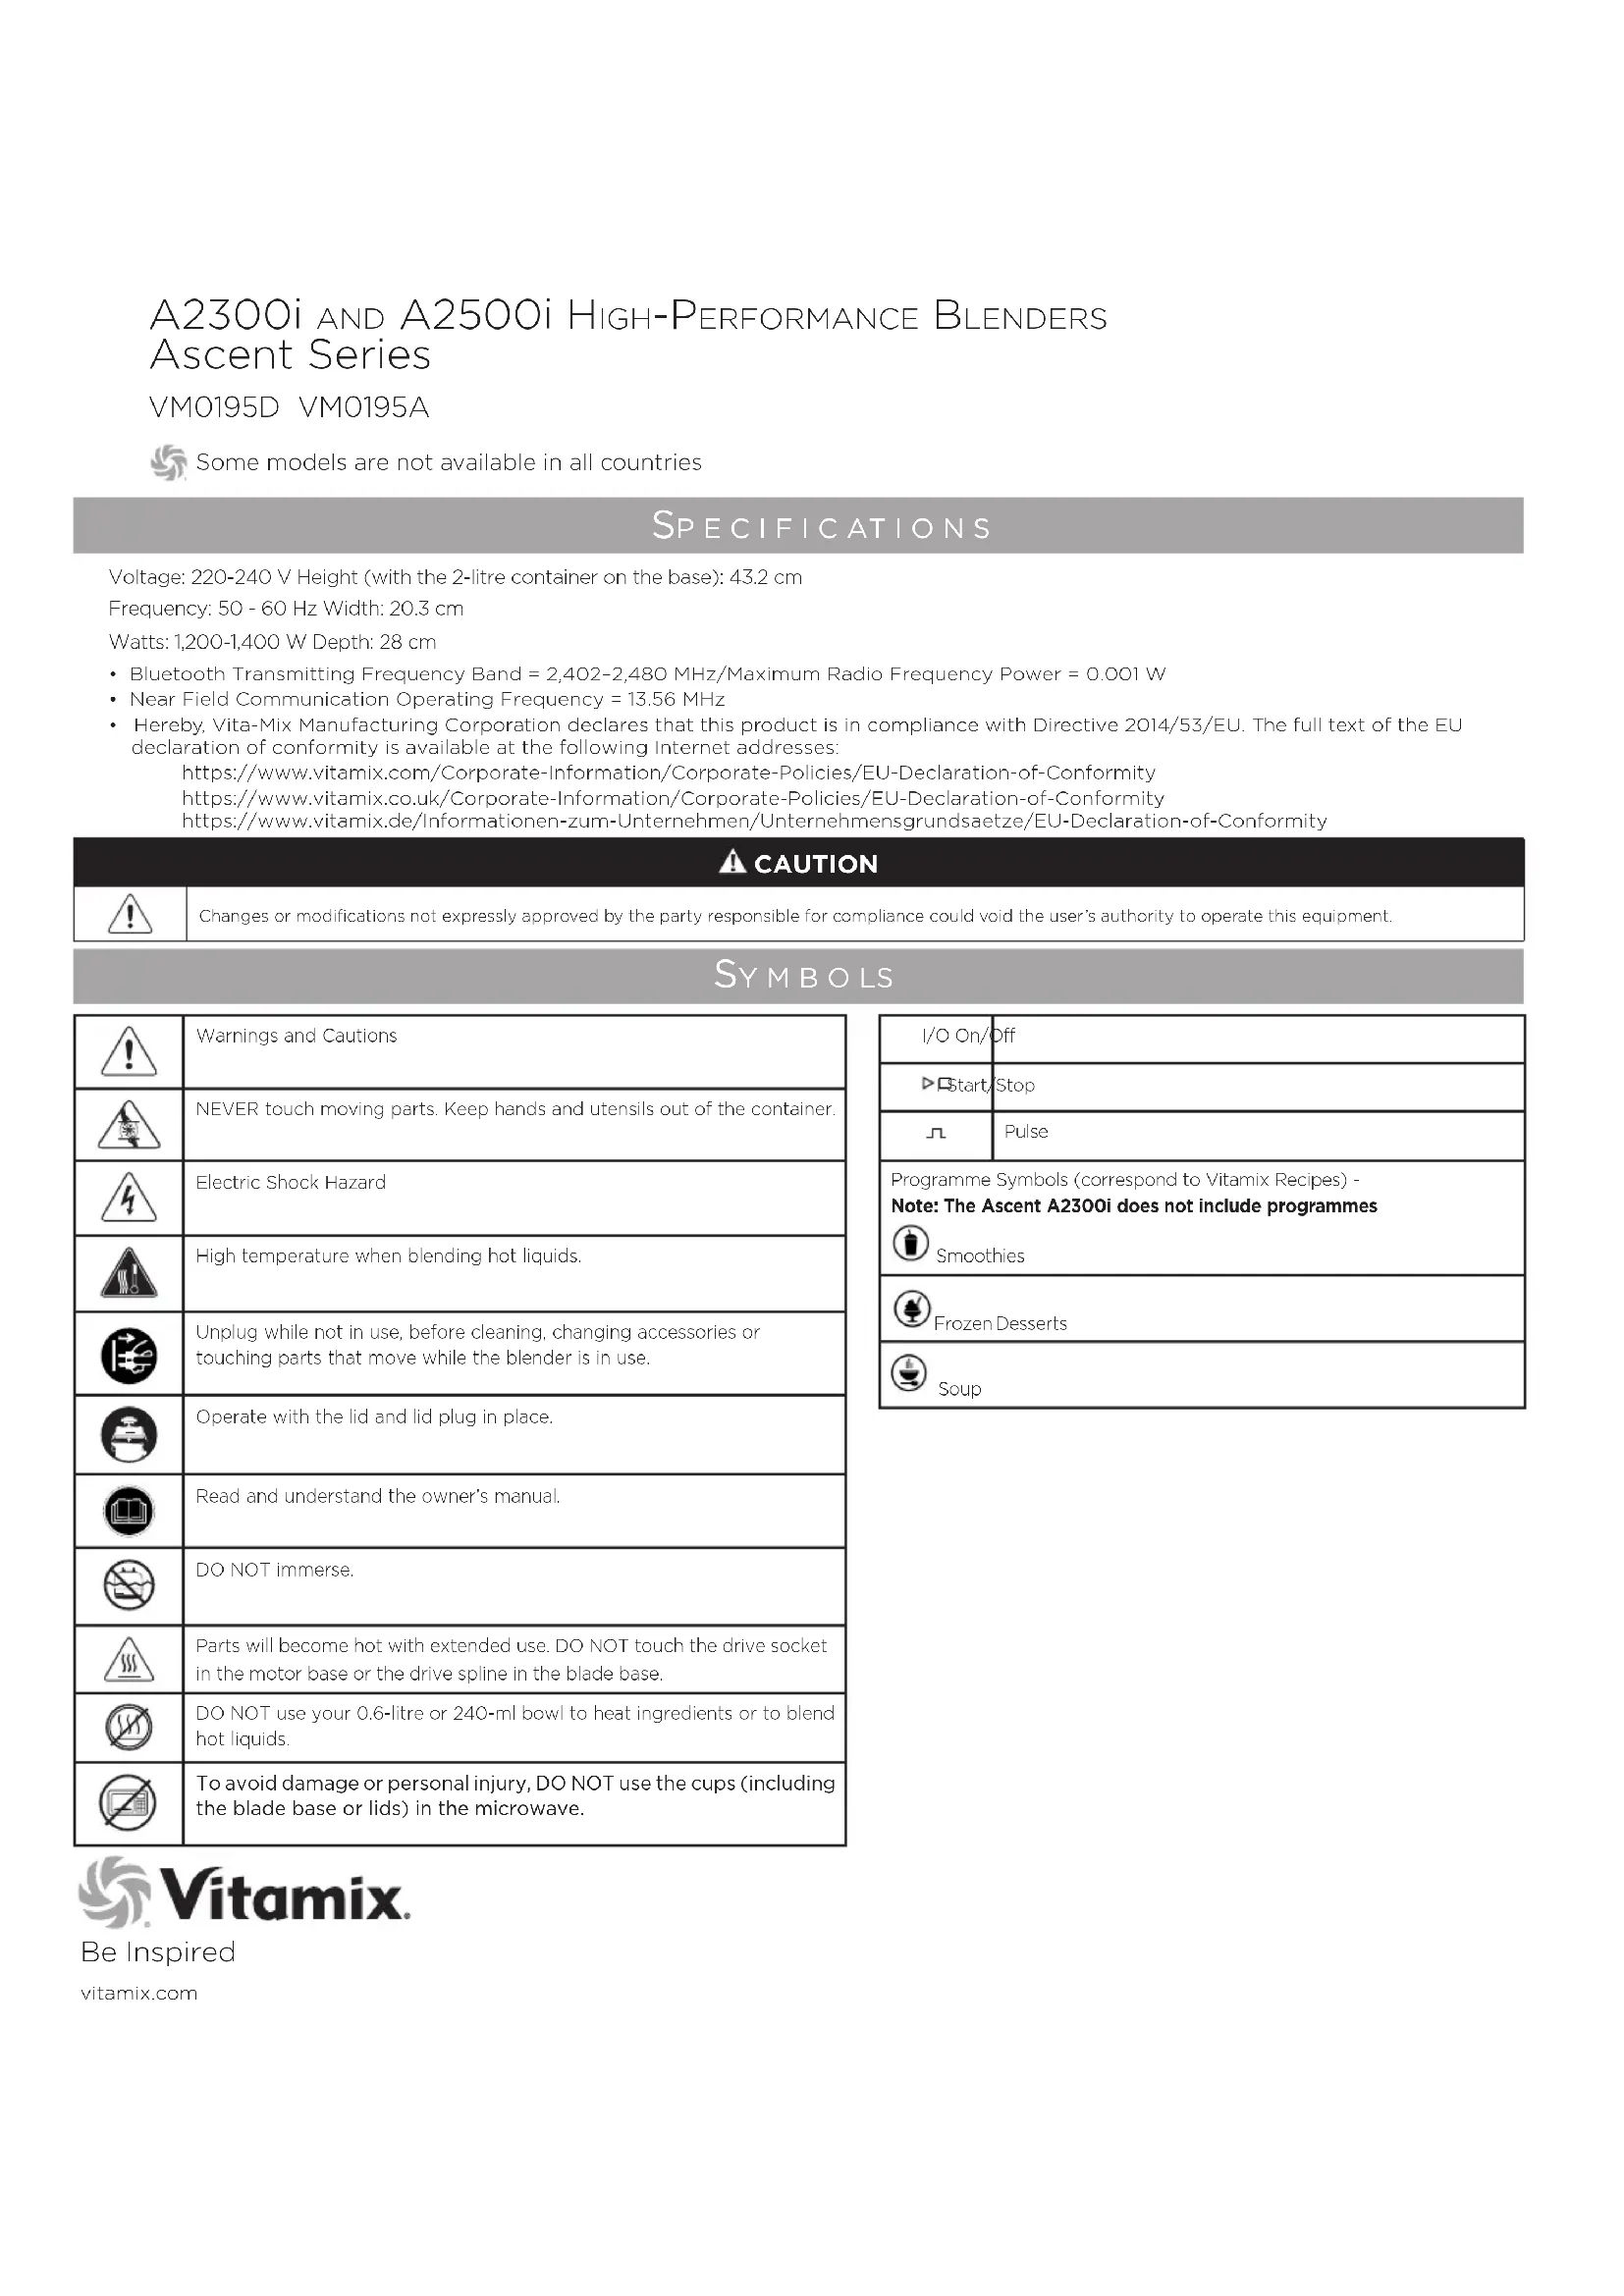
Some models are not available in all countries
SPECIFICATIONS
Voltage: 220-240 V Height (with the 2-litre container on the base): 43.2 cm
Frequency: 50 - 60 Hz Width: 20.3 cm
Watts: 1,200-1,400 W Depth: 28 cm
- Bluetooth Transmitting Frequency Band = 2,402-2,480 MHz/Maximum Radio Frequency Power = 0.001 W
• Near Field Communication Operating Frequency = 13.56 MHz - Hereby, Vita-Mix Manufacturing Corporation declares that this product is in compliance with Directive 2014/53/EU. The full text of the EU declaration of conformity is available at the following Internet addresses:
https://www.vitamix.com/Corporate-Information/Corporate-Policies/EU-Declaration-of-Conformity https://www.vitamix.co.uk/Corporate-Information/Corporate-Policies/EU-Declaration-of-Conformity https://www.vitamix.de/Informationen-zum-Unternehmen/Unternehmensgrundsaetze/EU-Declaration-of-Conformity
CAUTION

Changes or modifications not expressly approved by the party responsible for compliance could void the user's authority to operate this equipment.
SYMBOLS
| Warnings and Cautions | |
| NEVER touch moving parts. Keep hands and utensils out of the container. | |
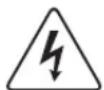
| Electric Shock Hazard | |
| High temperature when blending hot liquids. | |
| Unplug while not in use, before cleaning, changing accessories or touching parts that move while the blender is in use. | |
| Operate with the lid and lid plug in place. | |
| Read and understand the owner's manual. | |
| DO NOT immerse. | |
| Parts will become hot with extended use. DO NOT touch the drive socket in the motor base or the drive spline in the blade base. | |
| DO NOT use your 0.6-litre or 240-ml bowl to heat ingredients or to blend hot liquids. | |
| To avoid damage or personal injury, DO NOT use the cups (including the blade base or lids) in the microwave. |
| I/O On/Off | |
| ▶Start/Stop | |
| ### | Pulse |
| Programme Symbols (correspond to Vitamix Recipes) -Note: The Ascent A2300i does not include programmesSmoothies | |
| ###Frozen Desserts | |
| ###Soup | |

Vitamix.
Be Inspired
vitamix.com
IMPORTANT INSTRUCTIONS FOR SAFE USE

WARNING: To avoid the risk of serious injury when using your Vitamix® blender, basic safety precautions should be followed, including the following. READ ALL THE INSTRUCTIONS, SAFEGUARDS AND WARNINGS BEFORE OPERATING THE BLENDER.
- Read all instructions.
- Do not use the blender for anything other than its intended use.
- Not intended for use by or near children or persons with reduced physical, sensory or mental capabilities, or lack of experience and knowledge. Close supervision is necessary when any blender is used by or near children or incapacitated persons. Children should be supervised to ensure that they do not play with the blender.
- WARNING: To avoid inadvertent activation, switch off the appliance and unplug from the outlet when not in use, before putting on or taking off parts, and before cleaning.
- CAUTION: In order to avoid a hazard due to inadvertent resetting of the thermal cut-out, power to this blender must not be supplied through an external switching device, such as a timer, or connected to a circuit that is regularly switched on and off by the utility.
- To protect against risk of electrical shock, do not put the blender base in water or other liquid.
- Always check that the blender is OFF before plugging the cable into a power socket. To disconnect, turn OFF the blender, then remove the plug from the power socket.
- Illuminated icons and numbers on the control panel indicate that it is ready to operate. Avoid inadvertent contact with the touch screen.
- Avoid contact with moving parts.
- Do not operate any blender with a damaged cable or plug or after the blender malfunctions, or is dropped or damaged in any manner. Call Vitamix Customer Service on 0800 587 0019 or +1 440 235 4840 or email service@vitamix.com at once for examination, repair, replacement or adjustment. If purchased outside the U.S.A. or Canada, contact your local Vitamix dealer.
- GFI circuit breakers might be installed in your kitchen. Look for them in outlets near sinks. If the blender won't operate, unplug the blender. Reset the wall outlet or circuit breaker. If the circuit breaker continues to trip, unplug the blender from the outlet. Allow the blender to sit for 24 hours before attempting to use it again. Contact Vitamix Customer Services if the problem persists.
- Alteration or modification of any part of the blender, including the use of any part or parts that are not genuine authorised Vitamix parts, may cause fire, electric shock or injury and will void your warranty.
- The use of attachments not expressly authorised or sold by Vitamix for use with this blender, including preserving jars, may cause fire, electric shock or injury. Use in this way will void your warranty.
- Do not use outdoors.
- Do not let the cable hang over the edge of the table or counter.
- Do not place the motor base or container on or near a hot gas or electric hob, in or on a heated oven.
- Keep hands and utensils out of the container while blending to reduce the risk of severe injury to persons or damage to the blender. A rubber scraper or spatula may be used, but only when the blender is not running.
- The tamper provided must be used only when the main part of the lid is in place.
- Blades are sharp. Clean around the blade assembly in the container with extreme care to avoid injury. To reduce the risk of injury, never place a blade assembly on the motor base unless assembled to the Vitamix container.
- Care should be taken when handling the sharp cutting blades, emptying the container and during cleaning.
- Do not leave foreign objects, such as spoons, forks, knives or the lid plug, in the container as this will damage the blades and other components when starting the blender and may cause injury.
- Never attempt to operate with damaged blades.
- Never attempt to operate with the centring pad removed.
- Always operate the blender with lid and lid plug firmly in place. Only remove the lid plug to add ingredients and to use the tamper.
- DO NOT remove the lid while blades are rotating. Only remove the lid plug to add ingredients and to use the tamper. If the lid is removed during operation, the motor base will stop and will not run until the lid and lid plug are in place on the container.
- DO NOT defeat the lid interlock mechanism.
-
Do not fill the 2-litre container, 0.6-litre cup or 240-ml bowl above the marked maximum capacity line to avoid risk of injury caused by damage to the lid and container.
-
When blending hot liquids or ingredients in the 2-litre (large) container, use caution; spray or escaping steam may cause burns. Always begin processing on the lowest speed setting, variable-speed 1. Keep hands and other exposed skin away from the lid opening to prevent possible burns.
- DO NOT use your 0.6-litre cup or 240-ml bowl to heat ingredients or to blend hot liquids. Heated ingredients and liquids may create internal pressure which could cause the cup to burst and cause injury.
- DO NOT continuously use your machine for more than 75 seconds when blending with a cup and blade base.
- If a cup becomes warm to the touch or steams or vents, immediately stop blending ingredients and turn off or unplug the blender. Allow the cup and ingredients to cool to room temperature before removing the blade base.
32 DO NOT use the cups (including the blade base or lids) in the microwave. - When making nut butters or oil-based foods, do not process for more than one minute after the mixture starts to circulate in the container. Processing for longer periods can cause over-heating.
- Make sure that the container or cup and blade base are flush with the centring pad to ensure that the drive spline is engaged with the drive socket before operating.
- Make sure to use the seal on the blade base and tighten the cup adequately to the blade base before blending.
- Never place the blade base onto the motor base without the cup attached to the blade base.
- The blender will reset itself in the event of power line surge and the counter will reset to 'O'. This is a normal action for the blender to avoid hazards, if used as intended. The timer is only for the user's reference and is not considered an essential function of the blender's operation.
SAVE THESE INSTRUCTIONS
WARNING

To Avoid Injury.
Read and understand the instruction manual before using this machine.

IMPORTANT INSTRUCTIONS FOR SAFE USE
This product is intended for HOUSEHOLD USE ONLY and is not intended to be used for commercial purposes.
Do not leave your Vitamix blender unattended when operating.
Any repair, servicing or replacement of parts must be performed by Vitamix or a Vitamix-authorised service representative.
NOTICE: THE FAILURE TO FOLLOW ANY OF THE IMPORTANT SAFEGUARDS AND IMPORTANT INSTRUCTIONS FOR SAFE USE IS A MISUSE OF YOUR VITAMIX BLENDER THAT CAN VOID YOUR WARRANTY AND CREATE THE RISK OF SERIOUS INJURY.
WARNING
Electrical Shock Hazard.
ONLY use an earthed outlet.
DO NOT remove the earth.
DO NOT use an adapter.
DO NOT use an extension cable.
Always unplug before cleaning the motor base or when not in use.
Do not put the motor base in water or other liquids.
Failure to follow instructions can cause death or electric shock.

PARTS AND FEATURES
| Technology - The blender, containers and cups communicate through wireless technology. Each container is programmed to run on the base for optimum performance according to its size and functionality. |
| Legacy Vitamix Containers - Legacy Vitamix containers will not work with your Ascent blender base. Legacy machines are the Vitamix C Series, G Series and S Series. For more information about Vitamix products, please go to vitamix.com. |
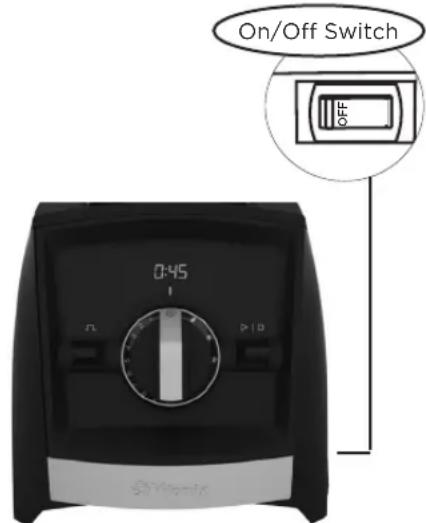
| On/Off (I/O) Switch - The On/Off switch (I/O) is located on the right side of the base. The On/Off switch controls power to the machine. |
| Sleep Mode - The blender will enter sleep mode if the control panel is not used for 60 seconds. The screen will dim. To exit sleep mode, rotate the variable-speed dial to the desired speed or programme for your next blend. |
| Container Detect - Three dashes (- - ) will be displayed on the control panel if a container with attached lid is not on the blender base. Once a container with lid is placed, 0:00 will show on the display. The blender will not operate without a container and attached lid in place. |
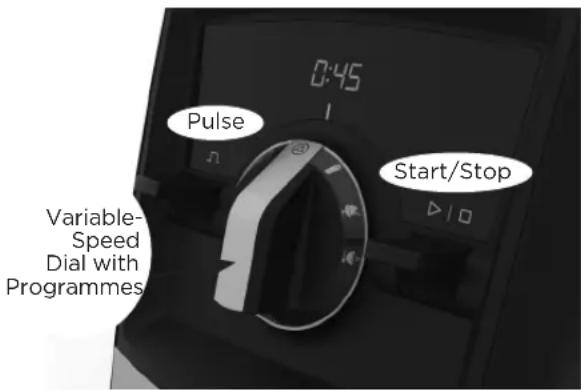
| Start/Stop (▶□) - Stop the blender at any time by pressing Start/Stop (▶□). |
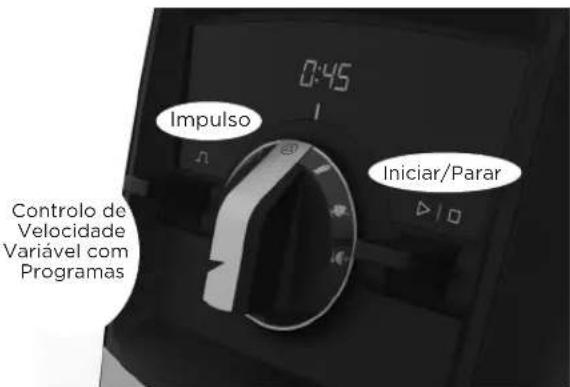
| Variable-Speed Dial - The Variable-Speed Dial gives you manual control from Variables 1 (slowest) to 10 (highest). |
| Pulse (−) - The blades will rotate at the speed displayed on the control panel when pressed. |
| Display - The timer will count up when using variable speed until Start/Stop is pressed. Each container is programmed with a specific maximum run time. The blender will turn off automatically when the maximum run time has elapsed. |
| Programmes - The icons are listed in Vitamix recipes. The blender will automatically stop at the end of the programme. Programmes can be stopped by pressing Start/Stop at any time. Programme times are not adjustable with the timer function. When Start/Stop is pressed mid-programme; the machine will stop and the programme time will reset on the display to the beginning of the run time. If the dial is moved to Standby (▼0:00 will be visible on the display.Smoothies Frozen Desserts Source |
| Error Codes - If you see an error code on the display, make a note of the numbers on the display after the error code. Call Vitamix Customer Services or your distributor for help with the issue. |
A2500i Control Panel
Motor - The motor is designed to protect itself from overheating. If the blender does not start immediately, check to make sure that you have plugged in the unit and that the On/Off switch is On. If the motor has overheated, allow the motor to cool for 20-45 minutes.
Tips to prevent 'overloading' your blender:
- When learning how to use the blender, we recommend using only Vitamix recipes.
- Do not process recipes at lower speeds than recommended.
- Do not process recipes at higher speeds than recommended.
- Do not process recipes for longer than recommended.
• Use your tamper to process thicker mixtures and keep ingredients moving around and through the blades.
Tamper - Lids and tampers are not interchangeable between different container styles, types and sizes. Use the tamper that was supplied with your blender. The container should not be more than two thirds full when the tamper is used. To avoid overheating, DO NOT use the tamper for more than 30 consecutive seconds.
PARTS AND FEATURES
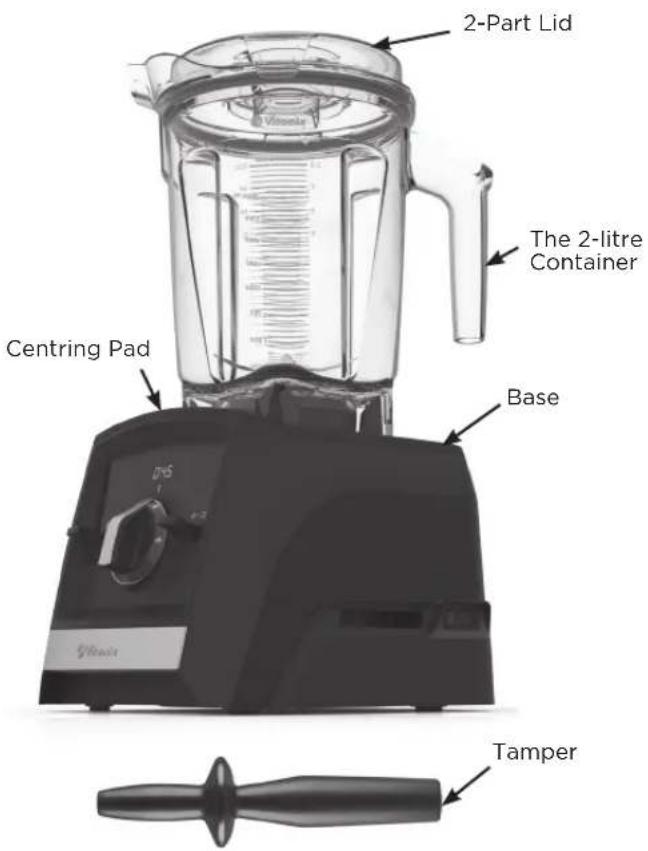
Container, Lid, Lid Plug and Tamper
CAUTION

Rotating Blades Can Cause Damage.
Lids and tampers are not interchangeable between different container styles, types and sizes. Use the tamper that was supplied with your blender.
• Always use the lid and the lid plug when operating the blender.
- Never operate the blender without checking to make sure that the lid is securely locked in place.
• The lid plug is marked so it can be used as a measuring cup.
- Insert the lid plug through the lid plug opening. Lock the plug in place by turning clockwise. To remove, turn anti-clockwise and lift out.
- Remove the lid plug to use the tamper or to add ingredients.
- Legacy Vitamix containers (C, G and S Series) will not operate on the Ascent blender base.
Accessories
Accessories are available for creative recipe development. Visit vitamix.com for product offerings and inspiration.
AWARNING


DO NOT use your 0.6-litre cup or 240-ml bowl to heat ingredients or to blend hot liquids. Heated ingredients and liquids may create internal pressure which could cause the cup to burst and cause injury.
DO NOT continuously use your machine for more than 75 seconds when blending with a cup or bowl and blade base.
If a cup becomes warm to the touch or steams or vents, immediately stop blending ingredients and turn off or unplug the blender. Allow the cup and ingredients to cool to room temperature before removing the blade base.
Parts will become hot with extended use.
DO NOT touch the drive socket in the motor base or the drive spline in the blade base.
To avoid damage or personal injury, DO NOT use the cups (including the blade base or lids) in the microwave.
BLENDING
Note: The cups mentioned here are optional accessories of the Ascent Blenders. Please visit www.vitamix.com for more information.
WARNING


To Avoid Possible Burns, Never Start on Speeds Above 1 when Processing Hot Liquids in a Large Container.
Escaping steam, splashes or contents may burn. Always start on Variable 1, then slowly increase to 10.
DO NOT use your 0.6-litre cup or 240-ml bowl to heat ingredients or to blend hot liquids. Heated ingredients and liquids may create internal pressure which could cause the cup to burst and cause injury.
DO NOT continuously use your machine for more than 75 seconds when blending with a cup and blade base.
If a cup becomes warm to the touch or steams or vents, immediately stop blending ingredients and turn off or unplug the blender. Allow the cup and ingredients to cool to room temperature before removing the blade base.
Parts will become hot with extended use.
DO NOT touch the drive socket in the motor base or the drive spline in the blade base.
To avoid damage or personal injury, DO NOT use the cups (including the blade base or lids) in the microwave.

IMPORTANT! Always use the lid and the lid plug on the Large Container when the machine is in operation. Never operate the blender without checking to make sure that the lid and lid plug are securely locked in place. After blending, wait until the blades completely stop before removing the lid or container/cup from the blender base.
- The On/Off switch is on the right hand side of the base. Press the On/Off switch to the On (I) position. After the blender is turned on, --- will be displayed on the control panel when there is no container on the blender base.
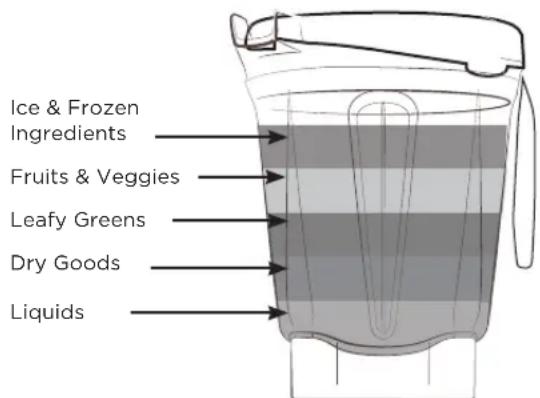
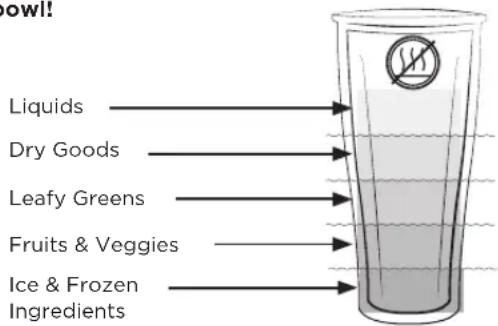
- Load your container according to your recipe or the load order below.
Large Containers
Note: Ingredients for cups load in the opposite order of the large containers
DO NOT blend hot liquids in the 0.6-litre cup or 240-ml bowl!
0.6-litre cup
-
Perform one of the following:
-
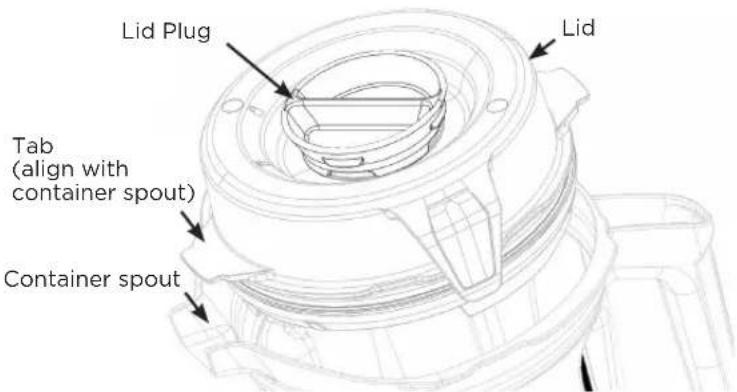
Large Containers – Put the lid onto the container. Align one tab on the lid with the spout of the container to ensure proper lid alignment and seal. Push the lid down into place until the two tabs snap onto the lip of the container. Insert the lid plug. Turn the lid plug clockwise to lock.
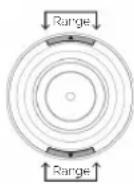
- Cups - Put a seal on the bottom thread of the blade base. The seal should fit snugly and evenly around the thread. Locate the two arrows on the blade base. Thread the blade base onto the cup in a clockwise direction and line up the arrows within the range marked on the cup. DO NOT over-tighten.
- Put the container (or cup and blade base) onto the blender base. Variable-Speed 1 will display when a container/cup is detected and the blender is ready to operate.
- Perform one of the following:
• To use variable speed:
a. Turn the variable-speed dial anti-clockwise until Variable-Speed 1 appears on the control panel.
b. To set a blend time, use the +/- icons on the controls.
c. Press Start/Stop. The blades will begin to turn and the timer will count the minutes and seconds that the blend has been processing.
d. Rotate the Variable-Speed Dial between 1 and 10 during the blending cycle to increase or decrease the speed of the blades.
e. At the end of the blend, rotate the Variable-Speed Dial anti-clockwise to Standby (▼). Press Start/Stop.
• To use Programmes:
Note: The soup programme is not available for use with the cups. DO NOT blend hot liquid in the cup or bowl.
a. Press the icon for the desired programme. (The default programme time and variable-speed setting will be displayed on the control panel).
b. Press Start/Stop to start the programme. (The blender will automatically stop at the end of the programme.) Press Start/Stop at any time to stop the programme.
-
If the mixture stops circulating:
-
Large Containers - Insert the tamper through the lid plug and stir until it 'burps'. If this does not work, press the On/Off switch to stop the motor. Remove the container from the blender base and use a rubber spatula to press the air bubble away from the blades. Add liquid if necessary. Replace the lid and lid plug. Return the container to the blender base and continue blending.
- Cups/Bowls - Press the Start/Stop to stop the motor. Wait until the blades stop rotating. Remove the cup and blade base from the blender base. Turn the cup over. Unthread the blade base from the cup. Stir the ingredients. Add liquid if necessary. Reattach the blade base, place on the blender base and continue blending.
CARE AND CLEANING
BEFORE FIRST USE:
- Wipe the base with a warm damp cloth and wipe clean with a dry, soft cloth. Wash the container, cups, lids, lid plug and tamper with warm, soapy water. Rinse all parts. Wipe dry with a dry, soft cloth.
- Choose a space on the counter that is level, dry and clean. Plug the blender into an earthed, 3-prong outlet.
Note: Your Vitamix container is designed to be completely cleanable without removing the retainer nut and blade assembly. DO NOT attempt to remove the retainer nut or blade assembly from the container. Our Normal Cleaning and Sanitising procedures or a dishwasher cleaning cycle will ensure a complete and thorough cleaning of your container and its components. If your container is damaged, please do not use. Contact Vitamix Customer Service IMMEDIATELY.
Care and Cleaning of Large Containers:
To Clean:
- Fill the container half full with warm water and add a couple of drops of washing-up liquid.
- Snap or push the complete 2-part lid into the locked position.
- Put the container onto the base.
- Press Start/Stop.
- Slowly increase the variable speed to 10.
- Run the machine for 30 to 60 seconds.
- Rotate the Variable-Speed dial back to Variable 1. Press Start/Stop.
- Rinse and drain all pieces.
To Sanitise: (Bleach) (Full-size Containers)
- Follow the cleaning instructions above.
- Fill the container half full of water and add 1½ teaspoons of liquid bleach.
- Snap or push the complete 2-part lid into the locked position.
- Put the container onto the base.
- Press Start/Stop.
- Slowly increase the variable speed to 10.
- Run the machine for 30 to 60 seconds.
- Rotate the Variable-Speed dial back to Variable 1. Press Start/Stop.
- Allow the mixture to stand in the container for an additional 1½ minutes.
- Pour out the bleach mixture. Allow the container to air dry. Do not rinse after sanitising.
To Sanitise: (Vinegar) (Full-size Containers)
- Follow the cleaning instructions above.
- Prepare the vinegar solution: for the 2-litre container, dilute 475 ml of vinegar in 475 ml water.
- Snap or push the complete 2-part lid into the locked position.
- Put the container onto the base.
- Press Start/Stop.
- Slowly increase the variable speed to 10.
- Run the machine for 30 to 60 seconds.
- Rotate the Variable-Speed dial back to Variable 1. Press Start/Stop.
- Allow the mixture to stand in the container for an additional 3 full minutes. The total contact time of the vinegar solution in the container should equal 5 minutes.
- Pour the vinegar solution out of the container over the inside surface of the 2-part lid. Repeat the sanitisation procedure a second time.
- Allow the container and lid to air dry. Do not rinse after sanitising. If necessary, rinse immediately before the next use.
Lids, Lid Plug, Centring Pad and Tamper
The parts are dishwasher-safe. If preferred, wash the parts in warm soapy water. Rinse clean under running water, then dry.
In-Place Cleaning: (0.6-litre cup and 240-ml bowl)
- Fill the container half full with water and add a couple of drops of washing-up liquid. DO NOT BLEND HOT WATER.
- Put a seal on the bottom thread of the blade base. The seal should fit snugly and evenly around the thread. Thread the blade base onto the cup in a clockwise direction until just tight.
- Put the cup and blade base onto the base.
- Press Start/Stop. Slowly increase the variable speed to 10.
- Run the machine for 30 to 60 seconds.
- Rotate the Variable-Speed dial back to Variable 1. Press Start/Stop.
- Rinse and drain all pieces.
To Sanitise: (Bleach) (0.6-litre cup and 240-ml bowl)
- Follow the cleaning instructions above.
- Fill the container half full with water and 1/2 teaspoon of liquid bleach. DO NOT BLEND HOT WATER.
- Put a seal on the bottom thread of the blade base. The seal should fit snugly and evenly around the thread. Thread the blade base onto the cup in a clockwise direction until just tight.
- Put the cup and blade base onto the base.
- Press Start/Stop.
- Slowly increase the variable speed to 10.
- Run the machine for 30 to 60 seconds.
- Rotate the Variable-Speed dial back to Variable 1. Press Start/Stop.
- Allow the mixture to stand in the container for an additional 1½ minutes.
- Pour out the bleach mixture. Allow the container to air dry. Do not rinse after sanitising.
To Sanitise the (0.6-litre cup and 240-ml bowl) with Vinegar (minimum 5% acidity):
Note: If the vinegar has greater acidity, the water can be increased to get a minimum 2.5% solution. For example, for 10% acidity use 1 part vinegar and 3 parts water.
- Follow the cleaning instructions above.
- Fill the container 150 ml with water and 150 ml white vinegar (60 ml with water and 60 ml white vinegar). DO NOT BLEND HOT WATER.
- Put a seal on the bottom thread of the blade base. The seal should fit snugly and evenly around the thread. Thread the blade base onto the cup in a clockwise direction until just tight. Put the cup and blade base onto the base.
- Use Variable Speed:
a. Press Start/Stop.
b. Slowly increase the variable speed to 10.
c. Run the machine for 60 seconds.
d. Rotate the Variable-Speed dial back to Variable 1. Press Start/Stop.
- Allow the mixture to stand in the container for an additional 4 minutes (5 minutes total contact time).
- Pour the vinegar mixture out. Allow the container to air dry. Do not rinse after sanitising.
| WARNING | |
| To Avoid Injury and Damage. To avoid inadvertent activation, turn off and unplug the blender before cleaning. | |
| WARNING | |
| Electrical Shock Hazard. Always unplug before cleaning the blender base or when not in use. Do not put the blender base in water or other liquids. Failure to follow instructions can cause death or electric shock. | |
Blender Base
- Turn off and unplug the blender.
- Wash the outside surface with a damp, soft cloth or sponge that has been rinsed in a mild solution of washing-up liquid and warm water. Do not place the blender base in water. The centring pad can be removed for more thorough cleaning.
- Immediately dry all surfaces and polish with a soft cloth.
WARRANTY
10-Year full Machine Warranty
1. PRODUCT REGISTRATION.
You can register online at vitamix.com/warranty; or by calling our Customer Services Department on 0800 587 0019 or +1 440 235 4840. Failure to register your product purchase will not diminish your warranty rights. However, registering your purchase will allow Vitamix to better serve you with any of your customer service needs.
2. WHO CAN SEEK WARRANTY COVERAGE?
This Warranty is extended by Vitamix to the owner of this blender for personal household use only. This Warranty does not apply to products used for commercial, rental or resale purposes. Should ownership of the blender change during the 10-year period, please update the blender's owner information at vitamix.com.
3. WHAT IS COVERED?
Vitamix warrants to the owner that if this Blender (a 'Blender' consists of a motor blender base, any container(s), lids and tamper(s) purchased together) fails within 10 years from the date of purchase due to a defect in material or workmanship or as a result of normal wear and tear from ordinary household use, Vitamix will, within 30 days of receipt of the returned blender, repair the failed Blender or component part of the Blender free of charge.
If, at Vitamix's sole discretion, the failed Blender or component part of the Blender cannot be repaired, Vitamix will elect to either (A) replace the Blender free of charge or (B) refund the full purchase price to the owner, unless Vitamix receives prior written notice of the owner's preference.
4. WHAT IS NOT COVERED?
This Warranty does not apply to Blenders used commercially or in non-household applications. This Warranty does not cover cosmetic changes that do not affect performance, such as discolouration or the effects of the use of abrasives or cleaners, or food build-up. This Warranty is only valid if the Blender is used and maintained in accordance with the instructions, warnings and safeguards contained in the owner's manual.
Containers: Processing certain herbs and spices in the container/cup will result in cosmetic marring of the container/cup and may cause the blades to wear prematurely. Traces of sand, as well as coarse, gritty and abrasive herbs, will also cause the blades to wear prematurely. Herbs may contain volatile oils, cause the container/cup to retain the oils and cause permanent discolouration.
Vitamix will not be responsible for the cost of any unauthorised warranty repairs.
REPAIR, REPLACEMENT OR REFUND OF THE PURCHASE PRICE ARE THE EXCLUSIVE REMEDIES OF THE PURCHASER AND THE SOLE LIABILITY OF VITAMIX UNDER THIS WARRANTY. NO EMPLOYEE OR REPRESENTATIVE OF VITAMIX IS AUTHORISED TO MAKE ANY ADDITIONAL WARRANTY OR ANY MODIFICATION TO THIS WARRANTY WHICH MAY BE BINDING UPON VITAMIX. ACCORDINGLY, THE PURCHASER SHOULD NOT RELY UPON ANY ADDITIONAL STATEMENTS MADE BY ANY EMPLOYEE OR REPRESENTATIVE OF VITAMIX. IN NO EVENT, WHETHER BASED ON CONTRACT, INDEMNITY, WARRANTY, TORT (INCLUDING NEGLIGENCE), STRICT LIABILITY OR OTHERWISE, SHALL VITAMIX BE LIABLE FOR ANY SPECIAL, INDIRECT, INCIDENTAL OR CONSEQUENTIAL DAMAGES, INCLUDING, WITHOUT LIMITATION, LOSS OF PROFIT OR REVENUE.
Some states do not allow limits on warranties. In such states, the above limitations may not apply to you. Outside the U.S.A. and Canada, other warranties may apply.
5. WHAT VOIDS THIS WARRANTY?
Abuse, misuse, negligent use, alteration of the Blender, exposure to abnormal or extreme conditions or failure to follow the operating instructions in this manual will void this Warranty.
The Warranty is also void if repairs to the Blender or any component part of the Blender are performed by someone other than either Vitamix or an authorised Vitamix Service Provider or if any component part of a Blender subject to this Warranty is used in combination with a motor base or container that is not expressly authorised by Vitamix.
6. HOW TO OBTAIN RETURN AUTHORISATION UNDER THIS WARRANTY.
In the event that you need service or repair, please call Vitamix Customer Services on 0800 587 0019 or +1 440 235 4840. You will be asked to provide a date of purchase and proof of purchase for any blender that has not been registered with Vitamix. For blenders subject to this Warranty, you will be provided with a return authorisation number, up-to-date delivery instructions and a pre-paid return collection label. Vitamix will pay standard shipping costs on the return of a Blender for warranty service and repair and for return shipment of the blender to you after the warranty repair or replacement. The purchaser is responsible for the costs of special delivery requests.
Within the U.S.A. and Canada, this Warranty is honoured directly through the Vita-Mix Corporation.
United States Canada
Vita-Mix Corporation Vita-Mix Corporation
8615 Usher Road 200-1701 Shepherd Street East
Cleveland, Ohio 44138-2199 Windsor, Ontario N8Y 4Y5
+1 800 848 2649 +1 800 848 2649
service@vitamix.com
service@vitamix.com
You will be deemed to have accepted the returned product 'as is' upon delivery unless you notify Vitamix of any problem, including shipment damage, within 48 hours of delivery.
INTERNATIONAL CONTACTS
| EUROPE | FINLAND | MONTENEGRO | SLOVAKIA | AFRICA & MIDDLE EAST |
| BELGIUM | Primulator Cy | Enzita d.o.o. | Settour Slovakia spol. s r.o. | |
| Dalcq SA | Työpajankatu 10A | Podgorica, 1000 | Lazaretská 29 | SOUTH AFRICA |
| 86 Rue de Hainaut | Hi- 00580 Helsinki | Montonogro | 811 09 Bratislava | CONGLOMUS CC T/A |
| 6180 Courcelles | Finland | Tel: +381 (0) 65 21 550 65 | Slovakia | HFAI THMAKERS |
| Belgium | Tel: (+358) 972.60622 | www.Enzita.me | Tel: +421.2.52932868-9 | 9 Hoog Street |
| Tel: +32 (0) 19 63 38 33 | www.theblonder.fi | info@onzita.me | amatko@settour.sk | Ulrechl |
| www.theblender.be | ITALY | NETHERLANDS | SWEDEN | ZA |
| BOSNIA & HERZEGOVINA | KÜNZI S.p.A. | MultiBrands Marketing & Sales BV | Lindenbaum Agenturer AB | Tel: +(27) 34 331 4824 |
| Via L. Ariosto, | Hardemogatan 7 | www.healthmakers.co.za | ||
| Enzita d.o.o. | 19 - I - 20091 Bresso (MI) | Hoeroweg 337-A | S-124 67 Bandhagen | sales@healthmakers.co.za |
| Pave Radana br. 15 | Italy | 2161 BL Sassenheim | Sweden | ISRAEL |
| Banja Luka, 78000 | Tel: (+39) 02.61.45.16.1 | The Netherlands | Tel: (+46) 08-570 347 77 | New Horizon |
| Bosnia and Herzegovina | Fax: (+39) 02.66.500.553 | Tel: +31 (0) 252 241240 | www.theblender.se | Maskit 27 |
| Tel: +387 (0) 66 117 188 | www.kunzi.it | Fax: +31 (0) 252 241244 | GERMANY, AUSTRIA, SWITZERLAND | Herzlia 46733 |
| www.Enzita.ba | info@kunzi.it | info@multibrands.nl | Israel | |
| info@onzita.ba | EASTERN EUROPE | NORWAY | Vita-Mix GmbH | Tel: (+972) 9.9576422 |
| Hollaender Elektro | Lindenbaum Agenturer AB | Kurfuerstondamm 21 | Tol: (+972) 1.700.70.2009 | |
| BULGARIA | GmbH & Co.KG | Hardemogatan 7 | 10719 Berlin | www.newnori/on.co.il |
| Enzita EOOD | Hlinschstrasso 35, | 5-124 67 Bandhagon | Germany | BAHRAIN, KUWAIT. |
| Simeonovsko shose 33 | 60388 Frankfurt | Sweden | Tel: (+49) 800 8482 6491 | OMAN, QATAR. |
| Sofia, 1000 | Germany | Tel: (+46) 857.034.777 | www.vilamix.de | AND SAUDI ARABIA |
| Bulgaria | Tel: +19 69 1990131 | www.theblonder.se | GERMANY | 4Homes FZCO |
| Tel: +389 (0) 76 487 171 | gmbh@hollaender-elektro.de | info@theblender.se | Koimling Naturkost GmbH | PO Box 61379, Dubai UAE. |
| www.Enzita.bg | POLAND | Zum Fruchthof 7a | Tol: +971 4 380/611 | |
| info@enzita.bg | ICELAND | Logo S.C. | 21614 Buxlehude | Fax: +971 4 387612 |
| CROATIA | Kaclitaokni Ltd. | Ul. Kraszowicka 81 | Germany | 4homes@4homos.ac |
| Enzita d.o.o. | Rauðagerði 25 | 58-100 Swidnica | Tel: (+49) 4161.51.160 | www.tavolashop.com |
| Avenija Dubrovnik 15 | 108 Reykjavik | Poland | www.keimling.de | UNITED ARAB |
| Zagrebački velesajam | Iceland | Tel: (+48) 71735 66 60 | AUSTRIA | EMIRATES |
| (Kinoski pavilion) | Tel: (+49) 89.864987.0 | www.besiblender.pl | Hollaandor Elektro GmbH | Vitality General |
| Zagreb, 10020 | www.cooltech.is | info@bestblender.pl | & Co.KG | Trading LLC |
| Croatia | PO Box 73265 | |||
| Tol: +385 (0) 99 81 59 050 | LITHUANIA | ROMANIA | Flinschstrasso 35, | Dubai |
| www.Enzita.hr | Zaliavalgis.lt | Quark S.R.L. | 60388 Frankfurt | United Arab Emirates |
| info@onzita.hr | Dovanu stolele UAB | Str. Mizil 2B, Soctor | Germany | Tol: +971 (0) 561089662 |
| Pamenkalno g.1 | 3032265 Bucharest | Tel: +49 69 4990131 | www.vitality.ac | |
| CZECH REPUBLIC | 0116 Vilnius, | Romania | gmbh@hollaender-elektro.de | info@vitality.ac |
| Traminal s.r.o. | Lithuania | Tel: (+40) 21 345 1725 | SWIT ZERLAND | 4Homes FZCO |
| Kaprova 42/14 | Tel: (+370) 52611011 | www.BeOrganic.ro | Keimling Naturkost | PO Box 61379, Dubai UAE. |
| 11000 Praha 1 | Tel: (+370) 61562740 | office@quark.com.ro | Fürstonlandstrasse 96 | Tel: +971 4 3807611 |
| Czech Republic | www.zaliavalgis.lt | 9014 St. Gallen | Fax: +971 4 387612 | |
| Tel: +420.773.753.333 | info@zaliavalgis.lt | SERBIA | Swilzerland | 4homes@4homes.ae |
| www.atranot.cz | Enzita d.o.o. | Tel: 0800 534 654 | www.tavolashop.com | |
| DENMARK | LUXEMBOURG | Leposave Vujošević 11/14 | www.keimling.ch | |
| High on Lile ApS | Dalcq SA | Beograd, 11000 | ASIA PACIFIC | |
| Bakkelyvej 2 | 86 Rue de Hainaut | Serbia | UNITED KINGDOM | |
| 8680 Ry | 6180 Courcelles | Tel: +381 (0) 65 21 550 65 | & IRELAND | AUSTRALIA & |
| Denmark | Belgium | www.Enzita.rs | Vite-Mix Europe LTD | NEW ZEALAND |
| Tel: (+45) 42 78 32 76 | Tel: +32 (0) 19 63 38 33 | info@enzita.rs | Regus Woburn Place | Vitamix ANZ Pty Limited |
| info@highonlife.dk | SPAIN | 16 Upper Woburn Place | 167 King St | |
| FRANCE | MACEDONIA | CONASI | Office number 318 | Newcastle NSW2300 |
| Wismer S.A. | Nutri Vila | Carlos V n°4 Bajos | London WCIIH GAF | Australia |
| Zone Inova 3000 - allée n°5 | Mile Pop Jordanov | 23680 Alcalà la Real (Jaén) | Tel: (+44) 0800 587 0019 | Tel: 1-800-766137 (AUS) |
| 88150 Thaon los Vosgos | 23a/51000 | Spain | www.vitamix.co.uk | Tel: 050-853 0697 (NZ) |
| France | Skopio | Tel: (+34) 953 10 25 60 | www.vitamix.com.au | |
| Tel: +33 (0)3.29.82.27.71 | Macedonia | www.conasi.eu | www.vitamix.co.nz | |
| www.wismer.fr | Tel: (+389) 70.272.072 | info@conasi.eu | ||
| www.vitamix.mk |
©2017 Vita-Mix Corporation. No part of this publication may be reproduced or transmitted in any form or by any means, or stored in a database or retrieval system, without the written permission of Vita-Mix Corporation.
122171_Rev A_EUK 6/17
A2300i UND A2500i HOCHLEISTUNGSMIXER
Ascent-Serie
VM0195D VM0195A

Cleveland, Ohio 44138-2199 Windsor, Ontario N8Y 4Y5
+1 (800) 848 2649
+1 (800) 848 2649
service@vitamix.com
service@vitamix.com
Cleveland, Ohio 44138-2199 Windsor, Ontario N8Y 4Y5
+1 800 848 2649 +1 800 848 2649
service@vitamix.com
service@vitamix.com
Cleveland, Ohio 44138-2199 Windsor, Ontario N8Y 4Y5
+1 800 848 2649 +1 800 848 2649
service@vitamix.com
service@vitamix.com
Tel: (+389) 70.272.072
www.vitamix.mk
MONTENEGRO
En/ita cl.o.o.
Podgorica, 1000
Montenegro
Tel: +381 (0) 65 21 550 65
www.Enzita.me
info@en/ita.me
PAÍSES BAJOS
MultiBrands Marketing
& Sales BV
Heereweg 337-A
2161 BL Sassenheim
Países Bajos
Tel: +31 (0) 252 241240
Fax: +31 (0) 252 241244
info@multibrands.nl
NORUEGA
Lindenbaum Agenturer AB
Hardemogatan 7
S-124 67 Bandhagen
Suecia
Tel: (+46) 857.034.777
www.theblender.se
info@theblender.se
POLONIA
Logo S.C.
Ul. Kraszowicka 81
58-100 Świdnica
Polonia
Tel: (+48) 71735 66 60
www.bestblender.pl
info@bestblender.pl
RUMANÍA
Quark S.R.L
Str. Mizil 2B, Sector
3032265 Bucarest
Rumania
Tel: (+40) 21 345 1725
www.BeOrganic.ro
office@quark.com.ro
SERBIA
En/ita d.o.o.
Leposave Vujošević 11/14
Belgrado, 11000
Serbia
Tel: +381 (0) 65 21 550 65
www.Enzita.rs
info@benzita.rs
ESPAÑA
CONASI
Carlos V n.º 4
23680 Alcalá la Real
(Jaén)
España
Tel: (+34) 953 10 25 60
www.conasi.eu
Info@conasi.eu
ESLOVAQUIA
Settour Slovakia spol. s r.o.
Lazaretská 29
811 09 Bratislava
Eslovaquila
Tel: +421.2.52932868-9
amatko@settour.sk
SUECIA
Lindenbaum Agenturer AB
Hardemogatan 7
S-124 67 Bandhagen
Suecia
Tel: (+46) 08-570 347 77
www.theblender.se
[Non-Text]
ALEMANIA, AUSTRIA Y EUIZA
Vita-Mix GmbH
Kurfuerstendamm 21
10719 Berlin
Alemania
Tel: (+49) 800 8482 6491
www.vitamix.de
ALEMANIA
16 Upper Woburn Place
Office number 318
Londres WCIH OAF
Tel: (+44) 0800 587 0019
www.vitamix.co.uk
ÁFRICA Y ORIENTE
MEDIO
SUDÁFRICA
CONGLOMUS CC T/A
HEALTHMAKERS
9 Hood Street
Utrecht
ZA
Tel.: +(27) 34 331 4824
www.healthmakers.co.za
sales@healthmakers.co.za
ISRAEL
New Horizon
Maskit 27
Herzlia 46733
Israel
Tel: (+972) 9.9576422
Tel: (+972) 1.700.70.2009
www.newhorizon.co.il
BARÉIN, KUWAIT,
OMÁN CATAR
Y ARABIA SAUDÍ
4Homes FZCO
61379, Dubái (Emiratos
Arabes Unidos)
Tel.: +971 4 3807611
Fax: +971 4 387612
4homes@4homes.ac
www.tavolashop.com
EMIRATOS ÁRABES
UNIDOS
Vitality General
Trading LLC
73265
Dubai
Vitamix ANZ Pty Limited
167 King St
Newcastle NSW2300
Australia
Tel.: 1-800-766437
(Australia)
Tel.: 050-853-0697 (Nueva
Zelanda)
www.vitamix.com.au
www.vitamix.co.nz
CHINA
Hunan Covinda Robotic
Technology Co., Ltd
348W Tongzipo Road.
Changsha High-tech
Development Zone,
Hunan, China
Tel.: 400-660-8885
vitamix-FAQ@covinda.com
HONG KONG (RPC)
Total Nutrition Center Ltd.
Room 901-902 9/F
Kingdom Power
Commercial Building
32-36 Des Voeux Road
West
Hong Kong
Tel.: (+852) 2881.8270
Painel de Controlo do A2500I
Cleveland, Ohio 44138-2199 Windsor, Ontario N8Y 4Y5
+1 800 848 2649 +1 800 848 2649
service@vitamix.com
service@vitamix.com
Tel: +420.773.753.333
www.atranet.cz
DINAMARCA
High on Life ApS
Bakkelyvej 2
8680 Ry
Dinamarca
Tel: (+45) 42 78 32 76
info@highonlife.dk
FRANÇA
Wismer S.A.
Tel: +33.(0)3.29.82.27.71
www.wismer.fr
FINLÂNDIA
Primulator Oy
Työpajankatu 10A
FI- 00580 Holsínquia
Finlândia
Tel.: (+358) 972.60622
www.theblender.fi
ITALIA
KÜNZI S.p.A.
Via L. Ariosto.
19 - I - 20091 Bresso (MI)
Italia
Tel: (+39) 02.61.45.16.1
Fax: (+39) 02.66.500.553
www.kunzi.it
nfo@kunzi.it
EUROPA DE LESTE
Hollaender Elektro
GmbH & Co.K
Flinschstrasse 35,
60388 Frankfurt
Alemanha
Tel: (+389) 70.272.072
www.vitamix.mk
MONTENEGRO
En/ita d.o.o.
Podgorica, 1000
Montenegro
Tel:
+381 (0) 65 21 550 65
www.En/ita.me
info@enzita.me
[Non-Text]
PAISES BAIXOS
MultiBrands Marketing
& Sales BV
Heereweg 337-A
2161 BL Sassenheim
Países Baixos
Tel.: +31 (0) 252 241240
Fax: +31 (O) 252 241244
info@multibrands.nl
NORUEGA
Lindenbaum Agenturer AB
Hardemogatan 7
S-124 67 Bandhagen
Suècia
Tel.: +(+46) 857.034.777
www.theblendler.se
info@theblender.se
POLÓNIA
Logo S.C.
Ul. Kraszowicka 81
58-100 Świdnica
Polônia
Tel: (+48) 71735 66 60
www.bestblender.p
info@bestblender.pl
ROMÉNIA
Quark S.R.L.
Str. Mizil 2B, Sector
3032265 Bucareste
Roménia
Tel: (+40) 21 345 1725
www.BeOrganic.ro
office@quark.com.ro
SÈRVIA
Enzita d.o.o.
Leposave Vujošević 11/14
Belgrado, 11000
Sérvia
Tel.: +381 (0) 65 21 550 65
www.Enzita.rs
info@enzita.rs
ESPANHA
CONASI
Carlos V n°4 Bajos
16 Upper Woburn Place
Office number 318
Londres WC1H OAF
www.healthmakers.co.za
sales@healthmakers.co.za
ISRAEL
New Horizon
Maskit 27
Herzila 46733
|srae|
Tel: (+972) 9.9576422
Tel: (+972) 1.700.70.2009
www.newhorizon.co.il
BAHREIN, KUWAIT,
OMÃ, CATAR,
E ARÁBIA SAUDITA
4Homes FZCO
PO Box 61379, Dubai EAU.
Tel: +971 4 3807611
Fax: +971 4 387612
4homes@4homes.ae
www.tavolashop.com
EMIRADOS ÁRABES
UNIDOS
Vitality General
Trading LLC
PO Box 73265
Dubai
Vitamix ANZ Pty Limited
167 King St
Newcastle NSW2300
Austrália
Tel: 1-800-766437 (AUS)
Tel: 050-853-0697 (NZ)
www.vitamix.com.au
www.vitamix.co.n/
CHINA
Hunan Covinda Robotic
Technology Co., Ltd
348W Tongzipo Road.
Changsha High-tech
Development Zone,
Hunan, China
Tel: 400-660-8885
vitamix-FAQ@covinda.com
HONG KONG PRC
Total Nutrition Center Ltd.
Room 901-902 9/F
Kingdom Power
Commercial Building
32-36 Des Voeux Road
West
Hong Kong
Tel: (+852) 2881.8270
A2300i EN A2500i HOOGWAARDIGE BLENDERS
Ascent-serie
VM0195D VM0195A

Cleveland, Ohio 44138-2199 Windsor, Ontario N8Y 4Y5
+1 800 848 2649 +1 800 848 2649
service@vitamix.com
service@vitamix.com
https://www.vitamix.com/Corporate-Information/Corporate-Policies/EU-Declaration-of-Conformity
https://www.vitamix.co.uk/Corporate-Information/Corporate-Policies/EU-Declaration-of-Conformity
5. VAD MEDFÖR ATT GARANTIN OGILTIGFÖRKLARAS?
Tfin: +420.773.753.333
www.atranet.cz
DANMARK
High on Life ApS
Bakkelyvej 2
8680 Rv
Danmark
Tfm: (+45) 42 78 32 76
info@highonlife.dk
FRANKRIKE
Wismer S
Tfn: +33.(0)3.29.82.27.71
www.wismer.fr
FINLAND
Primulator Oy
Työpajankatu 10A
FI-00580 Helsingfors
Finland
Tfn: (+358) 972.60622
www.theblender.fi
ITALIEN
KÜNZI S.p.A.
Via L. Ariosto.
19 - 1 - 20091 Bresso (MI)
Italien
Tfn: (+39) 02.61.45.16.1
Fax: (+39) 02.66.500.553
www.kunzi.it
nfo@kunzi.it
ÖSTEUROPA
Hollaender Elektro
GmbH & Co.KG
Flinschstrasse 35,
60388 Frankfurt
Tyskland
Tfn: +49 69 4990131
gmbh@hollaender
elektro.dle
ISLAND
Kaelitaekni Ltd.
Rauðagerði 25
108 Reykjavik
Island
Tln: (+49) 89.864987.0
www.cooltech.is
LITAUEN
Zaliavalgis.lt
Dovanu stolele UAB
Pamenkalnio g. 1
0116 Vilnius,
Litauen
Tfn: (+370) 52611011
Tfn: (+370) 61562740
www./aliavalgis.it
info@zaliavalgis.lt
LUXEMBURG
Dalcq 5A
86 Rue de Hainaut
6180 Courcelles
Belgien
Tfn: +32 (0) 19 63 38 33
www.theblender.be
MAKEDONIEN
Nutri Vita
Mile Pop. Jordanov
23a/51000
Skopje
Makedonien
Tfn: (+389) 70272072
www.vitamix.mk
MONTENEGRO
En/ita d.o.o
Podgorica, 1000
Montenegro
Tfn: +381 (0) 65 21 550 65
www.Enzita.me
info@benzita.me
NEDERLÄNDERNA
MultiBrands Marketing
& Sales BV
Heereweg 337-A
2161 BL Sassenheim
Nederländerna
Tfn: +31 (0) 252 241240
Fax: +31 (0) 252 241244
info@multibrands.nl
NORGE
Lindenbaum Agenturer AB
Hardemogatan 7
5-124 67 Bandhagen
Sverige
Tfn: +(+46) 857.034.777
www.theblender.se
info@theblender.se
2017
Logo S.C
III. Kraszowicka 81
58-100 Świdnica
Polen
Tfn: (+48) 71735 66 60
www.bestblender.pl
info@bestblender.pl
RUMÄNIEN
Quark S.R.L.
Str. Mizil 2B, Sector
3032265 Bukarest
Rumänien
Tfn: (+40) 21 345 1725
www.BeOrganic.ro
office@quark.com.ro
SERBIEN
Enzita d.o.o.
Leposave Vujošević 11/14
Beograd, 11000
Serbien
Tfn: +381 (0) 65 21 550 65
www.En/ita.rs
info@benzita.rs
SPANIEN
CONASI
Carlos V n°4 Bajos
16 Upper Woburn Place
Office number 318
London WC1H OAF
Tin: (+44) 0800 587 0019
www.vitamix.co.uk
AFRIKA OCH
MELLANÖSTERN
SYDAFRIKA
CONGLOMUS CC T/A
HEALTHMAKERS
9 Hoog Street
Utrecht
ZA
Tfn: +(27) 34 331 4824
www.healthmakers.co.za
sales@healthmakers.co.za
ISRAEL
New Horizon
Maskit 27
Herzila 46735
Israel
Tfn: (+972) 9.9576422
Tfn: (+972) 1.700.70,2009
www.newhorizon.co.il
BAHRAIN, KUWAIT,
OMAN, QATAR
OCH SAUDIARABIEN
4Homes FZCO
PO Box 61379, Dubai UAE.
Tfn: +971 4 3807611
Fax: +971 4 387612
4homes@4homes.ae
www.tavolashop.com
FÖRENADE
ARABEMIRATEN
Vitality General
Trading LLC
PO Box 73265
Dubai
Vitamix ANZ Pty Limited
167 King St
Newcastle NSW2300
Australien
Tfn: 1-800-766437 (AUS)
Tfn: 050-853-0697 (NZ)
www.vitamix.com.au
www.vitamix.co.nz
KINA
Hunan Covinda Robotic
Technology Co., Ltd
348W Tongzipo Road,
Changsha High-tech
Development Zone.
Hunan, Kina
Tln: 400-660-8885
vitamix-FAQ@covinda.com
HONGKONG
Total Nutrition Center Ltd.
Room 901-902 9/F
Kingdom Power
Commercial Building
32-36 Des Voeux Road West
Hongkong
Tfn: (+852) 2881 8270
A2300i og A2500i H∅JTYDENDE BLENDERE
Ascent-serien
VM0195D VM0195A

5. HVAD ANNULLERER DENNE GARANTI?
Cleveland, Ohio 44138-2199 Windsor, Ontario N8Y 4Y5
+1 800 848 2649 +1 800 848 2649
service@vitamix.com
service@vitamix.com
Cleveland, Ohio 44138-2199 Windsor, Ontario N8Y 4Y5
+1 800 848 2649 +1 800 848 2649
service@vitamix.com
service@vitamix.com
Det anses at du har godtatt det returnerte produktet «slik det er» ved tilbakelevering, med mindre du varsler Vitamix om et problem, inkludert skader under forsendelse, innen 48 timer eller leveringen.
INTERNASJONALE KONTAKTER
| EUROPA | FINLAND | MONTENEGRO | SLOVAKIA | AFRIKA OG MIDT∅STEN | KINA |
| Primulator Oy | Enzita d.o.o. | Settour Slovakia spol. s r.o. | Hunan Covinda Robotic | ||
| BELGIA | Työpajankatu IOA | Podgorica, 1000 | Lazaretská 29 | S∅R-AFRIKA | Technology Co., Ltd |
| Dalcq SA | FI- 00580 Helsinki | Montonogro | 811 09 Bratislava | CONGLOMUS CC T/A | 348W Tongzipo Road, |
| 86 Rue de Hainaut | Finland | Tlf +381 (0) 65 21 550 65 | Slovakia | HEALTHMAKERS | Changsha High-tech |
| 6180 Courcelles | Tlf: (+358) 972 60622 | www.Enzita.mo | Tlf: +421 2 52932868 9 | 9 Hoog Street | Development Zone, |
| Belgia | www.theblonder.fi | Info@enzita.me | amatko@settour.sk | Ultrecht | Hunan, Kina |
| Tlf: +32 (0) 19 63 38 33 | ITALIA | NEDERLAND | SVERIGE | ZA | Tll: 400 660 8885 |
| www.theblender.be | KÜNZI S.p.A. | MultiBrands Marketing & Sales BV | Lindenbaum Agenturer AB | Tll: +(27) 34 331 4824 | vitamix-FAQ@covinda.com |
| BCSNIA OG | Via L. Ariosto, | Hardemogatan 7 | www.healthmakers.co.za | ||
| HERZEGOVINA | 19 - 1 - 20091 Brosso (MI) | Hoerowog 337-A | 5-124 67 Bandhagen | sales@healthmakers.co.za | HONG KONG PRC |
| Enzita d.o.o. | Italia | 2161 BI. Sassenheim | Sverige | ISRAEL | Total Nutrition Center Ltd. |
| Pave Radana br. 15 | Tlf: (+39) 02 61 45 16 1 | Nodorland | Tlf: (+46) 08-5/0 347 77 | New Horizon | Rom 901 902 9/F |
| Banja Luka, 78000 | Faks: (139) 02 66 500 553 | Tlf: +31 (0) 252 241240 | www.theblender.se | Maskit 27 | Kingdom Power |
| Bosnia og Herzegovina | www.kunzi.it | Faks: +31 (0) 252 241244 | Herzia 46733 | Commercial Building | |
| Tll: +387 (0) 66 117 188 | info@kunzi.it | Info@multibrendis.nl | TYSKLAND, ∅STERRIKE, SVEITS | Israel | 32 36 Des Voeux Road |
| www.Enzita.ba | Tll: (+972) 9 9576422 | West | |||
| info@onzita.ba | ∅ST-EUROPA | NORGE | Vita-Mix GmbH | Tll: (+972) 1 700 70 2009 | Hongkong |
| Hollaender Elektro | Lindenbaum Agenturer AB | Kurfuorstondamm 21 | www.newhorizon.co.il | Tll: (+852) 2881 8270 | |
| BULGARIA | GmbH & Co.KG | Hardemogatan 7 | 10719 Berlin | ||
| Enzita FOOD | Flinschstrasso 35, | 5-124 67 Bandhagen | Tyskland | BAHRAIN, KUWAIT, | |
| Simeonovsko shose 33 | 60388 Frankfurt | Sverige | Tlf: (+49) 800 8482 6491 | OMAN, QATAR, | |
| Sofia, 1000 | Tyskland | Tlf: +(+46) 857 034 777 | www.vitamix.de | OG SAUDI ARABIA | |
| Bulgaria | Tlf: +149 69 4990131 | www.theblender.se | TYSKLAND | 4Homes FZCO | |
| Tlf: +389 (0) 76 487 171 | gmbh@hollaender-elektro.de | info@theblender.se | Koimling Naturkost GmbH | PO Box 61379, Dubai UAE | |
| www.Enzita.bg | Tll: +971 4 380/611 | ||||
| info@enzita.bg | POI FN | Zum Fruchthof 7a | Faks: +971 4 387612 | ||
| ISLAND | Logo S.C. | 21614 Buxlehude | 4homes@4homes.ac | ||
| KROATIA | Kaolitaokni Ltd. | Ul. Kraszowicka 81 | Tyskland | www.tavolashop.com | |
| Enzita d.o.o. | RauÖageröl 25 | 58-100 Swidnica | Tlf: (+49) 4161 51160 | ||
| Avenida Dubrovnik 15 | 108 Reykjavik | Polon | www.keiming.de | DE FORENTE ARABISKE | |
| Zagrebački velesajam | Island | Tlf: (+48) 71735 66 60 | EMIRATER | ||
| (Kinoski paviljon) | Tll: (+49) 89 864987 0 | www.bestblender.pl | ∅STERRIKE | Vitality General | |
| Zagreb, 10020 | www.cooltech.is | info@bostblonder.pl | Hollaendor Elektro GmbH & Co.KG | Trading LLC | |
| Kroatia | PO Box 73265 | ||||
| Tlf: +385 (0) 99 81 59 050 | LITAUEN | ROMANIA | Flinschstrasso 35, | Dubai | |
| www.Enzita.hr | Zallavalgis.it | Quark S.R.L. | 60388 Frankfurt | De forente arabiske | |
| info@onzita.hr | Dovanu stolele UAB | Str. Mizil 2B. Sector | Tyskland | emirater | |
| Pamenkalno g.1 | 30-52265 Bucharest | Tlf: +49 69 4990131 | Tll: +971 (0) 561089662 | ||
| TSJFKKIA | 0116 Vilnius, | Romania | gmbh@hollaender-elektro.de | www.vitality.se | |
| Traminal s.r.o. | Litauen | Tlf: (+40) 21 345 1725 | info@vitality.ae | ||
| Kaprova 42/14 | Tlf: (+370) 5261011 | www.BeOrganic.ro | SVEITS | 4Homes FZCO | |
| 11000 Praha I | Tll: (+370) 61562740 | office@quark.com.ro | Keiming Naturkost | PO Box 61379, Dubai UAE | |
| Tsjoldka | www.ralavalgis.it | Fürstenlandstrasse 96 | Tll: +971 4 3807611 | ||
| Tlf: +420 773 753 333 | info@zallavalgis.it | SERBIA | 9014 SL. Gallen | Faks: +971 4 387612 | |
| www.atranot.cz | Enzita d.o.o. | Sveits | 4homes@4homes.ac | ||
| LUXEMBOURG | Leposave Vujošević Ti/14 | Tlf: 0800 534 654 | www.tavolashop.com | ||
| DANMARK | Dalcq SA | Beograd, 1000 | www.keiming.ch | ||
| High on Life ApS | 86 Rue de Hainaut | Sorbia | ASIA PACIFIC | ||
| Bakkelyvej 2 | 6180 Courcales | Tlf: +381 (0) 65 21 550 65 | STORBRITANNIA | ||
| 8680 Ry | Belgia | www.Enzita.rs | OG IRLAND | AUSTRALIA OG | |
| Danmark | Tlf: +32 (0) 19 63 38 33 | info@onzita.rs | Vita-Mix Europe LTD | NEW ZEALAND | |
| Tlf: (+45) 42 78 32 76 | www.theblonder.bo | Regus Woburn Place | Vitamix ANZ Pty Limited | ||
| info@highonlife.dk | SPANIA | 16 Upper Woburn Place | 167 King St | ||
| MAKEDONIA | CONASI | Office number 318 | Newcastle NSW2300 | ||
| FRANKRIKE | Nutri Vila | Carlos V n°4 Bajos | London WCIH GAF | Australia | |
| Wismer S.A. | Mile Pop Jordanov | 23680 Alcalà la Real (Jaén) | Tlf: (+44) 0800 587 0019 | Tll: 1800 766437 (AUS) | |
| Zone Inova 3000 - allée n°5 | 23a/51000 | Spunia | www.vitamix.co.uk | Tll: 050 853 0697 (NZ) | |
| 88150 Thaon los Vosgos | Skopio | Tlf: (+34) 953 10 25 60 | www.vitamix.com.au | ||
| Frankrike | Makedonia | www.conasi.eu | www.vitamix.co.nz | ||
| Tlf: +33 (0) 3 29 82 27 71 | Tlf: (+389) 70 272 072 | info@conasi.eu | |||
| www.wismer.fr | www.vitamix.mk |
Cleveland, Ohio 44138-2199 Windsor, Ontario N8Y 4Y5
+1-800-848-2649
+1-800-848-2649
service@vitamix.com
service@vitamix.com
https://www.vitamix.com/Corporate-Information/Corporate-Policies/EU-Declaration-of-Conformity
https://www.vitamix.co.uk/Corporate-Information/Corporate-Policies/EU-Declaration-of-Conformity
TYTO POKYNY SI USCHOVEJTE
⚠️ VAROVÁNÍ

Cleveland, Ohio 44138-2199 Windsor, Ontario N8Y 4Y5
+1 800 848 2649 +1 800 848 2649
service@vitamix.com
service@vitamix.com
Tel. 6: +421 2 52932868-9
amatko@settour.sk
ŠVĚDSKO
Lindenbaum Agenturer AB
Hardemogatan 7
5-124 67 Bandhagen
Švědsko
Tel. 6: (+46) 08-570 347 77
www.theblender.se
NĚMECKO, RAKOUSKO,
SVYCARSKO
Vita-Mix GmbH
Kurfuerstendamm 21
10719 Berlin
Německo
Tel. č.:
(+49) 800 8482 6491
www.vitamix.de
NĚMECKO
16 Upper Woburn Place
Office number 318
London WCIH OAF
Tel. c: (+44) 0800 587 0019
www.vitamix.co.uk
AFRIKA A STŘEDNÍ
VÝCHOD
JIŽNÍ AFRIKA
CONGLOMUS CC T/A
HEALTHMAKERS
9 Hoog Street
Utrecht
ZA
www.healthmakers.co.za
sales@healthmakers.co.za
IZRAEL
New Horizon
Maskit 27
Herzliya 46733
|zrael
Vitamix ANZ Pty Limited
167 King St
Newcastle NSW 2300
Australie
vitamix-FAQ@covinda.com
ZVLÁŠTNÍ SPRÁVNI
OBLAST ČÍNSKÉ LIDOVE
REPUBLIKY HONGKONG
Total Nutrition Center Ltd.
Room 901-902 9/F
Kingdom Power
Commercial Building
32-36 Des Voeux Road West
Hongkong
https://www.vitamix.com/Corporate-Information/Corporate-Policies/EU-Declaration-of-Conformity
https://www.vitamix.co.uk/Corporate-Information/Corporate-Policies/FU-Declaration-of-Conformity
Cleveland, Ohio 44138-2199 Windsor, Ontario N8Y 4Y5
+1 800 848 2649 +1 800 848 2649
service@vitamix.com
service@vitamix.com
Cleveland, Ohio 44138-2199 Windsor, Ontario N8Y 4Y5
+1 800 848 2649 +1 800 848 2649
service@vitamix.com
service@vitamix.com
Tel: (+389) 70.272.072
www.vitamix.mk
CZARNOGÓRA
Enzita d.o.o.
Podgorica, 1000
Czarnogóra
Tel.: +381 (0) 65 21 550 65
www.Enzita.me
info@enzita.me
HOLANDIA
MultiBrands Marketing
& Sales BV
Heereweg 337-A
2161 BL Sassenheim
Holandia
Tel.: +31 (0) 252 241240
Fax: +31 (0) 252 241244
info@multibrands.nl
NORWEGIA
Lindenbaum Agenturer AB
Hardemogatan 7
5-124 67 Bandhagen
Szwecja
Tel.: +(+46) 857.034.777
www.theblender.se
info@theblender.se
[Non-Text]
POLSKA
Logo S.C.
Ul. Kraszowicka 81
58-100 Świdnica
Polska
Tel: (+48) 71735 66 60
www.bestblende
info@bestblender.pl
RUMUNIA
Quark S.R.L.
Str. Mizil 2B. Sector
3032265 Bucharest
Rumunia
Tel:(+40)213451725
www.BeOrganic.ro
office@quark.com.ro
SERBIA
En/ita d.o.o.
Leposave Vujošević 11/14
Beograd, 11000
Serbia
Tel.: +381 (0) 65 21 550 65
www.Enzilars
info@en/ita.rs
HISZPANIA
CONASI
Carlos V n°4 Bajos
16 Upper Woburn Place
Office number 318
London WCIH OAF
Tel: (+44) 0800 587 0019
www.vitamix.co.uk
AFRYKA I BLISKI WSCHÓD
[Non-Text]
RPA
CONGLOMUS CC T/A
HEALTHMAKERS
9 Hoog Street
Utrecht
ZA
Tel.: +(27) 34 331 4824
www.healthmakers.co/a
sales@healthmakers.co/a
IZRAEL
New Horizon
Maskit 27
Horzila 46733
|zrael
Tel: (+972) 9,9576422
Tel: (+972) 1.700.70.2009
www.newhorizon.co.il
BAHRAJN, KUWEJT,
OMAN, KATAR
I ARABIA SAUDYJSKA
4Homes FZCO
PO Box 61379, Dubai ZEA
Tel: +971 4 3807611
Fax: +971 4 387612
4homes@4homes.ae
www.tavolashop.com
ZJEDNOCZONE EMIRATY
ARABSKIE
Vitality General
Trading LLC
PO Box 73265
Dubai
Zjednoczone Emiraly
Arabskie
Tel: +971 (0) 561089662
www.vitality.ae
info@vitality.ae
4Homes FZCO
PO Box 61379, Dubai ZEA
Tel: +971 4 3807611
Fax: +971 4 387612
4homes@4homes.ac
www.tavolashop.com
AZJA | PACYFIK
AUSTRALIA
I NOWA ZELANDIA
Vitamix ANZ Pty Limited
167 King St
Newcastle NSW2300
Australia
Tel: 1-800-766437 (AUS)
Tel: 050-853-0697 (NZ)
www.vilamix.com.au
www.vitamix.co.n/
CHINY
Hunan Covinda Robotic
Technology Co., Ltd
348W Tong/ipo Road,
Changsha High-tech
Development Zone.
Hunan, Chiny
Tel: 400-660-8885
vilamix-FAQ@covinda.com
HONGKONG
Total Nutrition Center Ltd.
Room 901-902 9/F
Kingdom Power
Commercial Building
32-36 Des Voeux Road
West
Hongkong
Tel: (+852) 2881.8270
Cleveland, Ohio 44138-2199 Windsor, Ontario N8Y 4Y5
+1 800 848 2649 +1 800 848 2649
service@vitamix.com
service@vitamix.com
Tel: +420.773.753.333
www.alranet.c/
DANIMARKA
High on Life ApS
Bakkelyvej 2
8680 Ry
Danimarka
Tel: (+45) 42 78 32 76
info@highonlife.dk
FRANSA
Wismer S.A.
Tel: +33.(0)3.29.82.27.71
www.wismer.fr
FINLANDIYA
Primulator Oy
Työpajankatu 10A
FI- 00580 Helsinki
Finlandiya
Tel: (+358) 972.60622
www.theblender.fi
ITALYA
KÜNZI S.p.A.
Via L. Ariosto,
19 - 1 - 20091 Bresso (MI)
Italya
Tel: (+39) 02.61.45.16.1
Faks: (+39) 02.66.500.553
www.kunzi.it
nfo@kunzi.it
DOĞU AVRUPA
Hollaender Elektro
GmbH & Co.KG
Flinschstrasse 35,
60388 Frankfurt
Almanya
Tel: +49 69 4990131
gmbh@hollaender-
elektro.de
IZLANDA
Kaelitaekni Ltd.
Rauðagerði 25
108 Reykjavik
Izlanda
Tel: (+49) 89.864987.0
www.cooltech.is
LITVANYA
Zaliavalgis.it
Dovanu stotele UAB
Pamenkalnio g. 1
0116 Vilnius,
Litvanya
Tel: (+370) 52611011
Tel: (+370) 61562740
www./aliavalgis.lt
info@zaliavalgis.lt
LÜKSEMBURG
Dalcq SA
86 Rue de Hainaut
6180 Courcelles
Belçika
Tel: +32 (0) 19 63 38 33
www.theblender.be
MAKEDONYA
Nutri Vita
Mile Pop Jordanov
23a/51000
Skopje
Makedonya
Tel: (+389) 70.272.072
www.vitamix.mk
KARADAG
En/ita d.o.o.
Podgorica, 1000
Karadağ
Tel: +381 (0) 65 21 550 65
www.Enzita.me
info@en/ita.me
HOLLANDA
MultiBrands Marketing
& Sales BV
Heereweg 337-A
2161 BL Sassenheim
Hollanda
Tel: +31 (0) 252 241240
16 Upper Woburn Place
Office number 318
London WC1H OAF
Tel: (+44) 0800 587 0019
www.vitamix.co.uk
AFRİKA VE ORTA DOĞU
GÜNEY AFRIKA
CONGLOMUS CC T/A
HEALTHMAKERS
9 Hoog Street
Utrecht
Güney Afrika
Tel: +(27) 34 331 4824
www.healthmakers.co.za
sales@healthmakers.co.za
isRAiL
New Horizon
Maskit 27
Herzija 46733
israil
Tel: (+972) 9.9576422
Tel: (+972) 1700.70.2009
www.newhorizon.co.il
BAHREYN, KUVEYT,
UMMAN, KATAR
VE SUUDI ARABISTAN
4Homes FZCO
PO Box 61379, Dubai BAE.
Tel: +971 4 3807611
Faks: +971 4 387612
4homes@4homes.ae
www.tavolashop.com
BİRLEŞİK ARAP
EMİRLİKLERİ
Vitality General
Trading LLC
PO Box 73265
Dubai
Vitamix ANZ Pty Limited
167 King St
Newcastle NSW2300
Avustralya
Tel: 1-800-766437 (AUS)
Tel: 050-853-0697 (NZ)
www.vitamix.com.au
www.vitamix.co.nz
CIN
Hunan Covinda Robotic
Technology Co., Ltd
348W Tongzipo Road.
Changsha High-tech
Development Zone,
Hunan, Çin
Tel: 400-660-8885
vilamix-FAQ@covinda.com
HONG KONG PRC
Total Nutrition Center Ltd.
Room 901-902 9/F
Kingdom Power
Commercial Building
32-36 Des Voeux Road
vwest
Hong Kong
Tel (+852) 2881.8270
https://www.vitamix.com/Corporate-Information/Corporate-Policies/EU Declaration of Conformity
https://www.vitamix.co.uk/Corporate-Information/Corporate-Policies/EU-Declaration-of-Conformity
Cleveland, Ohio 44138-2199 Windsor, Ontario N8Y 4Y5
+1 800 848 2649 +1 800 848 2649
service@vitamix.com
service@vitamix.com
| XONIKONIKAAK |
| Total Nutrition Center Ltd. |
| Room 901 902 9/F |
| Kingdom Power |
| Commercial Building |
| 32-36 Des Voeux Road West |
| Hong Kong |
| Trk: (1852) 2881.8270 |
https://www.vitamix.com/Corporate-Information/Corporate-Policies/EU-Declaration-of-Conformity
https://www.vitamix.co.uk/Corporate-Information/Corporate-Policies/EU-Declaration-of-Conformity
(Variable 1) (Variable Speed) (Variable Speed) (Variable Speed) (Variable Speed) (Variable Speed) (Variable Speed) (Variable Speed) (Variable Speed) (Variable Speed) (Variable Speed) (Variable Speed) (Variable Speed) (Variable Speed) (Variable Speed) (Variable Speed) (Variable Speed) (Variable Speed) (Variable Speed) (Variable Speed) (Variable Speed) (Variable Speed) (Variable Speed) (Variable Speed) (Variable Speed) (Variable Speed) (VariableSpeed)
Windsor, Ontario N8Y 4Y5 Cleveland, Ohio 44138-2199
+1800 848 2649 +1800 848 2649
service@vitamix.com service@vitamix.com
https://www.vitamix.com/Corporate-Information/Corporate-Policies/EU-Declaration-of-Conformity
https://www.vitamix.co.uk/Corporate-Information/Corporate-Policies/EU-Declaration-of-Conformity
Cleveland, Ohio 44138-2199 Windsor, Ontario N8Y 4Y5
+1800 848 2649 +1800 848 2649
service@vitamix.com service@vitamix.com
Bosnia and Herzegovina
電話:+387(0)66117188
www.Fnzitaba
info@enzita.ba
保加利亞
Enzila EOOD
Simeonovsko shose 33
Sofia, 1000
Bulgaria
電話:+389(0)76487171
www.Enzita.bg
info@en/ita.bg
克羅地亞
Enzita d.o.o
Avenija Dubrovnik 15
16 Upper Woburn Place
Office number 318
London WC1H OAF
電話:(+44) 0800 587 0019
www.vitamix.co.uk
非洲與中東
本山
1.2.3
CONGLOMOS CC 17A
HEALTHMAKERS
9 Hoog Street
Utrecht
7A
電話:+(27)343314824
www.healthmakers.co/a
sales@healthmakers.co.za
以色列
New Horizon
Maskit 27
Herzia 46733
Israel
電話:(+972) 9.9576422
電話:(+972)1700.702009
www.newhorizon.co.il
巴林、科威特、
阿景、卡達
與沙烏地阿拉伯
4Homes FZCO
PO Box 61379, Dubai UAE
電話:+97143807611
傳真:+971438
4homes@4homes.ae
www.tavoleshop.com
阿拉伯联合
大公國
Vitality General
Trading LLC
PO Box 73265
Dubai
United Arab Emirates
電話:+971(0)561089662
www.vitality.ac
info@vitality.ae
4Homes FZCO
PO Box 61379, Dubai UAE
電話:+97143807611
传真:+9714387612
4homes@4homes.de
www.tavoleshop.com
亞人地區
澳大利亚與
紐西蘭
Vitamix ANZ Pty Limited
167 King 5t
Newcastle NSW2300
Australia
vitamix-FAQ@covinda.com
中國香港特別行政區
Total Nutrition Center Ltd.
Room 901-902 9/F
Kingdom Power
Commercial Building
32-36 Des Voeux Road
West
Hong Kong
電話:(+852) 2881.8270

- SPECIFICATIONS
- CAUTION
- SYMBOLS
- Vitamix.
- IMPORTANT INSTRUCTIONS FOR SAFE USE
- WARNING: To avoid the risk of serious injury when using your Vitamix® blender, basic safety precautions should be followed, including the following. READ ALL THE INSTRUCTIONS, SAFEGUARDS AND WARNINGS BEFORE OPERATING THE BLENDER.
- SAVE THESE INSTRUCTIONS
- WARNING
- To Avoid Injury.
- Electrical Shock Hazard.
- PARTS AND FEATURES
- Rotating Blades Can Cause Damage.
- Accessories
- AWARNING
- BLENDING
- CARE AND CLEANING
- BEFORE FIRST USE:
- Care and Cleaning of Large Containers:
- To Clean:
- To Sanitise: (Bleach) (Full-size Containers)
- To Sanitise: (Vinegar) (Full-size Containers)
- Lids, Lid Plug, Centring Pad and Tamper
- In-Place Cleaning: (0.6-litre cup and 240-ml bowl)
- To Sanitise: (Bleach) (0.6-litre cup and 240-ml bowl)
- To Sanitise the (0.6-litre cup and 240-ml bowl) with Vinegar (minimum 5% acidity):
- Blender Base
- WARRANTY
- 10-Year full Machine Warranty
- PRODUCT REGISTRATION.
- WHO CAN SEEK WARRANTY COVERAGE?
- WHAT IS COVERED?
- WHAT IS NOT COVERED?
- WHAT VOIDS THIS WARRANTY?
- HOW TO OBTAIN RETURN AUTHORISATION UNDER THIS WARRANTY.
- United States Canada
- INTERNATIONAL CONTACTS
- A2300i UND A2500i HOCHLEISTUNGSMIXER
- Ascent-Serie
- VM0195D VM0195A
- A2300i EN A2500i HOOGWAARDIGE BLENDERS
- VAD MEDFÖR ATT GARANTIN OGILTIGFÖRKLARAS?
- A2300i og A2500i H∅JTYDENDE BLENDERE
- Ascent-serien
- HVAD ANNULLERER DENNE GARANTI?
- INTERNASJONALE KONTAKTER
- TYTO POKYNY SI USCHOVEJTE
- ⚠️ VAROVÁNÍ
- 保加利亞
- 克羅地亞
- 非洲與中東
- 以色列
- 巴林、科威特、
- 阿景、卡達
- 阿拉伯联合
- 大公國
- 亞人地區
- 澳大利亚與
- 紐西蘭
- 中國香港特別行政區
Brand : Vitamix
Model : Ascent A2500i
Category : Blender