
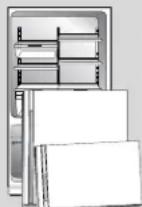
XRBR 904 - Fridge AMANA - Free user manual and instructions
Find the device manual for free XRBR 904 AMANA in PDF.

| Brand | Amana |
| Model | XRBR 904 |
| Product Type | Combined refrigerator with freezer |
| Power Supply | 220-240 V, 50 Hz, 10 A, independent circuit |
| Number of Doors | 2 (refrigerator and freezer) |
| Temperature Controls | Separate for refrigerator and freezer, setting 1 to 5 |
| Operating Ambient Temperature | 13 °C to 43 °C |
| Interior Lighting | Bulbs 40 W max, with lens |
| Defrost | Automatic (defrost timer) |
| Ice Maker | Optional (available as needed) |
| Vegetable Drawers | With humidity control (low/high setting) |
| Deli Drawer | With temperature control (Cold/Coldest) |
| Shelves | Full width, Spillsaver, Easy Glide depending on model |
| Door Storage | Adjustable bins, butter and cheese compartment |
| Exterior Material | Stainless steel (for some models) |
| Care and Cleaning | Sodium bicarbonate, warm soapy water; avoid abrasives |
| Safety | Unplug before maintenance; grounding required |
| Serviceability | After-sales service by authorized repairer; spare parts available |
| Warranty | Manufacturer warranty, requires purchase receipt |
| User Manual | 184 pages, available in multiple languages |
Frequently Asked Questions - XRBR 904 AMANA
User questions about XRBR 904 AMANA
0 question about this device. Answer the ones you know or ask your own.
Ask a new question about this device
Download the instructions for your Fridge in PDF format for free! Find your manual XRBR 904 - AMANA and take your electronic device back in hand. On this page are published all the documents necessary for the use of your device. XRBR 904 by AMANA.
USER MANUAL XRBR 904 AMANA
Please read this Owner's Manual thoroughly. This manual provides proper maintenance information.
Warranty service must be performed by an authorized servicer. The manufacturer also recommends contacting an authorized servicer if service is required after warranty expires. To locate an authorized servicer, contact your distributor.
When contacting your servicer, please provide the following information. Product information is on the serial plate, located on wall of fresh food section.
Model Number:
P' Number:
Serial Number:
Date of Purchase:
Dealer Name:
Dealer Address:
Dealer Phone:
HOW TO OBTAIN REPLACEMENT PARTS AND SERVICES?
Problems? Save yourself the nuisance of unnecessary service calls; check the "Before Calling Service" section of the owner's manual.
Your new refrigerator has been carefully engineered and manufactured under strict quality standards and should give you satisfactory and dependable operation. However, like all mechanical merchandise, it may occasionally require adjustment, replacement parts, or maintenance. Should you ever need assistance, please contact the dealer from whom you purchased the refrigerator.
Provide the following:
Model
Manufacturing Number
- Serial Number and all of the other data shown on the model serial plate.
- State briefly the trouble you are having.
The page area to the left has been provided to record valuable information.
KEEP INSTRUCTIONS FOR FUTURE REFERENCE!
Keep this manual and your sales receipt together in a safe place in case warranty service is required.
WHAT IF THESE FEATURES ARE DIFFERENT FROM MINE?
This book is intended to show the variety of features that are available in the product line. If interested in purchasing additional items available for your refrigerator, please contact your distributor.
CONTENTS
Introduction 1
Contents 1
Important Safety Information 2
Installing Your Refrigerator 3-4
Temperature Controls 5
Fresh Food Features 6-7
Freezer Features 8
Care and Cleaning 9-10
Normal Operating Sounds 11
Before You Call. 12-13
IMPORTANT SAFETY INFORMATION
RECOGNIZE SAFETY SYMBOLS, WORDS, LABELS
DANGER
DANGER - Immediate hazards which WILL result in severe personal injury or death.
WARNING
WARNING - Hazards or unsafe practices which COULD result in severe personal injury or death.
CAUTION
CAUTION - Hazards or unsafe practices which COULD result in minor personal injury or product or property damage.
WHAT YOU NEED TO KNOW ABOUT SAFETY INSTRUCTIONS
Warning and Important Safety Instructions appearing in this manual are not meant to cover all possible conditions and situations that may occur. Common sense, caution and care must be exercised when installing, maintaining or operating refrigerator.
Always contact your dealer, distributor, service agent or manufacturer about problems or conditions you do not understand.
DANGER
To reduce risk of injury or death, follow basic precautions, including the following:
Proper Disposal of Your Refrigerator
IMPORTANT: Child entrapment and suffocation are not problems of the past. Junked or abandoned refrigerators are still dangerous - even if they sit out for "just a few days." If you are getting rid of your old refrigerator, please follow the instructions below to help prevent accidents.
Before you throw away your old refrigerator or freezer:
Take off the doors.
Leave the shelves in place so children may not easily climb inside.
INSTALLING YOUR REFRIGERATOR
These instructions were provided to aid you in the installation of your refrigerator. The manufacturer cannot be responsible for improper installation.
STEPS TO FOLLOW...
A qualified engineer must connect refrigerator in accordance with these installation instructions. Measure door opening and depth and width of refrigerator. Remove handles or doors if required. Engineer must also do the following:
- Follow local water and electrical company connection regulations.
- Complete water supply connection before electrical supply connection.
Service to or replacement of power cord must be performed by a qualified servicer.
- Install on an earthed outlet with a separate 220-240 volt, 50hz., 10A circuit.
- Protect soft flooring with cardboard or rugs.
- Provide 5mm clearance at side of refrigerator and for models more than 60 cm deep, provide 12.7 mm clearance at top and back of refrigerator.
- 60 cm deep models. Trim corners of counter top to a 45^ angle if counter top has 25 mm overhang.
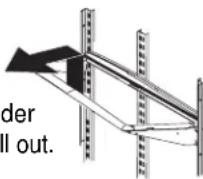
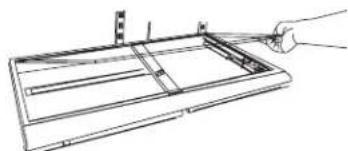
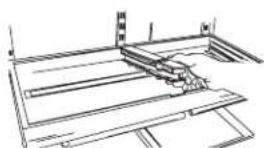
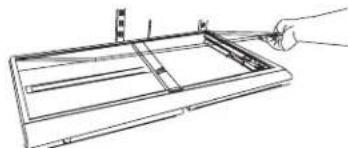
HOW TO REMOVE WOODEN BASE
CAUTION
To avoid personal injury or property damage, two people must remove wooden base.
- Tape doors shut to prevent doors from opening unexpectedly.
- Slide appliance cart under side of refrigerator.
- Wrap refrigerator with blanket or pad. Thread strap around refrigerator. Put foam shipping pads, located in shipping carton, under strap. Tighten strap securely.
- Lower appliance cart to floor with appliance cart handles on bottom.
- Remove top two bolts from skid.
- Return refrigerator and appliance cart to an upright position. Remove strap.
- Slide appliance cart under opposite side of refrigerator.
- Repeat steps 3-5.
- Remove wooden base.
- Return refrigerator and appliance cart to an upright position and remove appliance cart.
IMPORTANT: Do not leave refrigerator on its side longer than necessary to remove bolts.
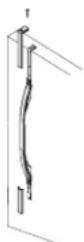
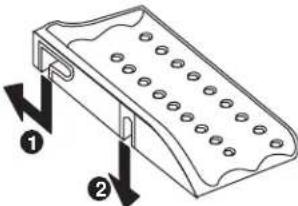
INSTALLING FRESH FOOD FRONT-MOUNT HANDLE
If installing handles for the first time, the fresh food handle can be located within the fresh food section. The handle trim will be located in the literature package.
Remove 14 hex head screws from door face with hex head driver.
- If reversing door, remove door plugs from opposite side of door and insert in screw holes.

Align handle holes with screw holes on door face and secure with 2 door face screws previously removed.
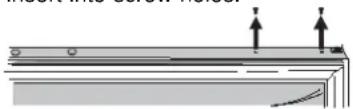
Locate handle trim in literature pack and install over top and bottom of handle.
- Secure top handle trim with remaining screw removed previously.
- Snap bottom trim over bottom portion of handle.
INSTALLING FREEZER HANDLE
If installing handle for the first time, the freezer handle can be located in the literature package inside the refrigerator.
Remove Phillips screws from top edge of freezer door opposite hinge side.
- Retain screws for later replacement.
- If reversing freezer door, remove door plugs from top edge of door and insert into screw holes.
Align handle holes with screw holes
on door edge and secure with screws previously removed.
HOW TO REMOVE AND REPLACE DOORS AND HINGES
Contact a qualified engineer to perform this task.
REMOVING FRESH FOOD FRONT-MOUNTED HANDLE
Remove top handle trim by removing top handle screw.
- Retain trim and screw for later replacement.
Pry bottom handle trim from handle with screwdriver flat blade wrapped in masking tape.
- Retain trim for later replacement.
Removing two remaining handle screws and remove handle.
- Retain screws for later replacement.

NOTE: Side-mounted fresh food handles are available in kits for some models. Please see your dealer for details.
REMOVING FREEZER HANDLE
Removing handle may be necessary when transporting refrigerator through tight spaces or when reversing door.
Remove handle screws with Phillips screwdriver.
- Retain screws for later replacement.
To avoid damage to walls and flooring, protect soft vinyl or other flooring with cardboard, rugs or other protective material.
To avoid damage or breakage to adjusting bolt, do not use power tools to correct leveling.
DO NOT adjust refrigerator down to where the base of the refrigerator which supports the condenser is resting on the floor. Doing so may damage underside components.
TOOLS NEEDED:
- 3/8" hex head driver
-
Level
-
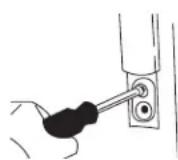
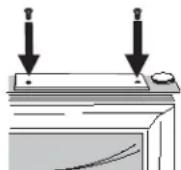
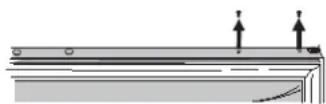
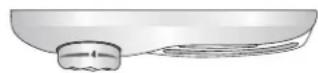
Removetoegirleand bottomhinge covers.
- Turn both front adjustment screws (A) clockwise to raise and counterclockwise to lower.
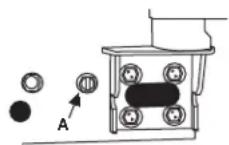
- Turn both rear adjustment screws (B) clockwise to raise and counterclockwise to lower.
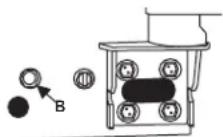
- Check with level to verify 6mm tilt to the back for proper door closure.
If refrigerator is aligned and stable, replace toe grille.
FOR PULLOUT DRAWER ONLY:
- Turn both stabilizing legs clockwise until firmly against floor. Turn roller adjustment screws 2 to 3 times counterclockwise so that the full weight of refrigerator rests on stabilizing legs.
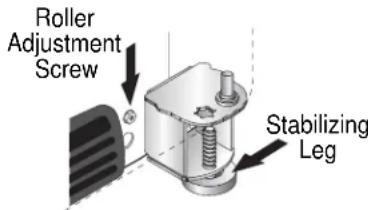
- Replace toe grille and bracket cover(s). See markings on inside of toe grille to insure proper placement.
- Snap bottom portion into place first. Press down on top of grille until top portion snaps into place.
WHAT IF MY REFRIGERATOR ROCKS?
Turn rear adjustment screw clockwise to raise rocking corner.
Replace toe grille.
TEMPERATURE CONTROLS
This refrigerator is designed to operate at a household temperature of 13^ to 43^ C.
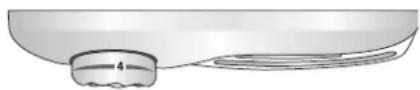
INITIAL SETTING
Locate refrigerator controls at the top of fresh food compartment and freezer controls at top of freezer section. Set both controls to 4.
IMPORTANT: Neither section will cool if freezer control is set to OFF.
Allow 24 hours for temperature to stabilize.
TEMPERATURE ADJUSTMENTS
Check to see if freezer temperature is -17° to -16° C.
T urn control to next highest number if too warm.
- T urn control to next lowest number if too cold. Allow 5 to 8 hours for adjustments to take effect.
Check to see if fresh food temperature is 3^ to 4^ C.
- T urn control to next highest number if too warm.
- T urn control to next lowest number if too cold. Allow 5 to 8 hours for adjustments to take effect.
TEMPERATURE TEST
MATERIALS NEEDED:
- 2 thermometers that measure -21^ to 10^ C
2 drinking glasses
FREEZER
Place thermometer in glass of vegetable oil in middle of freezer and continue with Temperature Adjustments.
IMPORTANT: Always start temperature adjustments with freezer section.
REFRIGERATOR
Place thermometer in glass of water in middle of refrigerator and continue with Temperature Adjustments.
FRESH FOOD FEATURES
INTERIOR SHELVES
CAUTION
To avoid personal injury or property damage, observe the following:
Confirm shelf is secure before placing items on shelf.
Handle tempered-glass shelves carefully. Shelves may break suddenly if nicked, scratched or exposed to sudden temperature change.
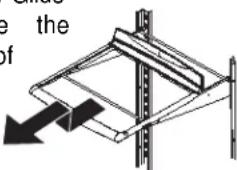
FULL-WIDTH SHELVES
To remove shelves:
Unhook shelf from rear ladder assembly and pull out.
To reinstall shelves:
Insert shelf hooks into rear ladder assembly and lower into place.
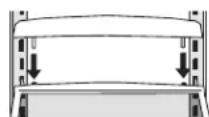
SPILLSAVERTM
SpillsaverTM stationary shelves hold simple spills for easier cleaning
To remove shelves:
Lift up and out.
To reinstall shelves:
Reverse above procedure.
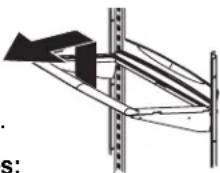
SPILLSAVERTM EASYGLIDETM
(SELECT MODELS)
SpillsaverTM Easy GlideTM shelves feature the
convenience of easy cleaning with a pullout design to reach items in the
back. For ease of cleaning, glass shelf may be removed by pulling to full extension and lifting out of frame.
To remove shelf and frame:
Lift up and out.
Toreinstall shelf and frame:
Reverse above procedure.
REAR SHELF EXTENSIONS
(SELECT MODELS)
Rear shelf extensions help prevent articles from falling off the back of the shelf.
To remove shelf extension:
Pull extension straight up from rear of shelf.
Toinstall shelf extension:
Insert posts of the shelf extension into holes in the shelf frame.
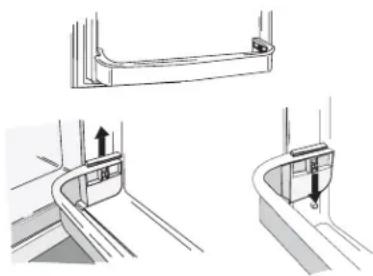
DOOR STORAGE
DAIRY CENTER
The dairy center provides convenient storage for items such as butter, yogurt, cheese, etc.
This compartment is an adjustable feature located in the door. It can be moved to several different locations to accommodate storage needs.
Toremove:
Open dairy door, pull up w a r d and tilt out.
Toinstall:
Reverse above procedure.
DOOR BUCKETS
Door buckets adjust to meet individual storage needs.
To remove buckets:
Slide bucket up and pull straight out.
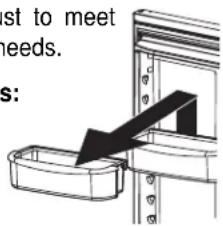
Toreinstall buckets:
Reverse above procedure.
DOOR RETAINER
Door retainers remove for easy cleaning.
To remove:
To reinstall:
Slide retainer up and pull straight out.
Reverse above procedure.
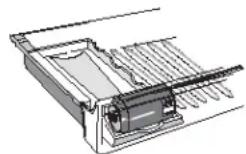
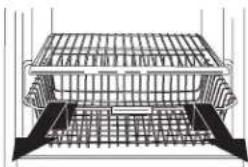
WINE TRIVET/CAN RACK
The Wine Trivet/Can Rack accessory seats in the bottom o most drawer assembl
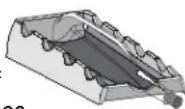
Beer bottles can be laid crosswise, or a single bottle may be laid in the center depression. Cans may also be stored, as illustrated.
FRESH FOOD FEATURES, CONT.
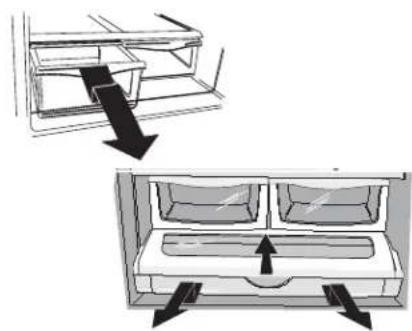
DRAWERS
HUMIDITY-CONTROLLED CRISPER DRAWERS
The crisper drawer keeps produce fresh longer by providing an environment with adjustable humidity.
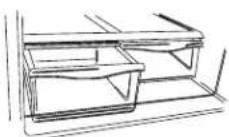
The crisper controls regulate the amount of humidity in the crisper drawer. Use the low setting for produce with outer skins. Use the high setting for leafy produce.
LOW
- apples -grapes
- cauliflower - oranges
corn-zucchini - cucumbers
HIGH
- asparagus - fresh herbs
broccoli - fresh sprouts - cabbage - lettuce
- celery - spinach
When storing produce in humidity-controlled crispers:
DO NOT wash produce before placing in crispers. Any additional moisture added to the crispers may cause produce to prematurely spoil.
DO NOT line crispers with paper towels. Towels will retain moisture.
Follow control instructions carefully. Incorrect control settings may damage produce.
TEMPERATURE-CONTROLLED DRAWERS
Deli/Crisper and Fresh Food Pantry
The Deli/Crisper system and Fresh Food Pantry system provide drawers with a variable temperature control that keeps the compartment up to 3^ colder than refrigerator temperature. This drawer can be used for deli storage or additional produce storage.
Controls
The Deli and Fresh Food Pantry controls regulate the air temperature in the drawers. Set control level to cold to provide normal refrigerator temperature for produce with outer skins. Use the coldest setting for meats or other deli items.
NOTE: Cold air directed to the Deli/Crisper System or Fresh Food Pantry can decrease refrigerator temperature. Refrigerator control may need to be adjusted.
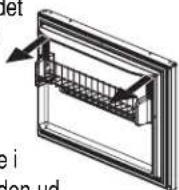
SNACK DRAWER
This drawer can be used for storage of food items or extra produce. Some models may have a control feature. For operating instructions see the appropriate control category listed earlier.
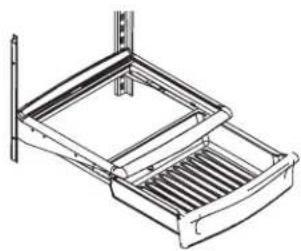
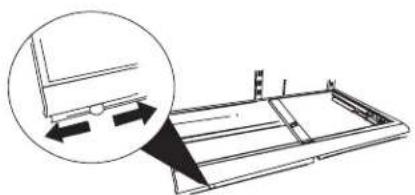
To remove drawers:
Pull drawer out to full extension. Tilt up front of drawer and pull straight out.
Toreinstall drawers:
Insert drawer into frame rails and push back into place.
To remove and install glass and frame:
Remove drawer as instructed above.
Place hand beneath frame to push up glass from underneath. Lift glass out.
Lift frame from refrigerator liner rails.
Toreinstall:
Reverse above procedure.
If refrigerator door does not open far enough to remove drawers:
Remove drawer furthest from hinge side of cabinet.
Remove glass as instructed previously.
Lift center divider from frame. Slide existing drawer away from hinge side of cabinet and remove.
FREEZER FEATURES
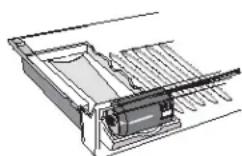
AUTOMATIC ICE MAKER
NOTE: Ice makers are available as a kit. Please see your dealer for more information.
SHELVES
ICE SERVICE RACK (SELECT MODELS)
Tinstall rack:
Slide L-shaped groove of shelf down over back wall screw. Push rack back until screw is stopped in L-shaped groove (1). Slide front portion of shelf over front wall screw (2).
To remove rack:
Reverse above procedure.
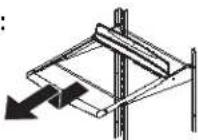
FIXED FREEZER SHELF
To remove shelf:
Pull shelf out to full extension. Tilt up front of shelf and pull straight out.
Toreinstall shelf:
Insert shelf into refrigerator liner rails and push to back of compartment.
GLIDE-OUT FREEZERSHELF
To remove shelf:
Pull shelf out to full extension. Tilt up front of shelf and pull straight out.
Toreinstall shelf:
Insert shelf into refrigerator liner rails and push to back of compartment.
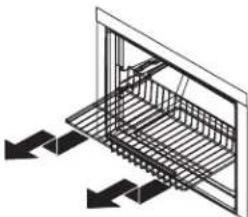
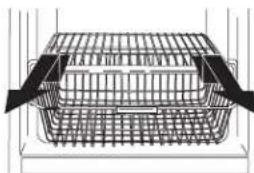
WIRE BASKET
To remove basket:
Pull basket out to full extension. Tilt up front of basket and pull straight out.
Toreinstall basket:
Insert basket into refrigerator liner rails and push back into place.
DOOR STORAGE
FIXED DOOR SHELF
The fixed door shelf provides convenient storage for frozen food items in freezer door.
To remove shelf:
Lift assembly from side liner tabs and pull out.
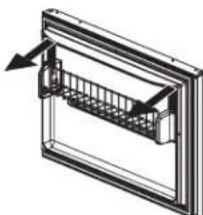
Toreinstall shelf:
Fit ends of shelf assembly on liner tabs and slide down.
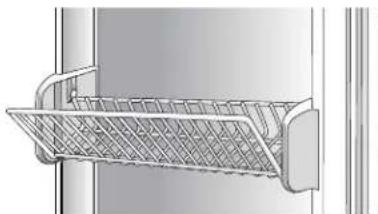
TILT-OUT BIN (SELECT MODELS)
The tilt-out bin in the freezer door tilts for ward for easy access to stored items.
Lift assembly from side liner tabs and pull out.
Toreinstalldloor shelf:
Fit ends of shelf assembly on liner tabs and slide down.
ACCESSIONS
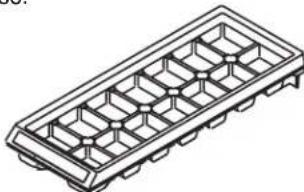
ICE CUBE TRAY
The ice cube tray provides an area to freeze cubes for manual dispensing of ice.
To release ice cubes from tray, hold tray upside down over a storage container and twist both ends of tray until cubes release.
CARE AND CLEANING
WARNING
To avoid electrical shock which can cause severe personal injury or death, disconnect power to refrigerator before cleaning. After cleaning, connect power.
CAUTION
Toavoid personal injury or property damage, observe the following:
- Read and follow manufacturer's directions for all cleaning products.
- DO NOT place buckets, shelves or accessories in dishwasher. Cracking or warping of accessories may result.
| PART DO | DO NOT USE | |
| Textured Doors and Exterior | Abrasive or harsh cleaners AmmoniaChlorine bleachConcentrated detergents or solventsMetal or plastic-textured scouring pads | Use 4 tablespoons of baking soda dissolved in 1 quart (1 liter) warm soapy water.Rinse surfaces with clean warm water and dry immediately to avoid water spots. |
| Cabinet Interior | ||
| Stainless Steel Doors and ExteriorIMPORTANT: Damage to stainless steel finish due to improper use of cleaning products or non-recommended products is not covered under this product's warranty. | Abrasive or harsh cleaners AmmoniaChlorine bleachConcentrated detergents or solventsMetal or plastic-textured scouring padsVinegar-based productsCitrus-based cleaners | Use warm, soapy water and a soft, clean cloth or sponge.Rinse surfaces with clean warm water and dry immediately to avoid water spots. |
| Door Gaskets | Abrasive or harsh cleaners Metal or plastic-textured scouring pads | |
| Condenser CoilRemove base grille to access | Use a vacuum cleaner hose nozzle. | |
| Condenser Fan OutletGrilleSee back of refrigerator | Use a vacuum cleaner hose nozzle with brush attachment. | |
| Accessories Shelves, buckets, drawers, etc. | A dishwasher | Follow removal and installation instructions from appropriate feature section.Allow items to adjust to room temperature.Dilute mild detergent and use a soft clean cloth or sponge for cleaning.Use a plastic bristle brush to get into crevices.Rinse surfaces with clean warm water.Dry glass and clear items immediately to avoid spots. |
STAINLESS STEEL
There is a cleaner available for purchase from the manufacturer (Part # 31960801).
For a list of other recommended cleaning products, please contact your local distributor.
C
Today's refrigerators have new features and are more energy efficient. Foam insulation is very energy efficient and has excellent insulating capabilities, however, foam insulation is not as sound absorbent. As a result, certain sounds may be unfamiliar. In time, these sounds will become familiar. Please refer to this information before calling service.
| TOPIC | POSSIBLE CAUSE | SOLUTION |
| Clicking | > Freezer control (A) clicks when starting or stopping compressor. | Normal operation |
| > Defrost timer (B) sounds like an electric clock and snaps in and out of defrost cycle. | Normal operation | |
| Air rushing or whirring | > Freezer fan (C) and condenser fan (D) make this noise while operating. | Normal operation |
| Gurgling or boiling sound | > Evaporator (E) and heat exchanger (F) refrigerant makes this noise when flowing. | Normal operation |
| Thumping | > Ice cubes from ice maker (select models) drop into ice bucket (G). | Normal operation |
| Vibrating noise | > Compressor (H) makes a pulsating sound while running. | Normal operation |
| > Refrigerator is not level. | See Installation Instructions for details on how to level your refrigerator. | |
| Buzzing | > Ice maker water valve (I) hookup (select models) buzzes when ice maker fills with water. | Normal operation |
| Humming | > Ice maker (J) is in the 'on' position without water connection. | > Stop sound by raising ice maker arm to 'off' position. See Automatic Ice Maker section in your Owner's Manual for details. |
| > Compressor (H) can make a high-pitched hum while operating. | Normal operation | |
| Hissing or popping | > Defrost heater (K) hisses, sizzles or pops when operational. | Normal operation |

BEFORE YOU CALL
OPERATION
| PROBLEM POSSIBLE CAUSES WHAT TO DO | ||
| Freezer control and lights are on, but compressor is not operating | Refrigerator is in defrost mode. | Normal operation. Wait 40 minutes to see if refrigerator restarts. |
| Crisper drawer Control setting temperature is too warm | gs are too low. See section on Crisper drawer to Freezer controls are set too low. See controls section in Owner's Manual on how to adjust your controls. | adjust controls. |
| Drawer is improperly positioned. See section on Crisper drawer to verify drawer positioning. | Section in Owner's Manual on how to adjust your controls. | |
| Refrigerator does not Refrigerator operate | Refrigerator is not plugged in. Plug in refrigerator. | Owner's Manual. |
| Freezer control is not on. See controls section in Owner's Manual. | Replace any blown fuses. Check circuit breaker and reset, if. | |
| Fuse is blown, or circuit breaker needs to be reset. necessary. | Company listing to report outage. | |
| Refrigerator still won't operate | Refrigerator is malfunctioning. | Unplug refrigerator and transfer food to another refrigerator. If another refrigerator is not available, place dry ice in freezer section to preserve food. Warranty does not cover food loss. Contact service for assistance. |
| Food temperature is too cold | Condenser coils are dirty. | Clean according to your Owner's Manual. |
| Refrigerator or freezer controls are set too high. | See controls section in Owner's Manual on how to adjust controls. | |
| Food temperature is too warm | Door is not closing properly. | Refrigerator is not level. See How to Level Your Refrigerator for details on how to level your refrigerator. |
| Check gaskets for proper seal. Clean, if necessary, according to cleaning instructions in Owner's Manual. | ||
| Check for internal obstructions that are keeping door from closing properly (i.e. improperly closed drawers, ice buckets, oversized or improperly stored containers or foodstuffs, etc.) | ||
| Controls need to be adjusted. | See the controls section in Owner's Manual for assistance on how to adjust your controls. | |
| Condenser coils are dirty. | Clean according to cleaning instructions in Owner's Manual. | |
| Rear air grille is blocked. | Check the positioning of food items in refrigerator to make sure grille is not blocked. Rear air grilles are located under crisper drawers. | |
| Door has been opened frequently, or has been opened for long periods of time. assure door is open. | Reduce time door is open. Organize food items efficiently to open for as short a time as possible. | |
| Food has recently been added. | Allow time for recently added food to reach refrigerator or freezer temperature. | |
| Refrigerator has an odor | Compartment is dirty or has odor-causing food. | Refer to Care and Cleaning in Owner's Manual for odor removal instructions. |
| Water droplets form on outside of refrigerator | Check gaskets for proper seal. | Clean, if necessary, according to cleaning instructions in Owner's Manual. |
| Humidity levels are high. | Normal during times of high humidity. | |
| Controls require adjustment. See the controls section in Owner's Manual for assistance on how to adjust your controls. | Clean, if necessary, according to cleaning instructions in Owner's Manual. | |
| Water droplets form on inside of refrigerator | Humidity levels are high or door has been opened frequently. | See the controls section in Owner's Manual for assistance on how to adjust your controls. |
| Check gaskets for proper seal. | Reduce time door is open. Organize food items efficiently to assure door is open for as short a time as possible. | |
| Clean, if necessary, according to cleaning instructions in Owner's Manual. | ||
| Refrigerator or ice maker makes unfamiliar sounds or seems too loud | Normal operation. | Refer to noise section of Normal Operating Sounds guide in Owner's Manual. |
| Crisper drawers do not close freely in the surrounding | Contents of drawer, or positioning of items compartment could be the drawers. obstructing drawer. | Reposition food items and containers to avoid interference with |
| Drawer is not in proper position. See Crisper drawer section for proper placement. | Refrigerator details on how to level your refrigerator. | |
| Drawer channels are dirty or need treatment. Clean drawer channels with warm, soapy water. Rinse and dry thoroughly. | Apply a thin layer of petroleum jelly to drawer channels. | |
| Refrigerator runs too frequently long periods of time | Doors have been opened frequently or for assure door is open for as short a time as possible. | Reduce time door is open. Organize food items efficiently to |
| Humidity or heat in surrounding area is high. No normal operation. | Allow interior environment to adjust for period the door has been opened. | |
| Food has recently been added. | Allow time for recently added food to reach refrigerator or freezer temperature. | |
| Refrigerator is exposed to heat by environment or by appliances nearby. | Evaluate your refrigerator's environment. Refrigerator may need to be moved to run more efficiently. | |
| Condenser coils are dirty. | Clean according to cleaning instructions in your Owner's Manual. | |
| Controls need to be adjusted. | See controls section in your Owner's Manual for assistance on how to adjust your controls. | |
| Door is not closing properly. Refrigerator is not level. See How to Level Your Refrigerator for details on how to level your refrigerator. | Check gaskets for proper seal. Clean, if necessary, according to cleaning instructions in Owner's Manual. | |
| Check for internal obstructions that are keeping door from closing properly (i.e. improperly closed drawers, ice buckets, oversized or improperly stored containers or foodstuffs, etc.) | ||
ICE (refrigerators with icemaker only)
| PROBLEM | POSSIBLE CAUSES | WHAT TO DO |
| Refrigerator is leaking water | Plastic tubing was used to complete water connection. | The manufacturer recommends using copper tubing for installation. Plastic is less durable and can cause leakage. The manufac-turer is not responsible for property damage due to improper installation or water connection. |
| Improper water valve was installed. | Check water connection procedure in your Installation Instructions. Self-piercing and "3/16" saddle valves cause low water pressure and may clog the line over time. The manufacturer is not responsible for property damage due to improper installation or water connection. | |
| Ice forms in inlet tube to ice maker | Water pressure is low. | Water pressure must be between 20 to 100 pounds per square inch to function properly. A minimum pressure of 35 pounds per square inch is recommended for refrigerators with water filters. |
| Freezer temperature is too high. | See controls section in chapter called Installing Your Refrigerator on how to adjust your controls. Freezer is recommended to be between -18 to -17°C. | |
| Water flow is slower than normal | Water pressure is low. | Water pressure must be between 20 to 100 pounds per square inch to function properly. A minimum pressure of 35 pounds per square inch is recommended for refrigerators with water filters. |
| Improper water valve was installed. | Check water connection procedure in your Installation Instructions. Self-piercing and "3/16" saddle valves cause low water pressure and may clog the line over time. The manufacturer is not responsible for property damage due to improper installation or water connection. |
puede also be protected by guards as a means of ensuring the safety of people in the area.
CAJONES
VERDULEROS CON CONTROL DE HUMEDAD
Para retiring el compartmento:
Para reinstalar el compartmento:
Para reinstalar el compartmento:
FAST HYLLA I FRYSFACKET
SKJUTBAR HYLLA I FRYSFACKET
JAAKAAPIN ASSETTAMINEN VAAKASUORAAN
HUOMAA
WAT ALS DE KOELKAST SCHUDT?
(SOLO IN ALCUNI MODELLI)
(SOLO IN ALCUNI MODELLI)
Foreta overstaende prosedyre i revers.
SPILLSAVERTM EASYGLIDETM (ENKELTE MODELLER)
Foreta overstaende prosedyreirevers.
BAKRE HYLLEGJERDE (ENKELTE MODELLER)
Foreta overstaende prosedyre i revers.
DORTRAU
Foreta overstaende prosedyre i revers.
TILLYKKE MED DIT NYE KOLESKAB!
Temperaturregulating. 130
Funktionerikoleldelen 131-132
ABNE OPBEVARINGSBOKSE
Du kan opbevare mange forskellige ting i de abne opbevaringsbokse.
Fjerne abne opbevaringsbokse:
OPBEVARING I FRYSERDØREN
FAST DØRHYLDE
Den feste dorhylde gort det muligt at opbevarre frose nfedevarer i fryserdoren.
Fjerne hylde:
TONOThetaTHS AABHSTHE IOPTAS SYNTHPHSE
Eav tonotheite Tc lae cya npwn fopna, n lah nTnnptaouvtipnncpkioketai eoa aTo xwpO uovtnponnc. Ta diakoountika Tnla hnepeiaabavovtai otuokeuaoia to uko TKunpiowc.
ApaepoTe TIC BiEc EaywviKnc KepaInc Y4" (6,4 mm) ano TnV npooyn Tnnpotac e eva kEidi.
Eav aaaaetene popa aoivmuos nnpotac, aapaepote tic diaokauntikec tanec ano tv aaan paupa tnc
nopTac KAI TOnoBtnoTe TIC OTIC ONeT Twv Biow Tou apalpeate.
Evuypauiote Tc ones TnC
aBns tC oneTow biow
OTNV npooyn Tnc nopTac KAI
OTEPEwTe Tn Abn e duo
ano tic BiEc nou eixate
aepoei nponyouevoc.
Evtoniote Ta diakooantika Tc, aBnc otouakeuaia me to uiko TKnpiwang kai tonoetote ta oTo enawkai katw epoc nL aBnc.
Eav to np68nma eniive:
Apaipote Taoupapia kal tonoetntote Ta 0To eIavw paTou xwpou ouvtnponnc.
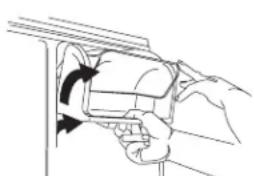
AMPTHPEXQPOY SYNTHPHSE

ApaieoTe Tn 3i0a ano to kaiumu taWv AauTTnpw. DualeTe TIV yia apyotepa.
Supete to kaiumu npoc ta niow yia va to anoanaeTe ano n diataen
ApaapeoTe touaunTpeC.
AvtakataoTheoucueaunnpesuyeiou, 1xuocnoueivepaiveTa40W.
Enavatono8eTnTo KaLumaw
Aaunnpwv, TOno8etovTac Tg YawTIDc
tou meo atic EideKcOnc nou pioKovtai
ekatepwev TNC diataen GwTIOOU.
UpeTe To KALUMa npoc Ta eunpoc,
mexpic otou aopaioei OTOeON Tou.
MHN aoknoete duvaon oTo KAUMa
nepav Tou onueiou aoPaioc Tou. KatI
Teto Ev6exTa va npokaeezieta oTo
kALUMa.
EnavatoonoeetnTo Bida oTo kaLmua Tov λaunnpw.
Aauntnpaacxwpou katauueNc
Piote a TIC NIOw yawTIDcTou KAUmuTOC TOAauNTnpa KAI TpaBnETo KaUmuia iOa npoc taKAT.
AcpoeoTe to lacnnnpa.
AvtikataoToteu aunmpa yuyeiou, 1xuoou eiv t40W.
TOOnoBETnOte TIG eunpoc yawTIDcTou KAUmuAtoc OTc avTIOxEc OeC KAI "KoumWTe" To niow mepoc navw ano TNI diataEn Wtioaou, Etoi wote va aaoaiaoov Ka o Niow yawTIDc.
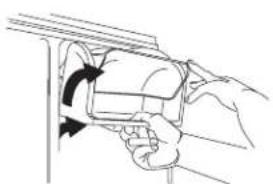
REMOÇÃO E TROCA DE LÁMPÁDAS
ADVERTÉNCIA
SABIT DONDURUCU RAFI
Rafi qikartmak icin:
Rafi tum ilavesiyde disari dokru cekin.Rafin onunu yukari dokru egin ve di sariya direk减免n.

- HOW TO OBTAIN REPLACEMENT PARTS AND SERVICES?
- KEEP INSTRUCTIONS FOR FUTURE REFERENCE!
- WHAT IF THESE FEATURES ARE DIFFERENT FROM MINE?
- CONTENTS
- IMPORTANT SAFETY INFORMATION
- RECOGNIZE SAFETY SYMBOLS, WORDS, LABELS
- DANGER
- WARNING
- CAUTION
- WHAT YOU NEED TO KNOW ABOUT SAFETY INSTRUCTIONS
- INSTALLING YOUR REFRIGERATOR
- STEPS TO FOLLOW...
- HOW TO REMOVE WOODEN BASE
- INSTALLING FRESH FOOD FRONT-MOUNT HANDLE
- INSTALLING FREEZER HANDLE
- HOW TO REMOVE AND REPLACE DOORS AND HINGES
- REMOVING FRESH FOOD FRONT-MOUNTED HANDLE
- REMOVING FREEZER HANDLE
- TOOLS NEEDED:
- FOR PULLOUT DRAWER ONLY:
- WHAT IF MY REFRIGERATOR ROCKS?
- TEMPERATURE CONTROLS
- INITIAL SETTING
- TEMPERATURE ADJUSTMENTS
- TEMPERATURE TEST
- MATERIALS NEEDED:
- FREEZER
- REFRIGERATOR
- FRESH FOOD FEATURES
- INTERIOR SHELVES
- FULL-WIDTH SHELVES
- SPILLSAVERTM
- SPILLSAVERTM EASYGLIDETM
- REAR SHELF EXTENSIONS
- To remove shelf extension:
- DOOR STORAGE
- DAIRY CENTER
- Toremove:
- DOOR BUCKETS
- To remove buckets:
- Toreinstall buckets:
- DOOR RETAINER
- To remove:
- To reinstall:
- WINE TRIVET/CAN RACK
- FRESH FOOD FEATURES, CONT.
- DRAWERS
- HUMIDITY-CONTROLLED CRISPER DRAWERS
- LOW
- HIGH
- TEMPERATURE-CONTROLLED DRAWERS
- Deli/Crisper and Fresh Food Pantry
- Controls
- SNACK DRAWER
- To remove drawers:
- Toreinstall drawers:
- To remove and install glass and frame:
- Toreinstall:
- If refrigerator door does not open far enough to remove drawers:
- FREEZER FEATURES
- AUTOMATIC ICE MAKER
- SHELVES
- ICE SERVICE RACK (SELECT MODELS)
- Tinstall rack:
- To remove rack:
- FIXED FREEZER SHELF
- To remove shelf:
- Toreinstall shelf:
- GLIDE-OUT FREEZERSHELF
- WIRE BASKET
- To remove basket:
- Toreinstall basket:
- FIXED DOOR SHELF
- TILT-OUT BIN (SELECT MODELS)
- Toreinstalldloor shelf:
- ACCESSIONS
- ICE CUBE TRAY
- CARE AND CLEANING
- STAINLESS STEEL
- BEFORE YOU CALL
- OPERATION
- CAJONES
- VERDULEROS CON CONTROL DE HUMEDAD
- Para reinstalar el compartmento:
- FAST HYLLA I FRYSFACKET
- SKJUTBAR HYLLA I FRYSFACKET
- JAAKAAPIN ASSETTAMINEN VAAKASUORAAN
- HUOMAA
- WAT ALS DE KOELKAST SCHUDT?
- SPILLSAVERTM EASYGLIDETM (ENKELTE MODELLER)
- BAKRE HYLLEGJERDE (ENKELTE MODELLER)
- DORTRAU
- TILLYKKE MED DIT NYE KOLESKAB!
- ABNE OPBEVARINGSBOKSE
- Fjerne abne opbevaringsbokse:
- OPBEVARING I FRYSERDØREN
- FAST DØRHYLDE
- Fjerne hylde:
- TONOThetaTHS AABHSTHE IOPTAS SYNTHPHSE
- Eav to np68nma eniive:
- AMPTHPEXQPOY SYNTHPHSE
- Aauntnpaacxwpou katauueNc
- REMOÇÃO E TROCA DE LÁMPÁDAS
- ADVERTÉNCIA
- SABIT DONDURUCU RAFI
Brand : AMANA
Model : XRBR 904
Category : Fridge