
Z29852B - Scale SILVERCREST - Free user manual and instructions
Find the device manual for free Z29852B SILVERCREST in PDF.
| Product type | Digital kitchen scale |
| Brand | SilverCrest |
| Model | Z29852B |
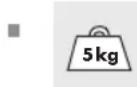
| Maximum capacity | 5 kg / 11 lb |
| Accuracy | 1 g / 0.1 oz |
| Weight units | gram (g), pound:ounce (lb:oz) |
| Volume units | milliliter (ml), fluid ounce (fl'oz) for water and milk |
| Power supply | 1 CR2032 lithium battery (included) |
| Display | LCD with mode and tare indicators |
| Functions | Weighing, tare, zeroing, unit conversion, add-and-weigh, water/milk volume display, auto-off after 2 min |
| Weighing platform | Included, removable, food-safe |
| Materials | Plastic, electronic components |
| Safety | Do not overload beyond 5 kg, do not immerse, keep out of reach of children, use batteries correctly |
| Cleaning and maintenance | Clean with a slightly damp cloth, no abrasive cleaners, do not immerse |
| Used batteries | Do not dispose of in household waste, recycle at collection points |
| Warranty | 3 years from date of purchase, upon presentation of receipt |
| Package contents | Scale, platform, CR2032 lithium battery, instruction manual |
| Food compatibility | Platform suitable for contact with food |
| Country of origin | Not specified |
Frequently Asked Questions - Z29852B SILVERCREST
User questions about Z29852B SILVERCREST
0 question about this device. Answer the ones you know or ask your own.
Ask a new question about this device
Download the instructions for your Scale in PDF format for free! Find your manual Z29852B - SILVERCREST and take your electronic device back in hand. On this page are published all the documents necessary for the use of your device. Z29852B by SILVERCREST.
USER MANUAL Z29852B SILVERCREST
Operation and Safety Notes
SE
KÖKSVAG
GB/IEOperation and Safety NotesPage 4
Proper Use.
Description of Parts . 5
Technical Data . 5
Features
Supply Scope.. 6
Safety Instructions
General Safety Instructions
Battery Safety Instructions.. Page 7
Getting started
Replacing the battery.. 8
Unit conversion button.. 8
Weighing. 9
Weigh and add . Page 9
Removing part of the weight from the kitchen scale.. Page 10
Automatic or manual switch-off Page 10
Volume units display mode.. Page 10
Troubleshooting
Cleaning
Disposal
Warranty
Introduction
Kitchen Scale
Introduction

Before assembling and using the device for the first time, take time to familiarise yourself with the product first. Read the
following assembly instructions and safety instructions carefully. Only use the product as described and for the designated areas of application. Please keep these instructions in a safe place. If you hand this product on to a third party, you must also pass on all documents relating to the product.
Proper Use
This appliance is designed to weigh household quantities of foods. The digital kitchen scale measures the weight of non-aggressive, non-corrosive and non-abrasive liquids or solids. It is not intended for weighing medication or prohibited materials. Any use other than that described above or any modification of the product is not permissible and will result in damage. Misuse may also result in other life-threatening risks and injury. The product is for private use only and is not intended for medical or commercial use.
Description of Parts
1
2
3
Weighing bowl
Kitchen scale
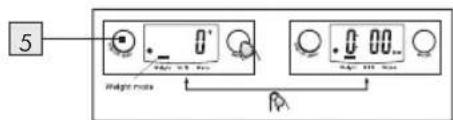
Mode setting button (Weight Milk Water)
4 LC display
5 On/Off & Zero button (hare) (On/Off/Zero)
6 Weighing platform
7 Battery compartment cover clip
8 Battery compartment cover
9 Gram/lb:oz unit conversion button
10 Battery metal contact - spring action
11 Battery embedding case
12 Battery black locking tab
13 Battery compartment cover extension
14
2 notches on the edge of the battery compartment opening
15
Battery compartment
16
Battery isolating strip
LC display:
[ \boxed{17} \quad "g" = \text{weight unit indication (gram)} ]
18 "ml" = volume unit indication (millilitre)
19 "fl'oz" = volume unit indication (fluid ounce)
20 "lb:oz" = weight unit indication (pound: ounce)
21"-" = sign over "Water" = measuring water
volume mode (ml or fl'oz water)
22"-" = sign over "Milk" = measuring milk volume mode (ml or fl'oz milk)
23"-" = sign over "Weight" = weighing mode (gram or lb:oz)
24 "0" icon = zero weight (bottom left corner of the LC display)
25 "--"icon negativevalue
(left side of LC display)
26 "T" icon = tare weight
(top left corner of the LC display)
Technical Data
Weighing range: 0.1 oz - 11 lb (pounds) / 1 g - 5 kg (kilograms)
Graduation: 0.1 oz/1 g
Battery: 1x3V lithium battery
(CR2032 Lithium round cells / included)
Features
□ Indicators for volume units for water and milk.
Two different weight unit systems - grams (g) or pounds (lb:oz), switchable.
LC displays warning symbol to indicate "Low battery power"/"Overload".
High precision strain gauge sensors.
Zero reset or tare function.
Auto-off function: switches the device off if not used for two minutes to save power.
Introduction / Safety Instructions
Manual switch off: press the On / Off / Zero button 5 and keep it pressed for three seconds.
Supply Scope
After unpacking the delivery, please check immediately that it contains all parts and that the appliance is in perfect condition.
1 x digital kitchen scale
1 x weighing bowl
1 x lithium battery (pre-installed inside the battery case)
1 x operating manual
- Safety Instructions

GeneralSafety Instructions

WARNING! DANGER TO LIFE
AND RISK OF ACCIDENTS FOR INFANTS AND CHIL
DREN! Never leave children
unattended with packaging materials or the product. There is otherwise a risk of fatal injury by suffocation. Always keep children away from the product. This is not a toy.
This appliance can be used by children aged from 8 years and above and persons with reduced
physical, sensory or mental capabilities or lack of experience and knowledge if they have been given supervision or instruction concerning use of the appliance in a safe way and understand the hazards involved. Children shall not play with the appliance. Cleaning and user maintenance shall not be made by children without supervision.
CAUTION! RISK OF INJURY! Do not ex
ceed the 5kg capacity of the scale. This could damage the product.
Do not expose the product to
- extreme temperatures,
-strong vibrations, - heavy mechanical loads,
direct sunlight,
-magnetic fields, - moisture.
These can damage the product.
This appliance has delicate electronic components. This means that if it is placed near an object that transmits radio signals, it could cause interference. This could be, for example, mobile telephones, walkie talkies, CB radios, remote controls and microwaves. If the display indicates a problem, move such objects
Safety Instructions
away from it.
Electromagnetic interference/ high-frequency emissions can lead to the appliance failing. In cases of the appliance failing to work remove the battery for a short while and then replace it. Do this as described in the "Replacing the battery" section.
Check the product for damage before use. Never use a damaged product.
WARNING! Never open the housing of the product. This can result in injury and damage to the product. Repairs must be carried out by an electrician only. Do not allow anyone inexperienced to use the product. Make sure that anyone intending to use the product has read the operating manual and is capable of operating the product safely. Place the product on a solid, horizontal and flat surface.
FOOD-SAFE!This product has no adverse effect on taste or smell. (Weighing bowl)
Not suitable for microwaves!
The product is not suitable for dishwasher.

BatterySafety Instructions
WARNING! DANGER TO
LIFE!Keep batteries out of the reach of children. Do not leave batteries lying around. There is a risk of children or animals swallowing them. Consult a doctor immediately if a battery is swallowed.
EXPLOSIONHAZ
ARD! Never recharge, short-circuit and / or open batteries. This can cause them to overheat, burn or burst. Never throw batteries into fire or water. The batteries may explode.
- Avoid extreme conditions and temperatures which can affect batteries, e. g. heaters. Otherwise there is an increased risk of leakage.
Check regularly that the battery is not leaking.
Leaked or damaged batteries can cause
chemical burns if they come into contact with the skin; in such cases you must wear suitable protective gloves.
Avoid contact with the skin, eyes and mucous membranes if fluid has leaked from the battery. In
Safety Instructions / Getting started
the event of contact with battery acid, rinse the affected area with plenty of clean water and consult a doctor immediately.
Remove light dirt from the battery and product contacts with a dry, non-flushing cloth before inserting the batteries.
Remove the battery from the product if it is not in use for any length of time.
Make sure that the polarity is correct when you insert the battery. This is indicated in the battery compartment. The battery can otherwise explode.
Insert the battery with care. The product can otherwise be damaged.
Please do not dispose of used batteries in your household waste but take them to a designated collection depot for special waste.
Getting started
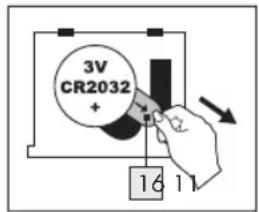
- Open the battery compartment 15 under the scale by pushing the clip 7 on the battery compartment cover 8 towards the battery compartment and lift up the cover.
- Remove the battery isolating strip 16 from under the battery metal contact to which it is attached.
- Place the battery compartment cover 8 back on the battery compartment 15. Ensure that the two extensions 13 on the battery compartment
cover 8 fit into the two notches 14 on the edge of the battery compartment opening when the cover is closed. Press the battery compartmentcover 8 firmly on to the battery compartment 15 until you hear it engage.
- Replacing the battery
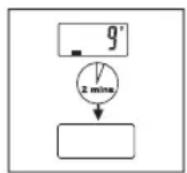
- Switch off the scale. Press and hold down the On/Off/Zero button 5 for 3 seconds.
- Open the battery compartment 15 as described above.
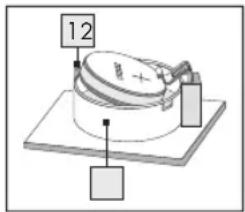
- Remove the exhausted batteries from the battery embedding case [1] by pressing the black battery locking tab [12]. The battery is automatically released from the battery embedding case [11]. Ensure that you do not exert too much force on the contact [10], otherwise it could be damaged by over-bending as the battery is lifted. Remove the battery from the battery embedding case [11].
- Insert a new battery into the battery embedding case [1]. Make sure you fit the battery the right way round (polarity). The "+" side must face upwards. The metal contact [10] presses battery into position.
- Close the battery compartment 15 as described above.
- Unit conversion button
The unit conversion button for the units of weight can be found on the bottom of the kitchen scale. By simply pressing the button the units of measure change between metric (g, ml) and imperial (lb:oz, fl'oz).
Note:
If the units of weight are set to metric (g) then the units of volume will be automatically shown as ml.
Getting started
If the units of weight are set to imperial (lb:oz) then the units of volume will be automatically shown as fl'oz.
The standard unit of weight is g.
Weighing
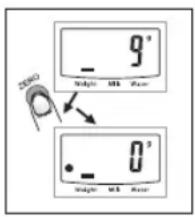
Note: The kitchen scale 2 always starts from 0g/ 0:0.0 lb:oz 17/20 if the On/Off/Zero button 5 is pressed. If you place the weighing bowl 1 on to the kitchen scale 2 before switching on, it will also start from 0g/0:0.0 lb:oz 17/20. If you place the weighing bowl 1 on the kitchen scale 2 after it has been switched on, then the display will show the weight of the weighing bowl 1.
Press the On/Off/Zero button 5 once to reset the display to 0g / 0:0.01b:0z 17/20
Place the kitchen scale on a solid, flat surface.
Press the On/Off/Zero button 5 to switch on the kitchen scale 2.
Wait until the LC display 4 stops and stabilizes
on 0g 17, 0:0.0 lb:oz 20 or 0ml 18 or 0.0 fl'oz 19, which will be the mode the kitchen scale was in when it was last switched off.
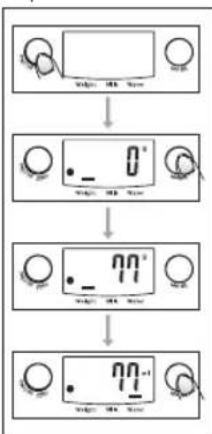
Press the mode setting button 3 to set the kitchen scale to the normal weighing mode 23
If necessary select the units of weight in advance by pressing the g / lb:oz unit conversion button on the bottom of the kitchen scale before you start weighing.
When you have selected the units of weight press and hold down the On/Off/Zero button5 for 3 seconds to switch off the kitchen scale2.
Stand the kitchen scale 2 on a hard, flat table surface. Place the weighing bowl 1 on the weighing platform 6.
Press the On/Off/Zero button 5 to switch on the kitchen scale in the normal weighing mode.
Wait until all the segments of the LC display 4 have illuminated and the kitchen scale has stabilized at O g17,0:0.0 lb:oz20.
Place the substance to be weighed into the weighing bowl 1 to start the weighing process. The LC display 4 shows the weight of the substance in the weighing bowl in the selected unit of weight.
Note: The kitchen scale works without the weighing bowl in the same way. Simply follow and repeat the above steps without the weighing bowl.
- Weigh and add
The kitchen scale 2 allows you to carry out consecutive weighings without emptying the weighing bowl 1 between weighings.
Place the weighing bowl 1 on the weighing platform 6.
Press the On/Off/Zero button 5 to switch on the kitchen scale 2.
Wait until the LC display 4 stops and stabilizes on O g17,0:0.0 lb:oz20 or 0 ml18 or 0.0 fl'oz19, which will be the mode the kitchen scale was in when it was last switched off.
Press the mode button 3 to set the scale to weighing mode 23 (preset to g or lb:oz).
Place the substance to be weighed into the weighing bowl 1 to start the weighing process. The LC display 4 shows the weight of the first substance placed in the weighing bowl.
Press the On/Off/Zero button 5 to reset the LC display 4 to zero.
You can add further substances into the weighing bowl in the same way and pressing the On/Off/Zero button 5 between each new substance.

Getting started
Note for zero or tare setting:
a) If the total weight of all the substances already placed on the kitchen scale including the weighing bowl is less than 200 g, then the LC display 4 shows the "0" icon 24 in the bottom left corner. This means that the kitchen scale has been reset to zero = the remaining weight capacity of the kitchen scale remains between 5000 and 5200 g.
b) If the total weight of all the substances already placed on the kitchen scale including the weighing bowl is more than 200g , then the LC display 4 will show the "T" icon 26 instead in the top
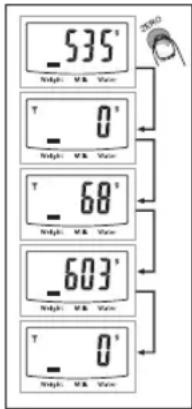
left corner. This means that the kitchen scale is in tare mode = the remaining weight capacity of the kitchen scale is 5000g minus the weight of substances already placed on the kitchen scale.
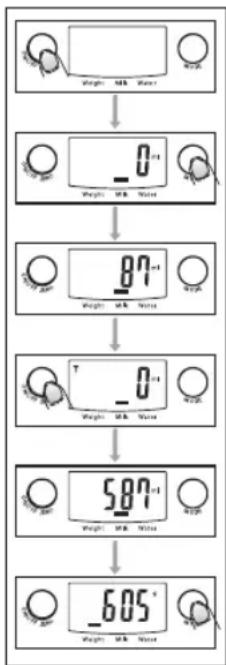
- Removing part of the weight from the kitchen scale
Place the weighing bowl 1 on the weighing platform 6.
Note: The container bowl must not exceed 200g .
Press the On/Off/Zero button 5 to switch on the kitchen scale 2.
Wait until the LC display 4 stops and stabilizes on 0g 17, 0:0.0 lb:oz 20 or 0 ml 18 or 0.0 fl'oz 19, which will be the mode the kitchen scale was in when it was last switched off.
Press the mode button 3 to set the weighing mode 23 (preset to g or lb:oz).
Place the substance to be weighed into the weighing bowl 1 to start the weighing process. The LC display 4 shows the weight of the first substance placed in the weighing bowl.
Press the On/Off/Zero button 5 to reset the
LC display 4 to zero.
Now remove the desired amount of substance from weighing bowl 1. The LC display 4 shows the weight of the substance removed from the weighing bowl as a negative value.
Automatic or manual switch-off
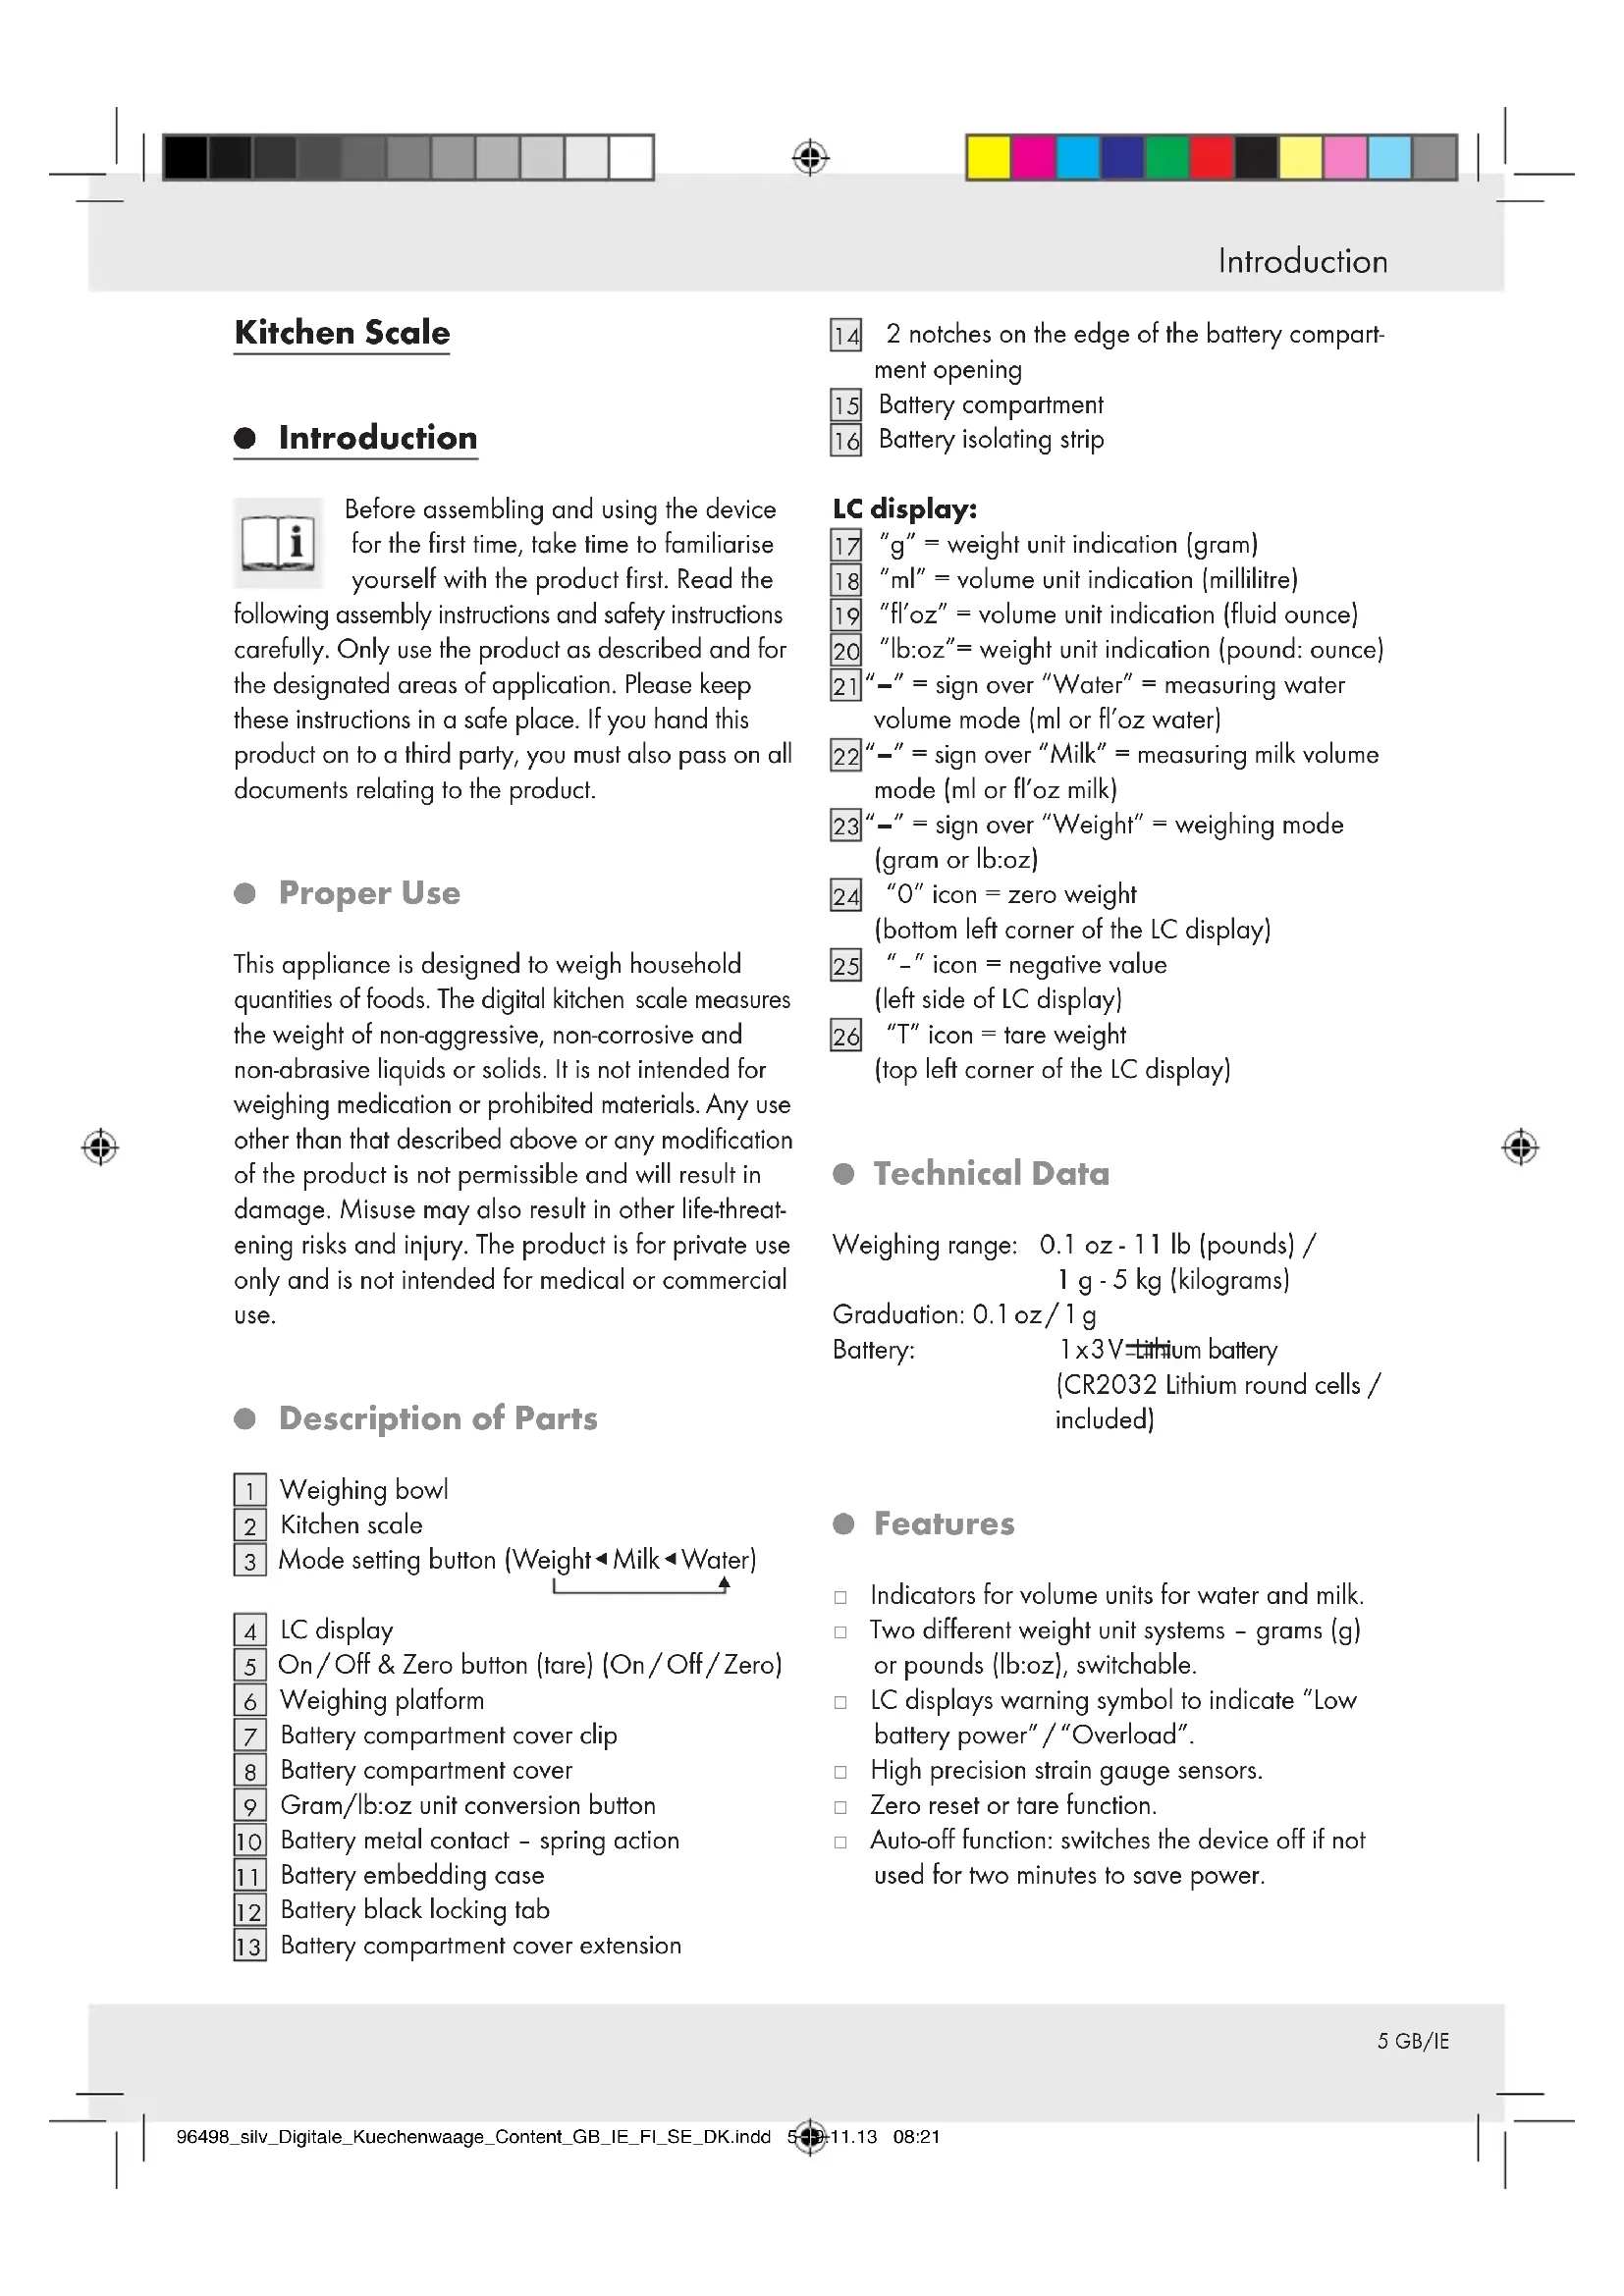
The kitchen scale switches itself off automatically if it has not been used for 2 minutes.
Press the On/Off/Zero button 5 for longer than 3 seconds to switch off the kitchen scale.
Volume units display mode
Place the kitchen scale on a solid, flat surface.
Press the On/Off/Zero button 5 to switch on the kitchen scale 2.
Wait until the LC display 4 stops and stabilizes on 0g17,0:0.0lb:oz20 or Oml18or 0.0 fl'oz19, which will be the mode the kitchen scale was in when it was last switched off.
Press the mode button 3 until milk 22 or water 21 appears as the volume mode with the units as ml or fl'oz.
Place a container for liquid or the weighing bowl 1 on the weighing platform
Press the On/Off/Zero button 5 to set the LC display 4 to zero (0 ml or 0.0 fl'oz). Pour milk or water (as selected previously) into the container.
The LC display 4 now automatically shows the volume of liquid poured into the container, either in ml or in fl'oz, depending on the setting.
Then press the mode button 3 to set the kitchen scale to weighing mode again and read off the equivalent weight of the liquid.
Troubleshooting / Cleaning / Disposal / Warranty
Troubleshooting
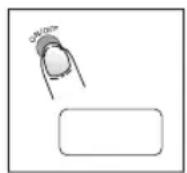
| Error Cause Solution | ||
| The LCD readout4 indicates“Err” and does not change. | The maximum capacity of the kitchen scale 2 of 5 kg/11 lb has been exceeded. | Remove the food from the kitchen scale 2. Switch the kitchen scale 2 off and then back on again. Reduce the amount of food and weigh it in several steps. |
| The LCD readout4 indicates“Lo”. | The battery is empty. | Replace the battery as described in the “Replacing the battery” chapter. |
| It is not possible to switch the kitchen scale 2 on. | The battery may be empty. | Replace the battery as described in the “Replacing the battery” chapter. If it is still not possible to switch the kitchen scale 2 on, please contact a specialist. |
- Cleaning
Clean the product with a slightly dampened, non-fluffing cloth. To remove more stubborn dirt, you can also dampen the cloth with a weak soap solution.
Do not use chemical cleaners, scouring agents or sharp objects for cleaning. These can damage the product.
Never immerse the product in water or other liquids. This can damage the product.
Disposal

The packaging is made entirely of recyclable materials, which you may dispose of at local recycling facilities.
Contact your local refuse disposal authority for more details of how to dispose of your worn-out product.
To help protect the environment, please dispose of the product properly when it has reached the end of its useful life and not in the household waste. Information on collection points and their opening hours can be obtained from your local authority.
Faulty or used batteries must be recycled in accordance with Directive 2006/66/EC. Please return the batteries and / or the device to the available collection points.

Environmental damage through incorrect disposal of the batteries!
Batteries may not be disposed of with the usual domestic waste. They may contain toxic heavy metals and are subject to hazardous waste treatment rules and regulations. The chemical symbols for heavy metals are as follows: Cd = cadmium, Hg = mercury, Pb = lead. That is why you should dispose of used batteries at a local collection point.
Warranty
The device has been manufactured to strict quality guidelines and meticulously examined before delivery. In the event of product defects you have legal rights against the retailer of this product. Your legal rights are not limited in any way by our warranty detailed below.
The warranty for this device is 3 years from the date of purchase. Should this device show any fault in materials or manufacture within three years from
Warranty
the date of purchase, we will repair or replace it - at our choice - free of charge to you.
The warranty period begins on the date of purchase. Please keep the original sales receipt in a safe location. This document is required as your proof of purchase. This warranty becomes void if the device has been damaged or improperly used or maintained.
The warranty applies to faults in material or manufacture. This warranty does not cover product parts subject to normal wear, thus possibly considered consumables (e.g. batteries) or for damage to fragile parts, e.g. switches, rechargeable batteries or glass parts.
C
12 GB/IE
Johdanto
WAARSCHUWING! LEVENSGEVAAR EN
KANS OP ONGELUKKEN VOOR PEUTERS EN KINDE

- KÖKSVAG
- Safety Instructions
- Getting started
- Introduction
- Kitchen Scale
- Proper Use
- Description of Parts
- LC display:
- Technical Data
- Features
- Introduction / Safety Instructions
- Supply Scope
- - Safety Instructions
- GeneralSafety Instructions
- WARNING! DANGER TO LIFE
- AND RISK OF ACCIDENTS FOR INFANTS AND CHIL
- CAUTION! RISK OF INJURY! Do not ex
- BatterySafety Instructions
- WARNING! DANGER TO
- EXPLOSIONHAZ
- - Replacing the battery
- - Unit conversion button
- Note:
- Weighing
- - Weigh and add
- Note for zero or tare setting:
- - Removing part of the weight from the kitchen scale
- Automatic or manual switch-off
- Volume units display mode
- Troubleshooting / Cleaning / Disposal / Warranty
- Troubleshooting
- - Cleaning
- Disposal
- Environmental damage through incorrect disposal of the batteries!
- Warranty
- Johdanto
- WAARSCHUWING! LEVENSGEVAAR EN
- KANS OP ONGELUKKEN VOOR PEUTERS EN KINDE
Brand : SILVERCREST
Model : Z29852B
Category : Scale