KM 250 A1 - Food Processor SILVERCREST - Free user manual and instructions
Find the device manual for free KM 250 A1 SILVERCREST in PDF.
User questions about KM 250 A1 SILVERCREST
0 question about this device. Answer the ones you know or ask your own.
Ask a new question about this device
Download the instructions for your Food Processor in PDF format for free! Find your manual KM 250 A1 - SILVERCREST and take your electronic device back in hand. On this page are published all the documents necessary for the use of your device. KM 250 A1 by SILVERCREST.
USER MANUAL KM 250 A1 SILVERCREST
FOOD PROCESSOR KM 250 A1
GB IE
FOOD PROCESSOR
Operating instructions
FR BE
ROBOT MÉNAGER
Mode d'emploi
DE AT CH
KUCHENMASCHINE
Bedienungsanleitung
DK
FOODPROCESSOR
Beteningsvejledning
NL BE
KEUKENMACHINE
Gebruksaanwijzing
IAN 102697
GB IE
Before reading, unfold the page containing the illustrations and familiarise yourself with all functions of the device.
DK
GB/IE Operating instructions Page 1
| DK | Betjeningsvejledning | Side | 11 |
| FR/BE | Mode d'emploi Page 21 | ||
| NL/BE | Gebruiksaanwijzing Pgina 31 | ||
| DE/AT/CH | Bedienungsanleitung Seite 41 |
Table of Contents
Introduction. 2
Proper use. 2
Package contents 2
Appliance description. 2
Technical details 2
Safety instructions 3
Before first use 5
Assembling the appliance 5
Cutting blades 5
Food processing attachments 6
Operation 6
Using the cutting blades 6
Working with the food processor 7
Cleaning and care. 8
Storage 8
Disposal. 9
Service. 9
Importer 9
Troubleshooting 10
Introduction
Congratulations on the purchase of your new appliance.
You have selected a high-quality product.
The operating instructions are part of this product. They contain important information on safety, use and disposal. Before using the product, familiarise yourself with all operating and safety instructions. Use this product only as described and only for the specified areas of application. Please also pass these operating instructions on to any future owner(s).
Proper use
This appliance is intended exclusively for chopping and processing food. This appliance is intended exclusively for use in domestic households.
Not to be used for commercial purposes.
Package contents
Food processor
(lid, pusher, bowl, motor unit)
Cutting blades
Disc adapter
Grater attachment
Slicer attachment
Operating instructions
Check the delivery contents for completeness immediately after unpacking.
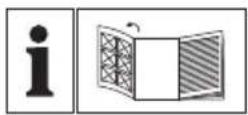
Appliance description
Pusher
Feed tube
Lid
Cutting blades
Bowl
6 Driveshaft
Motor unit
8 ON button
OFF/PULSE button
10 Disc adapter
Grater attachment
12 Slicerattachment
Technical details
Rated voltage: 220-240 V , 50 Hz
Nominal power: 250 W
Protection class: II
CO time: 1 minute
CO time
The CO time (continuous operation time) is the amount of time an appliance can be operated without the motor overheating and becoming damaged. When the specified CO time has been reached, the appliance must be switched off until the motor has cooled down to room temperature.
Safety instructions
- The appliance must only be connected to correctly installed and earthed mains power sockets. Ensure that the rating of the local power supply corresponds with the details on the rating plate of the appliance.
- Ensure that the power cord does not become wet or moist during use. Route the cable in such a way that it cannot be crushed or damaged.
- Keep the power cord away from hot surfaces.
- Do not perform any repairs on the appliance. All repairs must be performed by our Customer Services or by qualified personnel.
- Remove the plug from the mains power socket when the appliance is being cleaned or in the event of a fault. Switching the appliance off is insufficient, since the appliance receives power for as long as the plug is connected to the mains power socket.
- To avoid risks, arrange for defective plugs and/or power cables to be replaced at once by qualified technicians or our Customer Service Department.
The appliance and its connecting cable must be kept away from children.

Never submerge the appliance in water or other liquids.
WARNING! RISK OF INJURY!
Always disconnect the appliance from the mains power supply when fitting or removing accessory parts. This will prevent unintentional activation of the appliance.
The appliance should always be disconnected from the mains when not supervised and before assembly, disassembly or cleaning.
- Only use the original accessory parts for this appliance. Accessory parts from other manufacturers may not be suitable, and this may lead to risks!
This appliance may be used by children aged 8 years or over if they are supervised or have been instructed how to use the appliance safely and have understood the potential risks. Cleaning and user maintenance tasks must not be carried out by children unless they are aged 8 years or over and are supervised. The appliance and its connecting cable must be kept away from children younger than 8 years old.
- Appliances can be used by persons with reduced physical, sensory or mental capabilities or lack of experience and knowledge if they are supervised or have been given instruction concerning use of the appliance in a safe way and if they understand the hazards involved.
Children must not play with the appliance.
- Caution: the cutting blades, the slicer attachment and the grater attachment are very sharp! For this reason, take care when cleaning.
- Caution: the cutting blades, the slicer attachment and the grater attachment are very sharp! For this reason, take care when emptying the bowl.
- When the appliance is operating, do not put anything other than the ingredients to be processed into the bowl.
- Never use the appliance for purposes other than those described in these instructions. Otherwise you run a risk of serious injury!
WARNING!RISKOFINJURY!
- To avoid personal injury and damage to the appliance, never insert or place your hands or any foreign objects into the feed tube.
- Do not change accessories unless the drive is stationary and the mixer is unplugged from the power supply! The appliance will run on for a short time after being switched off!
- Never leave the appliance unattended!
Before changing accessories or additional parts that are in motion during operation, the appliance must be switched off and disconnected from mains power.
Before first use
Remove all packaging materials from the appliance.
Clean the appliance as described in the section "Cleaning and care".
Ensure that all parts are completely dry before operating the appliance.
Assembling the appliance
NOTE
The appliance will not start until the bowl 5 and the lid 3 are correctly attached.
1) Place the motor unit ⑦ on a fl at surface so that the sucker feet can attach fi rmly and the appliance stands fi rmly in place.
2) Place the bowl 5 onto the motor unit 7 so that the arrow on the bowl 5 points towards the open lock symbol on the motor unit 7. Then turn the bowl 5 until the arrow points to the closed lock symbol and the bowl 5 clicks into place.
If you want to work with the cutting blades 4, assemble the appliance as described in the section "Cutting blades".
If you want to work with the food processing attachments, assemble the appliance as described in the section "Food processing attachments".
Cutting blades
1) Place the cutting blades onto the drive shaft. The flattened side of the drive shaft must correctly fit into the take up of the cutting blades. Otherwise the cutting blades cannot be properly attached.
2) Place the lid 3 onto the bowl 5 so that the arrow on the lid 3 coincides with the arrow and the opened lock symbol on the bowl 5.
3) Turn the lid 3 until the arrow on the lid 3 points to the arrow and the closed lock symbol on the bowl.
4) Place the pusher 1 into the feed tube 2.
5) Insert the plug into a mains power socket.
Food processing attachments
1) Select the desired attachment:
-the slicer attachment 12
or the grater attachment 11.
2) If another attachment is still installed: press the long metal tab of the attachment inwards and slide the attachment out of the disc adapter 10 using the metal tab as an aid. You can now lift the catch at the other end of the attachment out of the disc adapter 10.
3) Insert the new attachment with the catch first into the disc adapter 10.
4) Then carefully push the side with the large metal tab into the disc adapter ⑩. The best way to do this is to press with both thumbs on the outer edges of the attachment until it clicks completely into place in the disc adapter ⑩.
5) Place the disc adapter 10 with the attachment fitted onto the drive shaft 6. The fl attened side of the drive shaft 6 must correctly fit into the take up of the disc adapter 10. Otherwise the disc adapter 10 cannot be properly attached.
6) Place the lid 3 onto the bowl 5 so that the arrow on the lid 3 coincides with the arrow and the opened lock symbol on the bowl 5.
7) Turn the lid 3 until the arrow on the lid 3 points to the arrow and the closed lock symbol on the bowl 5.
8) Place the pusher 1 into the feed tube 2.
9) Insert the plug into a mains power socket.
Operation
Using the cutting blades
The cutting blades 4 can be used to chop foods such as onions or meat.
NOTE
Do not attempt to mix liquids with the cutting blades 4. These will over flow or spray out.
1) Fit the cutting blades 4 as described in the chapter "Assembling the appliance".
2) Cut the ingredients into pieces of approximately 2 - 3cm
3) Pour the ingredients in. Do not exceed the quantities specified in the following table.
| INGREDIENT | MAX. AMOUNT | SPEED |
| Bread max. 80 g ON | ||
| Cheese max. 150 g ON | ||
| Meat max. 300 g ON | ||
| Herbs max. 30 g ON | ||
| Garlic 80-200 g PULSE | ||
| Onions | max. 300 g PULSE | |
| Ice cubes | max. 140 g PULSE | |
NOTE
The speeds given in the table are intended as reference values. These can vary depending on the quality and quantity of the ingredients!
4) Close the lid ③.
5) Start chopping by pressing the ON button 8. Press OFF/PULSE button 9 once when all the ingredients have been chopped and you want to stop the appliance.
If you would like to continue to process the ingredients using the PULSE function, press the OFF/PULSE button 9 several times in succession until the ingredients are suffi cientsly chopped.
If ingredients stick to the sides of the bowl 5 or the blades:
-
Switch the appliance off.
-
Remove the lid 3.
-
Remove the ingredients from the cutting blades ④ and the inside using a dough scraper or a spoon.
-
Close the lid 3.
-
Restart the appliance.
NOTE
Only process meat that is boneless!
Do not allow the appliance to operate for long periods when chopping (hard) cheese. Otherwise the cheese will become too hot, start to melt and clump.
If you wish to add ingredients during the cutting process, add them via the feed tube 2! The appliance stops if the lid 3 is opened! Do not exceed the maximum quantities specified in the table when adding ingredients!
Working with the food processor
You can grate or slice food using the processor's attachments 1/12.
1) Select the required attachment and assemble everything as described in the chapter "Assembling the appliance".
2) Remove the pusher 1 from the feed tube 2.
3) Cut the food into pieces that will easily fit into the feed tube 2.
4) Start grating/slicing by pressing the ON button 8.
5) Then gradually add the food. Push the food in using the pusher without applying pressure. Do not exceed the quantities specified in the following table.
INGREDIENT SLICER ATTACHMENT
Apples/carrots max. 350g
Cucumber max. 1.5
Potatoes max. 350 g
Onions max. 200 g
INGREDIENT
Apples/carrots
Parmesan
Potatoes
Hard cheese (e.g. mature Gouda)
GRATER ATTACHMENT
max. 350g
max. 150g
max. 350g
max. 200g
NOTE
Do not prepare large quantities all at once, but in several portions. Empty the bowl 5 after each use.
Do not allow the appliance to operate for long periods when chopping (hard) cheese or chocolate. Otherwise the ingredients will become too hot, start to melt and clump.
Cleaning and care

WARNING RISK OF ELECTRIC SHOCK!
Always remove the plug from the mains power socket before cleaning the appliance.

Under no circumstances must the motor unit 7 be submerged in liquid! This could result in a potentially fatal electric shock and the appliance could be damaged.
- Never open the appliance housing! Otherwise there is a risk of a fatal electric shock.

WARNING RISK OF INJURY!
Take extreme care when cleaning the cutting blades 4, the slicer attachment 12 and the grater attachment 11.
These parts are extremely sharp!
CAUTION - PROPERTY DAMAGE!
Do not use solvents or abrasive cleaners. These will damage the surface of the appliance!
Do not use abrasive, aggressive or chemical cleaning agents! They could irreparably damage the surface!
NOTE
Always clean all parts immediately after use. This makes food residue easier to remove.
- Processing strongly staining foods, such as carrots, can lead to staining of the plastic parts on the appliance. This is not a defect in the appliance and will not adversely affect operation.
You can rub off discolourations using a little cooking oil.
Clean the motor unit 7 and the power cable with a damp cloth. Dry everything properly before re-using it.
Clean the bowl 5, the lid 3, the pusher 1, the cutting blades 4, the disc adapter 10, the slicer attachment 12 and the grater attachment 11 in warm washing up water. Afterwards, rinse all parts with clean water so that no detergent residue remain on the parts.
Dry all parts thoroughly, before re-using the appliance.
Storage
Store the cleaned appliance in a clean, dust-free and dry location.
Disposal

dispose of the appliance in normal domestic waste. This product is subject to the provisions of European Directive 2012/19/EU.
Dispose of the appliance via an approved disposal company or your municipal waste facility. Please observe the currently applicable regulations. Please contact your waste disposal centre if you are in any doubt.

The packaging is made from environmentally friendly material and can be disposed of at your local recycling plant.
Service

Service Great Britain
Tel.: 0871 5000 720 (£ 0.10/Min.)
E-Mail: kompernass@lidl.co.uk
IAN 102697

Service Ireland
Tel.: 1890 930 034
(0,08 EUR/Min., {peak})
(0,06 EUR/Min., (off peak))
E-Mail: kompernass@lidl.ie
IAN 102697
Hotline availability: Monday to Friday 08:00 - 20:00 (CET)
Importer
KOMPERNASS HANDELS GMBH
BURGSTRASSE 21
44867 BOCHUM
GERMANY
www.kompernass.com
Troubleshooting
| PROBLEM POSSIBLE CAUSE POSSIBLE SOLUTIONS | ||
| The appliance is not working. | The appliance is not connect- ed with a mains power socket. | Connect the appliance to a mains power socket. |
| The appliance is damaged. Contact Customer Services. | ||
| The appliance will not start. | The bowl 5 is not correctly clicked into place on the motor unit 7. | Check the placement of the bowl 5 and correct it if necessary. |
| The lid 3 is not/not correctly in place and closed. | Close the lid 3 correctly. | |
If the malfunction cannot be corrected with the above suggestions, or if you have determined that the malfunction may have other causes, please contact our Customer Service.
Indholdsfortegnelse
KOMPERNASS HANDELS GMBH
BURGSTRASSE 21
44867 BOCHUM
GERMANY
www.kompernass.com
Afhjælpning af fejl

intermittence:1 minute
KOMPERNASS HANDELS GMBH
BURGSTRASSE 21
44867 BOCHUM
GERMANY
www.kompernass.com
Dépannage
WAARSCHUWING! LETSELGEVAAR!
WAARSCHUWING! LETSELGEVAAR!
WAARSCHUWING LETSELGEVAAR!
KOMPERNASS HANDELS GMBH
BURGSTRASSE 21
44867 BOCHUM
GERMANY
www.kompernass.com
Problemen oplossen
(Deckel, Stopfer, Schüssel, Motorblock)
Schneidmesser
Scheibenadapter
Raspelscheibe
Schneidscheibe
Bedienungsanleitung
WARNING STROMSCHLAGGEFAHRI!
KOMPERNASS HANDELS GMBH
BURGSTRASSE 21
44867 BOCHUM
GERMANY
www.kompernass.com

KOMPERNASS HANDELS GMBH
BURGSTRASSE 21
44867 BOCHUM
DEUTSCHLAND/GERMANY
www.kompernass.com
Last Information Update · Tilstand of information
Version des informations · Stand van de informatie