SKMH 1100 A1 - Food Processor SILVERCREST - Free user manual and instructions
Find the device manual for free SKMH 1100 A1 SILVERCREST in PDF.
| Product type | Multifunction food processor |
| Brand | SilverCrest |
| Model | SKMH 1100 A1 |
| Power supply | 230 V ~/50 Hz |
| Maximum power | 1100 W (blender: 500 W, cooker: 1000 W) |
| Blender bowl capacity | 2 litres (max 1 litre at speed 10 or Turbo) |
| Number of speeds | 10 (1 to 10) |
| Temperature range | 37 °C to 100 °C + steam function (SF) |
| Main functions | Blending, beating, whisking, chopping, slicing, pureeing, emulsifying, steaming, boiling, stewing |
| Included accessories | Blender bowl, chopper knife, whisk, cooking basket, 2 steam baskets (flat and deep), water collector, spatula, measuring cap |
| Protection class | I (grounded) |
| Safety | Overheat protection, lid lock, overflow outlet, automatic shut-off in case of water shortage |
| Cleaning | Blender bowl, cap, chopper knife (without seal), cooking basket, whisk, spatula, water collector (without seal), steam baskets and lid dishwasher safe. Base unit to be cleaned with a damp cloth. |
| Maintenance | Descaling with white vinegar to remove limescale |
| Warranty | 3 years (HOYER Handel GmbH) |
Frequently Asked Questions - SKMH 1100 A1 SILVERCREST
User questions about SKMH 1100 A1 SILVERCREST
0 question about this device. Answer the ones you know or ask your own.
Ask a new question about this device
Download the instructions for your Food Processor in PDF format for free! Find your manual SKMH 1100 A1 - SILVERCREST and take your electronic device back in hand. On this page are published all the documents necessary for the use of your device. SKMH 1100 A1 by SILVERCREST.
USER MANUAL SKMH 1100 A1 SILVERCREST
natural_image
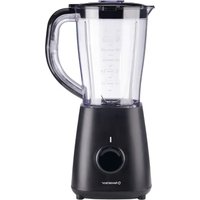
White Silver Crest kitchen blender with digital display and control panel (no visible text or symbols on device body)MONSIEUR CUISINE SKMH 1100 A1
GB IE
MONSIEUR CUISINE
Operating instructions
SE
MONSIEUR CUISINE
Bruksanvisning
FR BE
MONSIEUR CUISINE
Mode d'emploi
DE AT CH
MONSIEUR CUISINE
Bedienungsanleitung
FI
MONSIEUR CUISINE
Käyttöohje
DK
MONSIEUR CUISINE
Be sure to note the fold-out page.
Suomi 26
Huomioi taittosivu
Svenska 50
Beakta utvikssidan
Dansk 73
text_image
Exploded view diagram of a kitchen appliance with numbered parts and control panel for digital display


Contents
- Device description .... 2
- Names of parts (see fold-out page).... 3
- Technical data.... 3
- Safety information 4
- Unpacking and setting up 7
- Operating the appliance 8
- Using the blender jug 10
- Steaming 15
- Tips for steaming 18
- Cleaning and maintaining the appliance 19
- Malfunctions, causes and solutions.... 22
- Disposal.... 24
- HOYER Handel GmbH Warranty....24
Congratulations on the purchase of your new product.
You have selected a high-quality product. The operating instructions are a constituent part of this product. They contain important information about safety, use and disposal. Familiarize yourself with all the operating and safety instructions before using the product. Use the product only as described and for the stated spheres of application.
If you pass the product on to a third party, always pass on all the documentation as well.
1. Device description
1.1 Intended purpose
This SilverCrest SKMH 1100 A1 food processor is used for blending, whisking, beating, stirring, chopping, pulverising, puréeing, emulsifying, steaming, braising and cooking foods and food products.
These user instructions describe basic functions such as blending, chopping and steaming. You can find details on preparing specific recipes in the recipe book supplied. This appliance may be used only in dry rooms. It may not be used out of doors or in wet rooms.
This appliance is intended for private use and is not suitable for commercial purposes.
The appliance is not suitable for:
- use in staff kitchens in shops, offices and other commercial areas,
• use in agricultural settings, - customers in hotels, motels and other accommodation,
• bed-and-breakfast establishments.
2 GB

1.2 Contents of package
• 1 food processor, base unit
- 1 blender jug with:
- blade assembly
- lid for blender jug
- lid for blender jug's fill opening with measuring scale
• 1 cooking pot
- 1 mixer attachment
• 1 spatula
• 1 steamer attachment, comprising:
- condensed water drip tray
- steamer basket, deep
- steamer basket, shallow
- lids for steamer baskets
• 1 copy of the user instructions
• 1 recipe book
2. Names of parts (see fold-out page)
1 lids for steamer baskets
2 steamer basket, shallow
3 steamer basket, deep
4 drip tray
5 seal for drip tray
6 blender jug
7 Operating display
- red: Appliance is connected to the power supply but is not in operation
- blue: Appliance is in operation
8 Display
9 pulse button "TURBO"
10 timer "TIME"
11 "ON/OFF" button
12 speed control "SPEED"
13 temperature control "TEMP."
14 holder for blender jug
15 overflow hole
16 lock
17 base unit
18 suction feet
19 seal for blade assembly
20 blade assembly
21 cooking pot
22 mixer attachment
23 spatula
24 seal for lid of blender jug
25 lid for blender jug
26 lid for blender jug's fill opening with measuring scale
3. Technical data
Power supply: 230 V
Power: max. 1,100 W
\~/ 50 Hz
mixing: 500 W, cooking: 1,000 W
Protection class: 1
Maximum capacity of blender jug 6: 2 litre
CE
SKMH 1100 A1 3
GB


4. Safety information
4.1 Terminology
The following alerts are used in these user instructions:

Warning!
High risk: Ignoring this warning may result in injuries to limb.
Caution!
Moderate risk: Ignoring this warning could result in damage to property.
Note:
Slight risk: Points to be noted when handling the appliance.
4.2 Special information about this appliance

Warning! To avoid injury or damage, please observe the following information.
• The appliance may not be used by children.
- Keep the appliance and its mains power cable away from children.
- Do not allow children to play with the appliance.
- This appliance can be used by persons who have reduced physical, sensory or mental ability or lack experience and/or knowledge, provided they are supervised or instructed in the safe use of the appliance and have understood its associated hazards.
- While it is not under supervision and before it is assembled, disassembled or cleaned, the appliance should be disconnected from the power supply.
- Before you attach or replace an accessory, switch the appliance off and disconnect it from the power supply.
- Remember that the blades of the blade assembly 20 are extremely sharp:
- never touch them with your bare hands to avoid cutting yourself.
-when washing up by hand, the water should be clear enough for you to be able to see the blade assembly 20 easily to prevent you cutting yourself on its extremely sharp blades.
-when emptying the blender jug 6, ensure that you do not touch the blades of the blade assembly 20.
-when removing and attaching the blade assembly 20, ensure that you do not touch its blades. - When using the pulse function (see "6.8 Pulse function" on page 9), do not have any hot ingredients in the blender jug 6. These could spray out and lead to scalds.
- The appliance may not be operated on an external time switch or separate remote control system such as a radio-controlled power socket.
- Never immerse the base unit 17 in water.
- Never use abrasive, corrosive or scratching cleaning materials as these could damage the appliance.
4.3 General information
- Please read these user instructions carefully before use. They constitute a part of the equipment and must be available at all times.
- Use the appliance only for its described intended purpose (see "1.1 Intended purpose" on page 2).
- Check that the mains voltage required (see type plate on the appliance) is compatible with your mains voltage.
- Please note that any claim under the warranty or for liability will be invalidated if accessories are used that are not recommended in these operating instructions, or if original spare parts are not used for repairs. This also applies to repairs undertaken by unqualified persons. Contact details can be found in "Service Centre" on page 25.
- If the appliance becomes faulty during its warranty period, it may be serviced only by our Service Centre. Otherwise all claims under warranty are null and void.
4.4 Preventing electric shocks

Warning! The following safety regulations are intended to protect you against electric shocks.
- Connect the appliance only to an earthed mains socket as this provides protection against electric shocks.
- The appliance must never be used if it is damaged. In such cases have the appliance repaired by a qualified specialist. Contact details can be found in "Service Centre" on page 25.
• To avoid injuries, if the mains plug of the appliance becomes damaged, it must be replaced by the manufacturer or a similarly qualified person.
- Make sure that your mains power supply corresponds to the technical data for the appliance (see "3. Technical data" on page 3).
• Under no circumstances should water or other liquids be allowed to get into the base unit 17. Therefore:
- never use it outdoors
- never immerse the base unit 17 in water
- never place containers filled with liquid, such as drinking glasses, vases etc. on the appliance
- never use in very humid environments
- never use in the immediate vicinity of a kitchen sink, bath, shower or a swimming pool, as water may splash into the appliance.
If liquid should enter the appliance, unplug the mains plug immediately and have the appliance repaired by a qualified technician. Contact details can be found in "Service Centre" on page 25.
- Never touch the appliance, the power cable or the mains plug with wet hands.
- To disconnect the power cable, always take hold of the plug. Never pull on the cable.
• Make sure that the power cable is never kinked or compressed. - Keep the mains power cable away from hot surfaces (e.g. cooker hob).
- If you are not using the machine for a prolonged period of time, remove the plug from the wall socket. Only then is it fully disconnected from the mains.
-
Avoid using extension cables. They may be used only under very specific conditions:
-
The extension cable must be able to handle the amount of current drawn by the device.
- The extension cable may not hang loose: keep children away from it and ensure that it is not possible for anybody to trip over it.
- Under no circumstances use a damaged extension cable.
- Do not connect any appliances other than this product to the same mains socket, since it could cause an
overload (do not use multi-way splitters of any kind).
4.5 Preventing the risk of fire

Warning! Since the appliance operates at high temperatures, always comply with the following safety instructions to prevent it causing a fire.
• To prevent overheating, never cover the appliance, Always ensure that air can get in and out freely, otherwise heat may build up in the appliance.
4.6 Preventing injuries

Warning! To avoid injury, please observe the following information.
• Make sure that the mains cable never becomes a trip hazard, that no-one can get tangled in it or tread on it.
- During operation, avoid contact with the moving parts of the appliance such as the blade assembly 20 or mixer attachment 22. Your hands or hair could be drawn into the appliance, leading to injuries.
• Always remove the power supply plug from the mains socket before cleaning the appliance or changing the attachments.
- Be aware that the surfaces of the appliance can become hot in operation:
- When the appliance is in operation, never touch the drip tray 4, steamer baskets 3 and 2 or their lids 1 without using an oven cloth or gloves.
- Allow the appliance to cool down before moving it to a different location.
• The appliance operates using hot steam. To prevent scalds:
- if possible, avoid lifting the lids of steamer baskets during the cooking process because hot steam will escape;
- be aware that hot steam also escapes from the vents in the steamer lids 1. Never cover these openings, otherwise steam might build up in the appliance and escape violently when it is opened:
- When you do need to lift the lid of a steamer basket 1, first raise it slightly at the back, so that the escaping rush of steam is directed away from you.
4.7 Child safety

Warning! Children often injure themselves because they are unable to correctly assess hazards. Therefore, please note:
- This appliance may be used only under adult supervision to ensure that children do not play with it.
• Take great care to ensure that the appliance is always out of the reach of children so that they cannot play with it or pull it down by tugging at the mains lead.
• Make sure the packaging film does not become a deathtrap for children. Packaging film is not a toy.
4.8 Material damage
Caution! Follow the instructions given below to prevent material damage.
• Always place the appliance on a level, dry, non-slip surface to prevent it tipping over or sliding off.
- Do not place the appliance on top of a hot hotplate.
6 GB


- Never use the mixer attachment 22 and blender jug 6 while empty. This might cause the motor to overheat.
- The mixer attachment 22 may be used only at speeds 1 to 4.
• The pulse button may not be used together with the mixer attachment 22. - Never use the blender jug 6 without the lid 25 in place, as liquid might otherwise be thrown out.
- Do not move the appliance while food or dough is still inside.
- Do not overfill the blender jug 6 as the contents might otherwise be thrown out. Overflowing liquid will run onto the
underlay, which is why this needs to be waterproof.
- When steaming, make sure there is never too much or too little water in the appliance.
- Do not place the appliance immediately underneath a suspended cupboard, as steam escapes upwards and might damage your furniture.
- Use only clean drinking water to generate steam.
- The manufacturer and importer accept no liability for damage caused by an inadequate power supply or improper electrical installation in your building. If in doubt, consult a qualified electrician.
5. Unpacking and setting up

A number of individual parts are given a protective film of grease In production. When you use the appliance for the first time, run it without any foodstuffs to allow such residues to evaporate.
Note: When you use the appliance for the first time you may notice a slight odour as the motor becomes hot. This is harmless. Make sure the room is adequately ventilated.
- Remove the individual parts from their packaging.
- Check that the individual parts are all present (see "1.2 Contents of package" on page 3) and are undamaged.
- Clean the appliance thoroughly before using it for the first time (see "10. Cleaning and maintaining the appliance" on page 19).
- Always place the appliance on a level, dry, non-slip waterproof surface to prevent it tipping over or sliding off.
Caution! Overflowing liquid will run onto the underlay, which is why this needs to be waterproof.
The appliance is now ready to use.


6. Operating the appliance
For safety reasons, the settings described in this section may only be selected when the appliance has been fully assembled (see "7. Using the blender jug" on page 10 or "8. Steaming" on page 15).
6.1 Connecting the power supply
-
Insert the power supply plug into a suitable mains socket (see "3. Technical data" on page 3):
-
the operating indicator 7 wi red;
- the display 8 will light up and show all the control symbols. All the adjustable values are set to "0".

text_image
TIME 00:00 0 TEMP 0- An audible signal sounds.
6.2 Displays
All the settings and operating values are shown on the display 8.
The display 8 illumination will go out after a certain time. As soon as you press one of the buttons or turn one of the controls the display 8 will light up again.
The operating indicator 7 shows the current state of the appliance:
- red: Appliance is connected to the power supply but is not in operation
- blue: Appliance is in operation
6.3 Setting the timer
You can use the "TIME" controller 10 to set how long cooking or processing is to take:
Timer "-"10: reducing the time
Timer "+" 10: increasing the time
- You can set up times between 1 second and 60 minutes.
• The currently set time is shown on the display 8


- when the function is started the time begins counting down;
- the time can be modified while the appliance is in operation;
• Once the set time has elapsed:
- the appliance stops;
- an alarm is heard.
6.4 Setting the temperature
You set the cooking temperature by turning the "TEMP" temperature controller 13:
- You can set up temperatures between 37 °C and 100 °C;
• The currently set temperature is shown on the display 8

text_image
TEMP 100°C- As soon as the selected temperature is reached, the appliance emits an audible signal and displays an appropriate symbol;

- The temperature can be modified while the appliance is in operation;
- If you select a speed setting higher than 3, the heating function will be disabled and no temperature can be set up.
6.5 Steaming
For steaming, turn the temperature control 13 to the right until the display 8 shows "5F" ("extra steam").

text_image
TEMP 5FYou will find the exact procedure for steaming in "8. Steaming" on page 15.
6.6 Setting the speed
You set the speed by rotating the "SPEED" controller 12:
• The speed can be adjusted in 10 steps:
- Speeds 1 - 4: for the mixer attachment 22;
- Speeds 1 - 10: for the blade assembly 20.
Caution!
- The mixer attachment 22 may be used only at speeds 1 to 4.
- When blending liquids on level 10, do not exceed a quantity of 1 litre in the blender jug 6, otherwise liquid may spray out (see "7. Using the blender jug" on page 10). At speeds lower than 10, the blender jug may contain up to 2 l.
• The currently set speed is shown on the display 8;

- The speed can be modified while the appliance is in operation;
- If you change the speed setting to "0" while the appliance is in operation, it will stop;
- If you have selected a temperature, only speed levels 1–3 are available.
Notes:
- If you select a speed from 7 to 10, the appliance will begin with speed level 6 and gradually increase to the selected level. This is to prevent liquid being thrown out of the blender jug 6 due to sudden acceleration.
- If the blender j speed may be reduced automatically. This is done by interrupting the rotation of the blade assembly 20 at two-second intervals to prevent the motor from overheating.
6.7 Starting and stopping the appliance
Once you have set the values for time, temperature and speed, start the appliance by pressing the "ON/OFF" button 11.
Press the "ON/OFF" button 11 again to halt the current cooking or processing function.
6.8 Pulse function

Warning!
When using the pulse function, do not have any hot ingredients in the blender jug 6. These could spray out and lead to scalds.
Caution!
- When blending liquids, do not exceed a quantity of 1 litre in the blender jug 6, otherwise liquid may spray out.
-
When you use this function, firmly hold the lid of the blender jug's filling opening, including the measuring scale 26.
-
Press and hold the pulse button 9 for a maximum of 10 seconds.
- Never use this function while the mixer attachment 22 is in use.
You can briefly select maximum speed (level 10) using the pulse function. This is used for rapid chopping of nuts or small quantities of herbs or onions, for example.
- Press the "ON/OFF" button 11.
The speed symbol on the display will flash.

- Press the pulse button 9.
Notes:
- The pulse function can be used only while no speed is selected.
- The speed is increased abruptly to its maximum (level 10). The appliance
does not speed up gradually as when you select the speed using the regulator 12 (see "6.6 Setting the speed" on page 9).
6.9 Overflow
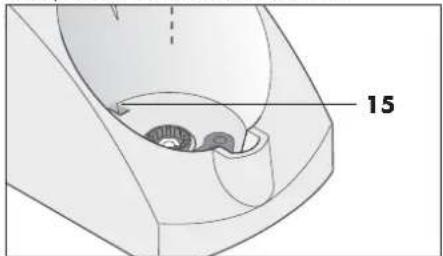
The receptacle 14 for the blender jug incorporates an overflow hole 15.
natural_image
Technical drawing of a mechanical component with labeled part '15' (no other text or symbols)If any liquid leaks out of the blender jug 6 it does not collect in the base unit 17, it drains via the overflow hole 15 onto the underlay.
7. Using the blender jug
Note: These user instructions describe basic functions such as blending, chopping and steaming. You can find details on preparing specific recipes in the recipe book supplied.
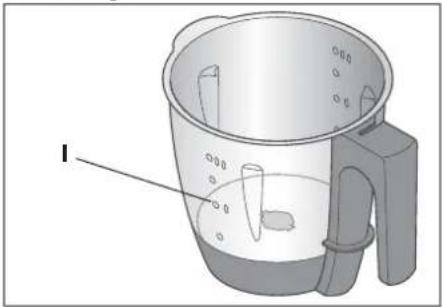
7.1 Markings inside the blender jug
natural_image
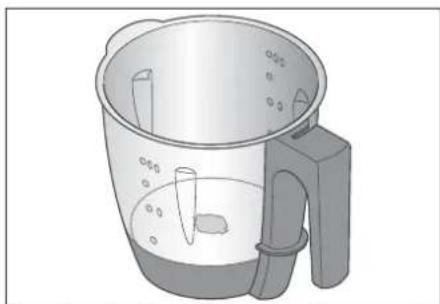
Illustration of a cooking pot with handle and lid, showing internal components (no text or symbols)The blender jug 6 has markings on the inside showing the volume of contents:
Lowest marking: 0.5 litre
Highest marking: 2 litres, corresponding to the maximum permissible contents.
Intermediate markings: 1.0 and 1.5 litres

Caution! When blending liquids on level 10 or using the pulse button 9, do not exceed a quantity of 1 litre in blender jug 6, otherwise liquid may spray out. At speeds lower than 10, the blender jug may contain up to 2 l.
Note: Certain operations require a sufficiency of contents in the blender jug 6 for the appliance to function properly. For example, when whipping cream always use at least 200 ml, and when whisking egg whites use at least two.
7.2 Inserting and removing the blade assembly
The blender jug 6 may never be used without the blade assembly 20 because the assembly 20 constitutes the seal for the bottom of the jug 6.

Warning! Remember that the blades of the assembly 20 are extremely sharp. Never touch them with your bare hands to avoid cutting yourself.
Here is how to remove the blade assembly 20:
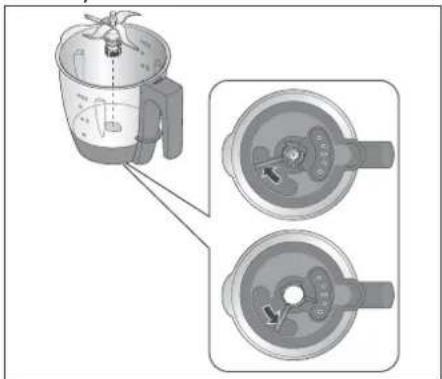
text_image
Diagram showing a kitchen mixer with water level indicator and two views of the lid, likely illustrating a cooking or cleaning process.-
Lay the blender jug 6 on its side.
-
Press the unlock lever on the underside of the blender jug 6 so that it is pointing at the open padlock symbol.

- Carefully remove the blade assembly 20.
Here is how to insert the blade assembly 20:
-
Lay the blender jug 6 on its side.
-
Insert the blade assembly 20 from the inside. Note that the two protrusions on the base of the blade assembly 20 have to be inserted into the two holes in the base of the blender jug 6.
Caution!
• Make sure that the rubber seal 19 of the blade assembly 20 is correctly seated, otherwise the contents are liable to leak out.
- To lock the blade assembly 20, press the unlock lever on the underside of the blender jug 6 so that it is pointing at the closed padlock symbol.

Note: Cut large pieces into smaller ones with an edge length of about 3 - 4cm. Pieces larger than this may get jammed in the blades.
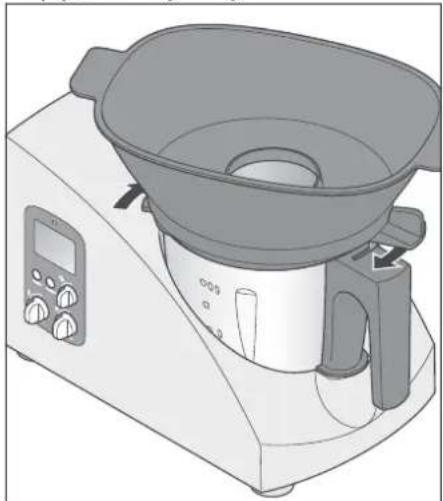
7.3 Positioning the blender jug
-
Position the blender jug 6 in its receptacle 14.
-
Press the blender jug 6 down slightly until it meshes with the drive gear.
Notes:
- If the gears do not line up and you are unable to press the blender jug 6 down, you may need to wriggle it slightly to get the gears of the jug 6 to slide into the receptacle 14.


- If the blender jug 6 is not positioned correctly, a safety mechanism will prevent the appliance from operating.
7.4 Inserting and removing the mixer attachment
The mixer attachment 22 is placed on the blade assembly 20 :
- It must be possible to completely position the mixer attachment 22 without encountering any resistance. If this proves not to be the case, rotate the mixer attachment 22 through 90^ and position it afresh;
- The fins of the mixer attachment 22 are accommodated in the spaces between the blades;
Caution!
- The mixer attachment 22 may be used only at speeds 1 to 4.
- The pulse button 9 may not together with the mixer attachment 22.
- When the mixer attachment 22 is used you may not use the spatula 23 because it could get into the mixer 22;
- When you add foodstuffs, make sure they do not prevent the mixer attachment 22 from rotating.
- the mixer attachment 22 is not suitable for kneading firm dough for foods such as pizza or bread. The blade assembly 20 works better for this.
To remove the mixer attachment 22, pull it off upwards.
7.5 Positioning the lid of the blender jug
The lid of the blender jug 25 can be fitted only if the jug 6 is correctly positioned.
-
Check that the sealing ring 24 is properly seated in the lid of the jug 25.
-
Place the lid 25 on the jug 6 at a slight angle.
The symbol of the open lock points to the arrow on the lock 16.
natural_image
Mechanical component diagram showing a lid and base with arrows indicating motion (no text or symbols)- Rotate the lid of the jug 25 in such a way that the closed lock symbol points to the arrow on the lock 16.
natural_image
Mechanical component diagram showing a circular housing with a handle and mounting bracket (no text or symbols)be used:
• The appliance can be started only if the lid of the blender jug 25 is correctly positioned.
• To ensure the lid for the jug 25 is correctly latched into place you will find it useful to press slightly on the lock symbol while screwing it shut.
- If the lid of the jug 25 is not correctly positioned an appropriate symbol will appear on the display.

7.6 Using the lid for the blender jug's fill opening with measuring scale
The cover for the fill opening of the blender jug with measuring scale 26 serves both to close the jug 6 and to measure the ingredients.
12 GB


GB


To close the blender jug 6, place the lid of the fill opening with measuring scale 26 onto the lid of the jug 25 with the opening downwards, and lock it by turning it clockwise.
Caution!
Before you remove the lid of the fill opening in the blender jug with measuring scale 26 you must reduce the speed to level 1, 2 or 3 to prevent food being thrown out.
You can briefly remove the lid of the fill opening with measuring scale 26 to add ingredients to the blender jug.
7.7 Boiling and steaming with the cooking pot
-
Place at least 500 ml and at most 2 litres of water in the blender jug 6:
-
If the food is entirely under the water it will be boiled;
-
If the water does not completely cover it, it will be steamed.
-
Place the ingredients in the cooking pot 21.
- Place the cooking pot 21 in the blender jug 6.
- Close the blender jug 6 with its lid 25 and the lid of the fill opening with measuring scale 26.
- Set the desired time.
- Set up the desired temperature on the "TEMP" control 13.
- The chosen temperature is shown on the display 8;

text_image
TEMP 90°C- Select speed 1.
- Press the "ON/OFF" button 11.
The appliance will begin working.
7.8 Using the spatula
The spatula 23 is used to stir ingredients and to remove the cooking pot 21.
Caution!
- The spatula 23 may not be used while the mixer attachment 22 is in use because the spatula 23 could become jammed in the attachment 22.
- Don't use any other kitchen tools to stir your ingredients. They could get into the blades and cause injuries or damage.
- The spatula 23 is so constructed that it does not come into contact with the blade assembly 20 even when the blades are rotating.
- Always stir in a clockwise direction.
natural_image
Illustration of a kitchen blender with a rotating knob and handle (no text or symbols)The spatula 23 is designed so that if you stir clockwise, it cannot come into contact with the blade assembly 20 even if the assembly is rotating.


natural_image
Pure geometric crosshair symbols without any text or labels
natural_image
Pure geometric diagram with crosshair and circular target-like pattern (no text or symbols)You can use the hook on the back of the spatula 23 to lift out the hot cooking pot 21 without having to actually touch it.
natural_image
Two identical metal containers with handles, one holding a small object, against a plain background (no text or symbols)7.9 Chopping
The following guide times apply to use of the blade assembly 20 for chopping foods (see "7.2 Inserting and removing the blade assembly" on page 11):
| Food Quantity | Level Time | ||
| Almonds (shelled) 200 g 9 25 seconds | |||
| Bread roll 1 - 3 8 25 seconds | |||
| Carrots (sliced, about 5 cm) | 500 g Pulse | Press briefly 3 times | |
| Cereals, coarse | 50 g - 250 g | 10 | 50 seconds |
| Cereals, fine | 50 g - 250 g | 10 | 2 minutes |
| Chocolate/coating | 200 g | 8 30 seconds | |
| Coffee beans | 100 g | 10 | 2 minutes |
| Foam fruit shakes 200 ml - 600 ml 8 50 seconds | |||
| Foam smoothies, soups, sauces | 200 ml - 600 ml | 8 50 seconds | |
| Garlic | 1 - 10 cloves | 6 | 8 seconds |
| Ice cubes | 200 g | 5 20 seconds | |
| Linseed | 20 g | 9 25 seconds | |
| Meat (frozen) | 20 g - 200 g | 7 | 20 - 30 seconds |
| Nuts | 200 g | 9 25 seconds | |
| Onion | 1 - 10 | 6 | 8 seconds |
| Parmesan cheese | 150 g | 10 | 35 seconds |
| Peppercorns | 20 g | Pulse | Press briefly 3 times |
| Potatoes (for fritters) | 1,000 g | 5 15 seconds | |
| Purée fruit | 100 g - 800 g | 6 8 - 10 seconds | |
| Purée vegetables | 100 g - 800 g | 8 8 - 10 seconds | |
| Red cabbage | 500 g | 5 | 9 seconds |
| Sesame | 50 g | 8 30 seconds | |
| Food | Quantity | Level | Time |
| Spices 20 g 10 30 seconds | |||
| Sugar 200 g Pulse | Press up to 6 times for 10 | seconds each time. Check the condition of the sugar every so often and grind to suit your requirements. | |
| White cabbage | 500 g | 5 | 9 seconds |
7.10 Blending
The following guide times apply to use of the mixer attachment 22 for blending foods (see "7.4 Inserting and removing the mixer attachment" on page 12):
| Food | Quantity | Level | Time |
| Beat egg whites until stiff | 2 - 3 | 4 | 4 minutes |
| Beat whipping cream until stiff | 200 - 600 g | 3 | 1 - 2 minutes |
| Mayonnaise | 1 - 3 eggs | 4 | 4 minutes |
8. Steaming
Note: These user instructions describe basic functions such as mixing, chopping and steaming. You can find details on preparing specific recipes in the recipe book supplied.
8.1 Preheat
If you wish to cook food from frozen, in particular meat or fish, the appliance has to be preheated for 10 minutes.
- Prepare the appliance as described in "8.2 Steaming using the steamer baskets" on page 16 or "8.3 Steaming with the cooking pot" on page 17.
Before putting food in the appliance, allow it to run for 10 minutes.
-
Use the "TIME" control 10 to set 10 minutes.
-
Turn the temperature control 13 to the right until the display 8 shows "5F" ("extra steam").

text_image
TEMP 5F-
Select speed level 1.
-
Press the "ON/OFF" button 11.
The appliance will begin working.
After 10 minutes, the appliance switches off. You can now put food in the appliance and start steaming.
8.2 Steaming using the steamer baskets
- Stand the blender jug 6 in the base 17.
- Pour 1000 ml water into blender jug 6. This corresponds to the second lowest marking "I".
natural_image
3D rendering of a kitchen pot with a handle and lid, showing internal components (no text or symbols)-
Check that the seal 5 is properly seated in the drip tray 4.
-
Place the drip tray 4 on the blender jug 6 at a slight angle.
natural_image
Illustration of a kitchen grater with digital display and control panel (no text or symbols)- Rotate the drip tray 4 until it audibly clicks into place.
The appliance can be started only if the drip tray 4 is correctly positioned.
- Place the ingredients in the steamer baskets 3 and 2.
Note: Even if you need only the shallow basket 2 you must always use them both, 3 and 2, to prevent steam from escaping to the side.
- Place the filled steamer baskets 3/2 in the drip tray 4.
- Cover each steamer basket with the corresponding lid 1.
- Set the desired time.
- Turn the temperature control 13 to the right until the display 8 shows "SF" ("extra steam").

text_image
TEMP 5F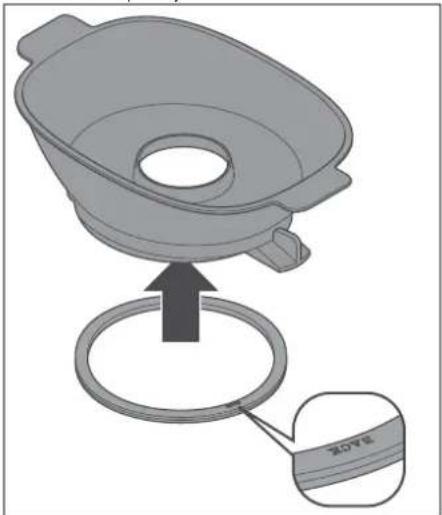
natural_image
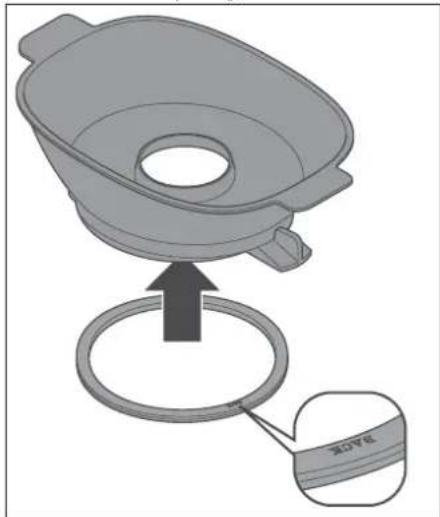
3D diagram of a funnel-shaped container with an arrow pointing to a ring and a labeled component (no text or symbols)Note: The seal 5 for the drip tray 4 must me mounted in such a way that the label "BACK" is no longer visible.
16 GB


-
Select speed 1.
-
Press the "ON/OFF" button 11.
The appliance will begin working.
8.3 Steaming with the cooking pot
- Pour 500 ml water into the blender jug 6.
- Place the foods in the cooking pot 21.
- Place the cooking pot 21 in the blender jug 6.
- Close the blender jug 6 with its lid 25 and the lid of the filling opening for the blender jug with measuring scale 26.
- Set the desired time.
- Turn the temperature control 13 to the right until the display 8 shows "SF" ("extra steam").

text_image
TEMP SF- Select speed 1.
- Press the "ON/OFF" button 11.
The appliance will begin working.
To remove the cooking pot 21 at the end of steaming time, see "7.8 Using the spatula" on page 13.
8.4 Checking whether the food is cooked
Ensure you do not cook foods for too long, otherwise vegetables become too soft and meat and fish may become over-dry and tough.

Warning! A cloud of hot steam may escape if you remove lid 1 or 25 without sufficient caution during the cooking process.
To check the state of the food during cooking, proceed as outlined below.
- Carefully open the lid for steamer baskets 1/the lid for the blender jug 25. When opening the lid, ensure that you are not hit by a cloud of hot steam.
- Take the lid right off.
- Use a relatively long skewer or fork to check the state of the food being cooked.
- If the food is ready, press the "ON/OFF" button 11 to switch the appliance off.
- If the food being cooked is not yet ready, put the lid back on and allow the appliance to continue working.
8.5 Thermal cut-out
The appliance is protected against overheating. As soon as all the water in the blender jug 6 has evaporated, allowing the temperature to get too high, the appliance switches off automatically.
If this happens, disconnect the appliance from the power supply and allow it to cool down.
You can then run the appliance again with water in it.
9. Tips for steaming
Steaming is one of the healthiest ways of cooking food. Not only are the nutrients and colour of foods largely retained, the natural flavour and bite of food cooked this way make it a pleasure to eat, so salt, fat and seasoning can be used sparingly.
9.1 Using the steamer baskets
You can use either the deep steamer basket 3 on its own, or both of them together, as necessary.
It is not possible to use the shallow steamer basket 2 without the deep one 3.
9.2 Preparing whole meals
If you are preparing a whole meal and therefore using both steamer baskets one above the other, please note that:
- meat and fish should always be cooked in the lower steamer basket 3 so that their juices do not run over the other foods;
- if possible, the heaviest food item should be cooked in the lower basket 3.
9.3 Cooking times when steaming
The following guide times apply when steaming (see "8. Steaming" on page 15):
| Food Quantity Time | ||
| Asparagus, whole spears 500 g 30 minutes | ||
| Bell peppers (strips about 10 mm in size) | 500 g | 12 minutes |
| Bockwurst with skin 4 sausages 10 minutes | ||
| Broccoli, in florets 500 g 15 minutes | ||
| Brussels sprouts, whole 500 g 40 minutes | ||
| Buttered vegetables, frozen 300 g 22 minutes | ||
| Cabanossi 4 sausages 20 minutes | ||
| Carrots (slices about 3 mm in size) 500 g 22 minutes | ||
| Cauliflower, in florets 500 g 40 minutes | ||
| Chicken breast, cut into portions 500 g 10 minutes | ||
| Chicken breast, whole | 150 g | 20 minutes |
| Courgettes (slices about 5 mm in size) | 500 g | 17 minutes |
| Fennel (pieces about 10 mm in size) | 500 g | 17 minutes |
| Fish, whole (trout 250 g) | 1 - 2 | 20 minutes |
| Green beans, whole | 500 g | 25 minutes |
| Kohlrabi (pieces about 10 mm in size) | 500 g | 20 minutes |
18 GB


| Food | Quantity | Time |
| Leek (slices about 10 mm in size) 500 g 15 minutes | ||
| Mangetout peas, whole 200 g 12 m nutes | ||
| Meatballs | 500 g | 30 minutes |
| Mushrooms, sliced | 250 g | 12 minutes |
| Peas, frozen | 250 g | 22 minutes |
| Potatoes, peeled, quartered | 800 g | 35 minutes |
| Potatoes, small, not peeled | 800 g | 35 minutes |
| Prawns | 250 g | 22 minutes |
| Salmon fillet (200 g, 2 cm thick) | 1 - 4 | 13 minutes |
| Salmon fillet (300 g, 3 - 4 cm thick) | 1 - 4 | 15 minutes |
| Spinach, fresh | 500 g | 20 minutes |
| Turkey breast, cut into portions | 500 g | 10 minutes |
| Turkey breast, whole | 150 g | 20 minutes |
| White cabbage (strips about 10 mm in size) | 500 g | 30 minutes |
- Please note that times may vary depending on the food, and these are only guide values.
- If you wish to cook food from frozen, in particular meat or fish, the appliance has to be preheated for 10 minutes (see "8.1 Preheat" on page 15).
- Frozen food can take up to twice the cooking time quoted above, so please check its state regularly (see "8.4 Checking whether the food is cooked" on page 17).
10. Cleaning and maintaining the appliance

Warning! To prevent the risk of electric shock, injury or damage:
- Always take the mains plug out of its socket before cleaning.
- Never immerse the base unit 17 in water.
- Remember that the blades in the blender jug 20 are extremely sharp. Never touch them with your bare hands to avoid cutting yourself.
Caution! Never use scouring, corrosive or abrasive cleaning materials as these might damage the appliance.
10.1 Cleaning the base unit
- Clean the base unit 17 with a damp cloth. A little detergent may also be used.
- Wipe over with clean water.
- Do not use the base unit 17 again until it is completely dry.
10.2 Cleaning the blender jug
-
Place the blender jug 6 containing the blade assembly on the appliance 20.
-
Half fill it with hot water.
- Put the lids for the blender jug 25 and its fill opening with measuring scale 26 in place.
- Insert the power supply plug into a suitable mains socket (see "3. Technical data" on page 3).
- Press the pulse button briefly several times 9.
- Take the jug 6 off the appliance.
- Pour away the water.
The blender jug 6 is now pre-cleaned.
-
Remove the blade assembly 20 (see "7.2 Inserting and removing the blade assembly" on page 11)..
-
Clean the blender jug 6 by hand in the sink with soapy water.
-
Then rinse it 6 thoroughly under clear water.
-
Allow the jug 6 to dry completely before using it again.
10.3 Cleaning the accessories

Warning! The blade assembly 20 has very sharp blades. To avoid injury, please observe the following information:
- Remember that the blades of the assembly 20 are extremely sharp. Never touch them with your bare hands to avoid cutting yourself.
- When washing up by hand, the water should be clear enough that you can easily see the blade assembly 20 and do not risk cutting yourself on its extremely sharp blades.
-
Remove the blade assembly 20 from the blender jug 6 (see "7.2 Inserting and removing the blade assembly" on page 11).
-
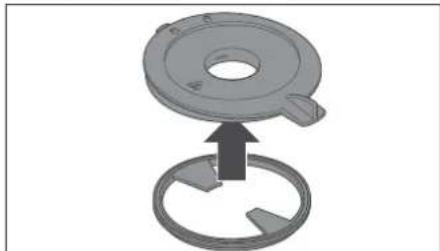
Remove the seal 19 from the blade assembly 20.
- Remove the seal 24 from the lid of the blender jug 25.
- Remove the seal 5 from the drip tray 4.
- Clean all the accessories by hand in the sink.
- Allow all parts to become completely dry.
- Replace the seal 5 in the drip tray 4.
Note: The seal for the drip tray 5 must be mounted in such a way that the label "BACK" is no longer visible.
- Replace the seal 24 in the lid of the blender jug 25.
Note: The seal 24 in the lid of the blender jug must be positioned so that the smooth side is inwards.
natural_image
Mechanical component diagram showing a flange and ring assembly with an arrow indicating motion (no text or symbols)- Replace the seal 19 in the blade assembly 20.
10.4 Cleaning in the dishwasher
The following parts are suitable for cleaning in a dishwasher:
- blender jug 6
- lid for blender jug's fill opening with measuring scale 26
• lid for blender jug 25 without its seal 24
• blade assembly 20 without its seal 19 - cooking pot 21
- mixer attachment 22
- spatula 23


• drip tray 4 without its seal 5
- steamer basket, deep 3
• steamer basket, shallow 2
- lids for steamer baskets 1
Under no circumstances may any of the following parts be cleaned in the dishwasher:
- base unit 17
- seals
10.5 Descaling
If you steam with very hard water, especially, the parts used, particularly those in the blender jug 6, can become covered in limescale.
-
Remove mild limescale deposits by wiping them off with a little household vinegar on a cloth.
-
Rinse off with clean water.
If significant deposits of limescale have already accumulated, remove these urgently to ensure the appliance works properly. Limescale can impair performance considerably.
Caution! Do not use commercial descaling products, pure acetic acid or vinegar essence.
- To get rid of significant limescale, we recommend putting 500 ml white table vinegar and 500 ml boiling water in a suitable container, such as a plastic bowl, and to leave this to act on the parts covered in limescale for 30 min.
Note: longer soaking times will not improve descaling, but may permanently damage the parts.
- Rinse off with clean water.
- Allow parts to dry completely before using them again.
10.6 Ordering seals
Seals for the lid of the blender jug 24, the blade assembly 19 and the drip tray 5 can be ordered from our Service Centre (see "Service Centre" on page 25).


natural_image
Pure geometric crosshair symbol with concentric circles and dots, no text or labels present
natural_image
Pure geometric diagram with crosshair and circular target-like shapes (no text or symbols)11. Malfunctions, causes and solutions
11.1 Malfunctions during operation
| Malfunction Cause Solution | ||
| Appliance fails to start Blender | lender jug 6 is not correctly positioned | Position the blender jug 6 correctly (see "7.3 Positioning the blender jug" on page 11) |
| Lid 25 of the blender jug 6 is not correctly positioned | Position the lid 25 correctly (see "7.5 Positioning the lid of the blender jug" on page 12) | |
| No power supply Check the Plug and if necessary also the fuse | ||
| Incorrect power supply Make sure to use the correct power supply (see "6.1 Connecting the power supply" on page 8) | ||
| There is liquid underneath the appliance | Blade assembly 20 is not correctly seated and is leaking | Position the blade assembly 20 correctly (see "7.2 Inserting and removing the blade assembly" on page 11) |
| The seal of the blade assembly 19 is defective | Install a new seal 19 (see "10.6 Ordering seals" on page 21) | |
| Liquid has escaped from the blender jug 6 and has drained through the base unit's overflow hole 17 onto the underlay (see "6.9 Overflow" on page 10) | When blending liquids on level 10 or using the pulse button 9, do not exceed a quantity of 1 litre in the blender jug 6, otherwise liquid may spray out. At speeds lower than 10, the blender jug may contain up to 2 l. | |
| Liquid is leaking from the lid 25 of the blender jug 6 | Seal 24 is not correctly positioned | Position the seal 24 correctly (see "10.3 Cleaning the accessories" on page 20) |
| Seal 24 is defective | Install a new seal 24 (see "10.6 Ordering seals" on page 21) | |
| Unable to select a temperature | You have selected a speed in the range 4 - 10 | Select a speed in the range 0 - 3 (see "6.6 Setting the speed" on page 9) |
| Malfunction Cause | Solution | |
| It is not possible to select a speed higher than 3. | A temperature is currently set | Set the temperature to 0 |
11.2 Error code in display
| Display Cause Solution | ||
| E3 | Blender jug 6 is too fullRemove some of the contents | |
 | The lid of the blender jug 6is not properly closedClose the lid properly (see"7.5 Positioning the lid of theblender jug" on page 12) | |
| HHH | The blender jug 6 is notcorrectly positioned in thebase unit 17Position the blender jug 6correctly (see"7.3 Positioning the blenderjug" on page 11) | |
| The blender jug 6 wasremoved while the appliancewas in operationStop the appliance beforeremoving the blender jug 6(see "6.7 Starting andstopping the appliance" onpage 9) | ||
| LLL Fault in the logic circuitry | Contact the Service Centre(see "Service Centre" onpage 25) | |
 | Selected temperature hasbeen reached (see"6.4 Setting thetemperature" on page 8)None required | |
12. Disposal
12.1 Appliance

The symbol with the crossed-out rubbish bin on wheels means that within the European Union, the product must be disposed of to a sorted rubbish collection. This applies to the product and all accessories which are marked with this symbol. Marked products must not be disposed of via the regular domestic waste but must be handed in to a recycling centre
for electrical or electronic devices. Recycling helps to reduce the use of raw materials and to relieve the environment. It is therefore imperative that you follow the disposal regulations applicable in your country.
12.2 Packaging
If you wish to discard the packaging, please observe the applicable environmental regulations in your country.
You have a warranty on this product which is valid for 3 years from the date of purchase. In the event of this product being defective, you have statutory rights against the seller of the product. These statutory rights are not limited by our warranty as set out below.
Warranty conditions
The warranty period begins with the date of purchase. Please keep the original till receipt in a safe place. This is required as your proof of purchase.
If a defect in materials or workmanship occurs within three years of the date your product was purchased, we will repair or replace the product at our discretion at no charge to you. This service under warranty assumes that the defective product and the proof of purchase (till receipt) are submitted within the three-year period and that a brief description in writing is provided of what the defect is and when it occurred.
If the defect is covered by our warranty, the repaired product or a new one will be sent back to you. There is no new warranty period following repair or replacement of the product.
Warranty period and statutory claims relating to defects
The warranty period is not extended when a service is provided under warranty. This also applies to replaced and repaired parts. Any damage or defects present at purchase must be reported immediately the product is unpacked. Repairs incurred once the warranty period has expired are chargeable.
Scope of warranty
The product has been carefully manufactured in accordance with strict quality guidelines and was thoroughly checked before being delivered.
The warranty applies to defective materials or workmanship. This warranty does not


extend to product parts exposed to normal wear and tear (and which can therefore be considered wear parts) or to damage to fragile parts such as switches, batteries or parts made of glass.
This warranty is void if the product is damaged or if it is not used or maintained properly. All the information in the operating instructions should be observed precisely to ensure that the product is used properly.
It is essential to avoid intended uses and actions which are discouraged or warned against in the operating instructions.
The product is intended for only private use and not for commercial purposes.
The warranty is void in the event of misuse, incorrect treatment, use of force or interference by anyone other than our authorized service centre.
Warranty process
Please follow the instructions below to ensure that your claim is processed quickly.
- In case of any enquiry, please keep the article number (for this product: IAN 93471) and the till receipt as proof of purchase.
- The article number can be found on the rating plate, as an engraving, on the cover sheet of your instructions (bottom left) or as a label on the back or underside of your appliance.
- If malfunctions or any other defects should occur, in the first instance contact the Service Centre mentioned below by telephone or e-mail.
- Once a product has been recorded as defective, you can then send it Freepost to the service address you are given, enclosing the proof of purchase (till receipt) and quoting what the defect is and when it occurred.

You can download these instructions and many other manuals, product videos and software from www.lidl-service.com.

Service Centre
GB Service Great Britain
Tel.: 0871 5000 720 (£ 0.10/Min.)
E-Mail: hoyer@lidl.co.uk
IR Service Ireland
Tel.: 1890 930 034
(0,08 EUR/Min., (peak))
(0,06 EUR/Min., (off peak))
E-Mail: hoyer@lidl.ie
CY Service Cyprus
Tel.: 8009 4409
E-Mail: hoyer@lidl.com.cy
MT Service Malta
Tel.: 80062230
E-Mail: hoyer@lidl.com.mt
IAN: 93471

Supplier
Please note that the address below is not a service address. In the first instance, contact the service centre mentioned above.
HOYER Handel GmbH
Kühnehöfe 5
22761 Hamburg
Germany
Sisältö
natural_image
Technical line drawing of a mechanical component with labeled part '15' (no text or symbols beyond label)natural_image
Illustration of a kitchen pot with handle and side blades (no text or symbols)text_image
Diagram showing a kitchen mixer with labeled components and two circular insets illustrating the internal structure.natural_image
Mechanical component diagram showing a circular housing with mounting flanges and a small inset view (no text or symbols)natural_image
Mechanical component diagram showing a flanged circular housing with mounting bracket and base (no text or symbols)Huomautuksia:
natural_image
Illustration of a kitchen blender with a rotating knob and handle (no text or symbols)natural_image
Two identical basket diagrams with a tool, no text or symbols present7.8 Kaapimen käyttö
natural_image
Illustration of a kitchen blender with labeled parts (no text or symbols on the device itself)natural_image
3D diagram of a funnel-shaped container with an arrow pointing to a ring and a labeled component (no text or symbols)natural_image
Illustration of a kitchen grater with digital display and control panel (no text or symbols)natural_image
Mechanical component diagram showing a flanged top and ring assembly with directional arrows (no text or symbols)natural_image
Technical diagram of a mechanical component with labeled part 15 (no text or symbols beyond label)natural_image
3D rendering of a kitchen pot with handle and side legs, no text or symbols visibletext_image
Diagram showing a kitchen mixer with two views of the lid and side view, illustrating the process of mixing or cleaning.natural_image
Mechanical component diagram showing a cylindrical housing with mounting flanges and a knob (no text or symbols)natural_image
Technical illustration of a mechanical component with a flange and mounting bracket (no text or symbols)Observera:
natural_image
Illustration of a kitchen brush applying material to a pot, showing a rotating brush and handle (no text or symbols)natural_image
Two identical metal basket designs with a tool, no text or symbols present7.9 Krossa
natural_image
3D diagram of a container with internal components and labeled parts (no text or symbols)natural_image
3D diagram of a mechanical component with a ring and an arrow indicating assembly (no text or symbols)natural_image
Illustration of a kitchen grater with a digital display and control panel (no text or symbols)natural_image
Mechanical component diagram showing a circular housing with a ring and internal blades, no text or symbols present.natural_image
Technical line drawing of a mechanical component with a labeled dimension (15), no readable text or symbols present.natural_image
3D rendering of a kitchen pot with lid and side blades (no text or symbols)natural_image
Pure geometric crosshair symbol with concentric circles and lines, no text or labels present

natural_image
Pure geometric diagram with crosshair and circular target-like shapes (no text or symbols)
text_image
Diagram showing a kitchen mixer with labeled components and two close-up views of the lid and side view.natural_image
Mechanical component diagram showing a circular housing with mounting flanges and a side-mounted handle (no text or symbols)natural_image
Mechanical component diagram showing a circular flange with mounting base and internal bore (no text or symbols)Henvisninger:
natural_image
Illustration of a kitchen blender with a rotating knob and handle (no text or symbols)natural_image
Two identical metal basket designs with handles, no text or symbols visible7.9 Findeling
natural_image
3D diagram of a mechanical component with a ring and a labeled part (no text or symbols present)natural_image
Illustration of a kitchen grater with a digital display and control panel (no text or symbols)natural_image
3D diagram of a mechanical component with a central hole and two circular parts, no text or symbols present.natural_image
Technical line drawing of a mechanical component with a circular feature and labeled dimension (15), no readable text or symbols present.natural_image
3D rendering of a kitchen pot with lid and side handles, showing internal components (no text or symbols)text_image
Diagram showing a kitchen mixer with labeled components and two close-up views of the main component.natural_image
Mechanical component diagram showing a circular housing with mounting holes and a handle, no visible text or symbolsnatural_image
Mechanical component diagram showing a circular housing with mounting flanges and a handle (no text or symbols)Remarques :
natural_image
Illustration of a kitchen blender with a rotating handle and lid, showing no text or symbols.natural_image
Two identical metal basket designs with handles, one filled with a tool and the other with a handle (no text or symbols)7.9 Hadage
natural_image
Illustration of a kitchen pot with labeled parts (no text or symbols)natural_image
Illustration of a kitchen grater with a digital display and control panel (no text or symbols)natural_image
Mechanical component diagram showing a circular housing with a ring and a central arrow indicating motion (no text or symbols)10.6 Commander des joints
natural_image
Technical line drawing of a mechanical component with labeled part '15' (no text or symbols beyond label)natural_image
Illustration of a cooking pot with lid and side handles (no text or symbols)natural_image
Illustration of a kitchen mixer with two views showing internal components (no text or symbols)natural_image
Pure geometric crosshair symbols without any text or labels
natural_image
Pure geometric crosshair symbols without any text or labelsnatural_image
Mechanical component diagram showing a circular housing with mounting flanges and a handle, no visible text or symbolsnatural_image
Technical illustration of a mechanical component with a central circular feature and mounting bracket (no text or symbols)Aanwijzingen:
natural_image
Illustration of a kitchen blender with a rotating handle and lid, showing no text or symbols.natural_image
Two identical metal basket designs with handles, no text or symbols visible7.9 Fijnbakken
natural_image
Illustration of a cooking pot with a lid and side pan, showing internal components (no text or symbols)- Controleer of de afdichtring 5 in de condensaat-opvangbak 4 correct zit.
text_image
P20


natural_image
Illustration of a kitchen grater with a digital display and control panel (no text or symbols)natural_image
3D diagram of a mechanical component with a flange and ring assembly (no text or symbols)natural_image
Technical drawing of a mechanical component with labeled part '15' (no other text or symbols)natural_image
Illustration of a kitchen blender with handle and side blades (no text or symbols)text_image
Diagram showing a kitchen mixer with two views of the lid and side view, illustrating the process of mixing or cleaning.natural_image
Mechanical component diagram showing a circular housing with mounting flanges and a handle, no visible text or symbolsnatural_image
Mechanical component diagram showing a circular housing with mounting bracket and control knob (no text or symbols)Hinweise:
natural_image
Illustration of a kitchen blender with a rotating knob and handle (no text or symbols)natural_image
Pure geometric crosshair symbol with concentric circles and lines, no text or labels present