SDR 1500 A1 - Steam cleaner SILVERCREST - Free user manual and instructions
Find the device manual for free SDR 1500 A1 SILVERCREST in PDF.
| Product type | Steam cleaner |
| Brand | SilverCrest |
| Model | SDR 1500 A1 |
| Heating power | 1500 W |
| Voltage | 220–240 V ~ 50/60 Hz |
| Protection class | I |
| Protection rating | IPX4 |
| Max. service pressure | 0.32 MPa |
| Heating time | Approximately 7 minutes |
| Max. steam output | 40 g/min |
| Boiler capacity | 1.0 L (min 0.2 L) |
| Weight (without accessories) | 3.1 kg |
| Dimensions (L x W x H) | 380 x 254 x 260 mm |
| Included accessories | Steam gun, pencil jet nozzle, round brush, manual nozzle with sponge cover, 2 extension tubes, floor nozzle with floor cloth |
| Main functions | High-pressure steam cleaning, steam flow adjustment (reduced/max), child safety lock, automatic shut-off via safety thermostat |
| Maintenance and descaling | Rinse boiler every 5 fills, descale according to cycle depending on water hardness (use commercial descaling agent) |
| Safety instructions | Do not use on electrical appliances, do not direct steam at people or animals, unplug before maintenance |
| Repairability | Spare parts available through customer service or manufacturer Cleanerworld GmbH |
| Warranty | 3 years, requires proof of purchase and warranty card |
Frequently Asked Questions - SDR 1500 A1 SILVERCREST
User questions about SDR 1500 A1 SILVERCREST
0 question about this device. Answer the ones you know or ask your own.
Ask a new question about this device
Download the instructions for your Steam cleaner in PDF format for free! Find your manual SDR 1500 A1 - SILVERCREST and take your electronic device back in hand. On this page are published all the documents necessary for the use of your device. SDR 1500 A1 by SILVERCREST.
USER MANUAL SDR 1500 A1 SILVERCREST
Operating Instructions 14
FR CH BE
NETTOYEUR Á VAPEUR SDR 1500 A1
PARNI CISTAC SDR 1500 A1
Upute za rad 60
HU
GOZTISZTITOGEPSDR1500A1
Uzemeitetesiutasitas 69
| DE Kurzanleitung | IT In sintesi | HR Krakte upute |
| GB Quick reference | NL Korte handleiding | HU Rövid bevezétés |
| FR Instructions abrégées | PT Instruções resumidas |


A

B

C
D
E
F
G
Inhalt
97953 Königheim (Germany)
www.cleanerworld-gmbh.de
■ SERVICE TELEFON: 01805 212784
E. Moritsch
Head of Development
97953 Konigheim (Germany)
Königheim, 2010/10/01
Cleanerworld GmbH
Am Schützenbaum 19, 97953 Königheim (Germany)
Telefon: 01805 212784 Fax: 01805 212785
Garantie
97953 Koenigheim (Germany)
Tel: +49 1805 212784
Fax: +49 1805 212785
Produktbezeichnung:
Description of the Appliance 14
Safety instructions 15
Operation 16
How to Use the Accessories 18
Maintenance and care 19
Troubleshooting 20
Technical specifications 21
Disposal information 21
CE declaration 21
Warranty 22
General information
Dear Customer,

Please read and comply with these original instructions prior
to the initial operation of your appliance and store them for later use or subsequent owners.
Symbols in the operating instructions
Danger
Immediate danger that can cause severe injury or even death.
Warning
Possible hazardous situation that could lead to severe injury or even death.
Caution
Possible hazardous situation that could lead to mild injury to persons or damage to property.
Environmental protection

The packaging material can be recycled. Please do not place the package to the ordinary refuse for disposal, but go for the proper recycling.
Proper use
Only use the steam cleaner for private household applications. The unit is meant for steam cleaning and can be used with appropriate accessories as described in these operating instructions. Especially mind the safety instructions during use.
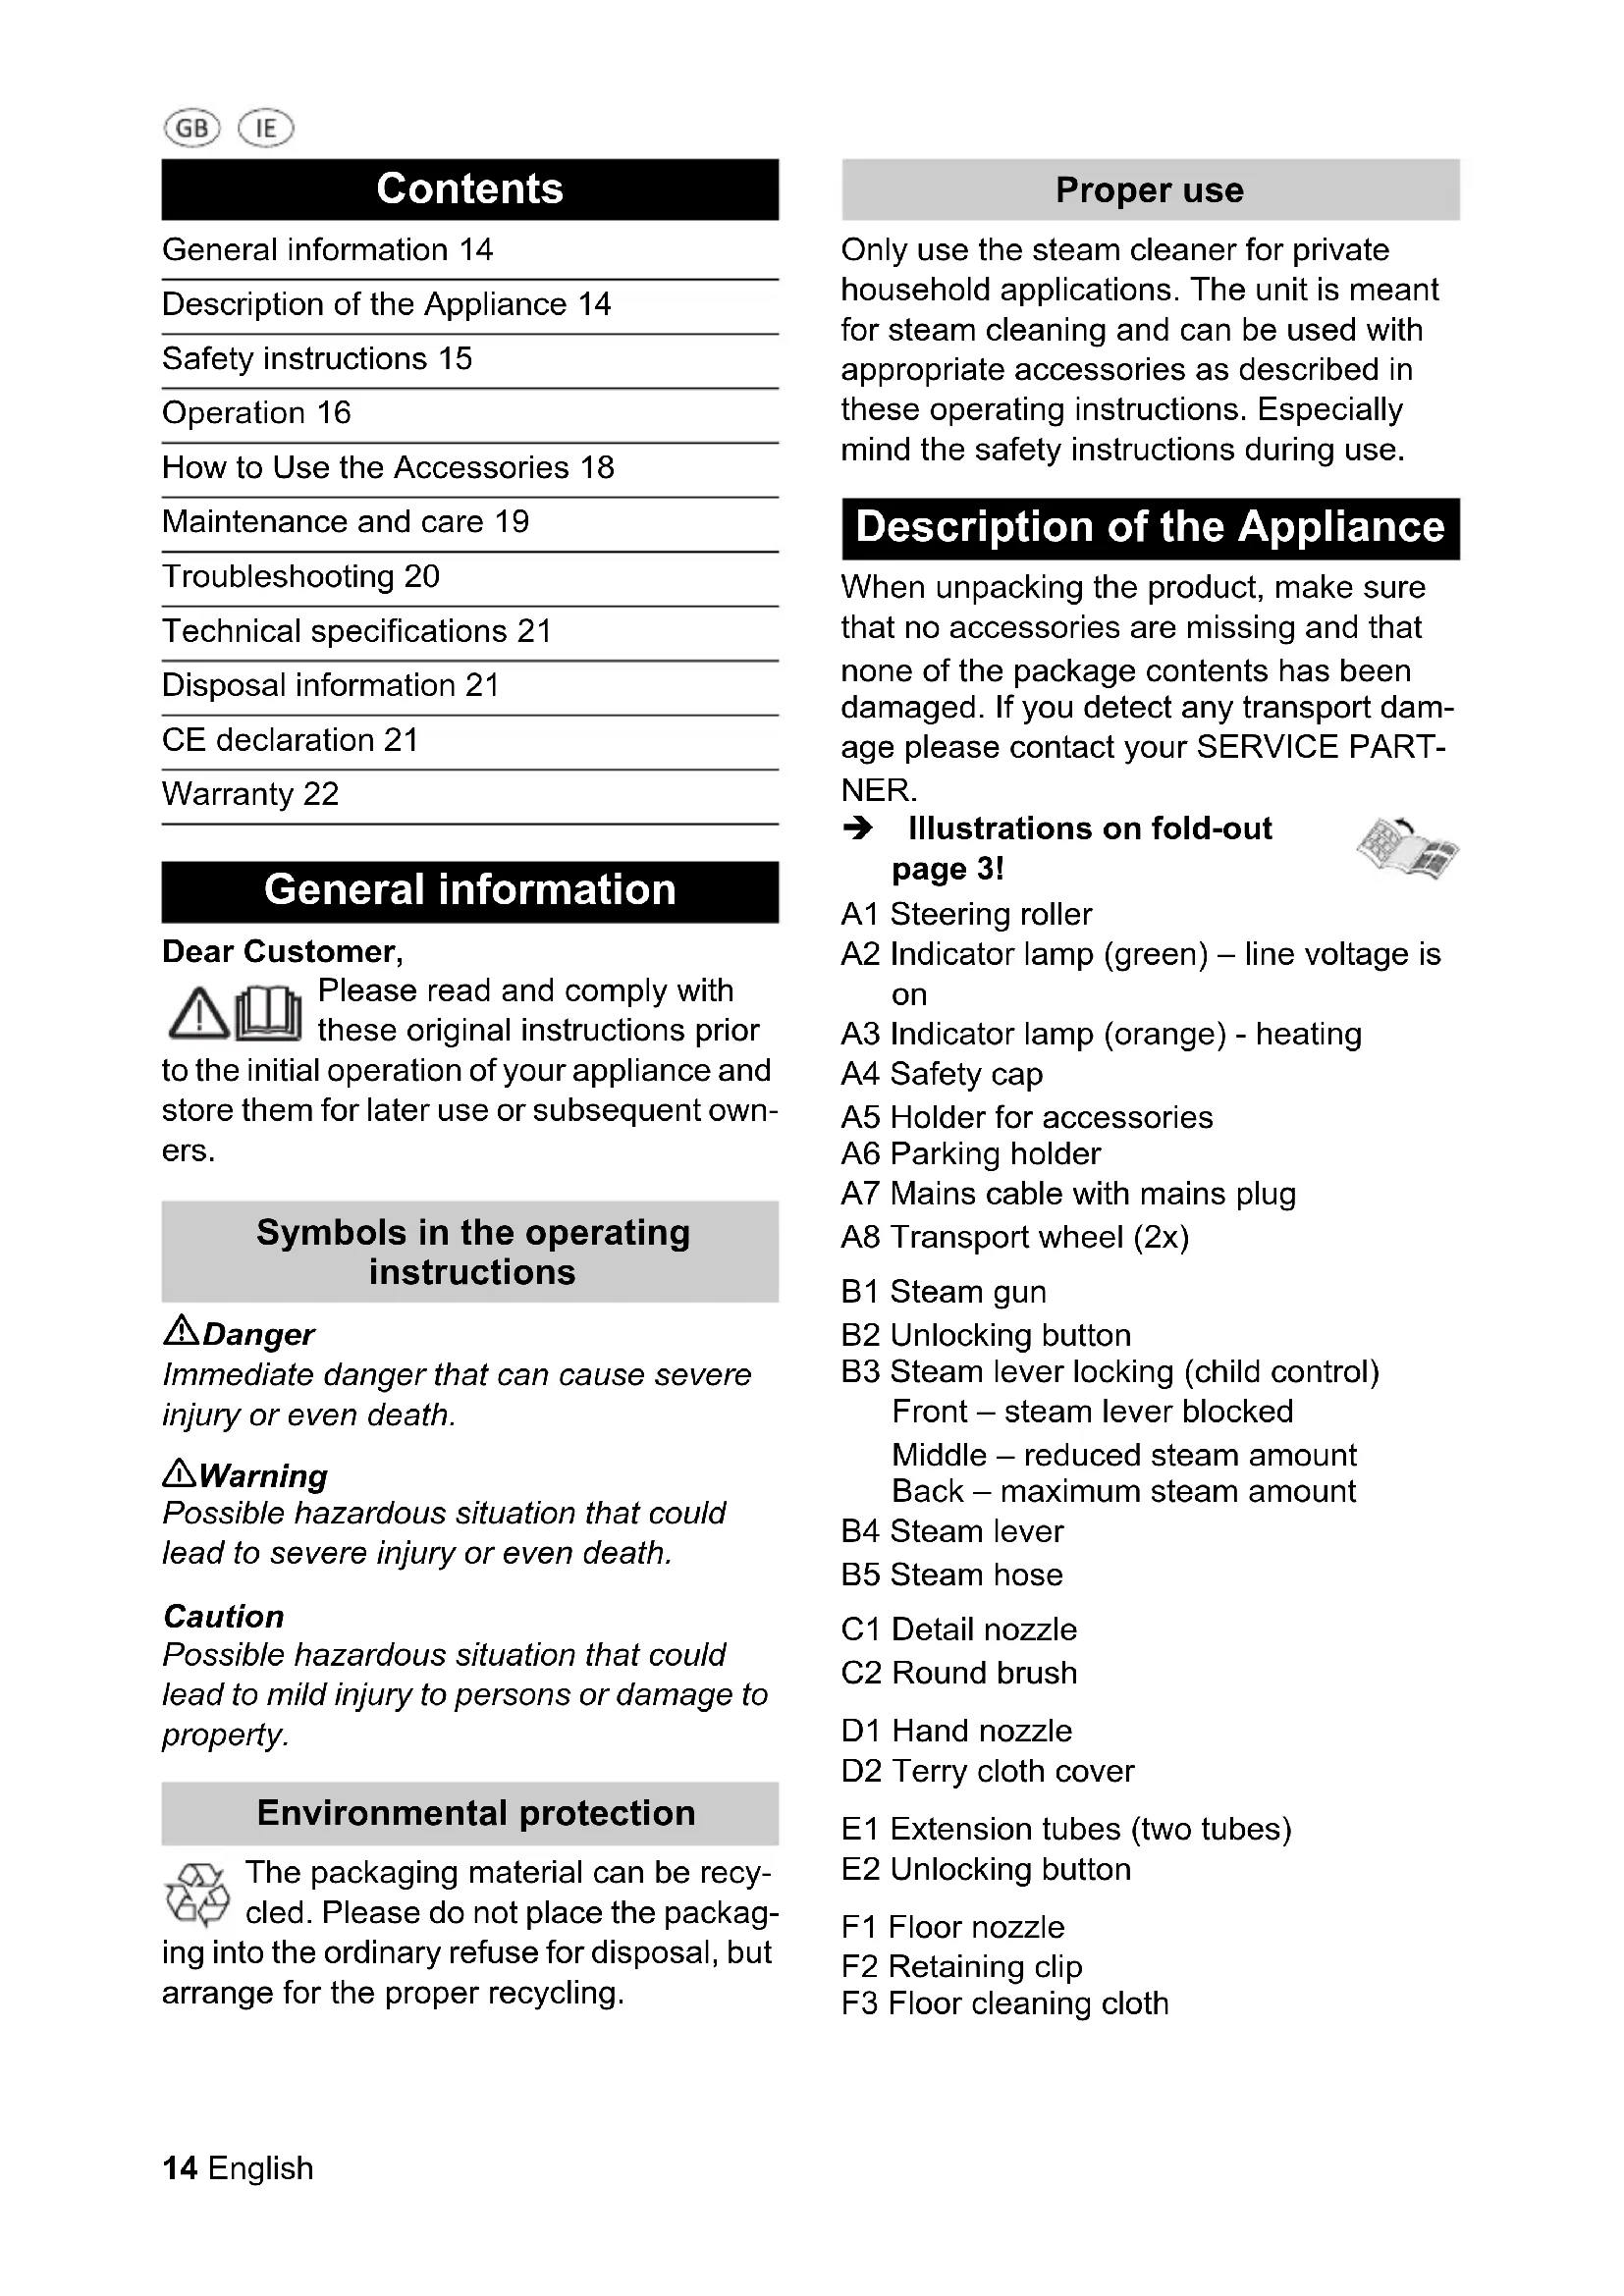
Description of the Appliance
When unpacking the product, make sure that no accessories are missing and that none of the package contents has been damaged. If you detect any transport damage please contact your SERVICE PARTNER.
Illustrations on fold-out page 3!

A1 Steering roller
A2 Indicator lamp (green) - line voltage is on
A3 Indicator lamp (orange) - heating
A4 Safety cap
A5 Holder for accessories
A6 Parking holder
A7 Mains cable with mains plug
A8 Transport wheel (2x)
B1 Steam gun
B2 Unlocking button
B3 Steam lever locking (child control)
Front - steam lever blocked
Middle - reduced steam amount
Back - maximum steam amount
B4 Steam lever
B5 Steam hose
C1 Detail nozzle
C2 Round brush
D1 Hand nozzle
D2 Terry cloth cover
E1 Extension tubes (two tubes)
E2 Unlocking button
F1 Floor nozzle
F2 Retaining clip
F3 Floor cleaning cloth
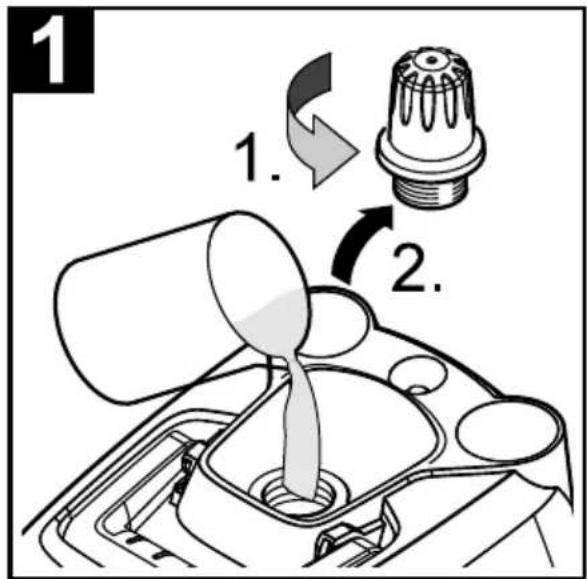
Quick Reference
Illustrations on Page 2
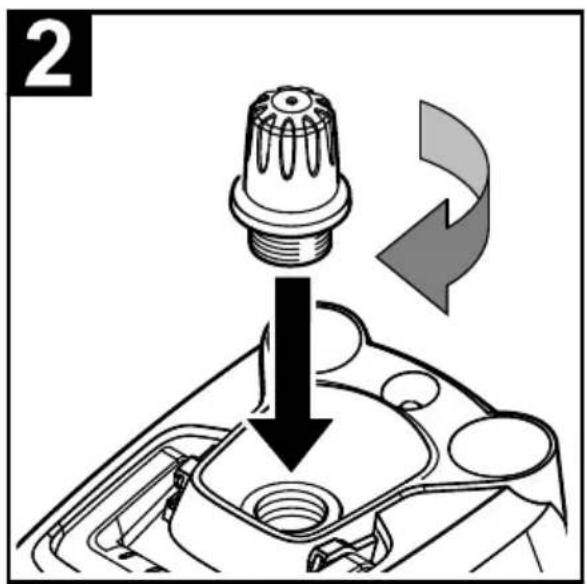
1 Unscrew the safety lock (A4) and fill the steam cleaner with a minimum of 0.2 litres and a maximum of 1.0 litres of water.
2 Screw in safety cap.
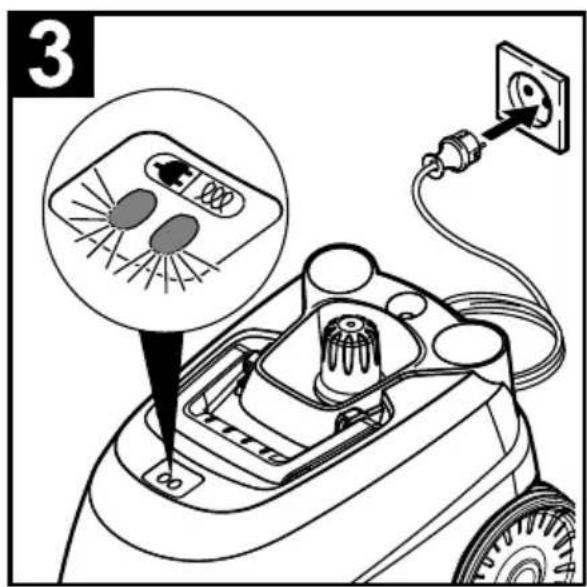
3 Insert the mains plug (A7) into a socket. Both indicator lamps (A2/A3) must illuminate.
4 The orange indicator lamp (A3) goes out after approximately 7 minutes.
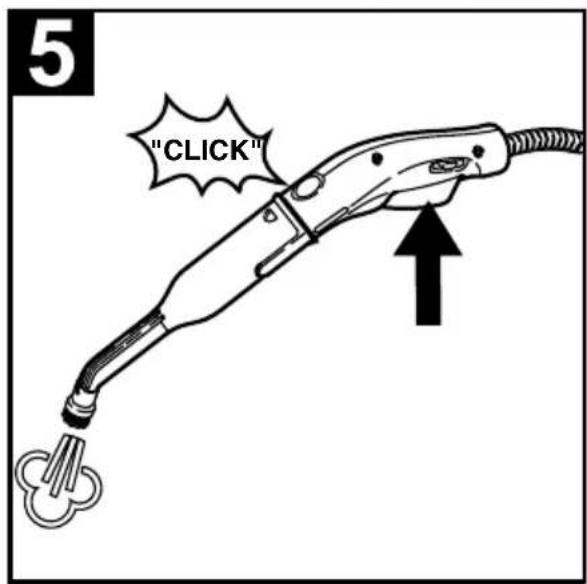
5 Connect the required accessories to the steam gun (B1).
The steam cleaner is ready to use.
Safety instructions
Danger
The appliance may not be used in areas where a risk of explosion is present.
If the appliance is used in hazardous areas the corresponding safety provisions must be observed.
- Never use the appliance in pools containing water.
The device should not be used to clean electrical appliances such as oven, exhaust, micro-wave, televisions, lamps, hair-dryer, electrical heating systems, etc.
Check the condition of the appliance and accessories for damage before use. Otherwise, the appliance must not be used. Please check in particular the power cord (A7), the safety lock (A4), and the steam hose (B5).
If the power cord is damaged, please arrange immediately for the exchange by an authorized customer service or a skilled electrician.
Please arrange for the immediate exchange of a damaged steam hose. You may only use a steam hose that is recommended by the manufacturer.
- Never touch the mains plug and the socket with wet hands.
Never use the appliance to clean objects containing hazardous substances (e.g. asbestos).
- Never touch the steam jet from a short distance with your hands and never direct the steam jet to persons or animals (risk of scalds).
Warning
The appliance may only be connected to an electrical supply which has been installed in accordance with IEC 60364.
The appliance may only be connected to alternating current. The voltage must correspond with the type plate on the appliance.
In wet rooms, e.g. bathrooms, connect the appliance to sockets with a series connected RCD adapter.
Unsuitable extension cables can be hazardous. Only use a splashproof extension cable with a minimum section of 3 × 1 mm^2 .
The connection between power cord and extension cable must not lie in water.
If couplings of the power cord or extension cable are replaced the splash protection and the mechanical tightness must be ensured.
The operator must use the appliance correctly. When working with the appliance, he must consider the local conditions and pay due care and attention to other persons, in particular children, who are nearby.
This device is not intended for use by persons (including children) with reduced physical, sensory or mental abilities or lacking experience and/or knowledge, unless they are supervised by a person responsible for their safety or are instructed by these persons on the use of the device. Children should be supervised, to ensure that they do not play with the device.
- Never leave the appliance unattended when it is in operation.
- Be very careful while cleaning tiled walls with sockets.
Caution
Make sure that the power cable or extension cables are not damaged by running over, pinching, dragging or similar. Protect the power cable from heat, oil, and sharp edges.
- Never fill solvents, solvent-containing liquids or undiluted acids (e.g. detergents, benzene, paint thinner, and acetone) into the water reservoir as these substances affect the materials used on the appliance.
The appliance must provide of a stable ground.
Use and store the unit only in accordance with the specifications in the description and/or figure.
The steam switch (B4) must not be locked during the operation.
- Protect the appliance from rain. Do not store outside.
Symbols on the machine

Steam
CAUTION - Danger of scalding
Safety Devices
Caution
Safety devices protect the user and must not be modified or bypassed.
Pressure controller
The pressure controller keeps the boiler pressure during the operation as constant as possible. The heating is turned off if the maximum operating pressure of 4 bar is reached in the boiler and is reactivated in case of a pressure drop in the boiler due to steam tapping.
Safety thermostat
The safety thermostat turns off the appliance if the boiler thermostat fails and the appliance overheats.
Please contact your SERVICE PARTNER to reset the safety thermostat.
Safety lock (A4)
The safety lock seals the boiler against the steam pressure that builds up in the boiler. If the pressure controller is defective and the steam pressure in the boiler rises above 5.7 bars, a pressure control valve in the safety lock opens, and steam emerges through the lock to the outside.
Please contact your SERVICE PARTNER before you put the unit back into operation.
Operation
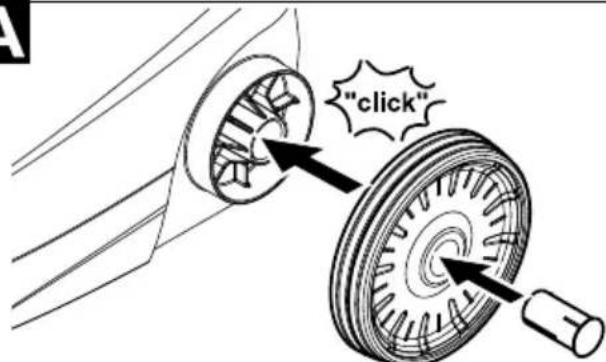
Attaching the Accessories
IllustrationA
Insert steering roller (A1) and transport wheels (A8) and let them lock into place.
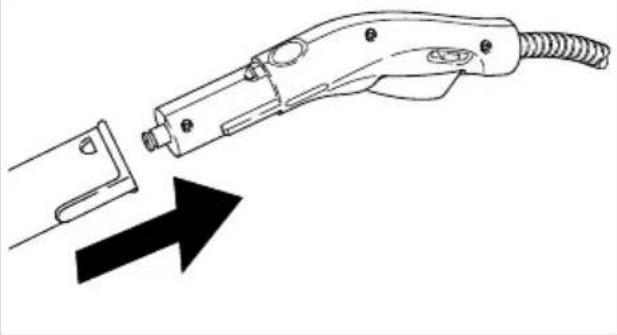
IllustrationB
Connect the required accessories to the steam gun (B1).
Insert the open end of the accessory on the steam gun and push onto the steam gun until the unlocking button (B2) of the steam gun locks into place.
IllustrationC
Use the extension pieces (E1) if necessary. To do so, connect one or both extension pieces to the steam gun (B1). Insert the required accessories on the free end of the extension piece.
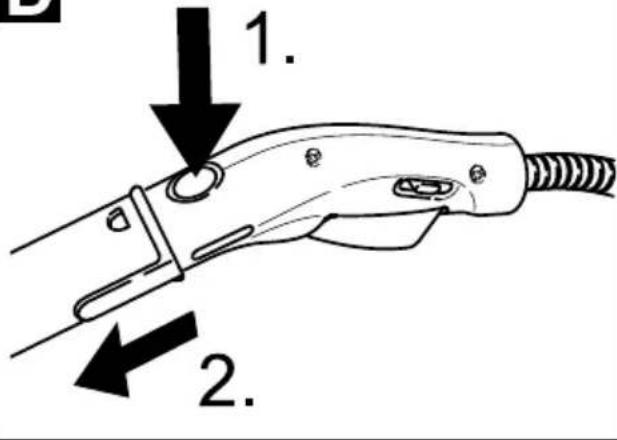
Removing the Accessories
Danger
Hot water may drip out of the accessory parts while you are detaching them! Never detach accessory parts while steam streams out - risk of scalding!
Push the steam lever locking (B3) to the front (steam switch blocked).
IllustrationD
To detach the accessory parts, press the unlocking button (B2 or E2), and pull the items apart.
Fill up with water
Note: If you always use usual commercial distilled water it is not necessary to descale the boiler.
Caution
Do not use condensation water from the drier!
Do not fill in detergents or other additives!
Remove the safety cap (A4) from the device.
Empty remaining water from boiler.
Fill the boiler with a minimum of 0.2 litres and a maximum of 1.0 litres of fresh tap water
Note: You can cut down the heating-up time by using warm water.
Screw the safety cap (A4) back onto the device.
Turning on the Appliance
Place the unit securely on a firm surface.
Caution
The appliance must not be carried during cleaning.
Insert the mains plug (A7) into a socket. Both indicator lamps (A2/A3) must illuminate.
Caution
Do not turn the appliance on without water in the boiler. Otherwise, the appliance may overheat (see Help with faults).
The orange indicator lamp (A3) goes out after approximately 7 minutes.
The steam cleaner is ready to use.
Push the steam switch lock (B3) to the back.
Note: If you push the lock forward, the steam switch cannot be actuated (child control).
Operate the steam switch (B4) and direct the emerging steam jet to a cloth until the steam emerges evenly.
Note: The heating of the steam cleaner is turned on in regular intervals during the operation of the appliance in order to maintain the pressure in the boiler at a constant level. When the heating is turned on, the orange indicator lamp (heater) lights up.
Adjusting the Steam Quantity
Use the steam switch (B4) to regulate the discharged steam.
The lock of the steam switch (B3) also allows for steam volume regulation.
- Switch in front position: no steam (child control)
- Switch in middle position: reduced steam amount
- Switch in back position: maximum steam amount
Refilling Water
Water needs to be filled into the boiler, if the steam volume decreases during work and no more steam is emitted in the end.
Note: The safety lock (A4) cannot be opened as long as slight pressure remains in the boiler.
Disconnect the mains plug (A7) from the socket.
Push the steam lever (B4) until steam discharge stops. Now, the boiler of the appliance is unpressurized.
Remove the safety cap (A4) from the device.
Danger
A residual amount of steam may be emitted when you open the safety lock. Be careful when opening the safety lock, there is a risk of scalding.
Fill the boiler with a minimum of 0.2 litres and a maximum of 1.0 litres of fresh tap water
GB IE
Danger
If the boiler is hot, there is the risk of scalding as the water may splash back during the filling process! Do not fill any detergents or other additives into the boiler!
Screw the safety cap back onto the device.
Insert the mains plug into a socket.
The orange indicator lamp (A3) goes out after approximately 7 minutes. The steam cleaner is ready to use.
Turning Off the Appliance
Disconnect the mains plug (A7) from the socket.
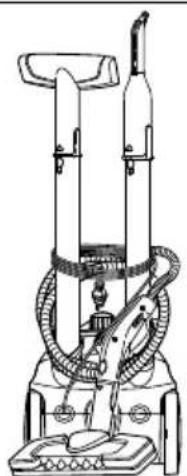
Storing the Appliance
IllustrationE
Put the extension pipes (E1) into the large accessory compartments (A5).
- Insert the manual nozzle (D1) and detail nozzle (C1) onto each extension pipe.
Put the round brush (C2) into the medium accessory compartments.
- Hook the floor nozzle (F1) into the parking holder (A6).
- Wrap the steam hose (B5) around the extension pipes and insert the steam pistol (B1) into the floor nozzle (F1).
How to Use the Accessories
Important application instructions
Cleaning of Textiles
Prior to treatment with the steam cleaner, always check the reaction of the textiles in an inconspicuous location: Steam heavily at first, then let dry and then check for colour or shape changes.
Cleaning of Coated or Lacquered Surfaces
Be careful when you clean kitchen and living room furniture, doors, parquet, lacquered or plastic-coated surfaces. The wax, furniture polish, plastic surfaces or paint can come loose or stains can be created. Therefore, always clean these surfaces with a steamed cloth only.
Caution
Never direct the steam jet at glued edges as the edge band may loosen. Do not use the steam cleaner on unsealed wooden or parquet floors.
Cleaning of Glass
In case of low outside temperatures, especially in the winter, warm up the window pane by slightly steaming the entire glass surface. This will prevent tensions on the surface which might lead to glass breakage.
Caution
Do not direct steam onto the sealed locations of the window frame to prevent damage.
Steam gun (B1)
You can use the steam gun without any additional accessories, e.g.:
- to remove odours and wrinkles from hanging clothes by steaming them at a distance of 10 to 20~cm .
to remove dust from plants. Here, keep a distance of 20-40 cm. - for moist dusting, by briefly steaming the cloth and wiping the furniture with it.
Detail nozzle (C1)
The closer this nozzle is to the contaminated area, the higher the cleaning effect, as the temperature and the steam are highest at the nozzle output. Especially suited for cleaning difficult access locations, joints, fittings, drains, sinks, toilets, blinds and heaters. Heavy limescale can be drenched in vinegar prior to steam-cleaning. Let the vinegar penetrate for about 5 minutes.
Round brush (C2)
The round brush can be installed onto the detail nozzle as an accessory. Attached brushes can therefore be used to remove heavy soiling.
Caution
Not suited for the cleaning of sensitive surfaces.
Manual nozzle (D1)
Pull the terry cloth (D2) cover over the manual nozzle. Especially well-suited for small washable areas, shower stalls, mirrors or furniture cloth material.
Floor nozzle (F1)
Suited for all washable wall and floor coverings, e.g. stone floors, tiles and PVC floors. Work slowly on very dirty surfaces to allow the steam to act on the dirt for a longer period of time.
Note:Detergent residue or care emulsions that are still present on the surfaces to be cleaned, can lead to smears when steam cleaned. However, these will disappear with repeated cleaning procedures.
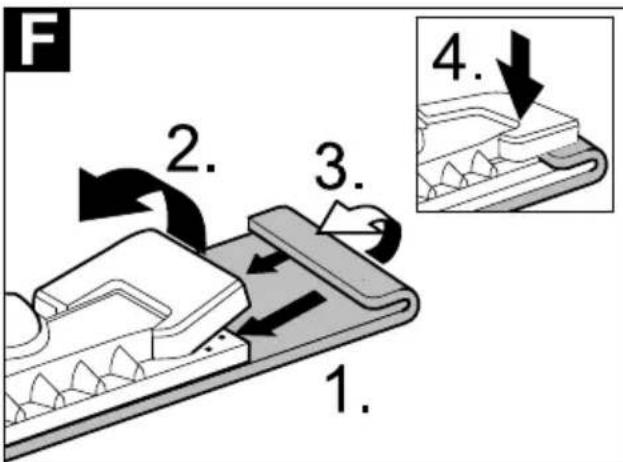
IllustrationF
Attach the floor cloth to the floor nozzle.
1 Fold the floor cloth (F3) the long way and place the floor nozzle (F1) on top of it.
2 Open holding clamps (F2).
3 Place the cloth ends into the openings.
4 Close the holding clamps.
Caution
Do not insert fingers between the clamps.
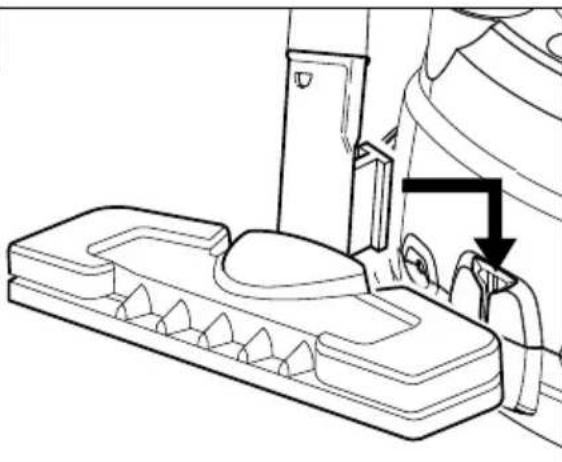
Parking the floor nozzle
Illustration
During work breaks:
Hook the floor nozzle (F1) into the parking holder (A6).
Maintenance and care
Danger
Always disconnect the mains plug (A7) and allow the steam cleaner to cool down before performing any maintenance work.
Rinsing the boiler
Rinse the steam cleaner boiler at the latest after 5 boiler fillings.
Fill the boiler with water and shake it strongly. This dissolves lime scaling residing on the boiler bottom.
Empty water out.
Descaling the boiler
Note: If you always use usual commercial distilled water it is not necessary to descale the boiler.
As limescale builds up on the boiler walls, we recommend to descale the boiler in the following intervals (RF=reservoir fillings):
| Degree of hardness° | dH mmol/l RF | |
| I soft 0-7 0-1,3 55 | ||
| II medium 7-14 1,3-2,5 45 | ||
| III hard 14-21 2,5-3,8 | 35 | |
| IV very hard >21 >3,8 | 25 |
Note: Please contact your Conservancy Board or the local water supply company to inquire about the hardness of your water.
Disconnect the mains plug (A7) from the socket.
Completely empty the steam boiler.
Warning
Use a commercially available descaler to descale your unit.
Caution
Use caution when filling and emptying the steam cleaner. The descending solution can have an aggressive effect on delicate surfaces.
Pour the descending solution into the boiler and allow it to react for approximately 8 hours.
Warning
Do not screw the safety cap (A4) on the appliance during the decalcifying.
Do not use the steam cleaner as long as there is decalcifying agent in the boiler.
Completely empty the descending solution after 8 hours. A small amount of the solution will remain in the boiler. Therefore, you should rinse the boiler two to three times with cold water to remove any residues of the descaler.
Care of the Accessories
Note: The floorcloth (F3) and the terry cloth cover (D2) have been pre-washed and can be used immediately for working with the steam cleaner.
You can wash dirty floorcloths and terry cloth covers in the washing machine at 60^ . Do not use a liquid softener as this would affect the ability of the cloths to pick up dirt. You may tumble dry the cloths.
Cleaning the device
Warning
Do not use abrasives, glass or universal cleaners! Never immerse the appliance in water.
Clean the appliance and accessory parts made of plastic with a commercial plastic cleaner.
Troubleshooting
Often, failures have simple causes and you can do the troubleshooting yourself using the following overview. If you are in doubt or if the failure is not listed here please contact your SERVICE PARTNER.
Danger
Always disconnect the mains plug (A7) and allow the steam cleaner to cool down before performing any maintenance work. Only the authorized SERVICE PARTNER is allowed to repair the unit.
Long heating-up time
Steam boiler is decalcified.
Descale the steam boiler.
No steam
No water in the steam boiler.
Turn off the appliance.
See "Refilling Water" Page 17
Steam lever (B4) cannot be pressed anymore
Steam switch is secured with the lock / child-proof lock.
Push the steam switch lock (B3) to the back.
Service
UK helpline: 0844 8710705
IE helpline: 01-4097777
info@cleanerworldgmbh.co.uk
Technical specifications
Power connection
| Voltage 220-240 | V |
| 1~50/60 Hz |
Protective class I
Protection class IPX4
Performance data
Heating output 1500 W
| Operating pressure | 0,32 MPa |
| max. |
Heating time 7 Minutes
Max. steam quantity 40 g/min
Dimensions
Boiler capacity 1,0 I
| Weight (without acces-sories) | 3,1 kg |
Width 254 mm
Length 380 mm
Height 260 mm
Subject to technical modifications!
Disposal information
Do not use worn out appliance; first put it out of use; then arrange for its proper disposal as scrap.

Old appliances contain valuable materials that can be recycled. Please arrange for the proper recycling of old
appliances. Please dispose your old appliances using appropriate collection systems.
CE declaration
We hereby declare that the machine described below complies with the relevant basic safety and health requirements of the EU Directives, both in its basic design and construction as well as in the version put into circulation by us. This declaration shall cease to be valid if the machine is modified without our prior approval.
Product: Steam cleaner
Type:SDR 1500 A1
Relevant EU Directives
2006/95/EC
2004/108/EC
Applied harmonized standards
EN 55014-1: 2006 + A1: 2009
EN 55014-2: 1997 + A2: 2008
EN 60335-1
EN 60335-2-54
EN 61000-3-2: 2006 + A2: 2009
EN 61000-3-3:2008
EN 62233: 2008
Applied national standards
The undersigned act on behalf and under the power of attorney of the company management.
E. Moritsch
Head of Development
Authorised Documentation Representative E. Moritsch
Cleanerworld GmbH
Am Schützenbaum 19
97953 Konigheim (Germany)
Königheim, 2010/10/01
Warranty
The warranty period is 3 years and begins on the date of purchase. In order to file a warranty claim, you must present the sales receipt as well as complete a warranty card. Therefore, make sure you keep the sales receipt and the warranty card in safe place!
The manufacturer warrants the rectification of defects that can be traced back to flaws in material or workmanship. The manufacturer will choose to repair, replace or refund the money for the product. The warranty does not cover damages caused by an accident, an unexpected incident (e.g. lightning, water, fire, etc.), improper use, or
transport, disobeying the safety and maintenance instructions or other improper processing or modifications. The warranty period can only be extended if this is intended by a legal standard. In countries, where a (mandatory) warranty and/or a spare parts storage or replacement warranty is demanded by law, the minimum legal requirements apply.
After the warranty period has elapsed, you may still send the defective device to the service address to be repaired. Repairs made after the warranty period has elapsed, are subject to repair costs.
Warranty card
Company and seller's headquarters: LIDL
Service address:
see page 20 of Operating Instructions
Phone hotline:
see page 20 of Operating Instructions
see page 20 of Operating Instructions
Name of manufacturer/importer:
Cleanerworld GmbH
Am Schuetzenbaum 19
97953 Koenigheim (Germany)
Tel: +49 1805 212784
Fax: +49 1805 212785
Product name:
Steam cleaner SDR 1500 A1
Product/manufacturer ID no.:
1.512-330.0 1.512-331.0 1.512-332.0
1.512-333.0 1.512-334.0 1.512-335.0
1.512-336.0 1.512-337.0
Buyer's name:
Postal Code/City:
Street:
Phone/E-mail:
Signature:
Fault description:
Contenu
Consignes generales 23
97953 Konigheim (Germany)
Tel: +49 1805 212784
Fax: +49 1805 212785
www.cleaningworld-gmbh.de
service@cleanerworld-gmbh.de
BE
Sertronics
Tel: 02.8081627
steamcleaner-be@sertronics.com
www.sertronics.com
\section*{Caracteristiques techniques}
E. Moritsch
Head of Development
Responsible de la documentation:
E. Moritsch
Cleanerworld GmbH
Am Schützenbaum 19
97953 Konigheim (Germany)
Königheim, 2010/10/01
Garantie
97953 Konigheim (Germany)
Tel: +49 1805 212784
Fax: +49 1805 212785
service@cleanerworld-gmbh.de
www.cleanerworld-gmbh.de
Dati tecnici
97953 Konigheim (Germany)
Königheim, 2010/10/01
Garanzia
97953 Koenigheim (Germany)
Tel: +49 1805 212784
Fax: +49 1805 212785
Geen water in reservoir.
steamcleaner-nl@sertronics.com
www.sertronics.com
BE
Sertronics
Tel: 02.8081627
steamcleaner-be@sertronics.com
www.sertronics.com
Technische gegevens
Stroomaansluiting
| Spanning 220-240 | V |
| 1~50/60 Hz |
Stoomreservoir 1,0 I
Gewicht (excl. accessoires) 3,1 kg
Breedte 254 mm
Lenght 380 mm
Hoopte 260 mm
E. Moritsch
Head of Development
97953 Konigheim (Germany)
Königheim, 2010/10/01
Garantie
E. Moritsch
Head of Development
97953 Konigheim (Germany)
Königheim, 2010/10/01
Garantia
97953 Koenigheim (Germany)
Tel: +49 1805 212784
Fax: +49 1805 212785
E. Moritsch
Head of Development
97953 Koenigheim (Germany)
Koenigheim, 2010/10/01

Izjava o sukladnosti za ovaj proizvod dostupna je na internet stranici www.lidl.hr.
Jamstvo
Jamstveni rok iznosi 3 godine pocev od datuma kupnje. Za ostvarivanje prava na jamstvene usluge treba priloziti fiskalni račun ili prisznanicu o uplati i ispunjen jamstveni list. Stoga Vas molimo da sačuvate fiskalni račun i jamstveni list!
97953 Koenigheim (Germany)
Tel: +49 1805 212784
Fax: +49 1805 212785
Naziv proizvoda:
Parni Čistac SDR 1500 A1
Identifikacijski broj proizvoda/proizvodača:
1.512-330.0 1.512-331.0 1.512-332.0
1.512-333.0 1.512-334.0 1.512-335.0
1.512-336.0 1.512-337.0
Imekupca:
mobile: 06-20-276-5907
Fax: 06-1-207-0299
E. Moritsch
Head of Development
97953 Koenigheim (Germany)
Tel: +49 1805 212784
Fax: +49 1805 212785
Termék megnevezése: