RA126 - Watch OREGON SCIENTIFIC - Free user manual and instructions
Find the device manual for free RA126 OREGON SCIENTIFIC in PDF.
User questions about RA126 OREGON SCIENTIFIC
0 question about this device. Answer the ones you know or ask your own.
Ask a new question about this device
Download the instructions for your Watch in PDF format for free! Find your manual RA126 - OREGON SCIENTIFIC and take your electronic device back in hand. On this page are published all the documents necessary for the use of your device. RA126 by OREGON SCIENTIFIC.
USER MANUAL RA126 OREGON SCIENTIFIC
COMPASS WATCH Model: RA126 User Manual
COMPASS WATCH MODEL: RA126
USER MANUAL
CONTENTS
Introduction. 2
Compass Watch. 2
Getting Started. 3
Getting Started. 3
Turn On Watch (First-time use only). 3
Getting Started. 3
Use in the Water. 4
Operation. 4
Backlight and Keypad Lock. 4
Operating Modes. 5
Clock Mode. 6
To Set the Time and Date. 6
Stopwatch. 6
To Set the Alarm. 7
Compass. 7
About the Compass. 7
Compass and Calibration. 8
To Set the North Calibration. 8
Declination Angle. 8
About Declination. 8
Bearing Tracking System. 9
About the Bearing Tracking System. 9
To Set the Bearing Tracking System. 9
Specifications. 10
Precautions. 10
About Oregon Scientific. 11
EU-Declaration of Conformity. 11
INTRODUCTION
Thank you for selecting the Oregon Scientific™ Compass Watch (RA126). The RA126 is a very useful product for any outdoor activity as it can help you locate your position and find your direction using the bearing tracking system. Equipped with temperature function, it is the perfect companion for any user who wishes to venture into the great outdoors. The RA126 bundles a digital compass, northern calibration, true north calibration, adjustable declination angle, bearing tracking system stopwatch and temperature.
IMPORTANT
- The measurement functions built into the RA126 are not meant to substitute professional measurement or industrial precision devices. Values produced by this watch should be considered as reasonable representations only.
- Oregon Scientific™ assumes no responsibility for any loss, or any claims by third parties that may arise through the use of this watch.
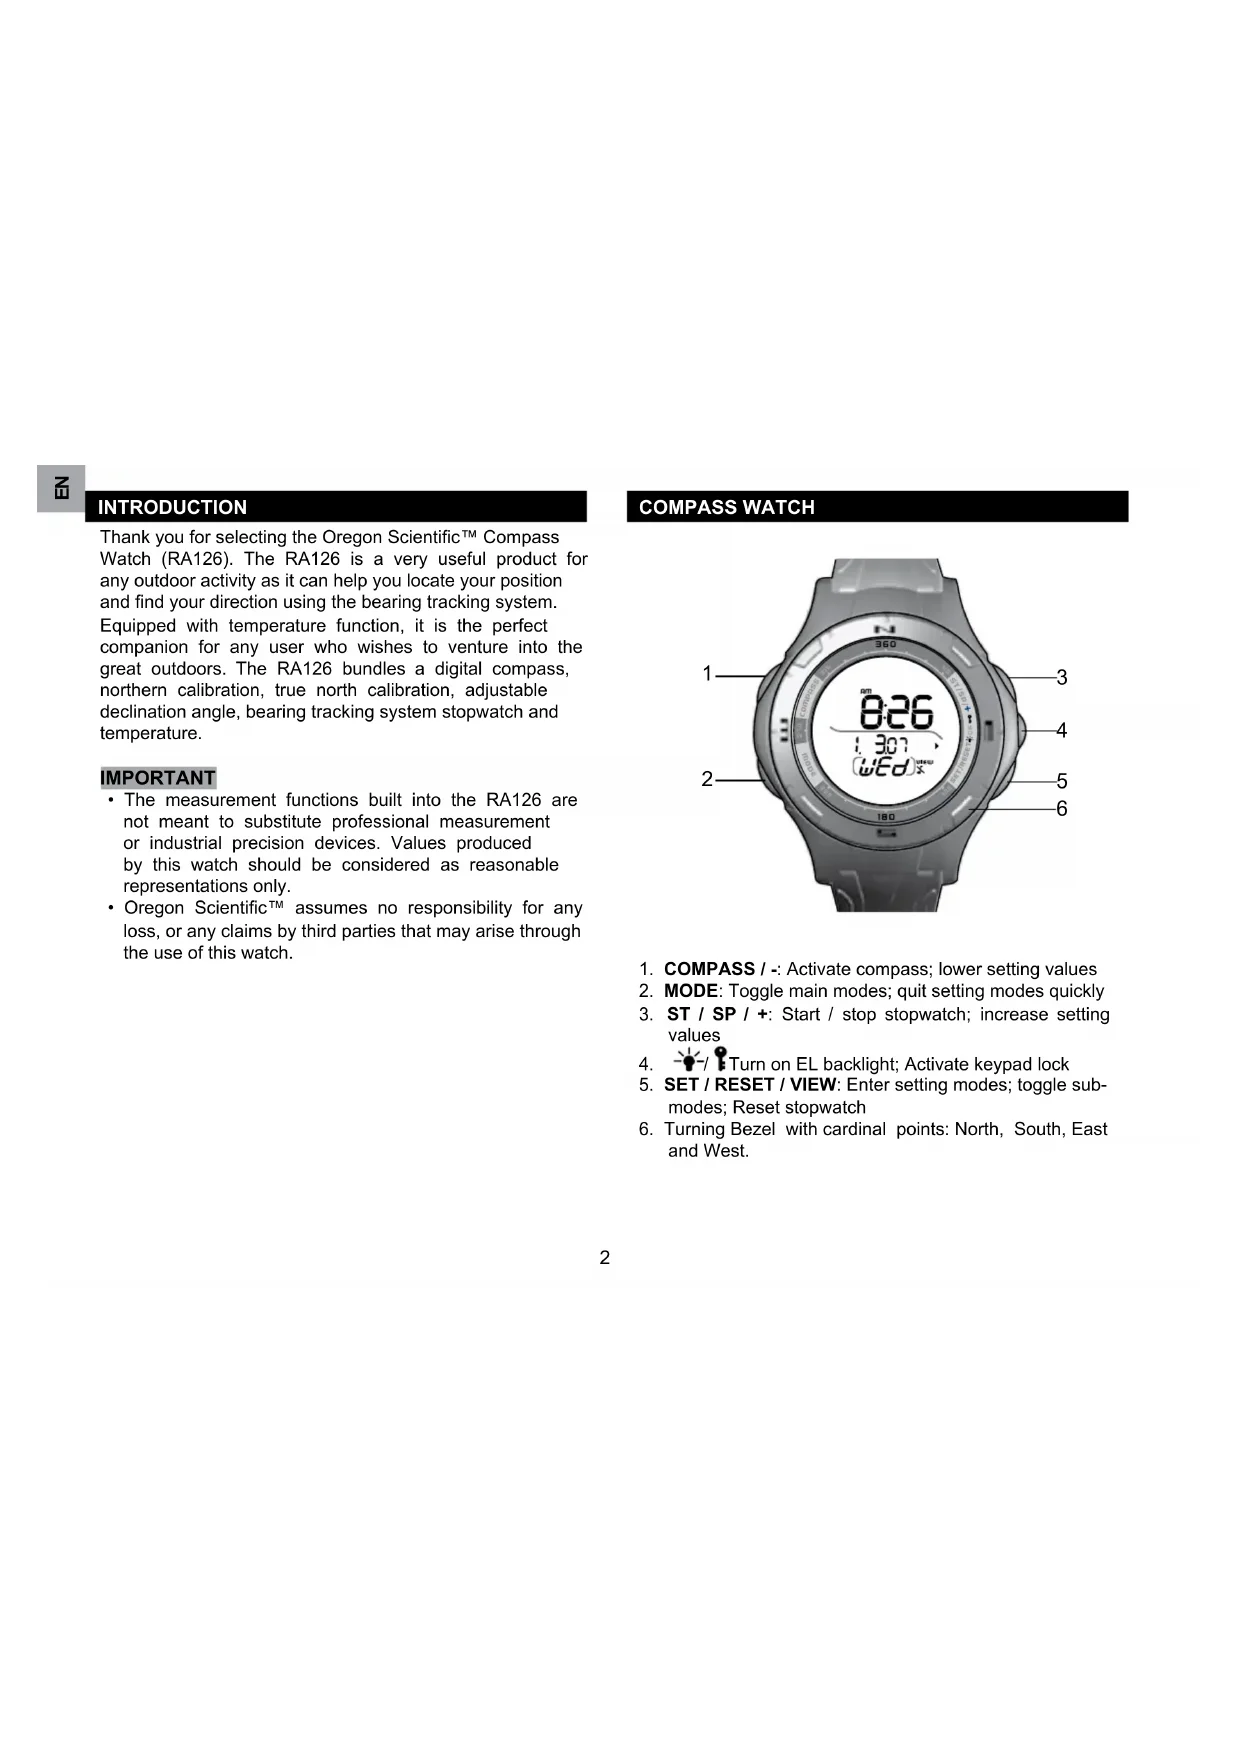
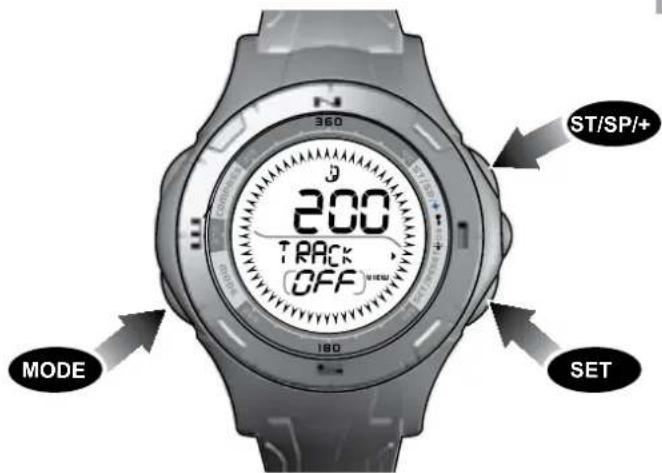
COMPASS WATCH
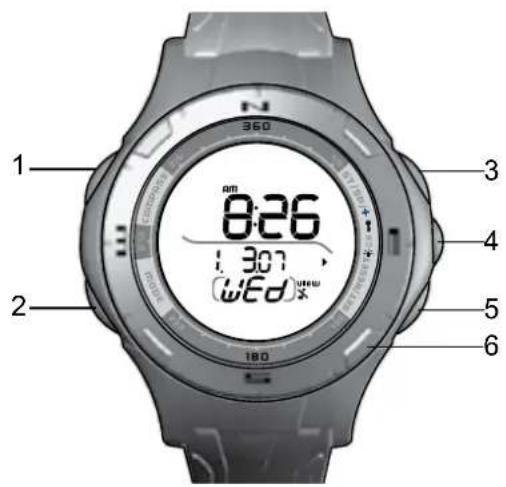
- COMPASS / Activate compass; lower setting values
- MODE: Toggle main modes; quit setting modes quickly
-
ST / SP /+: Start / stop stopwatch; increase setting values
-
Turn on EL backlight; Activate keypad lock
-
SET/RESET/VIEW:Enter setting modes; toggle submodes; Reset stopwatch
- Turning Bezel with cardinal points: North, South, East and West.
GETTING STARTED
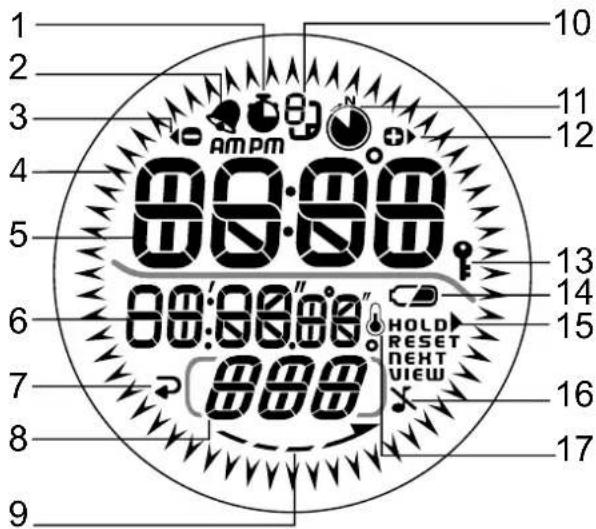
- : Swatch is shown or running
- Alarm is set; will flash when activated
- Smart indicator to lower values
- " 一 ^ < ^ : Directional arrows indicates your position
- BB:Master digits:i.e.Time
- 8: Minor digits: i.e. Stopwatch
-
Smart indicator to return / quick confirm
8.Cardinal direction -
: Indicates which way to turn the watch when calibrating the compass
- : Sub-mode page indicator
- : Indicates bearing tracking system in switched
ON 12. Press ST / SP / + to increase values 9 13.Keypad lock activated - Low battery
- Smart indicator
- X:Keypad tone is turned OFF
- :Temperature icon
GETTING STARTED
TURN ON WATCH (FIRST-TIME USE ONLY)
Press and hold any key for 2 seconds to activate the LCD display.
GETTING STARTED
The watch uses a 1 x CR2032 lithium battery, which has already been installed. See below for battery warnings.
| LOW BATTERY ICON | DESCRIPTION |
| The watch battery is low. |
#
#
Appears when the battery is too low to operate the sensor. " - " is shown instead of temperature and compass values.
To replace battery:
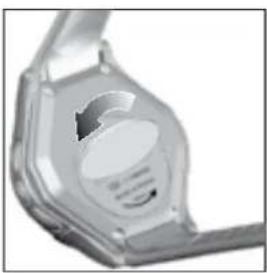
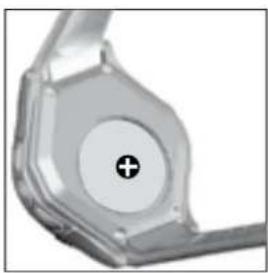
- Using a coin, remove battery compartment lid by twisting counter-clockwise until it clicks out of place.
- Remove the old batteries and insert the new matching the polarities.
- Replace the lid by twisting it clockwise until firmly in place.
NOTE When battery is replaced it is important to recalibrate the magnetic sensor.
USE IN THE WATER
The RA126 is water-resistant up to 50 meters (164 feet).
| SHOWERING (WARM) COOL WATER ONLY) | LIGHT SWIMMING / SHALLOW WATER | SHALLOW DIVING/ SURFING/ WATER SPORTS | SNORKELING / DEEP WATER DIVING | |
| 50M/ 164 FEET | OK OK OK OK NO | |||
NOTE Set the unit before exposing it to excessive water. Pressing the keys while in the water or during heavy rainstorms may cause water to enter the unit.
OPERATION
Press turn backlight ON for 5 seconds.
NOTE The backlight function will not operate while the low battery icon is displayed and it will return to normal once batteries have been replaced.
To toggle keypad lock ON / OFF:
Press and hold - / indicates keypad is locked.
OPERATING MODES
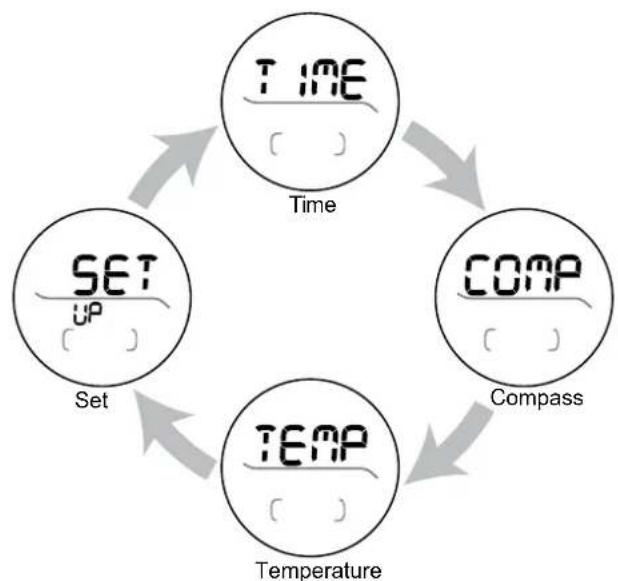
Press MODE to switch between:
Clock mode
- Compass mode
- Temperature mode
- Set up mode
To scroll through sub-modes:
Press SET to scroll through the mode options in each mode. They are as follows:

Clock mode:
Compass mode:
Temperature mode:

set up mode:
CLOCK MODE
TO SET THE TIME AND DATE
- Press MODE to navigate to Clock mode.
- Press SET to navigate to time and date.
- Press and hold SET to enter settings.
- Press ST / SP / + to scroll upwards and COMPASS / - to scroll downwards through the setting options. The setting sequence is as follows: 12 / 24-hour time; hour; minute; year; day-month / month-day; month; day; temperature unit.
- Press SET to confirm.
NOTE If no key is pressed for ten seconds, the display will return to Clock mode.
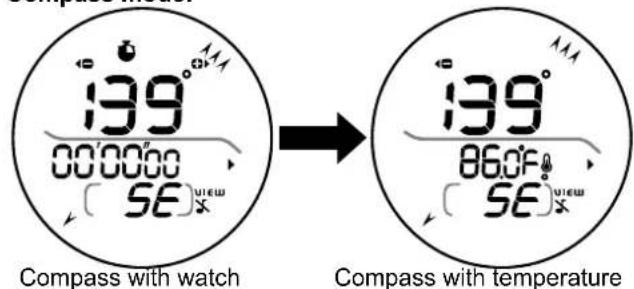
STOPWATCH
- Press MODE to navigate to Compass mode.
- Press SET to navigate to Compass with stopwatch.
- Press ST/SP/+ to start and stop the stopwatch.
- Press and hold SET to reset.
NOTE Unless you stop the stopwatch, " will blink in all modes to remind you that the stopwatch is still timing.
To view Compass with temperature:
- Press MODE to navigate to Compass mode.
- Press SET to navigate to Compass with temperature.
NOTE The compass display is active for 30 seconds at a time. After this, the compass will go into power saving mode and "---" will appear on the display. To re-activate the compass, press COMPASS.
TO SET THE ALARM
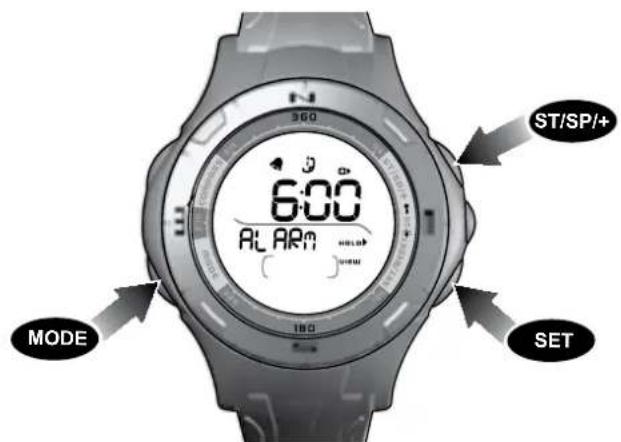
- Press MODE to navigate to Clock mode.
- Press SET to navigate to Alarm.
- Press and hold SET to enter settings.
- Press ST / SP / + to scroll upwards and COMPASS / - to scroll downwards through the setting options. The setting sequence is as follows: hour; minute.
- Press SET to confirm.
To activate or deactivate the alarm:
- Press MODE to navigate to Clock mode.
- Press SET to navigate to Alarm and press ST/SP/+ to turn the alarm on or off. will indicate that the alarm has been activated.
- Press SET to confirm.
NOTE When the alarm clock is activated, it will sound at the set time every day. Press any button to stop the alarm
for that day. The alarm clock is still active and will set off again the following day.
To silence the keys:
- Press MODE to navigate to Clock mode.
- Press SET to navigate to Beep ON / OFF.
- Press ST / SP / + to silence or to turn on key sounds.
COMPASS
ABOUT THE COMPASS
The compass shows the bearing of your position in degrees due North. The outer circumference of the display consists of 60 segments that graphically show your bearing. Three lit segments represent South whereas one lit segment represents North, as shown below.
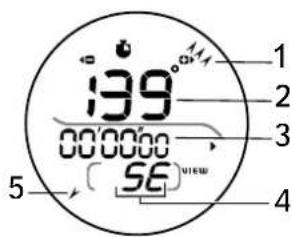
- South
- Bearing
- Stopwatch
4.Cardinal point - North
COMPASS AND CALIBRATION
Before the compass is first used, we recommend that you calibrate the compass sensor.
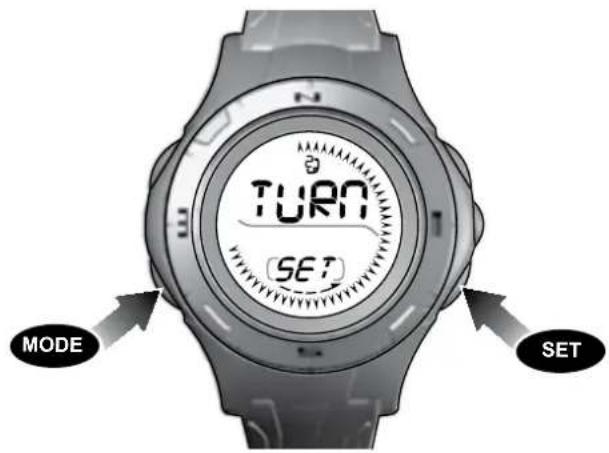
To calibrate the compass sensor:
- Press MODE to navigate to the Set up mode.
#
- Press SET to navigate to Calibration mode option.
- Press and hold SET to begin calibration of the compass.
Rotate the watch counter clockwise at the same speed as the moving segments around the circumference of the display. The rotation will be finished once you have performed 114 turns and the display will appear as shown below when nearing the end of its calibration.
NOTE The compass should be calibrated:
- Before you use it for the first time.
- When the battery is replaced.
- Before you leave for an extended outdoor activity.
- Whenever it is exposed to strong magnetic sources, extreme cold, or you suspect that other environmental conditions have affected the compass readings.
- If you notice that the compass is not showing the
direction correctly.
TO SET THE TRUE NORTH CALIBRATION
When you do not know the declination angle, the true north calibration function can be used to compensate for the difference between magnetic and true north. All you need to know is the direction of true north (this can be found from landmarks in your immediate vicinity). Setting the true north calibration makes the compass reading more accurate.
- Press MODE to navigate to Set up mode.
- Press SET to navigate to True north mode option.
- Turn the compass to the direction of true north and press ST/SP/+
To toggle True north calibration ON / OFF:
- Press MODE to navigate to Set up mode.
- Press SET to navigate to True north mode option.
- Press ST / SP / + to toggle true north mode to ON / OFF
NOTE If the declination angle is turned ON, the True north function will automatically turn itself OFF and vice-versa.
DECLINATION ANGLE
ABOUT DECLINATION
Declination is the angle between where a compass needle points (magnetic North Pole) and the true North Pole. The declination angle can vary from 0-30 degrees East (E) or West (W) and can be found on most maps or on the Internet.
For declinations in the United States:
http://www.ngdc.noaa.gov/seg/geomag/jsp/Declination.jsp
-
Enter your zip code in the area provided
-
Click "Get Location"
- Scroll down and click "Compute"
For declinations in Canada: http://www.geolab.nrcan.gc.ca/geomag/apps/mdcal_e.php
When you set the declination angle on the compass you compensate for the difference between true and magnetic north. This increases it's accuracy.
To set the declination angle:
- Press MODE to navigate to Set up mode.
- Press SET to navigate to Declination mode option.
- Press and hold SET to enter settings mode.
- Press ST / SP / + or COMPASS / - to toggle settings. The setting options are as follows: WEST / EAST declination angle.
- Press SET to confirm.
BEARING TRACKING SYSTEM
ABOUT THE BEARING TRACKING SYSTEM
The bearing tracking system enables you to lock onto a bearing, which you will be able to relocate using the compass. By locking the bearing you can see when you deviate from your course and how much you need to correct it to get back on track.
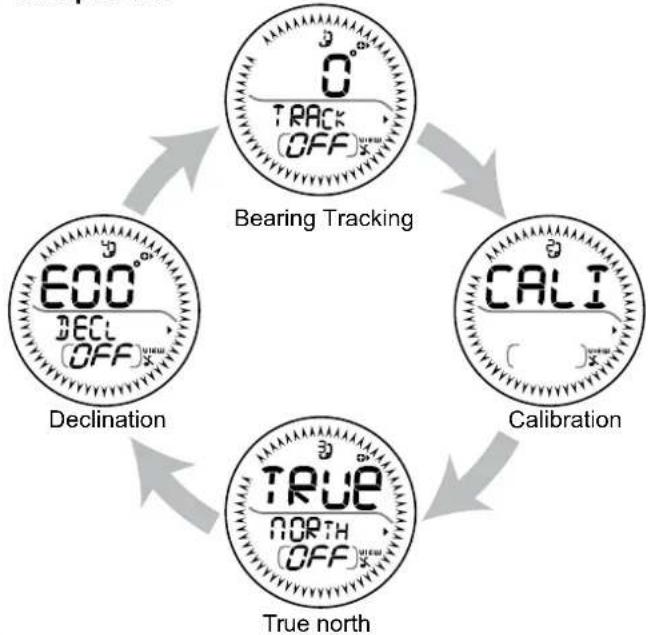
TO SET THE BEARING TRACKING SYSTEM
- Press MODE to navigate to Set up mode.
- Press and hold SET to enter setting mode.
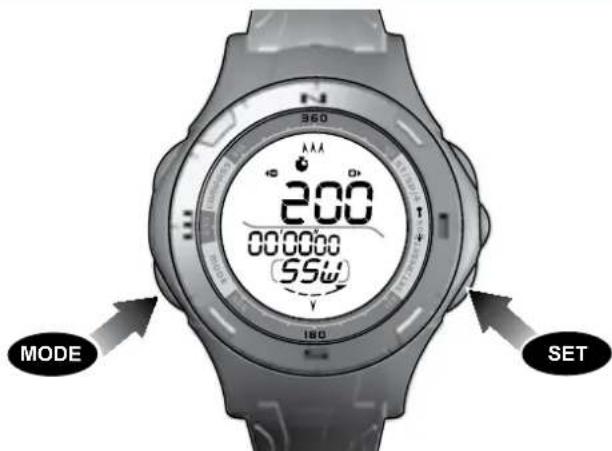
- The top figure shows your last bearing locked.
- The bottom figure shows your current bearing.
- Point the compass in the desired direction and press SET.
- Press SET to fine tune the bearing. Press ST/SP/+ to increase and COMPASS/- to decrease the bearing.
- Press SET to confirm.
- In the Compass mode, the locked bearing will appear instead of the cardinal reading.
Once the bearing tracking system has been set, the compass segments on the display will show how far you deviate from your locked course. See the examples below:
A. The locked bearing is 94 and the current bearing is 94.
B. Your locked bearing is 94 and your current bearing is 120.
面
A.
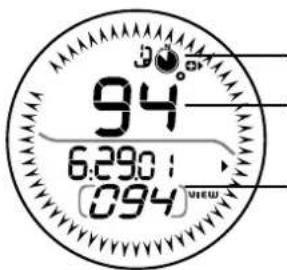
1 1. The locked bearing is 94 and the current bearing is 94.
2. Current compass bearing.
3. Locked compass bearing.
B.
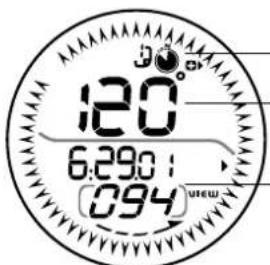
- Your locked bearing is 94 and your current bearing is 120.
3 2. Current bearing. - Locked bearing.
The compass segments now show the angle between your locked bearing and your current bearing. Therefore, you need to change the direction you are on to get back onto your locked bearing course.
To toggle the bearing tracking system to ON / OFF:
- Press MODE to navigate to Set up mode.
- Press SET to navigate to Bearing Tracking System.
- Press ST / SP / + to toggle ON / OFF.
NOTE The compass sensor should be calibrated before initially using the bearing tracking system.
SPECIFICATIONS
| Real time clock | 12/24 hour with hour / minute / second |
| Stopwatch | 00:00:00 to 59:59:59 (hrs: min: sec) |
| Thermometer measuring range | -5°C to 50°C (23°F to 122°F) |
| Resolution 0.1°C / 0.2°F | |
| Power Watch 1 x CR2032 3V battery | |
| Operating temp | -5°C to 50°C (23°F to 122°F) |
| Storage temp | -20°C to 60°C (-4°F to 140°F) |
| Water resistant | Up to 50 meters (164 feet) without pressing keys |
PRECAUTIONS
To ensure you use your product correctly and safely, read these warnings and the entire user manual before using the product:
- Use a soft, slightly moistened cloth. Do not use abrasive or corrosive cleaning agents, as these may cause damage. Use luke warm water and mild soap to clean the watch and chest belt thoroughly after each training session. Never use the products in hot water or store them when wet.
- Do not bend or stretch the transmitter part of the chest belt.
- Do not subject the product to excessive force, shock, dust, temperature changes, or humidity. Never expose the product to direct sunlight for extended periods. Such
treatment may result in malfunction.
- Do not tamper with the internal components. Doing so will terminate the product warranty and may cause damage. The main unit contains no user-serviceable parts.
- Do not scratch hard objects against the LCD display as this may cause damage.
- Take precautions when handling all battery types.
- Remove the batteries whenever you are planning to store the product for a long period of time.
- When replacing batteries, use new batteries as specified in this user manual.
- The product is a precision instrument. Never attempt to take this device apart. Contact the retailer or our customer service department if the product requires servicing.
- Do not touch the exposed electronic circuitry, as there is a danger of electric shock.
- Check all major functions if the device has not been used for a long time. Maintain regular internal testing and cleaning of your device. Have your watch serviced by an approved service center annually.
- When disposing of this product, do so in accordance with your local waste disposal regulations.
- Due to printing limitations, the displays shown in this manual may differ from the actual display.
- The contents of this manual may not be reproduced without the permission of the manufacturer.
NOTE The technical specifications for this product and the contents of the user manual are subject to change without notice.
ABOUT OREGON SCIENTIFIC
Visit our website (www.oregonscientific.com) to learn more about Oregon Scientific products.
If you're in the US and would like to contact our Customer Care department directly, please visit: www2.oregonscientific.com/service/support.asp
OR
Call 1-800-853-8883.
For international inquiries, please visit: www2. oregonscientific.com/about/international.asp.
EU-DECLARATION OF CONFORMITY
Hereby, Oregon Scientific, declares that this Compass Watch (Model: RA126) is in compliance with EMC directive 89/336/CE. A copy of the signed and dated Declaration of Conformity is available on request via our Oregon Scientific Customer Service.

RELOJ BRUJULA MODELO: RA126
MANUAL DE USUARIO
INDICE
www2.oregonscientific.com/about/international.asp.
www2.oregon scientific.com/service/support.asp
OU
EUROPE - DÉCLARATION DE CONFORMITÉ
Par la presente, Oregon Scientific declare que la montre
Voor declinations in Canada:
http://www.geolab.nrcan.gc.ca/geomag/apps/mdcal e.php
http://www.ngdc.noaa.gov/seg/geomag/jsp/Declination.jsp
2007 Oregon Scientific. All rights reserved.
086L005020-017