
RM813 - Wristwatch OREGON SCIENTIFIC - Free user manual and instructions
Find the device manual for free RM813 OREGON SCIENTIFIC in PDF.


| Product Type | Digital Watch |
| Brand | Oregon Scientific |
| Model | RM813 |
| Display Type | Digital LCD |
| Backlight | Electroluminescent (EL) backlight |
| Time Display | Hour, minute, second, AM/PM |
| Calendar | Month, day, date |
| Alarm | Daily alarm with buzzer |
| Chronograph | 1/100 second stopwatch with split time |
| Hourly Chime | Yes |
| Water Resistance | 30 meters (splash/light rain) |
| Battery Type | CR2032 (3V lithium) |
| Battery Life | Approximately 12 months under normal use |
| Case Material | Plastic/resin |
| Band Material | Silicone |
| Dimensions (W x H x D) | Approx. 43 x 42 x 14 mm |
| Weight | Approx. 40 g (including battery) |
| Operating Temperature | -10°C to 50°C |
| Storage Temperature | -20°C to 60°C |
| Maintenance | Clean with soft dry cloth; do not expose to solvents |
| Safety | Avoid strong magnetic fields; do not disassemble |
| Spare Parts / Repairability | Battery replaceable; other repairs by authorized service only |
| Manual Language | English (PDF available) |
Frequently Asked Questions - RM813 OREGON SCIENTIFIC
User questions about RM813 OREGON SCIENTIFIC
0 question about this device. Answer the ones you know or ask your own.
Ask a new question about this device
Download the instructions for your Wristwatch in PDF format for free! Find your manual RM813 - OREGON SCIENTIFIC and take your electronic device back in hand. On this page are published all the documents necessary for the use of your device. RM813 by OREGON SCIENTIFIC.
USER MANUAL RM813 OREGON SCIENTIFIC
Radio Controlled Projection Clock
MODEL: RM813P/RM813PU(UK Version)
Instruction Manual
INTRODUCTION
Congratulations on your purchase of the RF Projection Clock (RM813P/RM813PU).
The RM813P/RM813PU is a multifunctional radio-controlled clock. It can automatically synchronize its current time and date when brought within an approximate 1500 km radius of the radio signal DCF77 generated from Frankfurt, Germany (the UK version from MSF Rugby, England).
To facilitate night time reading, the unit comes with a projector that can cast large, clear clock-time figures onto flat surfaces in dark. It also has a guiding light at the back of the unit.
MAIN FEATURES

A Two-line display Displays the current time and calendar or alarm time
B [ ] Radio reception signal Indicates the condition of radio reception
C [ ] Alarm icon Appears when weekday alarm is activated
D [ ] Alarm icon Appears when single alarm is activated
E [SNOOZE] button Enables the snooze function when an alarm goes off or activates the projector for five seconds
F Up [ ▲ ] and Down [▼buttons Increases or decreases the value of a setting
G [ (•) ] button Sets the time for the two alarms
H [MODE] button Toggles the display modes and confirms entry in clock setting mode
I Projector For projecting the current time on the wall or ceiling
J [← PROJECTION ON] switch Used with the power adapter to enable extended use of the projector
K [LIGHT ON] switch Used with power adapter to enable extended use of the guiding light
L [TEST] button To turn on the guiding light as long as it is pressed and held
M [RESET] button Resets the unit by returning all settings to factory default values
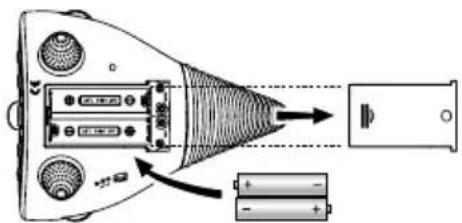
N Battery compartment Accommodates two (2) UM-3 or "AA" size batteries
O Guiding light PAC adapter jack
BATTERY INSTALLATION
The unit uses two (2) UM-3 or "AA" size 1.5V batteries.
To insert batteries:
- Slide the battery door in the direction of the arrow.
- Insert the batteries strictly according to the polarities shown therein.
- Replace the battery compartment door.
- Press the [RESET] button.
When the low battery indicator [ ≠ ] is shown on the display, replace with fresh batteries.
Note: Under normal circumstances, the batteries are good for 1 year. However, the battery life can be reduced vastly by frequent use of the projector or snooze function.

If not disposed of properly batteries can be harmful. Protect the environment by taking exhausted batteries to authorized disposal stations.
HOW TO USE THE PROJECTOR
Press [ SNOOZE ] and the projection will be activated for approximately 5 seconds.
Note: Make sure the [← PROJECTION ON] switch is switched to the front.
HOW TO USE THE PROJECTOR WITH POWER ADAPTER
RM813P/RM813PU comes with an AC power adapter. Use of the AC power adapter is required for continuous time projection.
To install the adapter:
- Insert adapter into jack at the bottom of the unit.
- Plug the adapter into an electrical wall outlet.

Note: Make sure the voltage is correct.
Once the power adapter is in place, you can select to turn on the projector for longer time (such as throughout the night) by sliding the [ ◆ PROJECTION ON ] switch on the side of the unit to the back. To turn off the projector, slide the switch back.
Note that this switch can only be used with the power adapter installed. For momentary projection, use the [SNOOZE].
ABOUT RADIO RECEPTION
RM813P/RM813PU is designed to synchronize its calendar clock automatically once it is brought within range of the Frankfurt DCF77 radio signal (MSF60 for UK version).
When RM813P/RM813PU is within range, the radio-controlled mechanism will override all manual setting unless radio reception is being deactivated.
When the unit is receiving signal, the Radio Reception symbol [ → ] will start to blink. Generally, complete reception takes around 2 to 10 minutes depending on the strength of the radio signal.
To disable the reception of RF signal manually, press and hold the [▼] button for 2 seconds until the Radio Reception symbol disappear.
To enable the reception again, press and hold the [▲] button for 2 seconds. The Radio Reception symbol will blink and the unit will search for RF signal automatically.
| STRONG | |
| WEAK | |
| NORECEPTION | |
| RECEIVING |
Interference
Reception can be affected by a number of factors. For best reception, place the device away from metal objects and electrical appliances.
Note: Interference from sources such as TV sets can affect the signal. If, after batteries have been inserted for ten minutes, the signal is not received, then set the time manually (see section: How To Set The Clock & Calendar Manually).
HOW TO SET THE CLOCK AND CALENDAR MANUALLY
To set the clock and calendar:
-
Press and hold [MODE] for 2 seconds and the time-zone offset hour digits will blink.
-
Enter the value by [ ▲ ] / [ ▼ ] buttons.
-
Confirm the entry by pressing [MODE] and the 12- or 24-hour display format will blink.
-
Repeat (2) and confirm the entry by pressing [MODE].
-
Repeat the above procedures to set the hour, minute, year, month, day and language for day-of-week. You can select among English (E), German (D), French (F), I (Italian) or Spanish (S).
| Language | Day-of-the-week | ||||||
| Monday | Tuesday | Wed. | Thursday | Friday | Saturday | Sunday | |
| English | Mo | Tu | WE | TH | Fr | SA | Su |
| German | Mo | III | III | Do | Fr | SA | So |
| French | Lu | MA | ME | DE | VE | SA | III |
| Italian | Lu | MA | ME | Di | VE | SA | Do |
| Spanish | Lu | MA | MI | Ju | VI | SA | Do |
Please note that in order to use the clock in different time-zone, 2nd time-zone offset hour has to be set. When an offset hour has been set (e.g. +1), the time displayed will be the RF clock time plus 1 hour.

HOW TO SET AND ACTIVATE THE ALARM
This unit is equipped with 2 alarms: Single Alarm [ ] and Weekday Alarm [ ]. For the Single Alarm, it will go off only once at the preset time. For the Weekday Alarm, it will be enabled from Monday to Friday and disabled automatically during weekend (i.e., Saturday and Sunday).
To set and activate the alarm:
- Select the alarm you want to set by pressing [ (•) ] .
-
Press and hold [ (•) ] for 2 seconds when the selected Alarm is displayed. The hours will blink.
-
Enter the values by [ ▲] / [ ▼] buttons.
- Confirm the entry by pressing [ (•) ] .
- The minutes will blink.
- Repeat (3) and (4) to finish the setting. The alarm will be activated automatically.
Follow the same procedures to set and activate the Single and/or Weekday Alarm.
HOW TO DEACTIVATE THE ALARM
To deactivate the alarm:
- Select the alarm you want to deactivate by pressing [ (•) ] .
- Press [ ▲ ] / [ ▼ ] buttons to deactivate the selected Alarm. “-:-” will be displayed when the alarm is being deactivated.
- To activate the alarm again, press [ ▲]/[▼] buttons when such alarm is in display.
CRESCENDO ALARM AND SNOOZE FUNCTION
When the alarm goes off at the preset time, the projector will be turned on for 8 seconds. The respective ALARM ON icon [✗] or [✗] will be flashing and the alarm sound will be turned on.
The crescendo alarm function allows the alarm sound to start off gently with step-up intensity. Without interruption, the alarm will go off for 2 minutes.
To stop the alarm, press [〈〈〉〉] or [SNOOZE]. If [SNOOZE] button is pressed, the alarm sound will be turned off temporarily and the snooze function will be activated. The alarm will go off again after approx. 8 minutes until other key is pressed to turn off the alarm.
RESETTING THE UNIT
In case of malfunction or abnormal display, press the [RESET] button at the bottom of the unit with a blunt stylus. All settings will be cleared and reset to their default values.
HOW TO USE THE GUIDING LIGHT
RM813P/ RM813PU is equipped with a guiding light. To test the functionality of the guiding light or to turn it on temporarily, press the [TEST] button with a blunt stylus at the bottom of the unit. The light will be on as long as the button is pressed and held.
For continuous use of the guiding light, AC Power adapter is required to be connected. For instructions on how to install the adapter, please see Section "How to Use the Projector with Power Adapter".
Once the power adapter is in place, slide the [LIGHT ON] switch at the side of the unit to the back to turn on the guiding light for a longer time. To turn the light off, simply slide the switch to the opposite direction.
Note that this switch can only be used when the power adapter is installed. For test or momentary light-on, use the [TEST] instead.
HOW TO CHANGE THE GUIDING LIGHT BULB
RM813P/ RM813PU is pre-installed with a 3V lightbulb. In case you want to change the lightbulb follow the instructions below:
-
Un-install the power adapter from the unit to prevent electric shock. Remove the batteries from the battery compartment as well.
-
Remove the tail of the unit as shown.

-
Then, remove the lightbulb by rotating it in a anti-clockwise direction.
-
Replace with new lightbulb with correct specifications. Make sure the lightbulb is securely fixated.
-
Replace the tail of the unit as shown.

-
To test if the guiding light is working properly, install batteries into the battery compartment and press the [TEST] button. The light should be turned on as long as the button is held.
-
If the light does not turn on, check if the lightbulb is broken or if the lightbulb is well-connected to the unit.
MAINTENANCE
When handled properly, this unit is engineered to give you years of satisfactory service. Here are a few product care instructions:
- Do not immerse the unit in water. If the unit comes in contact with water, dry it immediately with a soft lint-free cloth.
- Do not clean the unit with abrasive or corrosive materials. Abrasive cleaning agents may scratch the plastic parts and corrode the electronic circuit.
- Do not subject the unit to excessive: force, shock, dust, temperature, or humidity. Such treatment may result in malfunction, a shorter electronic life span, damaged batteries, or distorted parts.
- Do not tamper with the unit's internal components. Doing so will terminate the unit's warranty and may cause damage. The unit contains no user-serviceable parts.
- Only use new batteries as specified in this instruction manual.
- Read this instruction manual thoroughly before operating the unit.
PRODUCT SPECIFICATIONS
Operating Temperature : -5°C to 50°C
Radio Controlled : Auto synchronizes current time and date by Radio signal generated from Germany DCF77 (the UK version from MSF Rugby, England)
Calendar : Day of week in English / German / French / Italian / Spanish, Current date / month format
Clock Time : 12/24-hour format
Accuracy: +/- 0.5 second/day (when RF is disabled)
Hour offset : +/- 9 hours
Battery Type : Two (2) UM-3 or "AA" size 1.5V batteries
Unit Dimension: 90 x 111 x 148 mm (H x W x D)
Unit Weight : 200 g (without battery)
Lightbulb Rating : 3V, 300 mA
Lightbulb Dimension : T10 x 28 mm
NOTE ON COMPLIANCE
Warning: Changes or modifications to this unit not expressly approved by the party responsible for compliance could void the user's authority to operate the equipment.
R&TTE Compliance Note
This device complies with the essential requirements of Article 3 of the R&TTE 1999/5/EC Directive, if used for its intended use and that the following standard(s) has been applied:
Electromagnetic compatibility (Article 3.1.b of the R&TTE Directive)
Applied standards ETS 300 683 : 1997
Efficient use of the radio frequency spectrum (Article 3.2 of the R&TTE Directive)
Applied standards EN300 220-1:1997
INTENDED USE OF THE DEVICE
CAUTION
— The content of this manual is subject to change without further notice.
— Due to printing limitation, the displays shown in this manual may differ from the actual display.
— The contents of this manual may not be reproduced without the permission of the manufacturer.


- RADIO CONTROLLED PROJECTION CLOCK
- INTRODUCTION
- BATTERY INSTALLATION
- TO INSERT BATTERIES
- HOW TO USE THE PROJECTOR
- HOW TO USE THE PROJECTOR WITH POWER ADAPTER
- TO INSTALL THE ADAPTER
- ABOUT RADIO RECEPTION
- INTERFERENCE
- HOW TO SET THE CLOCK AND CALENDAR MANUALLY
- TO SET THE CLOCK AND CALENDAR
- HOW TO SET AND ACTIVATE THE ALARM
- TO SET AND ACTIVATE THE ALARM
- HOW TO DEACTIVATE THE ALARM
- TO DEACTIVATE THE ALARM
- CRESCENDO ALARM AND SNOOZE FUNCTION
- RESETTING THE UNIT
- HOW TO USE THE GUIDING LIGHT
- HOW TO CHANGE THE GUIDING LIGHT BULB
- MAINTENANCE
- PRODUCT SPECIFICATIONS
- NOTE ON COMPLIANCE
- R&TTE COMPLIANCE NOTE
- INTENDED USE OF THE DEVICE
- CAUTION
Brand : OREGON SCIENTIFIC
Model : RM813
Category : Wristwatch