
RMW128S - Wristwatch OREGON SCIENTIFIC - Free user manual and instructions
Find the device manual for free RMW128S OREGON SCIENTIFIC in PDF.


| Brand | Oregon Scientific |
| Model | RMW128S |
| Product Type | Radio-Controlled Watch |
| Display Modes | Time with seconds, Calendar, 2nd Zone Time, Daily Alarm, Stopwatch, Countdown Timer |
| Radio Signal Source | DCF77 (Frankfurt, Germany) |
| Auto-Reception Range | Approximately 1500 km radius |
| Clock Format | 24-hour (hh:mm:ss) |
| Calendar | dd:mm with weekday, auto-calendar from 2001 to 2098 |
| 2nd Zone Time Hour Offset | +/- 12 hours with automatic DST compensation for offsets +1 to -12 |
| Daily Alarm Duration | 1 minute, 3-step crescendo, snooze after 8 minutes |
| Stopwatch Maximum | 99 hours 59 minutes 59.99 seconds |
| Countdown Timer Maximum | 99 hours 59 minutes 59 seconds |
| Back Light | EL back light, 3 seconds duration |
| Water Resistance | 5 ATM (50 meters) |
| Battery Type | 1 x CR1620 3V lithium cell |
| Battery Replacement | By authorized dealer only; replace when weekday indicator flashes |
| Operating Temperature | -20°C to 50°C |
| Reset Function | Press and hold MODE, ZONE, START/STOP, SPLIT for 2 seconds |
| Compliance | R&TTE 1999/5/EC, CE Marking |
| Maintenance | Avoid chemicals, wipe with dry soft cloth, store in plastic container |
Frequently Asked Questions - RMW128S OREGON SCIENTIFIC
User questions about RMW128S OREGON SCIENTIFIC
0 question about this device. Answer the ones you know or ask your own.
Ask a new question about this device
Download the instructions for your Wristwatch in PDF format for free! Find your manual RMW128S - OREGON SCIENTIFIC and take your electronic device back in hand. On this page are published all the documents necessary for the use of your device. RMW128S by OREGON SCIENTIFIC.
USER MANUAL RMW128S OREGON SCIENTIFIC
RADIO CONTROLLED WATCH
MODEL NO.: RMW128C/ RMW128S
USER'S MANUAL
SECTION 1 INTRODUCTION
Congratulations on your purchasing the RMW128C/ RMW128S Radio-controlled Watch.
The RF Watch is a compact, easy-to-handle device with smart-looking design. The RMW128C (Classic Design) and RMW128S (Sport Design) are designed to automatically synchronize its current time and date when brought within an approximate 1500km radius of the radio signal generated from Frankfurt, Germany (DCF77).
This unit also comes with features such as Daily Alarm, Stopwatch, 2nd zone-time and Countdown Timer functions as well as EL back light.

FEATURES AND KEY CONFIGURATIONS
1. MODE BUTTON
-Press to change the display mode
-Press and hold to enter the setting routine
2. ALARM BUTTON
-Press to display the daily alarm function
-Press and hold to enable/disable the alarm
3. START/STOP (UP) BUTTON
-Press to increase the value of a setting
-Press to start or stop the stopwatch function
-Press and hold to enable auto-reception of radio signal
4. SPLIT (DOWN) BUTTON
-Press to decrease the value of a setting
-Press to reset or change the display of the stopwatch function
-Press and hold to disable auto-reception of radio signal
5. LIGHT BUTTON
-Press to turn on the back light for 3 seconds
6. ZONE BUTTON
-Press to change to 2nd zone time and date display
7. WEEKDAY INDICATOR
8. 2ND ZONE-TIME DISPLAY MODE
9. ALARM MODE
10. ALARM-ON INDICATOR
- STOPWATCH MODE
- TIMER MODE
- RADIO RECEPTION INDICATOR
BATTERY
The battery is pre-installed at time of manufacture and should be replaced by authorized dealer only.
Replace the battery when the weekday indicator starts flashing.
BACK LIGHT
Press the LIGHT button to turn on the back light for 3 seconds.
Note: Frequent use of the backlight will shorten the barterry life.
SECTION 2 THE CALENDAR CLOCK
DISPLAY MODES
Press the MODE button to display the following in sequence:
• Time with Seconds
• Time with Calendar
- Zone Time and Date
• Daily Alarm
- Stopwatch
- Countdown Timer
![graph TD A["MODE"] --> B["10:58"] B --> C["25, 9"] C --> D["1:58"] D --> E["25, 9"] E --> F["6:00"] A --> G["10:58"] G --> H["38"] H --> I["02:02"] I --> J["58"] J --> K["00:00"] K --> L["1:10"] L --> M["6:00"]](/content/2026/05/923086/images/89593767e68e6481dc4b8f60fb0d8f3b95d28f4bff0bb6078e3abaf1bfd74df8.jpg)
You can also press ALARM to display the alarm clock and details. Display will return to the last display mode upon release of the ALARM button.
Press ZONE to display the 2nd zone-time and calendar. After 3 seconds the display will return to the Time with seconds display mode.
ABOUT RADIO RECEPTION
When the unit is within range of its respective radio signals, its radio-control mechanism will override all manual settings unless the auto-reception function is mannally disabled by the users.
When the unit is receiving radio signal, the RADIO RECEPTION icon [ ] will start to blink. A complete reception generally takes about 2 to 10 minutes, depending on the strength of the radio signal. After that, the periodical scanning will only take a few seconds.
When the reception is complete, the icon will stop blinking.
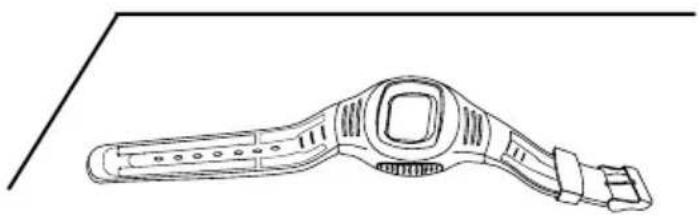
For better reception of radio signals, place the watch away from metal objects and electrical appliances to minimize interference.
To improve the signal reception place the watch on a stable surface as shown:
TO ENABLE OR DISABLE AUTO- RECEPTION
If you wish to disable the auto-reception feature while the unit is within range, press and hold the SPLIT (DOWN) button for 2 seconds. The antenna indicator will disappear and the unit will NOT respond to radio signals.
To enable the feature again, press and hold the START/STOP (UP) button for 2 seconds. The antenna indicator will start blinking to initiate reception automatically.
SETTING THE CALENDAR CLOCK MANUALLY
When the unit is not within range of the radio signal, you can set the time and calendar manually.
- Press and hold the MODE button for 2 seconds.
- Enter the year using the START/STOP(UP) or SPLIT (DOWN) buttons. Hold down either button to rapidly increase or decrease the value.
- Press the MODE button to confirm the entry.
- Enter the months using the START/STOP (UP) or SPLIT (DOWN) buttons. Press the MODE button to confirm the entry.
- Follow the same pattern to set the days, hours, minutes, seconds and 2nd time-zone hour-offset (+/- 12 hours).
- For second-setting, if its value is between 0 to 29, press either
START/STOP (UP) or SPLIT (DOWN) button will return to the present minute. If its value is between 30 to 59, it will proceed to the next minute. (e.g., when the time is 12:46:28, it will return to 12:46:00; when the time is 12:46:48, it will go to 12:47:00).
- For the 2nd time-zone setting, please note that the 2nd time-zone hour-offset function comes with automatic Daylight Saving Time (DST) compensation. When the hour-offset is set from +1 to -12 hours, the 2nd zone-time will synchronize with DCF-DST and be adjusted automatically. However, when the hour-offset is set from +2 to +12 hours, no DST compensation will be made.
- Press the MODE button to save the changes and exit. The unit will also save all changes and return to normal display automatically after the unit has been left idle for 2 minutes.
ABOUT THE ALARM
To set the alarm:
- In the Alarm time display mode, press and hold the MODE button for 2 seconds and the hours will flash.
- Use the START/STOP(UP) or SPLIT (DOWN) buttons to enter the hours.
- Press the MODE button to confirm.
- Use the START/STOP(UP) or SPLIT (DOWN) buttons to enter the minutes.
- Press the MODE button to confirm.
To activate the alarm, press and hold the ALARM button for 2 seconds and the ALARM-ON indicator will appear. To deactivate the alarm, press and hold the ALARM button again.
TO USE THE DAILY ALARM
An alarm will go off for 1 minute in 3-step crescendo patterns if undisturbed. The ALARM-ON indicator will flash and the alarm sound will be activated. To mute the alarm, press the MODE, ZONE, START/STOP (UP) or SPLIT (DOWN) button. If the Alarm sound is not turned off manually, the alarm will go off again for once after 8 minutes.
TO USE THE STOPWATCH FUNCTION
To use the stop-watch:
- Press the MODE button repeatedly to display the Stopwatch function
- Press the START/STOP (UP) button to start or stop the stopwatch. The maximum accumulated time is 99 hours, 59 minutes, 59 & 99 1/100 seconds.
To show
Elapsed Time :
![graph TD A["Start"] --> B["ST/SP (Start)"] B --> C["ST/SP (Stop)"] C --> D["SPLIT (Clear)"] D --> E["End"]](/content/2026/05/923086/images/dd2b945a5b85f274627dc3663a9a76cf463c5e811889978ebc5a3ce533e70987.jpg)
To show
Split Time :
![graph TD A["Start"] --> B["ST/SP (Start)"] B --> C["SPLIT (Split)"] C --> D["SPLIT (Split release)"] D --> E["Stop"] E --> F["ST/SP (Stop)"] F --> G["SPLIT (Clear)"]](/content/2026/05/923086/images/2e88af3ef055eab35e1f6bb39b144815df67c8a7a4673e77aed4eed6a2f788cc.jpg)
Note:
The stopwatch can continue to operate in other display modes.
The CHRONO icon will flash to indicate its operation.
SETTING THE COUNTDOWN TIMER
This Timer function can measure up to 99 hours, 59 minutes and 59 seconds.
- Press and hold the MODE button for 2 seconds in the Timer mode.
- Enter the hours using the START/STOP (UP) or SPLIT (DOWN) buttons. Hold down either button to rapidly increase or decrease the value.
- Press the MODE button to confirm the entry.
- Enter the minutes using the START/STOP (UP) or SPLIT (DOWN) buttons. Press the MODE button to confirm the entry.
- Then, enter the seconds using the START/STOP (UP) or SPLIT (DOWN) buttons. Press the MODE button to save the changes and exit.
TO USE THE COUNTDOWN TIMER
To start or stop the Countdown Timer function, press the START/STOP (UP) button. The Countdown function will continue to operate in other display modes. The TIMER icon will be flashing to indicate its operation.
Upon completion of the Countdown function, beep sound will be turned on for 1 minute.
SECTION 4 ADDITIONAL INFORMATION
RESETTING THE UNIT
The reset function is used to enhance synchronization of signals after battery replacement or when the unit is operating in an unfavorable way or malfunctioning. To activate this function, press and hold the MODE, ZONE, START/STOP (UP) and SPLIT (DOWN) buttons together for 2 seconds. All settings will return to their default values.
PRECAUTIONS
This unit is engineered to give you years of satisfactory service if handled carefully.
- Though the watch is 50-meter water resistant, do not operate buttons underwater nor wear it when snorkeling or diving.
- Though the watch is designed to withstand normal use, rough usage or dropping the watch should be avoided.
- Avoid direct contact of the watch with chemicals like colognes, sun block creams and other toiletries as this would cause deterioration of the plastic parts of the watch. When the watch comes into contact with such chemicals, remember to wipe it off with it dry and soft cloth.
- Store the watch into its plastic container when not in use.
- Painted or silk-screened finishing on the watch may be discolored and worn out by strong pressure, long-term rubbing as well as frictions.
-
Do not clean the unit with abrasive or corrosive materials.
-
Do not subject the unit to snow or excessive force, shock, dust, temperature or humidity.
- Do not tamper with the unit's internal components.
TECHNICAL SPECIFICATIONS
Operating Temperature: -20°C to 50°C
Radio Control : Auto synchronizing time
and date by radio signal
generated from Germany
DCF 77
Clock format : 24-hour format/ hh:mm:ss
2nd Zone time Hour-Offset: +/- 12 hours
Date format : dd:mm:with weekday
indication / Auto Calendar
from 2001 to 2098
Alarm Duration : 1-minute crescendo
Stopwatch Function : Up to 99 hours 59 minutes
59 & 99/100 seconds
Countdown Timer Function : Up to 99 hours 59 minutes
59 seconds
Water Resistant : 5 ATM (50 meters)
Battery Type : 1 x CR1620 3V lithium cell
NOTE ON COMPLIANCE
Warming: Changes or modifications to this unit not expressly approved by the party responsible for compliance could void the user's authority to operate the equipment.
R&TTE Compliance Note
This product complies with the essential requirements of Article 3 of the R&TTE 1999/5/EC Directives, if used for its intended use and that the following standard(s) has/have been applied:
Efficient use of radio frequency spectrum (Article 3.2 of the R&TTE Directive) applied standard(s): N / A
Electromagnetic compatibility (Article 3.1.b of the R&TTE
Directive) applied standard(s): ETS 300 683:1997
Safety of information technology equipment (Article 3.1.a of the
R&TTE directive) applied standard(s): EN 60950:1997
Additional information:
The product is therefore conform with the Low Voltage Directive 73/23/EC, the EMC Directive 89/336/EC and R&TTE Directive 1999/5/EC (appendix II) and carries the respective CE marking.
VS-Villingen / Germany August 2001
Gerhard Preis
EC representative of manufacturer
RTTE Compliant Countries :
All EU countries, Switzerland CH
And Norway N
CAUTION
- The content of this manual is subject to change without further notice.
- Due to printing limitation, the displays shown in this manual may differ from the actual display.
- The contents of this manual may not be reproduced without the permission of the manufacturer.

- RADIO CONTROLLED WATCH
- SECTION 1 INTRODUCTION
- FEATURES AND KEY CONFIGURATIONS
- MODE BUTTON
- ALARM BUTTON
- START/STOP (UP) BUTTON
- SPLIT (DOWN) BUTTON
- LIGHT BUTTON
- ZONE BUTTON
- WEEKDAY INDICATOR
- 2ND ZONE-TIME DISPLAY MODE
- ALARM MODE
- ALARM-ON INDICATOR
- BATTERY
- BACK LIGHT
- SECTION 2 THE CALENDAR CLOCK
- DISPLAY MODES
- ABOUT RADIO RECEPTION
- TO ENABLE OR DISABLE AUTO- RECEPTION
- SETTING THE CALENDAR CLOCK MANUALLY
- ABOUT THE ALARM
- TO SET THE ALARM
- TO USE THE DAILY ALARM
- TO USE THE STOPWATCH FUNCTION
- TO USE THE STOP-WATCH
- NOTE
- SETTING THE COUNTDOWN TIMER
- TO USE THE COUNTDOWN TIMER
- SECTION 4 ADDITIONAL INFORMATION
- RESETTING THE UNIT
- PRECAUTIONS
- TECHNICAL SPECIFICATIONS
- NOTE ON COMPLIANCE
- R&TTE COMPLIANCE NOTE
- RTTE COMPLIANT COUNTRIES
- CAUTION
Brand : OREGON SCIENTIFIC
Model : RMW128S
Category : Wristwatch