
AW133 - Electronic thermometer OREGON SCIENTIFIC - Free user manual and instructions
Find the device manual for free AW133 OREGON SCIENTIFIC in PDF.
| Product Type | Bluetooth BBQ Cooking Thermometer |
| Brand | Oregon Scientific |
| Model | AW133 |
| Display Unit Dimensions | 90 x 90 x 30.5 mm (3.54 x 3.54 x 1.20 in) |
| Display Unit Weight | 146 g (5.15 oz) without batteries |
| Power Supply | 2 AA batteries (1.5 V) |
| Temperature Measurement Range | 0 °C to 300 °C (32 °F to 572 °F) |
| Case Heat Resistance | Approximately 60 °C (140 °F) |
| Measurement Cycle | 6 seconds |
| Probe Heat Resistance | Approximately 380 °C (716 °F) |
| Metal Probe Length | 175 mm (7 in) |
| Metal Probe Weight | 62 g (2.22 oz) |
| Main Functions | Meat profile mode (8 types), target temperature mode, timer mode, audible and visual alert (color LED), Bluetooth 4.0 connection via Grill Right app, backlight, touch screen, dual probe support (one included), selectable °C/°F temperature unit |
| Care and Cleaning | Clean with a soft dry cloth. Do not immerse in water. Do not use corrosive or abrasive products. |
| Safety | Do not subject to shock, dust or moisture. Do not obstruct ventilation openings. Use only new batteries, do not mix new and used batteries. Do not alter internal components. |
| Spare Parts and Repairability | Additional metal probe (model AWP133) available on the Oregon Scientific website. Reset possible via RESET button. |
| General Information | EU compliance guarantee. For more information: www.oregonscientific.com and boutique@oregonscientif.fr. |
Frequently Asked Questions - AW133 OREGON SCIENTIFIC
User questions about AW133 OREGON SCIENTIFIC
0 question about this device. Answer the ones you know or ask your own.
Ask a new question about this device
Download the instructions for your Electronic thermometer in PDF format for free! Find your manual AW133 - OREGON SCIENTIFIC and take your electronic device back in hand. On this page are published all the documents necessary for the use of your device. AW133 by OREGON SCIENTIFIC.
USER MANUAL AW133 OREGON SCIENTIFIC
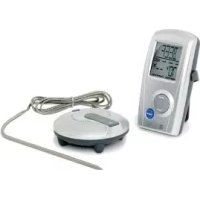
Grill Right Bluetooth BBQ Thermometer
Model:AW133
User Manual
CONTENTS
Introduction 2
Packaging Contents 2
Accessory-Metal Probe 2
Overview 2
Display Unit - Front View 2
Display Unit - Rear View 3
Metal Probe 4
Getting Started 4
Battery Installation 4
Connecting The Probe 4
Placement 4
Backlight 5
Settings 5
Select Channel 5
Bluetooth Pairing. 5
Temperature Measurement Unit 6
Meat Profile Mode 6
Target Temperature Mode 8
Timer Mode 8
Alert Sound & Led Status Light 8
Start/Stop 9
Turn On/Off The Unit 9
Operation 9
Meat Profile Mode. 9
Target Temperature Mode 10
Timer Mode 10
Remove Cooking History 10
Reset 10
Specification 10
Precautions 11
About Oregon Scientific 11
EU-Declaration of Conformity 12
FCC Statement 12
INSTRUCTION
Thank you for selecting Oregon Scientific™ Grill Right Bluetooth BBQ Thermometer. With the Grill Right, program your choice of meat type, target temperature or cooking time either on the touch-key display unit or your smart device via the corresponding app. When your food is cooked to perfection, the thermometer will alert you via color-coded indicator on your smart device. You do not need to wait by the grill to monitor the cooking status. This saves you time and leaves you free to attend to your guests.
Download the Grill Right App and enjoy smart cooking with interactive tools, recipes, and the ability to share your favourite dishes over social media!
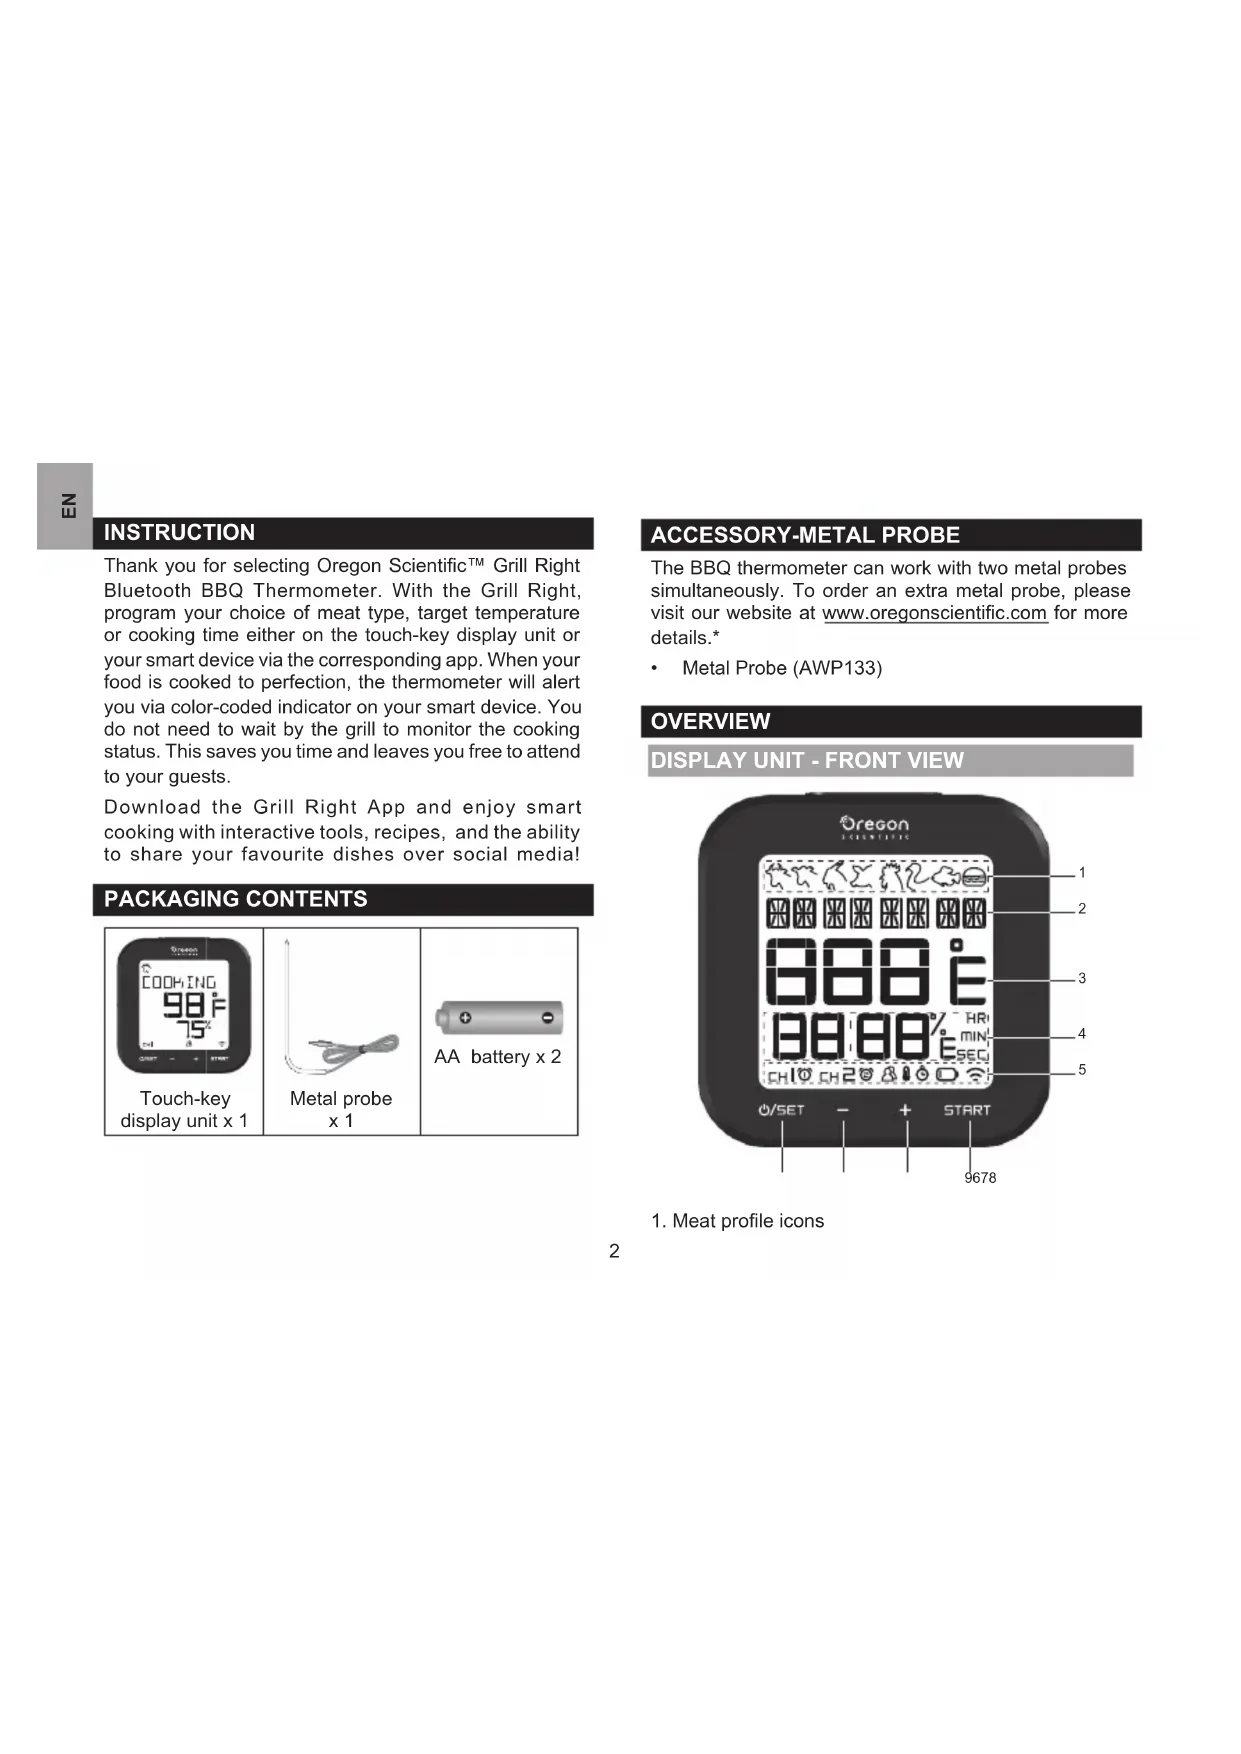
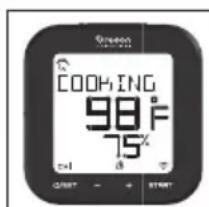
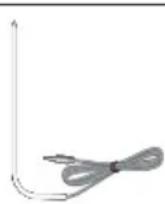
PACKAGING CONTENTS
Touch-key display unit x 1
Metal probe x 1
AA battery x 2
ACCESSORY-METAL PROBE
The BBQ thermometer can work with two metal probes simultaneously. To order an extra metal probe, please visit our website at www.oregonscientific.com for more details.*
Metal Probe (AWP133)
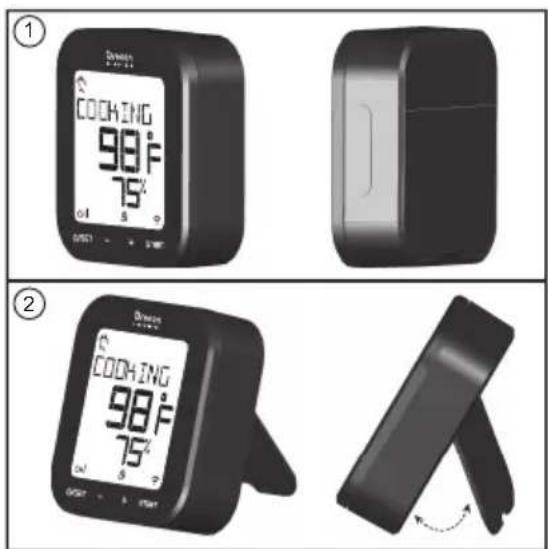
OVERVIEW
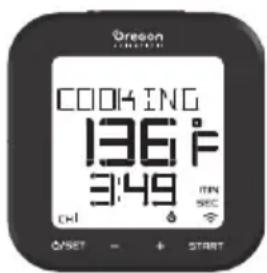
DISPLAY UNIT - FRONT VIEW
1. Meat profile icons
- Meat profile mode; name of food; doneness level; cooking status
- Current temperature; ^o C / ^o F :temperature measurement unit
- % Cooking progress; Cooking timer; Target temperature & indicator; HR/MIN/SEC: hour/minute/second indicator
- CHI/ channel one/channel two; 1 / alerts for channel one/two;
Meat profile mode indicator
8: Target temperature indicator;
: Timer mode indicator;
Low battery indicator
: Pairing indicator
- SET: Enter mode set-up; confirm setting. When the backlight is switched to OFF, press and hold to turn off. When the backlight is switched to ON, press any key, then press and hold to turn off.
- : Decrease value of the setting.
- +: Increase value of the setting.
- START: Start /stop the program or manually start/ stop time counting; press and hold for 5 seconds to remove cooking history.
DISPLAY UNIT - REAR VIEW
- Silicon cap
- Channel one jack
- Channel two jack
- ^ C / ^ : temperature measurement unit slide button
- LIGHT: backlight slide button
- RESET button
- Sliding stand
- Battery compartment
METAL PROBE

- Metal probe tip
- Metal probe connector wire
GETTING STARTED
BATTERY INSTALLATION
Please press RESET after battery installation or replacement.
- Slide upwards to remove the battery compartment cover.
- Install two AA batteries in the compartment as indicated by the polarity symbols (+ / - )
- Return the battery compartment cover.
CONNECTING THE PROBE
You can use two probes at the same time. To order an extra probe, please visit our website www.oregonscientific.com.
To connect the probe with the display unit:
- Carefully pull out the rubber cap and then plug the meat probe into the socket.
The top socket is for channel one, the bottom socket is for channel two.
PLACEMENT
To place display unit:
You can place the touch-key display unit on table or slide out the stand to adjust a right angle for desktop placement.
To place metal probe:
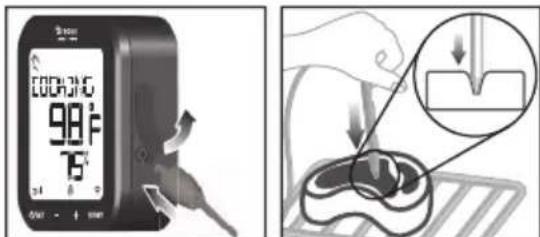
For an accurate temperature reading of your grill, you need to insert the tip of the metal probe as close to the middle of the food as possible.
The wire of the probe is about 1 meter length and made of heat-resistant material up to 300^ , do not heat the wire by a direct fire source.
BACKLIGHT
Tap any key to turn on, then tap the desired key for operation.
SETTINGS
You have three options to select your desired mode for your grill. They are
- Meat profile mode
Target temperature mode
Timer mode
SELECT CHANNEL
After battery installation of your first use, select a channel for your plugged probe. You need to set the program for each channel individually.
- Tap +/- to toggle between CH1/CH2, CH1/CH2 is blinking during setup.
BLUETOOTH PAIRING
You can download an application and control and view the BBQ thermometer through Bluetooth®v4.0 technology.

The application is available in both Apple App Store and Google Play Store. Search "Grill Right" in the search engine to find the app.
To pair up with your smart device:
- Download and install the "Grill Right" app.
- When the unit is in idle mode, press and hold - and + at the same time to enable the pairing mode.
- Turn on the Bluetooth on your smart device, then open the "Grill Right" app.
- Tap in the"Grill Right" app, then tap Pair to start pairing. The pairing progress takes up to 30 seconds, on the unit flashes during pairing, and will be on when the pairing is successful every time.
NOTE
- Once the pairing is successful, the unit connects with the smart device automatically when the Bluetooth on your smart device is turned on, or it moves within range of the base.
- You cannot enable the pairing mode when the unit is in setting.
If you set the backlight switch to ON, tap any key to activate, then tap desired key for the operation above. -
Visit http://corporate.oregonscientific.com/bbg/eng/index.html for the smart device compatible list & pairing issue.
-
For iPad owners please choose iPhone only from the upper left drop down menu, and the search for "Grill Right" and download onto your iPad.
TEMPERATURE MEASUREMENT UNIT
To select Fahrenheit (^) or Celsius (^) as temperature measurement unit, slide ^ C / ^ located in the battery compartment.
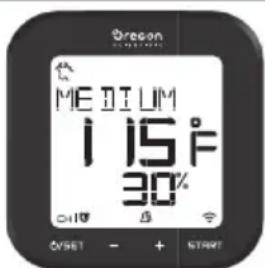
MEAT PROFILE MODE
In Meat Profile mode, you can select food type which has been programmed to grill in a pre-set temperature duration.
Select food type:
- After selecting a channel, tap o/SET to enter setting mode, the setting icon ( / ) flashes.
- Tap - / + to select Meat Profile mode (B). Tap 0/SET again and continue setting for your food type, the food type icon flashes.
- Tap +/- to select among different food types in the following sequence, which the food type icon name will be displayed at the same time.
| Sequence Food type icon Food name | ||
| 1 | Beef | |
| 2 Veal | ||
| 3 | Lamb | |
| 4 | Pork | |
| 5 | Chicken | |
| 6 | Turkey | |
| 7 | Fish | |
| 8 | Hamburger | |
- Tap proceed. The doneness level on the display unit flashes.
NOTE The screen stops flashing when the unit leaves the setting mode.
Select doneness level:
You can also set the doneness level through the application on your mobile device. Set the major four levels (RARE/MEDIUM RARE/MEDIUM/WELL DONE) on the display unit, you can customize doneness level (RARE/MEDIUM RARE/MEDIUM/MEDIUM WELL/ WELL DONE) through the application.
The default doneness levels for the food type are listed as follows:
| Food type icon | Food name | Doneness level available |
| Beef | RARE MEDIUM RARE MEDIUM WELL DONE | |
| Veal | RARE MEDIUM RARE MEDIUM WELL DONE | |
| Lamb | RARE MEDIUM RARE MEDIUM WELL DONE | |
| Pork | MEDIUM RARE MEDIUM WELL DONE | |
| Chicken WELL DONE | ||
| Turkey WELL DONE | ||
| Fish WELL DONE | ||
| Hamburger WELL DONE | ||
| Rare | Medium Rare | Medium Well Done |
| 57°C (135°F) | 63°C (145°F) | 71°C (160°F) |
NOTE The default setting of temperature of each doneness level follows the USDA standards.
- Tap +/- to toggle between RARE/ MEDIUM RARE / MEDIUM/WELL DONE, then tap 0/SET to confirm.
TARGET TEMPERATURE MODE
In Target Temperature mode ( ), you can directly set a desired temperature for your grill.
Set target temperature:
- After selecting a channel, tap o/SET to enter setting mode, the setting icon ( / ) flashes.
- Tap -/+ to select Target Temperature mode ( ).Tap 0/SET again to proceed. The temperature display flashes.
- Tap - / + to adjust the temperature value.
- Tap /SET to confirm the setting.
NOTE The screen stops flashing when the unit leaves the setting mode.
NOTE If you set the backlight switch to ON, tap any key to activate, then tap desired key for the operation above.
TIMER MODE
In Timer mode ( ), you can directly set a timer program for your grilled food. Once the timer starts, the time will be counted down. However, if you do not stop the timer, it will continue counting up until you stop it.
Set timer:
- After selecting a channel, tap o/SET to enter setting mode set up, the setting icon ( / ) flashes.
- Tap -/+ to select Target Temperature mode( ).Tap 0/SET again to proceed. The time format display flashes.
HR
- Tap -/+ to select a timer format: MIN (hour: minute) or MIN SEC (minute: second). Tap 0/select the desired format. The time display flashes.
- Tap +/- to adjust the value (up to 23 hours 59 minutes and 59 seconds). Tap 0/SET to confirm the setting.
NOTE The screen stops flashing when the unit leaves the setting mode.
NOTE If you set the backlight switch to ON, tap any key to activate, then tap desired key for the operation above.
ALERT SOUND & LED STATUS LIGHT
There are four sorts of LED backlight displayed on the screen while showing different cooking level of your grilled food.
If you do not want any LED light to be on, switch off the LIGHT button in the battery compartment.
| Cooking Pre-alert Ready Over cook | ||||
| LED Color | Yellow Amber | Red | Flashing in red | |
| Alert Sound | n/a 4 beeps | 4 beeps/second | 8 beeps/second | |
START/STOP
If you want to switch among different cooking modes, you need to stop the current one, and then redo settings.
Start program:
After setting is done, press START to start the measurement program.
Stop setting:
- During any setting, press START to interrupt the setting and return to idle mode.
Start setting:
Once you stop a setting and redo a new setting, press /
TURN ON/OFF THE UNIT
- When the unit is off, press and hold to turn on.
- When the unit is in idle, press and hold the turnoff.
You cannot press and hold on off when the unit is in setting mode or when the screen displays COOKING.
To turn off the unit when it is in setting mode:
- Tap0/5ET repeatedly to return to idle, then press and hold off.
To turn off the unit when it displays COOKING:
- Tap START to exit, then press and hold /SET to turn off.
NOTE If you set the backlight switch to ON, tap any key to activate, then tap desired key for the operation above.
NOTE The unit turns off when it is in idle after 3 hours.
OPERATION
MEAT PROFILE MODE
Before you start this mode, please ensure the probe tip is correctly inserted into the food.
Start your mode
- Tap START to activate the mode. When it starts working, you can see the cooking status, selected doneness level, meat type, or progress data (%) on the disp
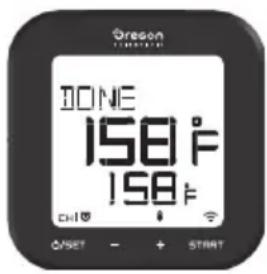
TARGET TEMPERATURE MODE
Once you activate this mode, you can view the cooking status, current food temperature, target cooking temperature and progress data (%) at the same time.
TIMER MODE
Once you activate this mode, you can view the cooking status, current food temperature and counting down timer at the same time.
NOTE If the food is overcooked, the timer will continue working but counting up with alert beep sounds.
NOTE The probe does starting the program.
not require insertion
REMOVE COOKING HISTORY
Press and hold START for 5 seconds to remove the last cooking mode setting.
RESET
Press RESET in the battery compartment using a pointed object such as a straightened paper clip.
SPECIFICATION
| TYPE DESCRIPTION | |
| DISPLAY UNIT | |
| L x W x H | 90 x 90 x 30.5 mm 3.54 x 3.54 x 1.20 in |
| Weight | 146 g (5.15 ounces) without battery |
| Temperature measuring range | 0°C to 300°C (32°F to 572°F) |
| Temperature unit °C / °F | |
| Power 2 x UM-3 (AA) 1.5V | batteries |
| Heat resistance for transmitter / table stand | Around 60 °C (140°F) |
| Measurement cycle 6 seconds | |
before METAL PROBE
| Length 175 mm (7 in) | |
| Weight 62 g (2.22 ounces) | |
| Heat resistance for metal probe | Around 380 °C (716 °F) |
| Temperature range 0°C to 800°C (32°F to 572°F) | |
PRECAUTIONS
- Do not subject the unit to excessive force, dust, temperature or humidity.
- Do not immerse the unit in water. If you spill liquid over it, dry it immediately with a soft, lint-free cloth.
- Do not clean the unit with abrasive or corrosive materials.
- Do not tamper with the unit's internal component. This invalidates the warranty.
- Only use fresh batteries. Do not mix new old batteries.
Images shown in this manual may differ from the actual display. - When disposing of this product, ensure it is collected separately for special treatment.
- Placement of this product on certain types of wood may result in damage to its finish for which Oregon Scientific will not be responsible. Consult the furniture manufacturer's care instructions for information.
- The contents of this manual may not be reproduced without the permission of the manufacturer.
- Do not dispose old batteries as unsorted municipal waste. Collection of such waste separately for special treatment is necessary.
- Please note that some units are equipped with a battery safety strip. Remove the strip from the battery compartment before first use.
NOTE The technical specifications for this product and the contents of the user manual are subject to change without notice.
NOTE Features and accessories will not be available in all countries. For more information, please contact your local retailer.
ABOUT OREGON SCIENTIFIC
Visit our website www.oregonscientific.com to learn more about Oregon Scientific products.
For any enquiry, please contact our Customer Services at info@oregonscientific.com.
Oregon Scientific Global Distribution Limited reserves the right to interpret and construe any contents, terms and provisions in this user manual and to amend it, at its sole discretion, at any time without prior notice. To the extent that there is any inconsistency between the English version and any other language versions, the English version shall prevail.
EU-DECLARATION OF CONFORMITY
Hereby, Oregon Scientific, declares that Grill Right Bluetooth BBQ Thermometer (model: AW133) is in compliance with the essential requirements and relevant provisions of Directive 1999/5/EC. A copy of the signed and dated Declaration of Conformity is available on request via our Oregon Scientific Customer Service.


COUNTRIES RTTE APPROVAL COMPLIED
All EU Countries, Switzerland CH
and Norway
N

FCC STATEMENT
This device complies with Part 15 of the FCC Rules. Operation is subject to the following two conditions: (1) This device may not cause harmful interference, and (2) This device must accept any received, including interference that may cause undesired operation.
WARNING Changes or modifications not expressly approved by the party responsible for compliance could void the user's authority to operate the equipment.
NOTE This equipment has been tested and found to comply with the limits for a Class B digital device,
pursuant to Part 15 of the FCC Rules. These limits are designed to provide reasonable protection against harmful interference in a residential installation.
This equipment generates, uses and can radiate radio frequency energy and, if not installed and used accordance with the instructions, may cause harmful interference to radio communications. However, there is no guarantee that interference will not occur in a particular installation. If this equipment does cause harmful interference to radio or television reception, which can be determined by turning the equipment off and on, the user is encouraged to try to correct the interference by one or more of the following measures:
Reorient or relocate the receiving antenna.
- Increase the separation between the equipment and receiver.
- Connect the equipment into an outlet on a different from that to which the receiver is connected.
- Consult the dealer or an experienced radio / TV technician for help.
DECLARATION OF CONFORMITY
The following information is not to be used as contact for support or sales. Please call our customer service number (listed on our website at www.oregonscientific.com), or on the warranty card for this product) for all inquiries instead.
We
Name: Oregon Scientific, Inc.
Address: 10778 SW Manhasset Dr.
UNIT B-2 Tualatin,
Or 97062 USA
Telephone No.: 1-800-853-8883
declare that the product
Product No. AW133
Product Name: Grill Right Bluetooth
BBQ Thermometer
Manufacturer: IDT Technology Limited
Address: Block C, 9/F, Kaiser Estate,
Phase 1, 41 Man Yue St.,
Hung Hom, Kowloon,
Hong Kong
Grill Right Bluetooth BBQ Thermometer
Modell:AW133
Bedienungsanleitung
INHALT
ACCESSORIO-SONDA IN METALLO
Grill Right Bluetooth BBQ thermometer
Model:AW133
Gebruikershandboek
INHoud
Bluetooth Pairing. 6
ACCESSORIES-METALEN THERMOMETER
| Σ | Varkensvlees | MEDIUM RARE MEDIUM WELL DONE |
| Kip | WELL DONE | |
| Kalkoen | WELL DONE | |
| Vis | WELL DONE | |
| Hamburger | WELL DONE |
| Rare (zeer rood) | Medium Rare (licht doorbak-ken, rood) | Medium (half door-bakken, roze) | Well Done (goed doorbak-ken) |
| 57°C (135°F) | 63°C (145°F) | 71°C (160°F) | 77°C (170°F) |
TILLBEHÖR - METALLSENSOR
Oregon Scientific Inc.
Tualatin, Oregon USA
欧西亚中国授权制造商
展科电子(深圳)有限公司
制造地:中国深圳宝安巨田工业村

2014欧西亚保留所有权利
Grill Right 藍牙燒烤溫度計
型號:AW133
用户手册
目录
简介 2
包装内容 2
配件-金属探針 2
概述 2
顯示組件一正面圖 2
顯示組件一背面圖 3
金屬探針 4
準備開始 4
安装電池 4
連接探針 4
放置方式 4
背光 5
设置 5
選擇頻道 5
蓝牙配對 5
溫度量度單位 6
肉類模式 6
目標溫度模式 8
時間制模式 8
聲音提示及LED狀態指示燈 8
開歟/停止 8
開啟/關閉設備 9
操作 9
肉類模式 9
目标溫度模式 9
時間制模式 9
消除過往烹飪記錄 9
重置按钮 10
規格 10
注意事项 10
關於歐西亞 11
简介
- Grill Right Bluetooth BBQ Thermometer
- CONTENTS
- INSTRUCTION
- PACKAGING CONTENTS
- ACCESSORY-METAL PROBE
- OVERVIEW
- DISPLAY UNIT - FRONT VIEW
- DISPLAY UNIT - REAR VIEW
- METAL PROBE
- GETTING STARTED
- BATTERY INSTALLATION
- CONNECTING THE PROBE
- To connect the probe with the display unit:
- PLACEMENT
- BACKLIGHT
- SETTINGS
- SELECT CHANNEL
- BLUETOOTH PAIRING
- To pair up with your smart device:
- NOTE
- TEMPERATURE MEASUREMENT UNIT
- MEAT PROFILE MODE
- Select food type:
- Select doneness level:
- TARGET TEMPERATURE MODE
- Set target temperature:
- TIMER MODE
- Set timer:
- HR
- ALERT SOUND & LED STATUS LIGHT
- START/STOP
- Start program:
- Stop setting:
- Start setting:
- TURN ON/OFF THE UNIT
- To turn off the unit when it is in setting mode:
- To turn off the unit when it displays COOKING:
- OPERATION
- Start your mode
- REMOVE COOKING HISTORY
- RESET
- SPECIFICATION
- PRECAUTIONS
- ABOUT OREGON SCIENTIFIC
- EU-DECLARATION OF CONFORMITY
- COUNTRIES RTTE APPROVAL COMPLIED
- FCC STATEMENT
- DECLARATION OF CONFORMITY
- We
- declare that the product
- Bedienungsanleitung
- INHALT
- ACCESSORIO-SONDA IN METALLO
- Gebruikershandboek
- INHoud
- ACCESSORIES-METALEN THERMOMETER
- TILLBEHÖR - METALLSENSOR
- Grill Right 藍牙燒烤溫度計
- 型號:AW133
- 用户手册
- 目录
- 简介
Brand : OREGON SCIENTIFIC
Model : AW133
Category : Electronic thermometer